YAMAHA NMAX 155 2021 Owner's Manual
Manufacturer: YAMAHA, Model Year: 2021, Model line: NMAX 155, Model: YAMAHA NMAX 155 2021Pages: 114, PDF Size: 10.93 MB
Page 21 of 114
Smart key system
3-3
3
EAUN2460
Handlin g of the smart key an d
mechanical keys
WARNING
EWA17952
The smart key shoul d b e carried
with you. Do not store it on the
vehicle.
When the smart key is within
operatin g ran ge, exercise due
care because other people not
carryin g the smart key can start
the en gine an d operate the vehi-
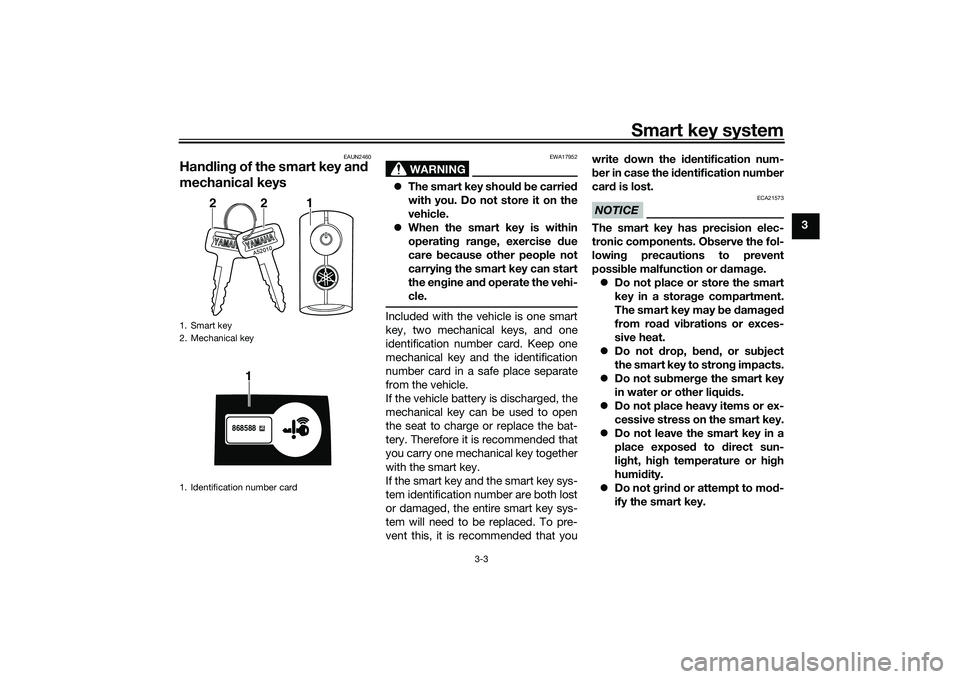
cle.Included with the vehicle is one smart
key, two mechanical keys, and one
identification number card. Keep one
mechanical key and the identification
number card in a safe place separate
from the vehicle.
If the vehicle battery is discharged, the
mechanical key can be used to open
the seat to charge or replace the bat-
tery. Therefore it is recommended that
you carry one mechanical key together
with the smart key.
If the smart key and the smart key sys-
tem identification number are both lost
or damaged, the entire smart key sys-
tem will need to be replaced. To pre-
vent this, it is recommended that you write
down the i dentification num-
b er in case the i dentification num ber
car d is lost.
NOTICE
ECA21573
The smart key has precision elec-
tronic components. O bserve the fol-
lowin g precautions to prevent
possi ble malfunction or damag e.
Do not place or store the smart
key in a stora ge compartment.
The smart key may be damag ed
from roa d vi brations or exces-
sive heat.
Do not drop, ben d, or su bject
the smart key to stron g impacts.
Do not su bmer ge the smart key
in water or other liqui ds.
Do not place heavy items or ex-
cessive stress on the smart key.
Do not leave the smart key in a
place exposed to direct sun-
lig ht, hi gh temperature or hi gh
humi dity.
Do not g rind or attempt to mo d-
ify the smart key.
1. Smart key
2. Mechanical key
1. Identification number card
A52010
221
868588
1
UBBDE0E0.book Page 3 Wednesday, June 2, 2021 2:57 PM
Page 22 of 114
Smart key system
3-4
3
Keep the smart key away from
stron g ma gnetic fiel ds an d
ma gnetic o bjects such as key
hol ders, TVs, an d computers.
Keep the smart key away from
electric me dical equipment.
Do not allow oils, polishin g
a g ents, fuel, or any stron g
chemicals to come in contact
with the smart key. The smart
key body may become discol-
ore d or cracked .
TIPThe smart key battery life is ap-
proximately two years, but this
may vary according to operating
conditions.
Replace the smart key battery
when the smart key system indi-
cator light flashes for 20 seconds
when the vehicle is turned on, or
when the smart key indicator light
does not come on when the smart
key button is pushed. (See page
3-6.) After changing the smart key
battery, if the smart key system still does not operate, check the
vehicle battery and then have a
Yamaha dealer check the vehicle.
If the smart key continually re-
ceives radio waves, the smart key
battery will discharge quickly. (For
example, when placed in the vicin-
ity of electrical products such as
televisions, radios, or computers.)
You can register up to six smart
keys for the same vehicle. See a
Yamaha dealer regarding spare
smart keys.
If a smart key is lost, contact a
Yamaha dealer immediately to
prevent the vehicle from being
stolen, etc.
EAU76474
Smart key
WARNING
EWA17952
The smart key shoul d b e carrie d
with you. Do not store it on the
vehicle.
When the smart key is within
operatin g ran ge, exercise due
care because other people not
carryin g the smart key can start
the en gine an d operate the vehi-
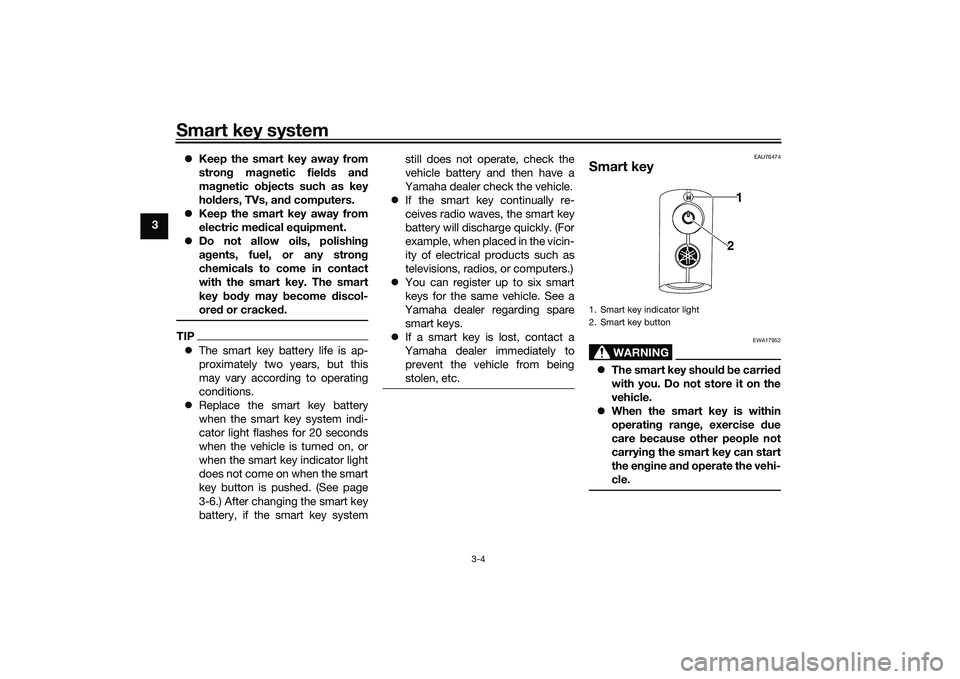
cle.1. Smart key indicator light
2. Smart key button
1
2
UBBDE0E0.book Page 4 Wednesday, June 2, 2021 2:57 PM
Page 23 of 114

Smart key system
3-5
3
To turn the smart key on or off
Push the smart key button for approxi-
mately 1 second to turn the smart key
on or off. When the smart key is turned
off, the vehicle cannot be operated
even if the smart key is within operating
range. To operate the vehicle, turn the
smart key on and bring it within operat-
ing range.
To check whether the smart key is
turne
d on or off
Push the smart key button to confirm
the current operating status of the
smart key.
If the smart key indicator light: Comes on quickly for 0.1 sec-
onds: The smart key is turned on.
Comes on slowly for 0.5 seconds:
The smart key is turned off.
Remote answer- back function
Push the smart key button to operate
the answer-back function remotely.
The beeper will sound twice and all of
the turn signal lights will flash twice.
This feature is convenient for locating
your vehicle in a parking lot and other
areas. Operatin
g ran ge of the answer- back
function
The approximate operating range of
the answer-back function is as shown.
As the smart key system uses weak ra-
dio waves, the operating range may be
affected by the surrounding environ-
ment.
To turn the answer- back beeper on
or off
The beeper, which sounds when the
answer-back function is operated, can
be turned on or off according to the fol-
lowing procedure. 1. Turn the smart key on and bring it within operating range. 2. Turn the main switch to “OFF”,
and then push the main switch
knob once.
3. Within 9 seconds of pushing the knob, push and hold the knob
again for 5 seconds.
4. When the beeper sounds, the set- ting is complete.
If the beeper: Sounds twice: The beeper is
turned off.
Sounds once: The beeper is
turned on.
~20m
UBBDE0E0.book Page 5 Wednesday, June 2, 2021 2:57 PM
Page 24 of 114
Smart key system
3-6
3
EAUN2712
Replacing the smart key bat-
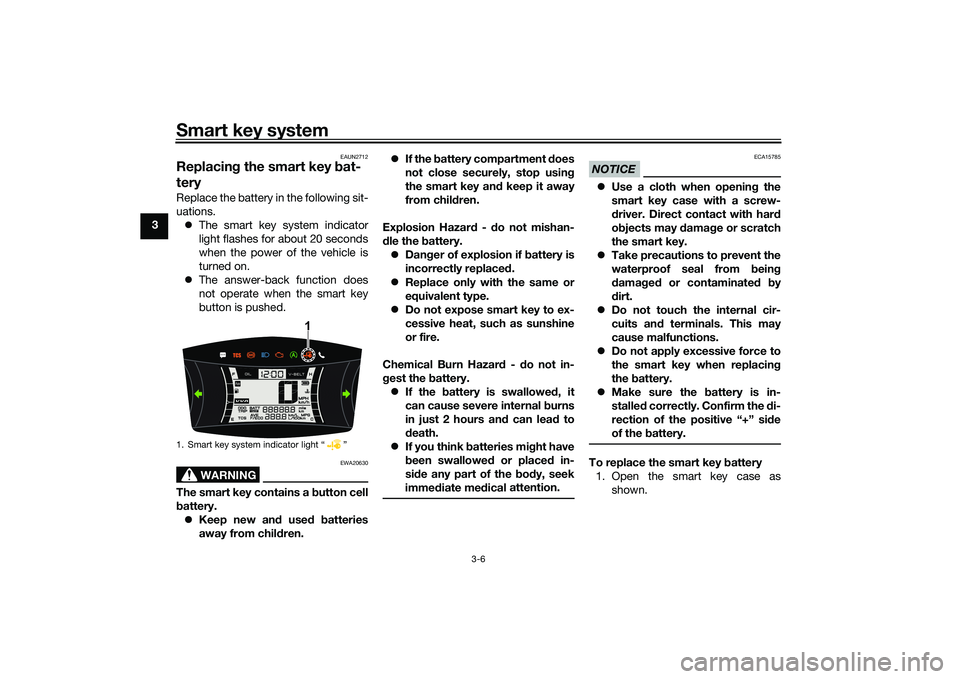
teryReplace the battery in the following sit-
uations.
The smart key system indicator
light flashes for about 20 seconds
when the power of the vehicle is
turned on.
The answer-back function does
not operate when the smart key
button is pushed.
WARNING
EWA20630
The smart key contains a button cell
b attery.
Keep new an d use d b atteries
away from chil dren.
If the b attery compartment d oes
not close securely, stop usin g
the smart key an d keep it away
from chil dren.
Explosion Hazar d - d o not mishan-
d le the battery.
Dan ger of explosion if battery is
incorrectly replace d.
Replace only with the same or
equivalent type.
Do not expose smart key to ex-
cessive heat, such as sunshine
or fire.
Chemical Burn Hazar d - do not in-
g est the battery.
If the battery is swallowed , it
can cause severe internal burns
in just 2 hours an d can lea d to
d eath.
If you think batteries mi ght have
b een swallowed or placed in-
si de any part of the body, seek
imme diate me
dical attention.
NOTICE
ECA15785
Use a cloth when openin g the
smart key case with a screw-
d river. Direct contact with har d
o bjects may d amage or scratch
the smart key.
Take precautions to prevent the
waterproof seal from bein g
d amag ed or contaminate d by
d irt.
Do not touch the internal cir-
cuits an d terminals. This may
cause malfunctions.
Do not apply excessive force to
the smart key when replacin g
the battery.
Make sure the battery is in-
stalle d correctly. Confirm the di-
rection of the positive “+” si de
of the battery.To replace the smart key battery
1. Open the smart key case as shown.
1. Smart key system indicator light “ ”
1
UBBDE0E0.book Page 6 Wednesday, June 2, 2021 2:57 PM
Page 25 of 114
Smart key system
3-7
3
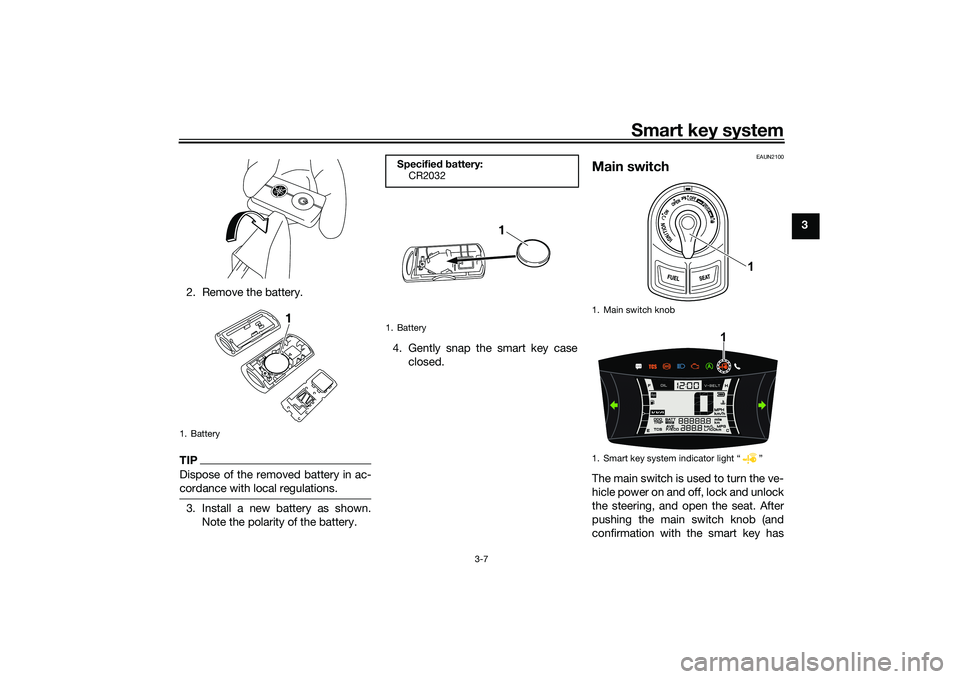
2. Remove the battery.
TIPDispose of the removed battery in ac-
cordance with local regulations.3. Install a new battery as shown. Note the polarity of the battery. 4. Gently snap the smart key case
closed.
EAUN2100
Main switchThe main switch is used to turn the ve-
hicle power on and off, lock and unlock
the steering, and open the seat. After
pushing the main switch knob (and
confirmation with the smart key has
1. Battery
1
Specified b attery:
CR2032
1. Battery
1
1. Main switch knob
1. Smart key system indicator light Ž
1
1
UBBDE0E0.book Page 7 Wednesday, June 2, 2021 2:57 PM
Page 26 of 114
Smart key system
3-8
3taken place), the main switch can be
turned while the smart key system indi-
cator light is on (approximately 4 sec-
onds).
WARNING
EWA18720
Never turn the main switch to
“OFF”, “ ”, or “OPEN” while the ve-
hicle is movin
g. Otherwise the elec-
trical systems will b e switched off,
which may result in loss of control or
an acci dent.TIPDo not push the main switch knob re-
peatedly or turn the main switch back
and forth excessively (beyond normal
use). To protect the main switch from
damage, the smart key system will
temporarily disable, and the smart key
system indicator light will flash. If this
occurs, wait until the indicator light
stops flashing, and then operate the
main switch.The main switch positions are de-
scribed below.
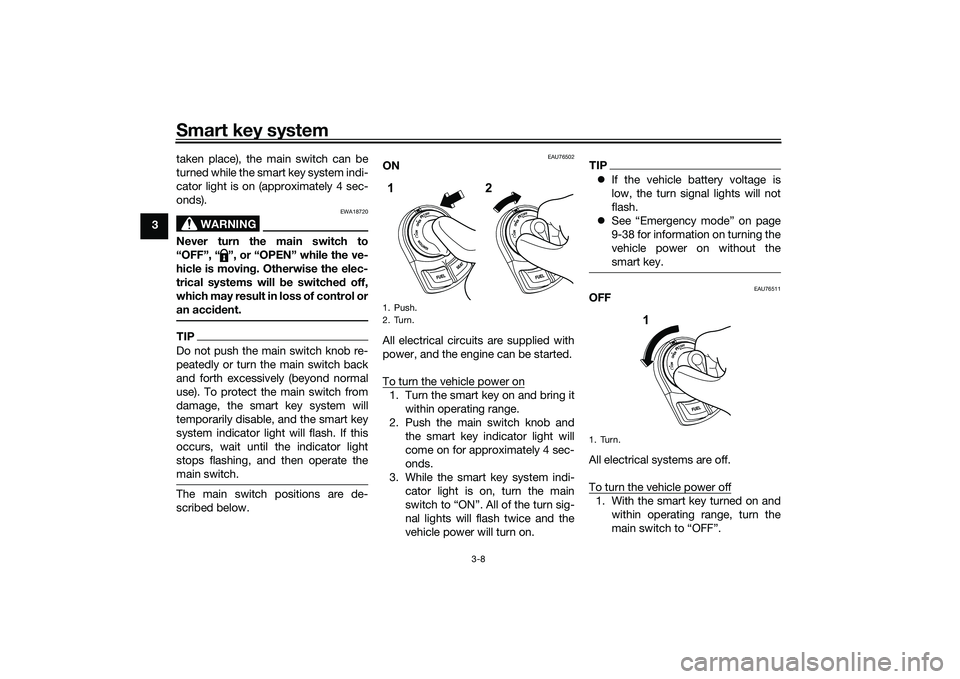
EAU76502
ON
All electrical circuits are supplied with
power, and the engine can be started.
To turn the vehicle power on1. Turn the smart key on and bring it
within operating range.
2. Push the main switch knob and the smart key indicator light will
come on for approximately 4 sec-
onds.
3. While the smart key system indi- cator light is on, turn the main
switch to “ON”. All of the turn sig-
nal lights will flash twice and the
vehicle power will turn on.
TIPIf the vehicle battery voltage is
low, the turn signal lights will not
flash.
See “Emergency mode” on page
9-38 for information on turning the
vehicle power on without the
smart key.
EAU76511
OFF
All electrical systems are off.
To turn the vehicle power off1. With the smart key turned on and
within operating range, turn the
main switch to “OFF”.
1. Push.
2. Turn.1 2
1. Turn.
1
UBBDE0E0.book Page 8 Wednesday, June 2, 2021 2:57 PM
Page 27 of 114

Smart key system
3-9
3
2. The turn signal lights flash once
and the vehicle power turns off.
TIPWhen the main switch is turned to
confirmed (the smart key is either out-
side operation range or has been
turned off), the beeper will sound for 3
seconds and the smart key system in-
dicator light will flash for 30 seconds. During this 30 seconds, the main
switch can be freely operated.
After 30 seconds, the vehicle
power will turn off automatically.
To turn the vehicle power off im-
mediately, push the main switch
knob four times within 2 seconds.
EAU76534
OPEN
The fuel tank cap lid and the seat can
be opened:
1. With the smart key on and within operating range, push the main
switch knob.
2. While the smart key system indi- cator light is on, turn the main
switch to “OPEN”. To open the fuel tank cap li
d
Push the “FUEL” button to open the
fuel tank cap lid.
After refueling, push the fuel tank cap
lid until it is closed.
TIP See page 6-14 for fuel tank cap re-
moval and installation procedures.To open the seat
Push the “SEAT” button, and then lift
the rear of the seat.
To close the seat, push down on the
rear to lock it in position.TIP Make sure that the seat is securely
closed before starting off.
The seat can also be opened with
the mechanical key. (See page
6-19.)
1. Push.
2. Turn.
1. “FUEL” button1
2
1
1.
1
UBBDE0E0.book Page 9 Wednesday, June 2, 2021 2:57 PM
Page 28 of 114

Smart key system
3-10
3Open position remin
der
To prevent you from accidentally leav-
ing the vehicle unlocked by walking
away with the main switch still in the
“OPEN” position, the smart key system
beeper will sound under the following
conditions. When the main switch has been in
the open position for 3 minutes
If the smart key is turned off while
the main switch is in the open po-
sition
If you walk out of range of the
smart key system with the main
switch in the open position
If the beeper sounds after 3 minutes,
turn the main switch to “OFF” or “ ”. If
the beeper sounds because the smart
key was turned off or moved out of
range, turn the smart key on and walk
back into range.
TIP The beeper will turn off after 1
minute.
EAU76521
“ ” (lock)
The steering is locked and all electrical
systems are off.
To lock the steering1. Turn the handlebar all the way to
the left.
2. With the smart key turned on and within operating range, push the
main switch knob.
3. While the smart key system indi- cator light is on, push and turn the
main switch to “ ”.
TIPIf the steering will not lock, try turning
the handlebar back to the right slightly.To unlock the steering1. With the smart key turned on andwithin operating range, push the
main switch knob.
2. While the smart key system indi- cator light is on, push and turn the
main switch to the desired posi-
tion.
1. Push.
2. Turn.1 2
1. Push.
2. Turn.12
UBBDE0E0.book Page 10 Wednesday, June 2, 2021 2:57 PM
Page 29 of 114
Stop and Start System
4-1
4
EAU76825
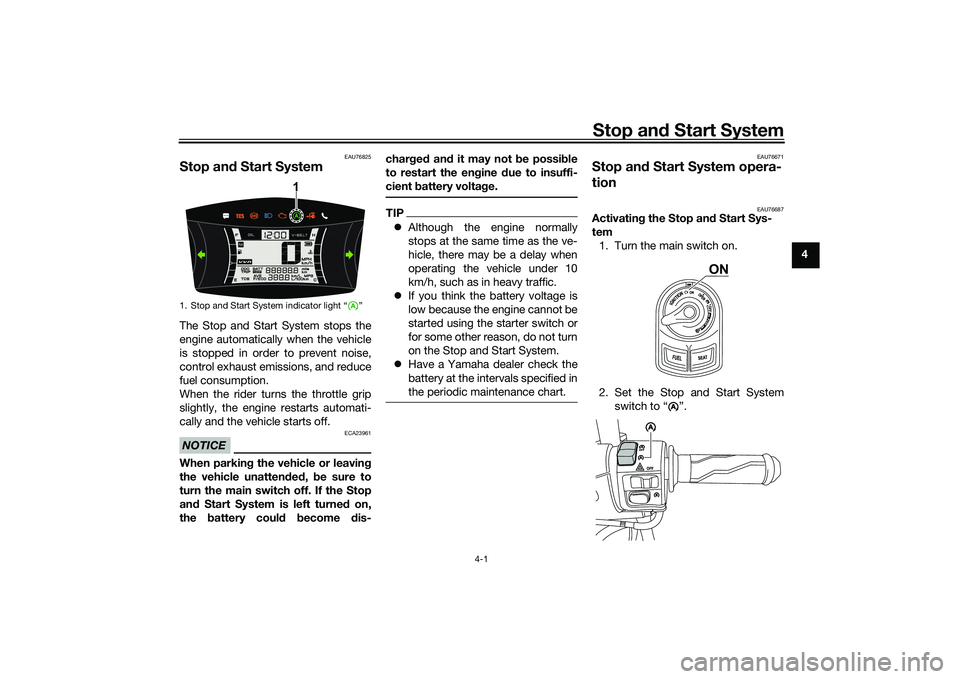
Stop an d Start SystemThe Stop and Start System stops the
engine automatically when the vehicle
is stopped in order to prevent noise,
control exhaust emissions, and reduce
fuel consumption.
When the rider turns the throttle grip
slightly, the engine restarts automati-
cally and the vehicle starts off.NOTICE
ECA23961
When parkin g the vehicle or leavin g
the vehicle unatten ded , be sure to
turn the main switch off. If the Stop
an d Start System is left turne d on,
the battery could become dis- char
ged an d it may not be possi ble
to restart the en gine due to insuffi-
cient battery volta ge.
TIP Although the engine normally
stops at the same time as the ve-
hicle, there may be a delay when
operating the vehicle under 10
km/h, such as in heavy traffic.
If you think the battery voltage is
low because the engine cannot be
started using the starter switch or
for some other reason, do not turn
on the Stop and Start System.
Have a Yamaha dealer check the
battery at the intervals specified in
the periodic maintenance chart.
EAU76671
Stop an d Start System opera-
tion
EAU76687
Activatin g the Stop an d Start Sys-
tem 1. Turn the main switch on.
2. Set the Stop and Start System switch to “ ”.
1. Stop and Start System indicator light “ ”
1
ON
A
AAA
UBBDE0E0.book Page 1 Wednesday, June 2, 2021 2:57 PM
Page 30 of 114

Stop and Start System
4-2
4 3. The Stop and Start System acti-
vates and the indicator light
comes on when the following con-
ditions are met: The Stop and Start System
switch is set to “ ”.
After the engine was warmed
up, the engine was left idling
for a certain period.
The vehicle has traveled at a
speed of 10 km/h or higher.
4. To turn off the Stop and Start Sys- tem, set the Stop and Start Sys-
tem switch to “ ”.
TIPTo preserve battery power, the
Stop and Start System may not
activate.
If the Stop and Start System does
not activate, have a Yamaha deal-
er check the battery.
EAU76832
Stop the en gine
The engine will stop automatically
when the following conditions are met: The Stop and Start System switch
is set to “ ”.
The “ ” indicator light on the
multi-function meter is on.
The vehicle is stopped with the
throttle grip fully returned. At this time, the “ ” indicator light
starts flashing to indicate that the en-
gine is currently stopped by the Stop
and Start System.
EAU76704
Restart the en
gine
If the throttle grip is turned while the
Stop and Start System indicator light is
flashing, the engine will automatically
restart and the “ ” indicator light will
stop flashing.
1. On
A1
A
AAA
A
A
1. On
2. Flashing
A
1
2
A
UBBDE0E0.book Page 2 Wednesday, June 2, 2021 2:57 PM