ESP YAMAHA TMAX 2002 Owners Manual
[x] Cancel search | Manufacturer: YAMAHA, Model Year: 2002, Model line: TMAX, Model: YAMAHA TMAX 2002Pages: 102, PDF Size: 1.67 MB
Page 19 of 102

3-3
EAU04424
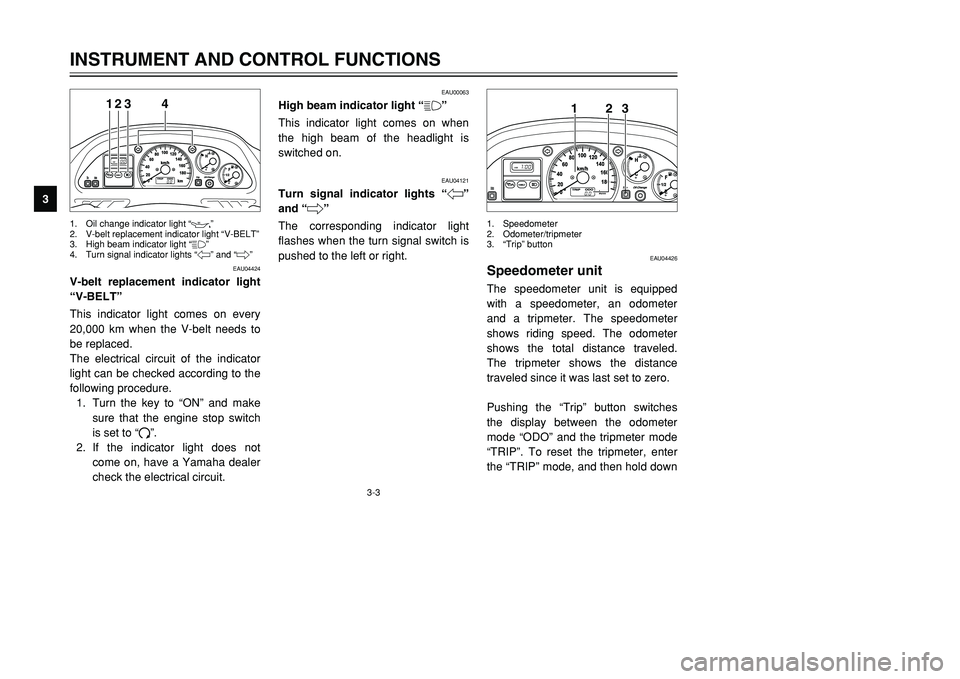
V-belt replacement indicator light
“V-BELT”V-belt replacement indicator lightThis indicator light comes on every
20,000 km when the V-belt needs to
be replaced.
The electrical circuit of the indicator
light can be checked according to the
following procedure.
1. Turn the key to “ON” and make
sure that the engine stop switch
is set to “#”.
2. If the indicator light does not
come on, have a Yamaha dealer
check the electrical circuit.
EAU00063
High beam indicator light “&”High beam indicator lightThis indicator light comes on when
the high beam of the headlight is
switched on.
EAU04121
Turn signal indicator lights “4”
and “6”Turn signal indicator lightsThe corresponding indicator light
flashes when the turn signal switch is
pushed to the left or right.
INSTRUMENT AND CONTROL FUNCTIONS
3
123
4
1. Oil change indicator light “
7
”
2. V-belt replacement indicator light “V-BELT”
3. High beam indicator light “&”
4. Turn signal indicator lights “4” and “6”
EAU04426
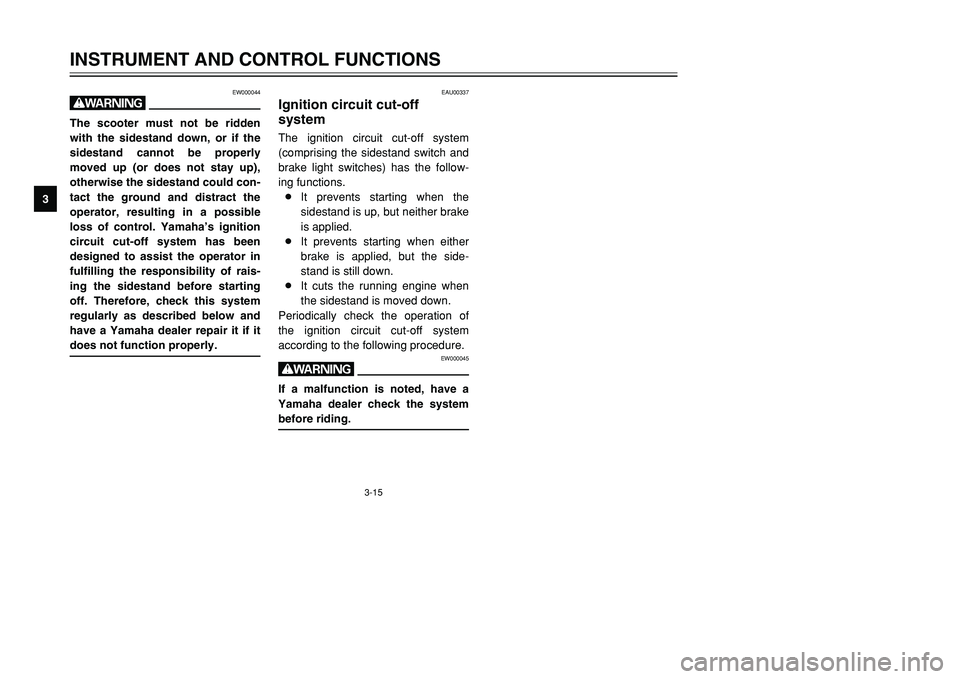
Speedometer unitSpeedometer unitThe speedometer unit is equipped
with a speedometer, an odometer
and a tripmeter. The speedometer
shows riding speed. The odometer
shows the total distance traveled.
The tripmeter shows the distance
traveled since it was last set to zero.
Pushing the “Trip” button switches
the display between the odometer
mode “ODO” and the tripmeter mode
“TRIP”. To reset the tripmeter, enter
the “TRIP” mode, and then hold down
123
1. Speedometer
2. Odometer/tripmeter
3.“Trip” button
5GJ-9-E1 9/4/01 1:27 PM Page 18
Page 29 of 102

3-13
EAU03879
Helmet holderHelmet holderThe helmet holder is located under
the seat. A helmet holding cable is
provided beside the owner’s tool kit
to secure a helmet to the helmet
holder.
To secure a helmet to the helmet
holder
1. Open the seat. (See page 3-11
for opening procedures.)
2. Pass the helmet holding cable
through the buckle on the helmet
strap as shown, and then hook
the cable loop over the helmet
holder.3. Securely close the seat.
EW000030
wNever ride with a helmet attached
to the helmet holder, since the hel-
met may hit objects, causing loss
of control and possibly an acci-
dent.To release the helmet from the hel-
met holder
Open the seat, remove the helmet
holding cable from the helmet holder
and the helmet, and then close the
seat.
INSTRUMENT AND CONTROL FUNCTIONS
3
1
1. Helmet holder
EAU01343
Shock absorberShock absorber
EAU00315
wThis shock absorber contains
highly pressurized nitrogen gas.
For proper handling, read and
understand the following informa-
tion before handling the shock
absorber. The manufacturer can-
not be held responsible for proper-
ty damage or personal injury that
may result from improper han-
dling.
8Do not tamper with or attempt
to open the gas cylinder.
8Do not subject the shock
absorber to an open flame or
other high heat sources, other-
wise it may explode due to
excessive gas pressure.
8Do not deform or damage the
gas cylinder in any way, as
this will result in poor damp-
ing performance.
8Always have a Yamaha dealer
service the shock absorber.
5GJ-9-E1 9/4/01 1:27 PM Page 28
Page 31 of 102

3-15
EW000044
wThe scooter must not be ridden
with the sidestand down, or if the
sidestand cannot be properly
moved up (or does not stay up),
otherwise the sidestand could con-
tact the ground and distract the
operator, resulting in a possible
loss of control. Yamaha’s ignition
circuit cut-off system has been
designed to assist the operator in
fulfilling the responsibility of rais-
ing the sidestand before starting
off. Therefore, check this system
regularly as described below and
have a Yamaha dealer repair it if it
does not function properly.
EAU00337
Ignition circuit cut-off
systemIgnition circuit cut-off systemThe ignition circuit cut-off system
(comprising the sidestand switch and
brake light switches) has the follow-
ing functions.
8It prevents starting when the
sidestand is up, but neither brake
is applied.
8It prevents starting when either
brake is applied, but the side-
stand is still down.
8It cuts the running engine when
the sidestand is moved down.
Periodically check the operation of
the ignition circuit cut-off system
according to the following procedure.
EW000045
wIf a malfunction is noted, have a
Yamaha dealer check the system
before riding.
INSTRUMENT AND CONTROL FUNCTIONS
3 5GJ-9-E1 9/4/01 1:27 PM Page 30
Page 35 of 102

4-1
EAU01114
PRE-OPERATION CHECKS
4The condition of a vehicle is the owner’s responsibility. Vital components can start to deteriorate quickly and unexpect-
edly, even if the vehicle remains unused (for example, as a result of exposure to the elements). Any damage, fluid leak-
age or loss of tire air pressure could have serious consequences. Therefore, it is very important, in addition to a thor-
ough visual inspection, to check the following points before each ride.
EAU03439
Pre-operation check list
Pre-operation check list
ITEM CHECKS PAGE
Fuel•Check fuel level in fuel tank.
•Refuel if necessary.
•Check fuel line for leakage.3-9–3-11
Engine oil•Check oil level in engine.
•If necessary, add recommended oil to specified level.
•Check vehicle for oil leakage.6-12–6-15
Coolant•Check coolant level in reservoir.
•If necessary, add recommended coolant to specified level.
•Check cooling system for leakage.6-17–6-18
Front brake•Check operation.
•If soft or spongy, have Yamaha dealer bleed hydraulic system.
•Check fluid level in reservoir.
•If necessary, add recommended brake fluid to specified level.
•Check hydraulic system for leakage.3-9, 6-25–6-28
Rear brake•Check operation.
•If soft or spongy, have Yamaha dealer bleed hydraulic system.
•Check fluid level in reservoir.
•If necessary, add recommended brake fluid to specified level.
•Check hydraulic system for leakage.3-9, 6-25–6-28
5GJ-9-E1 9/4/01 1:27 PM Page 34
Page 41 of 102

5-3
OPERATION AND IMPORTANT RIDING POINTS
5
EAU00435
BrakingBraking1. Close the throttle completely.
2. Apply both front and rear brakes
simultaneously while gradually
increasing the pressure.
EW000057
w8Avoid braking hard or sudden-
ly (especially when leaning
over to one side), otherwise
the scooter may skid or over-
turn.
8Railroad crossings, streetcar
rails, iron plates on road con-
struction sites, and manhole
covers become extremely slip-
pery when wet. Therefore,
slow down when approaching
such areas and cross them
with caution.
8Keep in mind that braking on a
wet road is much more diffi-
cult.
8Ride slowly down a hill, as
braking downhill can be very
difficult.
EAU03093
Tips for reducing fuel
consumptionFuel consumption, tips for reducingFuel consumption depends largely on
your riding style. Consider the follow-
ing tips to reduce fuel consumption:
8Thoroughly warm up the engine.
8Avoid high engine speeds during
acceleration.
8Avoid high engine speeds with
no load on the engine.
8Turn the engine off instead of let-
ting it idle for an extended length
of time (e.g., in traffic jams, at
traffic lights or at railroad cross-
ings).
5GJ-9-E1 9/4/01 1:27 PM Page 40
Page 65 of 102

6-21
PERIODIC MAINTENANCE AND MINOR REPAIR
6
EAU00630
Adjusting the carburetorsCarburetors, adjustingThe carburetors are important parts
of the engine and require very
sophisticated adjustment. Therefore,
most carburetor adjustments should
be left to a Yamaha dealer, who has
the necessary professional knowl-
edge and experience. The adjust-
ment described in the following sec-
tion, however, may be serviced by
the owner as part of routine mainte-
nance.
EC000095
cCThe carburetors have been set and
extensively tested at the Yamaha
factory. Changing these settings
without sufficient technical knowl-
edge may result in poor perfor-
mance of or damage to the engine.
NOTE:
The engine is warm when it quickly
responds to the throttle.4. Check the engine idling speed
and, if necessary, adjust it to
specification by turning the throt-
tle stop screw. To increase the
engine idling speed, turn the
screw in direction a. To
decrease the engine idling
speed, turn the screw in direction
b.
1a
b
1. Throttle stop screw
EAU03821
Adjusting the engine idling
speedEngine idling speedThe engine idling speed must be
checked and, if necessary, adjusted
as follows at the intervals specified in
the periodic maintenance and lubrica-
tion chart.NOTE:
A diagnostic tachometer is needed to
make this adjustment.1. Remove panel B. (See page 6-7
for panel removal and installation
procedures.)
2. Attach the tachometer to the
spark plug lead.
3. Start the engine and warm it up
for several minutes at 1,000–
2,000 r/min while occasionally
revving it to 4,000–5,000 r/min.
Engine idling speed:
1,150–1,200 r/min
5GJ-9-E1 9/4/01 1:27 PM Page 64
Page 85 of 102

7-1
EAU03873
SCOOTER CARE AND STORAGE
7
CareCareWhile the open design of a scooter
reveals the attractiveness of the tech-
nology, it also makes it more vulnera-
ble. Rust and corrosion can develop
even if high-quality components are
used. A rusty exhaust pipe may go
unnoticed on a car, however, it
detracts from the overall appearance
of a scooter. Frequent and proper
care does not only comply with the
terms of the warranty, but it will also
keep your scooter looking good,
extend its life and optimize its perfor-
mance.Before cleaning
1. Cover the muffler outlet with a
plastic bag after the engine has
cooled down.
2. Make sure that all caps and cov-
ers as well as all electrical cou-
plers and connectors, including
the spark plug cap, are tightly
installed.
3. Remove extremely stubborn dirt,
like oil burnt onto the crankcase,
with a degreasing agent and a
brush, but never apply such
products onto seals, gaskets and
wheel axles. Always rinse the dirt
and degreaser off with water.Cleaning
ECA00011
cC8Avoid using strong acidic
wheel cleaners, especially on
spoked wheels. If such prod-
ucts are used on hard-to-
remove dirt, do not leave the
cleaner on the affected area
any longer than instructed.
Also, thoroughly rinse the area
off with water, immediately dry
it, and then apply a corrosion
protection spray.
8Improper cleaning can damage
windshields, cowlings, panels
and other plastic parts. Use
only a soft, clean cloth or
sponge with mild detergent
and water to clean plastic.
5GJ-9-E1 9/4/01 1:27 PM Page 84