YAMAHA TT600RE 2004 Service Manual
Manufacturer: YAMAHA, Model Year: 2004, Model line: TT600RE, Model: YAMAHA TT600RE 2004Pages: 382, PDF Size: 6.39 MB
Page 221 of 382
ENGENGINE DISASSEMBLY
5-17
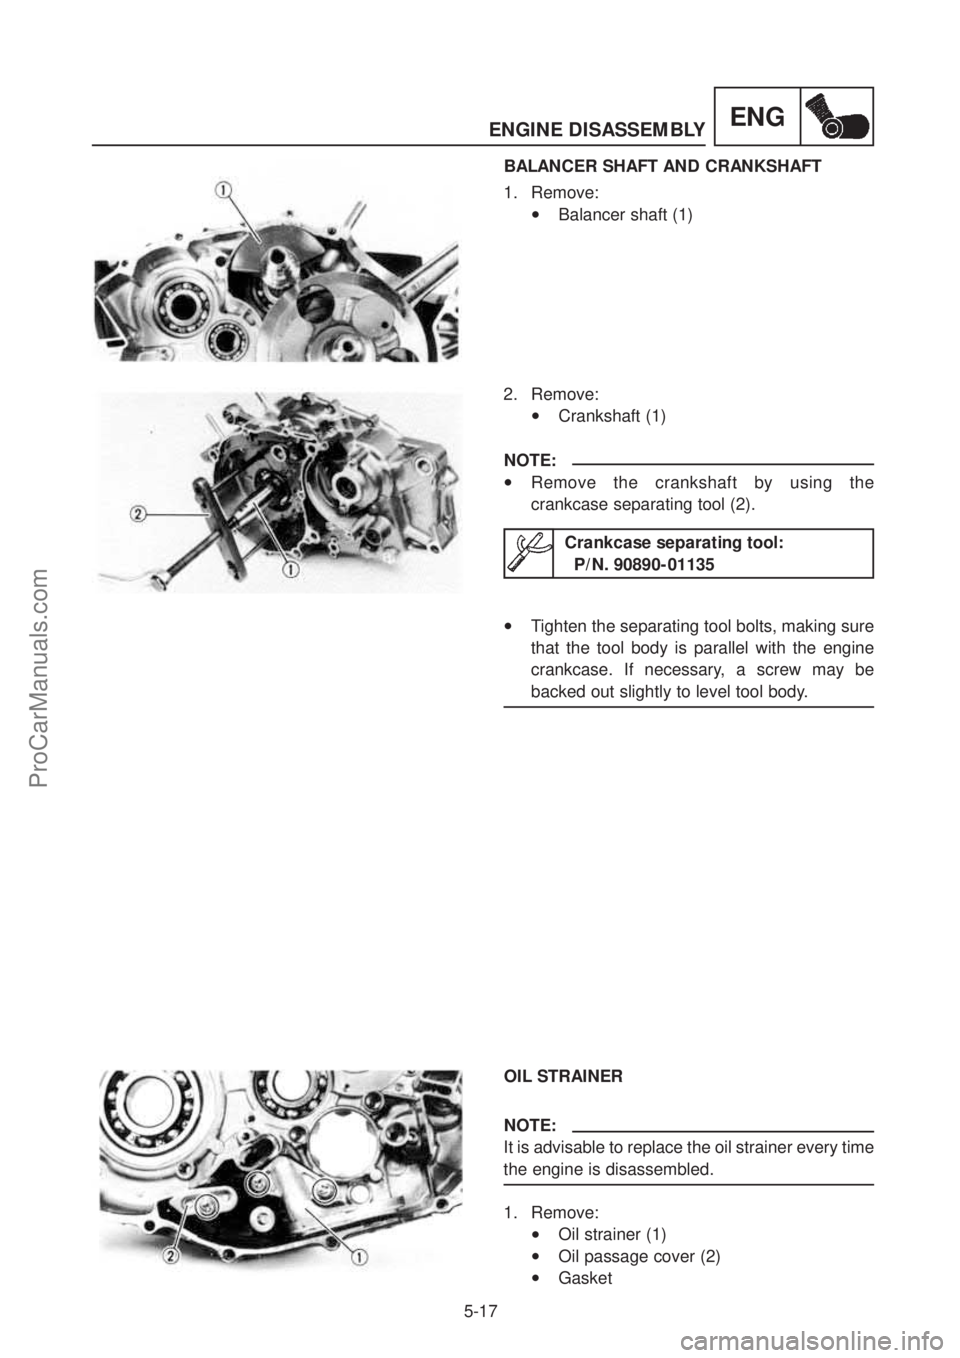
BALANCER SHAFT AND CRANKSHAFT
1. Remove:
•Balancer shaft (1)
2. Remove:
•Crankshaft (1)
NOTE:
•Remove the crankshaft by using the
crankcase separating tool (2).
Crankcase separating tool: P/N. 90890-01135
•Tighten the separating tool bolts, making sure
that the tool body is parallel with the engine
crankcase. If necessary, a screw may be
backed out slightly to level tool body.
OIL STRAINER
NOTE:
It is advisable to replace the oil strainer every time
the engine is disassembled.
1. Remove:
•Oil strainer (1)
•Oil passage cover (2)
•Gasket
ProCarManuals.com
Page 222 of 382
ENGINE DISASSEMBLY
5-18
ENG
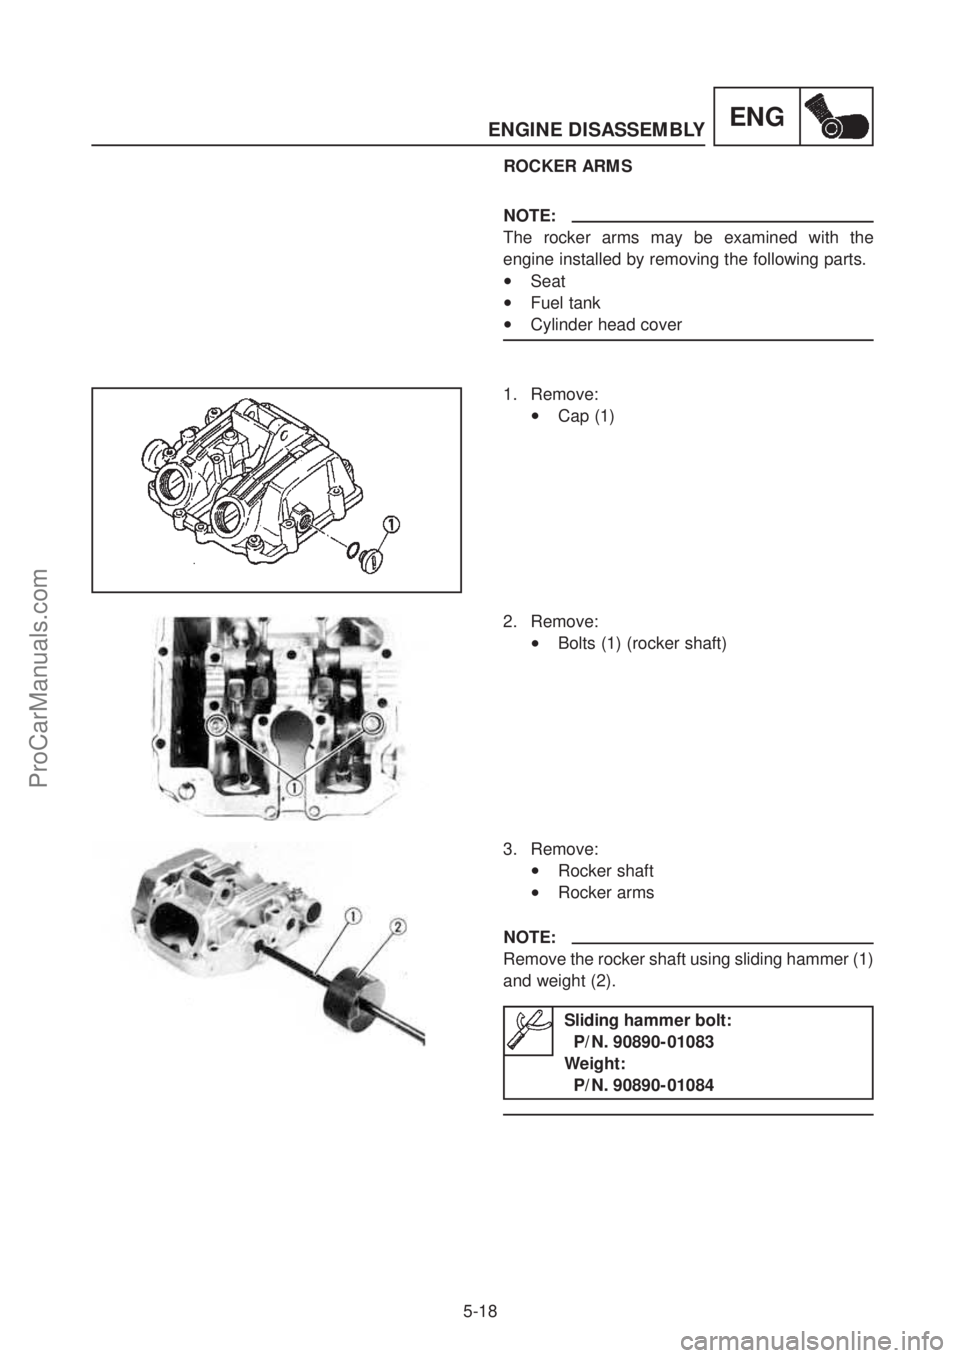
ROCKER ARMS
NOTE:
The rocker arms may be examined with the
engine installed by removing the following parts.
•Seat
•Fuel tank
•Cylinder head cover
1. Remove:
•Cap (1)
2. Remove:
•Bolts (1) (rocker shaft)
3. Remove:
•Rocker shaft
•Rocker arms
NOTE:
Remove the rocker shaft using sliding hammer (1)
and weight (2).
Sliding hammer bolt: P/N. 90890-01083
Weight: P/N. 90890-01084
ProCarManuals.com
Page 223 of 382
ENGENGINE DISASSEMBLY
5-19
VALVES
NOTE:
The valves may be inspected with the engine
installed by removing the following parts.
•Seat
•Fuel tank
•Exhaust pipe
•Carburetor
•Cylinder head cover
•Cylinder head
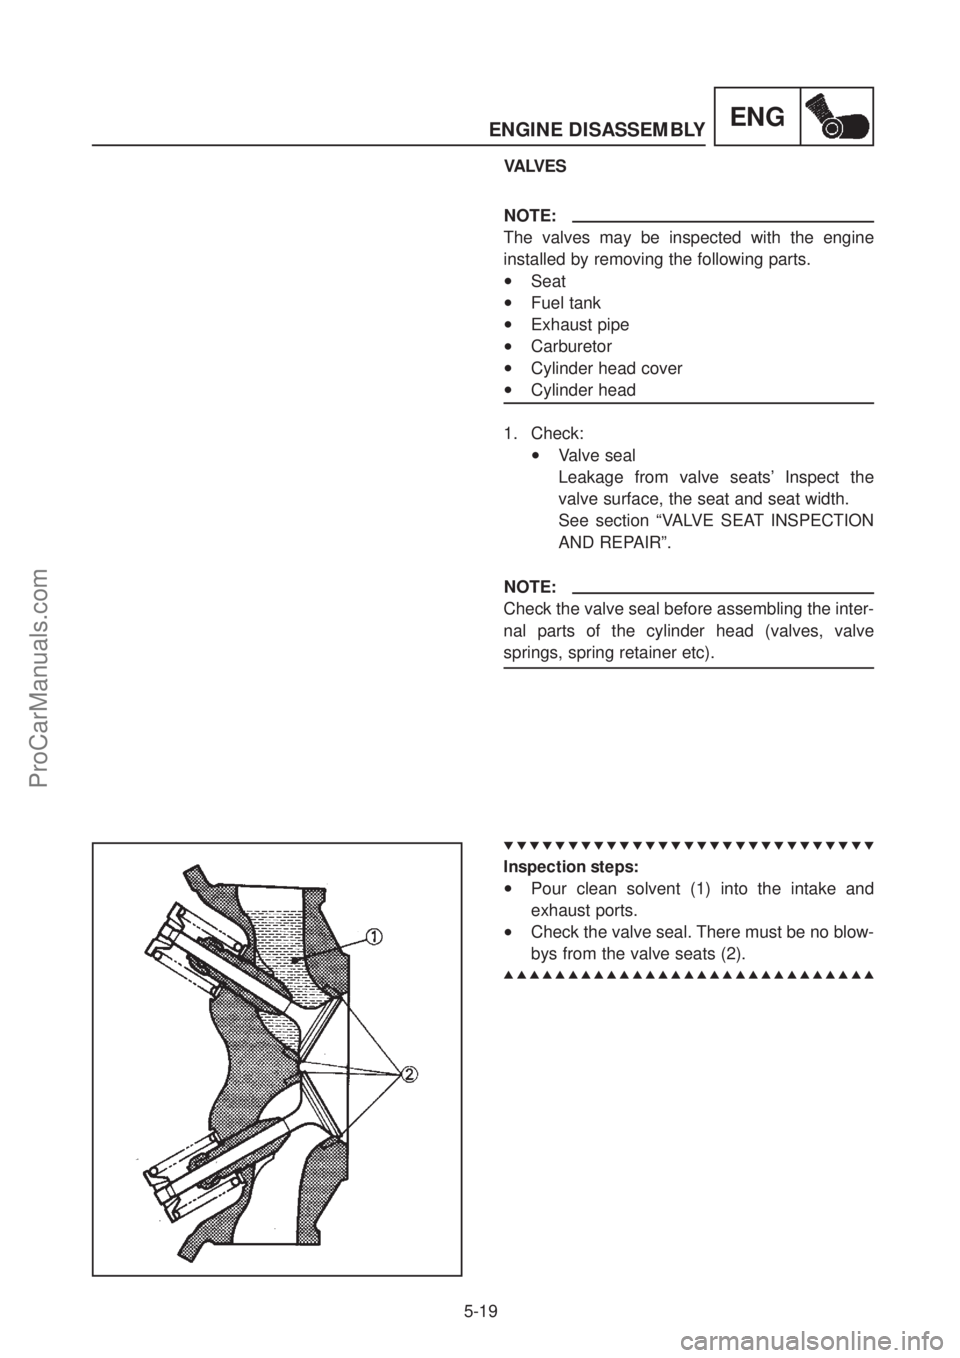
1. Check:
•Valve seal
Leakage from valve seats’ Inspect the
valve surface, the seat and seat width.
See section “VALVE SEAT INSPECTION
AND REPAIR”.
NOTE:
Check the valve seal before assembling the inter-
nal parts of the cylinder head (valves, valve
springs, spring retainer etc).
▼▼▼▼▼▼▼▼▼▼▼▼▼▼▼▼▼▼▼▼▼▼▼▼▼▼▼▼▼
▲▲▲▲▲▲▲▲▲▲▲▲▲▲▲▲▲▲▲▲▲▲▲▲▲▲▲▲▲
Inspection steps:
•Pour clean solvent (1) into the intake and
exhaust ports.
•Check the valve seal. There must be no blow-
bys from the valve seats (2).
ProCarManuals.com
Page 224 of 382
ENGINE DISASSEMBLY
5-20
ENG
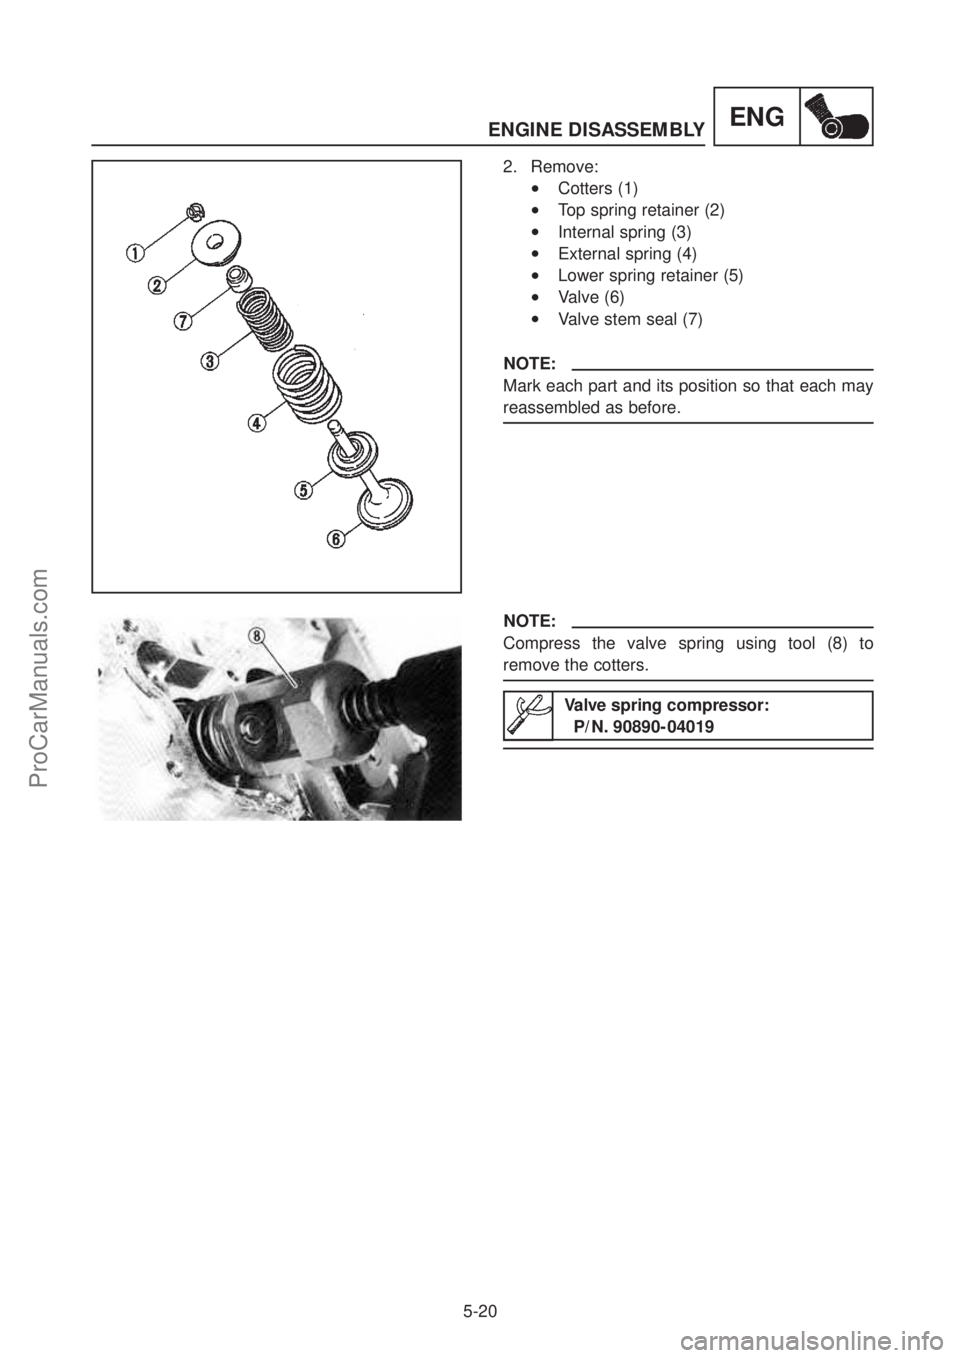
2. Remove:
•Cotters (1)
•Top spring retainer (2)
•Internal spring (3)
•External spring (4)
•Lower spring retainer (5)
•Valve (6)
•Valve stem seal (7)
NOTE:
Mark each part and its position so that each may
reassembled as before.
NOTE:
Compress the valve spring using tool (8) to
remove the cotters. Valve spring compressor: P/N. 90890-04019
ProCarManuals.com
Page 225 of 382
ENGINSPECTION AND REPAIR
5-21
INSPECTION AND REPAIR
CYLINDER HEAD
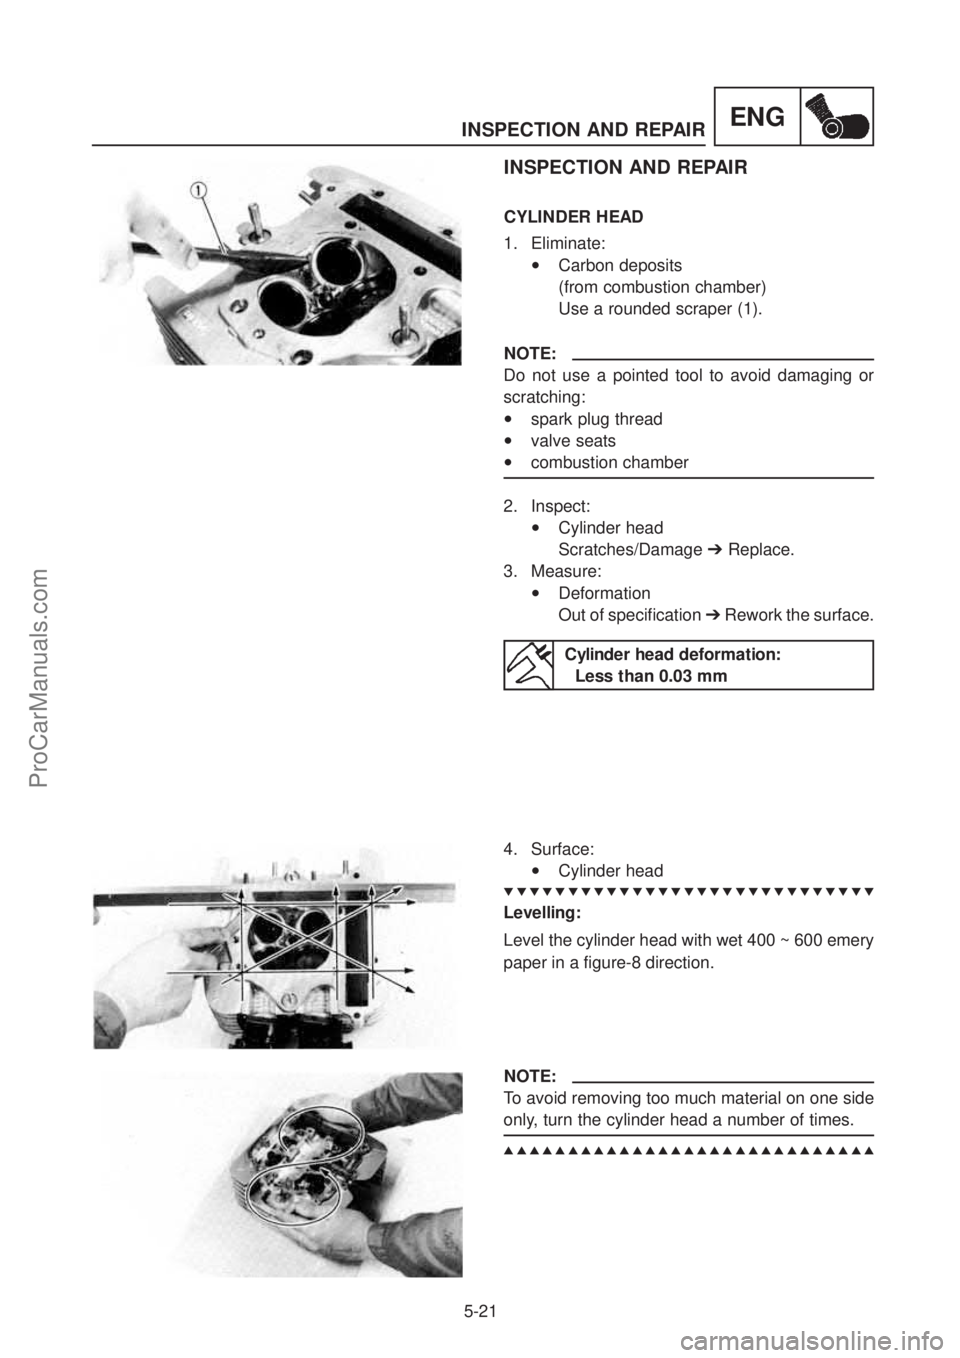
1. Eliminate:
•Carbon deposits
(from combustion chamber)
Use a rounded scraper (1).
NOTE:
Do not use a pointed tool to avoid damaging or
scratching:
•spark plug thread
•valve seats
•combustion chamber
2. Inspect:
•Cylinder head
Scratches/Damage ➔Replace.
3. Measure:
•Deformation
Out of specification ➔Rework the surface.
Cylinder head deformation: Less than 0.03 mm
4. Surface:
•Cylinder head
▼▼▼▼▼▼▼▼▼▼▼▼▼▼▼▼▼▼▼▼▼▼▼▼▼▼▼▼▼
▲▲▲▲▲▲▲▲▲▲▲▲▲▲▲▲▲▲▲▲▲▲▲▲▲▲▲▲▲
Levelling:
Level the cylinder head with wet 400 ~ 600 emery
paper in a figure-8 direction.
NOTE:
To avoid removing too much material on one side
only, turn the cylinder head a number of times.
ProCarManuals.com
Page 226 of 382
INSPECTION AND REPAIR
5-22
ENG
VALVES AND VALVE GUIDES
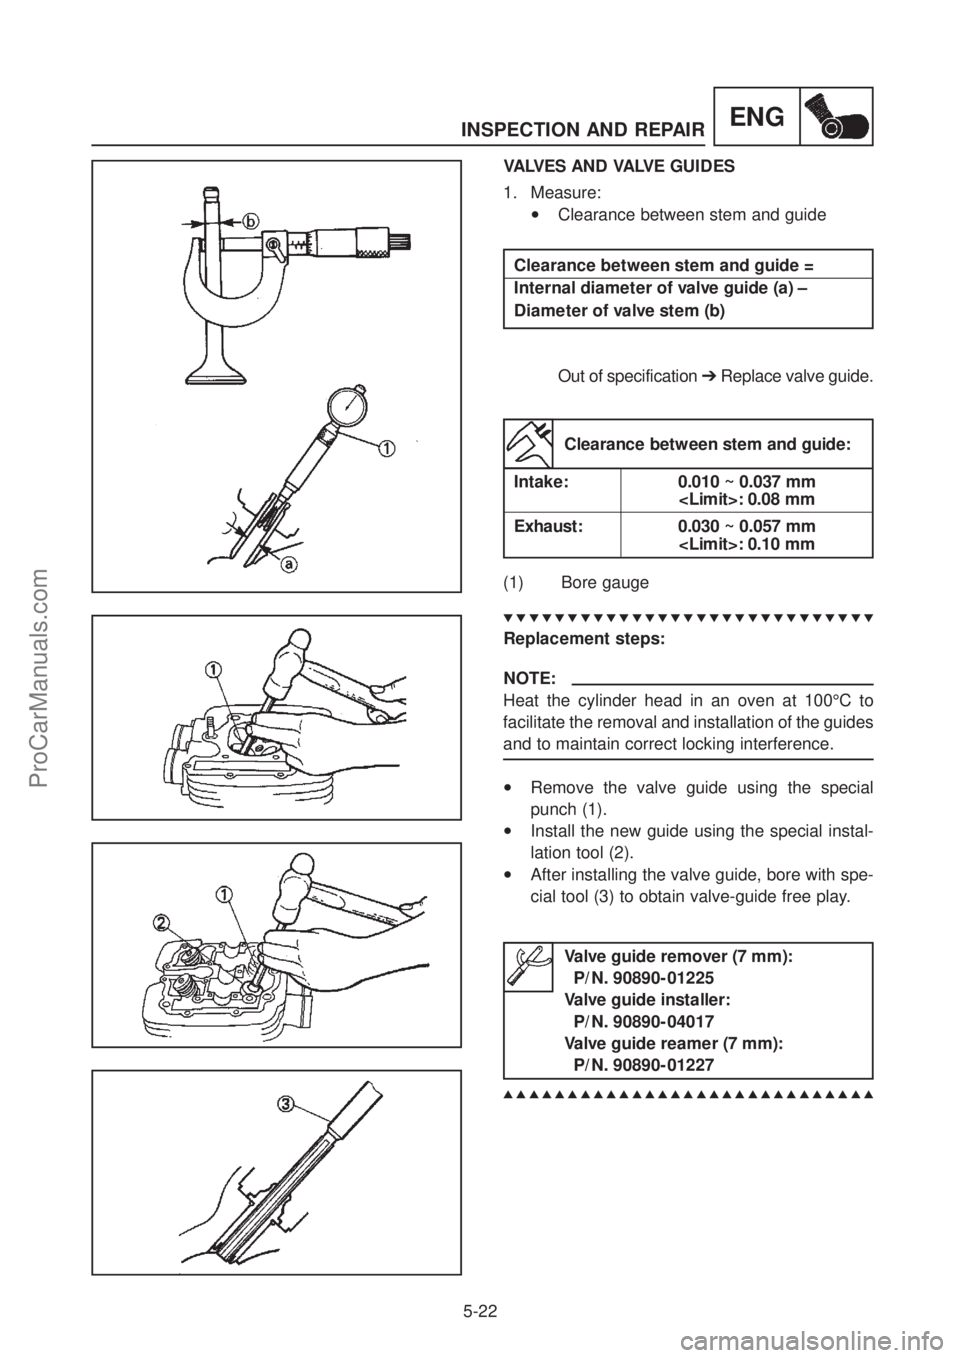
1. Measure:
•Clearance between stem and guide
Clearance between stem and guide =
Internal diameter of valve guide (a) –
Diameter of valve stem (b)
Out of specification ➔Replace valve guide.
Clearance between stem and guide:
Intake: 0.010 ~ 0.037 mm
Exhaust: 0.030 ~ 0.057 mm
(1) Bore gauge
▼▼▼▼▼▼▼▼▼▼▼▼▼▼▼▼▼▼▼▼▼▼▼▼▼▼▼▼▼
▲▲▲▲▲▲▲▲▲▲▲▲▲▲▲▲▲▲▲▲▲▲▲▲▲▲▲▲▲
Replacement steps:
NOTE:
Heat the cylinder head in an oven at 100°C to
facilitate the removal and installation of the guides
and to maintain correct locking interference.
•Remove the valve guide using the special
punch (1).
•Install the new guide using the special instal-
lation tool (2).
•After installing the valve guide, bore with spe-
cial tool (3) to obtain valve-guide free play.
Valve guide remover (7 mm): P/N. 90890-01225
Valve guide installer: P/N. 90890-04017
Valve guide reamer (7 mm): P/N. 90890-01227
ProCarManuals.com
Page 227 of 382
ENGINSPECTION AND REPAIR
5-23
2. Clean the valve surfaces of the carbon deposits.
3. Inspect:
•Valve seal surface
Pitting/Wear ➔Grind the valve seal sur-
face.
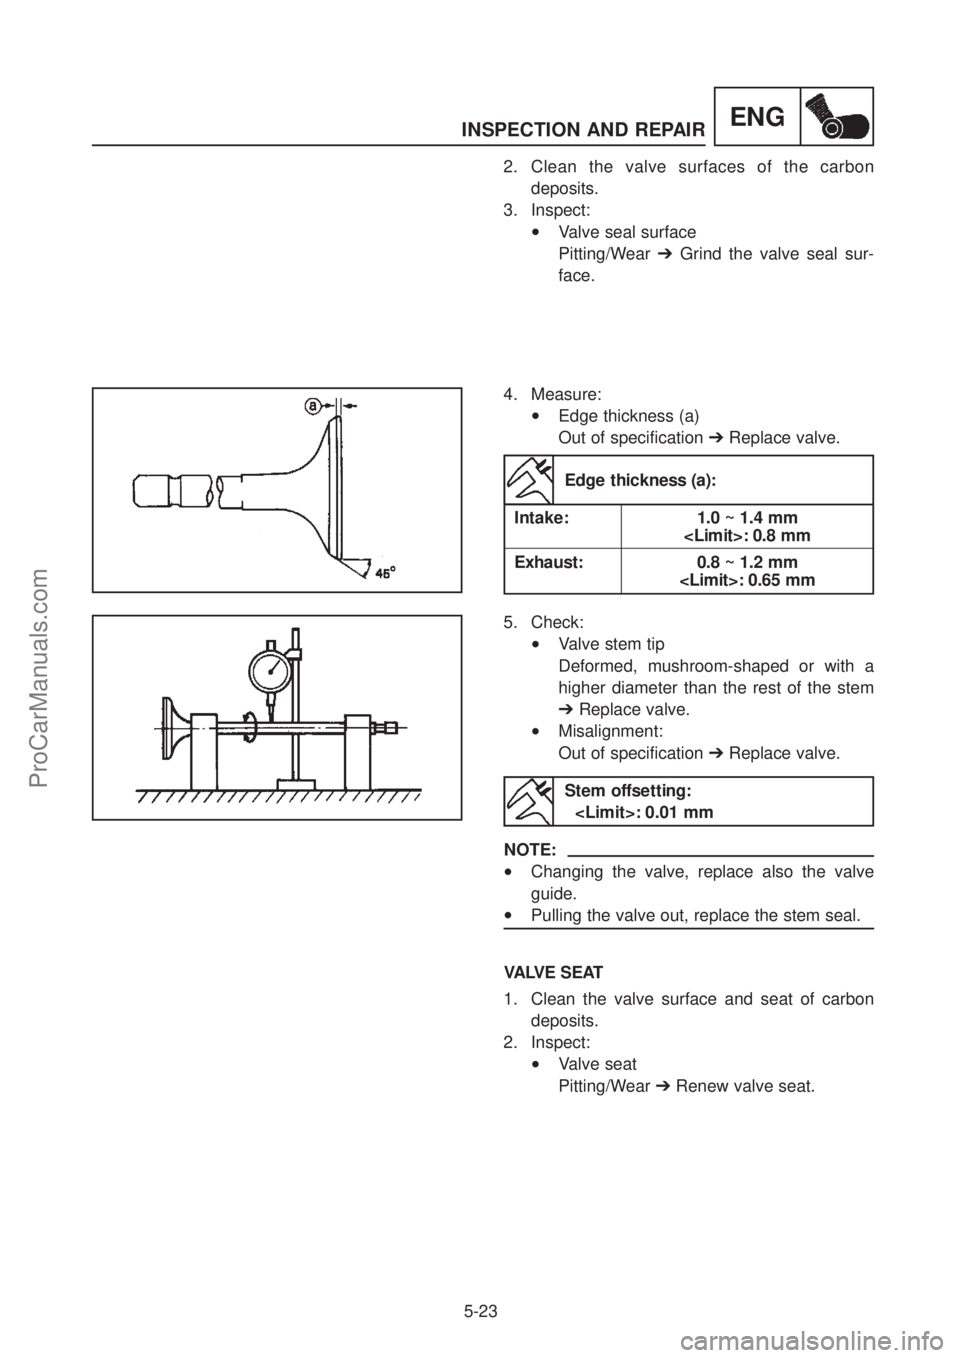
4. Measure:
•Edge thickness (a)
Out of specification ➔Replace valve.
Edge thickness (a):
Intake: 1.0 ~ 1.4 mm
Exhaust: 0.8 ~ 1.2 mm
5. Check:
•Valve stem tip
Deformed, mushroom-shaped or with a
higher diameter than the rest of the stem
➔ Replace valve.
•Misalignment:
Out of specification ➔Replace valve.
Stem offsetting:
NOTE:
•Changing the valve, replace also the valve
guide.
•Pulling the valve out, replace the stem seal.
VALVE SEAT
1. Clean the valve surface and seat of carbon deposits.
2. Inspect:
•Valve seat
Pitting/Wear ➔Renew valve seat.
ProCarManuals.com
Page 228 of 382
INSPECTION AND REPAIR
5-24
ENG
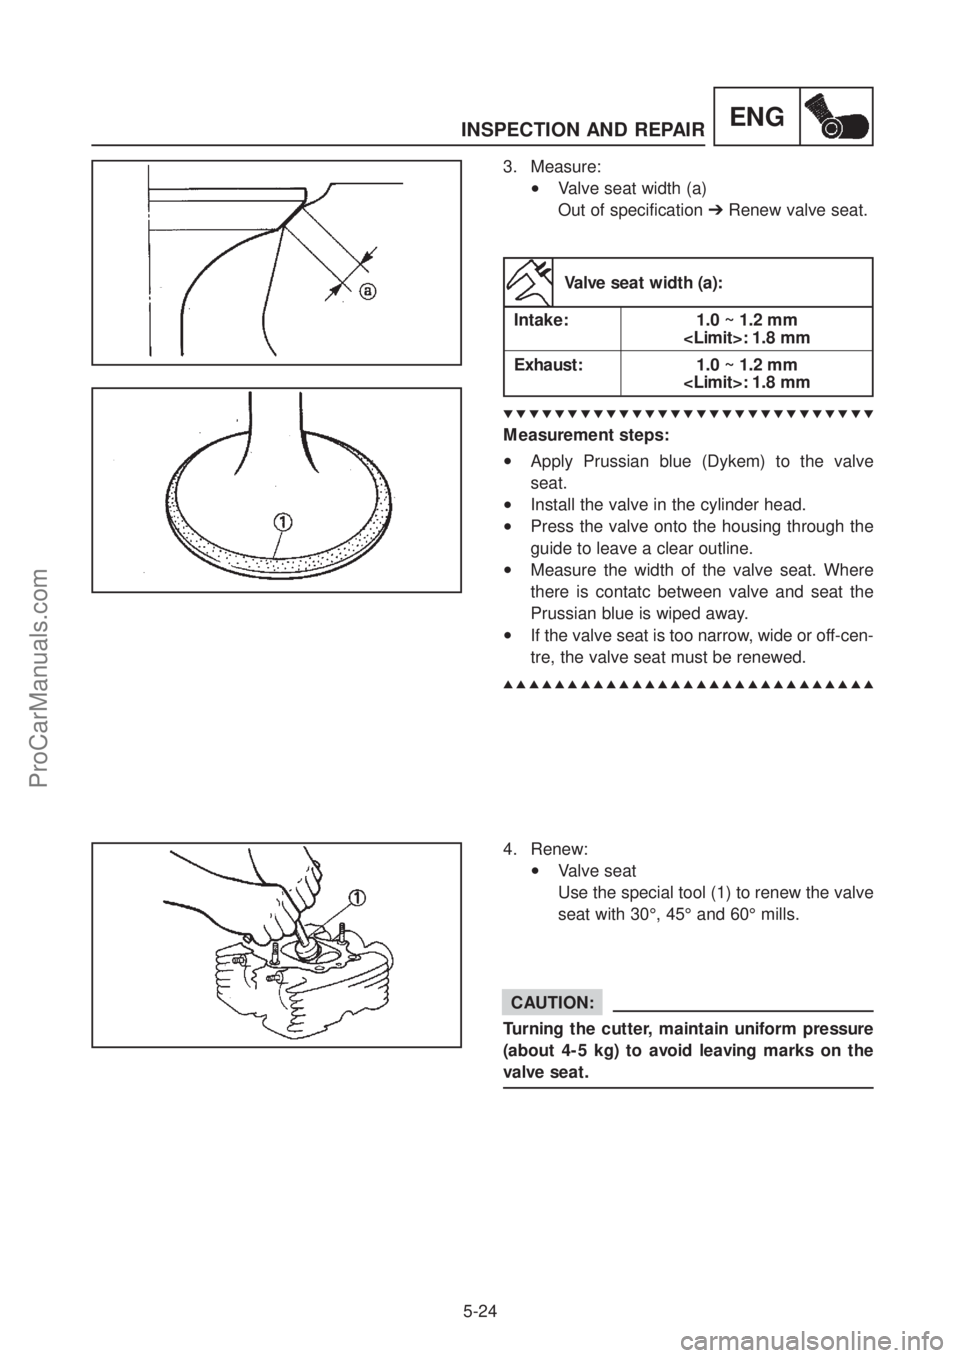
3. Measure:
•Valve seat width (a)
Out of specification ➔Renew valve seat.
Valve seat width (a):
Intake: 1.0 ~ 1.2 mm
Exhaust: 1.0 ~ 1.2 mm
▼▼▼▼▼▼▼▼▼▼▼▼▼▼▼▼▼▼▼▼▼▼▼▼▼▼▼▼▼
▲▲▲▲▲▲▲▲▲▲▲▲▲▲▲▲▲▲▲▲▲▲▲▲▲▲▲▲▲
Measurement steps:
•Apply Prussian blue (Dykem) to the valve
seat.
•Install the valve in the cylinder head.
•Press the valve onto the housing through the
guide to leave a clear outline.
•Measure the width of the valve seat. Where
there is contatc between valve and seat the
Prussian blue is wiped away.
•If the valve seat is too narrow, wide or off-cen-
tre, the valve seat must be renewed.
4. Renew:
•Valve seat
Use the special tool (1) to renew the valve
seat with 30°, 45° and 60° mills.
Turning the cutter, maintain uniform pressure
(about 4-5 kg) to avoid leaving marks on the
valve seat.
CAUTION:
ProCarManuals.com
Page 229 of 382
ENGINSPECTION AND REPAIR
5-25
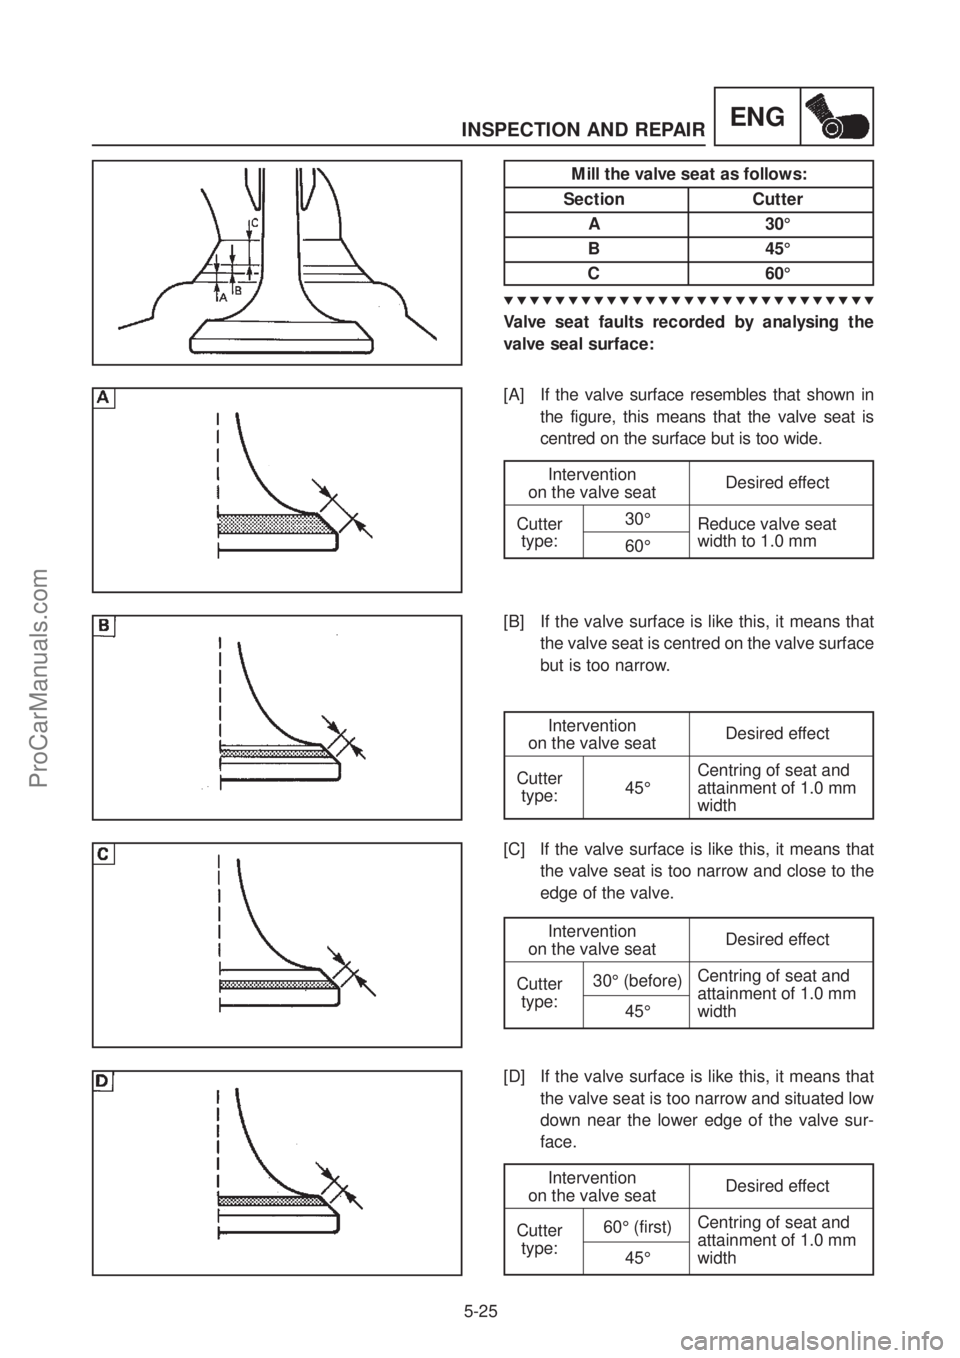
Mill the valve seat as follows:
Section Cutter
A30°
B45°
C60°
▼▼▼▼▼▼▼▼▼▼▼▼▼▼▼▼▼▼▼▼▼▼▼▼▼▼▼▼▼
Valve seat faults recorded by analysing the
valve seal surface:
[A] If the valve surface resembles that shown in
the figure, this means that the valve seat is
centred on the surface but is too wide.
Intervention Desired effect
on the valve seat
Cutter 30°
Reduce valve seat
type: 60° width to 1.0 mm
Intervention
Desired effect
on the valve seat
Cutter 30° (before) Centring of seat and
type: attainment of 1.0 mm
45° width
Intervention Desired effect
on the valve seat
Cutter 60° (first) Centring of seat and
type: attainment of 1.0 mm
45° width
Intervention Desired effect
on the valve seat
Cutter Centring of seat and
type: 45° attainment of 1.0 mm
width
[B] If the valve surface is like this, it means that
the valve seat is centred on the valve surface
but is too narrow.
[C] If the valve surface is like this, it means that the valve seat is too narrow and close to the
edge of the valve.
[D] If the valve surface is like this, it means that the valve seat is too narrow and situated low
down near the lower edge of the valve sur-
face.
ProCarManuals.com
Page 230 of 382
INSPECTION AND REPAIR
5-26
ENG
5. Emery:
•Valve seal surface
•Valve seat
NOTE:
If the valve seat is renewed or the valve and guide
replaced, the valve seat and seal surface must be
lapped.
▲▲▲▲▲▲▲▲▲▲▲▲▲▲▲▲▲▲▲▲▲▲▲▲▲▲▲▲▲
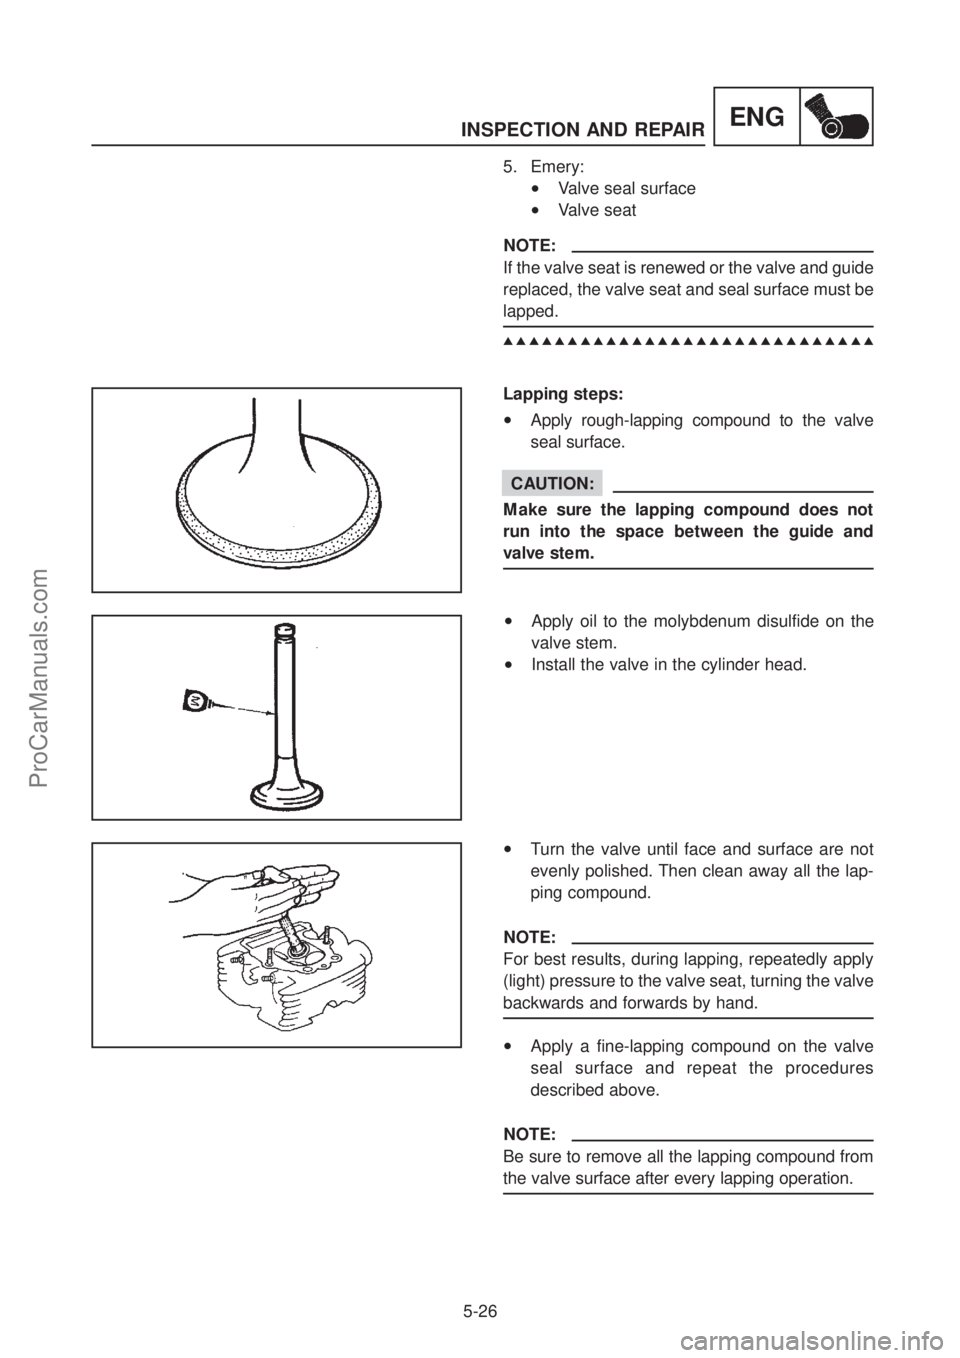
Lapping steps:
•Apply rough-lapping compound to the valve
seal surface.
Make sure the lapping compound does not
run into the space between the guide and
valve stem.
CAUTION:
•Apply oil to the molybdenum disulfide on the
valve stem.
•Install the valve in the cylinder head.
•Turn the valve until face and surface are not
evenly polished. Then clean away all the lap-
ping compound.
NOTE:
For best results, during lapping, repeatedly apply
(light) pressure to the valve seat, turning the valve
backwards and forwards by hand.
•Apply a fine-lapping compound on the valve
seal surface and repeat the procedures
described above.
NOTE:
Be sure to remove all the lapping compound from
the valve surface after every lapping operation.
ProCarManuals.com