YAMAHA WR 250F 2016 Owners Manual
Manufacturer: YAMAHA, Model Year: 2016, Model line: WR 250F, Model: YAMAHA WR 250F 2016Pages: 428, PDF Size: 14.13 MB
Page 241 of 428
CAMSHAFT
6-12
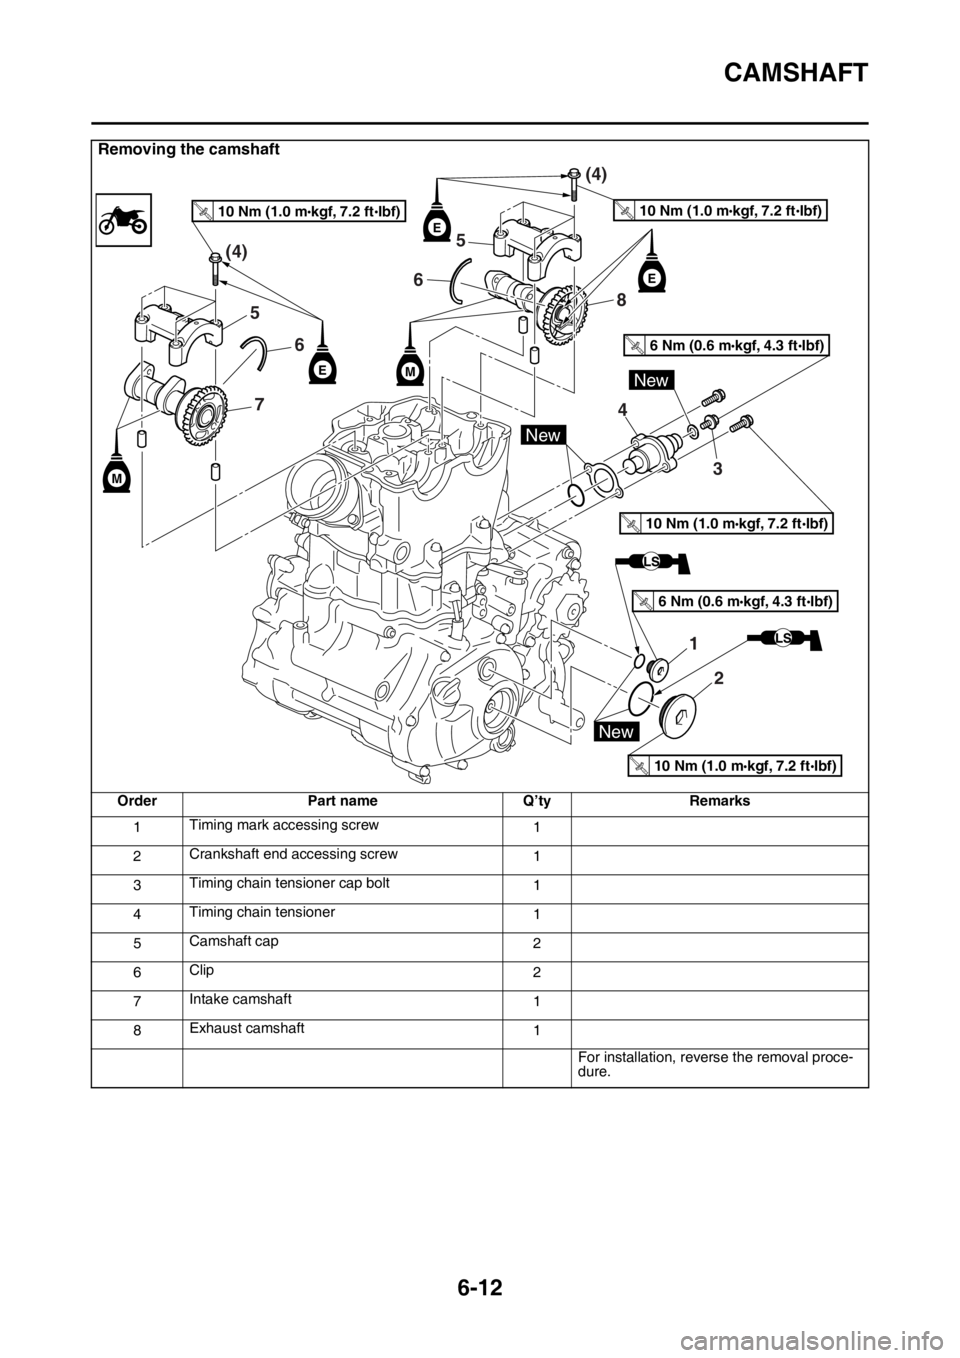
Removing the camshaft
Order Part name Q’ty Remarks
1Timing mark accessing screw
1
2Crankshaft end accessing screw
1
3Timing chain tensioner cap bolt
1
4Timing chain tensioner
1
5Camshaft cap
2
6Clip
2
7Intake camshaft
1
8Exhaust camshaft
1
For installation, reverse the removal proce-
dure.
6 Nm (0.6 m kgf, 4.3 ft Ibf)T.R.
6 Nm (0.6 m kgf, 4.3 ft Ibf)T.R.
10 Nm (1.0 m kgf, 7.2 ft Ibf)T.R.
10 Nm (1.0 m kgf, 7.2 ft Ibf)T.R.
10 Nm (1.0 m kgf, 7.2 ft Ibf)T.R.10 Nm (1.0 m kgf, 7.2 ft Ibf)T.R.
5
8
3
4
1
2
7
6
5 (4)(4)
6
M
M
E
New
New
NewE
E
Page 242 of 428
CAMSHAFT
6-13
EAS2GB7238REMOVING THE CAMSHAFT
1. Remove:
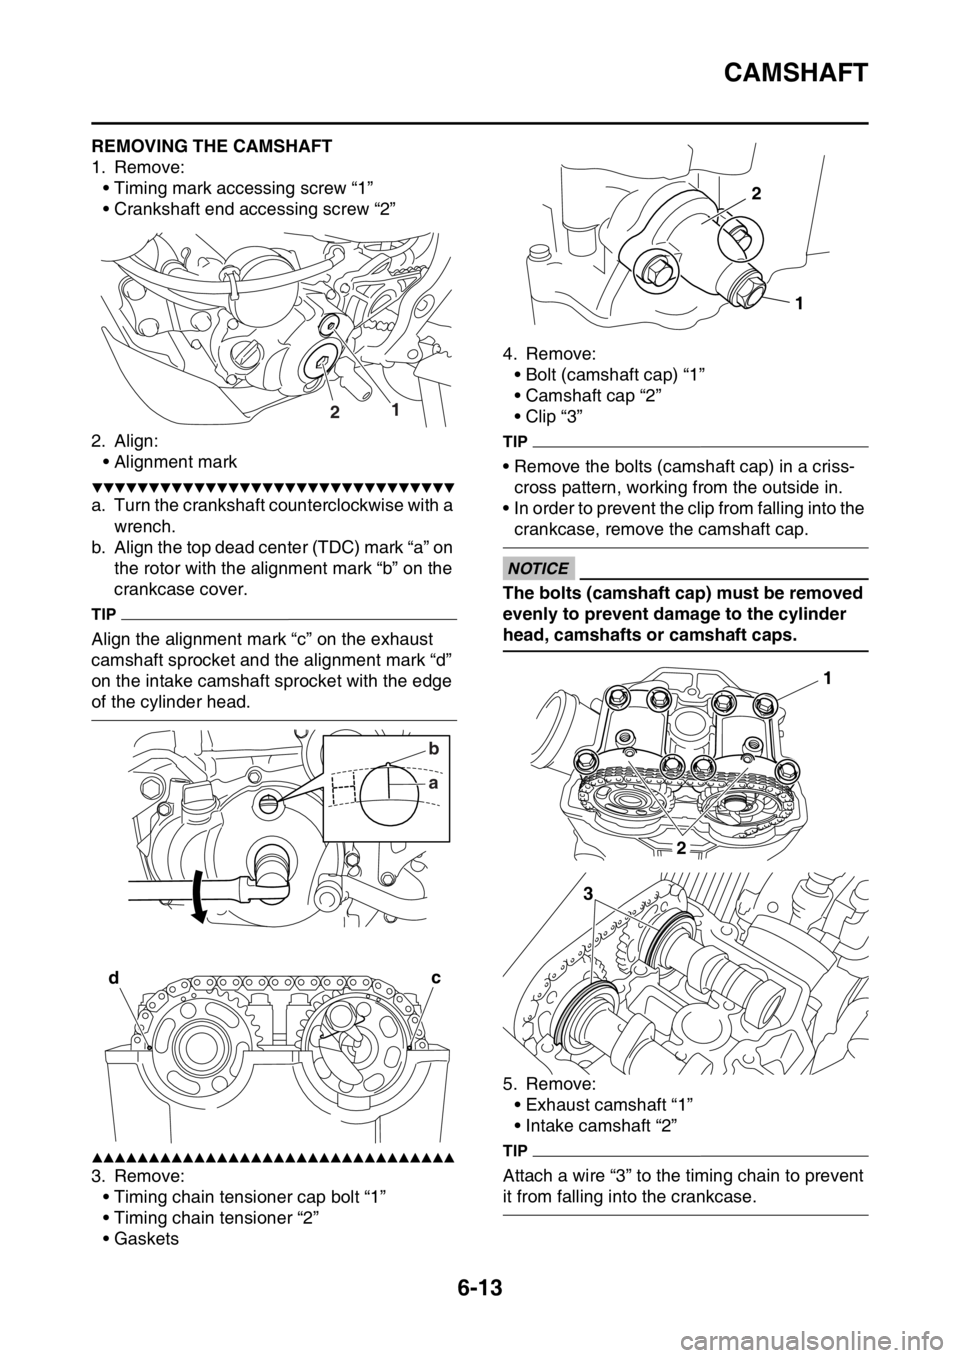
• Timing mark accessing screw “1”
• Crankshaft end accessing screw “2”
2. Align:
• Alignment mark
▼▼▼▼▼▼▼▼▼▼▼▼▼▼▼▼▼▼▼▼▼▼▼▼▼▼▼▼▼▼▼▼
a. Turn the crankshaft counterclockwise with a
wrench.
b. Align the top dead center (TDC) mark “a” on
the rotor with the alignment mark “b” on the
crankcase cover.
TIP
Align the alignment mark “c” on the exhaust
camshaft sprocket and the alignment mark “d”
on the intake camshaft sprocket with the edge
of the cylinder head.
▲▲▲▲▲▲▲▲▲▲▲▲▲▲▲▲▲▲▲▲▲▲▲▲▲▲▲▲▲▲▲▲
3. Remove:
• Timing chain tensioner cap bolt “1”
• Timing chain tensioner “2”
•Gaskets4. Remove:
• Bolt (camshaft cap) “1”
• Camshaft cap “2”
• Clip “3”
TIP
• Remove the bolts (camshaft cap) in a criss-
cross pattern, working from the outside in.
• In order to prevent the clip from falling into the
crankcase, remove the camshaft cap.
ECA
NOTICE
The bolts (camshaft cap) must be removed
evenly to prevent damage to the cylinder
head, camshafts or camshaft caps.
5. Remove:
• Exhaust camshaft “1”
• Intake camshaft “2”
TIP
Attach a wire “3” to the timing chain to prevent
it from falling into the crankcase.
12
ab
dc
1 2
1
2
3
Page 243 of 428
CAMSHAFT
6-14
EAS2GB7239CHECKING THE CAMSHAFT
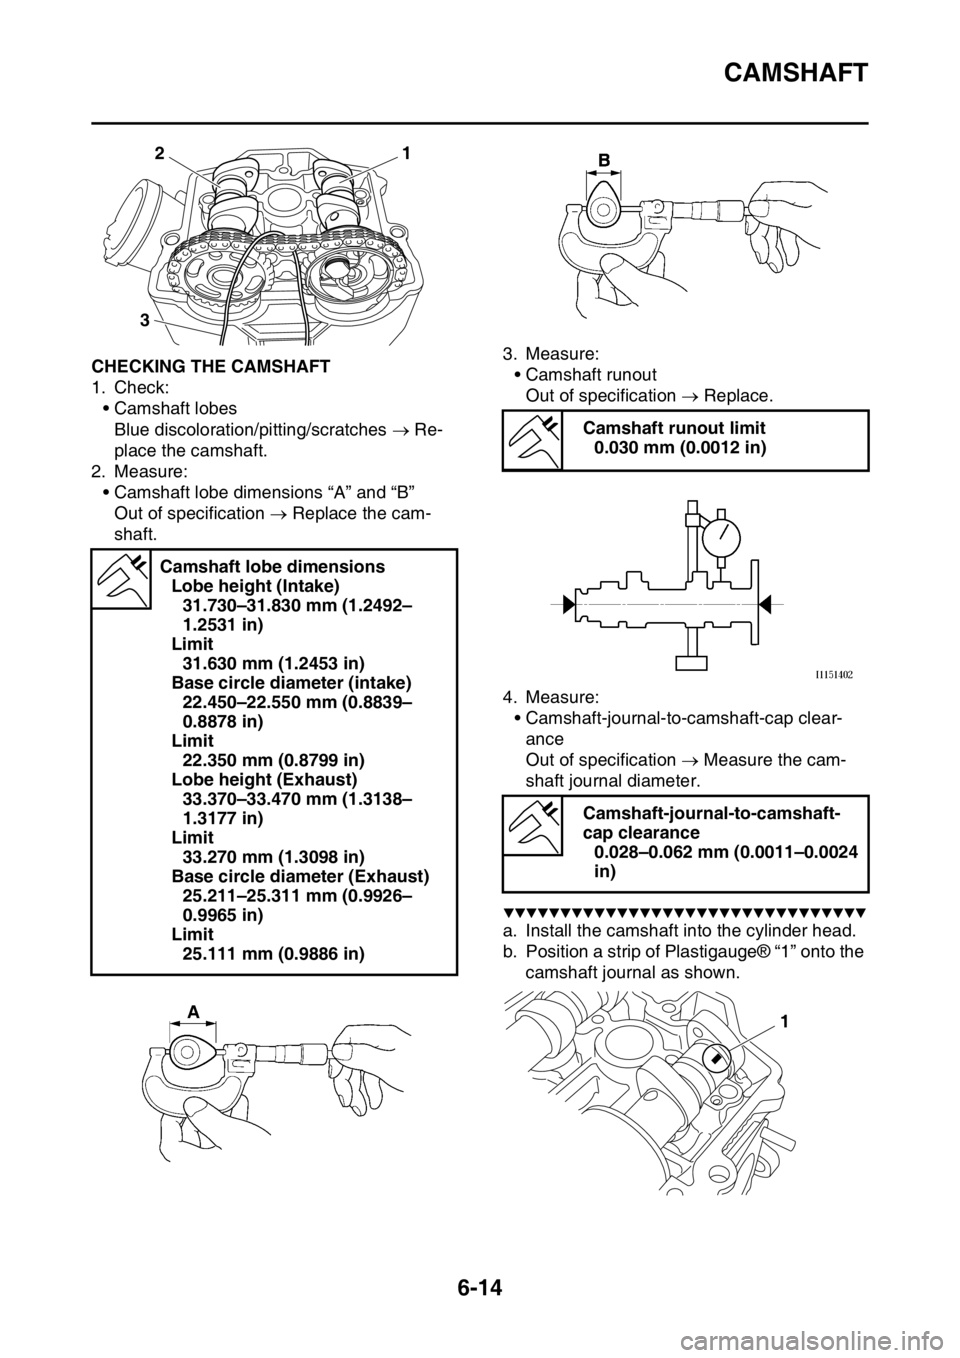
1. Check:
• Camshaft lobes
Blue discoloration/pitting/scratches Re-
place the camshaft.
2. Measure:
• Camshaft lobe dimensions “A” and “B”
Out of specification Replace the cam-
shaft.3. Measure:
• Camshaft runout
Out of specification Replace.
4. Measure:
• Camshaft-journal-to-camshaft-cap clear-
ance
Out of specification Measure the cam-
shaft journal diameter.
▼▼▼▼▼▼▼▼▼▼▼▼▼▼▼▼▼▼▼▼▼▼▼▼▼▼▼▼▼▼▼▼
a. Install the camshaft into the cylinder head.
b. Position a strip of Plastigauge® “1” onto the
camshaft journal as shown. Camshaft lobe dimensions
Lobe height (Intake)
31.730–31.830 mm (1.2492–
1.2531 in)
Limit
31.630 mm (1.2453 in)
Base circle diameter (intake)
22.450–22.550 mm (0.8839–
0.8878 in)
Limit
22.350 mm (0.8799 in)
Lobe height (Exhaust)
33.370–33.470 mm (1.3138–
1.3177 in)
Limit
33.270 mm (1.3098 in)
Base circle diameter (Exhaust)
25.211–25.311 mm (0.9926–
0.9965 in)
Limit
25.111 mm (0.9886 in)
1
2
3
Camshaft runout limit
0.030 mm (0.0012 in)
Camshaft-journal-to-camshaft-
cap clearance
0.028–0.062 mm (0.0011–0.0024
in)
1
Page 244 of 428
CAMSHAFT
6-15
c. Install the dowel pins and the camshaft
caps.
TIP
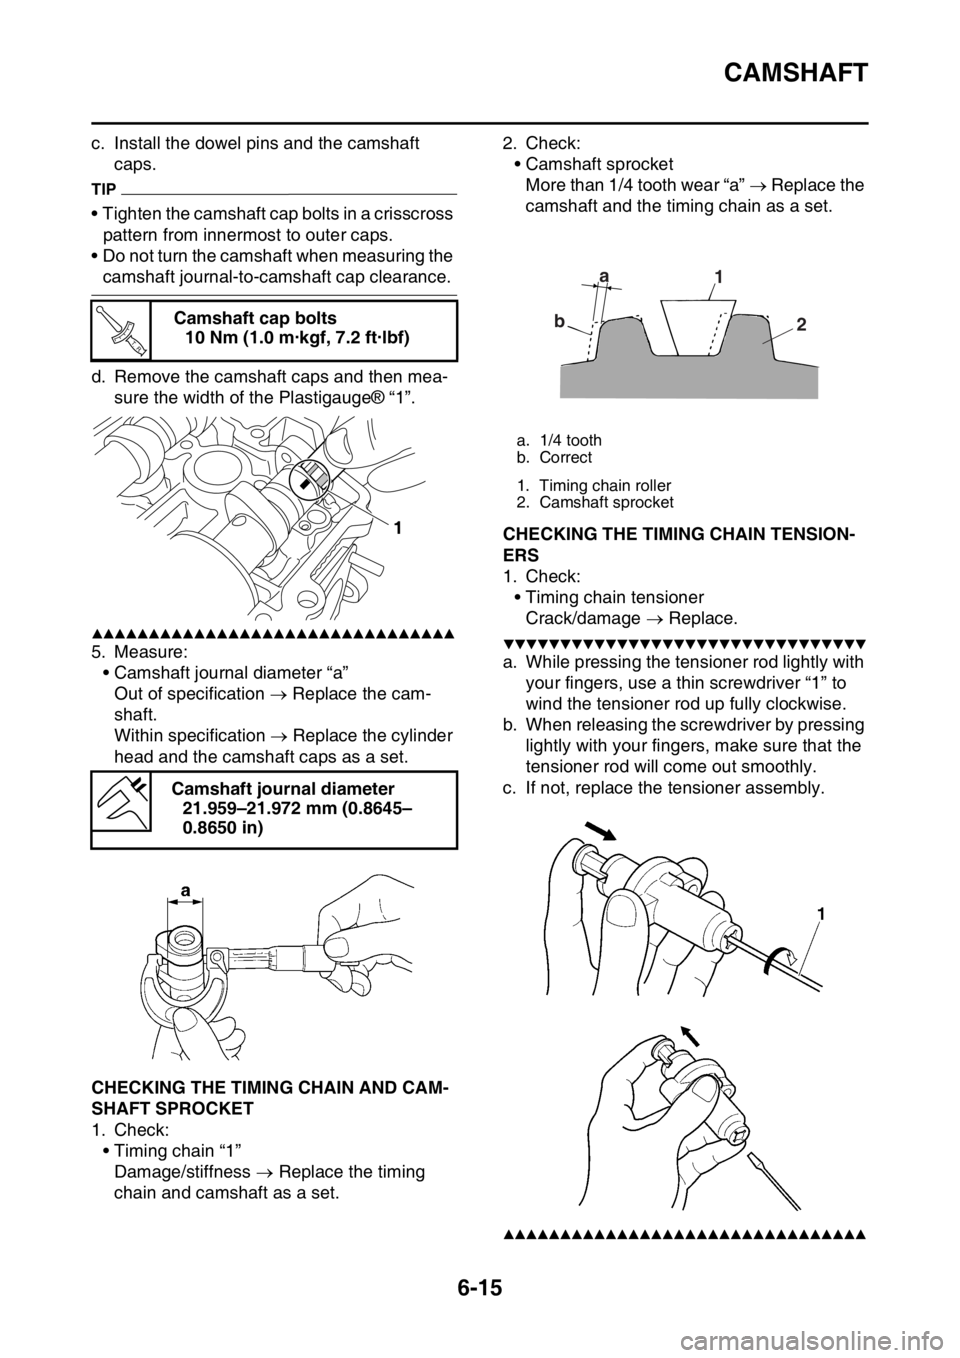
• Tighten the camshaft cap bolts in a crisscross
pattern from innermost to outer caps.
• Do not turn the camshaft when measuring the
camshaft journal-to-camshaft cap clearance.
d. Remove the camshaft caps and then mea-
sure the width of the Plastigauge® “1”.
▲▲▲▲▲▲▲▲▲▲▲▲▲▲▲▲▲▲▲▲▲▲▲▲▲▲▲▲▲▲▲▲
5. Measure:
• Camshaft journal diameter “a”
Out of specification Replace the cam-
shaft.
Within specification Replace the cylinder
head and the camshaft caps as a set.
EAS2GB7240CHECKING THE TIMING CHAIN AND CAM-
SHAFT SPROCKET
1. Check:
• Timing chain “1”
Damage/stiffness Replace the timing
chain and camshaft as a set.2. Check:
• Camshaft sprocket
More than 1/4 tooth wear “a” Replace the
camshaft and the timing chain as a set.
EAS2GB7241CHECKING THE TIMING CHAIN TENSION-
ERS
1. Check:
• Timing chain tensioner
Crack/damage Replace.
▼▼▼▼▼▼▼▼▼▼▼▼▼▼▼▼▼▼▼▼▼▼▼▼▼▼▼▼▼▼▼▼
a. While pressing the tensioner rod lightly with
your fingers, use a thin screwdriver “1” to
wind the tensioner rod up fully clockwise.
b. When releasing the screwdriver by pressing
lightly with your fingers, make sure that the
tensioner rod will come out smoothly.
c. If not, replace the tensioner assembly.
▲▲▲▲▲▲▲▲▲▲▲▲▲▲▲▲▲▲▲▲▲▲▲▲▲▲▲▲▲▲▲▲
Camshaft cap bolts
10 Nm (1.0 m·kgf, 7.2 ft·lbf)
Camshaft journal diameter
21.959–21.972 mm (0.8645–
0.8650 in)
T R..
1
a. 1/4 tooth
b. Correct
1. Timing chain roller
2. Camshaft sprocket
a
b1
2
Page 245 of 428
CAMSHAFT
6-16
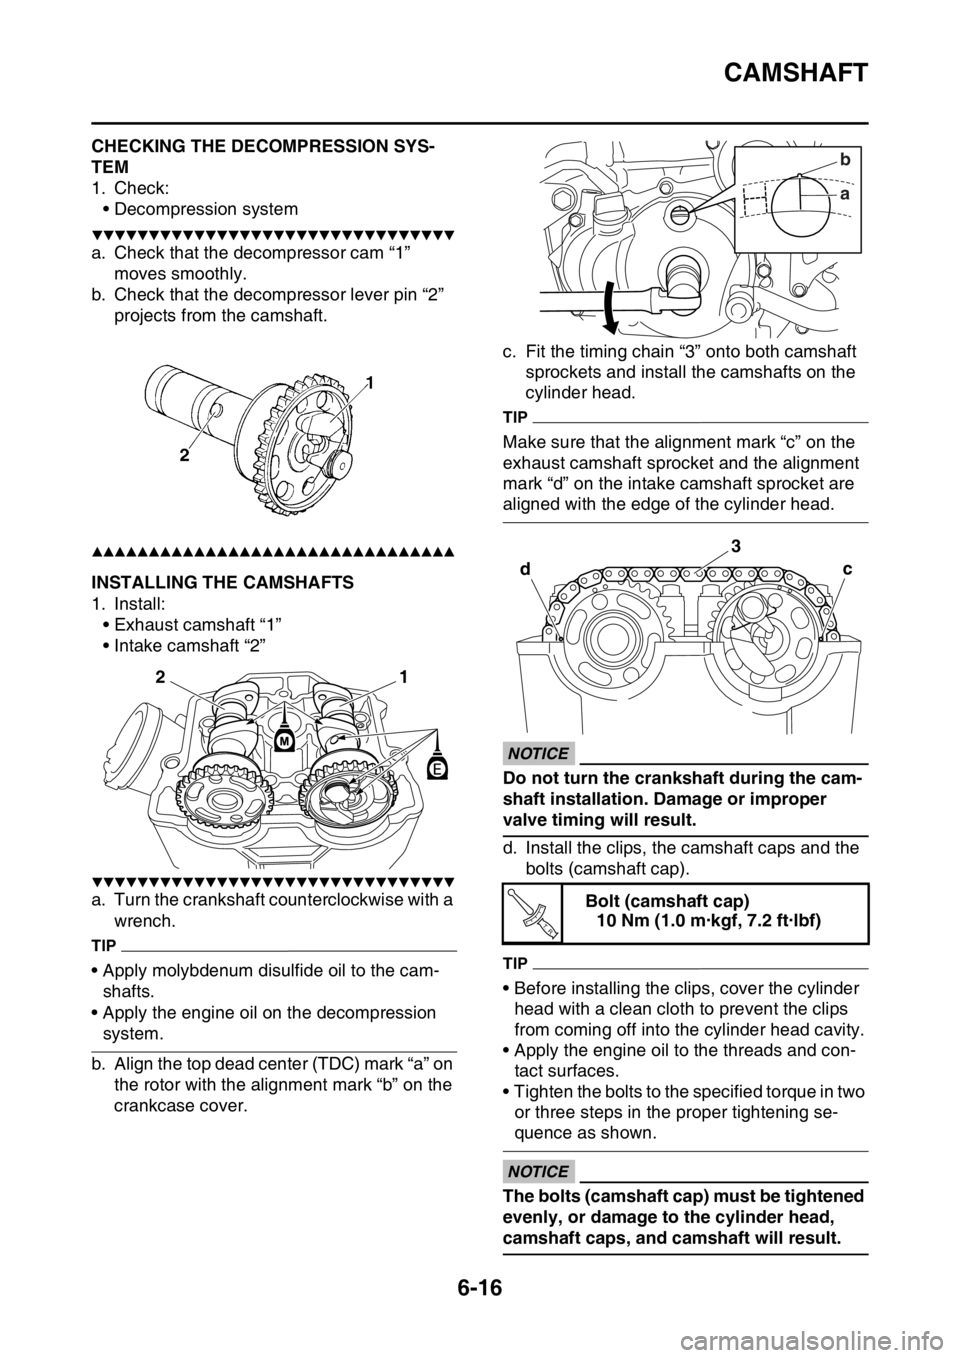
EAS2GB7242CHECKING THE DECOMPRESSION SYS-
TEM
1. Check:
• Decompression system
▼▼▼▼▼▼▼▼▼▼▼▼▼▼▼▼▼▼▼▼▼▼▼▼▼▼▼▼▼▼▼▼
a. Check that the decompressor cam “1”
moves smoothly.
b. Check that the decompressor lever pin “2”
projects from the camshaft.
▲▲▲▲▲▲▲▲▲▲▲▲▲▲▲▲▲▲▲▲▲▲▲▲▲▲▲▲▲▲▲▲
EAS2GB7243INSTALLING THE CAMSHAFTS
1. Install:
• Exhaust camshaft “1”
• Intake camshaft “2”
▼▼▼▼▼▼▼▼▼▼▼▼▼▼▼▼▼▼▼▼▼▼▼▼▼▼▼▼▼▼▼▼
a. Turn the crankshaft counterclockwise with a
wrench.
TIP
• Apply molybdenum disulfide oil to the cam-
shafts.
• Apply the engine oil on the decompression
system.
b. Align the top dead center (TDC) mark “a” on
the rotor with the alignment mark “b” on the
crankcase cover.c. Fit the timing chain “3” onto both camshaft
sprockets and install the camshafts on the
cylinder head.
TIP
Make sure that the alignment mark “c” on the
exhaust camshaft sprocket and the alignment
mark “d” on the intake camshaft sprocket are
aligned with the edge of the cylinder head.
ECA
NOTICE
Do not turn the crankshaft during the cam-
shaft installation. Damage or improper
valve timing will result.
d. Install the clips, the camshaft caps and the
bolts (camshaft cap).
TIP
• Before installing the clips, cover the cylinder
head with a clean cloth to prevent the clips
from coming off into the cylinder head cavity.
• Apply the engine oil to the threads and con-
tact surfaces.
• Tighten the bolts to the specified torque in two
or three steps in the proper tightening se-
quence as shown.
ECA
NOTICE
The bolts (camshaft cap) must be tightened
evenly, or damage to the cylinder head,
camshaft caps, and camshaft will result.
1
2
Bolt (camshaft cap)
10 Nm (1.0 m·kgf, 7.2 ft·lbf)
ab
dc
3
T R..
Page 246 of 428
CAMSHAFT
6-17
▲▲▲▲▲▲▲▲▲▲▲▲▲▲▲▲▲▲▲▲▲▲▲▲▲▲▲▲▲▲▲▲
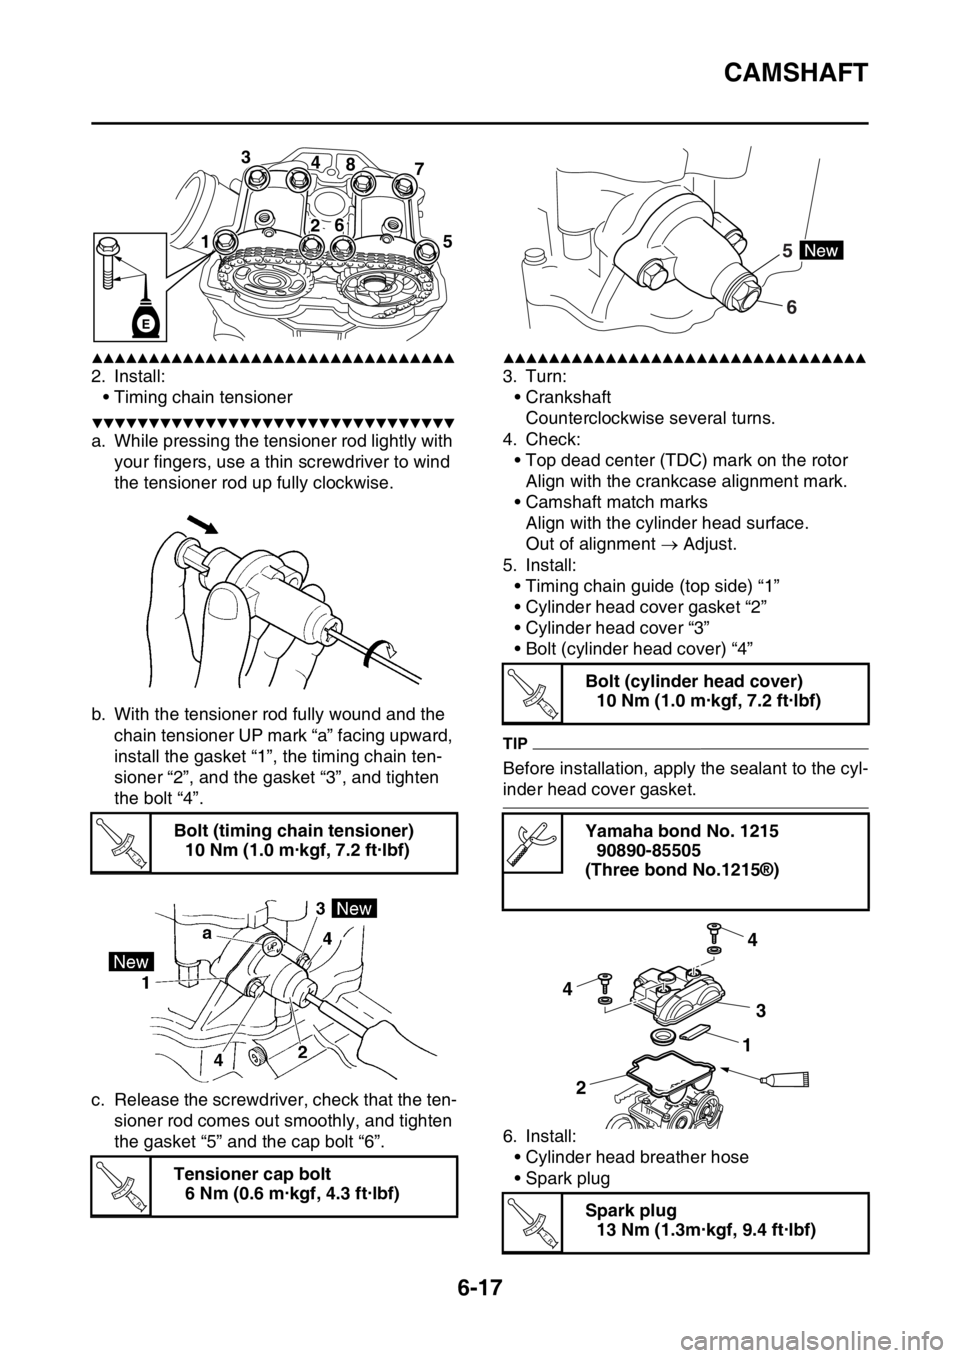
2. Install:
• Timing chain tensioner
▼▼▼▼▼▼▼▼▼▼▼▼▼▼▼▼▼▼▼▼▼▼▼▼▼▼▼▼▼▼▼▼
a. While pressing the tensioner rod lightly with
your fingers, use a thin screwdriver to wind
the tensioner rod up fully clockwise.
b. With the tensioner rod fully wound and the
chain tensioner UP mark “a” facing upward,
install the gasket “1”, the timing chain ten-
sioner “2”, and the gasket “3”, and tighten
the bolt “4”.
c. Release the screwdriver, check that the ten-
sioner rod comes out smoothly, and tighten
the gasket “5” and the cap bolt “6”.
▲▲▲▲▲▲▲▲▲▲▲▲▲▲▲▲▲▲▲▲▲▲▲▲▲▲▲▲▲▲▲▲
3. Turn:
• Crankshaft
Counterclockwise several turns.
4. Check:
• Top dead center (TDC) mark on the rotor
Align with the crankcase alignment mark.
• Camshaft match marks
Align with the cylinder head surface.
Out of alignment Adjust.
5. Install:
• Timing chain guide (top side) “1”
• Cylinder head cover gasket “2”
• Cylinder head cover “3”
• Bolt (cylinder head cover) “4”
TIP
Before installation, apply the sealant to the cyl-
inder head cover gasket.
6. Install:
• Cylinder head breather hose
• Spark plug Bolt (timing chain tensioner)
10 Nm (1.0 m·kgf, 7.2 ft·lbf)
Tensioner cap bolt
6 Nm (0.6 m·kgf, 4.3 ft·lbf)
3
4
8
7
15
26
E
T R..
T R..
Bolt (cylinder head cover)
10 Nm (1.0 m·kgf, 7.2 ft·lbf)
Yamaha bond No. 1215
90890-85505
(Three bond No.1215®)
Spark plug
13 Nm (1.3m·kgf, 9.4 ft·lbf)
6 5
T R..
4
4
3
21
T R..
Page 247 of 428
CYLINDER HEAD
6-18
EAS2GB7244
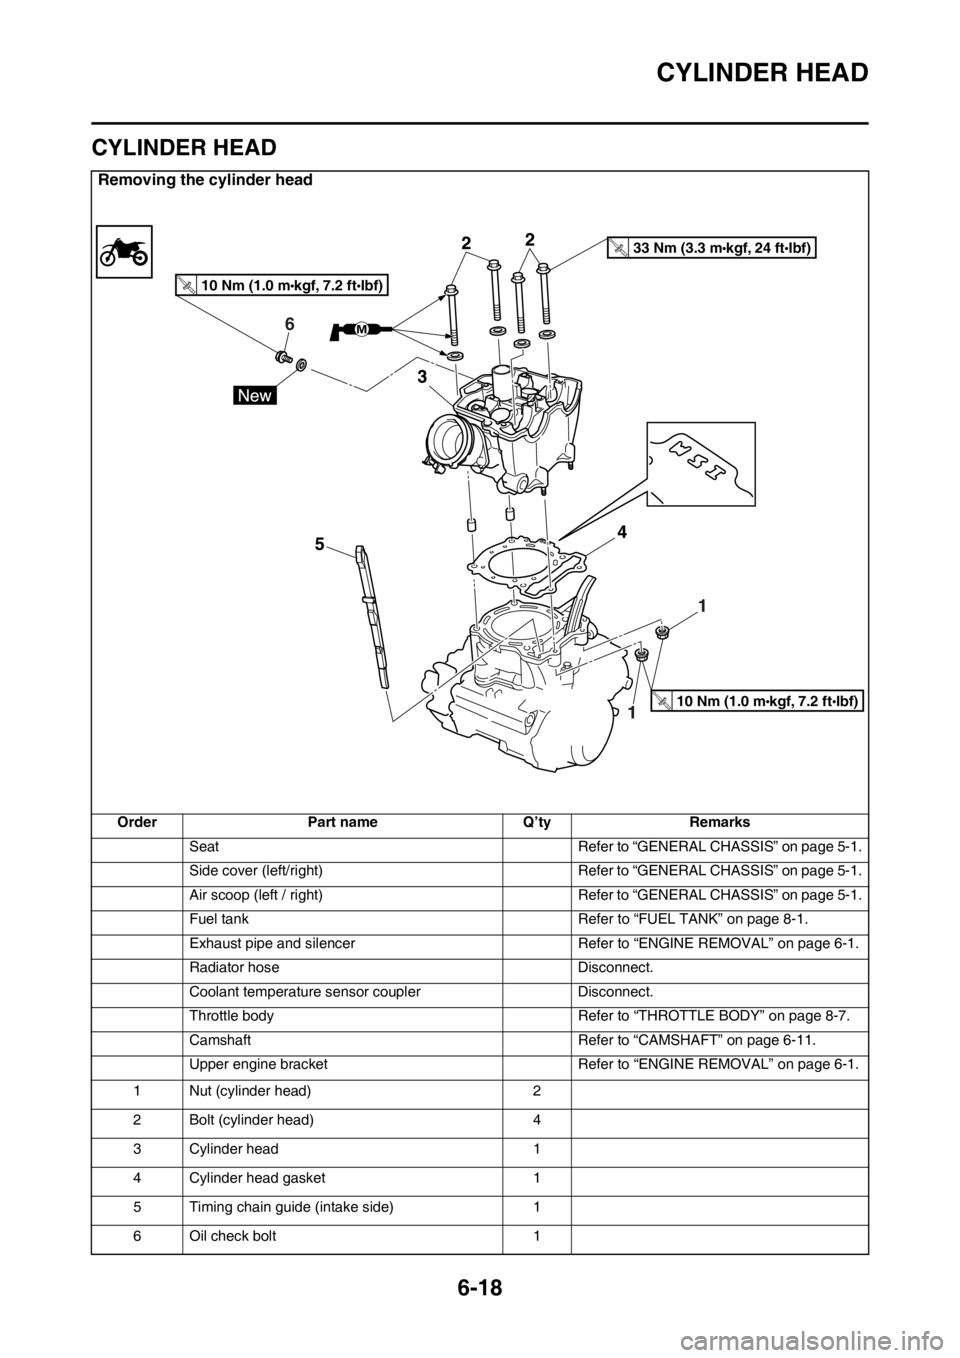
CYLINDER HEAD
Removing the cylinder head
Order Part name Q’ty Remarks
Seat Refer to “GENERAL CHASSIS” on page 5-1.
Side cover (left/right) Refer to “GENERAL CHASSIS” on page 5-1.
Air scoop (left / right) Refer to “GENERAL CHASSIS” on page 5-1.
Fuel tank Refer to “FUEL TANK” on page 8-1.
Exhaust pipe and silencer Refer to “ENGINE REMOVAL” on page 6-1.
Radiator hose Disconnect.
Coolant temperature sensor coupler Disconnect.
Throttle body Refer to “THROTTLE BODY” on page 8-7.
Camshaft Refer to “CAMSHAFT” on page 6-11.
Upper engine bracket Refer to “ENGINE REMOVAL” on page 6-1.
1 Nut (cylinder head) 2
2 Bolt (cylinder head) 4
3 Cylinder head 1
4 Cylinder head gasket 1
5 Timing chain guide (intake side) 1
6 Oil check bolt 1
6
10 Nm (1.0 m kgf, 7.2 ft Ibf)T.R.
33 Nm (3.3 m kgf, 24 ft Ibf)T.R.
10 Nm (1.0 m kgf, 7.2 ft Ibf)T.R.
Page 248 of 428
CYLINDER HEAD
6-19
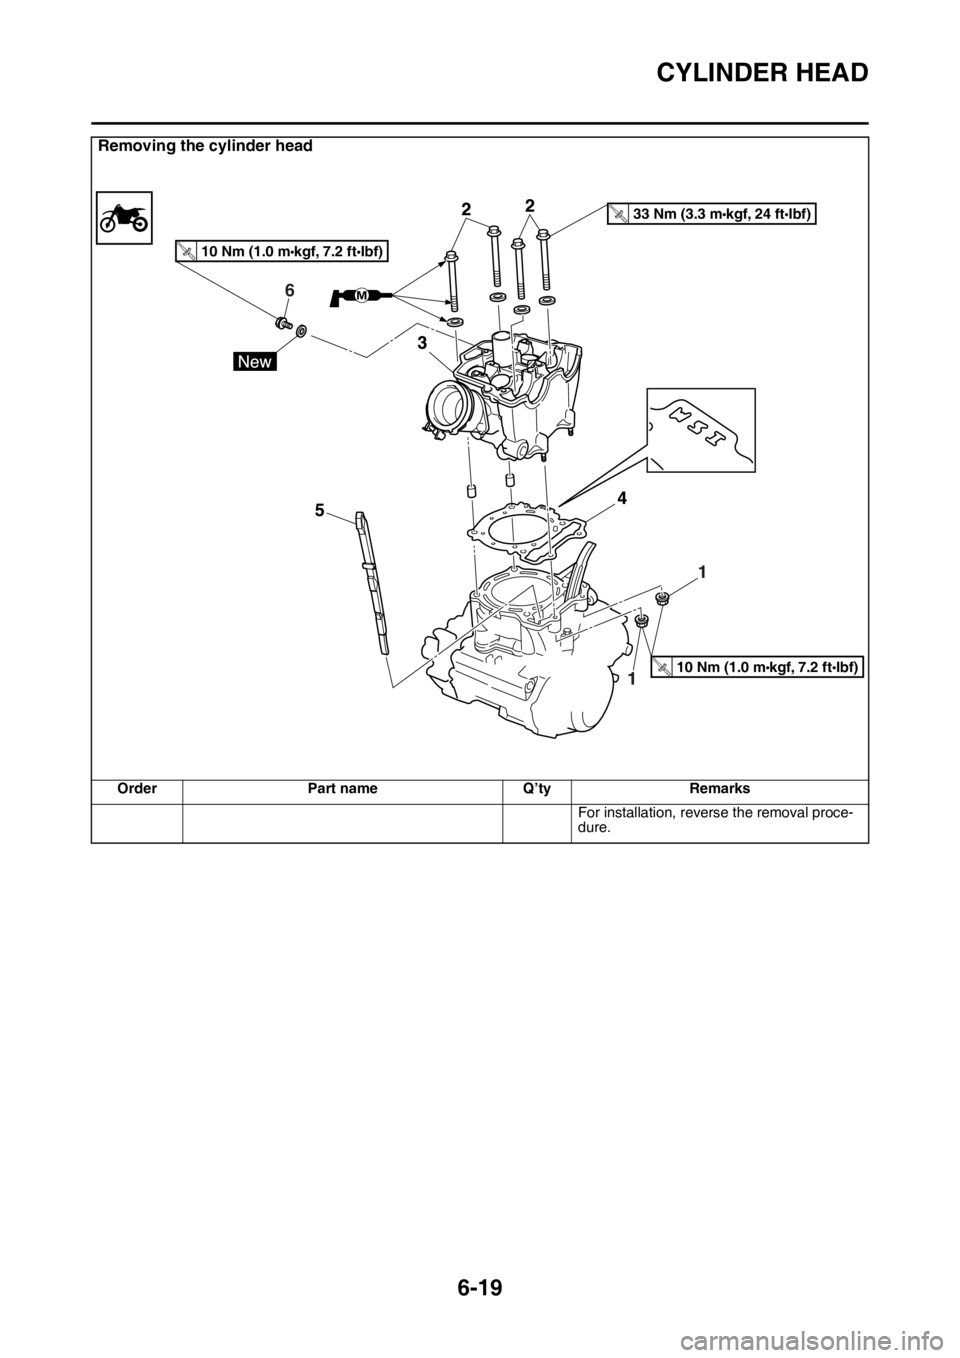
For installation, reverse the removal proce-
dure.
Removing the cylinder head
Order Part name Q’ty Remarks
6
10 Nm (1.0 m kgf, 7.2 ft Ibf)T.R.
33 Nm (3.3 m kgf, 24 ft Ibf)T.R.
10 Nm (1.0 m kgf, 7.2 ft Ibf)T.R.
Page 249 of 428
CYLINDER HEAD
6-20
EAS2GB7245REMOVING THE CYLINDER HEAD
1. Remove:
• Intake camshaft
• Exhaust camshaft
Refer to “REMOVING THE CAMSHAFT” on
page 6-13.
2. Remove:
• Cylinder head nuts
• Cylinder head bolts
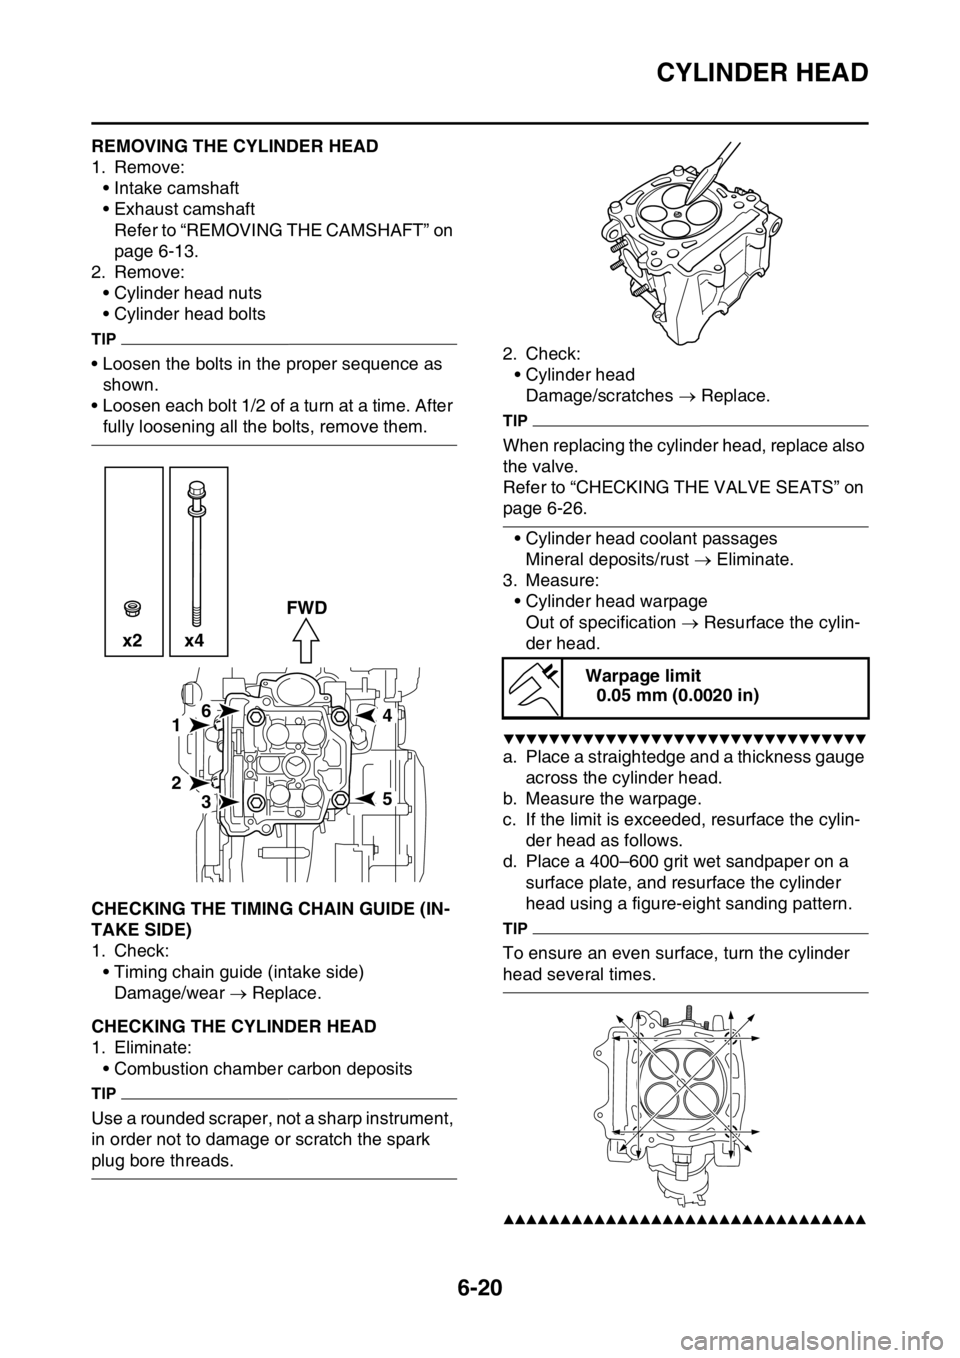
TIP
• Loosen the bolts in the proper sequence as
shown.
• Loosen each bolt 1/2 of a turn at a time. After
fully loosening all the bolts, remove them.
EAS2GB7246CHECKING THE TIMING CHAIN GUIDE (IN-
TAKE SIDE)
1. Check:
• Timing chain guide (intake side)
Damage/wear Replace.
EAS2GB7247CHECKING THE CYLINDER HEAD
1. Eliminate:
• Combustion chamber carbon deposits
TIP
Use a rounded scraper, not a sharp instrument,
in order not to damage or scratch the spark
plug bore threads.2. Check:
• Cylinder head
Damage/scratches Replace.
TIP
When replacing the cylinder head, replace also
the valve.
Refer to “CHECKING THE VALVE SEATS” on
page 6-26.
• Cylinder head coolant passages
Mineral deposits/rust Eliminate.
3. Measure:
• Cylinder head warpage
Out of specification Resurface the cylin-
der head.
▼▼▼▼▼▼▼▼▼▼▼▼▼▼▼▼▼▼▼▼▼▼▼▼▼▼▼▼▼▼▼▼
a. Place a straightedge and a thickness gauge
across the cylinder head.
b. Measure the warpage.
c. If the limit is exceeded, resurface the cylin-
der head as follows.
d. Place a 400–600 grit wet sandpaper on a
surface plate, and resurface the cylinder
head using a figure-eight sanding pattern.
TIP
To ensure an even surface, turn the cylinder
head several times.
▲▲▲▲▲▲▲▲▲▲▲▲▲▲▲▲▲▲▲▲▲▲▲▲▲▲▲▲▲▲▲▲
61
2
35
4 x2 x4FWD
Warpage limit
0.05 mm (0.0020 in)
Page 250 of 428
CYLINDER HEAD
6-21
EAS2GB7248INSTALLING THE CYLINDER HEAD
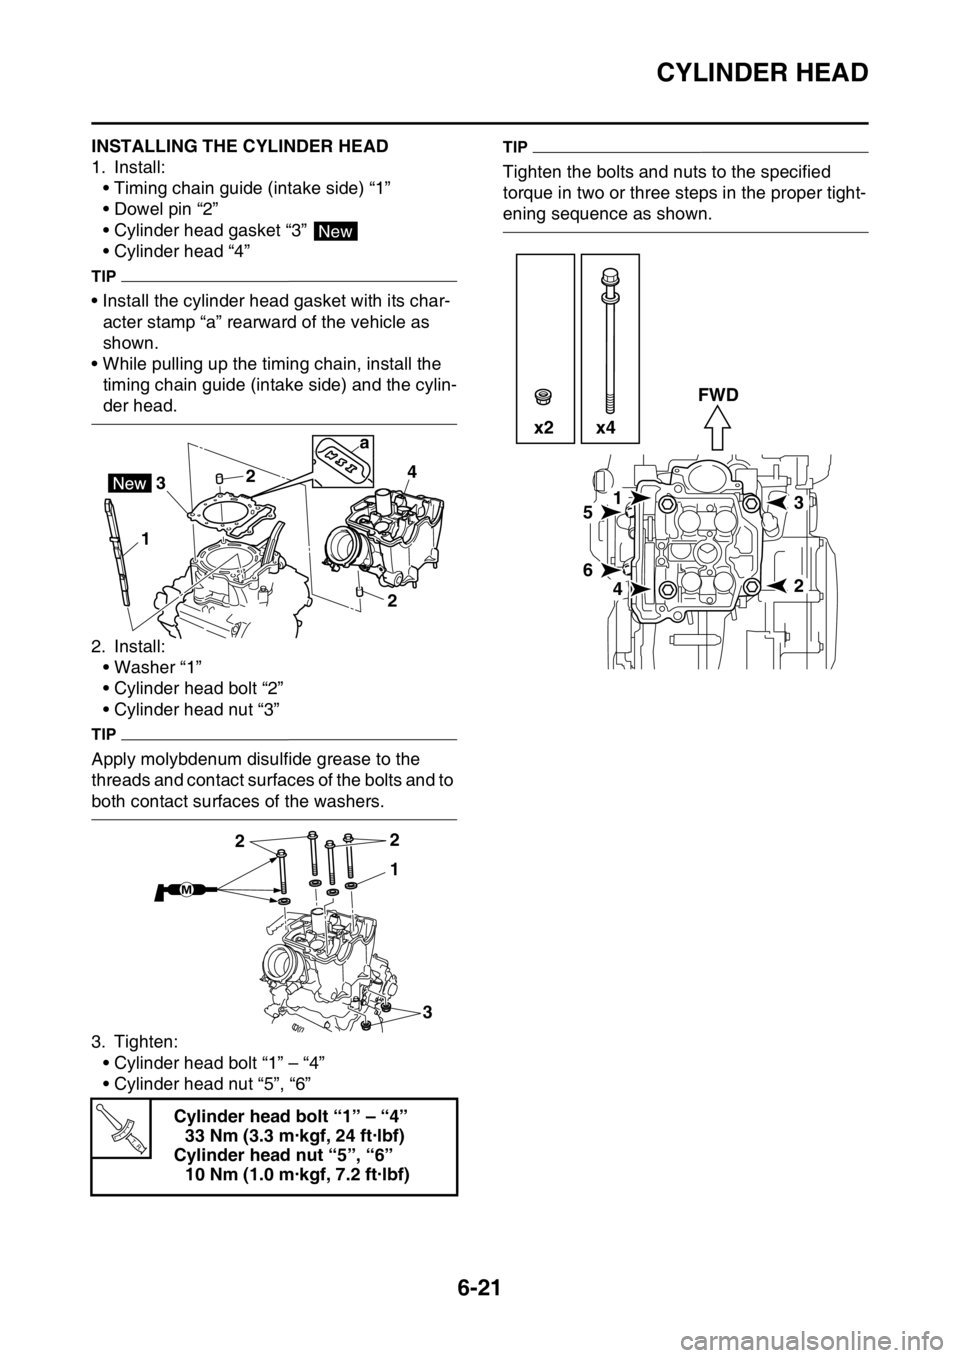
1. Install:
• Timing chain guide (intake side) “1”
• Dowel pin “2”
• Cylinder head gasket “3”
• Cylinder head “4”
TIP
• Install the cylinder head gasket with its char-
acter stamp “a” rearward of the vehicle as
shown.
• While pulling up the timing chain, install the
timing chain guide (intake side) and the cylin-
der head.
2. Install:
• Washer “1”
• Cylinder head bolt “2”
• Cylinder head nut “3”
TIP
Apply molybdenum disulfide grease to the
threads and contact surfaces of the bolts and to
both contact surfaces of the washers.
3. Tighten:
• Cylinder head bolt “1” – “4”
• Cylinder head nut “5”, “6”
TIP
Tighten the bolts and nuts to the specified
torque in two or three steps in the proper tight-
ening sequence as shown.
Cylinder head bolt “1” – “4”
33 Nm (3.3 m·kgf, 24 ft·lbf)
Cylinder head nut “5”, “6”
10 Nm (1.0 m·kgf, 7.2 ft·lbf)
New
12
24
3
a
1
3 22
T R..
15
6
42
3 FWD
x2 x4