YAMAHA WR 250F 2017 Owners Manual
Manufacturer: YAMAHA, Model Year: 2017, Model line: WR 250F, Model: YAMAHA WR 250F 2017Pages: 432, PDF Size: 14.14 MB
Page 291 of 432
OIL PUMP AND BALANCER GEAR
6-62
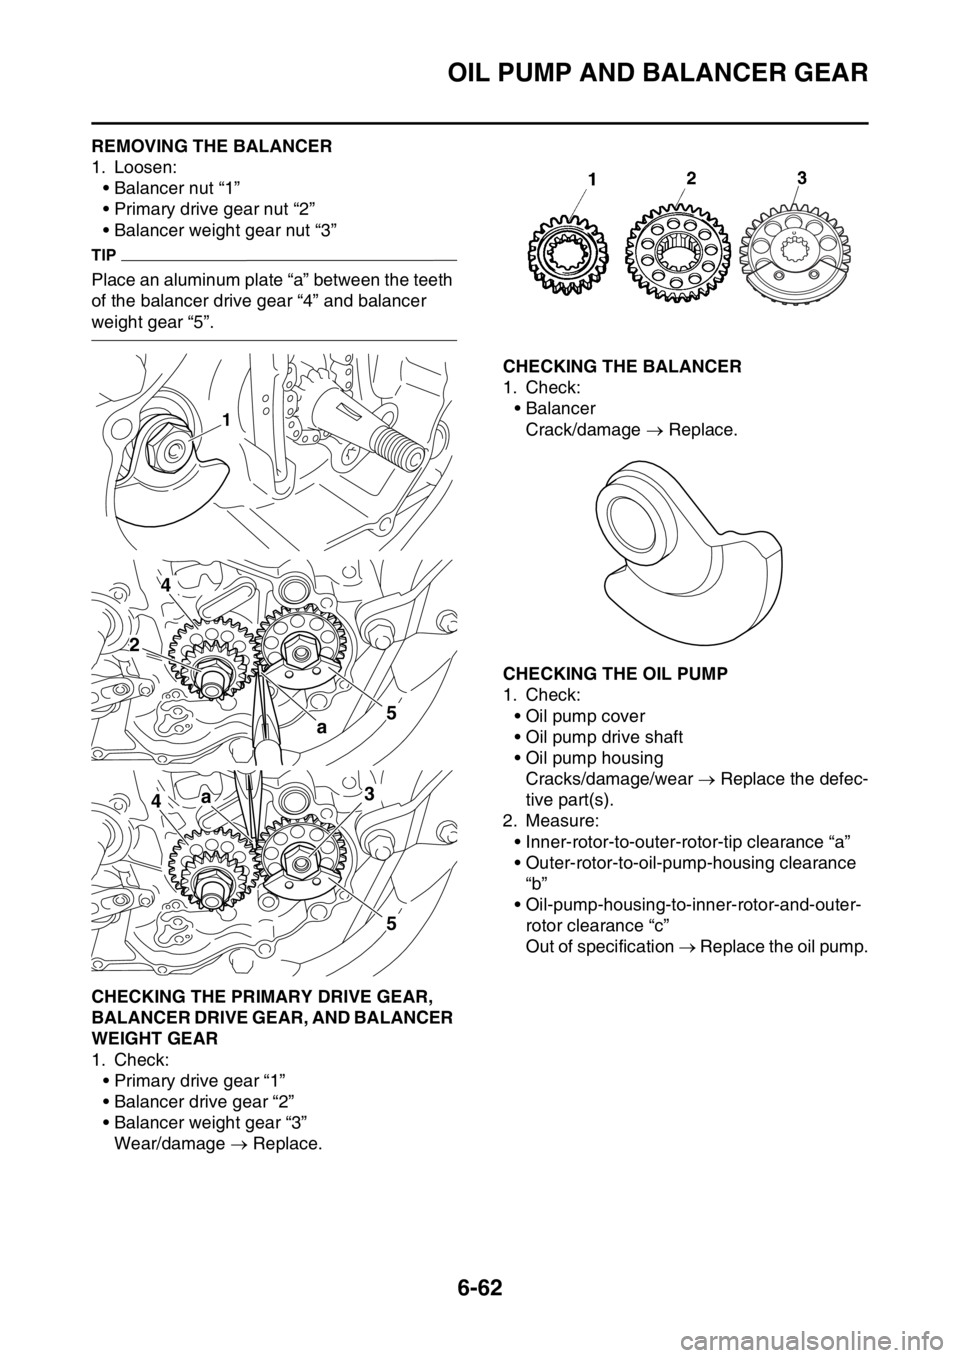
EAS2GBB299REMOVING THE BALANCER
1. Loosen:
• Balancer nut “1”
• Primary drive gear nut “2”
• Balancer weight gear nut “3”
TIP
Place an aluminum plate “a” between the teeth
of the balancer drive gear “4” and balancer
weight gear “5”.
EAS2GBB300CHECKING THE PRIMARY DRIVE GEAR,
BALANCER DRIVE GEAR, AND BALANCER
WEIGHT GEAR
1. Check:
• Primary drive gear “1”
• Balancer drive gear “2”
• Balancer weight gear “3”
Wear/damage Replace.
EAS2GBB301CHECKING THE BALANCER
1. Check:
•Balancer
Crack/damage Replace.
EAS2GBB302CHECKING THE OIL PUMP
1. Check:
• Oil pump cover
• Oil pump drive shaft
• Oil pump housing
Cracks/damage/wear Replace the defec-
tive part(s).
2. Measure:
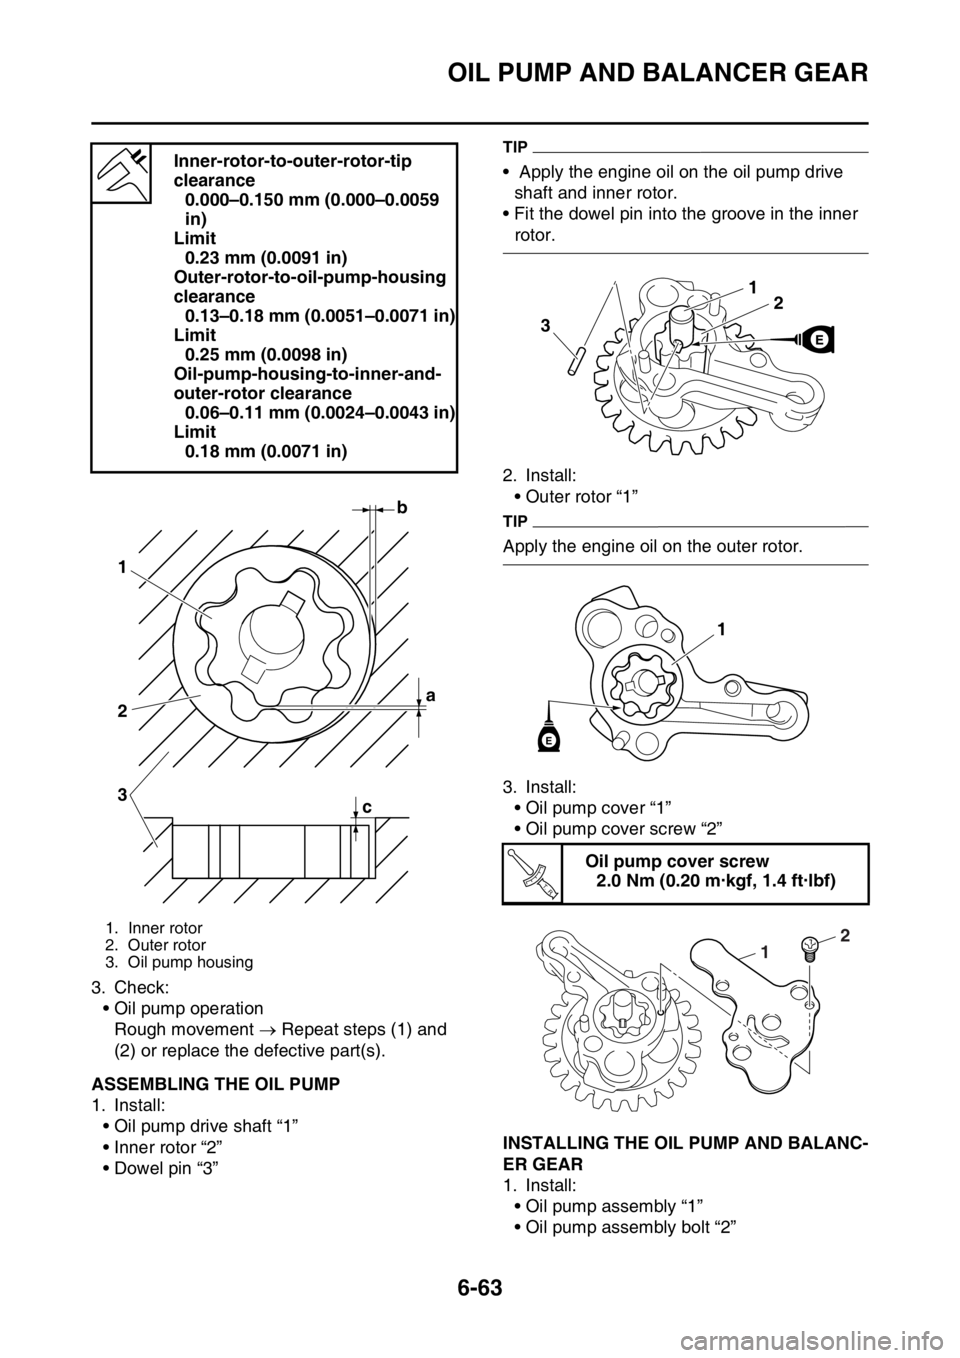
• Inner-rotor-to-outer-rotor-tip clearance “a”
• Outer-rotor-to-oil-pump-housing clearance
“b”
• Oil-pump-housing-to-inner-rotor-and-outer-
rotor clearance “c”
Out of specification Replace the oil pump.
1
4
a5
2
4a
5
3
Page 292 of 432
OIL PUMP AND BALANCER GEAR
6-63
3. Check:
• Oil pump operation
Rough movement Repeat steps (1) and
(2) or replace the defective part(s).
EAS2GBB303ASSEMBLING THE OIL PUMP
1. Install:
• Oil pump drive shaft “1”
• Inner rotor “2”
• Dowel pin “3”
TIP
• Apply the engine oil on the oil pump drive
shaft and inner rotor.
• Fit the dowel pin into the groove in the inner
rotor.
2. Install:
• Outer rotor “1”
TIP
Apply the engine oil on the outer rotor.
3. Install:
• Oil pump cover “1”
• Oil pump cover screw “2”
EAS2GBB304INSTALLING THE OIL PUMP AND BALANC-
ER GEAR
1. Install:
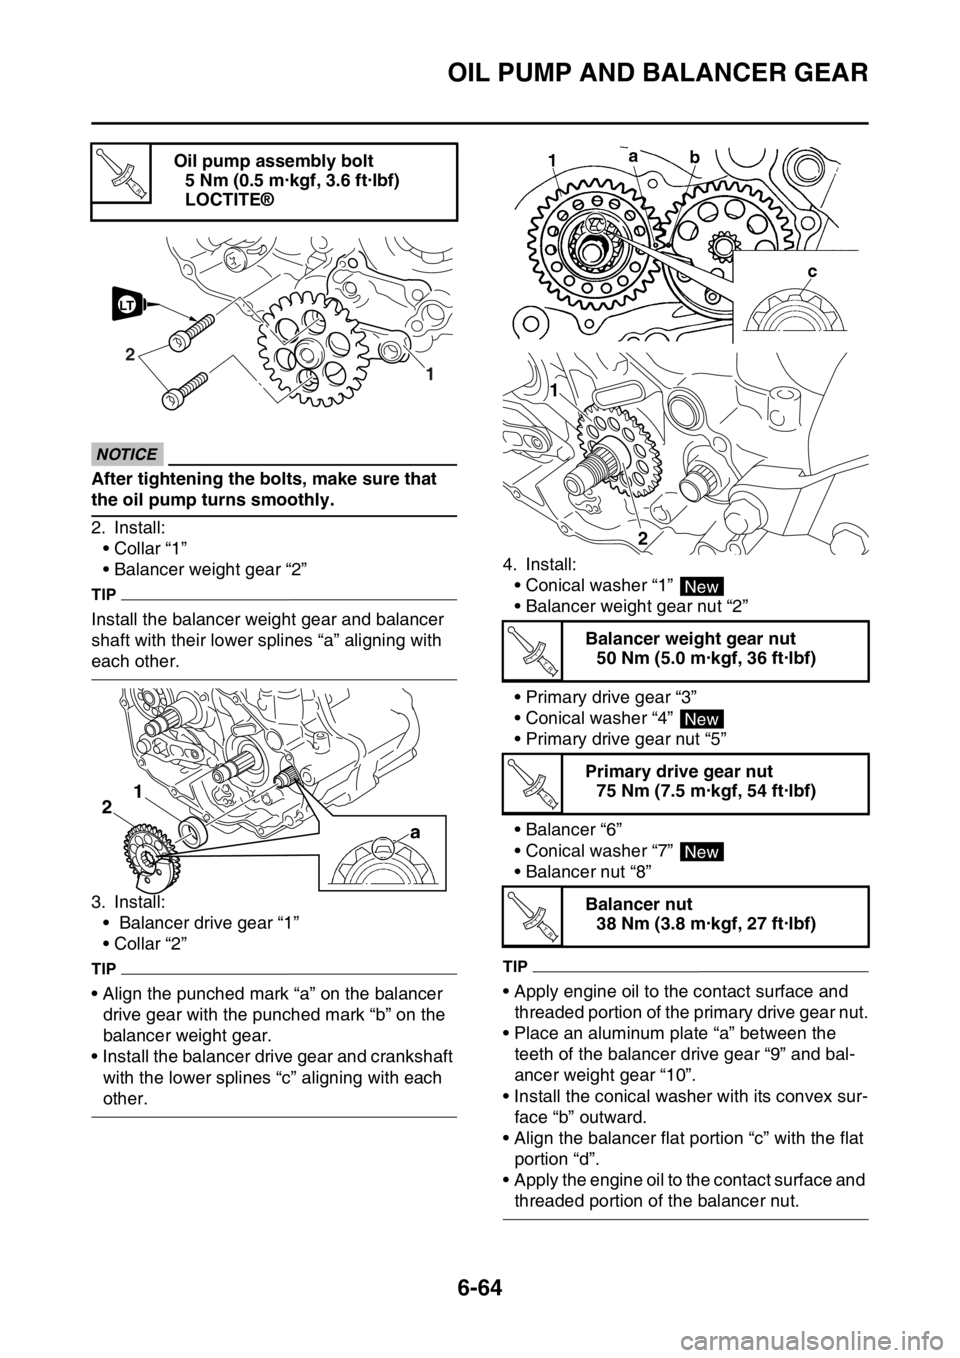
• Oil pump assembly “1”
• Oil pump assembly bolt “2” Inner-rotor-to-outer-rotor-tip
clearance
0.000–0.150 mm (0.000–0.0059
in)
Limit
0.23 mm (0.0091 in)
Outer-rotor-to-oil-pump-housing
clearance
0.13–0.18 mm (0.0051–0.0071 in)
Limit
0.25 mm (0.0098 in)
Oil-pump-housing-to-inner-and-
outer-rotor clearance
0.06–0.11 mm (0.0024–0.0043 in)
Limit
0.18 mm (0.0071 in)
1. Inner rotor
2. Outer rotor
3. Oil pump housing
b
a 1
2
3
c
Oil pump cover screw
2.0 Nm (0.20 m·kgf, 1.4 ft·lbf)
21
3
1
E
T R..
2
1
Page 293 of 432
OIL PUMP AND BALANCER GEAR
6-64
ECA
NOTICE
After tightening the bolts, make sure that
the oil pump turns smoothly.
2. Install:
• Collar “1”
• Balancer weight gear “2”
TIP
Install the balancer weight gear and balancer
shaft with their lower splines “a” aligning with
each other.
3. Install:
• Balancer drive gear “1”
• Collar “2”
TIP
• Align the punched mark “a” on the balancer
drive gear with the punched mark “b” on the
balancer weight gear.
• Install the balancer drive gear and crankshaft
with the lower splines “c” aligning with each
other.4. Install:
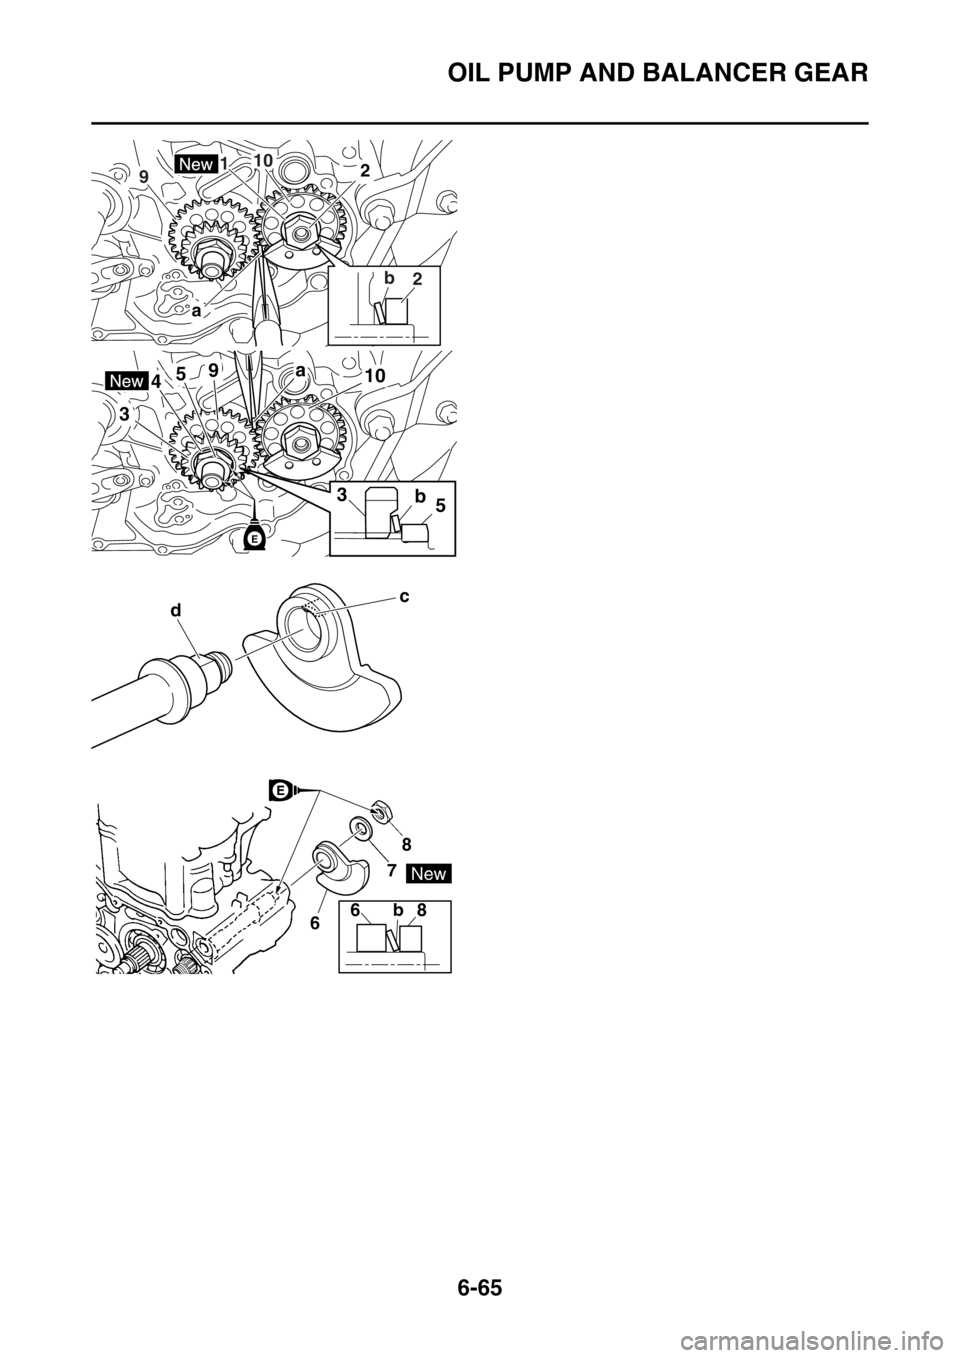
• Conical washer “1”
• Balancer weight gear nut “2”
• Primary drive gear “3”
• Conical washer “4”
• Primary drive gear nut “5”
•Balancer “6”
• Conical washer “7”
• Balancer nut “8”
TIP
• Apply engine oil to the contact surface and
threaded portion of the primary drive gear nut.
• Place an aluminum plate “a” between the
teeth of the balancer drive gear “9” and bal-
ancer weight gear “10”.
• Install the conical washer with its convex sur-
face “b” outward.
• Align the balancer flat portion “c” with the flat
portion “d”.
• Apply the engine oil to the contact surface and
threaded portion of the balancer nut. Oil pump assembly bolt
5 Nm (0.5 m·kgf, 3.6 ft·lbf)
LOCTITE®
T R..
1
2
LT
21
Balancer weight gear nut
50 Nm (5.0 m·kgf, 36 ft·lbf)
Primary drive gear nut
75 Nm (7.5 m·kgf, 54 ft·lbf)
Balancer nut
38 Nm (3.8 m·kgf, 27 ft·lbf)
1
2
New
T R..
New
T R..
New
T R..
Page 294 of 432
OIL PUMP AND BALANCER GEAR
6-65
a
210
b
2 91
b53
a41059
3
E
c
d
678
8 b6
Page 295 of 432
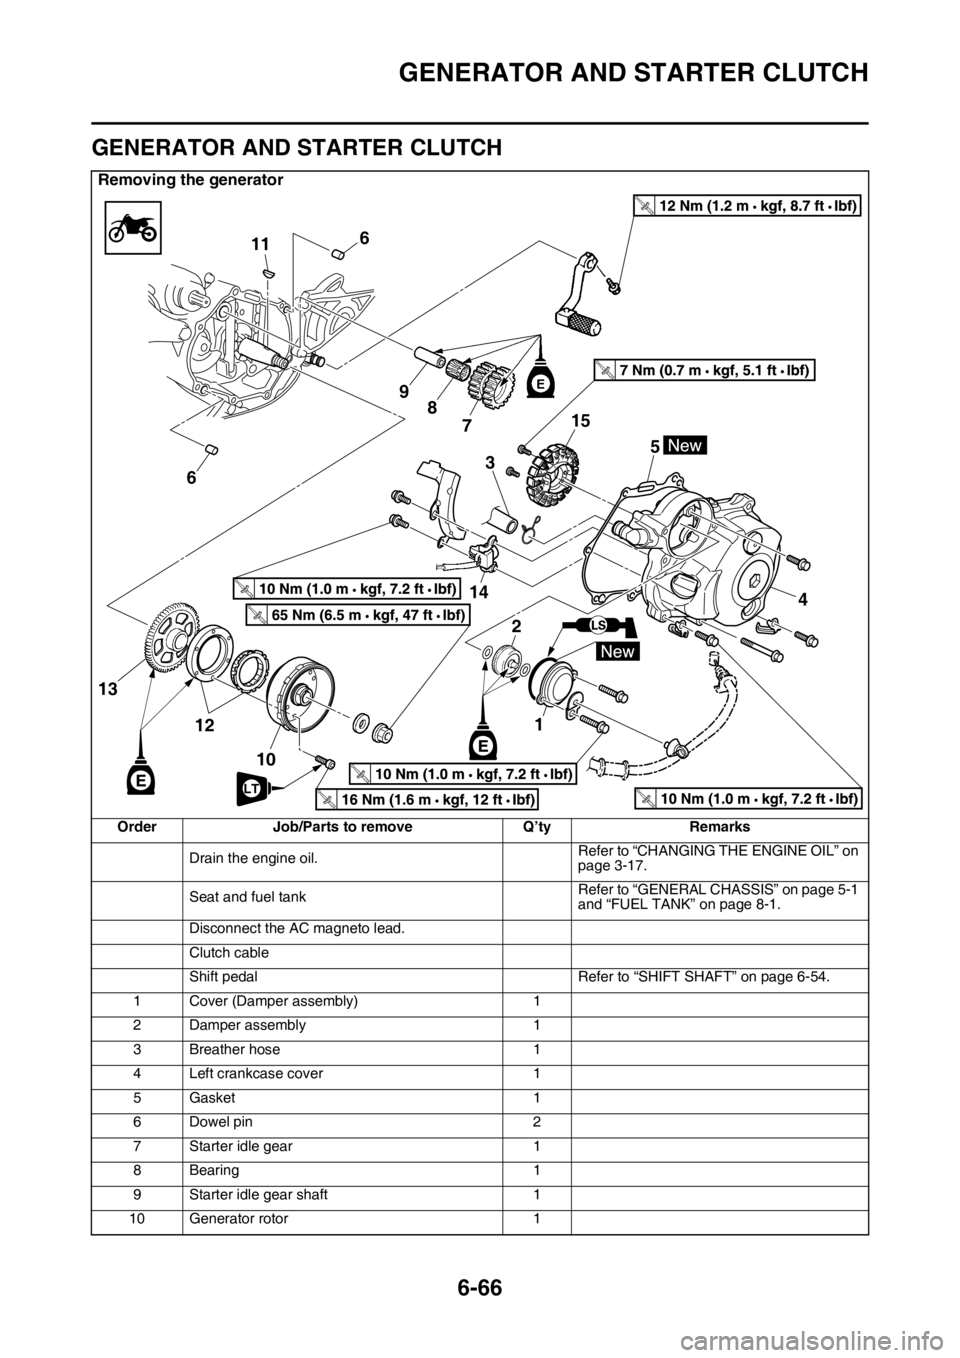
GENERATOR AND STARTER CLUTCH
6-66
EAS2GBB305
GENERATOR AND STARTER CLUTCH
Removing the generator
Order Job/Parts to remove Q’ty Remarks
Drain the engine oil.Refer to “CHANGING THE ENGINE OIL” on
page 3-17.
Seat and fuel tankRefer to “GENERAL CHASSIS” on page 5-1
and “FUEL TANK” on page 8-1.
Disconnect the AC magneto lead.
Clutch cable
Shift pedal Refer to “SHIFT SHAFT” on page 6-54.
1 Cover (Damper assembly) 1
2 Damper assembly 1
3 Breather hose 1
4 Left crankcase cover 1
5Gasket 1
6 Dowel pin 2
7 Starter idle gear 1
8 Bearing 1
9 Starter idle gear shaft 1
10 Generator rotor 1
T R..
T R..
6
611
9
8
7
2
3
1
14
4 5
12
10
13
T R..
T R..
T R..LTT R..
T R..
15
Page 296 of 432
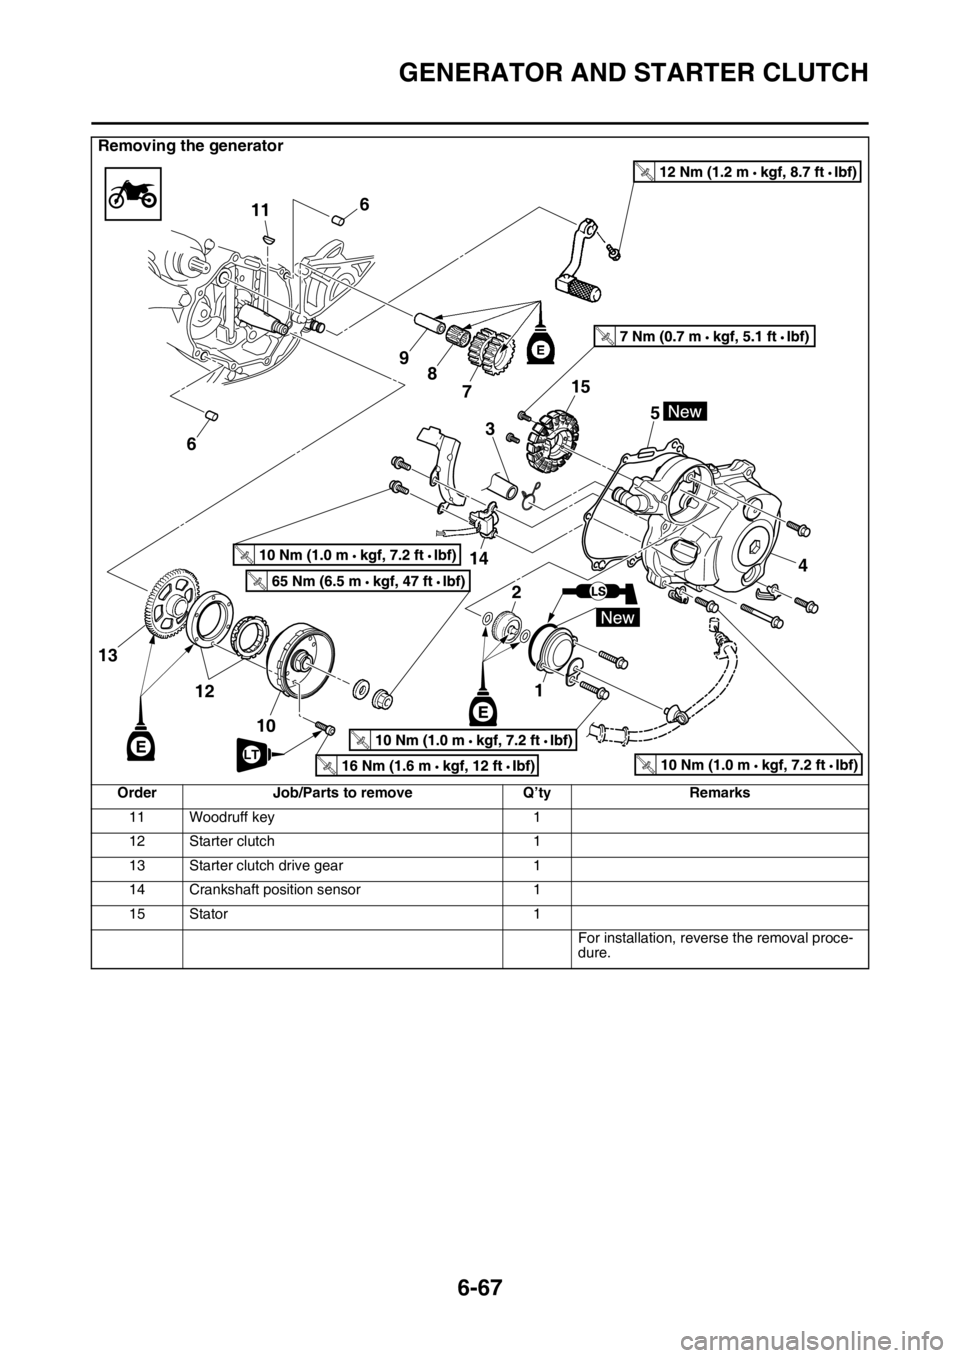
GENERATOR AND STARTER CLUTCH
6-67
11 Woodruff key 1
12 Starter clutch 1
13 Starter clutch drive gear 1
14 Crankshaft position sensor 1
15 Stator 1
For installation, reverse the removal proce-
dure.
Removing the generator
Order Job/Parts to remove Q’ty Remarks
T R..
T R..
6
611
9
8
7
2
3
1
14
4 5
12
10
13
T R..
T R..
T R..LTT R..
T R..
15
Page 297 of 432
GENERATOR AND STARTER CLUTCH
6-68
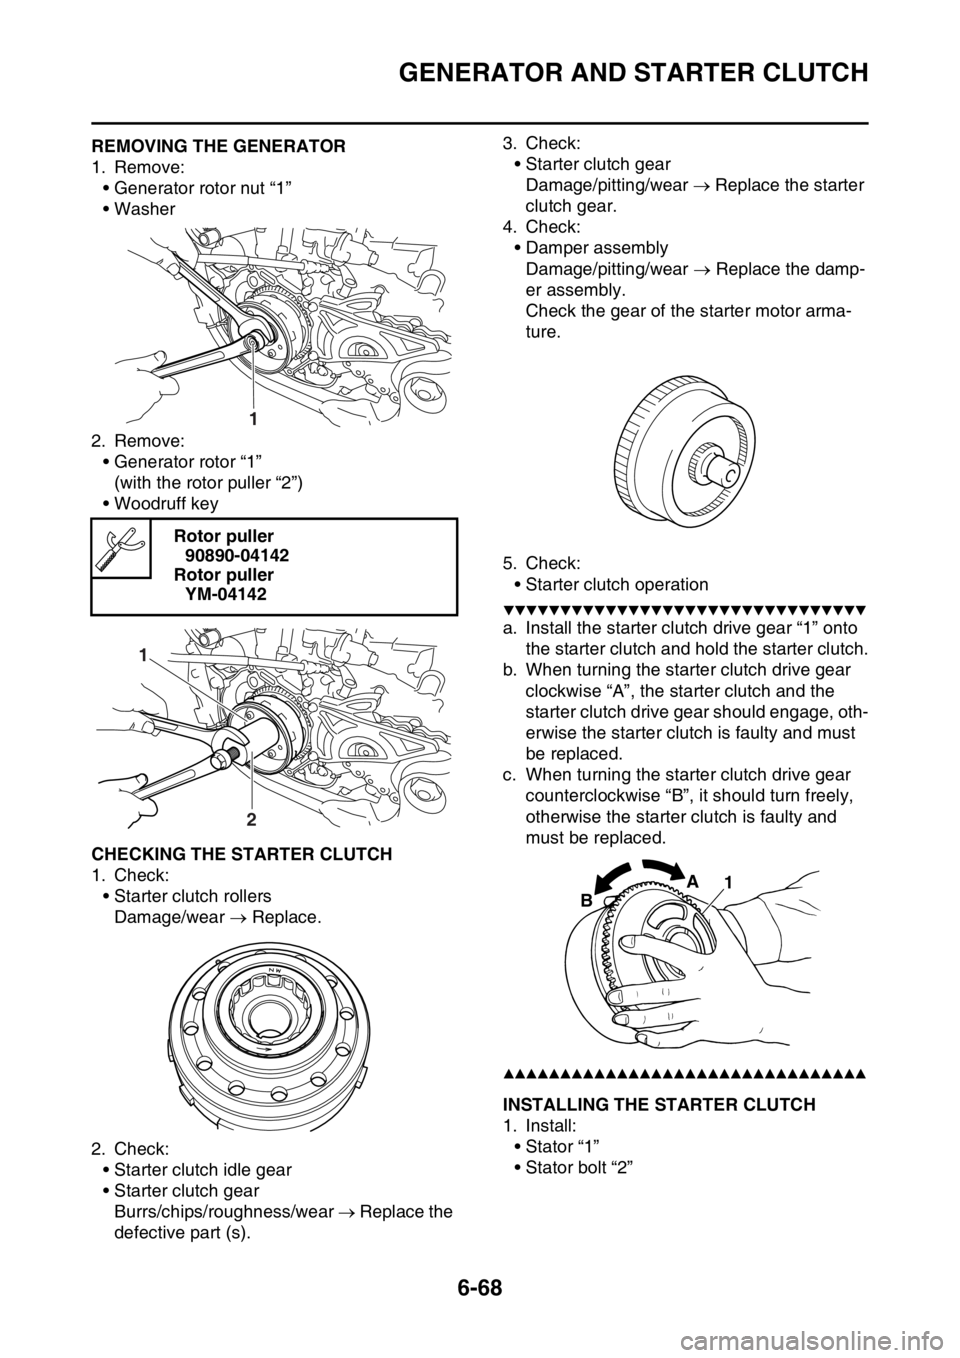
EAS2GBB306REMOVING THE GENERATOR
1. Remove:
• Generator rotor nut “1”
• Washer
2. Remove:
• Generator rotor “1”
(with the rotor puller “2”)
• Woodruff key
EAS2GBB307CHECKING THE STARTER CLUTCH
1. Check:
• Starter clutch rollers
Damage/wear Replace.
2. Check:
• Starter clutch idle gear
• Starter clutch gear
Burrs/chips/roughness/wear Replace the
defective part (s).3. Check:
• Starter clutch gear
Damage/pitting/wear Replace the starter
clutch gear.
4. Check:
• Damper assembly
Damage/pitting/wear Replace the damp-
er assembly.
Check the gear of the starter motor arma-
ture.
5. Check:
• Starter clutch operation
▼▼▼▼▼▼▼▼▼▼▼▼▼▼▼▼▼▼▼▼▼▼▼▼▼▼▼▼▼▼▼▼
a. Install the starter clutch drive gear “1” onto
the starter clutch and hold the starter clutch.
b. When turning the starter clutch drive gear
clockwise “A”, the starter clutch and the
starter clutch drive gear should engage, oth-
erwise the starter clutch is faulty and must
be replaced.
c. When turning the starter clutch drive gear
counterclockwise “B”, it should turn freely,
otherwise the starter clutch is faulty and
must be replaced.
▲▲▲▲▲▲▲▲▲▲▲▲▲▲▲▲▲▲▲▲▲▲▲▲▲▲▲▲▲▲▲▲
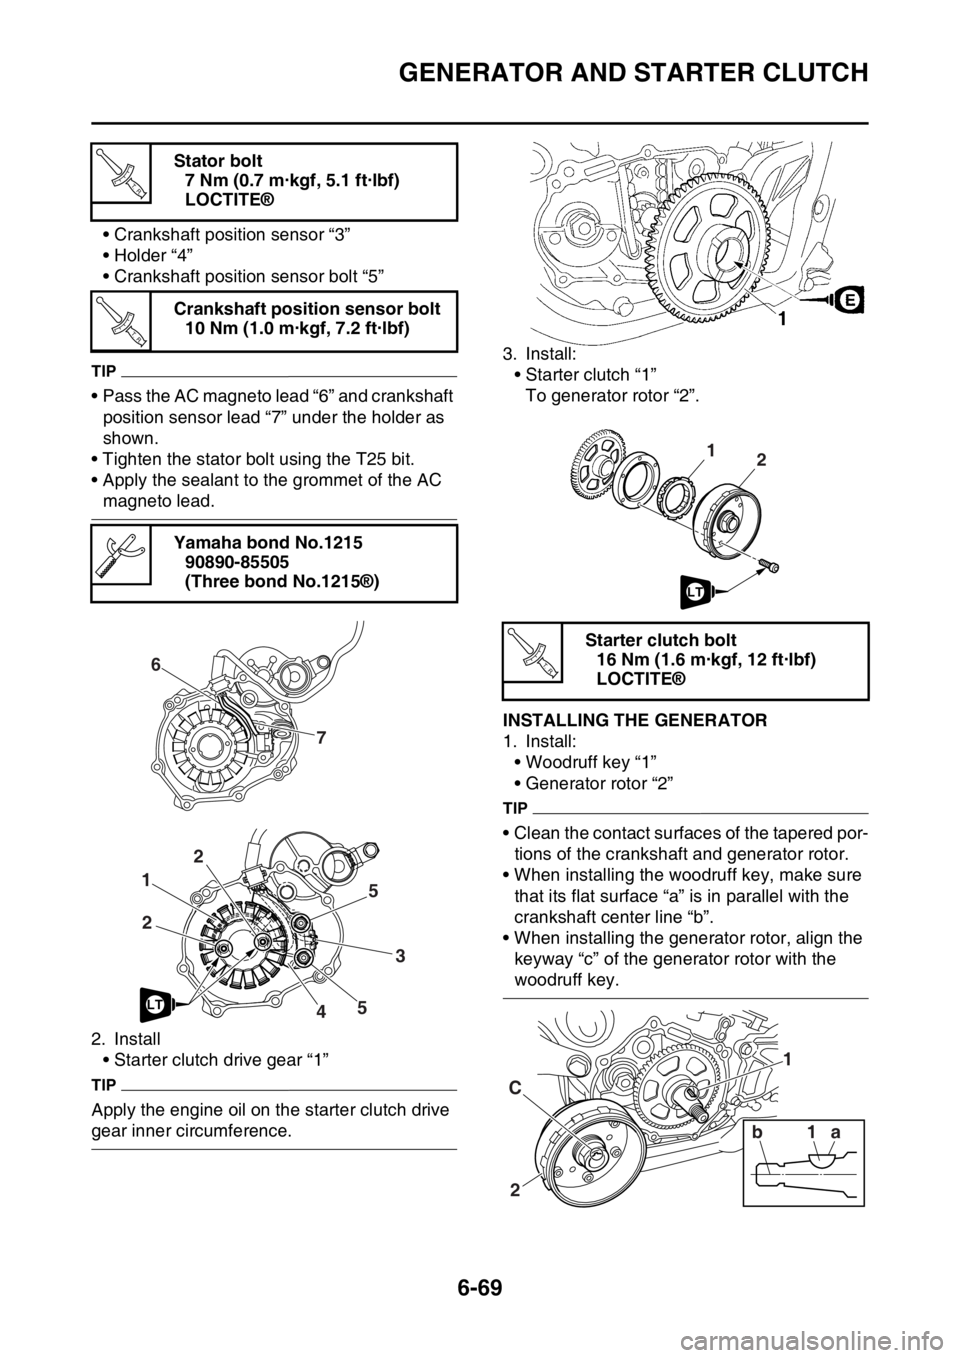
EAS2GBB308INSTALLING THE STARTER CLUTCH
1. Install:
• Stator “1”
• Stator bolt “2” Rotor puller
90890-04142
Rotor puller
YM-04142
1
1
2
1 A
B
Page 298 of 432
GENERATOR AND STARTER CLUTCH
6-69
• Crankshaft position sensor “3”
• Holder “4”
• Crankshaft position sensor bolt “5”
TIP
• Pass the AC magneto lead “6” and crankshaft
position sensor lead “7” under the holder as
shown.
• Tighten the stator bolt using the T25 bit.
• Apply the sealant to the grommet of the AC
magneto lead.
2. Install
• Starter clutch drive gear “1”
TIP
Apply the engine oil on the starter clutch drive
gear inner circumference.3. Install:
• Starter clutch “1”
To generator rotor “2”.
EAS2GBB309INSTALLING THE GENERATOR
1. Install:
• Woodruff key “1”
• Generator rotor “2”
TIP
• Clean the contact surfaces of the tapered por-
tions of the crankshaft and generator rotor.
• When installing the woodruff key, make sure
that its flat surface “a” is in parallel with the
crankshaft center line “b”.
• When installing the generator rotor, align the
keyway “c” of the generator rotor with the
woodruff key. Stator bolt
7 Nm (0.7 m·kgf, 5.1 ft·lbf)
LOCTITE®
Crankshaft position sensor bolt
10 Nm (1.0 m·kgf, 7.2 ft·lbf)
Yamaha bond No.1215
90890-85505
(Three bond No.1215®)
T R..
T R..
6
7
1
3
22
5
5
4LT
Starter clutch bolt
16 Nm (1.6 m·kgf, 12 ft·lbf)
LOCTITE®
21
LT
T R..
2 C1 1
1a b
Page 299 of 432
GENERATOR AND STARTER CLUTCH
6-70
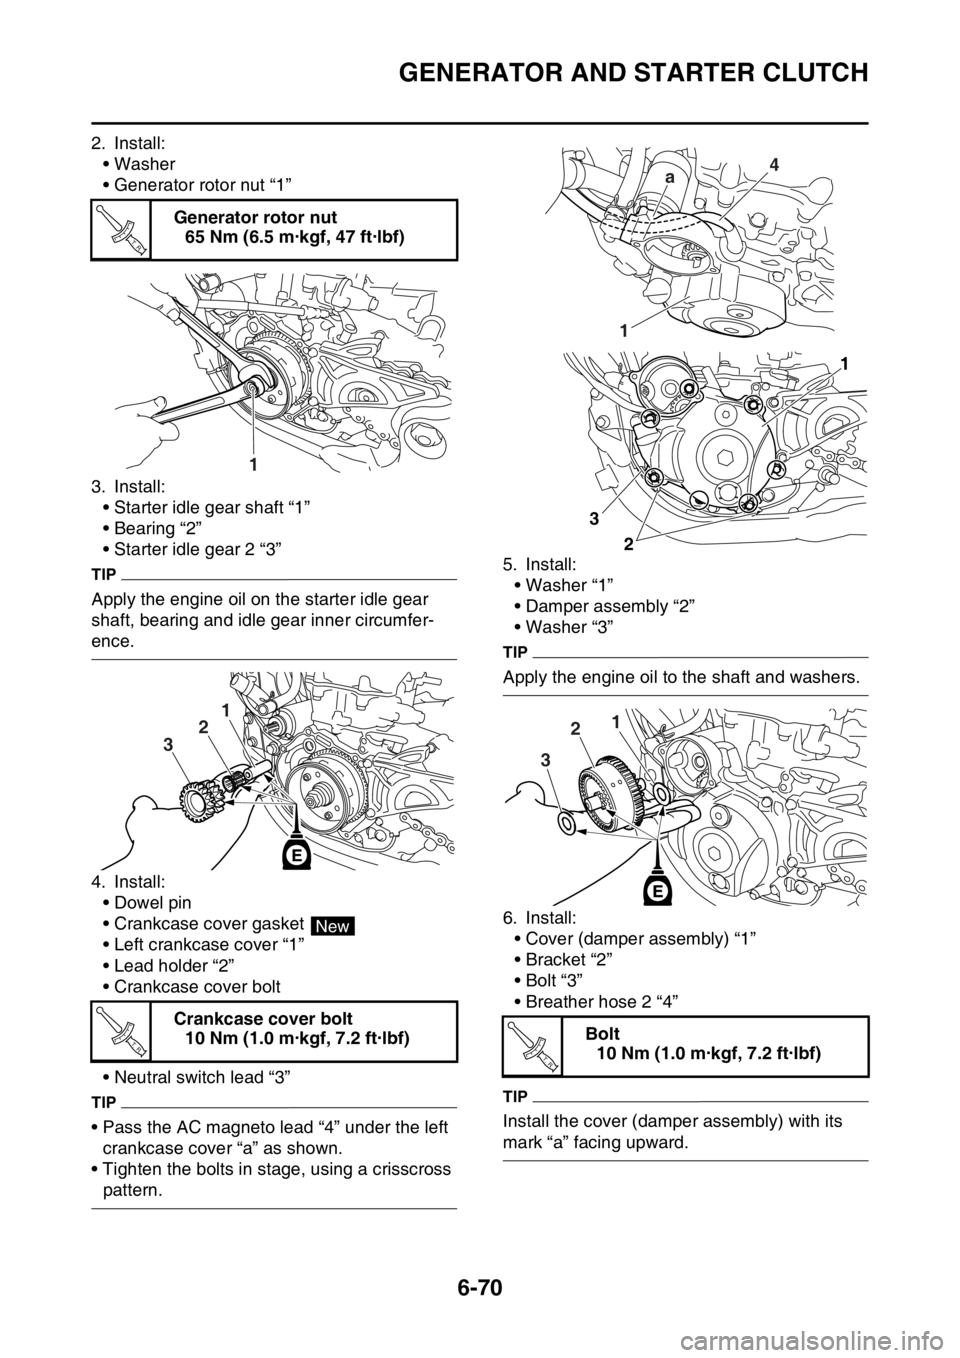
2. Install:
• Washer
• Generator rotor nut “1”
3. Install:
• Starter idle gear shaft “1”
• Bearing “2”
• Starter idle gear 2 “3”
TIP
Apply the engine oil on the starter idle gear
shaft, bearing and idle gear inner circumfer-
ence.
4. Install:
• Dowel pin
• Crankcase cover gasket
• Left crankcase cover “1”
• Lead holder “2”
• Crankcase cover bolt
• Neutral switch lead “3”
TIP
• Pass the AC magneto lead “4” under the left
crankcase cover “a” as shown.
• Tighten the bolts in stage, using a crisscross
pattern.5. Install:
• Washer “1”
• Damper assembly “2”
• Washer “3”
TIP
Apply the engine oil to the shaft and washers.
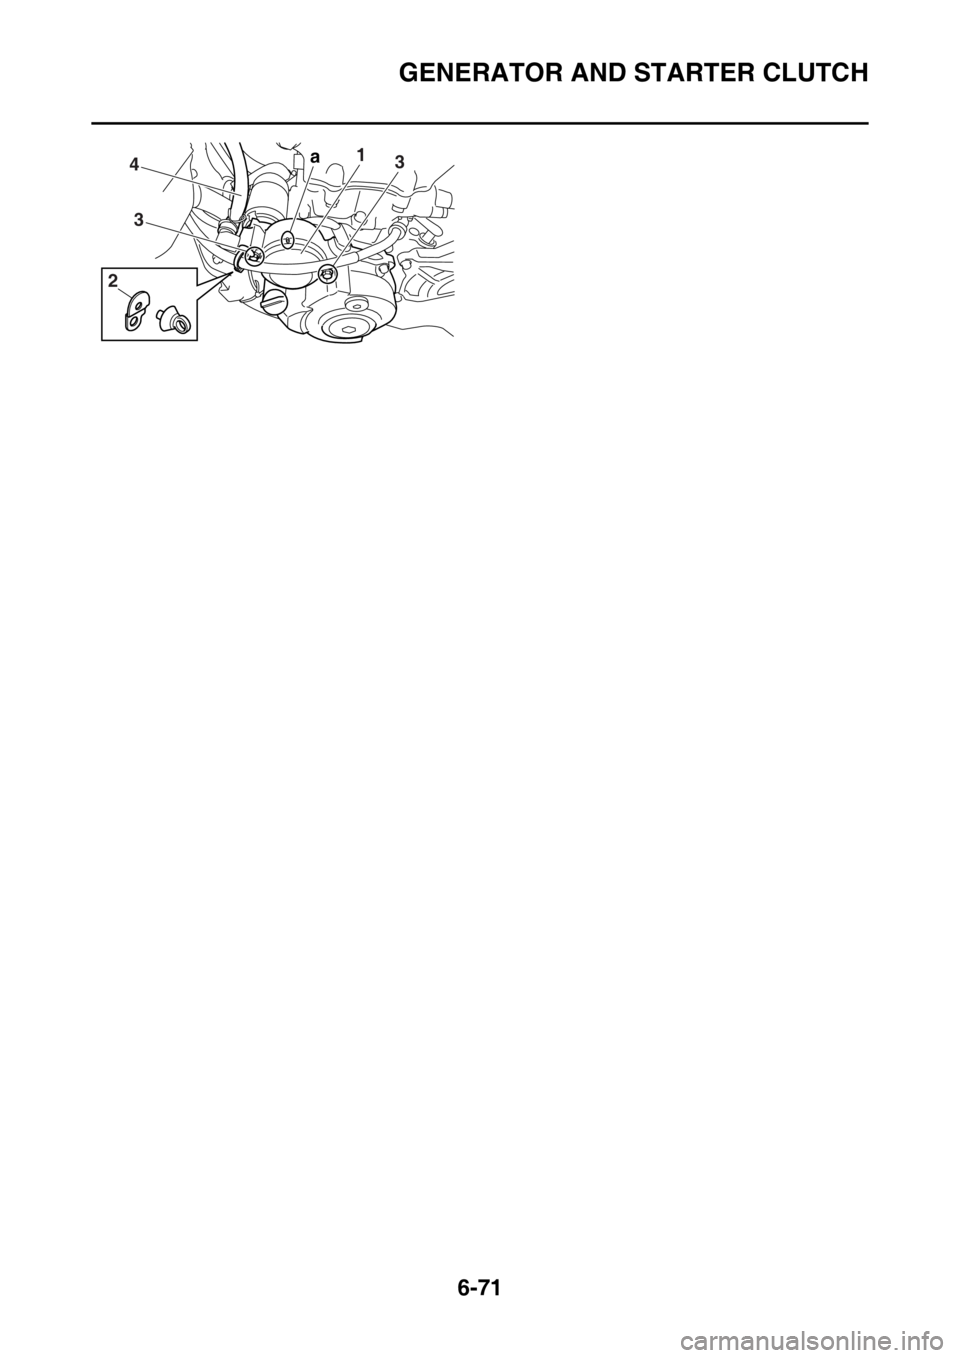
6. Install:
• Cover (damper assembly) “1”
• Bracket “2”
•Bolt “3”
• Breather hose 2 “4”
TIP
Install the cover (damper assembly) with its
mark “a” facing upward. Generator rotor nut
65 Nm (6.5 m·kgf, 47 ft·lbf)
Crankcase cover bolt
10 Nm (1.0 m·kgf, 7.2 ft·lbf)
T R..
1
1
21
2
3
New
T R..Bolt
10 Nm (1.0 m·kgf, 7.2 ft·lbf)
4
1a
1
2
3
21
2
3
T R..
Page 300 of 432
GENERATOR AND STARTER CLUTCH
6-71
1a3
3
2
4