fork YAMAHA WR 450F 2006 User Guide
[x] Cancel search | Manufacturer: YAMAHA, Model Year: 2006, Model line: WR 450F, Model: YAMAHA WR 450F 2006Pages: 786, PDF Size: 22.49 MB
Page 190 of 786
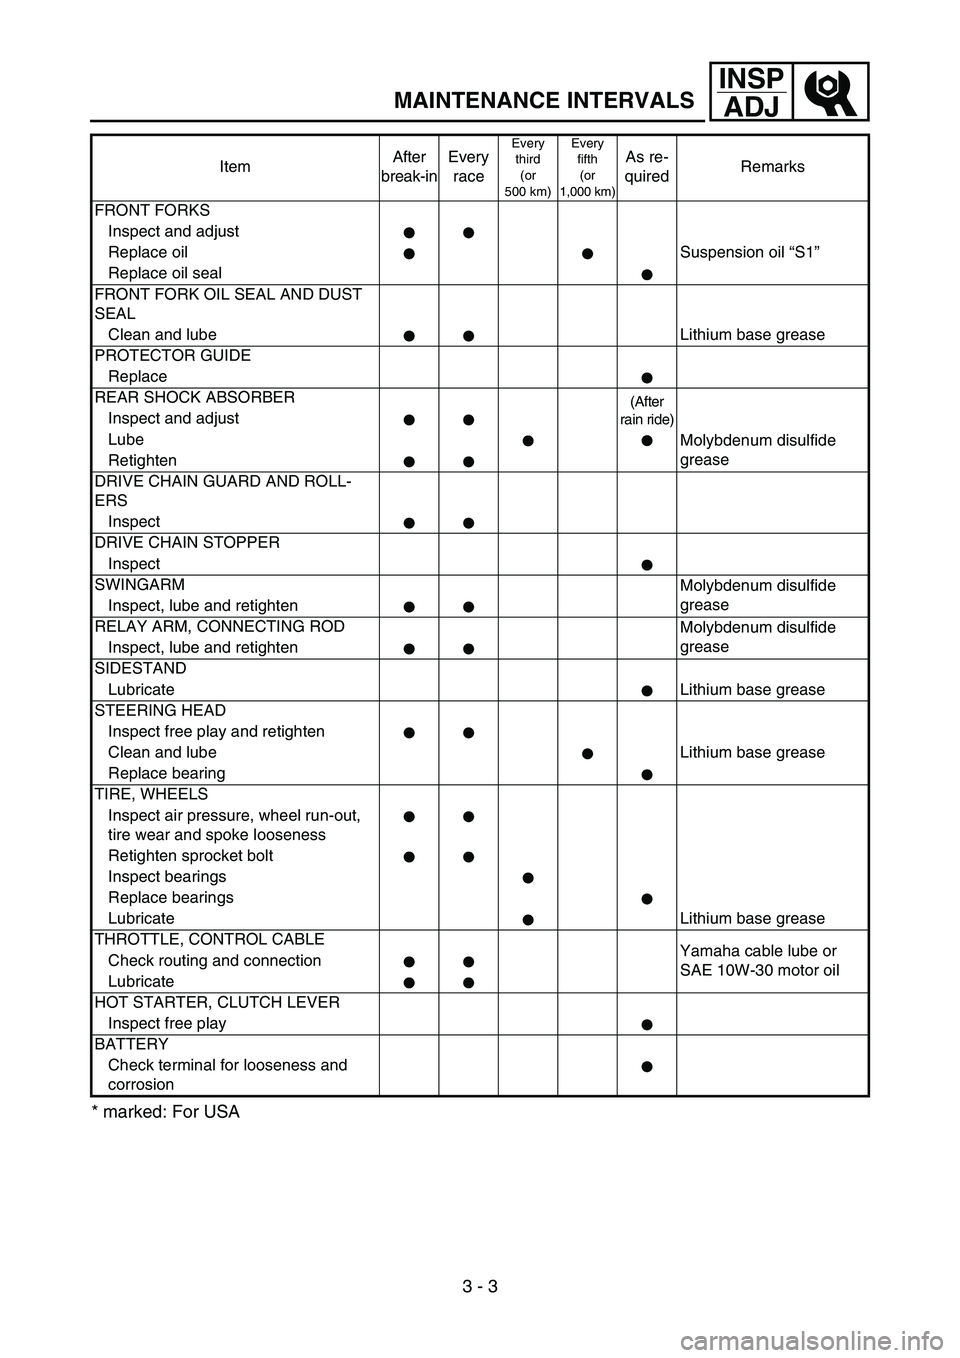
3 - 3
INSP
ADJ
MAINTENANCE INTERVALS
* marked: For USA
FRONT FORKS
Inspect and adjust
Replace oil Suspension oil “S1”
Replace oil seal
FRONT FORK OIL SEAL AND DUST
SEAL
Clean and lube Lithium base grease
PROTECTOR GUIDE
Replace
REAR SHOCK ABSORBER
(After
rain ride)
Inspect and adjust
Lube
Molybdenum disulfide
grease
Retighten
DRIVE CHAIN GUARD AND ROLL-
ERS
Inspect
DRIVE CHAIN STOPPER
Inspect
SWINGARM
Molybdenum disulfide
grease
Inspect, lube and retighten
RELAY ARM, CONNECTING ROD
Molybdenum disulfide
grease
Inspect, lube and retighten
SIDESTAND
Lubricate Lithium base grease
STEERING HEAD
Inspect free play and retighten
Clean and lube Lithium base grease
Replace bearing
TIRE, WHEELS
Inspect air pressure, wheel run-out,
tire wear and spoke looseness
Retighten sprocket bolt
Inspect bearings
Replace bearings
Lubricate Lithium base grease
THROTTLE, CONTROL CABLE
Yamaha cable lube or
SAE 10W-30 motor oil Check routing and connection
Lubricate
HOT STARTER, CLUTCH LEVER
Inspect free play
BATTERY
Check terminal for looseness and
corrosionItemAfter
break-inEvery
race
Every
third
(or
500 km)Every
fifth
(or
1,000 km)As re-
quiredRemarks
Page 200 of 786
3 - 4
INSP
ADJ
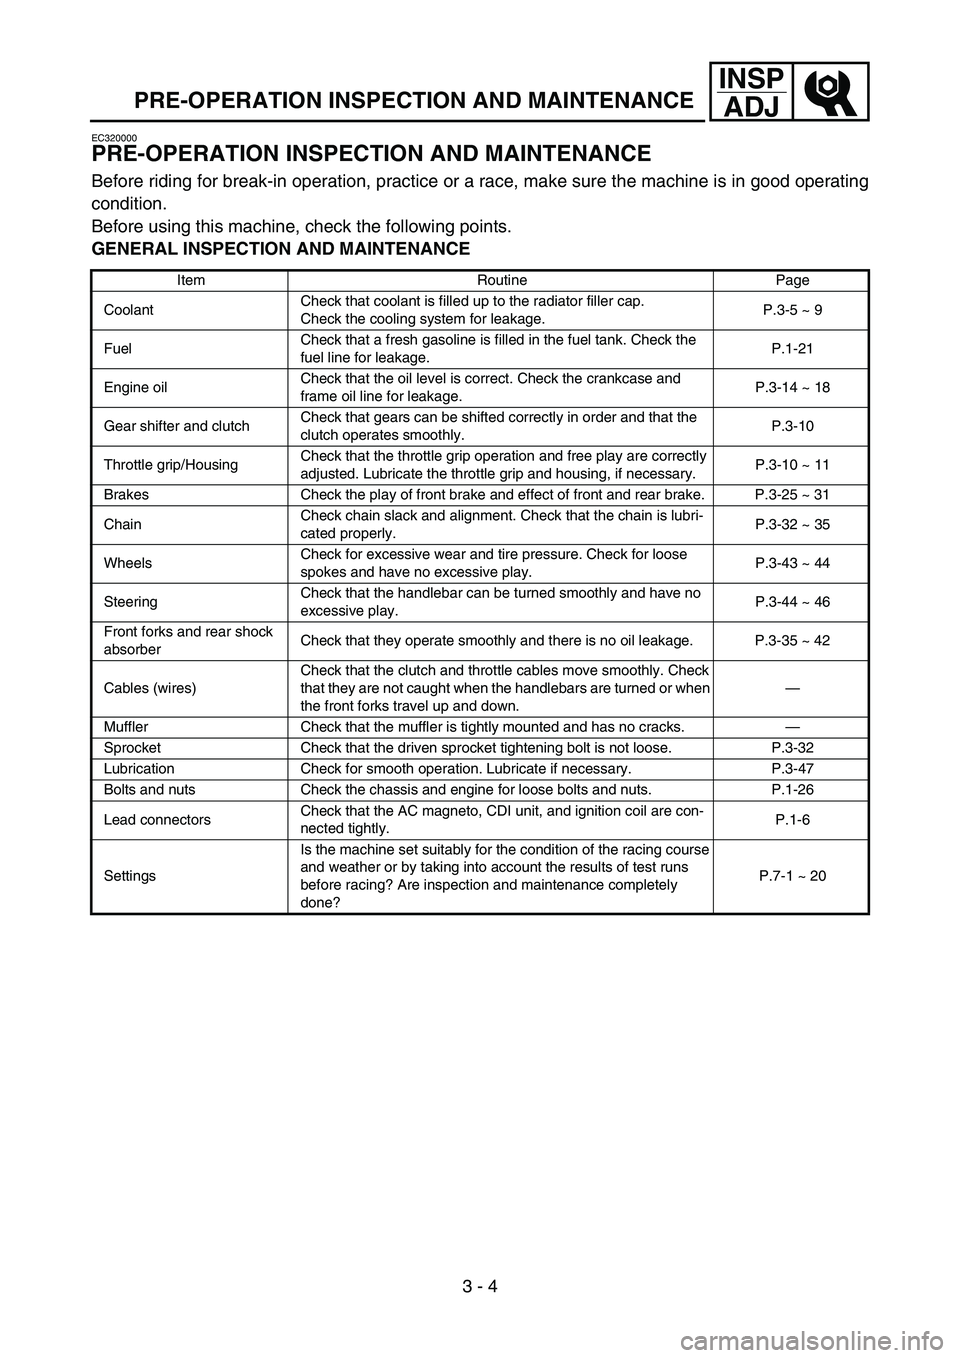
PRE-OPERATION INSPECTION AND MAINTENANCE
EC320000
PRE-OPERATION INSPECTION AND MAINTENANCE
Before riding for break-in operation, practice or a race, make sure the machine is in good operating
condition.
Before using this machine, check the following points.
GENERAL INSPECTION AND MAINTENANCE
Item Routine Page
CoolantCheck that coolant is filled up to the radiator filler cap.
Check the cooling system for leakage.P.3-5 ~ 9
FuelCheck that a fresh gasoline is filled in the fuel tank. Check the
fuel line for leakage.P.1-21
Engine oilCheck that the oil level is correct. Check the crankcase and
frame oil line for leakage.P.3-14 ~ 18
Gear shifter and clutchCheck that gears can be shifted correctly in order and that the
clutch operates smoothly.P.3-10
Throttle grip/HousingCheck that the throttle grip operation and free play are correctly
adjusted. Lubricate the throttle grip and housing, if necessary.P.3-10 ~ 11
Brakes Check the play of front brake and effect of front and rear brake. P.3-25 ~ 31
ChainCheck chain slack and alignment. Check that the chain is lubri-
cated properly.P.3-32 ~ 35
WheelsCheck for excessive wear and tire pressure. Check for loose
spokes and have no excessive play.P.3-43 ~ 44
SteeringCheck that the handlebar can be turned smoothly and have no
excessive play.P.3-44 ~ 46
Front forks and rear shock
absorberCheck that they operate smoothly and there is no oil leakage. P.3-35 ~ 42
Cables (wires)Check that the clutch and throttle cables move smoothly. Check
that they are not caught when the handlebars are turned or when
the front forks travel up and down.—
Muffler Check that the muffler is tightly mounted and has no cracks.—
Sprocket Check that the driven sprocket tightening bolt is not loose. P.3-32
Lubrication Check for smooth operation. Lubricate if necessary. P.3-47
Bolts and nuts Check the chassis and engine for loose bolts and nuts. P.1-26
Lead connectorsCheck that the AC magneto, CDI unit, and ignition coil are con-
nected tightly.P.1-6
SettingsIs the machine set suitably for the condition of the racing course
and weather or by taking into account the results of test runs
before racing? Are inspection and maintenance completely
done?P.7-1 ~ 20
Page 252 of 786
3 - 28
INSP
ADJ
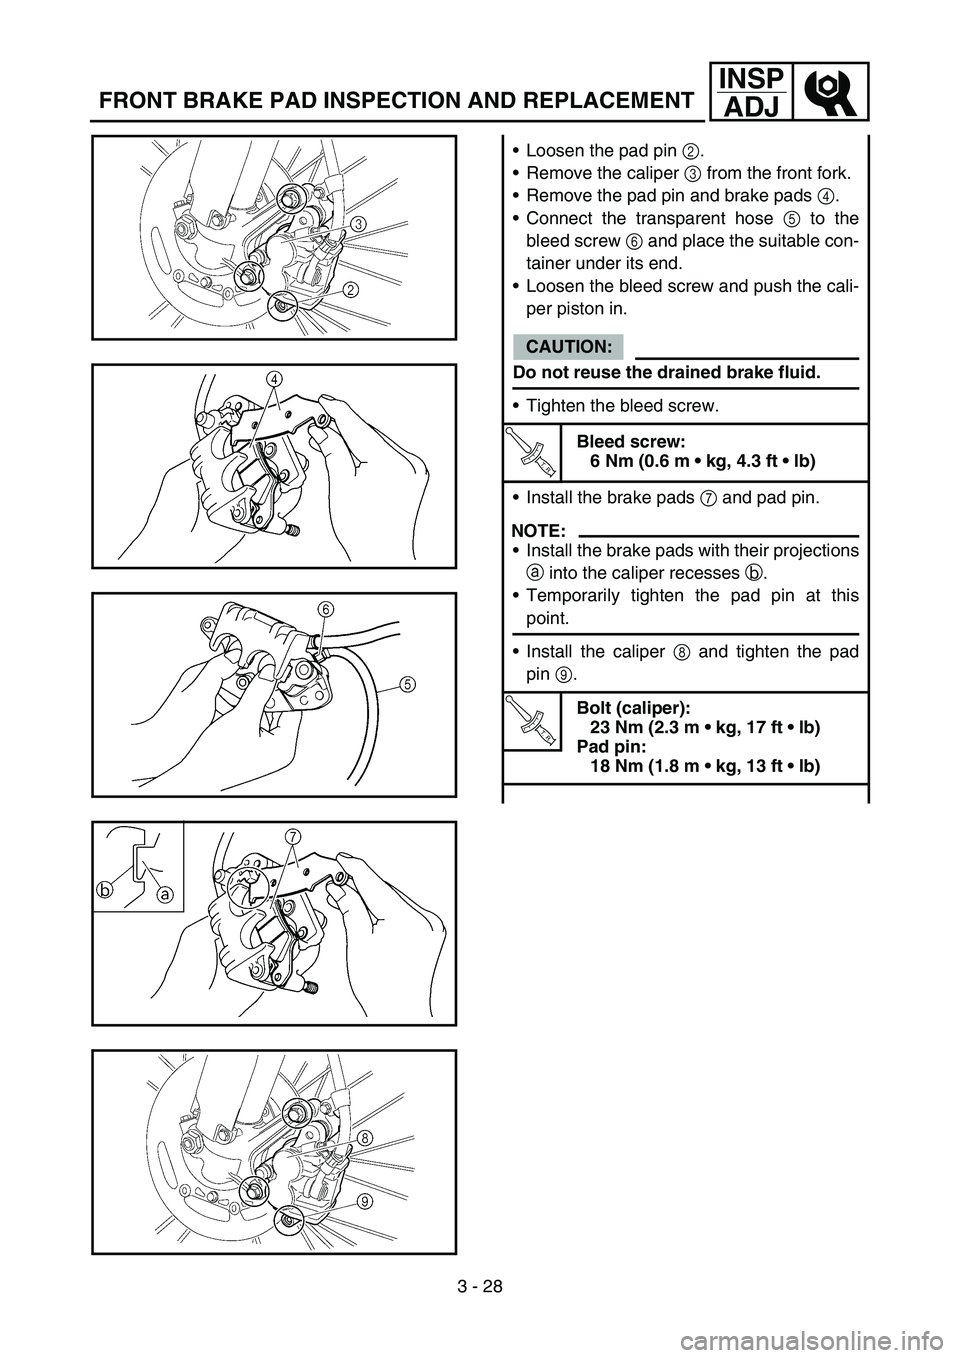
FRONT BRAKE PAD INSPECTION AND REPLACEMENT
Loosen the pad pin 2.
Remove the caliper 3 from the front fork.
Remove the pad pin and brake pads 4.
Connect the transparent hose 5 to the
bleed screw 6 and place the suitable con-
tainer under its end.
Loosen the bleed screw and push the cali-
per piston in.
CAUTION:
Do not reuse the drained brake fluid.
Tighten the bleed screw.
T R..
Bleed screw:
6 Nm (0.6 m kg, 4.3 ft lb)
Install the brake pads 7 and pad pin.
NOTE:
Install the brake pads with their projections
a into the caliper recesses b.
Temporarily tighten the pad pin at this
point.
Install the caliper 8 and tighten the pad
pin 9.
T R..
Bolt (caliper):
23 Nm (2.3 m kg, 17 ft lb)
Pad pin:
18 Nm (1.8 m kg, 13 ft lb)
Page 266 of 786
3 - 35
INSP
ADJDRIVE CHAIN STOPPER INSPECTION/FRONT FORK INSPECTION/
FRONT FORK OIL SEAL AND DUST SEAL CLEANING
Tighten the axle nut while pushing down
the drive chain.
T R..
Axle nut:
125 Nm (12.5 m kg, 90 ft lb)
Tighten the locknuts.
T R..
Locknut:
16 Nm (1.6 m kg, 11 ft lb)
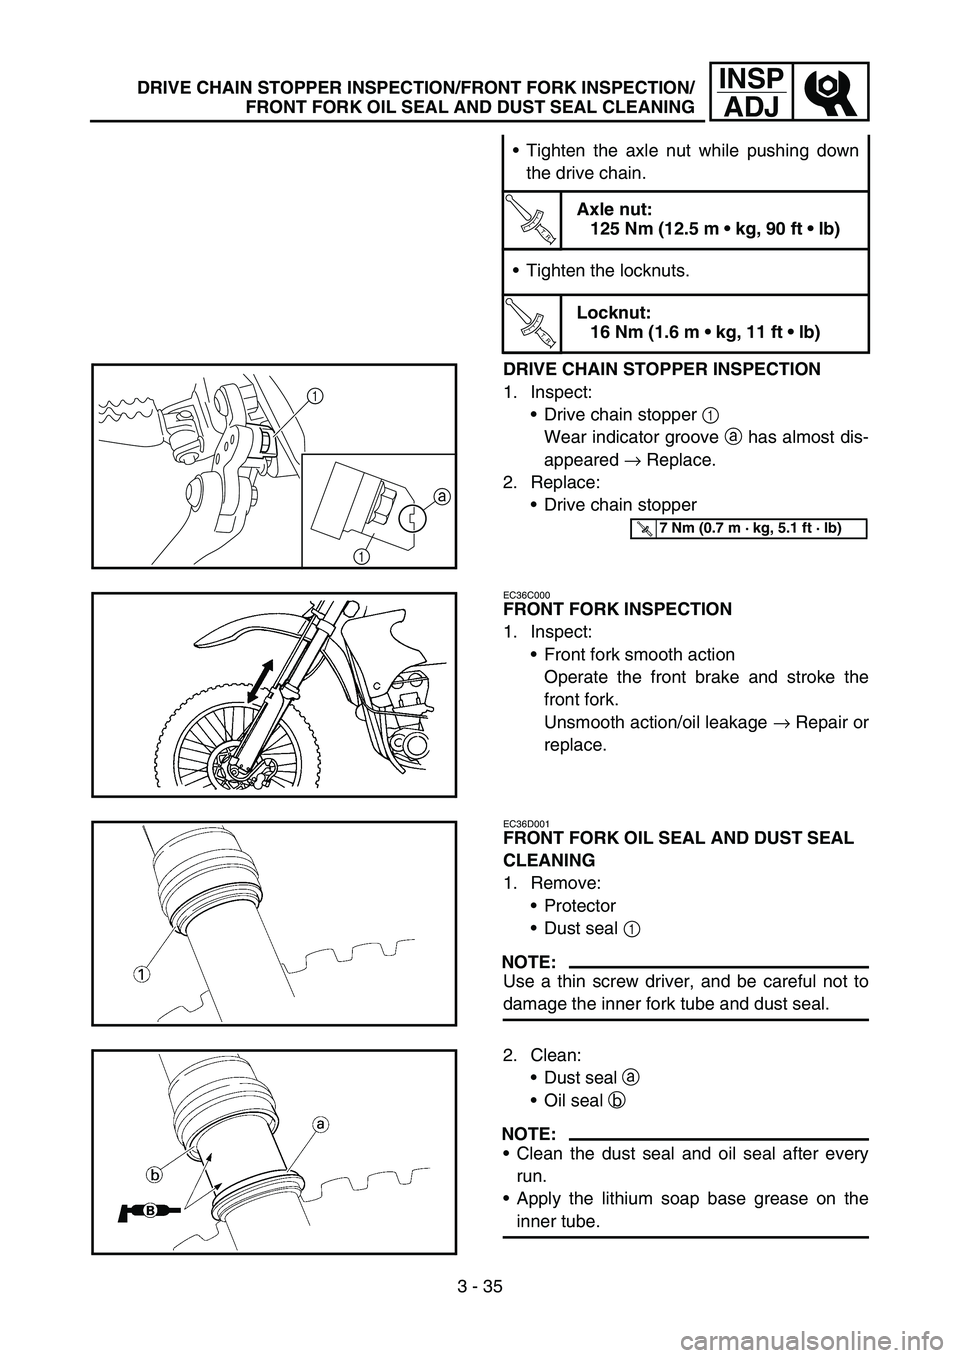
DRIVE CHAIN STOPPER INSPECTION
1. Inspect:
Drive chain stopper 1
Wear indicator groove a has almost dis-
appeared → Replace.
2. Replace:
Drive chain stopper
1
1a
T R..7 Nm (0.7 m · kg, 5.1 ft · lb)
EC36C000
FRONT FORK INSPECTION
1. Inspect:
Front fork smooth action
Operate the front brake and stroke the
front fork.
Unsmooth action/oil leakage → Repair or
replace.
EC36D001
FRONT FORK OIL SEAL AND DUST SEAL
CLEANING
1. Remove:
Protector
Dust seal 1
NOTE:
Use a thin screw driver, and be careful not to
damage the inner fork tube and dust seal.
2. Clean:
Dust seal a
Oil seal b
NOTE:
Clean the dust seal and oil seal after every
run.
Apply the lithium soap base grease on the
inner tube.
Page 268 of 786
3 - 36
INSP
ADJFRONT FORK INTERNAL PRESSURE RELIEVING/
FRONT FORK REBOUND DAMPING FORCE ADJUSTMENT
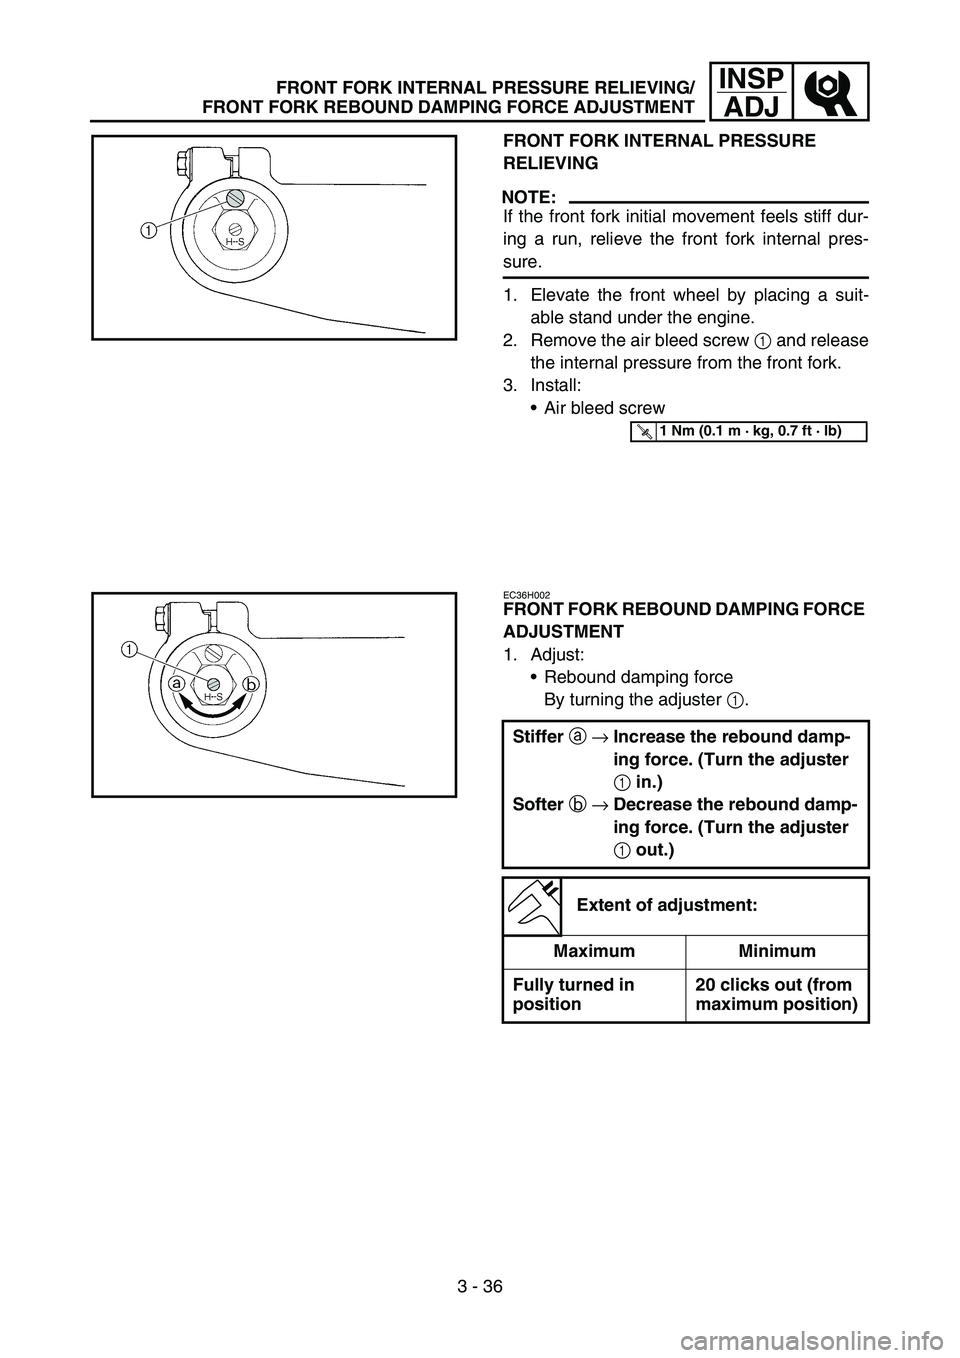
FRONT FORK INTERNAL PRESSURE
RELIEVING
NOTE:
If the front fork initial movement feels stiff dur-
ing a run, relieve the front fork internal pres-
sure.
1. Elevate the front wheel by placing a suit-
able stand under the engine.
2. Remove the air bleed screw 1 and release
the internal pressure from the front fork.
3. Install:
Air bleed screw
T R..1 Nm (0.1 m · kg, 0.7 ft · lb)
EC36H002
FRONT FORK REBOUND DAMPING FORCE
ADJUSTMENT
1. Adjust:
Rebound damping force
By turning the adjuster 1.
Stiffer a →Increase the rebound damp-
ing force. (Turn the adjuster
1 in.)
Softer b →Decrease the rebound damp-
ing force. (Turn the adjuster
1 out.)
Extent of adjustment:
Maximum Minimum
Fully turned in
position20 clicks out (from
maximum position)
Page 270 of 786
3 - 37
INSP
ADJFRONT FORK COMPRESSION DAMPING FORCE
ADJUSTMENT
STANDARD POSITION:
This is the position which is back by the spe-
cific number of clicks from the fully turned-in
position.
* For EUROPE
** For AUS, NZ and ZA
CAUTION:
Do not force the adjuster past the minimum
or maximum extent of adjustment. The
adjuster may be damaged.
WARNING
Always adjust each front fork to the same
setting. Uneven adjustment can cause poor
handling and loss of stability.
EC36J001
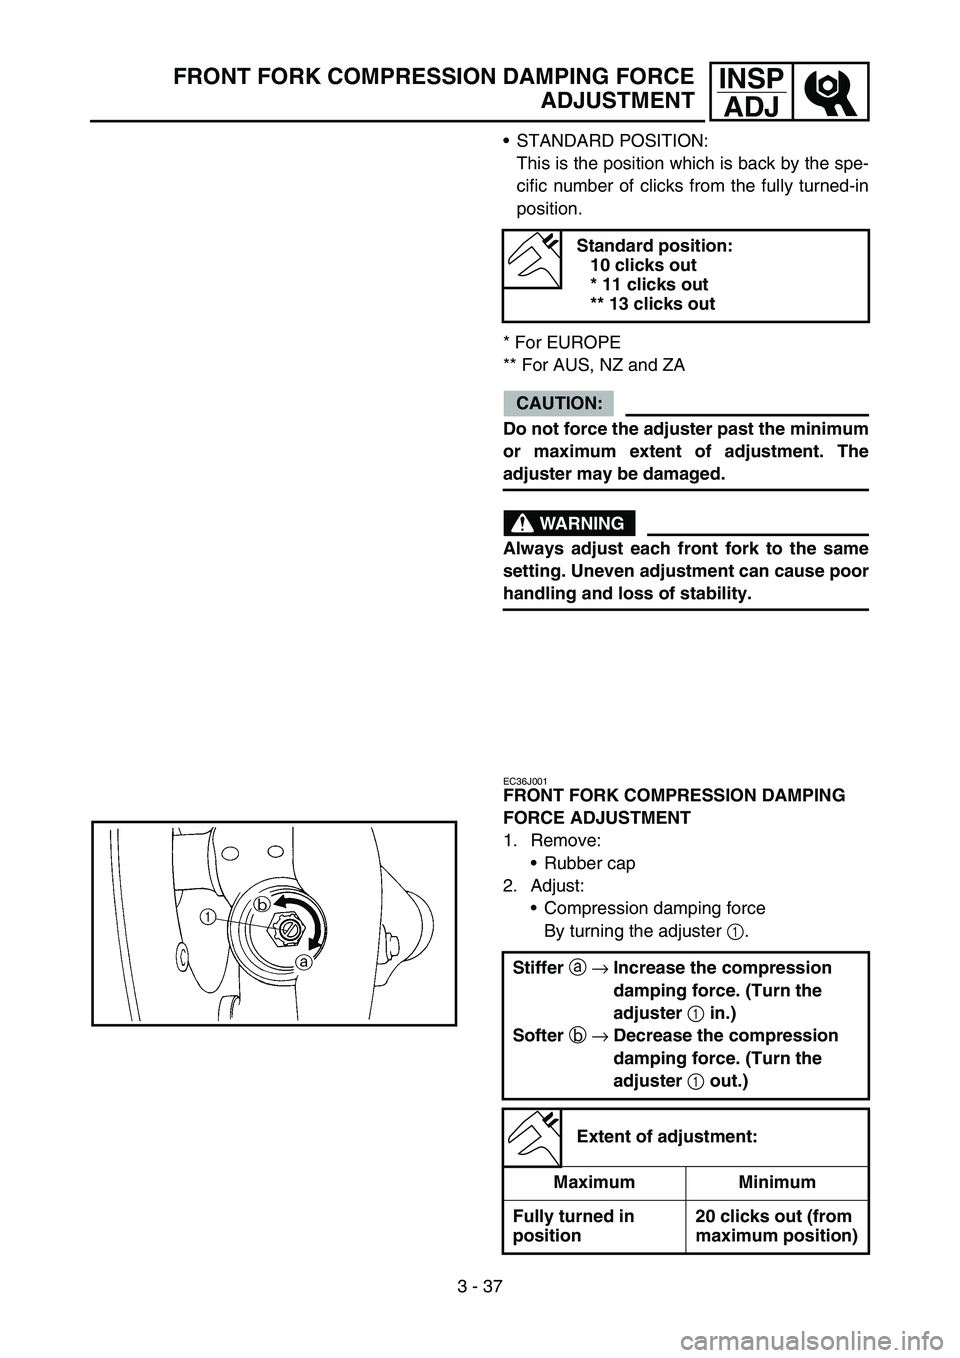
FRONT FORK COMPRESSION DAMPING
FORCE ADJUSTMENT
1. Remove:
Rubber cap
2. Adjust:
Compression damping force
By turning the adjuster 1.
Standard position:
10 clicks out
* 11 clicks out
** 13 clicks out
Stiffer
a
→Increase the compression
damping force. (Turn the
adjuster
1 in.)
Softer
b
→Decrease the compression
damping force. (Turn the
adjuster
1 out.)
Extent of adjustment:
Maximum Minimum
Fully turned in
position20 clicks out (from
maximum position)
Page 272 of 786
3 - 38
INSP
ADJ
REAR SHOCK ABSORBER INSPECTION
STANDARD POSITION:
This is the position which is back by the spe-
cific number of clicks from the fully turned-in
position.
* For EUROPE
** For AUS, NZ and ZA
CAUTION:
Do not force the adjuster past the minimum
or maximum extent of adjustment. The
adjuster may be damaged.
WARNING
Always adjust each front fork to the same
setting. Uneven adjustment can cause poor
handling and loss of stability.
3. Install:
Rubber cap
Standard position:
11 clicks out
* 8 clicks out
** 12 clicks out
EC36K000
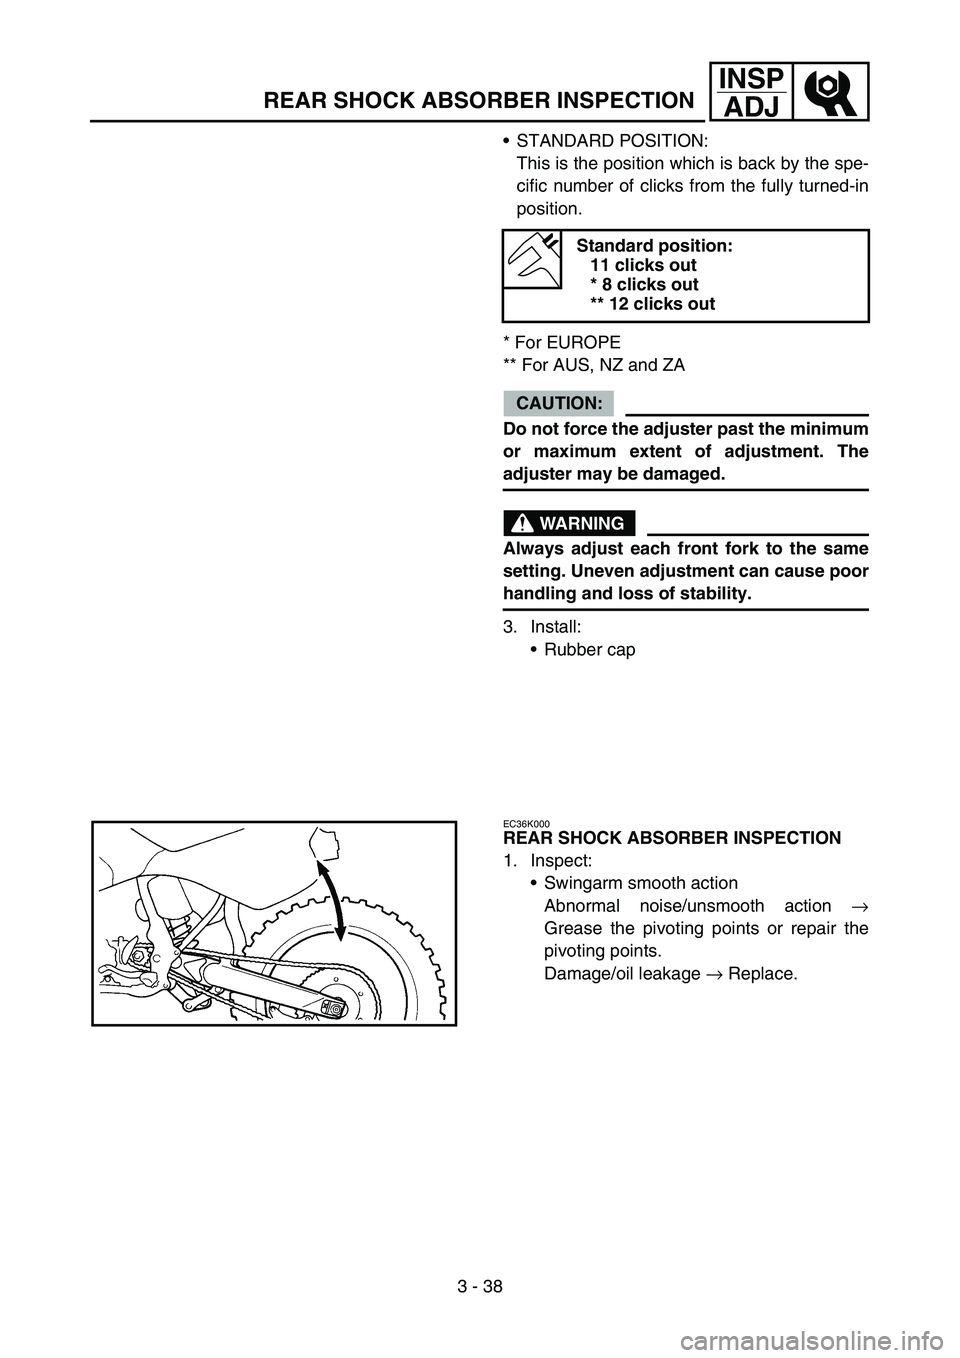
REAR SHOCK ABSORBER INSPECTION
1. Inspect:
Swingarm smooth action
Abnormal noise/unsmooth action →
Grease the pivoting points or repair the
pivoting points.
Damage/oil leakage → Replace.
Page 284 of 786

3 - 44
INSP
ADJ
STEERING HEAD INSPECTION AND ADJUSTMENT
2. Inspect:
Bearing free play
Exist play → Replace.
STEERING HEAD INSPECTION AND
ADJUSTMENT
1. Elevate the front wheel by placing a suit-
able stand under the engine.
2. Check:
Steering shaft
Grasp the bottom of the forks and gently
rock the fork assembly back and forth.
Free play → Adjust steering head.
3. Check:
Steering smooth action
Turn the handlebar lock to lock.
Unsmooth action → Adjust steering ring
nut.
4. Adjust:
Steering ring nut
Steering ring nut adjustment steps:
Remove the headlight.
Remove the handlebar and handle crown.
Loosen the ring nut 1 using the ring nut
wrench 2.
Ring nut wrench:
YU-33975/90890-01403
Page 504 of 786
4 - 94
ENGCRANKCASE AND CRANKSHAFT
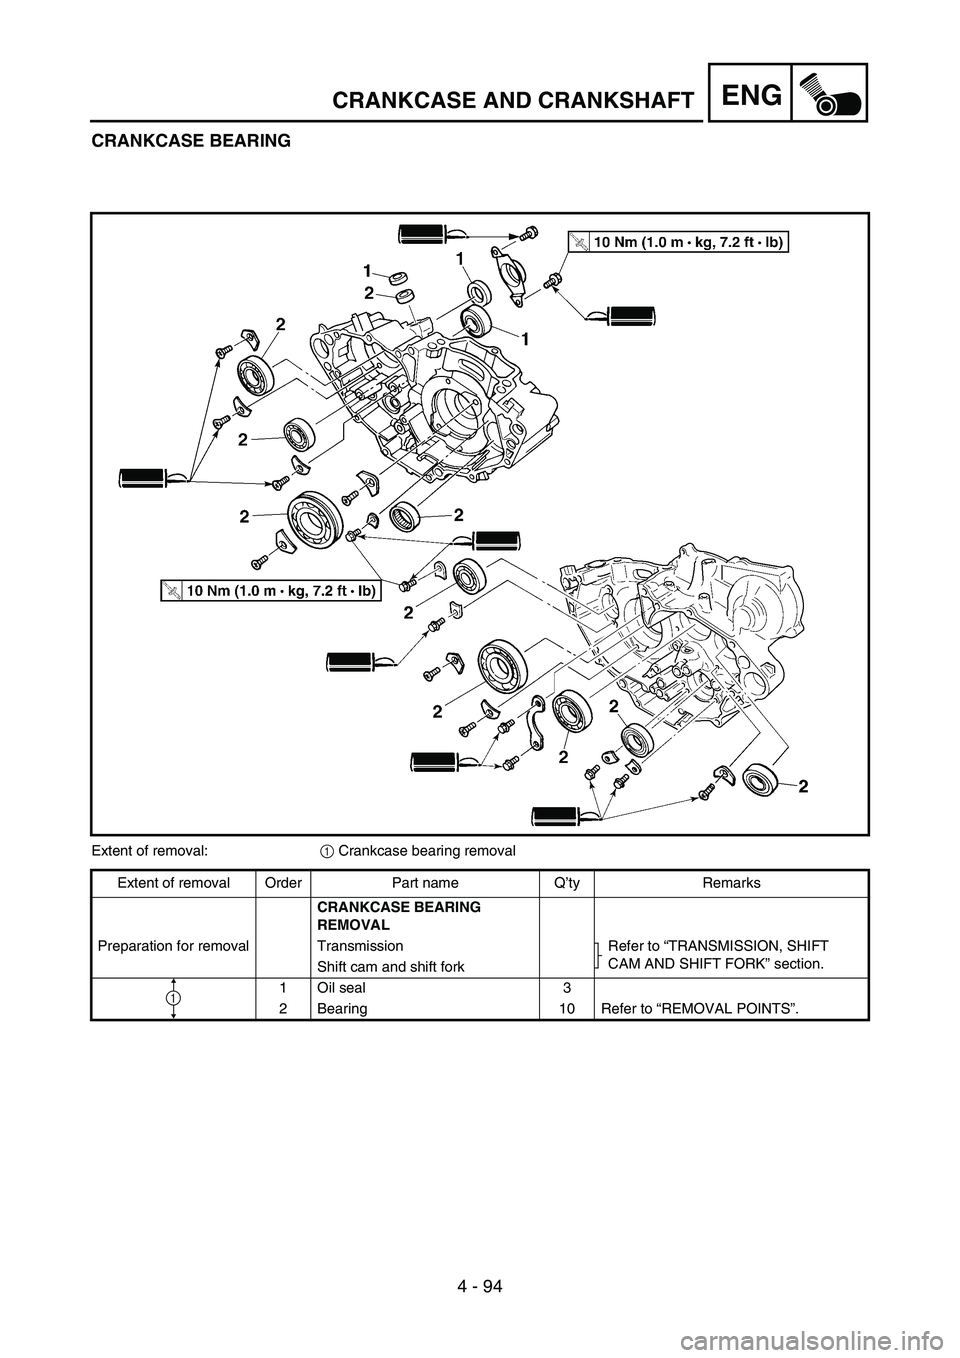
CRANKCASE BEARING
Extent of removal:
1 Crankcase bearing removal
Extent of removal Order Part name Q’ty Remarks
CRANKCASE BEARING
REMOVAL
Preparation for removal Transmission Refer to “TRANSMISSION, SHIFT
CAM AND SHIFT FORK” section.
Shift cam and shift fork
1 Oil seal 3
2 Bearing 10 Refer to “REMOVAL POINTS”.
1
Page 518 of 786
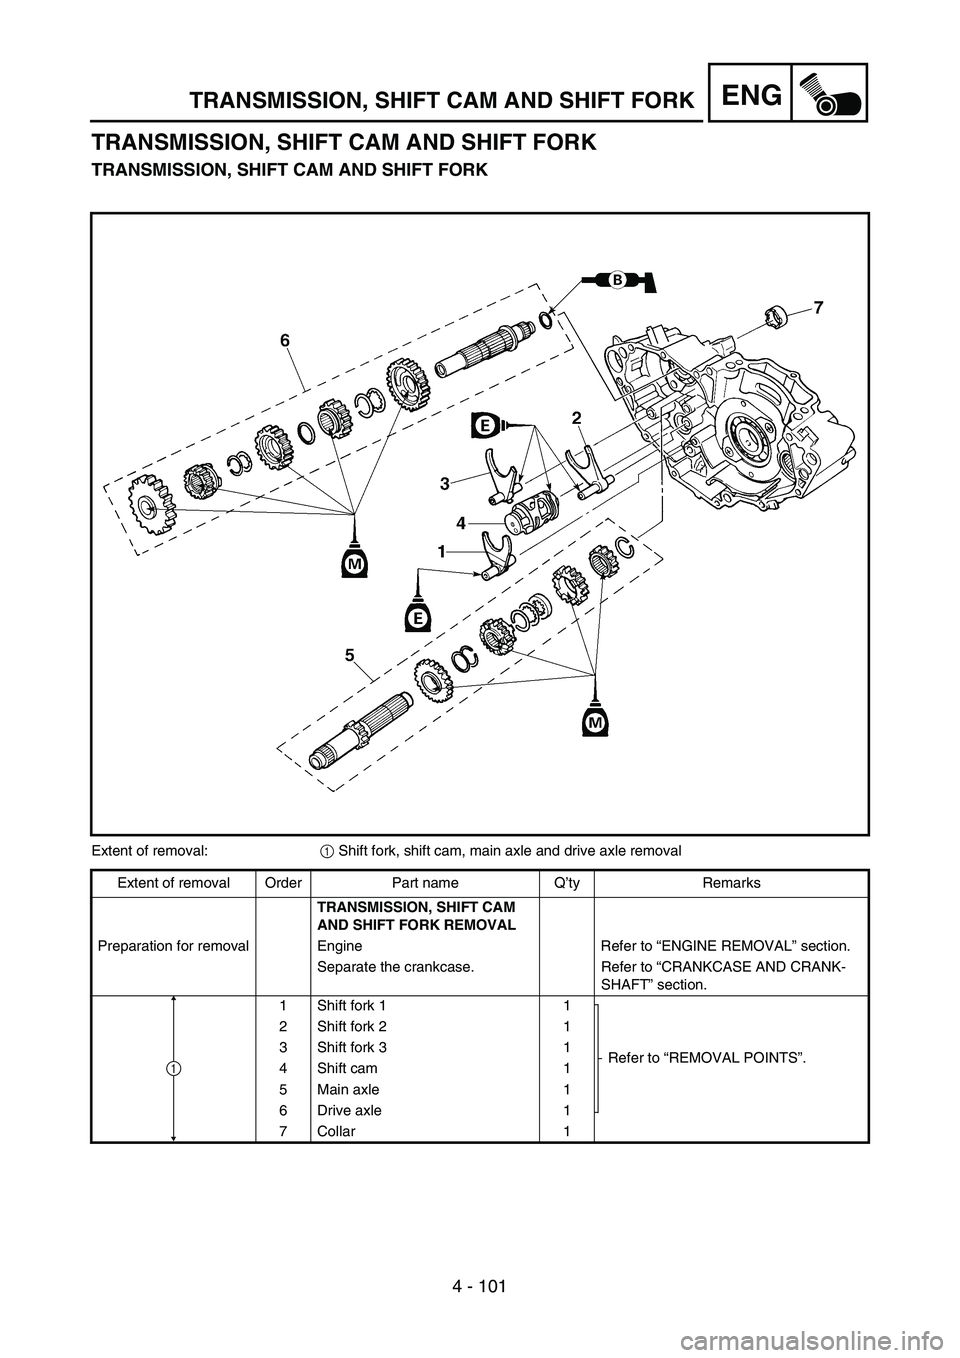
4 - 101
ENGTRANSMISSION, SHIFT CAM AND SHIFT FORK
TRANSMISSION, SHIFT CAM AND SHIFT FORK
TRANSMISSION, SHIFT CAM AND SHIFT FORK
Extent of removal:
1 Shift fork, shift cam, main axle and drive axle removal
Extent of removal Order Part name Q’ty Remarks
TRANSMISSION, SHIFT CAM
AND SHIFT FORK REMOVAL
Preparation for removal Engine Refer to “ENGINE REMOVAL” section.
Separate the crankcase. Refer to “CRANKCASE AND CRANK-
SHAFT” section.
1 Shift fork 1 1
Refer to “REMOVAL POINTS”. 2 Shift fork 2 1
3 Shift fork 3 1
4Shift cam 1
5 Main axle 1
6 Drive axle 1
7 Collar 1
1