fork YAMAHA WR 450F 2006 Owners Manual
[x] Cancel search | Manufacturer: YAMAHA, Model Year: 2006, Model line: WR 450F, Model: YAMAHA WR 450F 2006Pages: 786, PDF Size: 22.49 MB
Page 22 of 786
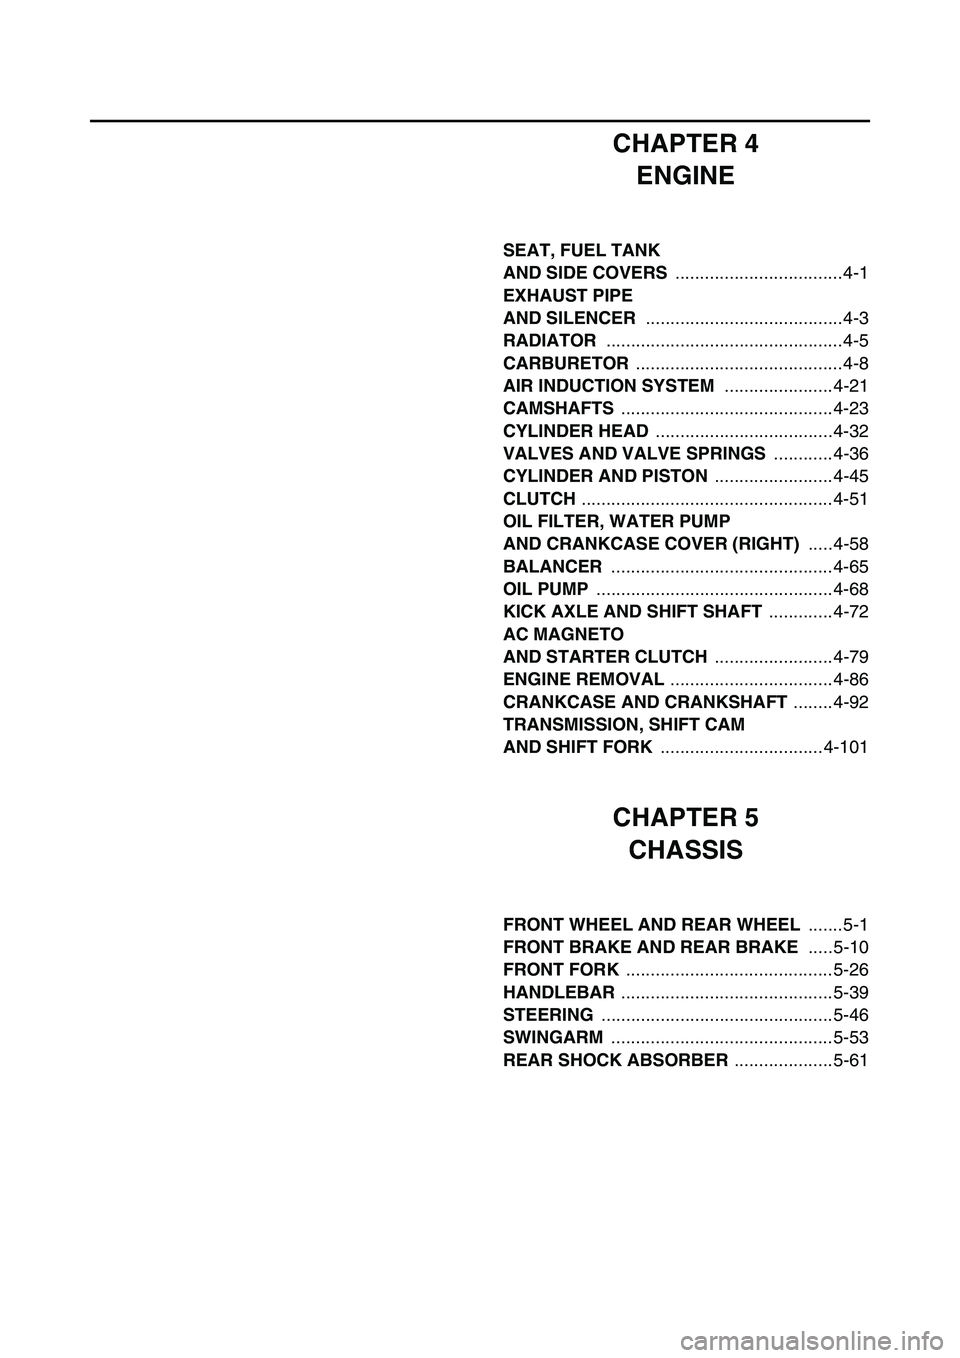
CHAPTER 4
ENGINE
SEAT, FUEL TANK
AND SIDE COVERS ..................................4-1
EXHAUST PIPE
AND SILENCER ........................................4-3
RADIATOR ................................................4-5
CARBURETOR ..........................................4-8
AIR INDUCTION SYSTEM ......................4-21
CAMSHAFTS ...........................................4-23
CYLINDER HEAD ....................................4-32
VALVES AND VALVE SPRINGS ............4-36
CYLINDER AND PISTON ........................4-45
CLUTCH ...................................................4-51
OIL FILTER, WATER PUMP
AND CRANKCASE COVER (RIGHT) .....4-58
BALANCER .............................................4-65
OIL PUMP ................................................4-68
KICK AXLE AND SHIFT SHAFT .............4-72
AC MAGNETO
AND STARTER CLUTCH ........................4-79
ENGINE REMOVAL .................................4-86
CRANKCASE AND CRANKSHAFT ........4-92
TRANSMISSION, SHIFT CAM
AND SHIFT FORK .................................4-101
CHAPTER 5
CHASSIS
FRONT WHEEL AND REAR WHEEL .......5-1
FRONT BRAKE AND REAR BRAKE .....5-10
FRONT FORK ..........................................5-26
HANDLEBAR ...........................................5-39
STEERING ...............................................5-46
SWINGARM .............................................5-53
REAR SHOCK ABSORBER ....................5-61
Page 26 of 786
GEN
INFO
1 - 1
DESCRIPTION
EC100000
GENERAL INFORMATION
EC110000
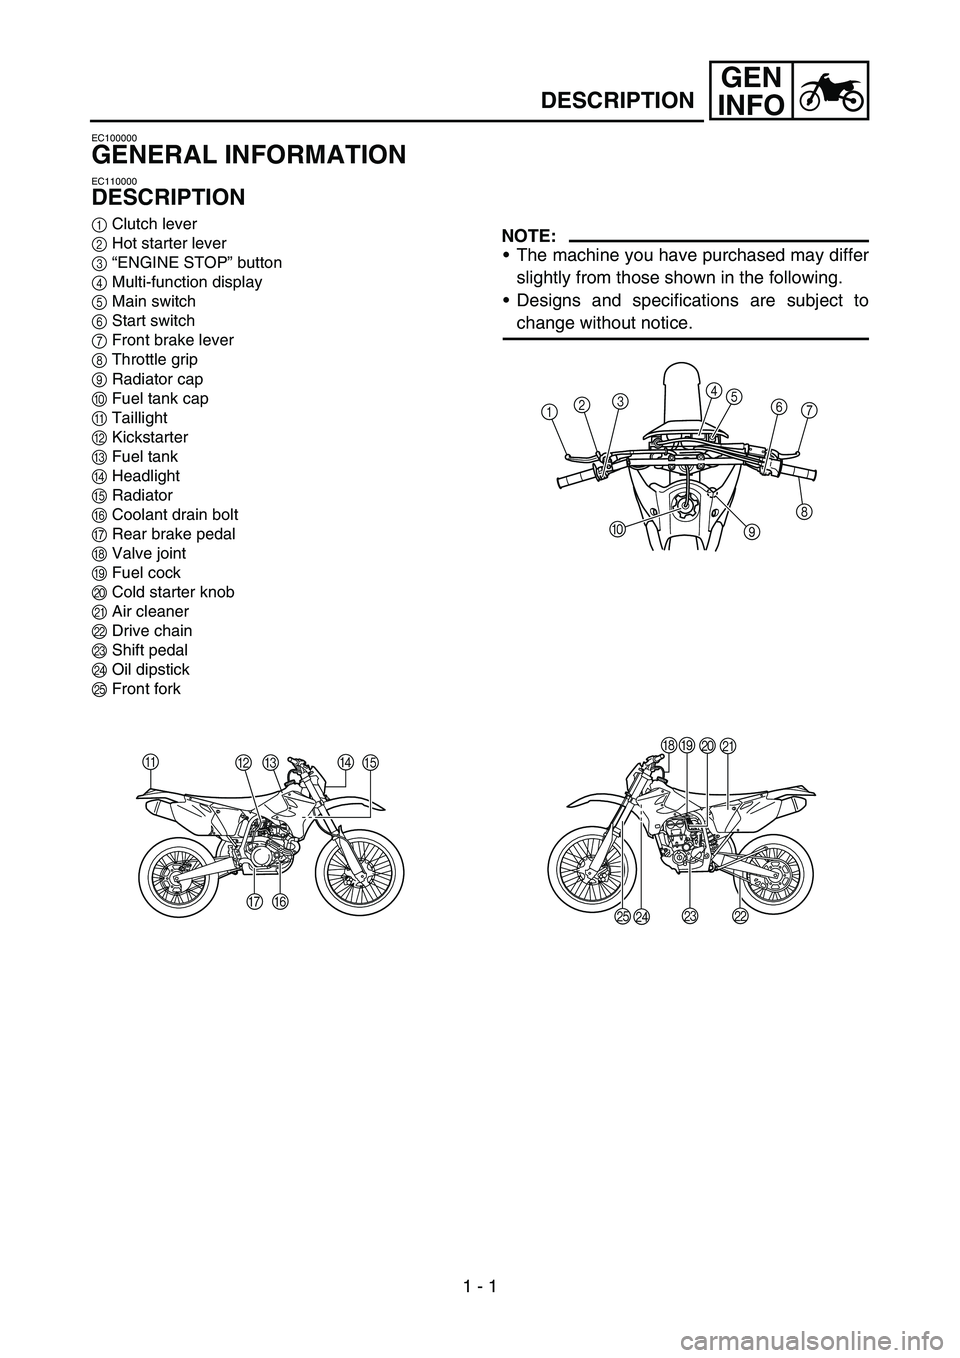
DESCRIPTION
1Clutch lever
2Hot starter lever
3“ENGINE STOP” button
4Multi-function display
5Main switch
6Start switch
7Front brake lever
8Throttle grip
9Radiator cap
0Fuel tank cap
ATaillight
BKickstarter
CFuel tank
DHeadlight
ERadiator
FCoolant drain bolt
GRear brake pedal
HValve joint
IFuel cock
JCold starter knob
KAir cleaner
LDrive chain
MShift pedal
NOil dipstick
OFront forkNOTE:
The machine you have purchased may differ
slightly from those shown in the following.
Designs and specifications are subject to
change without notice.
A
BCD
E
F G
1234
5
6
7
8
9 0
HI
J
K
L M
N O
Page 39 of 786
GEN
INFO
1 - 8
SPECIAL TOOLS
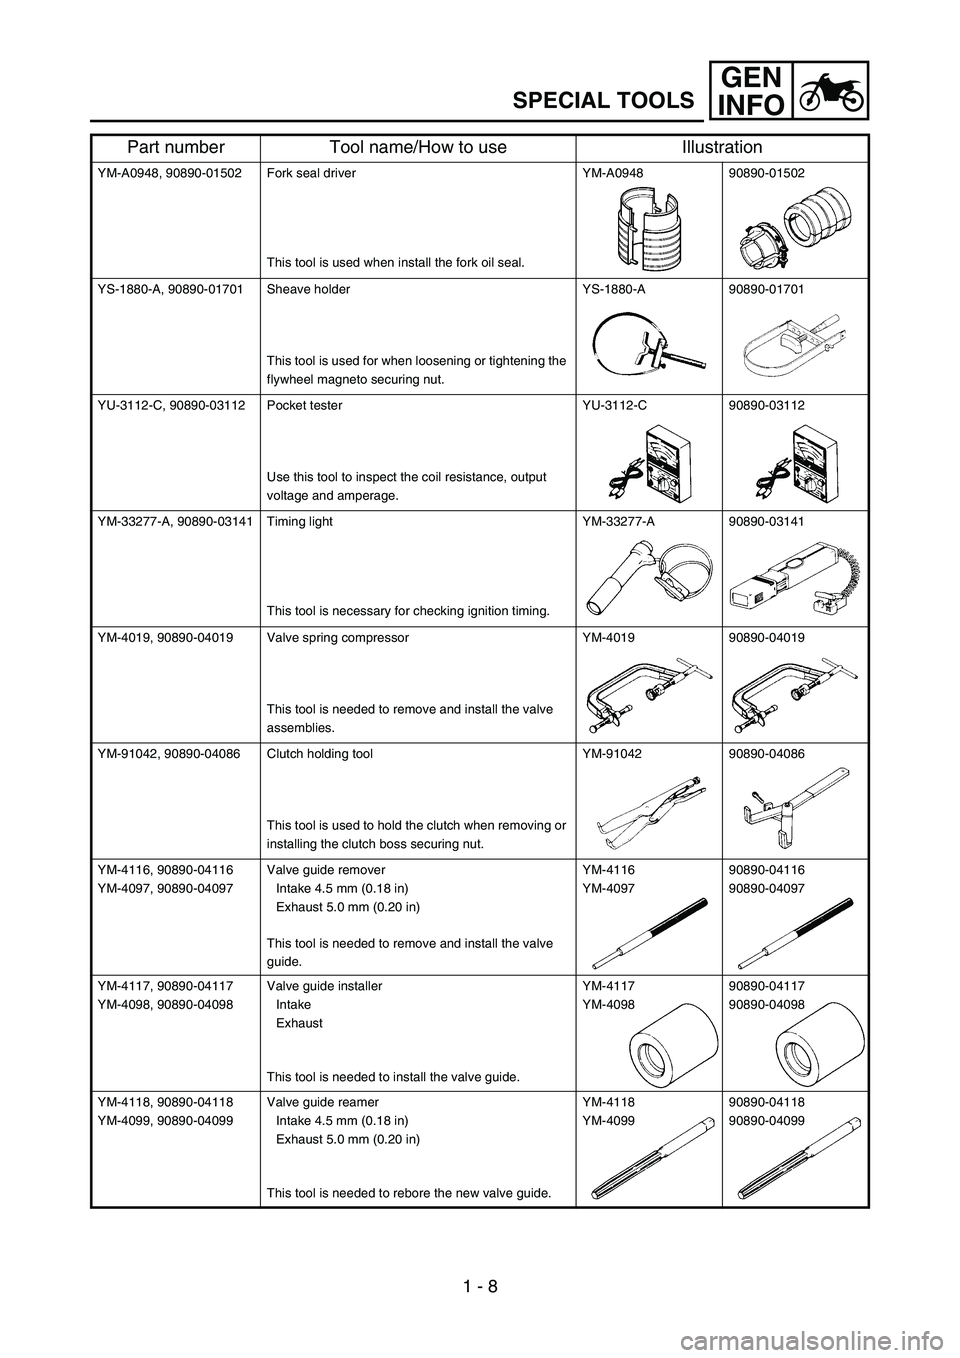
YM-A0948, 90890-01502 Fork seal driver
This tool is used when install the fork oil seal.YM-A0948 90890-01502
YS-1880-A, 90890-01701 Sheave holder
This tool is used for when loosening or tightening the
flywheel magneto securing nut.YS-1880-A 90890-01701
YU-3112-C, 90890-03112 Pocket tester
Use this tool to inspect the coil resistance, output
voltage and amperage.YU-3112-C 90890-03112
YM-33277-A, 90890-03141 Timing light
This tool is necessary for checking ignition timing.YM-33277-A 90890-03141
YM-4019, 90890-04019 Valve spring compressor
This tool is needed to remove and install the valve
assemblies.YM-4019 90890-04019
YM-91042, 90890-04086 Clutch holding tool
This tool is used to hold the clutch when removing or
installing the clutch boss securing nut.YM-91042 90890-04086
YM-4116, 90890-04116
YM-4097, 90890-04097Valve guide remover
Intake 4.5 mm (0.18 in)
Exhaust 5.0 mm (0.20 in)
This tool is needed to remove and install the valve
guide.YM-4116
YM-409790890-04116
90890-04097
YM-4117, 90890-04117
YM-4098, 90890-04098Valve guide installer
Intake
Exhaust
This tool is needed to install the valve guide.YM-4117
YM-409890890-04117
90890-04098
YM-4118, 90890-04118
YM-4099, 90890-04099Valve guide reamer
Intake 4.5 mm (0.18 in)
Exhaust 5.0 mm (0.20 in)
This tool is needed to rebore the new valve guide.YM-4118
YM-4099 90890-04118
90890-04099
Part number Tool name/How to use Illustration
Page 82 of 786
GEN
INFO
1 - 26
TORQUE-CHECK POINTS
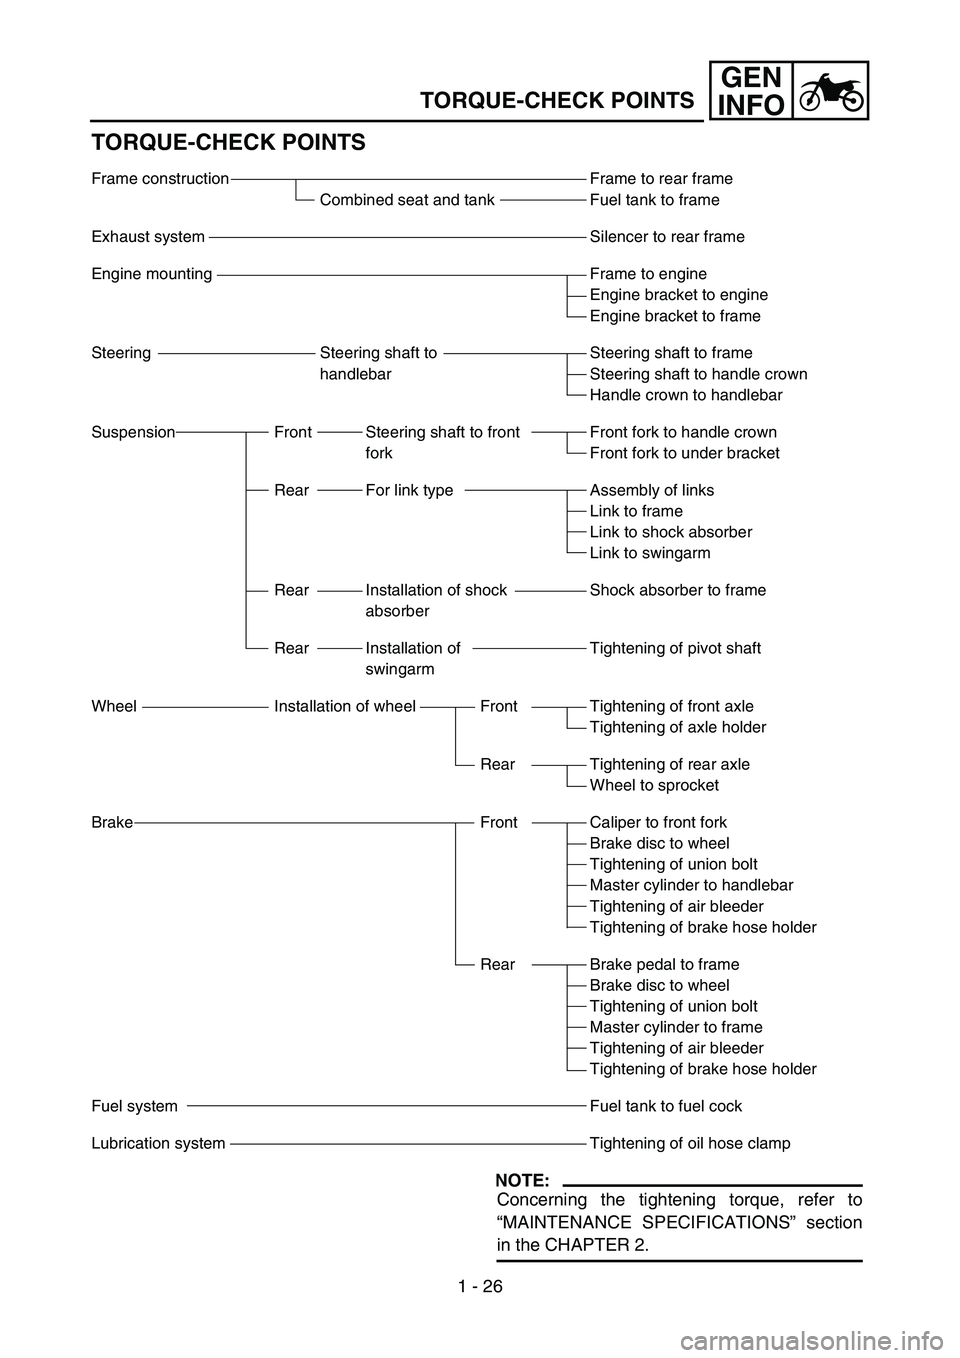
TORQUE-CHECK POINTS
NOTE:
Concerning the tightening torque, refer to
“MAINTENANCE SPECIFICATIONS” section
in the CHAPTER 2.
Frame to rear frame
Fuel tank to frame
Silencer to rear frame
Frame to engine
Engine bracket to engine
Engine bracket to frame
Steering shaft to frame
Steering shaft to handle crown
Handle crown to handlebar
Front fork to handle crown
Front fork to under bracket
Assembly of links
Link to frame
Link to shock absorber
Link to swingarm
Shock absorber to frame
Tightening of pivot shaft
Tightening of front axle
Tightening of axle holder
Tightening of rear axle
Wheel to sprocket
Caliper to front fork
Brake disc to wheel
Tightening of union bolt
Master cylinder to handlebar
Tightening of air bleeder
Tightening of brake hose holder
Brake pedal to frame
Brake disc to wheel
Tightening of union bolt
Master cylinder to frame
Tightening of air bleeder
Tightening of brake hose holder
Fuel tank to fuel cock
Tightening of oil hose clamp Frame construction
Combined seat and tank
Exhaust system
Engine mounting
Steering Steering shaft to
handlebar
Suspension Front Steering shaft to front
fork
Rear For link type
Rear Installation of shock
absorber
Rear Installation of
swingarm
Wheel Installation of wheel Front
Rear
Brake Front
Rear
Fuel system
Lubrication system
Page 86 of 786
1 - 27
GEN
INFO
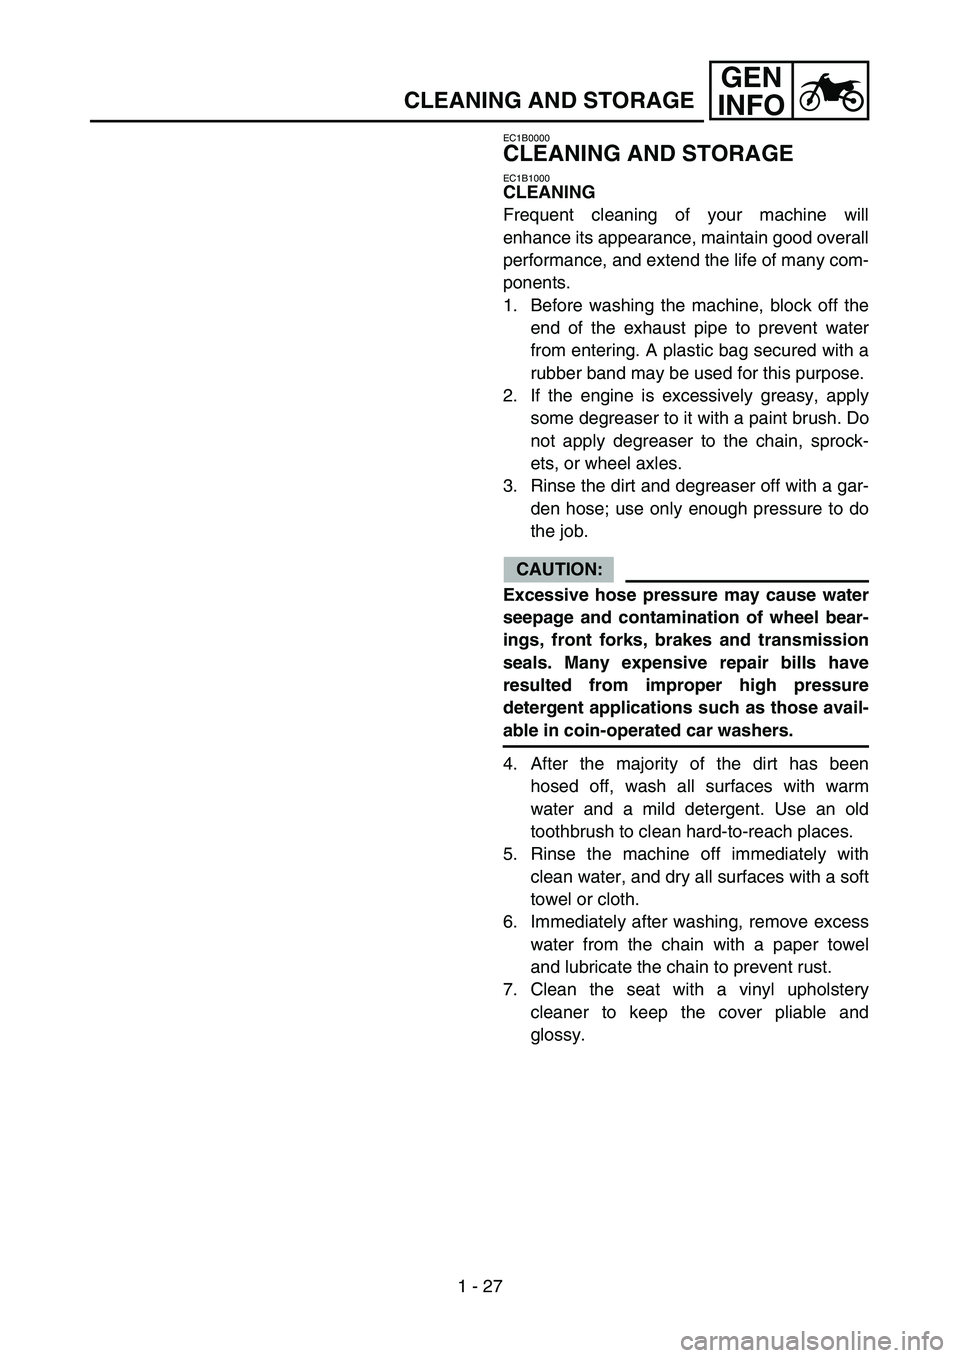
CLEANING AND STORAGE
EC1B0000
CLEANING AND STORAGE
EC1B1000
CLEANING
Frequent cleaning of your machine will
enhance its appearance, maintain good overall
performance, and extend the life of many com-
ponents.
1. Before washing the machine, block off the
end of the exhaust pipe to prevent water
from entering. A plastic bag secured with a
rubber band may be used for this purpose.
2. If the engine is excessively greasy, apply
some degreaser to it with a paint brush. Do
not apply degreaser to the chain, sprock-
ets, or wheel axles.
3. Rinse the dirt and degreaser off with a gar-
den hose; use only enough pressure to do
the job.
CAUTION:
Excessive hose pressure may cause water
seepage and contamination of wheel bear-
ings, front forks, brakes and transmission
seals. Many expensive repair bills have
resulted from improper high pressure
detergent applications such as those avail-
able in coin-operated car washers.
4. After the majority of the dirt has been
hosed off, wash all surfaces with warm
water and a mild detergent. Use an old
toothbrush to clean hard-to-reach places.
5. Rinse the machine off immediately with
clean water, and dry all surfaces with a soft
towel or cloth.
6. Immediately after washing, remove excess
water from the chain with a paper towel
and lubricate the chain to prevent rust.
7. Clean the seat with a vinyl upholstery
cleaner to keep the cover pliable and
glossy.
Page 92 of 786
SPEC
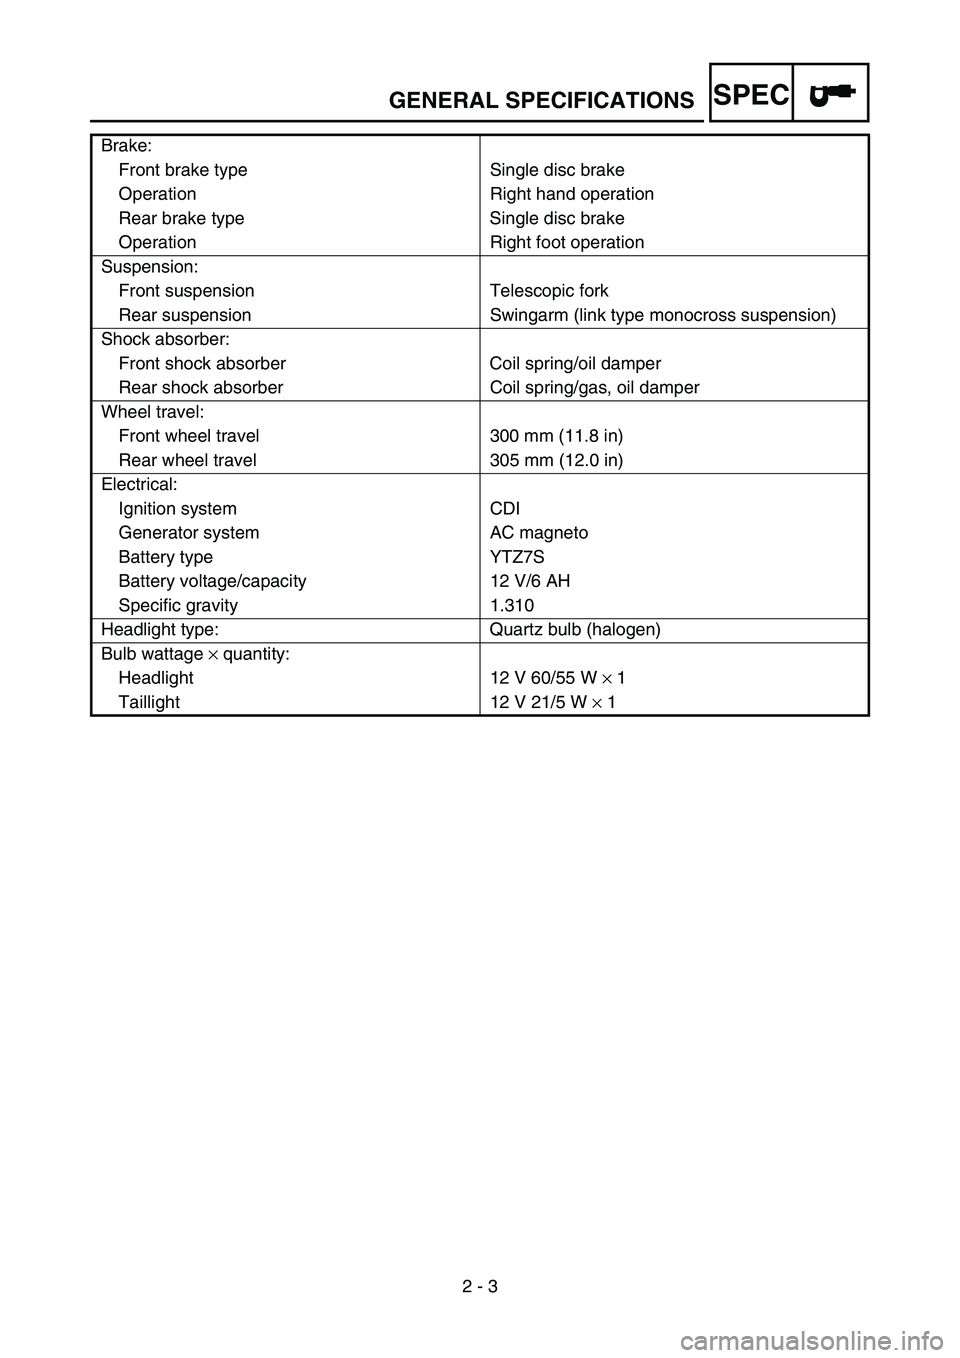
2 - 3 Brake:
Front brake type Single disc brake
Operation Right hand operation
Rear brake type Single disc brake
Operation Right foot operation
Suspension:
Front suspension Telescopic fork
Rear suspension Swingarm (link type monocross suspension)
Shock absorber:
Front shock absorber Coil spring/oil damper
Rear shock absorber Coil spring/gas, oil damper
Wheel travel:
Front wheel travel 300 mm (11.8 in)
Rear wheel travel 305 mm (12.0 in)
Electrical:
Ignition system CDI
Generator system AC magneto
Battery type YTZ7S
Battery voltage/capacity 12 V/6 AH
Specific gravity 1.310
Headlight type: Quartz bulb (halogen)
Bulb wattage × quantity:
Headlight 12 V 60/55 W × 1
Taillight 12 V 21/5 W × 1
GENERAL SPECIFICATIONS
Page 102 of 786
SPEC
2 - 13
EC212201
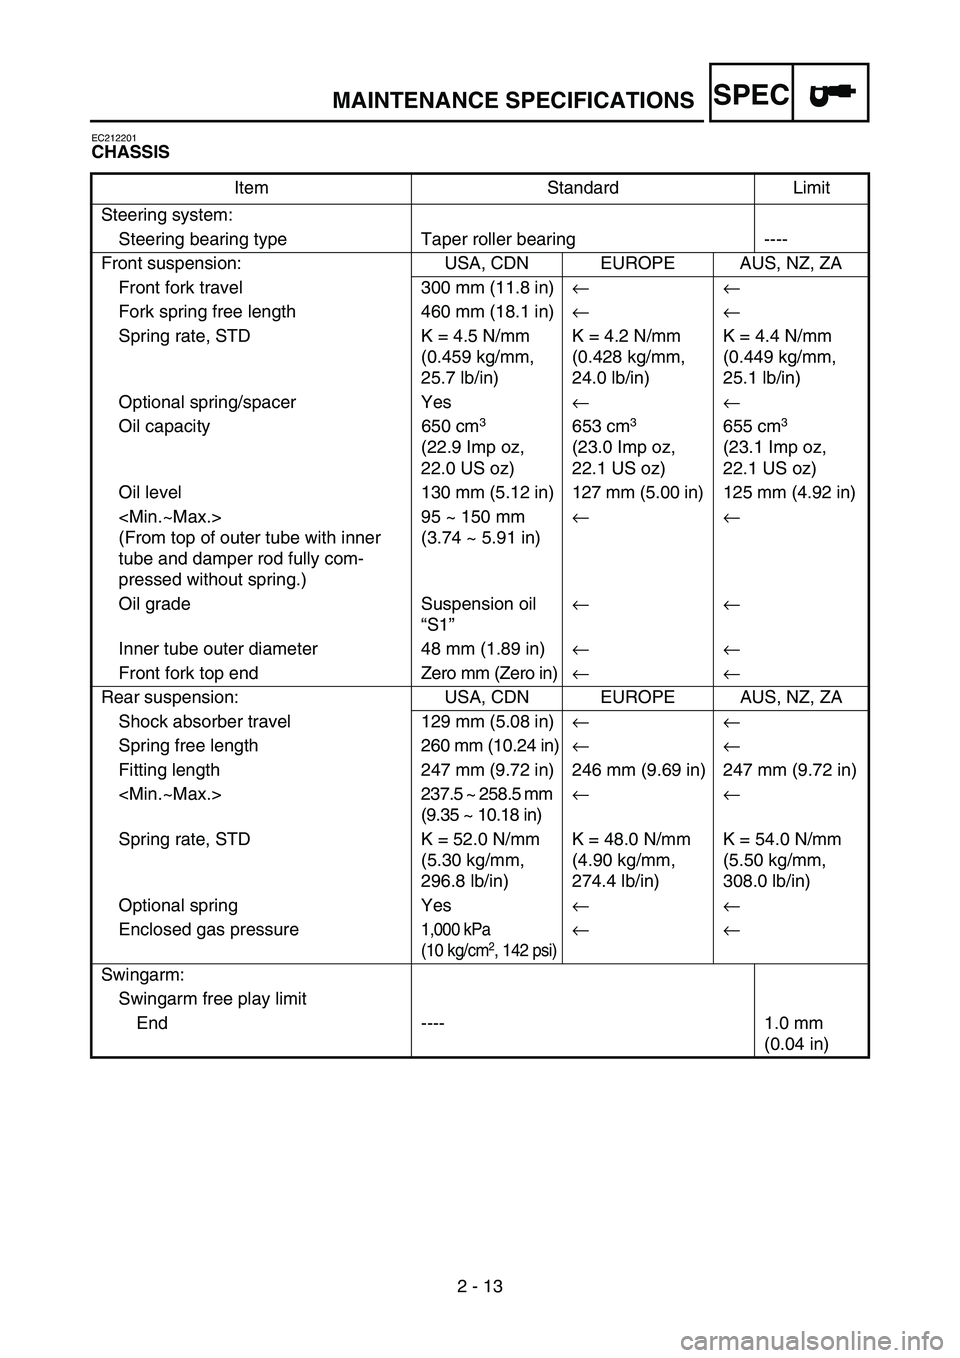
CHASSIS
Item Standard Limit
Steering system:
Steering bearing type Taper roller bearing ----
Front suspension: USA, CDN EUROPE AUS, NZ, ZA
Front fork travel 300 mm (11.8 in)← ←
Fork spring free length 460 mm (18.1 in)← ←
Spring rate, STD K = 4.5 N/mm
(0.459 kg/mm,
25.7 lb/in)K = 4.2 N/mm
(0.428 kg/mm,
24.0 lb/in)K = 4.4 N/mm
(0.449 kg/mm,
25.1 lb/in)
Optional spring/spacer Yes← ←
Oil capacity 650 cm
3
(22.9 Imp oz,
22.0 US oz) 653 cm3
(23.0 Imp oz,
22.1 US oz) 655 cm3
(23.1 Imp oz,
22.1 US oz)
Oil level 130 mm (5.12 in) 127 mm (5.00 in) 125 mm (4.92 in)
(From top of outer tube with inner
tube and damper rod fully com-
pressed without spring.)95 ~ 150 mm
(3.74 ~ 5.91 in)← ←
Oil grade Suspension oil
“S1”← ←
Inner tube outer diameter 48 mm (1.89 in)← ←
Front fork top end Zero mm (Zero in)← ←
Rear suspension: USA, CDN EUROPE AUS, NZ, ZA
Shock absorber travel 129 mm (5.08 in)← ←
Spring free length260 mm (10.24 in)← ←
Fitting length 247 mm (9.72 in) 246 mm (9.69 in) 247 mm (9.72 in)
(9.35 ~ 10.18 in)← ←
Spring rate, STD K = 52.0 N/mm
(5.30 kg/mm,
296.8 lb/in)K = 48.0 N/mm
(4.90 kg/mm,
274.4 lb/in)K = 54.0 N/mm
(5.50 kg/mm,
308.0 lb/in)
Optional spring Yes← ←
Enclosed gas pressure
1,000 kPa
(10 kg/cm2, 142 psi)
← ←
Swingarm:
Swingarm free play limit
End ---- 1.0 mm
(0.04 in)
MAINTENANCE SPECIFICATIONS
Page 104 of 786
SPEC
2 - 15
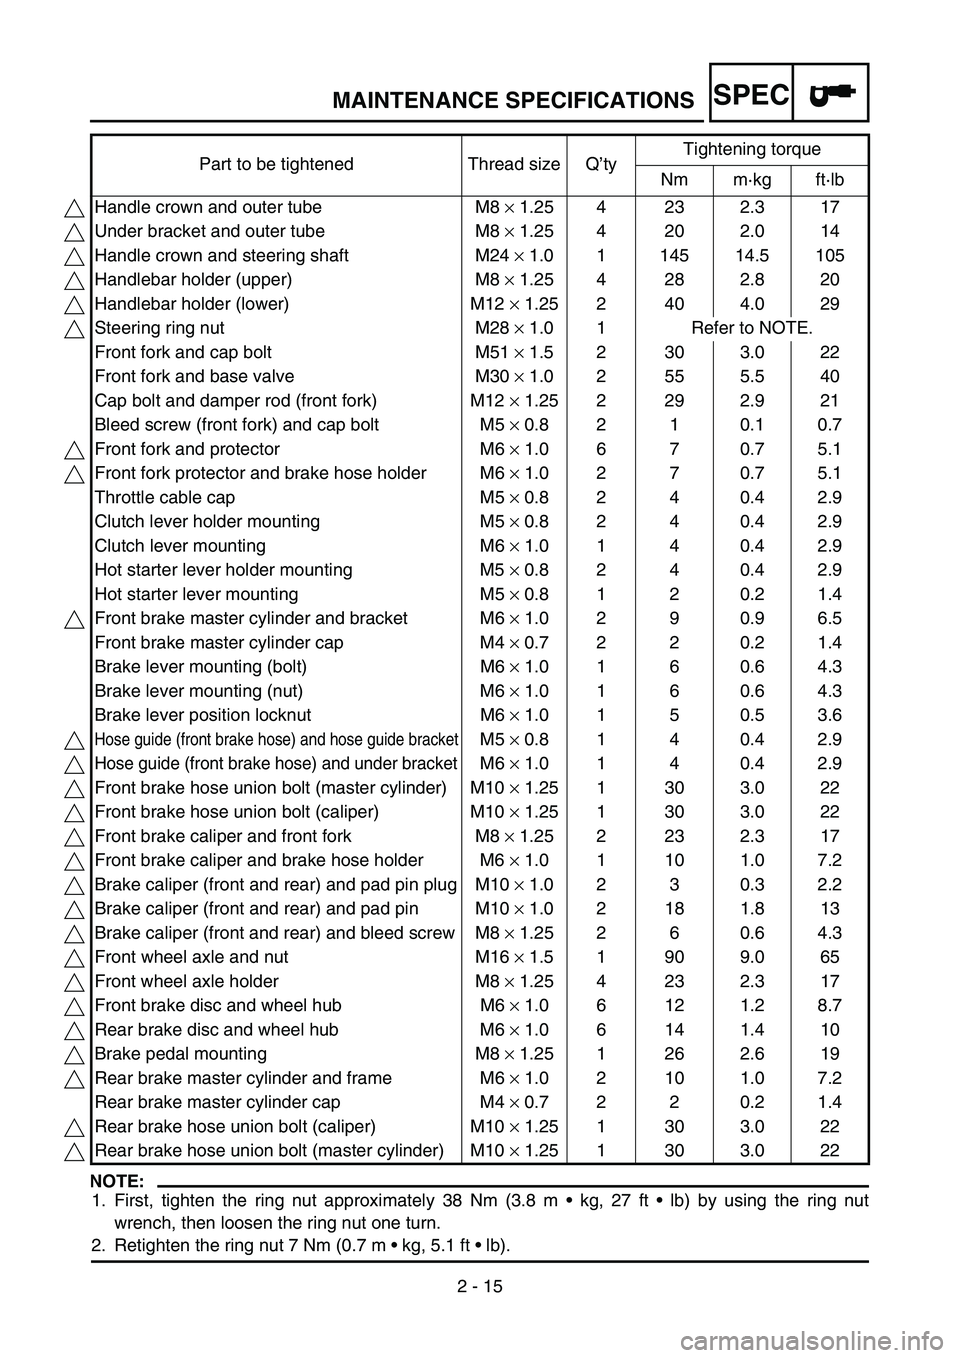
NOTE:
1. First, tighten the ring nut approximately 38 Nm (3.8 m kg, 27 ft lb) by using the ring nut
wrench, then loosen the ring nut one turn.
2. Retighten the ring nut 7 Nm (0.7 m kg, 5.1 ft lb). Part to be tightened Thread size Q’tyTightening torque
Nm m·kg ft·lb
Handle crown and outer tube M8 × 1.25 4 23 2.3 17
Under bracket and outer tube M8 × 1.25 4 20 2.0 14
Handle crown and steering shaft M24 × 1.0 1 145 14.5 105
Handlebar holder (upper) M8 × 1.25 4 28 2.8 20
Handlebar holder (lower) M12 × 1.25 2 40 4.0 29
Steering ring nut M28 × 1.0 1 Refer to NOTE.
Front fork and cap bolt M51 × 1.5 2 30 3.0 22
Front fork and base valve M30 × 1.0 2 55 5.5 40
Cap bolt and damper rod (front fork) M12 × 1.25 2 29 2.9 21
Bleed screw (front fork) and cap bolt M5 × 0.8 2 1 0.1 0.7
Front fork and protector M6 × 1.0 6 7 0.7 5.1
Front fork protector and brake hose holder M6 × 1.0 2 7 0.7 5.1
Throttle cable cap M5 × 0.8 2 4 0.4 2.9
Clutch lever holder mounting M5 × 0.8 2 4 0.4 2.9
Clutch lever mounting M6 × 1.0 1 4 0.4 2.9
Hot starter lever holder mounting M5 × 0.8 2 4 0.4 2.9
Hot starter lever mounting M5 × 0.8 1 2 0.2 1.4
Front brake master cylinder and bracket M6 × 1.0 2 9 0.9 6.5
Front brake master cylinder cap M4 × 0.7 2 2 0.2 1.4
Brake lever mounting (bolt) M6 × 1.0 1 6 0.6 4.3
Brake lever mounting (nut) M6 × 1.0 1 6 0.6 4.3
Brake lever position locknut M6 × 1.0 1 5 0.5 3.6
Hose guide (front brake hose) and hose guide bracketM5 × 0.8 1 4 0.4 2.9
Hose guide (front brake hose) and under bracketM6 × 1.0 1 4 0.4 2.9
Front brake hose union bolt (master cylinder) M10 × 1.25 1 30 3.0 22
Front brake hose union bolt (caliper) M10 × 1.25 1 30 3.0 22
Front brake caliper and front fork M8 × 1.25 2 23 2.3 17
Front brake caliper and brake hose holder M6 × 1.0 1 10 1.0 7.2
Brake caliper (front and rear) and pad pin plug M10 × 1.0 2 3 0.3 2.2
Brake caliper (front and rear) and pad pin M10 × 1.0 2 18 1.8 13
Brake caliper (front and rear) and bleed screw M8 × 1.25 2 6 0.6 4.3
Front wheel axle and nut M16 × 1.5 1 90 9.0 65
Front wheel axle holder M8 × 1.25 4 23 2.3 17
Front brake disc and wheel hub M6 × 1.0 6 12 1.2 8.7
Rear brake disc and wheel hub M6 × 1.0 6 14 1.4 10
Brake pedal mounting M8 × 1.25 1 26 2.6 19
Rear brake master cylinder and frame M6 × 1.0 2 10 1.0 7.2
Rear brake master cylinder cap M4 × 0.7 2 2 0.2 1.4
Rear brake hose union bolt (caliper) M10 × 1.25 1 30 3.0 22
Rear brake hose union bolt (master cylinder) M10 × 1.25 1 30 3.0 22
MAINTENANCE SPECIFICATIONS
Page 186 of 786

2 - 29
SPECCABLE ROUTING DIAGRAM
ÒPass the speed sensor lead
through the guide on the out-
side of the front fork.
ÓPass the start switch lead and
multi-function display lead (on
the wire harness side) above
the multi-function display lead
(on the side of the multi-func-
tion display lead) and speed
sensor lead, and then to the
right of the chassis.
4
5
Î
Ê Ó
A
B
F-FE-E
C
D
A
D
7
7
Ò ËA
12
È32
É
6
Ê
6
8
Ì0
9
ËÑ C
BÏ
2
Ð 8
8
1Í
4
5
4
5B2
C
DC BB A
F F
EE
EE
Ë
2
Page 188 of 786
3 - 1
INSP
ADJ
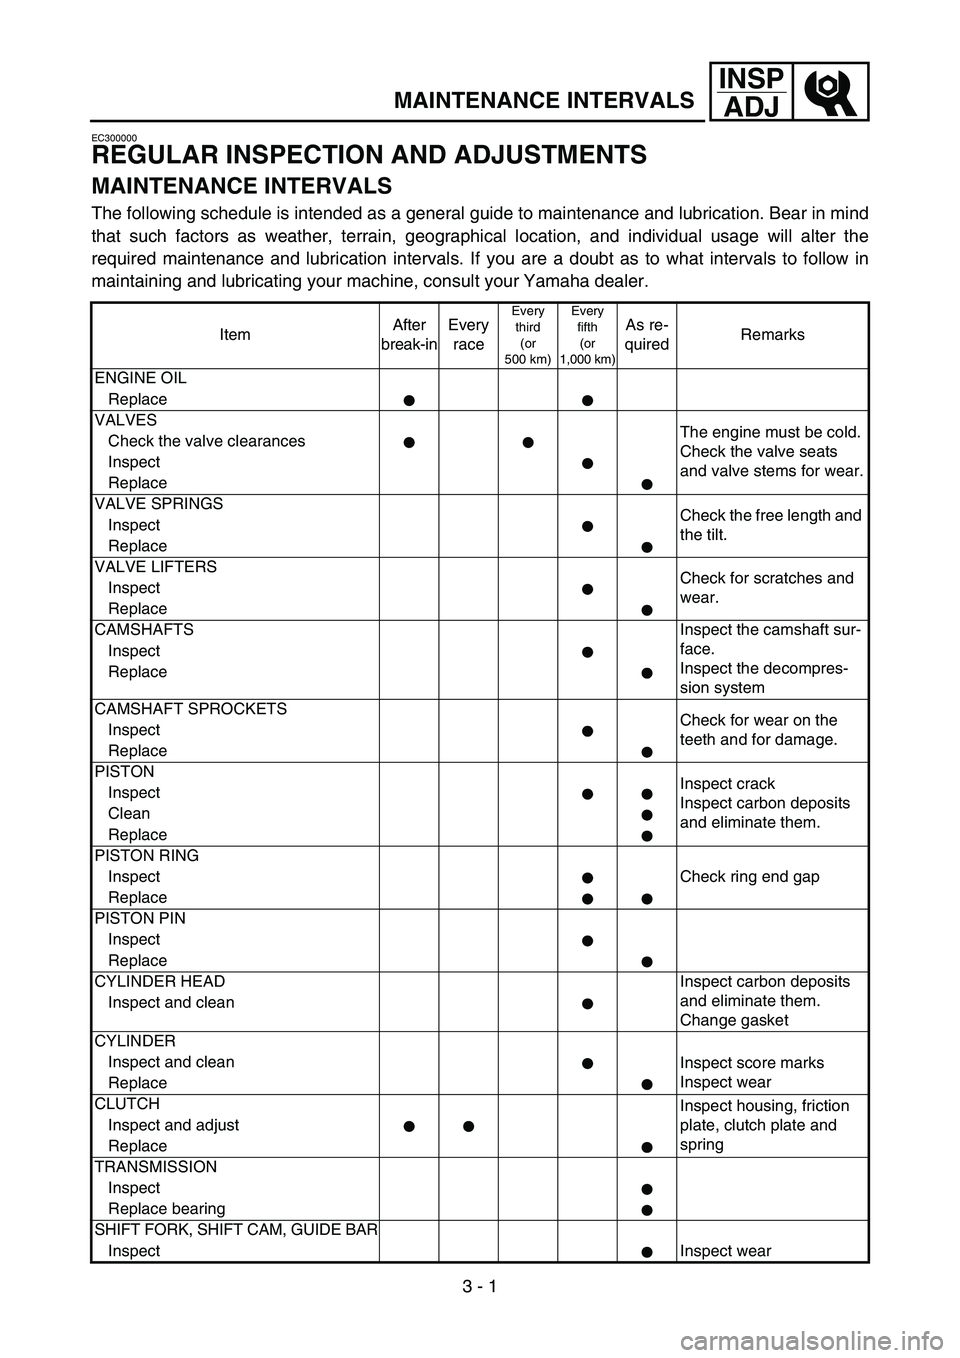
MAINTENANCE INTERVALS
EC300000
REGULAR INSPECTION AND ADJUSTMENTS
MAINTENANCE INTERVALS
The following schedule is intended as a general guide to maintenance and lubrication. Bear in mind
that such factors as weather, terrain, geographical location, and individual usage will alter the
required maintenance and lubrication intervals. If you are a doubt as to what intervals to follow in
maintaining and lubricating your machine, consult your Yamaha dealer.
ItemAfter
break-inEvery
race
Every
third
(or
500 km)Every
fifth
(or
1,000 km)As re-
quiredRemarks
ENGINE OIL
Replace
VALVES
The engine must be cold.
Check the valve seats
and valve stems for wear. Check the valve clearances
Inspect
Replace
VALVE SPRINGS
Check the free length and
the tilt. Inspect
Replace
VALVE LIFTERS
Check for scratches and
wear. Inspect
Replace
CAMSHAFTS Inspect the camshaft sur-
face.
Inspect the decompres-
sion system Inspect
Replace
CAMSHAFT SPROCKETS
Check for wear on the
teeth and for damage. Inspect
Replace
PISTON
Inspect crack
Inspect carbon deposits
and eliminate them. Inspect
Clean
Replace
PISTON RING
Check ring end gap Inspect
Replace
PISTON PIN
Inspect
Replace
CYLINDER HEAD Inspect carbon deposits
and eliminate them.
Change gasket Inspect and clean
CYLINDER
Inspect and clean
Inspect score marks
Inspect wear
Replace
CLUTCH
Inspect housing, friction
plate, clutch plate and
spring Inspect and adjust
Replace
TRANSMISSION
Inspect
Replace bearing
SHIFT FORK, SHIFT CAM, GUIDE BAR
InspectInspect wear