YAMAHA WR 450F 2010 Owners Manual
Manufacturer: YAMAHA, Model Year: 2010, Model line: WR 450F, Model: YAMAHA WR 450F 2010Pages: 230, PDF Size: 13.87 MB
Page 101 of 230
4-8
CHASSIS
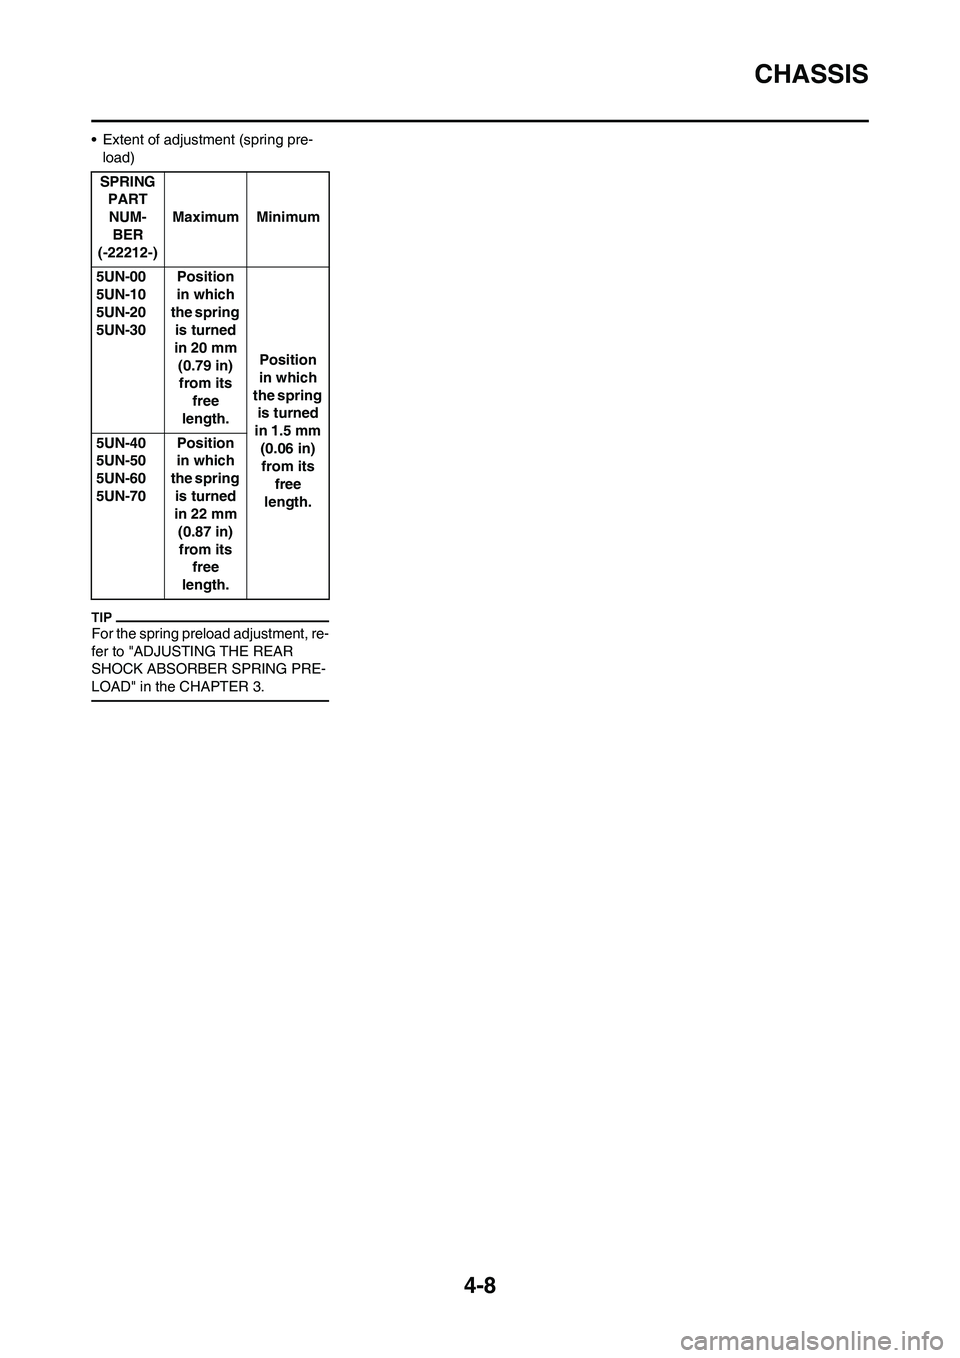
• Extent of adjustment (spring pre-
load)
For the spring preload adjustment, re-
fer to "ADJUSTING THE REAR
SHOCK ABSORBER SPRING PRE-
LOAD" in the CHAPTER 3.
SPRING
PART
NUM-
B E R
(-22212-)Maximum Minimum
5UN-00
5UN-10
5UN-20
5UN-30Position
in which
the spring
is turned
in 20 mm
(0.79 in)
from its
free
length.Position
in which
the spring
is turned
in 1.5 mm
(0.06 in)
from its
free
length. 5UN-40
5UN-50
5UN-60
5UN-70Position
in which
the spring
is turned
in 22 mm
(0.87 in)
from its
free
length.
Page 102 of 230
4-9
CHASSIS
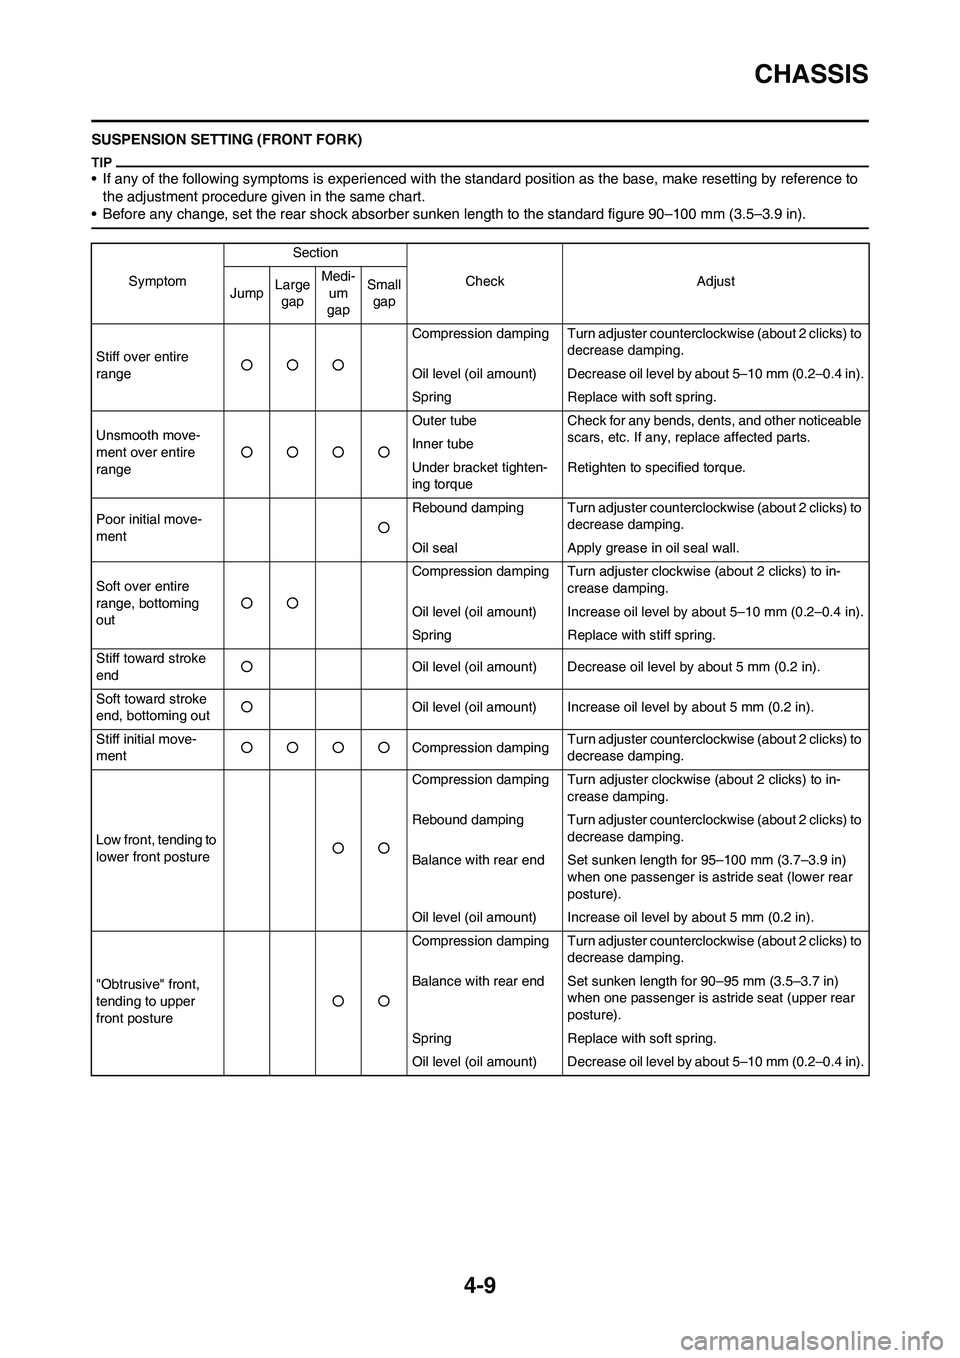
SUSPENSION SETTING (FRONT FORK)
• If any of the following symptoms is experienced with the standard position as the base, make resetting by reference to
the adjustment procedure given in the same chart.
• Before any change, set the rear shock absorber sunken length to the standard figure 90–100 mm (3.5–3.9 in).
SymptomSection
Check Adjust
JumpLarge
gapMedi-
um
gapSmall
gap
Stiff over entire
range○○○Compression damping Turn adjuster counterclockwise (about 2 clicks) to
decrease damping.
Oil level (oil amount) Decrease oil level by about 5–10 mm (0.2–0.4 in).
Spring Replace with soft spring.
Unsmooth move-
ment over entire
range○○○○Outer tube Check for any bends, dents, and other noticeable
scars, etc. If any, replace affected parts.
Inner tube
Under bracket tighten-
ing torqueRetighten to specified torque.
Poor initial move-
ment○Rebound damping Turn adjuster counterclockwise (about 2 clicks) to
decrease damping.
Oil seal Apply grease in oil seal wall.
Soft over entire
range, bottoming
out○○Compression damping Turn adjuster clockwise (about 2 clicks) to in-
crease damping.
Oil level (oil amount) Increase oil level by about 5–10 mm (0.2–0.4 in).
Spring Replace with stiff spring.
Stiff toward stroke
end○Oil level (oil amount) Decrease oil level by about 5 mm (0.2 in).
Soft toward stroke
end, bottoming out○Oil level (oil amount) Increase oil level by about 5 mm (0.2 in).
Stiff initial move-
ment○○○○Compression dampingTurn adjuster counterclockwise (about 2 clicks) to
decrease damping.
Low front, tending to
lower front posture○○Compression damping Turn adjuster clockwise (about 2 clicks) to in-
crease damping.
Rebound damping Turn adjuster counterclockwise (about 2 clicks) to
decrease damping.
Balance with rear end Set sunken length for 95–100 mm (3.7–3.9 in)
when one passenger is astride seat (lower rear
posture).
Oil level (oil amount) Increase oil level by about 5 mm (0.2 in).
"Obtrusive" front,
tending to upper
front posture○○Compression damping Turn adjuster counterclockwise (about 2 clicks) to
decrease damping.
Balance with rear end Set sunken length for 90–95 mm (3.5–3.7 in)
when one passenger is astride seat (upper rear
posture).
Spring Replace with soft spring.
Oil level (oil amount) Decrease oil level by about 5–10 mm (0.2–0.4 in).
Page 103 of 230
4-10
CHASSIS
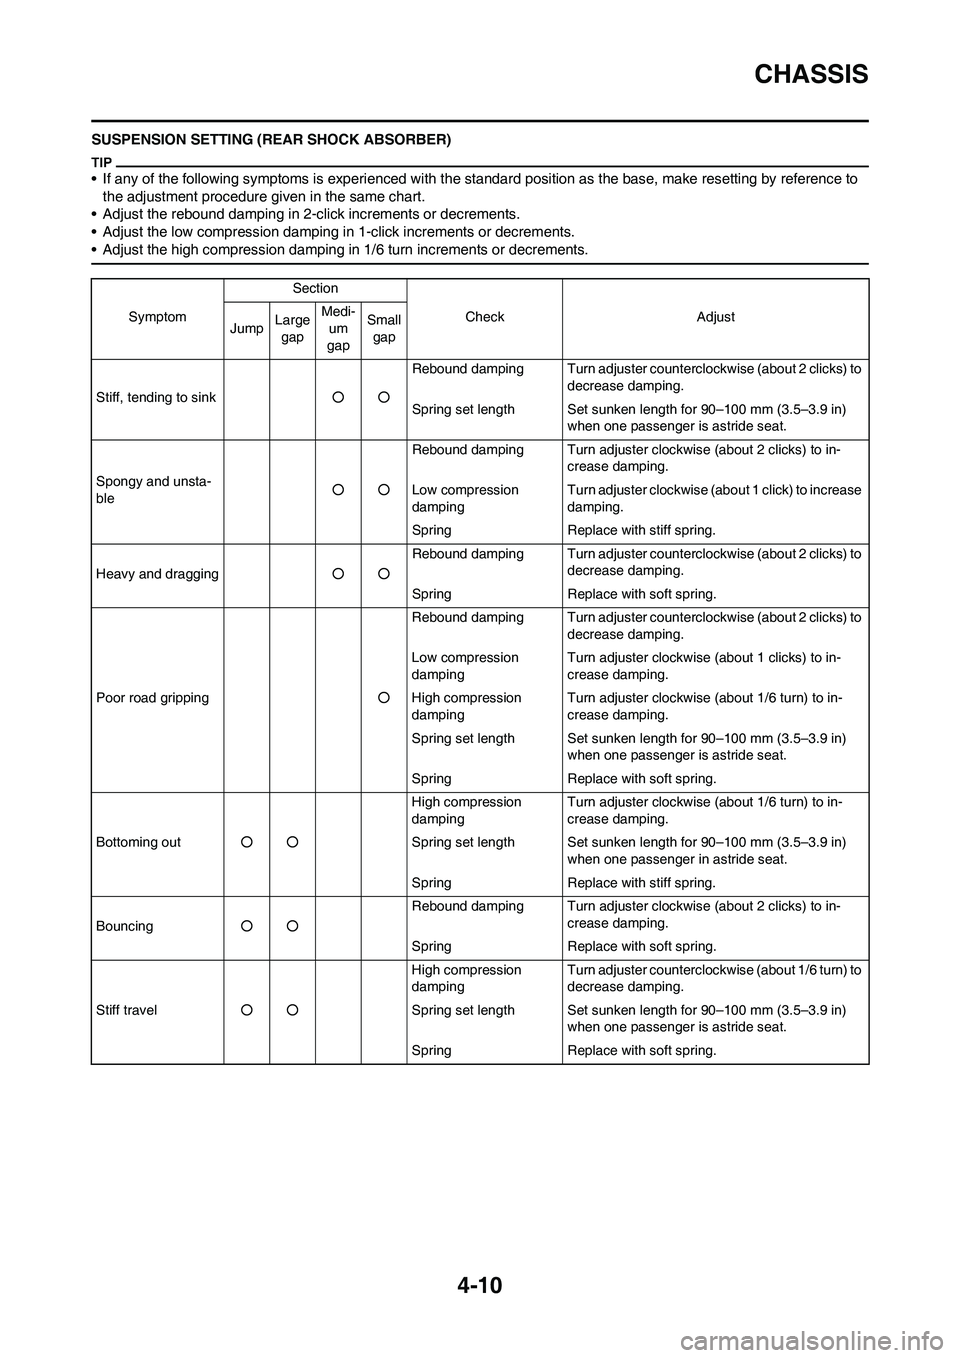
SUSPENSION SETTING (REAR SHOCK ABSORBER)
• If any of the following symptoms is experienced with the standard position as the base, make resetting by reference to
the adjustment procedure given in the same chart.
• Adjust the rebound damping in 2-click increments or decrements.
• Adjust the low compression damping in 1-click increments or decrements.
• Adjust the high compression damping in 1/6 turn increments or decrements.
SymptomSection
Check Adjust
JumpLarge
gapMedi-
um
gapSmall
gap
Stiff, tending to sink○○Rebound damping Turn adjuster counterclockwise (about 2 clicks) to
decrease damping.
Spring set length Set sunken length for 90–100 mm (3.5–3.9 in)
when one passenger is astride seat.
Spongy and unsta-
ble○○Rebound damping Turn adjuster clockwise (about 2 clicks) to in-
crease damping.
Low compression
dampingTurn adjuster clockwise (about 1 click) to increase
damping.
Spring Replace with stiff spring.
Heavy and dragging○○Rebound damping Turn adjuster counterclockwise (about 2 clicks) to
decrease damping.
Spring Replace with soft spring.
Poor road gripping○Rebound damping Turn adjuster counterclockwise (about 2 clicks) to
decrease damping.
Low compression
dampingTurn adjuster clockwise (about 1 clicks) to in-
crease damping.
High compression
dampingTurn adjuster clockwise (about 1/6 turn) to in-
crease damping.
Spring set length Set sunken length for 90–100 mm (3.5–3.9 in)
when one passenger is astride seat.
Spring Replace with soft spring.
Bottoming out○○High compression
dampingTurn adjuster clockwise (about 1/6 turn) to in-
crease damping.
Spring set length Set sunken length for 90–100 mm (3.5–3.9 in)
when one passenger in astride seat.
Spring Replace with stiff spring.
Bouncing○○Rebound damping Turn adjuster clockwise (about 2 clicks) to in-
crease damping.
Spring Replace with soft spring.
Stiff travel○○High compression
dampingTurn adjuster counterclockwise (about 1/6 turn) to
decrease damping.
Spring set length Set sunken length for 90–100 mm (3.5–3.9 in)
when one passenger is astride seat.
Spring Replace with soft spring.
Page 104 of 230
5-1
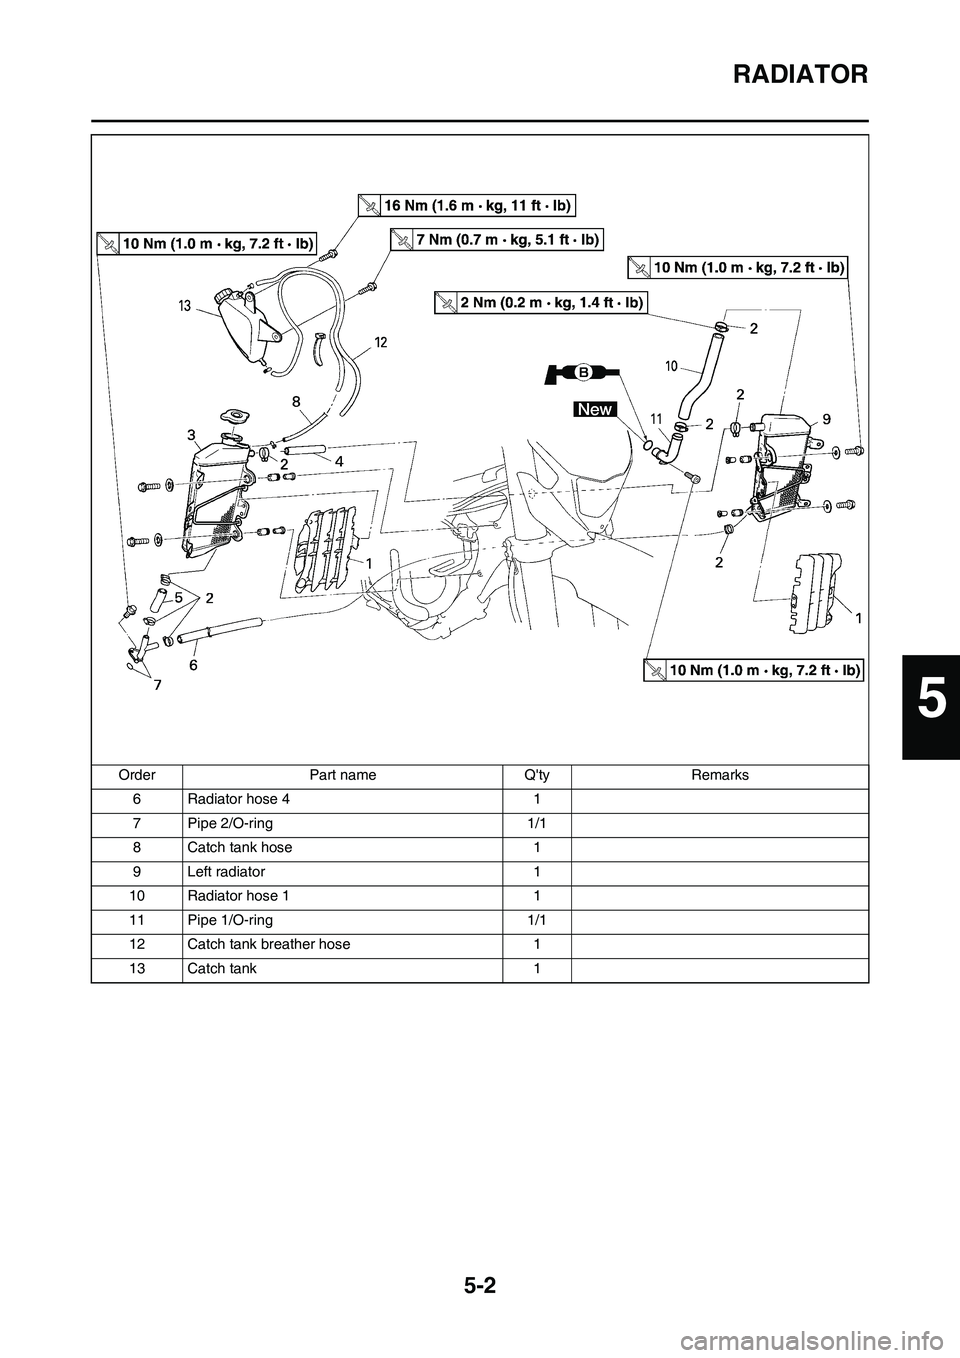
RADIATOR
ENGINE
This section is intended for those who have basic knowledge and skill concerning the servicing of Yamaha motorcycles
(e.g., Yamaha dealers, service engineers, etc.) Those who have little knowledge and skill concerning servicing are request-
ed not to undertake inspection, adjustment, disassembly, or reassembly only by reference to this manual. It may lead to
servicing trouble and mechanical damage.
RADIATOR
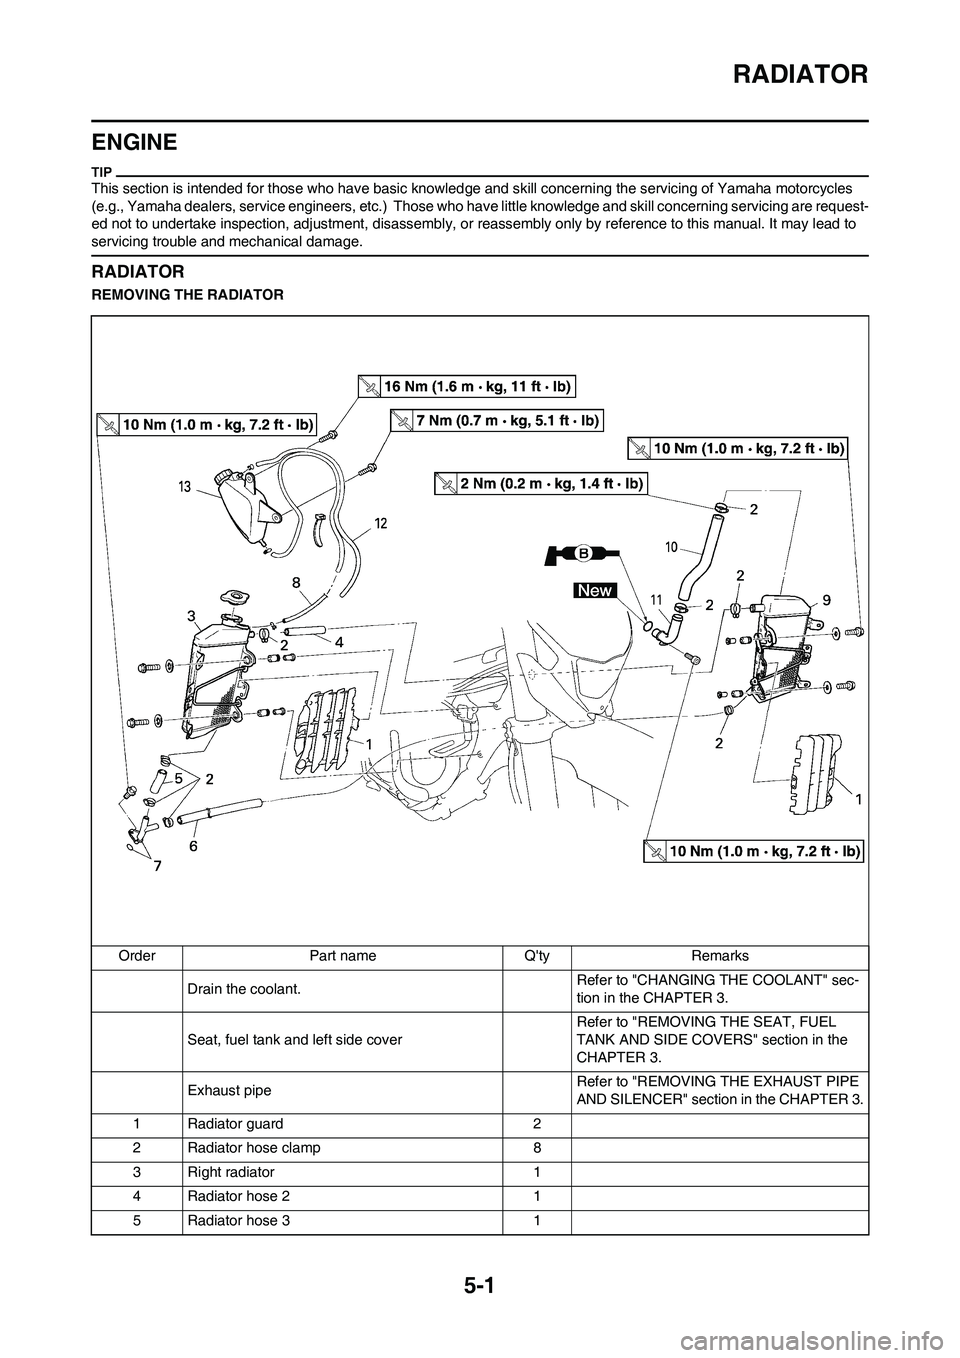
REMOVING THE RADIATOR
Order Part name Q'ty Remarks Drain the coolant. Refer to "CHANGING
THE COOLANT" sec-
tion in the CHAPTER 3.
Seat, fuel tank and left side cover Refer to "REMOVING THE SEAT, FUEL
TANK AND SIDE COVERS" section in the
CHAPTER 3.
Exhaust pipe Refer to "REMOVING THE EXHAUST PIPE
AND SILENCER" section in the CHAPTER 3.
1 Radiator guard 2
2 Radiator hose clamp 8
3 Right radiator 1
4 Radiator hose 2 1
5 Radiator hose 3 1
Page 105 of 230
5-2
RADIATOR
6 Radiator hose 4 1
7 Pipe 2/O-ring 1/1
8 Catch tank hose 1
9 Left radiator 1
10 Radiator hose 1 1
11 Pipe 1/O-ring 1/1
12 Catch tank breather hose 1
13 Catch tank 1 Order Part name Q'ty Remarks
5
Page 106 of 230

5-3
RADIATOR
HANDLING NOTE
Do not remove the radiator cap
when the engine and radiator are
hot. Scalding hot fluid and steam
may be blown out under pressure,
which could cause serious injury.
When the engine has cooled, open
the radiator cap by the following
procedure:
Place a thick rag, like a towel, over
the radiator cap, slowly rotate the
cap counterclockwise to the de-
tent. This procedure allows any re-
sidual pressure to escape. When
the hissing sound has stopped,
press down on the cap while turn-
ing counterclockwise and remove
it.
CHECKING THE RADIATOR
1. Inspect:
• Radiator core "1"
Obstruction→Blow out with com-
pressed air through rear of the ra-
diator.
Bent fin→Repair/replace.
INSTALLING THE RADIATOR
1. Install:
• Pipe 1 "1"
• Radiator hose 1 "2"
• Pipe 2 "3"
• Radiator hose 3 "4"
• Radiator hose 4 "5"2. Install:
• Radiator hose 2 "1"
• Left radiator "2"
3. Install:
• Catch tank hose "1"
• Right radiator "2"
Refer to "CABLE ROUTING DIA-
GRAM" section in the CHAPTER
2.
4. Install:
• Radiator guard "1"
First fit the inner hook portion "a" and
then the outer one "b" onto the radia-
tor.
5. Install:
• Catch tank "1"
• Bolt (catch tank) "2"
• Bolt (catch tank) "3"
• Catch tank hose "4"
• Catch tank breather hose "5"
Refer to "CABLE ROUTING DIA-
GRAM" section in the CHAPTER
2.
Pipe 1:
10 Nm (1.0 m•kg, 7.2
ft•lb)
Radiator hose 1:
2 Nm (0.2 m•kg, 1.4
ft•lb)
Pipe 2:
10 Nm (1.0 m•kg, 7.2
ft•lb)
Radiator hose 3:
2 Nm (0.2 m•kg, 1.4
ft•lb)
Radiator hose 4:
2 Nm (0.2 m•kg, 1.4
ft•lb)
Radiator hose 2:
2 Nm (0.2 m•kg, 1.4
ft•lb)
Left radiator:
10 Nm (1.0 m•kg, 7.2
ft•lb)
Right radiator:
10 Nm (1.0 m•kg, 7.2
ft•lb)
Bolt (catch tank):
7 Nm (0.7 m•kg, 5.1
ft•lb)
Bolt (catch tank):
16 Nm (1.6 m•kg, 11
ft•lb)
Page 107 of 230

5-4
CARBURETOR
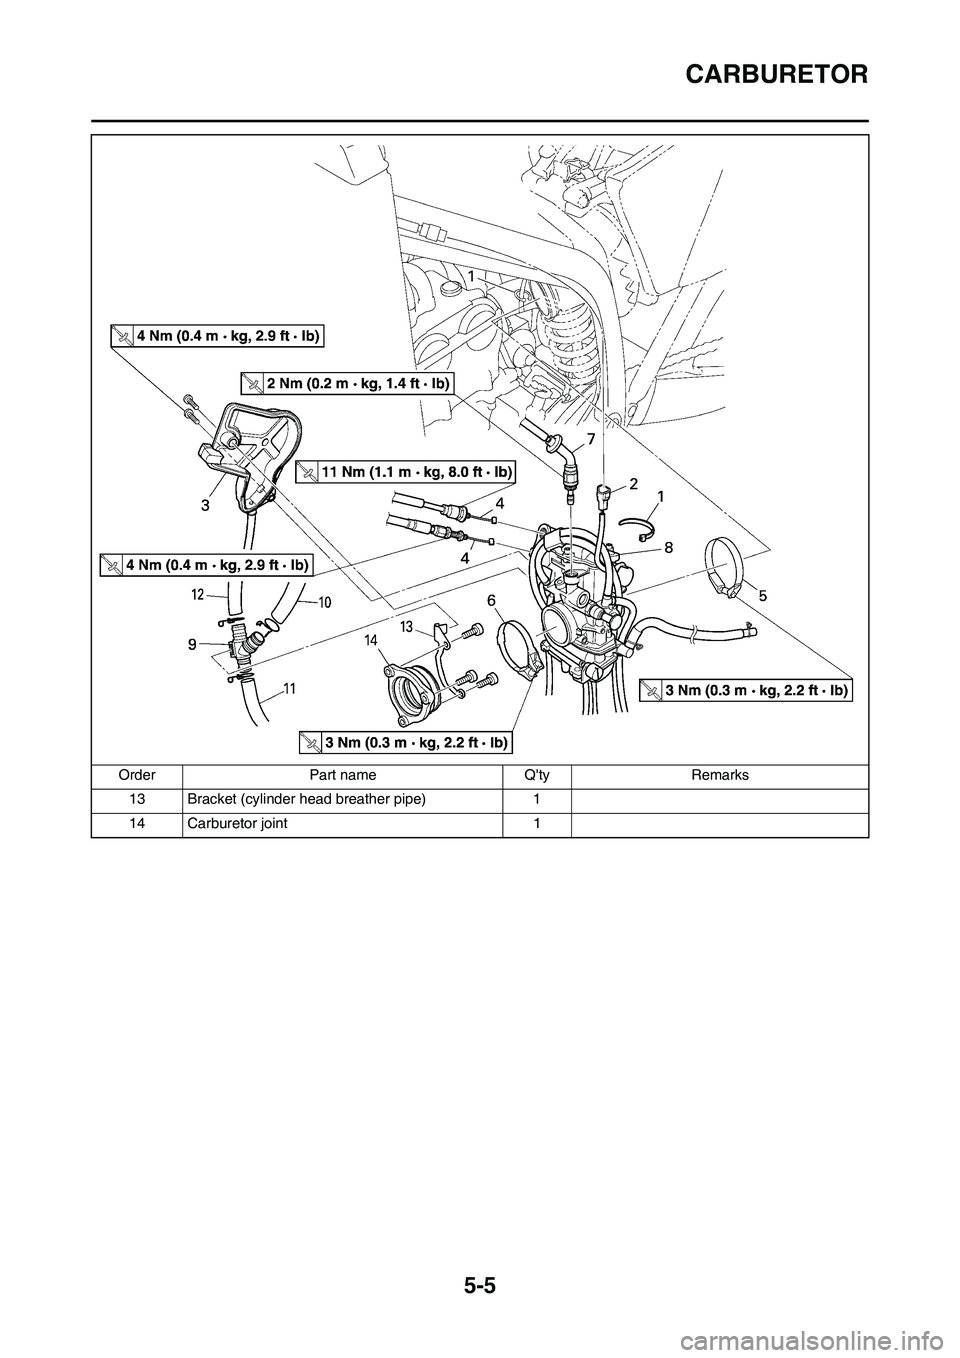
CARBURETOR
REMOVING THE CARBURETOR
Order Part name Q'ty Remarks
Seat and fuel tank Refer to "REMOVING THE SEAT, FUEL
TANK AND SIDE COVERS" section in the
CHAPTER 3.
Rear shock absorber Refer to "REAR SHOCK ABSORBER" sec-
tion in the CHAPTER 6.
1Clamp 2
2 Throttle position sensor lead coupler 1
3 Throttle cable cover 1
4 Throttle cable 2
5 Clamp (air filter joint) 1 Loosen the screw (air filter joint).
6 Clamp (carburetor joint) 1 Loosen the screws (carburetor joint).
7 Hot starter plunger 1
8 Carburetor 1
9 Cylinder head breather pipe 1
10 Cylinder head breather hose 1 1
11 Cylinder head breather hose 2 1
12 Cylinder head breather hose 3 1
Page 108 of 230
5-5
CARBURETOR
13 Bracket (cylinder head breather pipe) 1
14 Carburetor joint 1 Order Part name Q'ty Remarks
Page 109 of 230
5-6
CARBURETOR
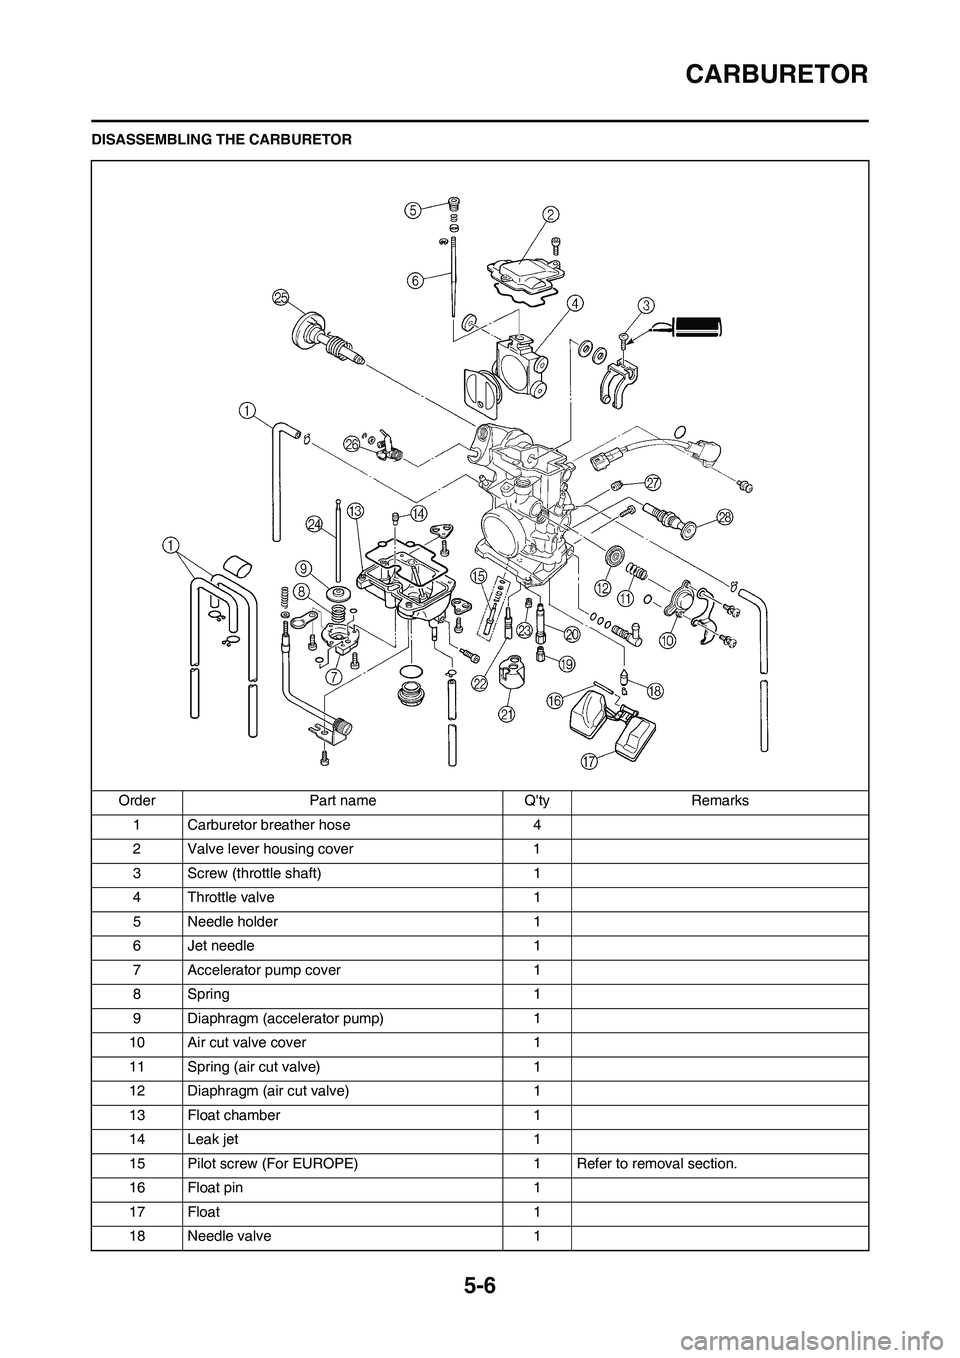
DISASSEMBLING THE CARBURETOR
Order Part name Q'ty Remarks
1 Carburetor breather hose 4
2 Valve lever housing cover 1
3 Screw (throttle shaft) 1
4 Throttle valve 1
5 Needle holder 1
6 Jet needle 1
7 Accelerator pump cover 1
8Spring 1
9 Diaphragm (accelerator pump) 1
10 Air cut valve cover 1
11 Spring (air cut valve) 1
12 Diaphragm (air cut valve) 1
13 Float chamber 1
14 Leak jet 1
15 Pilot screw (For EUROPE) 1 Refer to removal section.
16 Float pin 1
17 Float 1
18 Needle valve 1
Page 110 of 230
5-7
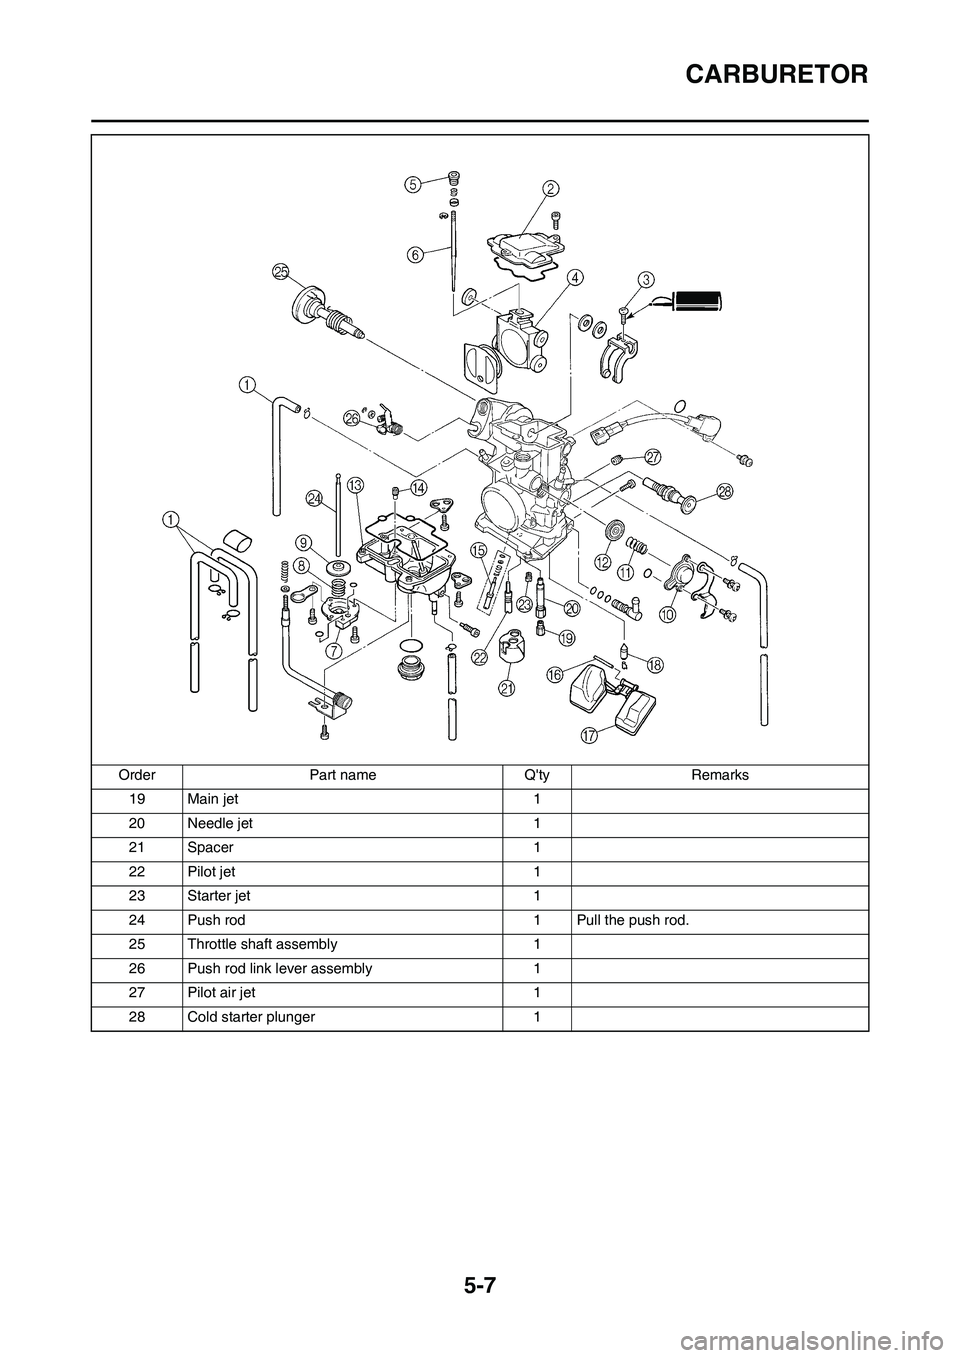
CARBURETOR
19 Main jet 1
20 Needle jet 1
21 Spacer 1
22 Pilot jet 1
23 Starter jet 1
24 Push rod 1 Pull the push rod.
25 Throttle shaft assembly 1
26 Push rod link lever assembly 1
27 Pilot air jet 1
28 Cold starter plunger 1 Order Part name Q'ty Remarks