fuel YAMAHA XT600E 2000 Owners Manual
[x] Cancel search | Manufacturer: YAMAHA, Model Year: 2000, Model line: XT600E, Model: YAMAHA XT600E 2000Pages: 96, PDF Size: 4.23 MB
Page 11 of 96
EAU00026
DESCRIPTION
12
3
4
5
6
7
8
9
2-1
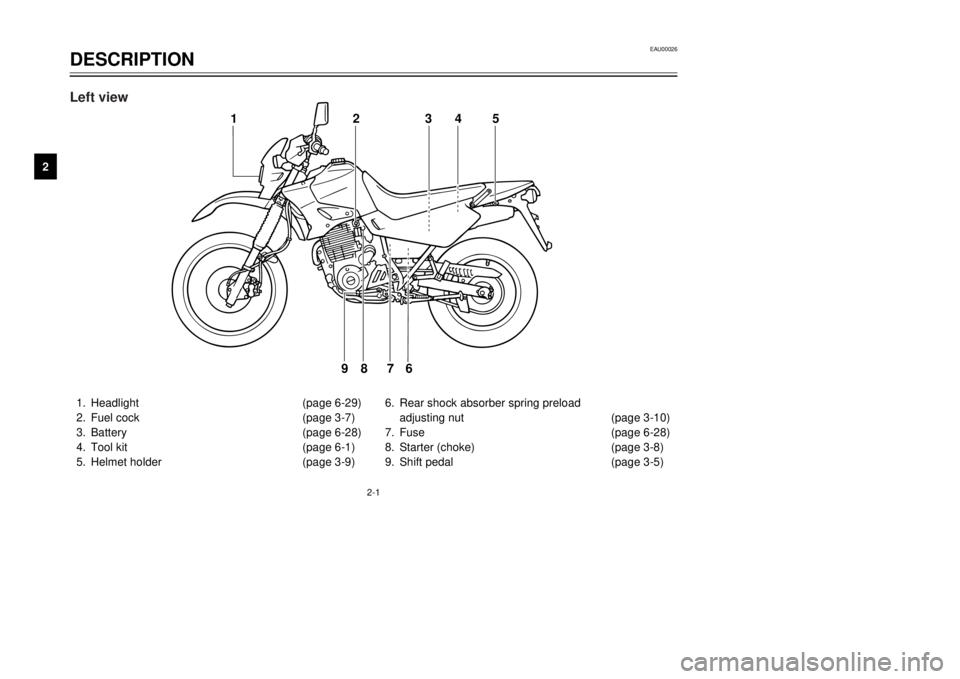
1.Headlight (page 6-29)
2.Fuel cock (page 3-7)
3.Battery (page 6-28)
4.Tool kit (page 6-1)
5.Helmet holder (page 3-9)6.Rear shock absorber spring preload
adjusting nut (page 3-10)
7.Fuse (page 6-28)
8.Starter (choke) (page 3-8)
9.Shift pedal (page 3-5)
1
2
3
45
6
7 8 9
Left view
4PT-9-E6 (ENG) 1~5 12/27/00 1:28 PM Page 10
Page 13 of 96
12
3
4
5
6
7
8
9
EAU00026
DESCRIPTION
2-3
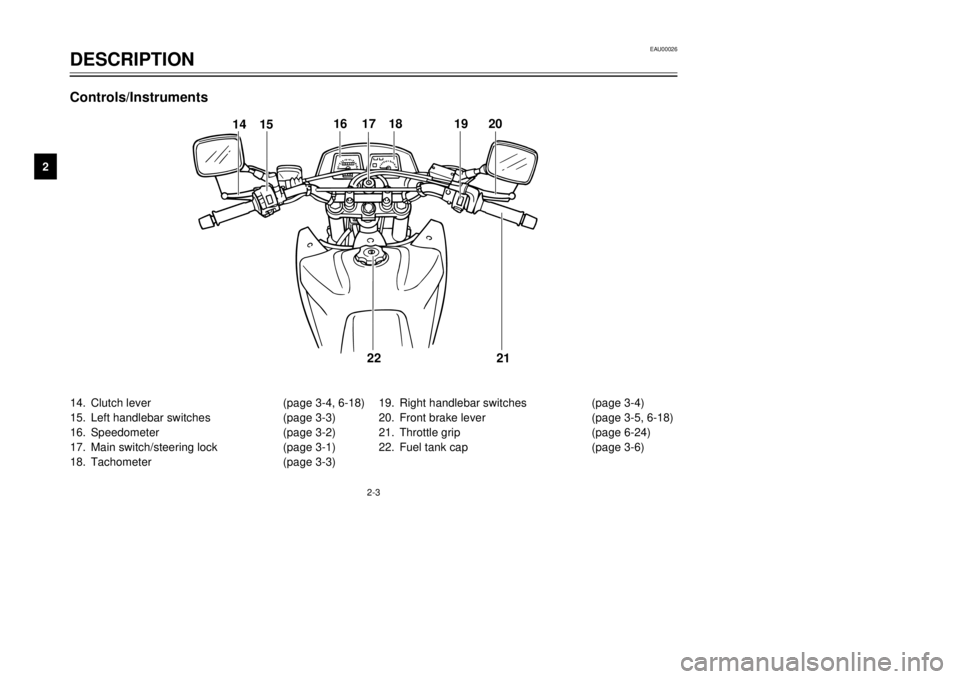
14.Clutch lever (page 3-4, 6-18)
15.Left handlebar switches (page 3-3)
16.Speedometer (page 3-2)
17.Main switch/steering lock (page 3-1)
18.Tachometer (page 3-3)19.Right handlebar switches (page 3-4)
20.Front brake lever (page 3-5, 6-18)
21.Throttle grip (page 6-24)
22.Fuel tank cap (page 3-6)
14
15161718
1920
21 22
Controls/Instruments
4PT-9-E6 (ENG) 1~5 12/27/00 1:28 PM Page 12
Page 14 of 96
INSTRUMENT AND CONTROL FUNCTIONSMain switch/steering lock.......................................................................3-1
Indicator lights.......................................................................................3-2
Speedometer.........................................................................................3-2
Tachometer...........................................................................................3-3
Handlebar switches...............................................................................3-3
Clutch lever............................................................................................3-4
Shift pedal..............................................................................................3-5
Front brake lever...................................................................................3-5
Rear brake pedal...................................................................................3-5
Fuel tank cap.........................................................................................3-6
Fuel........................................................................................................3-6
Fuel cock...............................................................................................3-7
Starter (choke) Ò
1Ó...............................................................................3-8
Seat.......................................................................................................3-9
Helmet holder........................................................................................3-9
Rear shock absorber adjustment.........................................................3-10
Sidestand.............................................................................................3-11
Sidestand/clutch switch operation check.............................................3-12
3
4PT-9-E6 (ENG) 1~5 12/27/00 1:28 PM Page 13
Page 16 of 96
3-2
12
3&
5
N
EAU00056
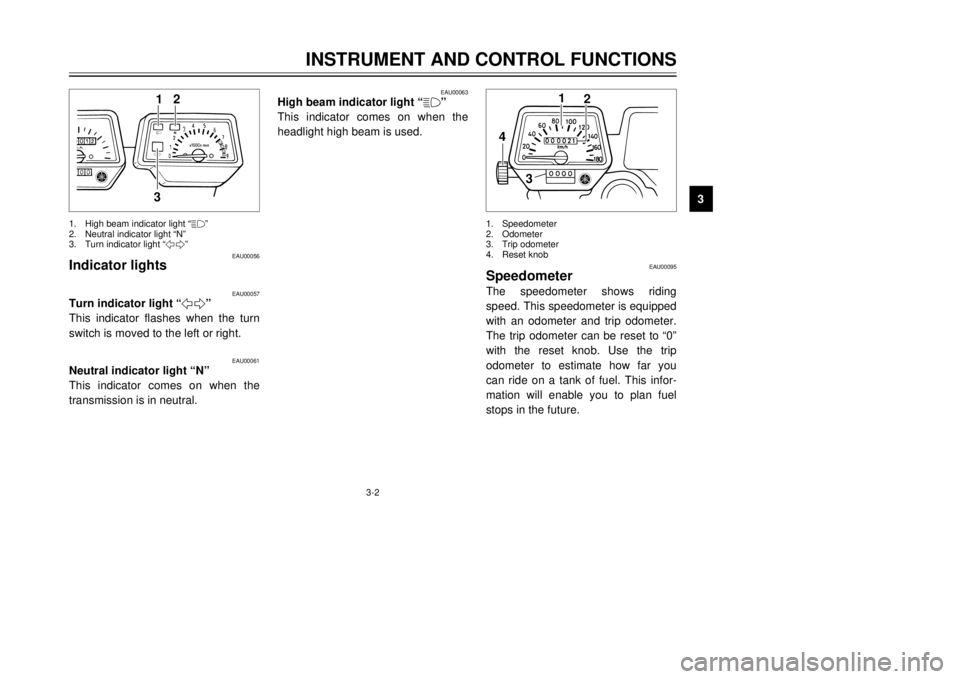
Indicator lights
EAU00057
Turn indicator light
Ò5Ó
This indicator flashes when the turn
switch is moved to the left or right.
EAU00061
Neutral indicator light ÒNÓ
This indicator comes on when the
transmission is in neutral.
EAU00063
High beam indicator light Ò&Ó
This indicator comes on when the
headlight high beam is used.
EAU00095
SpeedometerThe speedometer shows riding
speed. This speedometer is equipped
with an odometer and trip odometer.
The trip odometer can be reset to Ò0Ó
with the reset knob. Use the trip
odometer to estimate how far you
can ride on a tank of fuel. This infor-
mation will enable you to plan fuel
stops in the future.
1.High beam indicator light Ò&Ó
2.Neutral indicator light ÒNÓ
3.Turn indicator light Ò5Ó
INSTRUMENT AND CONTROL FUNCTIONS
1
23
4
5
6
7
8
9
1
2
4
3
1.Speedometer
2.Odometer
3.Trip odometer
4.Reset knob
4PT-9-E6 (ENG) 1~5 12/27/00 1:28 PM Page 15
Page 20 of 96

3-6
INSTRUMENT AND CONTROL FUNCTIONS
1
23
4
5
6
7
8
9
2
1
EAU00177
Fuel tank capTo open
Insert the key and turn it 1/4 turn
counterclockwise. Turn the cap 1/3
turn counterclockwise and remove it
from the tank.
To close
Put the cap in the filler neck and turn
it 1/3 turn clockwise. Lock the cap by
turning the key 1/4 turn clockwise,
and remove the key.1.Unlock
2.Open
NOTE:
The tank cap cannot be reinstalled
unless it is unlocked. The key must
remain in the cap until the cap is
properly installed and locked onto the
fuel tank.
EW000023
wBe sure the cap is properly
installed and locked in place
before riding the motorcycle.
2
1
1.Filler tube
2.Fuel level
EAU01183
FuelMake sure there is sufficient fuel in
the tank. Fill the fuel tank to the bot-
tom of the filler tube as shown in the
illustration.
EW000130
wDo not overfill the fuel tank. Avoid
spilling fuel on the hot engine. Do
not fill the fuel tank above the bot-
tom of the filler tube or it may
overflow when the fuel heats up
later and expands.
4PT-9-E6 (ENG) 1~5 12/27/00 1:28 PM Page 19
Page 21 of 96

3-7
INSTRUMENT AND CONTROL FUNCTIONS
1
23
4
5
6
7
8
9
EAU00185
cCAlways wipe off spilled fuel imme-
diately with a dry and clean soft
cloth. Fuel may deteriorate painted
surfaces or plastic parts.
EAU00191
NOTE:
If knocking or pinging occurs, use a
different brand of gasoline or higher
octane grade.
EAU03050
Fuel cockThe fuel cock supplies fuel from the
tank to the carburetor while filtering it
also.
The fuel cock has three positions:
OFF
With the lever in this position, fuel will
not flow. Always return the lever to
this position when the engine is not
running. Recommended fuel:
Regular unleaded gasoline
with a research octane
number of 91 or higher.
Fuel tank capacity:
Total:
15.0 L
Reserve:
2.0 L
RES
ONFUEL
OFF
1
1.Arrow mark pointing to ÒOFFÓOFF: closed position
4PT-9-E6 (ENG) 1~5 12/27/00 1:28 PM Page 20
Page 22 of 96

3-8
OFF
ONFUEL RES
1
RES
RES
This indicates reserve. If you run out
of fuel while riding, move the lever to
this position. Fill the tank at the first
opportunity. Be sure to set the lever
back to ÒONÓ after refueling!1.Arrow mark pointing to ÒRESÓ
INSTRUMENT AND CONTROL FUNCTIONS
1
23
4
5
6
7
8
9
1
b
a
EAU00210
Starter (choke) Ò1ÓStarting a cold engine requires a rich-
er air-fuel mixture. A separate starter
circuit supplies this mixture.
Move in direction ato turn on the
starter (choke).
Move in direction bto turn off the
starter (choke).1.Starter (choke) Ò1Ó
ON
FUEL
RES
OFF
1
ON
ON
With the lever in this position, fuel
flows to the carburetor. Normal riding
is done with the lever in this position.1.Arrow mark pointing to ÒONÓON:normal position
RES: reserve position
4PT-9-E6 (ENG) 1~5 12/27/00 1:28 PM Page 21
Page 30 of 96

4-2
PRE-OPERATION CHECKS
1
2
34
5
6
7
8
9
ITEMCHECKSPAGE
Sidestand pivot9Check for smooth operation.
6-25
9Lubricate if necessary.
Chassis fasteners9Make sure that all nuts, bolts, and screws are properly tightened.
Ñ
9Tighten if necessary.
Fuel tank9Check fuel level.
3-6 ~ 3-7
9Fill with fuel if necessary.
Lights, signals and
9Check for proper operation.6-29 ~ 6-32
switches
NOTE:
Pre-operation checks should be made each time the motorcycle is used. Such an inspection can be accomplished in a
very short time; and the added safety it assures is more than worth the time involved.wIf any item in the Pre-Operation Check is not working properly, have it inspected and repaired before operating
the motorcycle.
4PT-9-E6 (ENG) 1~5 12/27/00 1:28 PM Page 29
Page 32 of 96
OPERATION AND IMPORTANT RIDING POINTS
Starting the engine.............................................................................5-1
Starting a warm engine.......................................................................5-3
Shifting................................................................................................5-4
Recommended shift point (for Switzerland only)................................5-4
Tips for reducing fuel consumption.....................................................5-5
Engine break-in..................................................................................5-5
Parking...............................................................................................5-6
5
4PT-9-E6 (ENG) 1~5 12/27/00 1:28 PM Page 31
Page 35 of 96

5-3
1.Turn the fuel cock to ÒONÓ.
2.Turn the main switch to ÒONÓ and
the engine stop switch to Ò#Ó.
3.Shift the transmission into neu-
tral.NOTE:
When the transmission is in neutral,
the neutral indicator light should be
on. If the light does not come on, ask
a Yamaha dealer to inspect it.4.Turn on the starter (choke) and
completely close the throttle grip.
5.Start the engine by pushing the
start switch.
NOTE:
If the engine fails to start, release the
start switch, wait a few seconds, then
try again. Each attempt should be as
short as possible to preserve the bat-
tery. Do not crank the engine more
than 10 seconds on any one attempt.6.After starting the engine, move
the starter (choke) to the halfway
position.NOTE:
For maximum engine life, never
accelerate hard with a cold engine!7.After warming up the engine,
turn off the starter (choke) com-
pletely.NOTE:
The engine is warm when it responds
normally to the throttle with the starter
(choke) turned off.
EAU01258
Starting a warm engineThe starter (choke) is not required
when the engine is warm.
EC000046
cCSee the ÒEngine break-inÓ section
prior to operating the motorcycle
for the first time.
OPERATION AND IMPORTANT RIDING POINTS
1
2
3
45
6
7
8
94PT-9-E6 (ENG) 1~5 12/27/00 1:28 PM Page 34