lock YAMAHA YXZ1000R SS 2020 Owner's Manual
[x] Cancel search | Manufacturer: YAMAHA, Model Year: 2020, Model line: YXZ1000R SS, Model: YAMAHA YXZ1000R SS 2020Pages: 212, PDF Size: 9.36 MB
Page 76 of 212
![YAMAHA YXZ1000R SS 2020 Owners Manual 5-44
5
BAS7
BAS54. Tighten the locknut to the specified
torque. NOTICE: Always tighten the
locknut against the adjusting nut, and
then tighten it to the specified torque.
[ECB00082]
Crossover settin YAMAHA YXZ1000R SS 2020 Owners Manual 5-44
5
BAS7
BAS54. Tighten the locknut to the specified
torque. NOTICE: Always tighten the
locknut against the adjusting nut, and
then tighten it to the specified torque.
[ECB00082]
Crossover settin](/img/51/53897/w960_53897-75.png)
5-44
5
BAS7
BAS54. Tighten the locknut to the specified
torque. NOTICE: Always tighten the
locknut against the adjusting nut, and
then tighten it to the specified torque.
[ECB00082]
Crossover setting (BAS5)
The crossover setting adjusts the timing when
the shock absorber transitions from the soft
spring to the hard spring.TIP It is recommended to adjust the crossover
setting a similar distance whenever the
spring preload is adjusted.
The crossover setting is measured from the
bottom of the spring retainer to the top of
the crossover locknut.
1. Distance A
1. Distance A
11
Tightening torque:
Locknut:41 N·m (4.1 kgf·m, 30 lb·ft)
UBAS7AE0.book Page 44 Wednesday, June 19, 2019 11:51 AM
Page 77 of 212

5-45
5
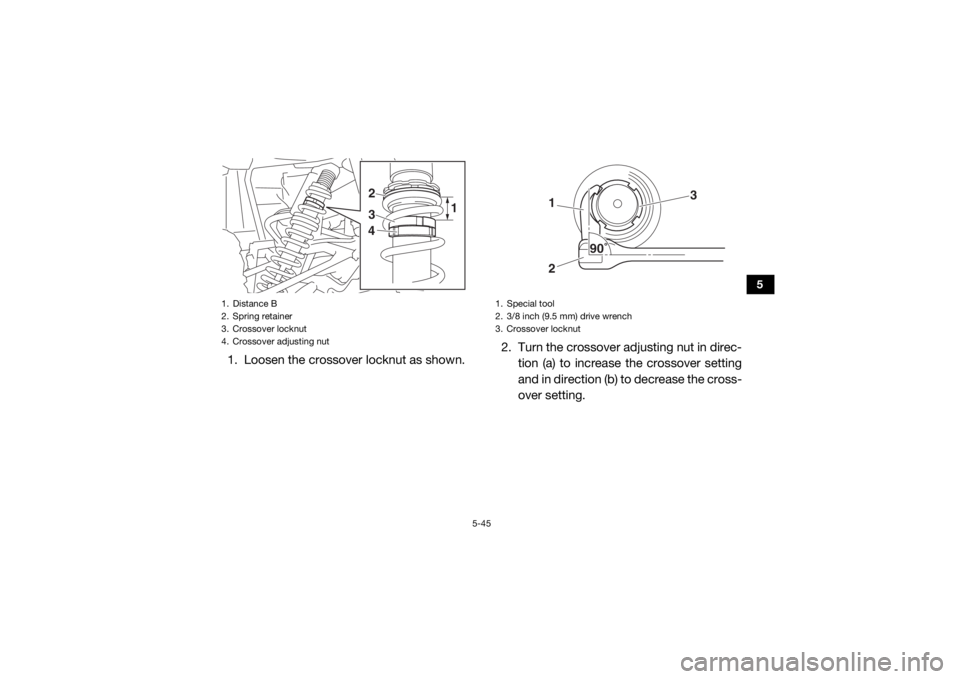
1. Loosen the crossover locknut as shown.2. Turn the crossover adjusting nut in direc-
tion (a) to increase the crossover setting
and in direction (b) to decrease the cross-
over setting.1. Distance B
2. Spring retainer
3. Crossover locknut
4. Crossover adjusting nut
32
4 1
1. Special tool
2. 3/8 inch (9.5 mm) drive wrench
3. Crossover locknut
12
3
90�
UBAS7AE0.book Page 45 Wednesday, June 19, 2019 11:51 AM
Page 78 of 212
![YAMAHA YXZ1000R SS 2020 Owners Manual 5-46
5
3. Tighten the locknut to the specifiedtorque. NOTICE: Always tighten the
locknut against the adjusting nut, and
then tighten it to the specified torque.
[ECB00082]
1. Distance B
2. Spring re YAMAHA YXZ1000R SS 2020 Owners Manual 5-46
5
3. Tighten the locknut to the specifiedtorque. NOTICE: Always tighten the
locknut against the adjusting nut, and
then tighten it to the specified torque.
[ECB00082]
1. Distance B
2. Spring re](/img/51/53897/w960_53897-77.png)
5-46
5
3. Tighten the locknut to the specifiedtorque. NOTICE: Always tighten the
locknut against the adjusting nut, and
then tighten it to the specified torque.
[ECB00082]
1. Distance B
2. Spring retainer
3. Crossover locknut
4. Crossover adjusting nutCrossover setting: Minimum (soft):Distance B = 48.5 mm (1.91 in)
Standard (recommended): Distance B = 61.2 mm (2.41 in)
Maximum (hard): Distance B = 73.9 mm (2.91 in)
32
4 1
(b)
(a)
Tightening torque:
Locknut:41 N·m (4.1 kgf·m, 30 lb·ft)1. Special tool
2. Torque wrench
3. Crossover locknut
21
3
90�
UBAS7AE0.book Page 46 Wednesday, June 19, 2019 11:51 AM
Page 89 of 212

6-7
6
EBU31800Seat beltsMake sure that the seat belts are not frayed,
torn, stretched, or damaged. The seat belts
must move smoothly when pulled out and re-
tract on its own when released. The seat belts
must also lock up when quickly pulled out.
The latch plate should click securely into the
buckle and release when the release button is
pushed firmly. Wash off any dirt or mud that
could affect operation. Have a Yamaha dealer
repair as necessary for proper operation.
A crash can damage the restraint systems in
your vehicle. A damaged restraint system
may not properly protect the person using it,
resulting in serious injury or death in a crash.
To help make sure your restraint systems are
working properly after a crash, have them in-
spected and any necessary replacements
made as soon as possible.
EBU31810Passenger handholdCheck that the handhold bar and its supports
are in good condition. Confirm that the lock-
ing pins are securely fastened, and then push
and pull on the handhold to make sure that it
is not loose.EBU31820SteeringPark on level ground. Turn the steering wheel
right and left. Check for excessive free play,
abnormal noises, or a rough feeling. Have a
Yamaha dealer repair as necessary for proper operation.EBU36691Drive select lever and shift paddlesThe drive select lever and shift paddles
should move smoothly and return to their
original position.
UBAS7AE0.book Page 7 Wednesday, June 19, 2019 11:51 AM
Page 100 of 212

7-8
7
the engine is not warmed up or is overheat-
ing.
the driver seat belt is not latched.
the differential gear is locked (“DIFF LOCK”
is selected) or the differential gear lock indi-
cator is flashing.
the parking brake is applied.
an engine or system malfunction is detect-
ed (a warning light is on). To activate the launch system1. Confirm that the front wheels and steer-
ing wheel are pointed straight ahead.
2. Shift the transmission into first gear.
3. While pressing the brake pedal, pull both
shift paddles toward you and hold them
in that position. The launch system indi-
cator light will come on, and the launch
system enters standby mode. 4. While checking in front of you for obsta-
cles or anything that may cross your
path, release the brake pedal, and then
press the accelerator pedal to rev the en-
gine to the desired launch engine speed.
TIPThe engine speed at launch must be be-
tween 5000–10000 r/min.
If you release one shift paddle, or if a sys-
tem restriction is detected during standby
mode, the launch system indicator light will
begin to flash and the launch will be can-
celled.
UBAS7AE0.book Page 8 Wednesday, June 19, 2019 11:51 AM
Page 102 of 212

7-10
7
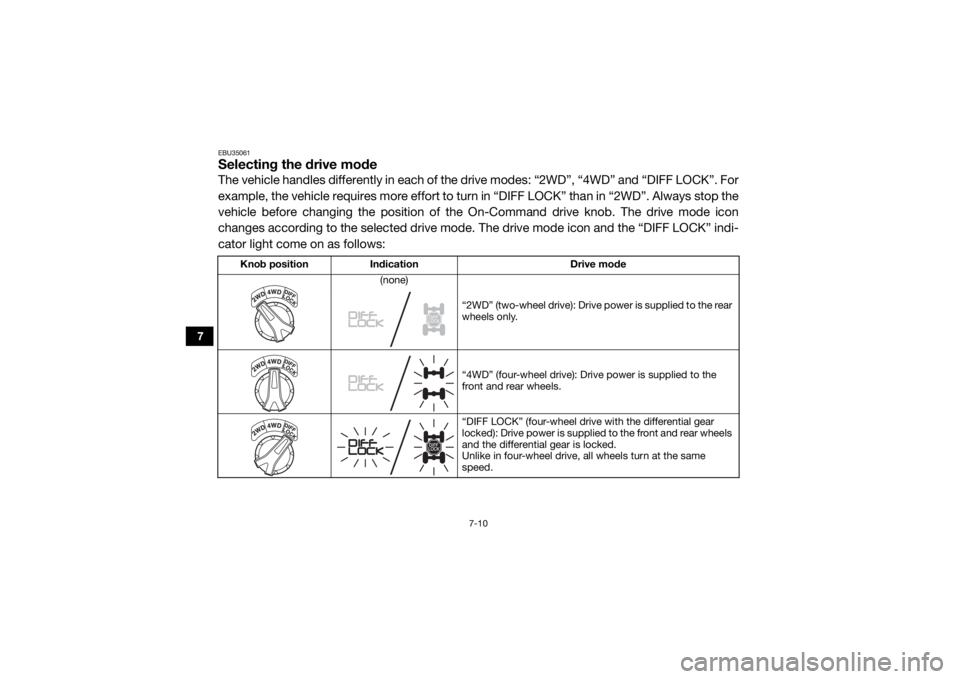
EBU35061Selecting the drive modeThe vehicle handles differently in each of the drive modes: “2WD”, “4WD” and “DIFF LOCK”. For
example, the vehicle requires more effort to turn in “DIFF LOCK” than in “2WD”. Always stop the
vehicle before changing the position of th e On-Command drive knob. The drive mode icon
changes according to the selected drive mode. The drive mode icon and the “DIFF LOCK” indi-
cator light come on as follows:
Knob position Indication Drive mode
(none)
“2WD” (two-wheel drive): Drive power is supplied to the rear
wheels only.
“4WD” (four-wheel drive): Drive power is supplied to the
front and rear wheels.
“DIFF LOCK” (four-wheel drive with the differential gear
locked): Drive power is supplied to the front and rear wheels
and the differential gear is locked.
Unlike in four-wheel drive, all wheels turn at the same
speed.
UBAS7AE0.book Page 10 Wednesday, June 19, 2019 11:51 AM
Page 103 of 212

7-11
7
TIPWhen the knob is set to “DIFF LOCK” or “4WD ”, the drive mode icon and the indicator light
will flash until the differential gear is completely locked or unlocked.
Turning the steering wheel back and forth will help the differential gear lock to engage or dis-
engage.
To protect the drivetrain from damage, vehicle speed is limited until the differential gear lock
has properly transitioned. UBAS7AE0.book Page 11 Wednesday, June 19, 2019 11:51 AM
Page 114 of 212

8-9
8
Adjust the handhold position as follows.1. Remove the locking pins. 2. Slide the handhold to
the desired position
and align the holes in the handhold bar
with the holes in the handhold supports.
3. Insert the pins into the holes and secure them with the wire loops. Make sure that
the handhold is properly secured before
starting off.1. Passenger handhold
2. Locking pin
1
2
1. Handhold support
2. Handhold bar
2
1
1
UBAS7AE0.book Page 9 Wednesday, June 19, 2019 11:51 AM
Page 118 of 212

8-13
8
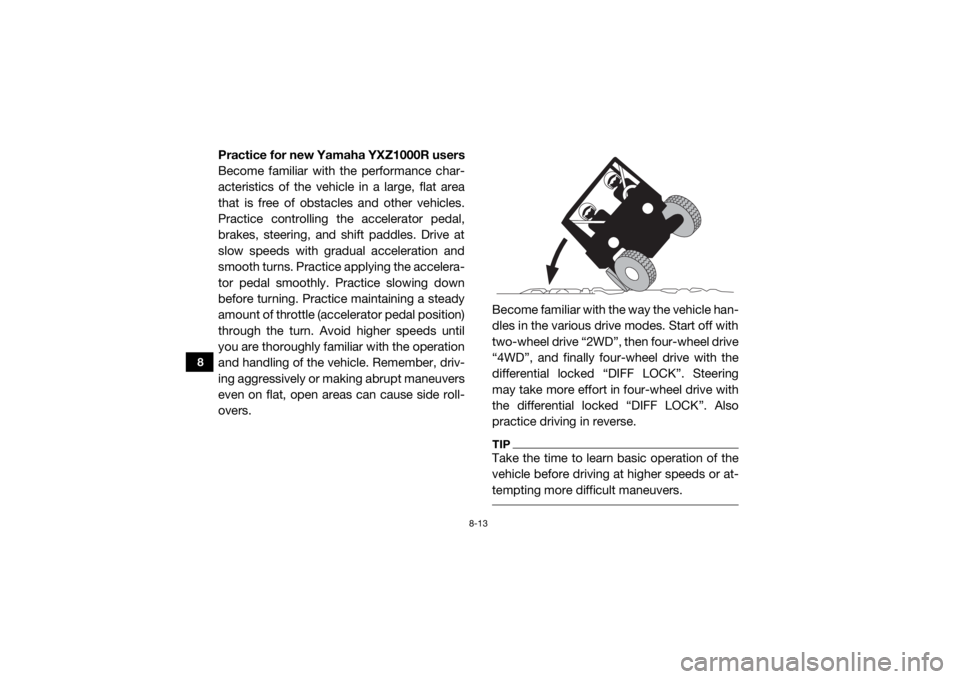
Practice for new Yamaha YXZ1000R users
Become familiar with the performance char-
acteristics of the vehicle in a large, flat area
that is free of obstacles and other vehicles.
Practice controlling the accelerator pedal,
brakes, steering, and shift paddles. Drive at
slow speeds with gradual acceleration and
smooth turns. Practice applying the accelera-
tor pedal smoothly. Practice slowing down
before turning. Practice maintaining a steady
amount of throttle (accelerator pedal position)
through the turn. Avoid higher speeds until
you are thoroughly familiar with the operation
and handling of the vehicle. Remember, driv-
ing aggressively or making abrupt maneuvers
even on flat, open areas can cause side roll-
overs.Become familiar with the way the vehicle han-
dles in the various drive modes. Start off with
two-wheel drive “2WD”, then four-wheel drive
“4WD”, and finally four-wheel drive with the
differential locked “DIFF LOCK”. Steering
may take more effort in four-wheel drive with
the differential locked “DIFF LOCK”. Also
practice driving in reverse.
TIPTake the time to learn basic operation of the
vehicle before driving at higher speeds or at-
tempting more difficult maneuvers.
UBAS7AE0.book Page 13 Wednesday, June 19, 2019 11:51 AM
Page 121 of 212

8-16
8
Parking on a slope
The parking brake is located on the rear drive
shaft. When the drivetrain is in “2WD” mode,
only the rear wheels will be locked. Therefore,
switch the drive mode to “DIFF LOCK” before
stopping the engine to lock all four wheels
when parking. In addition to the parking
brake, leave the transmission in gear to help
prevent the vehicle from rolling.
If you park on a hill that is too steep, the vehi-
cle may roll out of control. Never park on hills
that are so steep you cannot walk up them
easily. If you must park on an incline, follow
these instructions:1. First, bring the vehicle to a stop and con- tinue to apply the brake pedal.
2. Switch the drive mode to “DIFF LOCK”
and shift into first gear when parking up-
hill, or reverse gear when parking down-
hill.
TIPYou may need to turn the steering wheel left
and right to help the differential lock into pla-
ce. 3. Stop the engine (turn the key to “ ”[off]).
4. With the brake pedal still being applied, set the parking brake.
5. Finally, get out of the vehicle and block
the front and rear wheels with rocks or
other objects.
Loading
Be aware that vehicle load includes the total
combined weight of the operator, passenger,
any installed accessories, and any luggage or
cargo brought on board or stored in the cargo
bed. Make sure that the gross vehicle weight
(vehicle load plus weight of the vehicle itself)
never exceeds 1065 kg (2348 lb).
UBAS7AE0.book Page 16 Wednesday, June 19, 2019 11:51 AM