YAMAHA YZ125LC 2012 Manual Online
Manufacturer: YAMAHA, Model Year: 2012, Model line: YZ125LC, Model: YAMAHA YZ125LC 2012Pages: 168, PDF Size: 8.27 MB
Page 81 of 168
4-19
CLUTCH
CLUTCH
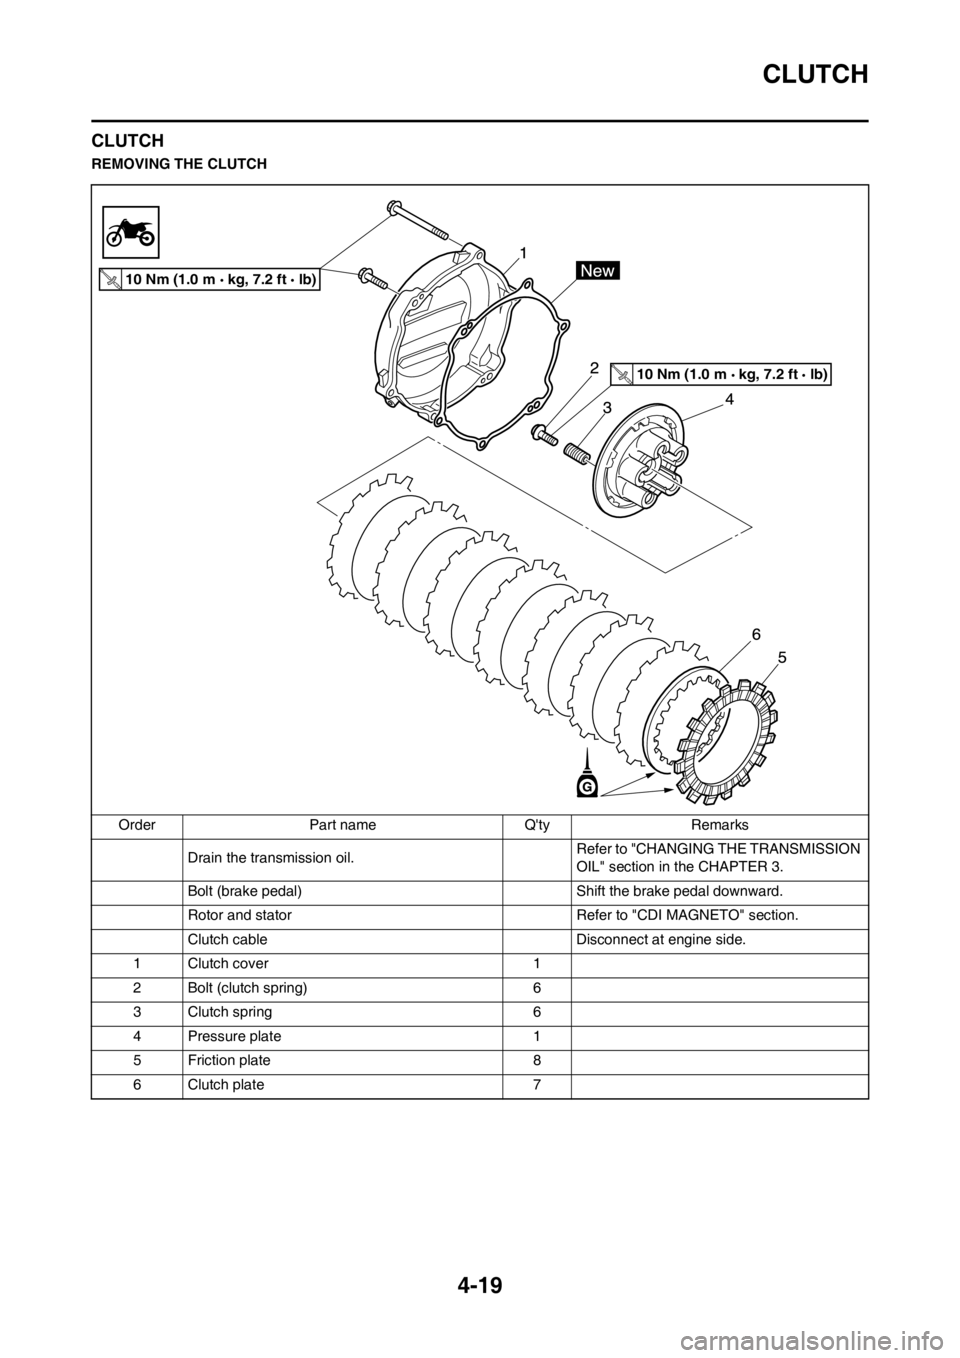
REMOVING THE CLUTCH
Order Part name Q'ty Remarks
Drain the transmission oil.Refer to "CHANGING THE TRANSMISSION
OIL" section in the CHAPTER 3.
Bolt (brake pedal) Shift the brake pedal downward.
Rotor and stator Refer to "CDI MAGNETO" section.
Clutch cable Disconnect at engine side.
1 Clutch cover 1
2 Bolt (clutch spring) 6
3 Clutch spring 6
4 Pressure plate 1
5 Friction plate 8
6 Clutch plate 7
10 Nm (1.0 m kg, 7.2 ft lb)
10 Nm (1.0 m kg, 7.2 ft lb)
Page 82 of 168
4-20
CLUTCH
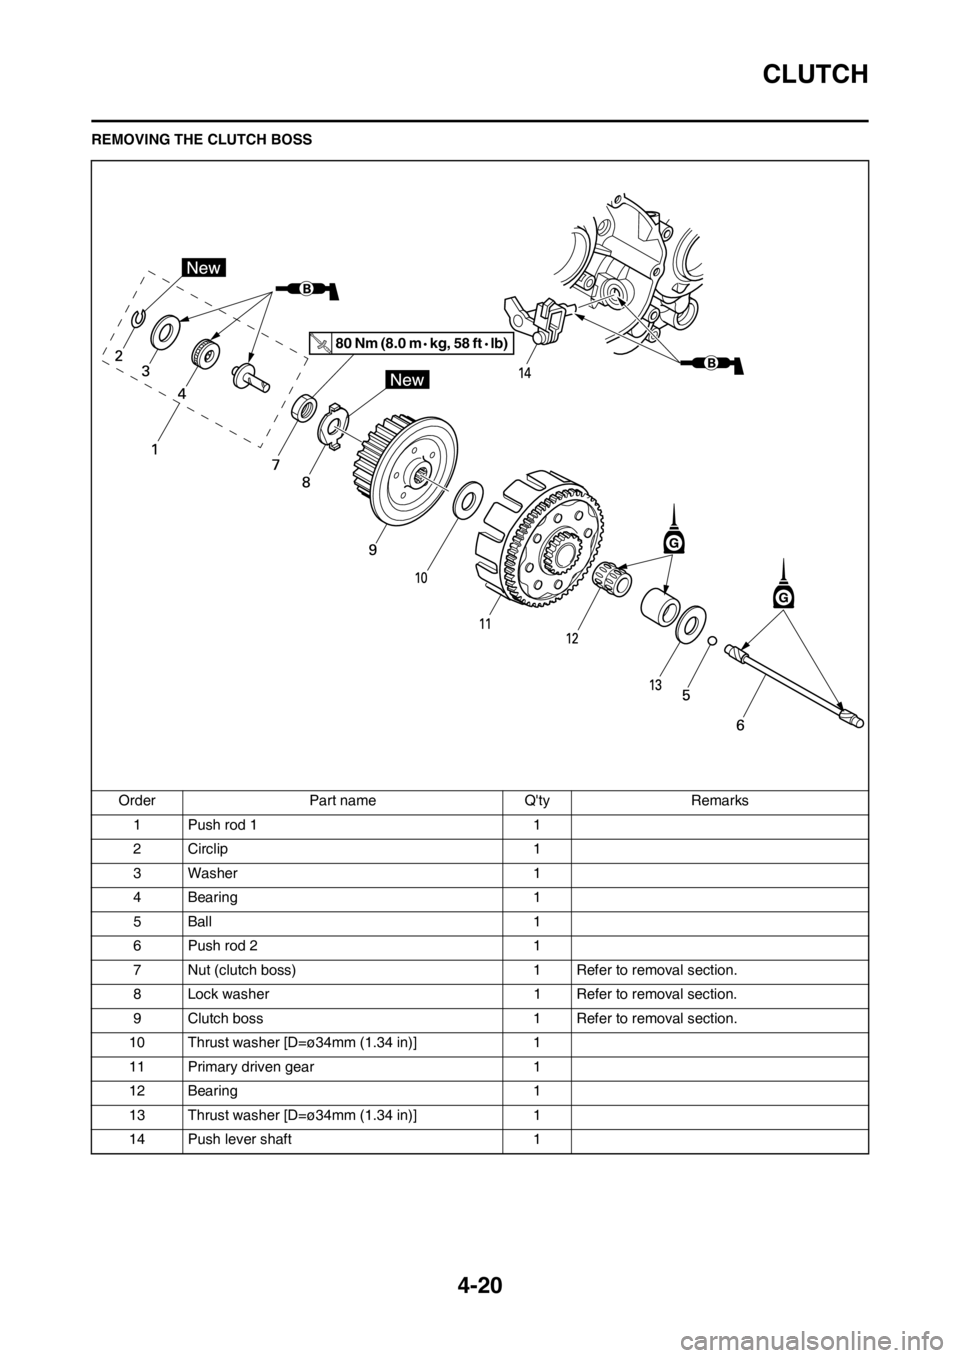
REMOVING THE CLUTCH BOSS
Order Part name Q'ty Remarks
1 Push rod 1 1
2 Circlip 1
3 Washer 1
4 Bearing 1
5Ball 1
6 Push rod 2 1
7 Nut (clutch boss) 1 Refer to removal section.
8 Lock washer 1 Refer to removal section.
9 Clutch boss 1 Refer to removal section.
10 Thrust washer [D=ø34mm (1.34 in)] 1
11 Primary driven gear 1
12 Bearing 1
13 Thrust washer [D=ø34mm (1.34 in)] 1
14 Push lever shaft 1
80 Nm (8.0 m kg, 58 ft lb)
Page 83 of 168
4-21
CLUTCH
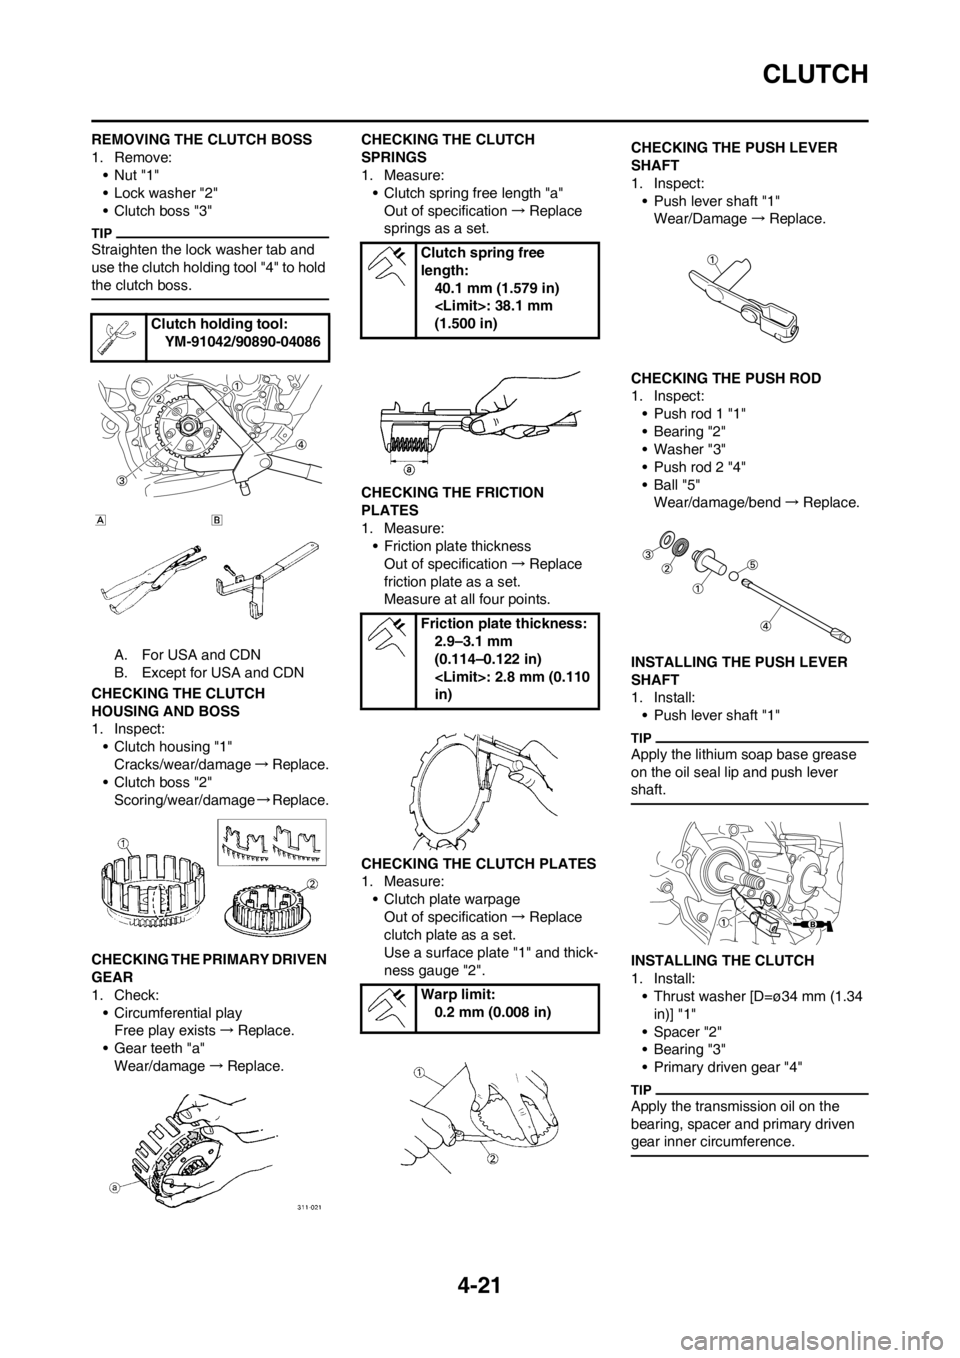
REMOVING THE CLUTCH BOSS
1. Remove:
•Nut "1"
• Lock washer "2"
• Clutch boss "3"
Straighten the lock washer tab and
use the clutch holding tool "4" to hold
the clutch boss.
A. For USA and CDN
B. Except for USA and CDN
CHECKING THE CLUTCH
HOUSING AND BOSS
1. Inspect:
• Clutch housing "1"
Cracks/wear/damage→Replace.
• Clutch boss "2"
Scoring/wear/damage→Replace.
CHECKING THE PRIMARY DRIVEN
GEAR
1. Check:
• Circumferential play
Free play exists→Replace.
• Gear teeth "a"
Wear/damage→Replace.CHECKING THE CLUTCH
SPRINGS
1. Measure:
• Clutch spring free length "a"
Out of specification→Replace
springs as a set.
CHECKING THE FRICTION
PLATES
1. Measure:
• Friction plate thickness
Out of specification→Replace
friction plate as a set.
Measure at all four points.
CHECKING THE CLUTCH PLATES
1. Measure:
• Clutch plate warpage
Out of specification→Replace
clutch plate as a set.
Use a surface plate "1" and thick-
ness gauge "2".CHECKING THE PUSH LEVER
SHAFT
1. Inspect:
• Push lever shaft "1"
Wear/Damage→Replace.
CHECKING THE PUSH ROD
1. Inspect:
• Push rod 1 "1"
• Bearing "2"
• Washer "3"
• Push rod 2 "4"
•Ball "5"
Wear/damage/bend→Replace.
INSTALLING THE PUSH LEVER
SHAFT
1. Install:
• Push lever shaft "1"
Apply the lithium soap base grease
on the oil seal lip and push lever
shaft.
INSTALLING THE CLUTCH
1. Install:
• Thrust washer [D=ø34 mm (1.34
in)] "1"
• Spacer "2"
• Bearing "3"
• Primary driven gear "4"
Apply the transmission oil on the
bearing, spacer and primary driven
gear inner circumference.
Clutch holding tool:
YM-91042/90890-04086
Clutch spring free
length:
40.1 mm (1.579 in)
(1.500 in)
Friction plate thickness:
2.9–3.1 mm
(0.114–0.122 in)
in)
Warp limit:
0.2 mm (0.008 in)
Page 84 of 168
![YAMAHA YZ125LC 2012 Manual Online 4-22
CLUTCH
2. Install:
• Thrust washer [D=ø34 mm (1.34
in)] "1"
• Clutch boss "2"
3. Install:
• Lock washer "1"
• Nut (clutch boss) "2"
Use the clutch holding tool "3" to hold
the clutc YAMAHA YZ125LC 2012 Manual Online 4-22
CLUTCH
2. Install:
• Thrust washer [D=ø34 mm (1.34
in)] "1"
• Clutch boss "2"
3. Install:
• Lock washer "1"
• Nut (clutch boss) "2"
Use the clutch holding tool "3" to hold
the clutc](/img/51/53905/w960_53905-83.png)
4-22
CLUTCH
2. Install:
• Thrust washer [D=ø34 mm (1.34
in)] "1"
• Clutch boss "2"
3. Install:
• Lock washer "1"
• Nut (clutch boss) "2"
Use the clutch holding tool "3" to hold
the clutch boss.
A. For USA and CDN
B. Except for USA and CDN
4. Bend the lock washer "1" tab.5. Install:
• Friction plate "1"
• Clutch plate "2"
• Install the clutch plates and friction
plates alternately on the clutch
boss, starting with a friction plate
and ending with a friction plate.
• Apply the transmission oil on the
friction plates and clutch plates.
6. Install:
•Bearing "1"
• Washer "2"
• Circlip "3"
To push rod 1 "4".
Apply the lithium soap base grease
on the bearing and washer.
7. Install:
• Push rod 2 "1"
• Ball "2"
• Push rod 1 "3"
Apply the transmission oil on the
push rod 1, 2 and ball.
8. Install:
• Pressure plate "1"9. Install:
• Clutch spring "1"
• Bolt (clutch spring) "2"
Tighten the bolts in stage, using a
crisscross pattern.
10. Install:
• Dowel pin "1"
• Gasket (clutch cover) "2"
11. Install:
• Clutch cover "1"
• Bolt (clutch cover)
Tighten the bolts in stage, using a
crisscross pattern.
12. Install:
• O-ring "1"
• Clutch cable "2"
Apply the lithium soap base grease
on the O-ring.
Nut (clutch boss):
80 Nm (8.0 m•kg, 58
ft•lb)
Clutch holding tool:
YM-91042/90890-04086
Bolt (clutch spring):
10 Nm (1.0 m•kg, 7.2
ft•lb)
Bolt (clutch cover):
10 Nm (1.0 m•kg, 7.2
ft•lb)
Page 85 of 168
4-23
KICK SHAFT AND SHIFT SHAFT
KICK SHAFT AND SHIFT SHAFT
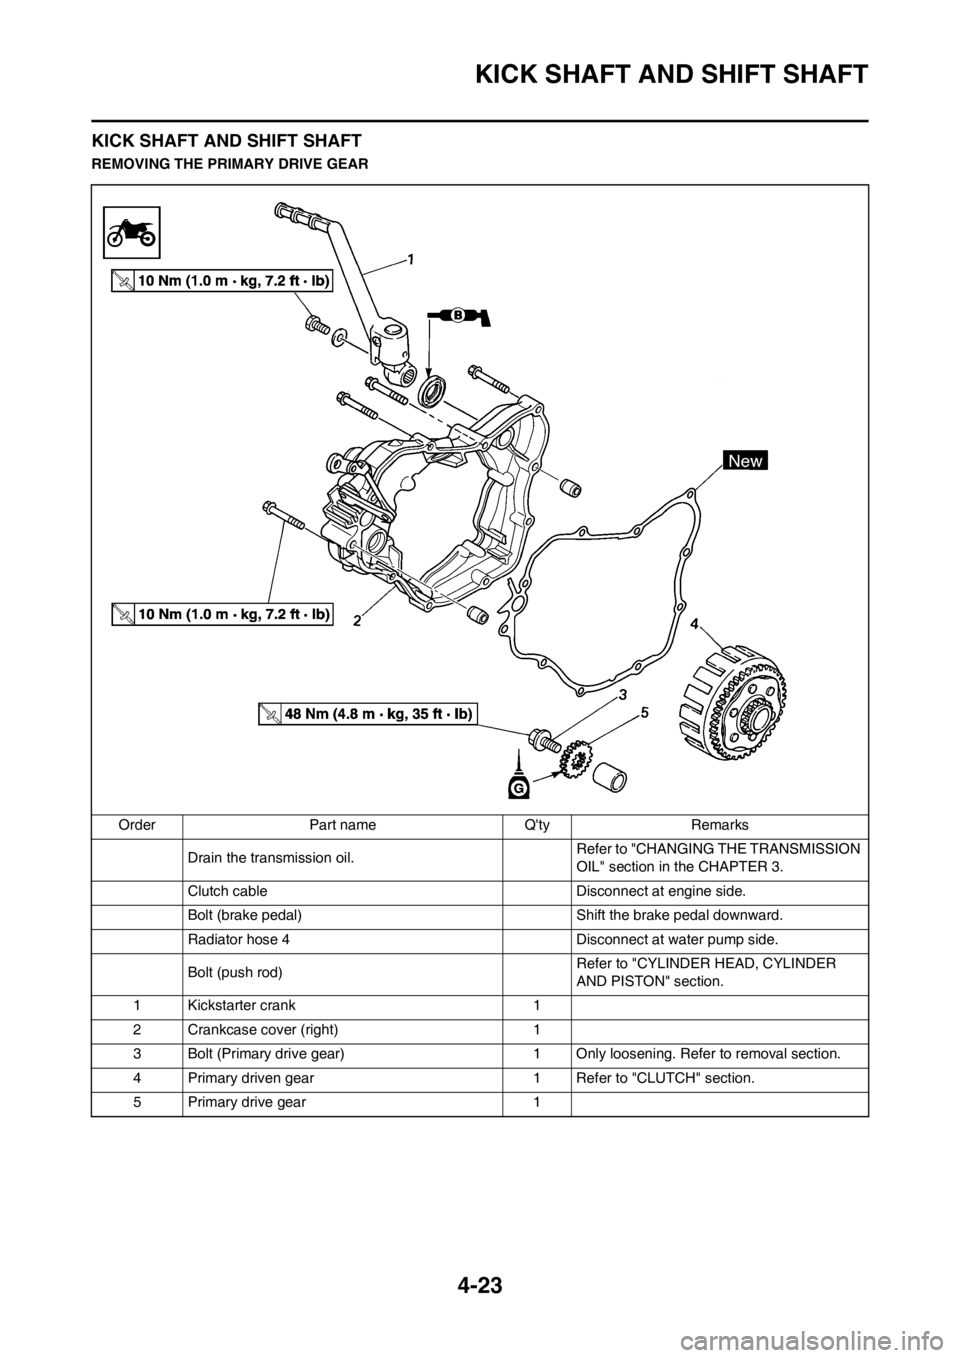
REMOVING THE PRIMARY DRIVE GEAR
Order Part name Q'ty Remarks
Drain the transmission oil. Refer to "CHANGING THE TRANSMISSION
OIL" section in the CHAPTER 3.
Clutch cable Disconnect at engine side.
Bolt (brake pedal) Shift the brake pedal downward.
Radiator hose 4 Disconnect at water pump side.
Bolt (push rod)Refer to "CYLINDER HEAD, CYLINDER
AND PISTON" section.
1 Kickstarter crank 1
2 Crankcase cover (right) 1
3 Bolt (Primary drive gear) 1 Only loosening. Refer to removal section.
4 Primary driven gear 1 Refer to "CLUTCH" section.
5 Primary drive gear 1
Page 86 of 168
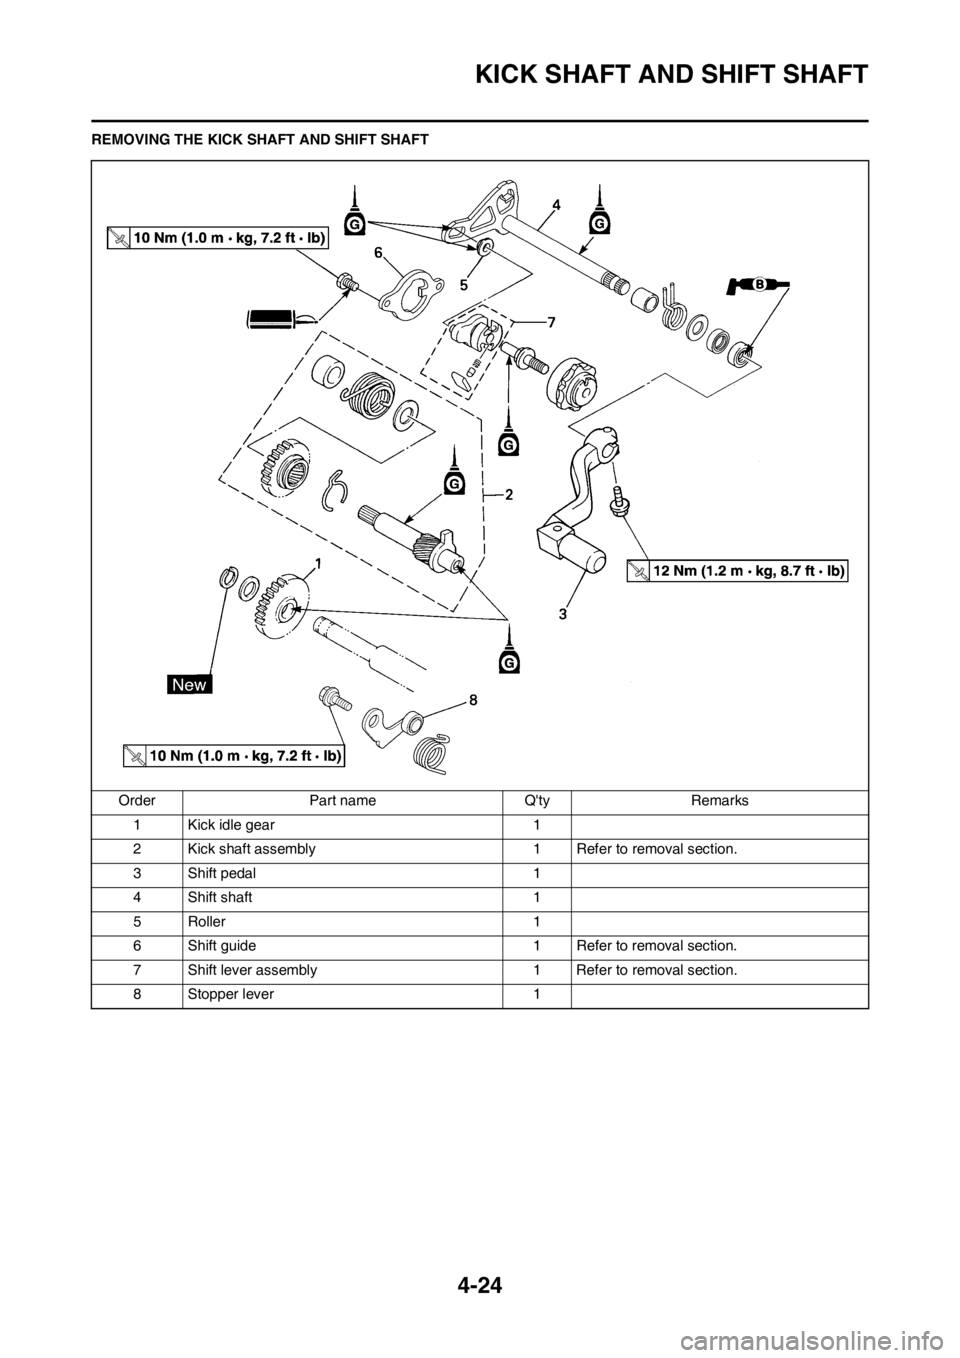
4-24
KICK SHAFT AND SHIFT SHAFT
REMOVING THE KICK SHAFT AND SHIFT SHAFT
Order Part name Q'ty Remarks
1 Kick idle gear 1
2 Kick shaft assembly 1 Refer to removal section.
3 Shift pedal 1
4 Shift shaft 1
5 Roller 1
6 Shift guide 1 Refer to removal section.
7 Shift lever assembly 1 Refer to removal section.
8 Stopper lever 1
Page 87 of 168
4-25
KICK SHAFT AND SHIFT SHAFT
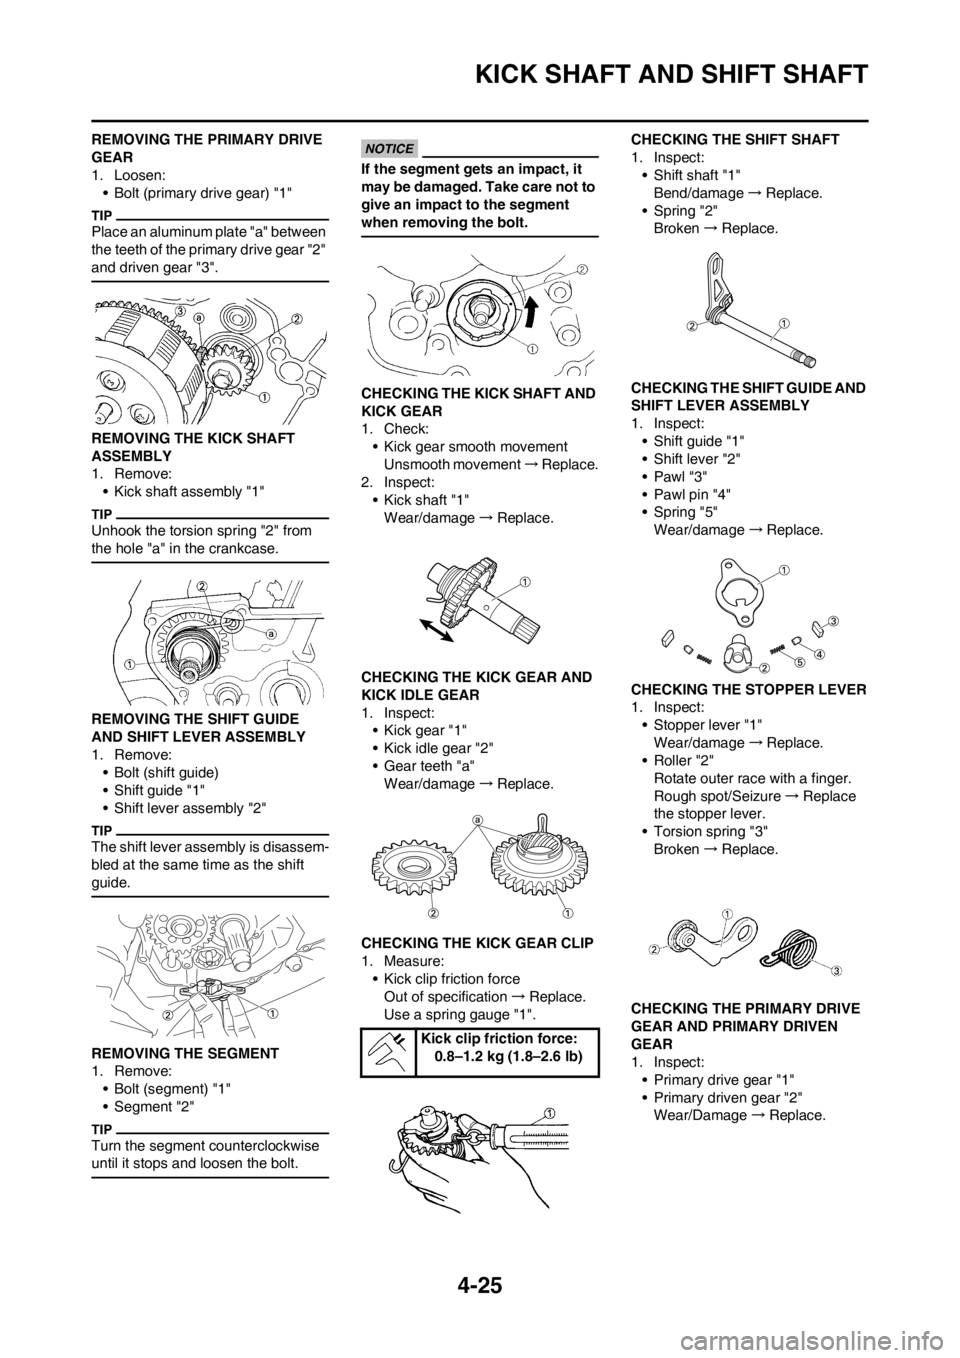
REMOVING THE PRIMARY DRIVE
GEAR
1. Loosen:
• Bolt (primary drive gear) "1"
Place an aluminum plate "a" between
the teeth of the primary drive gear "2"
and driven gear "3".
REMOVING THE KICK SHAFT
ASSEMBLY
1. Remove:
• Kick shaft assembly "1"
Unhook the torsion spring "2" from
the hole "a" in the crankcase.
REMOVING THE SHIFT GUIDE
AND SHIFT LEVER ASSEMBLY
1. Remove:
• Bolt (shift guide)
• Shift guide "1"
• Shift lever assembly "2"
The shift lever assembly is disassem-
bled at the same time as the shift
guide.
REMOVING THE SEGMENT
1. Remove:
• Bolt (segment) "1"
• Segment "2"
Turn the segment counterclockwise
until it stops and loosen the bolt.
If the segment gets an impact, it
may be damaged. Take care not to
give an impact to the segment
when removing the bolt.
CHECKING THE KICK SHAFT AND
KICK GEAR
1. Check:
• Kick gear smooth movement
Unsmooth movement→Replace.
2. Inspect:
• Kick shaft "1"
Wear/damage→Replace.
CHECKING THE KICK GEAR AND
KICK IDLE GEAR
1. Inspect:
• Kick gear "1"
• Kick idle gear "2"
• Gear teeth "a"
Wear/damage→Replace.
CHECKING THE KICK GEAR CLIP
1. Measure:
• Kick clip friction force
Out of specification→Replace.
Use a spring gauge "1".CHECKING THE SHIFT SHAFT
1. Inspect:
• Shift shaft "1"
Bend/damage→Replace.
• Spring "2"
Broken→Replace.
CHECKING THE SHIFT GUIDE AND
SHIFT LEVER ASSEMBLY
1. Inspect:
• Shift guide "1"
• Shift lever "2"
•Pawl "3"
• Pawl pin "4"
• Spring "5"
Wear/damage→Replace.
CHECKING THE STOPPER LEVER
1. Inspect:
• Stopper lever "1"
Wear/damage→Replace.
•Roller "2"
Rotate outer race with a finger.
Rough spot/Seizure→Replace
the stopper lever.
• Torsion spring "3"
Broken→Replace.
CHECKING THE PRIMARY DRIVE
GEAR AND PRIMARY DRIVEN
GEAR
1. Inspect:
• Primary drive gear "1"
• Primary driven gear "2"
Wear/Damage→Replace.
Kick clip friction force:
0.8–1.2 kg (1.8–2.6 lb)
Page 88 of 168
4-26
KICK SHAFT AND SHIFT SHAFT
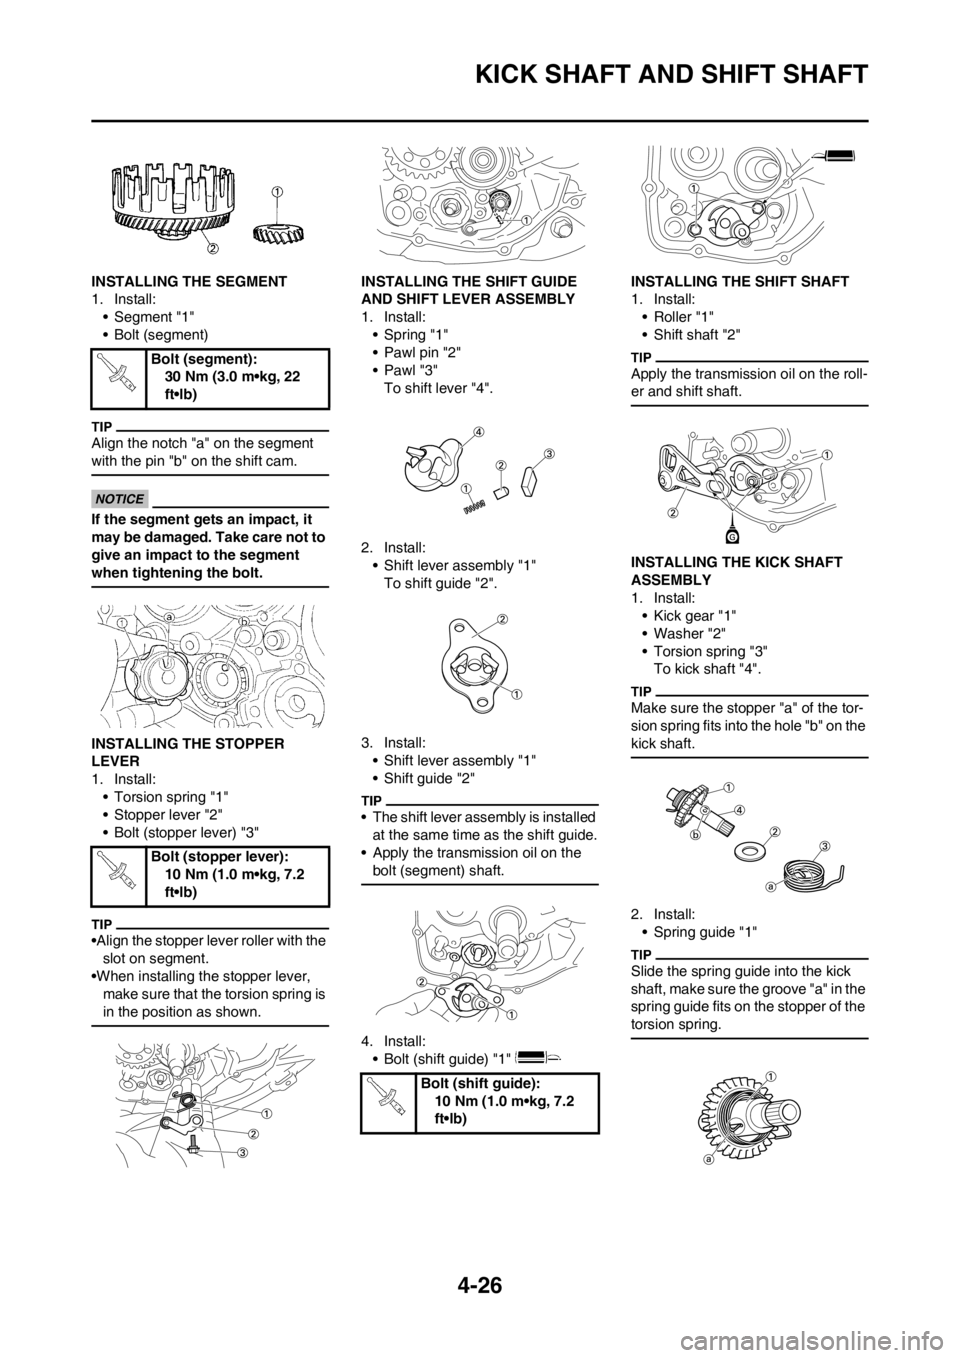
INSTALLING THE SEGMENT
1. Install:
• Segment "1"
• Bolt (segment)
Align the notch "a" on the segment
with the pin "b" on the shift cam.
If the segment gets an impact, it
may be damaged. Take care not to
give an impact to the segment
when tightening the bolt.
INSTALLING THE STOPPER
LEVER
1. Install:
• Torsion spring "1"
• Stopper lever "2"
• Bolt (stopper lever) "3"
•Align the stopper lever roller with the
slot on segment.
•When installing the stopper lever,
make sure that the torsion spring is
in the position as shown.
INSTALLING THE SHIFT GUIDE
AND SHIFT LEVER ASSEMBLY
1. Install:
• Spring "1"
• Pawl pin "2"
• Pawl "3"
To shift lever "4".
2. Install:
• Shift lever assembly "1"
To shift guide "2".
3. Install:
• Shift lever assembly "1"
• Shift guide "2"
• The shift lever assembly is installed
at the same time as the shift guide.
• Apply the transmission oil on the
bolt (segment) shaft.
4. Install:
• Bolt (shift guide) "1" INSTALLING THE SHIFT SHAFT
1. Install:
•Roller "1"
• Shift shaft "2"
Apply the transmission oil on the roll-
er and shift shaft.
INSTALLING THE KICK SHAFT
ASSEMBLY
1. Install:
• Kick gear "1"
• Washer "2"
• Torsion spring "3"
To kick shaft "4".
Make sure the stopper "a" of the tor-
sion spring fits into the hole "b" on the
kick shaft.
2. Install:
• Spring guide "1"
Slide the spring guide into the kick
shaft, make sure the groove "a" in the
spring guide fits on the stopper of the
torsion spring.
Bolt (segment):
30 Nm (3.0 m•kg, 22
ft•lb)
Bolt (stopper lever):
10 Nm (1.0 m•kg, 7.2
ft•lb)
Bolt (shift guide):
10 Nm (1.0 m•kg, 7.2
ft•lb)
Page 89 of 168
4-27
KICK SHAFT AND SHIFT SHAFT
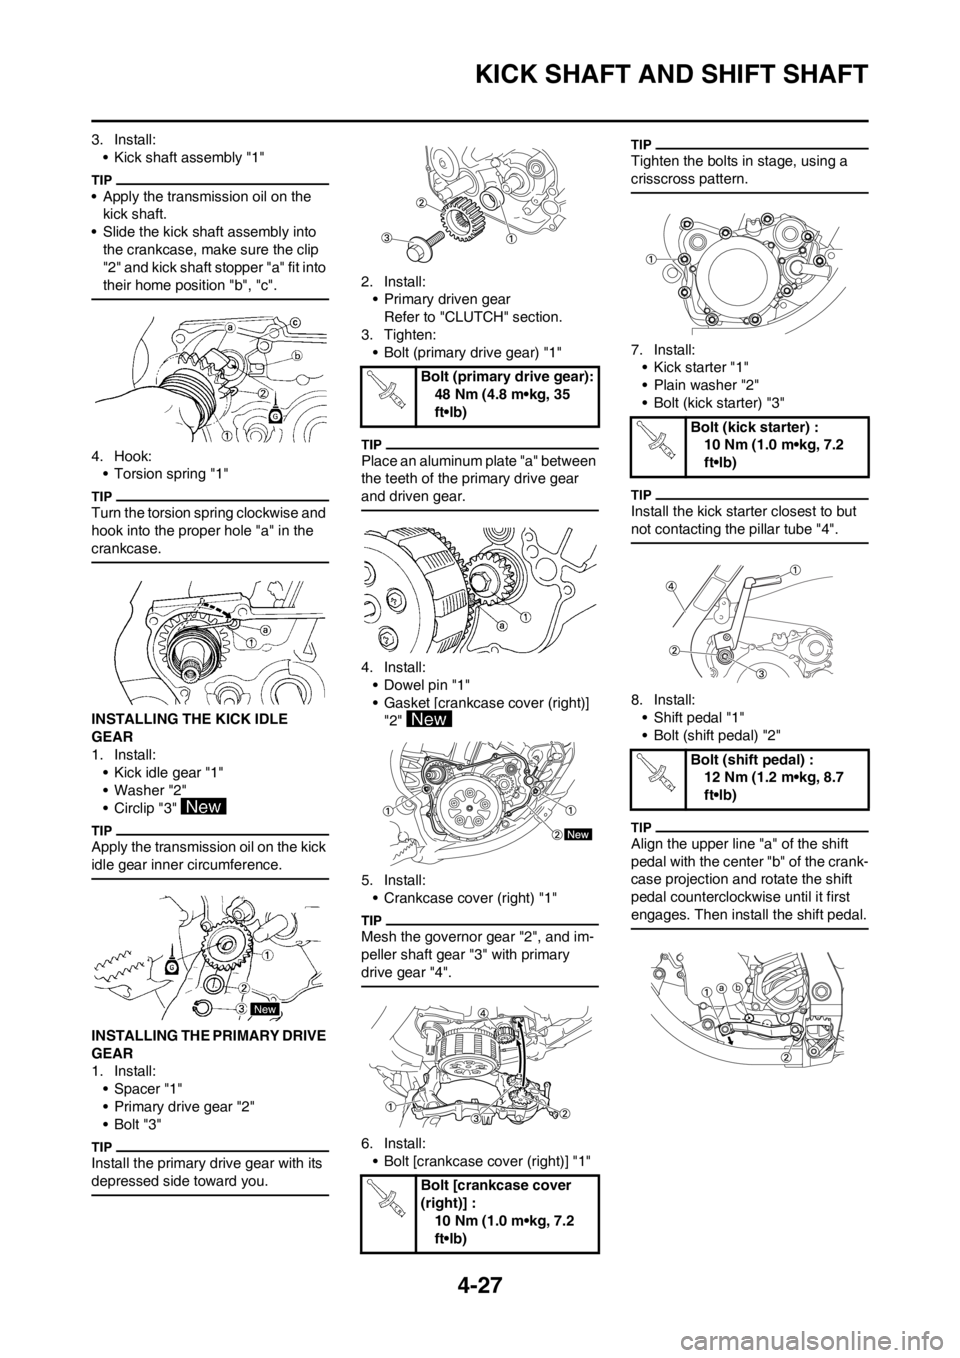
3. Install:
• Kick shaft assembly "1"
• Apply the transmission oil on the
kick shaft.
• Slide the kick shaft assembly into
the crankcase, make sure the clip
"2" and kick shaft stopper "a" fit into
their home position "b", "c".
4. Hook:
• Torsion spring "1"
Turn the torsion spring clockwise and
hook into the proper hole "a" in the
crankcase.
INSTALLING THE KICK IDLE
GEAR
1. Install:
• Kick idle gear "1"
• Washer "2"
• Circlip "3"
Apply the transmission oil on the kick
idle gear inner circumference.
INSTALLING THE PRIMARY DRIVE
GEAR
1. Install:
• Spacer "1"
• Primary drive gear "2"
•Bolt "3"
Install the primary drive gear with its
depressed side toward you.
2. Install:
• Primary driven gear
Refer to "CLUTCH" section.
3. Tighten:
• Bolt (primary drive gear) "1"
Place an aluminum plate "a" between
the teeth of the primary drive gear
and driven gear.
4. Install:
• Dowel pin "1"
• Gasket [crankcase cover (right)]
"2"
5. Install:
• Crankcase cover (right) "1"
Mesh the governor gear "2", and im-
peller shaft gear "3" with primary
drive gear "4".
6. Install:
• Bolt [crankcase cover (right)] "1"
Tighten the bolts in stage, using a
crisscross pattern.
7. Install:
• Kick starter "1"
• Plain washer "2"
• Bolt (kick starter) "3"
Install the kick starter closest to but
not contacting the pillar tube "4".
8. Install:
• Shift pedal "1"
• Bolt (shift pedal) "2"
Align the upper line "a" of the shift
pedal with the center "b" of the crank-
case projection and rotate the shift
pedal counterclockwise until it first
engages. Then install the shift pedal.
Bolt (primary drive gear):
48 Nm (4.8 m•kg, 35
ft•lb)
Bolt [crankcase cover
(right)] :
10 Nm (1.0 m•kg, 7.2
ft•lb)
Bolt (kick starter) :
10 Nm (1.0 m•kg, 7.2
ft•lb)
Bolt (shift pedal) :
12 Nm (1.2 m•kg, 8.7
ft•lb)
Page 90 of 168
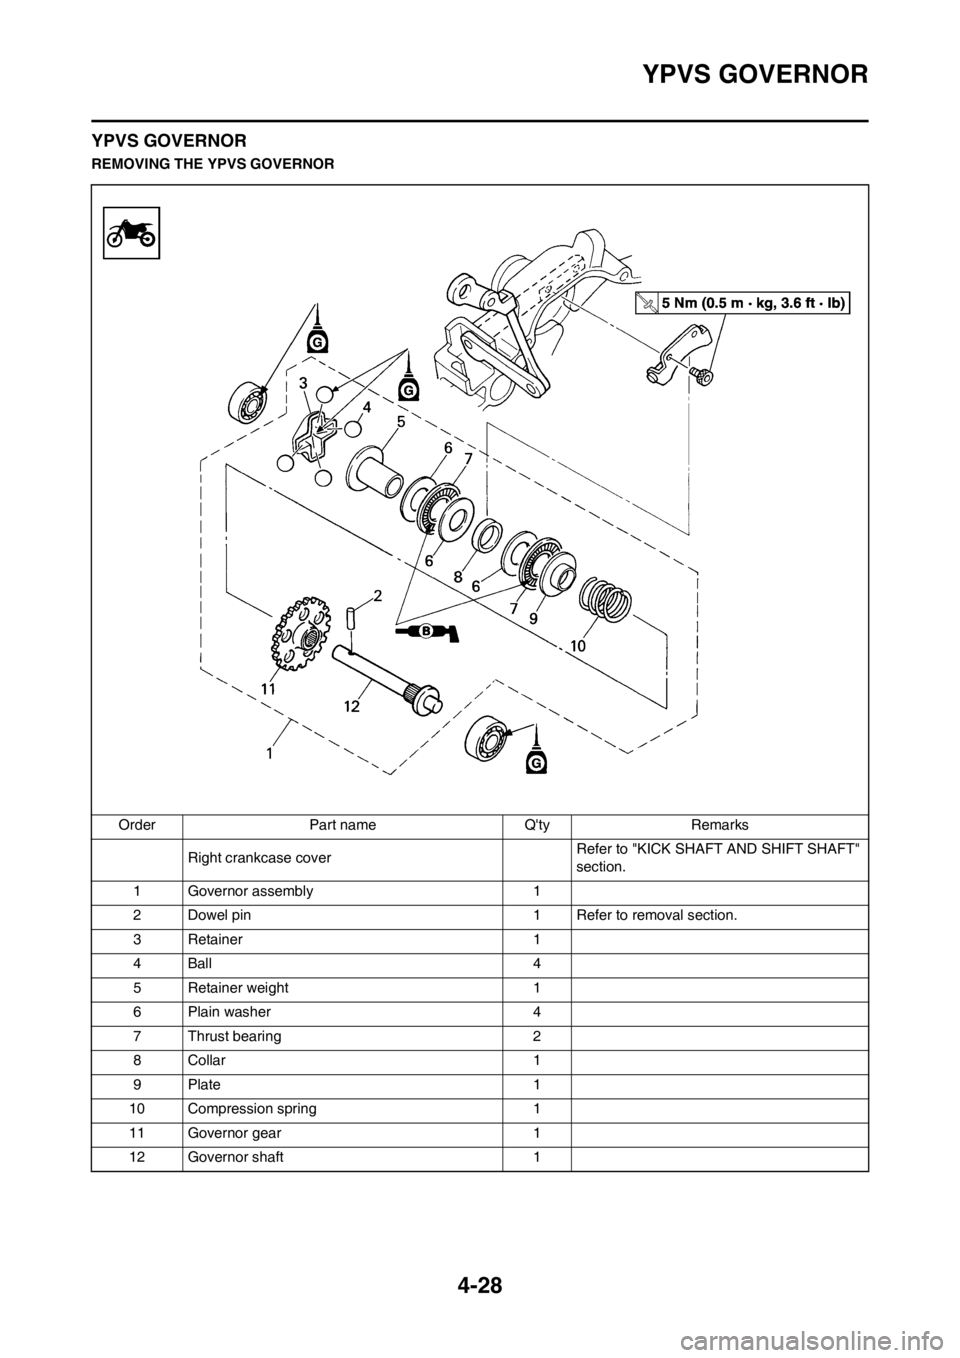
4-28
YPVS GOVERNOR
YPVS GOVERNOR
REMOVING THE YPVS GOVERNOR
Order Part name Q'ty Remarks
Right crankcase coverRefer to "KICK SHAFT AND SHIFT SHAFT"
section.
1 Governor assembly 1
2 Dowel pin 1 Refer to removal section.
3 Retainer 1
4Ball 4
5 Retainer weight 1
6 Plain washer 4
7 Thrust bearing 2
8 Collar 1
9Plate 1
10 Compression spring 1
11 Governor gear 1
12 Governor shaft 1