YAMAHA YZ250LC 2001 Notices Demploi (in French)
Manufacturer: YAMAHA, Model Year: 2001, Model line: YZ250LC, Model: YAMAHA YZ250LC 2001Pages: 578, PDF Size: 14.12 MB
Page 511 of 578

6-8
SISTEMA TPS (SENSORE DI POSIZIONE
DELL’ACCELERATORE)
ELEC
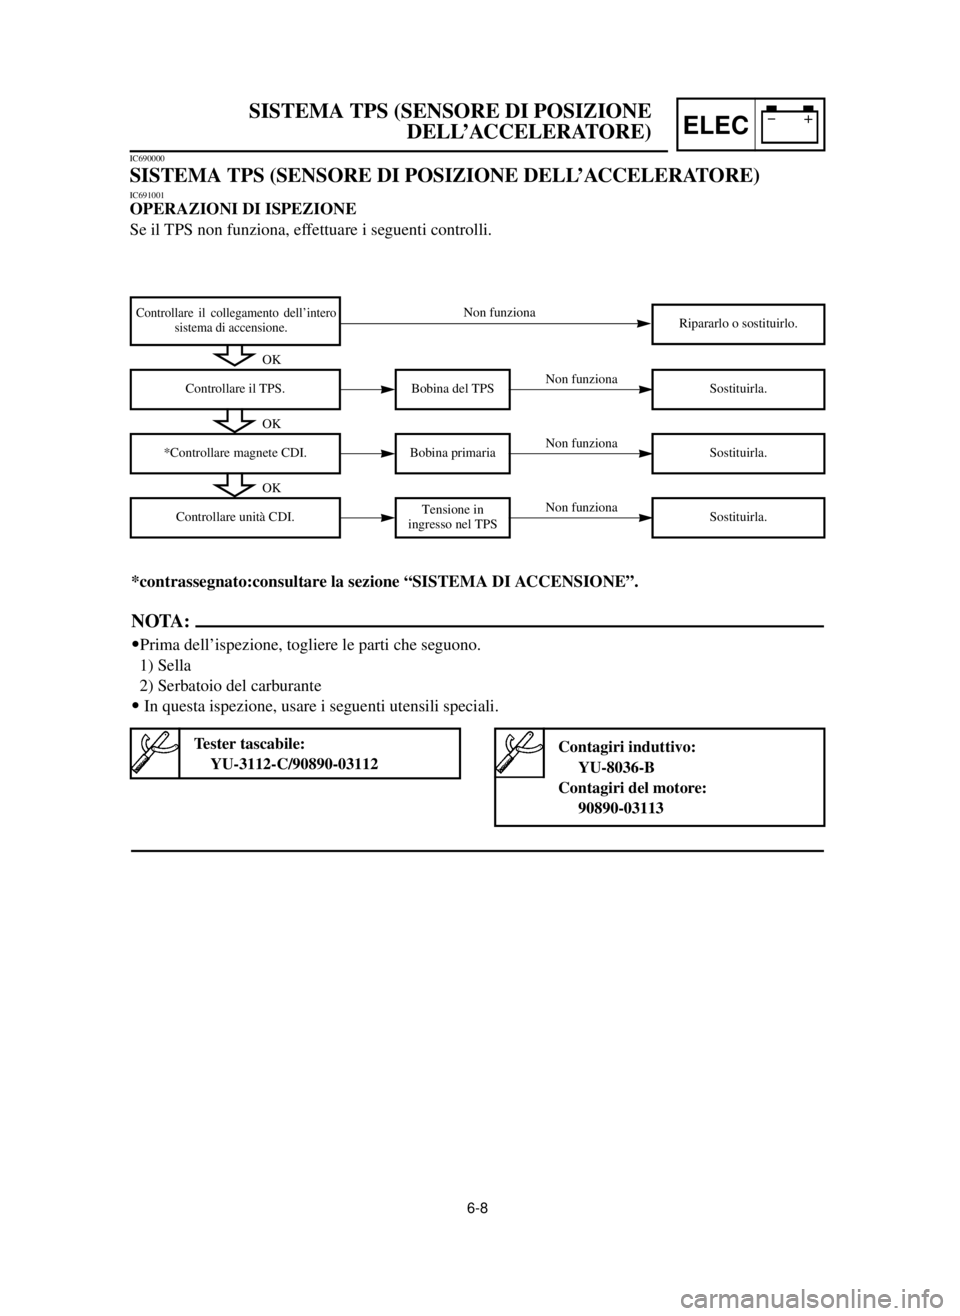
Bobina del TPS
Ripararlo o sostituirlo.Controllare il collegamento dell’intero
sistema di accensione.
Non funziona
Non funziona
Non funziona
Non funzionaControllare il TPS.Sostituirla.
*contrassegnato:consultare la sezione “SISTEMA DI ACCENSIONE”.
NOTA:
9Prima dell’ispezione, togliere le parti che seguono.
1) Sella
2) Serbatoio del carburante
9In questa ispezione, usare i seguenti utensili speciali.
Contagiri induttivo:
YU-8036-B
Contagiri del motore:
90890-03113Tester tascabile:
YU-3112-C/90890-03112
OK
OK
Bobina primaria
*Controllare magnete CDI.Sostituirla.
OK
Tensione in
ingresso nel TPS
Controllare unità CDI.Sostituirla.
IC690000
SISTEMA TPS (SENSORE DI POSIZIONE DELL’ACCELERATORE)
IC691001
OPERAZIONI DI ISPEZIONE
Se il TPS non funziona, effettuare i seguenti controlli.
5MW-9-30-6 7/6/00 1:38 PM Page 23
Page 512 of 578

6-9
TPS (THROTTLE POSITION SENSOR) SYSTEMELEC
EC624000
COUPLERS AND LEADS CONNECTION
INSPECTION
1. Check:
9Couplers and leads connection
Rust/ Dust/ Looseness/Short-circuit Õ
Repair or replace.
EC692000
TPS COIL INSPECTION
1. Remove:
9Carburetor
9Mixing chamber top
Refer to “CARBURETOR AND REED
VALVE” section in the CHAPTER 4.
2. Inspect:
9TPS coil resistance
Out of specification ÕReplace.
3. Inspect:
9TPS coil variable resistance
Check that the resistance in increased as
the lever 1is moved from the full close
position to the full open position.
Out of specification ÕReplace.
Tester (+) leadÕBluelead 1
Tester (–) lead
ÕBlacklead 2
TPS coil Tester selector
resistance position
4~6k½at
k½´1
20°C (68°F)
Tester (+) leadÕYellowlead 2
Tester (–) lead
ÕBlacklead 3
Tester selector
positionTPS coil variable
resistance
Full closed Full opened
Zero~2k½at 4~6k½at
20°C (68°F) 20°C (68°F)
k½´1
5MW-9-30-6 7/6/00 1:38 PM Page 24
Page 513 of 578

6-9
SYSTEME TPS (CAPTEUR DE POSITION DU PAPILLON)
TPS-SYSTEM (TPS = DROSSELSTELLUNGSSENSOR)
SISTEMA TPS (SENSORE DI POSIZIONE DELL’ACCELERATORE)ELEC
VERIFICATION DE CONNEXION
DES COUPLEURS ET FILS
1. Contrôler:
9Connexion des coupleurs et fils
Rouille/poussière/desserré/court
-circuit
Õ
Réparer ou changer.
INSPEKTION DES ANSCHLUSSES
DER KUPPLUNGEN UND KABEL
1. Kontrollieren:
9Anschluß deren Kupplungen
und Kabel
Rost/Staub/Lockerheit/Kurz-
schlußÕReparieren oder
erneuern.IC624000
ISPEZIONE DEL
COLLEGAMENTO DI
ACCOPPIATORI E CONDUTTORI
1. Controllare:
9Collegamento di accoppiatori e
conduttori
Ruggine/Polvere/Allentamen-
to/Cortocircuito ÕRipararli o
sostituirli.
INSPECTION DE LA BOBINE DU
TPS
1. Déposer:
9Carburateur
9Haut de chambre de mélange
Se reporter à la section “CAR-
BURATEUR ET SOUPAPE
FLEXIBLE”.
TPS-SPULENINSPEKTION
1. Ausbauen:
9Vergaser
9Mischkammer-Oberteil
Siehe Abschnitt „VERGASER
UND ZUNGENVENTIL“.IC692000
ISPEZIONE DELLA BOBINA DEL
TPS
1. Togliere:
9Carburatore
9Parte superiore del diffusore
Consultare la sezione “CARBU-
RATORE E VALVOLA A LA
MELLA”.
2. Examiner:
9Résistance de la bobine du TPS
Hors spécification
ÕChanger.
3. Examiner:
9Résistance variable de la bobine
du TPS
Vérifier si la résistance augmen-
te lorsque le levier 1est dépla-
cé de la position de fermeture
complète à la position d’ouver-
ture complète.
Hors spécification
ÕChanger.
2. Prüfen:
9TPS-Spulenwiderstand
Abweichung von Spezifikation
ÕErneuern.
3. Prüfen:
9Regelbarer TPS-Spulenwider-
stand
Prüfen ob der Widerstand sich
erhöht wenn der Hebel 1vom
vollständig geschlossenen
Stand in den vollständig geöff-
neten Stand bewegt wird.
Abweichung von Spezifikation
ÕErneuern.2. Ispezionare:
9Resistenza della bobina del TPS
Fuori specifica ÕSostituirla.
3. Ispezionare:
9Resistenza variabile della bobi-
na del TPS
Controllare che la resistenza
aumenti quando la leva 1viene
spostata dalla posizione tutto
chiuso a quella tutto aperto.
Fuori specifica ÕSostituirla. Resistenza
Posizione del della bobina selettore del
del TPS tester
4~6k½a
k½´ 1
20°C (68°F)
Conduttore (+) del tester Õ
Conduttore Blu 1
Conduttore (–) del tester Õ
Conduttore nero 2
Résistance Position de
de la bobine sélecteur de
du TPS testeur
4~6k½à
k½´1
20°C (68°F)
Fil (+) de testeurÕFil bleu 1
Fil (–) de testeurÕFil noir 2Positives (+) Kabel des PrüfgerätesÕ
Blau Kabel 1
Negatives (–) Kabel des PrüfgerätesÕ
Schwarz Kabel 2
TPS- Position des
Spulen-Wahlschalterswiderstand am Prüfgerät
4~6k½bei
k½´ 1
20°C (68°F)
Resistenza variabile Posizionedella bobina del selettoredel TPSdel tester
Completa- Completa-
mente chiuso mente aperto
Zero~2k½a 4~6k½ak½´ 1
20°C (68°F) 20°C (68°F)
Conduttore (+) del testerÕ
Conduttore Giallo 2
Conduttore (–) del testerÕ
Conduttore Nero 3Fil (+) de testeurÕ
Fil janne 2
Fil (–) de testeurÕ
Fil noir 3
Résistance Position de
variable de la sélecteur
bobine du TPS de testeur
Fermeture Ouverture
complète complète
Zéro~2k½à4~6k½àk½´120°C (68°F)20°C (68°F)
Positives (+) Kabel des PrüfgerätesÕ
Gelb Kabel 2
Negatives (–) Kabel des PrüfgeräteÕ
Schwarz Kabel 3
Regelbarer Position des TPS-Spulenwider-Wahlschalters standam Prüfgerät
VollständigVollständig geschlossengeöffnet
Null~2k½bei4~6k½beik½´ 120°C (68°F)20°C (68°F)
5MW-9-30-6 7/6/00 1:38 PM Page 25
Page 514 of 578

6-10
TPS (THROTTLE POSITION SENSOR) SYSTEMELEC
EC693000
TPS REPLACEMENT AND ADJUSTMENT
1. Remove:
9Carburetor
9Mixing chamber top
Refer to “CARBURETOR AND REED
VALVE” section in the CHAPTER 4.
2. Remove:
9Screw (TPS) 1
9Plain washer 2
9TPS 3
NOTE:
Loosen the screws using the T20 bit (tamper
resistant fastener type).
3. Replace:
9TPS
4. Install:
9TPS 1
9Plain washer 2
9Screw (TPS) 3
NOTE:
9Align the slot ain the TPS with the projection
bon the carburetor.
9Temporarily tighten the screws (TPS).
5. Install:
9Mixing chamber top
9Carburetor
Refer to “CARBURETOR AND REED
VALVE” section in the CHAPTER 4.
6. Start the engine and thoroughly warm it up.
5MW-9-30-6 7/6/00 1:39 PM Page 26
Page 515 of 578

6-10
SYSTEME TPS (CAPTEUR DE POSITION DU PAPILLON)
TPS-SYSTEM (TPS = DROSSELSTELLUNGSSENSOR)
SISTEMA TPS (SENSORE DI POSIZIONE DELL’ACCELERATORE)ELEC
INSPECTION DE LA BOBINE DU
TPS
1. Déposer:
9Carburateur
9Haut de chambre de mélange
Se reporter à la section “CAR-
BURATEUR ET SOUPAPE
FLEXIBLE”.TPS-SPULENINSPEKTION
1. Ausbauen:
9Vergaser
9Mischkammer-oberteil
Siehe Abschnitt „VERGASER
UND ZUNGENVENTIL“.IC693000
ISPEZIONE DELLA BOBINA DEL
TPS
1. Togliere:
9Carburatore
9Parte superiore del diffusore
Consultare la sezione “CARBU-
RATORE E VALVOLA A LA
MELLA”.
2. Déposer:
9Vis (TPS) 1
9Rondelle ordinaire 2
9TPS 3
N.B.:
Desserrer les vis à l’aide de l’embout
T20 (fixation infraudable).
2. Ausbauen:
9Schraube (TPS) 1
9Beilegescheibe 2
9TPS 3
ANMERKUNG:
Schrauben lösen und dazu T20-Maul
benutzen (narrensicherer Verschluß-
typ).
2. Togliere:
9Vite (TPS) 1
9Rosetta 2
9TPS 3
NOTA:
Allentare le viti usando la punta T20
(tipo di dispositivo di fissaggio resi-
stente alla manomissione).
3. Changer:
9TPS3. Erneuern:
9TPS3. Sostituire:
9TPS
4. Monter:
9TPS 1
9Rondelle ordinaire 2
9Vis (TPS) 3
N.B.:
9Aligner l’encoche adu TPS sur la
saillie bdu carburateur.
9Serrer provisoirement les vis (TPS).
5. Monter:
9Haut de chambre de mélange
9Carburateur
Se reporter à la section “CAR-
BURATEUR ET SOUPAPE
FLEXIBLE”.
6. Mettre le moteur en marche et bien
le chauffer.
4. Ausbauen:
9TPS 1
9Beilegescheibe 2
9Schraube (TPS) 3
ANMERKUNG:
9Nut aim TPS mit dem Vorsprung
bam Vergaser ausrichten.
9Schrauben (TPS) vorübergehend
anziehen.
5. Ausbauen:
9Mischkammer-Oberteil
9Vergaser
Siehe Abschnitt „VERGASER
UND ZUNGENVENTIL“.
6. Den Motor starten und gründlich
warmalaufen lassen.
4. Installare:
9TPS 1
9Rosetta 2
9Vite (TPS) 3
NOTA:
9Allineare la fessura adel TPS con la
sporgenza bsul carburatore.
9Serrare temporaneamente le viti
(TPS).
5. Installare:
9Parte superiore del diffusore
9Carburatore
Consultare la sezione “CARBU-
RATORE E VALVOLA A LA
MELLA”.
6. Avviare il motore e scaldarlo com-
pletamente.
5MW-9-30-6 7/6/00 1:39 PM Page 27
Page 516 of 578

6-11
TPS (THROTTLE POSITION SENSOR) SYSTEMELEC
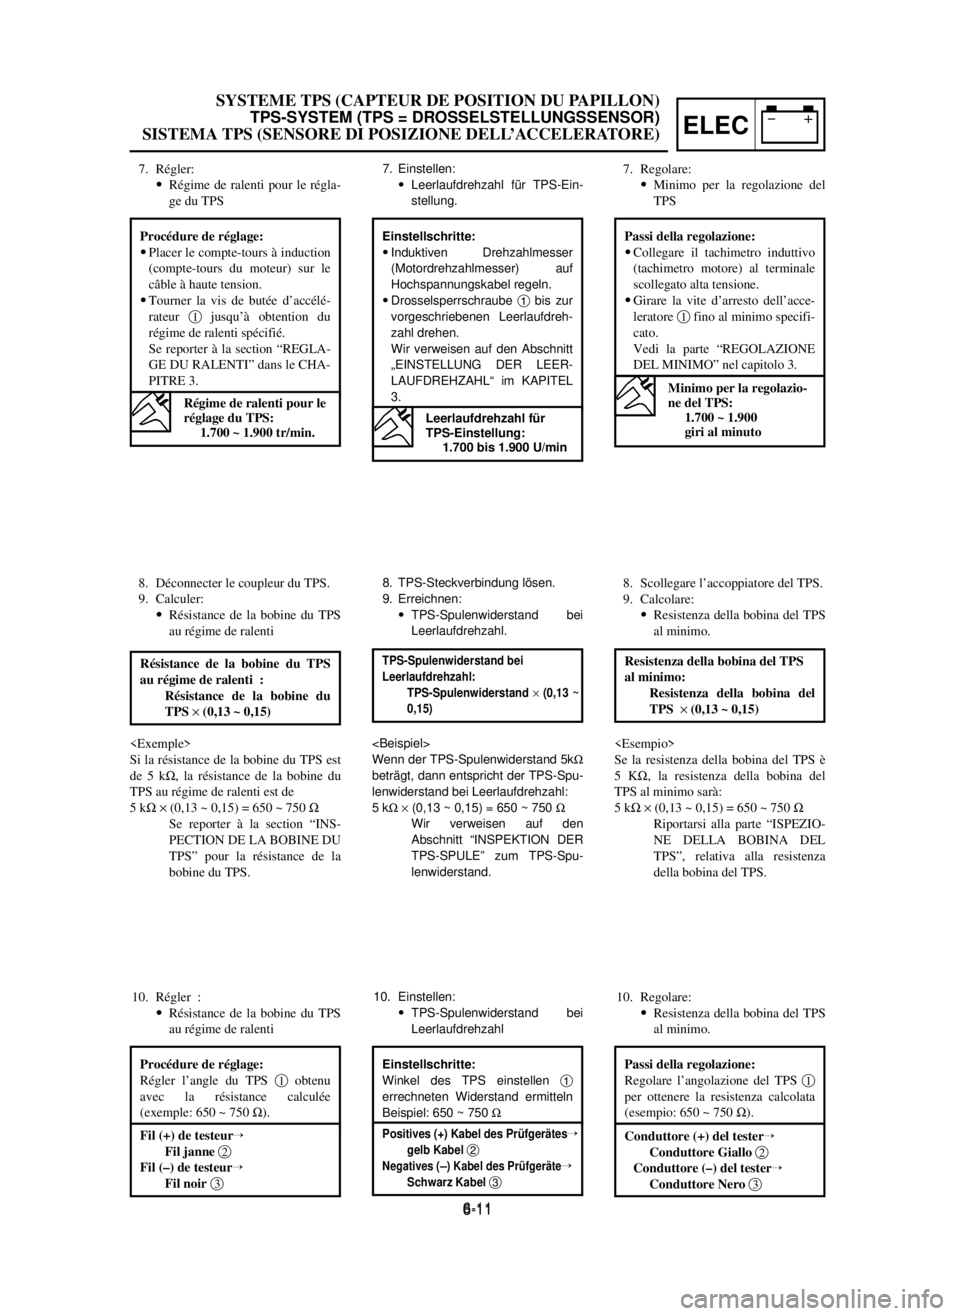
7. Adjust:
9Idle speed for TPS adjustment
8. Disconnect the TPS coupler.
9. Calculate:
9TPS coil resistance at idle speed.
If the TPS coil resistance is 5k½, then the TPS
coil resistance at idle speed is:
5k½´(0.13~0.15) = 650~750½
Refer to “TPS COIL INSPECTION” section
about the TPS coil resistance.
10. Adjust:
9TPS coil resistance at idle speed
Idle speed for TPS adjustment:
1,700~1,900 rpm
Adjustment steps:
9Set the inductive tachometer (engine
tachometer) to the high tension cord.
9Turn the throttle stop screw 1until the
specified idle speed.
Refer to “IDLE SPEED ADJUSTMENT” sec-
tion in the CHAPTER 3.
TPS coil resistance at idle speed:
TPS coil resistance ´(0.13~0.15)
Tester (+) leadÕYellowlead 2
Tester (–) lead
ÕBlacklead 3 Adjustment steps:
Adjust the angle of the TPS 1to obtain the
resistance calculated (example: 650~750½).
5MW-9-30-6 7/6/00 1:39 PM Page 28
Page 517 of 578

6-11
SYSTEME TPS (CAPTEUR DE POSITION DU PAPILLON)
TPS-SYSTEM (TPS = DROSSELSTELLUNGSSENSOR)
SISTEMA TPS (SENSORE DI POSIZIONE DELL’ACCELERATORE)ELEC
6-11
7. Régler:
9Régime de ralenti pour le régla-
ge du TPS7. Einstellen:
9Leerlaufdrehzahl für TPS-Ein-
stellung.7. Regolare:
9Minimo per la regolazione del
TPS
8. Déconnecter le coupleur du TPS.
9. Calculer:
9Résistance de la bobine du TPS
au régime de ralenti
Si la résistance de la bobine du TPS est
de 5 k½, la résistance de la bobine du
TPS au régime de ralenti est de
5 k½´(0,13 ~ 0,15) = 650 ~ 750 ½
Se reporter à la section “INS-
PECTION DE LA BOBINE DU
TPS” pour la résistance de la
bobine du TPS.
8. TPS-Steckverbindung lösen.
9. Erreichnen:
9TPS-Spulenwiderstand bei
Leerlaufdrehzahl.
Wenn der TPS-Spulenwiderstand 5k½
beträgt, dann entspricht der TPS-Spu-
lenwiderstand bei Leerlaufdrehzahl:
5 k½´(0,13 ~ 0,15) = 650 ~ 750 ½
Wir verweisen auf den
Abschnitt “INSPEKTION DER
TPS-SPULE” zum TPS-Spu-
lenwiderstand.8. Scollegare l’accoppiatore del TPS.
9. Calcolare:
9Resistenza della bobina del TPS
al minimo.
Se la resistenza della bobina del TPS è
5 K½, la resistenza della bobina del
TPS al minimo sarà:
5 k½´(0,13 ~ 0,15) = 650 ~ 750 ½
Riportarsi alla parte “ISPEZIO-
NE DELLA BOBINA DEL
TPS”, relativa alla resistenza
della bobina del TPS.
10. Régler :
9Résistance de la bobine du TPS
au régime de ralenti
10. Einstellen:
9TPS-Spulenwiderstand bei
Leerlaufdrehzahl10. Regolare:
9Resistenza della bobina del TPS
al minimo. Procédure de réglage:
9Placer le compte-tours à induction
(compte-tours du moteur) sur le
câble à haute tension.
9Tourner la vis de butée d’accélé-
rateur 1jusqu’à obtention du
régime de ralenti spécifié.
Se reporter à la section “REGLA-
GE DU RALENTI” dans le CHA-
PITRE 3.
Régime de ralenti pour le
réglage du TPS:
1.700 ~ 1.900 tr/min.
Einstellschritte:
9Induktiven Drehzahlmesser
(Motordrehzahlmesser) auf
Hochspannungskabel regeln.
9Drosselsperrschraube 1bis zur
vorgeschriebenen Leerlaufdreh-
zahl drehen.
Wir verweisen auf den Abschnitt
„EINSTELLUNG DER LEER-
LAUFDREHZAHL“ im KAPITEL
3.
Leerlaufdrehzahl für
TPS-Einstellung:
1.700 bis 1.900 U/min
Passi della regolazione:
9Collegare il tachimetro induttivo
(tachimetro motore) al terminale
scollegato alta tensione.
9Girare la vite d’arresto dell’acce-
leratore 1fino al minimo specifi-
cato.
Vedi la parte “REGOLAZIONE
DEL MINIMO” nel capitolo 3.
Minimo per la regolazio-
ne del TPS:
1.700 ~ 1.900
giri al minuto
Resistenza della bobina del TPS
al minimo:
Resistenza della bobina del
TPS ´(0,13 ~ 0,15)Résistance de la bobine du TPS
au régime de ralenti :
Résistance de la bobine du
TPS ´(0,13 ~ 0,15)TPS-Spulenwiderstand bei
Leerlaufdrehzahl:
TPS-Spulenwiderstand ´(0,13 ~
0,15)
Procédure de réglage:
Régler l’angle du TPS 1obtenu
avec la résistance calculée
(exemple: 650 ~ 750 ½).Einstellschritte:
Winkel des TPS einstellen 1
errechneten Widerstand ermitteln
Beispiel: 650 ~ 750 ½Passi della regolazione:
Regolare l’angolazione del TPS 1
per ottenere la resistenza calcolata
(esempio: 650 ~ 750 ½).
Conduttore (+) del testerÕ
Conduttore Giallo 2
Conduttore (–) del testerÕ
Conduttore Nero 3Fil (+) de testeurÕ
Fil janne 2
Fil (–) de testeurÕ
Fil noir 3Positives (+) Kabel des PrüfgerätesÕ
gelb Kabel 2
Negatives (–) Kabel des PrüfgeräteÕ
Schwarz Kabel 3
5MW-9-30-6 7/6/00 1:39 PM Page 29
Page 518 of 578

6-12
TPS (THROTTLE POSITION SENSOR) SYSTEMELEC
11. Put the aligning marks aon the TPS and
carburetor.
12. Remove:
9Carburetor
Refer to “CARBURETOR AND REED
VALVE” section in the CHAPTER 4.
13. Tighten:
9Screw (TPS) 1
NOTE:
Tighten the screws (TPS) using the T20 bit (tam-
per resistant fastener type) by aligning the marks
athat were put before removal.
14. Install:
9Carburetor
Refer to “CARBURETOR AND REED
VALVE” section in the CHAPTER 4.
EC694000
TPS INPUT VOLTAGE INSPECTION
1. Disconnect the TPS coupler.
2. Start the engine.
3. Inspect:
9TPS input voltage
Out of specification ÕReplace the CDI
unit.
Tester (+) leadÕBluelead 1
Tester (–) lead
ÕBlacklead 2
TPS input Tester selector
voltage position
4~6V DCV-20
5MW-9-30-6 7/6/00 1:40 PM Page 30
Page 519 of 578

6-12
SYSTEME TPS (CAPTEUR DE POSITION DU PAPILLON)
TPS-SYSTEM (TPS = DROSSELSTELLUNGSSENSOR)
SISTEMA TPS (SENSORE DI POSIZIONE DELL’ACCELERATORE)ELEC
11. Aligner les repères d’alignement
adu TPS et du carburateur.
12. Déposer:
9Carburateur
Se reporter à la section “CAR-
BURATEUR ET SOUPAPE
FLEXIBLE”.11. Ausrichtmarkierungen aam TPS
und Vergaser anbringen.
12. Ausbauen:
9Vergaser
Siehe Abschnitt „VERGASER
UND ZUNGENVENTIL“.11. Segnare le indicazioni adi posi-
zione sul TPS e il carburatore.
12. Togliere:
9Carburatore
Consultare la sezione “CARBU-
RATORE E VALVOLA A LA
MELLA”.
13. Serrer:
9Vis (TPS) 1
N.B.:
Serrer les vis (TPS) à l’aide de
l’embout T20 (fixation infraudable) en
alignant les repères aalignés avant la
dépose.
14. Monter:
9Carburateur
Se reporter à la section “CAR-
BURATEUR ET SOUPAPE
FLEXIBLE”.
13. Festziehen:
9Schraube (TPS) 1
ANMERKUNG:
TPS-Schrauben anziehen und dazu
T20-Maul benutzen (narrensicherer
Verschlußtyp), indem die vor dem
Ausbau angebrachten Markierungen
azum Ausrichten benutzt werden.
14. Einbauen:
9Vergaser
Siehe Abschnitt „VERGASER
UND ZUNGENVENTIL“.
13. Serrare:
9Vite (TPS) 1
NOTA:
Serrare le viti usando la punta T20 (tipo
di dispositivo di fissaggio resistente alla
manomissione) e allineando le indica-
zioni adi posizione segnate prima
dello smontaggio.
14. Installare:
9Carburatore
Consultare la sezione “CARBU-
RATORE E VALVOLA A LA
MELLA”.
VERIFICATION DE LA TENSION
D’ENTREE DU TPS
1. Déconnecter le coupleur du TPS.
2. Démarrer le moteur.
3. Examiner:
9Tension d’entrée du TPS
Hors spécification
ÕChanger le
bloc CDI.
KONTROLLE DER TPS-EINGANGS-
SPANNUNG
1. TPS-Steckverbindung trennen.
2. Den Motor anlassen.
3. Prüfen:
9TPS-Eingangsspannung
Abweichung von Spezifikation
ÕCDI-Einheit erneuern.
IC694000
ISPEZIONE DELLA TENSIONE IN
INGRESSO NEL TPS
1. Scollegare l’accoppiatore del TPS.
2. Avviare il motore.
3. Ispezionare:
9Tensione in ingresso nel TPS
Fuori specifica ÕSostituire
unità CDI.
Tensione in
Posizione del ingresso selettore del
nel TPS tester
4~6V DCV-20
Conduttore (+) del tester Õ
Conduttore Blu 1
Conduttore (–) del tester Õ
Conduttore Nero 2
Tension Position de
d’entrée sélecteur de
du TPS testeur
4~6V DCV-20
Fil (+) de testeurÕFil bleu 1
Fil (–) de testeurÕFil noir 2Positives (+) Kabel des PrüfgerätesÕ
Blau Kabel 1
Negatives (–) Kabel des PrüfgerätesÕ
Schwarz Kabel 2
TPS- Position des
Eingangs-Wahlschaltersspannung am Prüfgerät
4~6V DCV-20
5MW-9-30-6 7/6/00 1:40 PM Page 31
Page 520 of 578

7-1
SETTINGTUN
EC700000
TUNINGEC710000
ENGINEEC711001
Carburetor setting
9The role of fuel is to cool the engine, and in the
case of a 2-stroke engine, to lubricate the
engine in addition to power generation. Accord-
ingly, if a mixture of air and fuel is too lean,
abnormal combustion will occur, and engine
seizure may result. If the mixture is too rich,
spark plugs will get wet with oil, thus making it
impossible to bring the engine into full play or if
the worst comes to the worst, the engine may
stall.
9The richness of the air-fuel mixture required for
the engine will vary with atmospheric conditions
of the day and therefore, the settings of the car-
buretor must be properly suited to the atmos-
pheric conditions (air pressure, humidity and
temperature).
9Finally, the rider himself must make a test-run
and check his machine for conditions (pick-up of
engine speed, road surface conditions) and for
the discoloration of the spark plug(s). After tak-
ing these into consideration, he must select the
best possible carburetor settings.
It is advisable to make a note of settings,
atmospheric conditions, road surface condition,
lap-time, etc. so that the memorandum can be
used as a reference useful for future.
EC712000
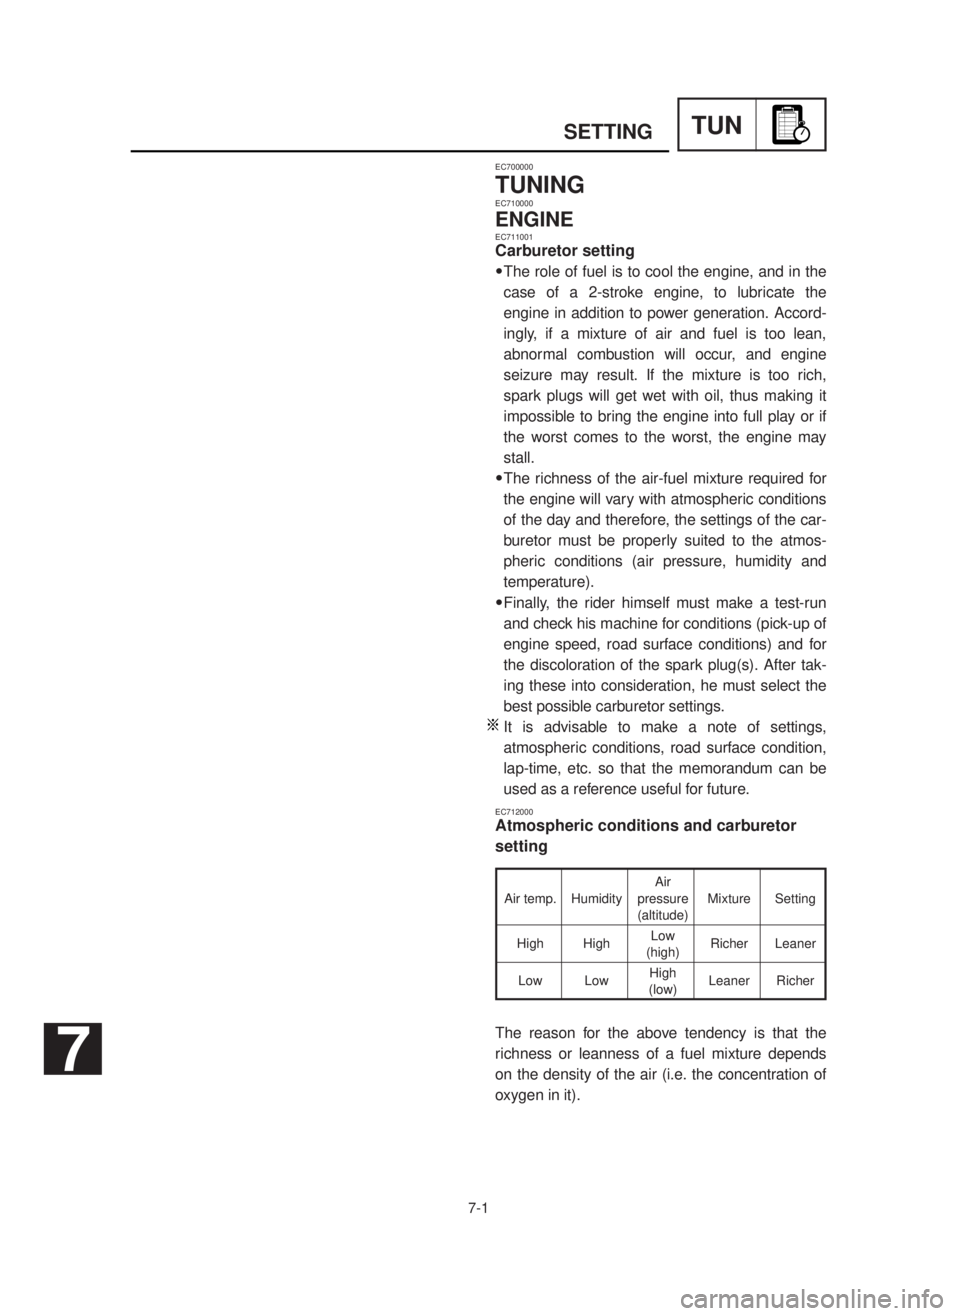
Atmospheric conditions and carburetor
setting
The reason for the above tendency is that the
richness or leanness of a fuel mixture depends
on the density of the air (i.e. the concentration of
oxygen in it).
Air
Air temp. Humidity pressure Mixture Setting
(altitude)
High HighLow
Richer Leaner
(high)
Low LowHigh
Leaner Richer
(low)
7
5MW-9-30-7 7/6/00 2:15 PM Page 2