engine YAMAHA YZ450F 2005 User Guide
[x] Cancel search | Manufacturer: YAMAHA, Model Year: 2005, Model line: YZ450F, Model: YAMAHA YZ450F 2005Pages: 646, PDF Size: 16.06 MB
Page 28 of 646
1 - 2
GEN
INFO
MACHINE IDENTIFICATION
EC120001
MACHINE IDENTIFICATION
There are two significant reasons for knowing
the serial number of your machine:
1. When ordering parts, you can give the
number to your Yamaha dealer for positive
identification of the model you own.
2. If your machine is stolen, the authorities will
need the number to search for and identify
your machine.
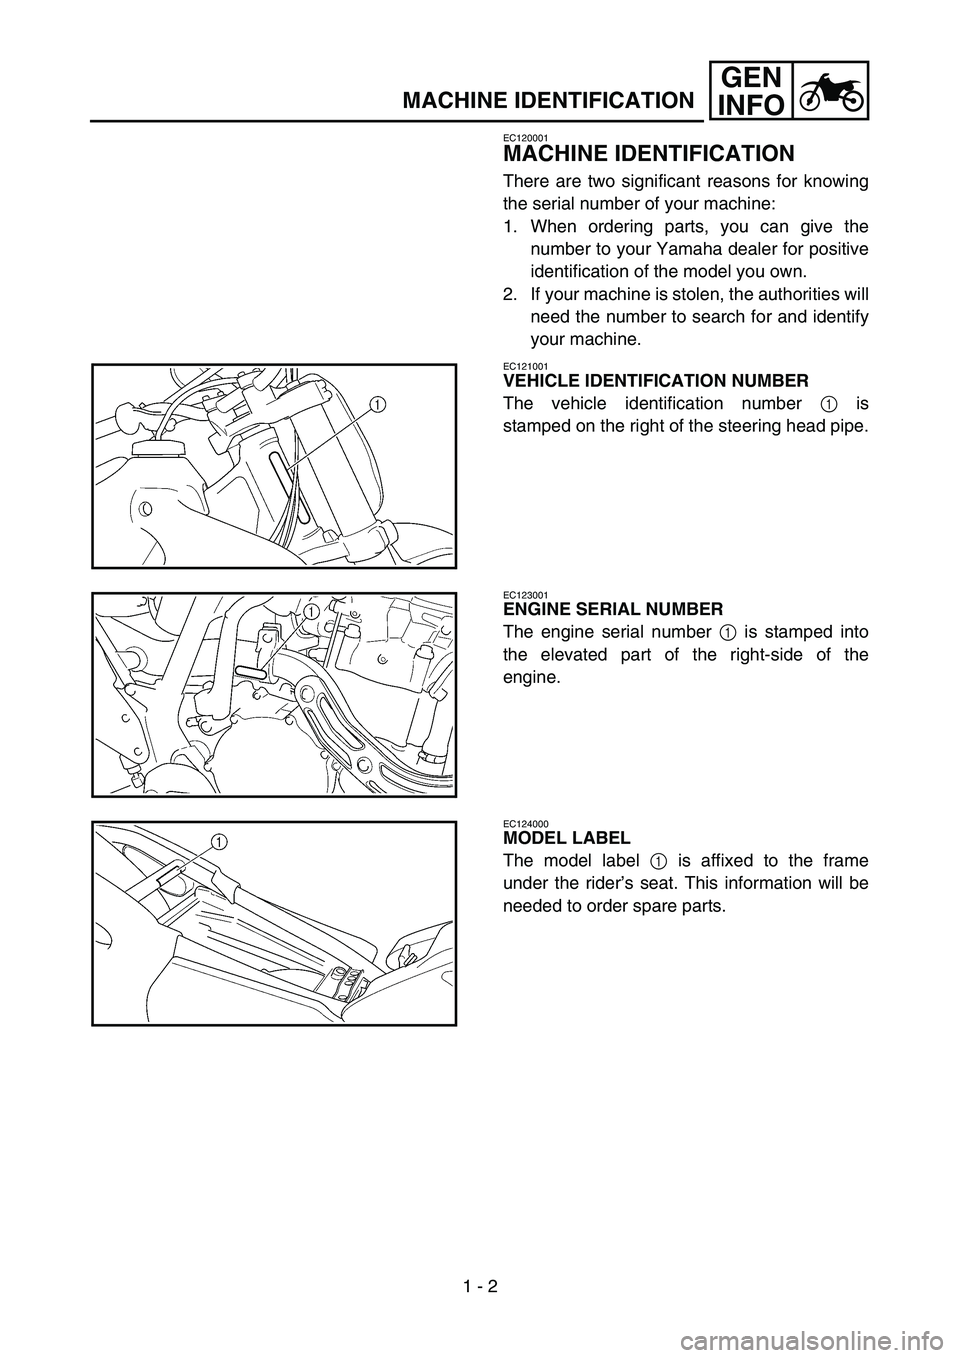
EC121001
VEHICLE IDENTIFICATION NUMBER
The vehicle identification number 1 is
stamped on the right of the steering head pipe.
EC123001
ENGINE SERIAL NUMBER
The engine serial number 1 is stamped into
the elevated part of the right-side of the
engine.
EC124000
MODEL LABEL
The model label 1 is affixed to the frame
under the rider’s seat. This information will be
needed to order spare parts.
Page 32 of 646
1 - 4
GEN
INFO
IMPORTANT INFORMATION
EC132000
ALL REPLACEMENT PARTS
1. We recommend to use Yamaha genuine
parts for all replacements. Use oil and/or
grease recommended by Yamaha for
assembly and adjustment.
EC133000
GASKETS, OIL SEALS AND O-RINGS
1. All gaskets, oil seals, and O-rings should
be replaced when an engine is overhauled.
All gasket surfaces, oil seal lips, and O-
rings must be cleaned.
2. Properly oil all mating parts and bearings
during reassembly. Apply grease to the oil
seal lips.
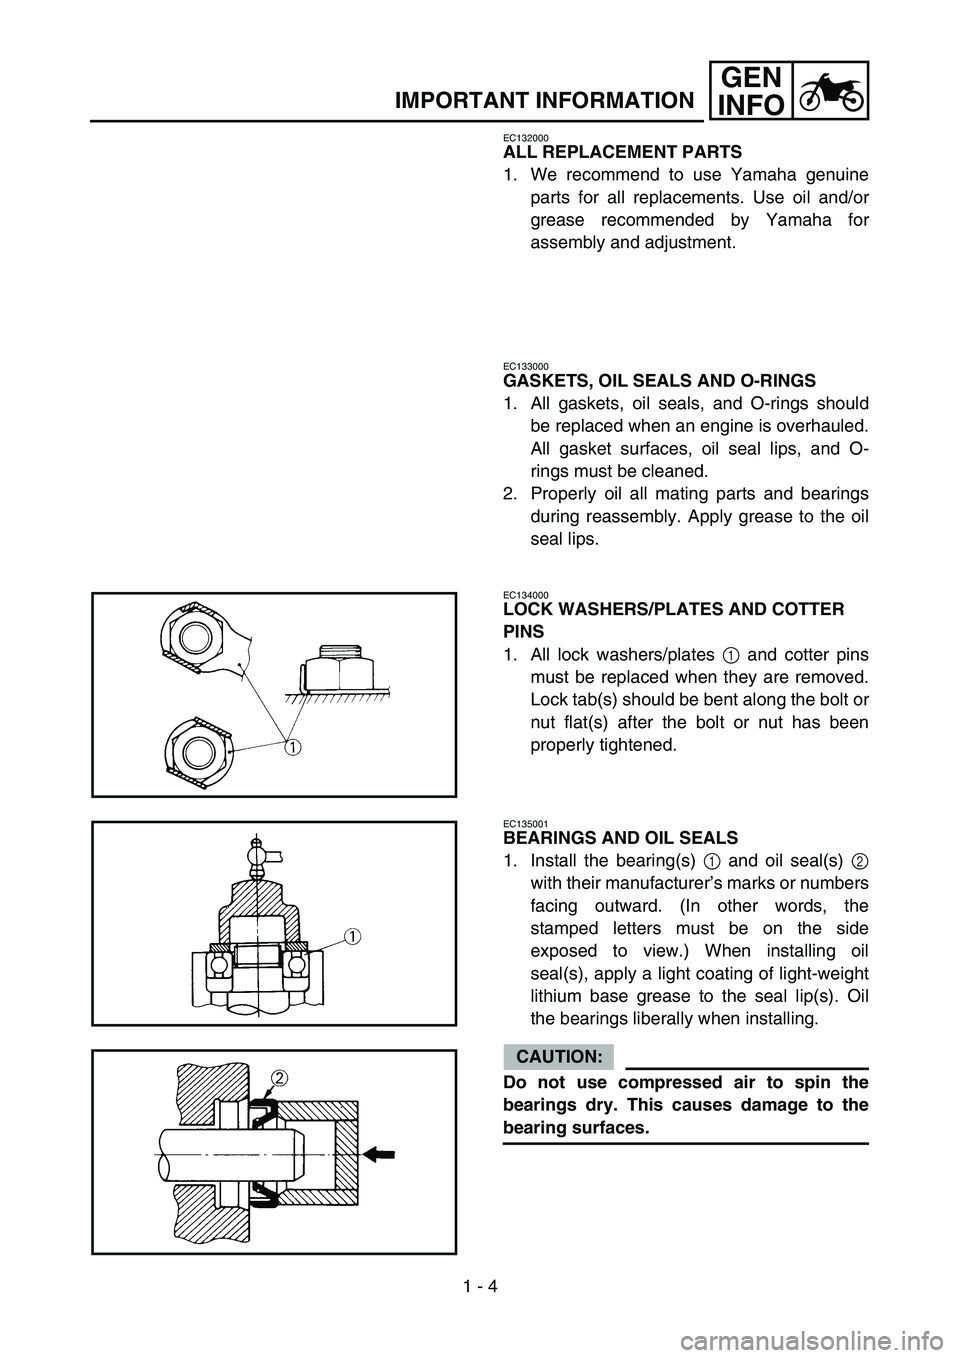
EC134000
LOCK WASHERS/PLATES AND COTTER
PINS
1. All lock washers/plates 1 and cotter pins
must be replaced when they are removed.
Lock tab(s) should be bent along the bolt or
nut flat(s) after the bolt or nut has been
properly tightened.
EC135001
BEARINGS AND OIL SEALS
1. Install the bearing(s) 1 and oil seal(s) 2
with their manufacturer’s marks or numbers
facing outward. (In other words, the
stamped letters must be on the side
exposed to view.) When installing oil
seal(s), apply a light coating of light-weight
lithium base grease to the seal lip(s). Oil
the bearings liberally when installing.
CAUTION:
Do not use compressed air to spin the
bearings dry. This causes damage to the
bearing surfaces.
Page 48 of 646
1 - 10
GEN
INFO
CONTROL FUNCTIONS
EC150000
CONTROL FUNCTIONS
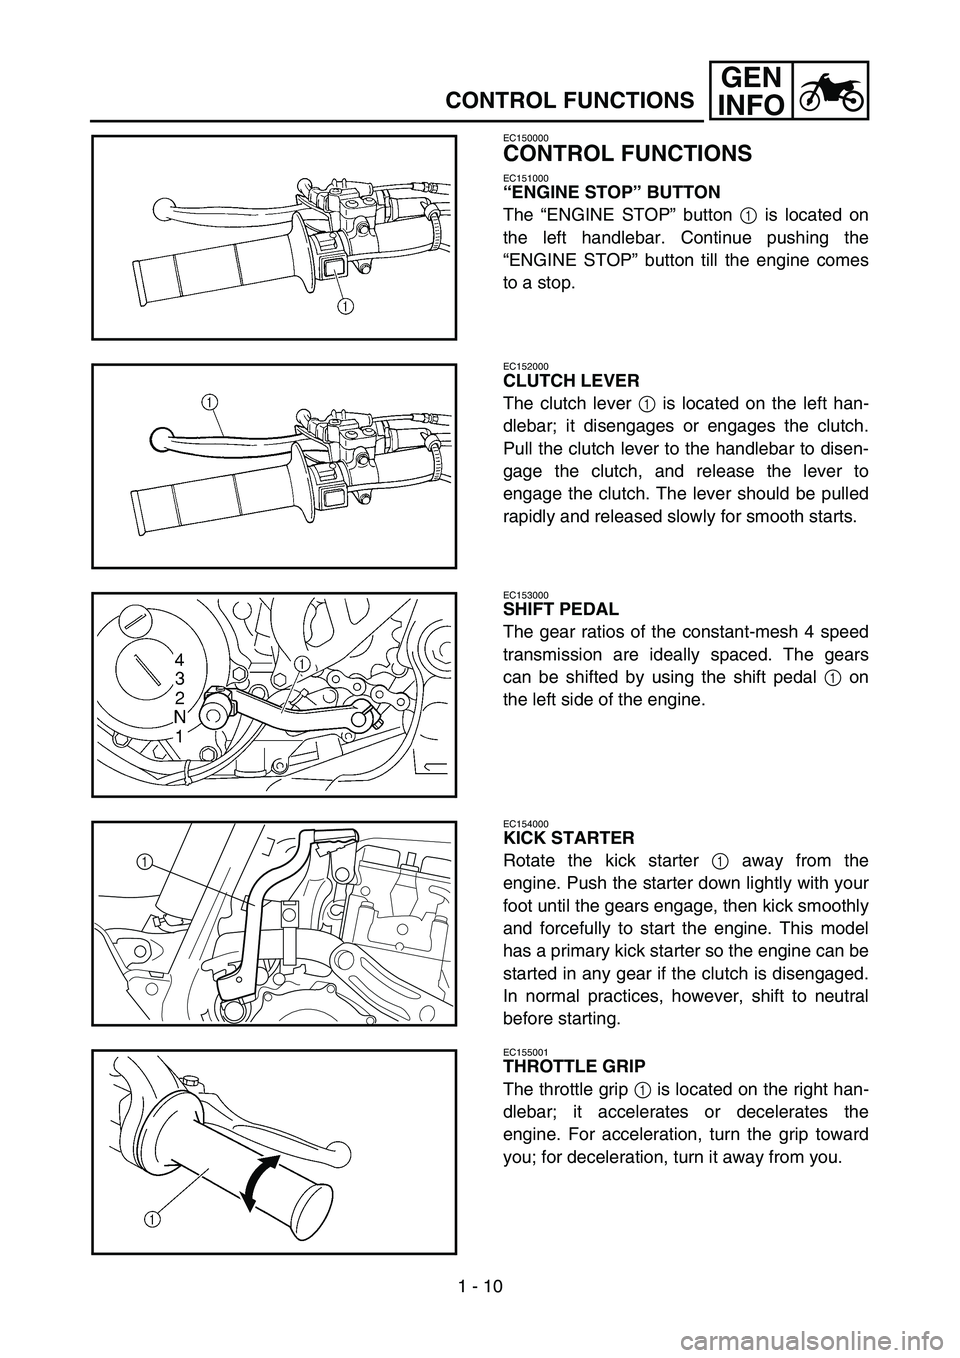
EC151000
“ENGINE STOP” BUTTON
The “ENGINE STOP” button 1 is located on
the left handlebar. Continue pushing the
“ENGINE STOP” button till the engine comes
to a stop.
EC152000
CLUTCH LEVER
The clutch lever 1 is located on the left han-
dlebar; it disengages or engages the clutch.
Pull the clutch lever to the handlebar to disen-
gage the clutch, and release the lever to
engage the clutch. The lever should be pulled
rapidly and released slowly for smooth starts.
EC153000
SHIFT PEDAL
The gear ratios of the constant-mesh 4 speed
transmission are ideally spaced. The gears
can be shifted by using the shift pedal 1 on
the left side of the engine.
EC154000
KICK STARTER
Rotate the kick starter 1 away from the
engine. Push the starter down lightly with your
foot until the gears engage, then kick smoothly
and forcefully to start the engine. This model
has a primary kick starter so the engine can be
started in any gear if the clutch is disengaged.
In normal practices, however, shift to neutral
before starting.
1
EC155001
THROTTLE GRIP
The throttle grip 1 is located on the right han-
dlebar; it accelerates or decelerates the
engine. For acceleration, turn the grip toward
you; for deceleration, turn it away from you.
Page 49 of 646
GEN
INFO
BEDIENUNGSELEMENTE UND
DEREN FUNKTION
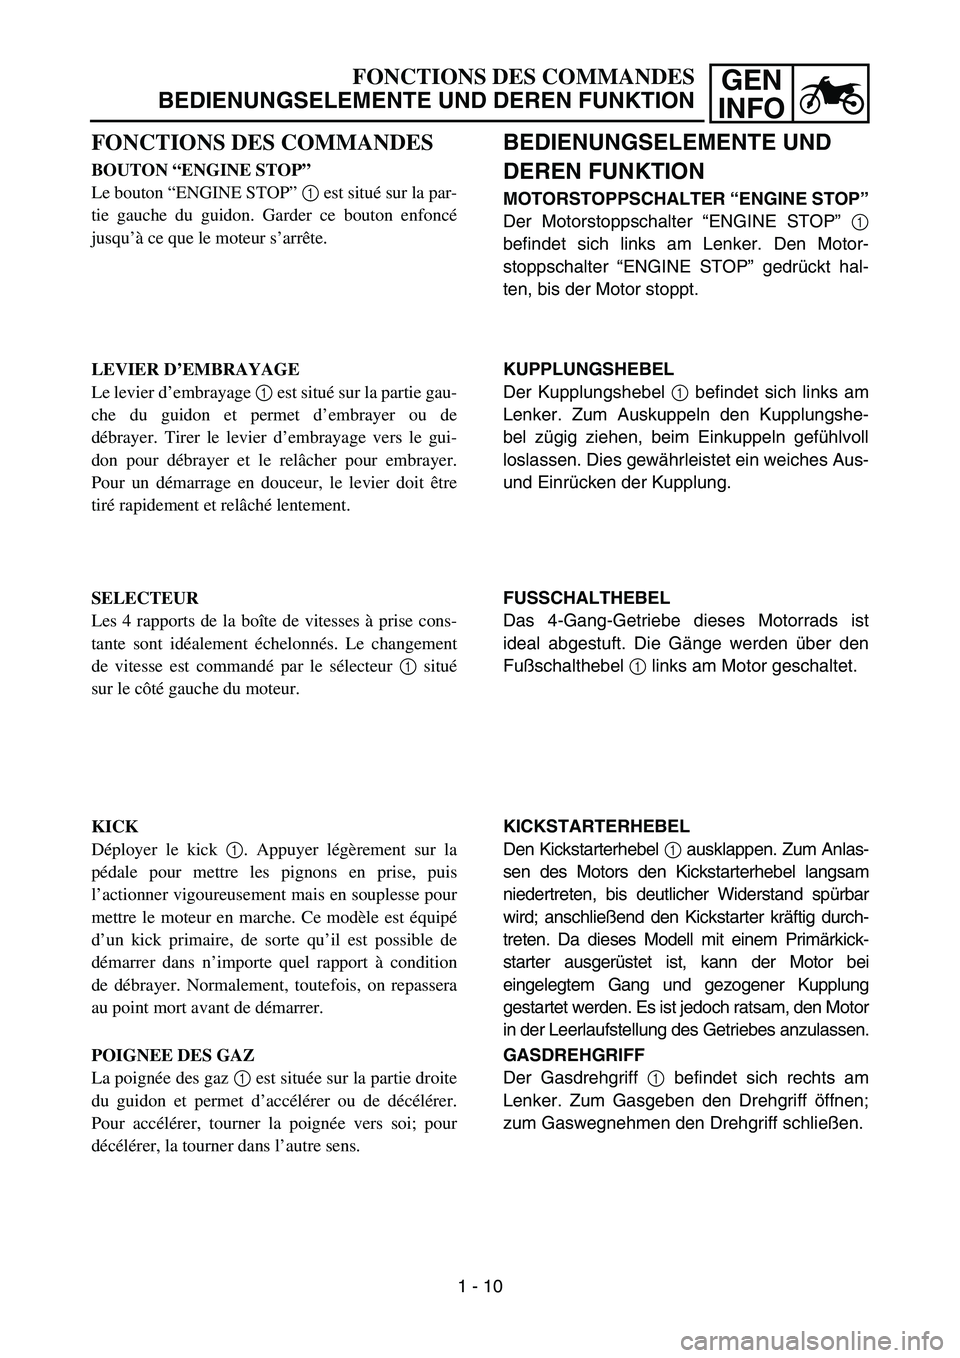
MOTORSTOPPSCHALTER “ENGINE STOP”
Der Motorstoppschalter “ENGINE STOP” 1
befindet sich links am Lenker. Den Motor-
stoppschalter “ENGINE STOP” gedrückt hal-
ten, bis der Motor stoppt.
KUPPLUNGSHEBEL
Der Kupplungshebel 1 befindet sich links am
Lenker. Zum Auskuppeln den Kupplungshe-
bel zügig ziehen, beim Einkuppeln gefühlvoll
loslassen. Dies gewährleistet ein weiches Aus-
und Einrücken der Kupplung.
FUSSCHALTHEBEL
Das 4-Gang-Getriebe dieses Motorrads ist
ideal abgestuft. Die Gänge werden über den
Fußschalthebel 1 links am Motor geschaltet.
KICKSTARTERHEBEL
Den Kickstarterhebel 1 ausklappen. Zum Anlas-
sen des Motors den Kickstarterhebel langsam
niedertreten, bis deutlicher Widerstand spürbar
wird; anschließend den Kickstarter kräftig durch-
treten. Da dieses Modell mit einem Primärkick-
starter ausgerüstet ist, kann der Motor bei
eingelegtem Gang und gezogener Kupplung
gestartet werden. Es ist jedoch ratsam, den Motor
in der Leerlaufstellung des Getriebes anzulassen.
GASDREHGRIFF
Der Gasdrehgriff 1 befindet sich rechts am
Lenker. Zum Gasgeben den Drehgriff öffnen;
zum Gaswegnehmen den Drehgriff schließen.
FONCTIONS DES COMMANDES
BEDIENUNGSELEMENTE UND DEREN FUNKTION
FONCTIONS DES COMMANDES
BOUTON “ENGINE STOP”
Le bouton “ENGINE STOP” 1 est situé sur la par-
tie gauche du guidon. Garder ce bouton enfoncé
jusqu’à ce que le moteur s’arrête.
LEVIER D’EMBRAYAGE
Le levier d’embrayage 1 est situé sur la partie gau-
che du guidon et permet d’embrayer ou de
débrayer. Tirer le levier d’embrayage vers le gui-
don pour débrayer et le relâcher pour embrayer.
Pour un démarrage en douceur, le levier doit être
tiré rapidement et relâché lentement.
SELECTEUR
Les 4 rapports de la boîte de vitesses à prise cons-
tante sont idéalement échelonnés. Le changement
de vitesse est commandé par le sélecteur 1 situé
sur le côté gauche du moteur.
KICK
Déployer le kick 1. Appuyer légèrement sur la
pédale pour mettre les pignons en prise, puis
l’actionner vigoureusement mais en souplesse pour
mettre le moteur en marche. Ce modèle est équipé
d’un kick primaire, de sorte qu’il est possible de
démarrer dans n’importe quel rapport à condition
de débrayer. Normalement, toutefois, on repassera
au point mort avant de démarrer.
POIGNEE DES GAZ
La poignée des gaz 1 est située sur la partie droite
du guidon et permet d’accélérer ou de décélérer.
Pour accélérer, tourner la poignée vers soi; pour
décélérer, la tourner dans l’autre sens.
1 - 10
Page 50 of 646
1 - 11
GEN
INFO
CONTROL FUNCTIONS
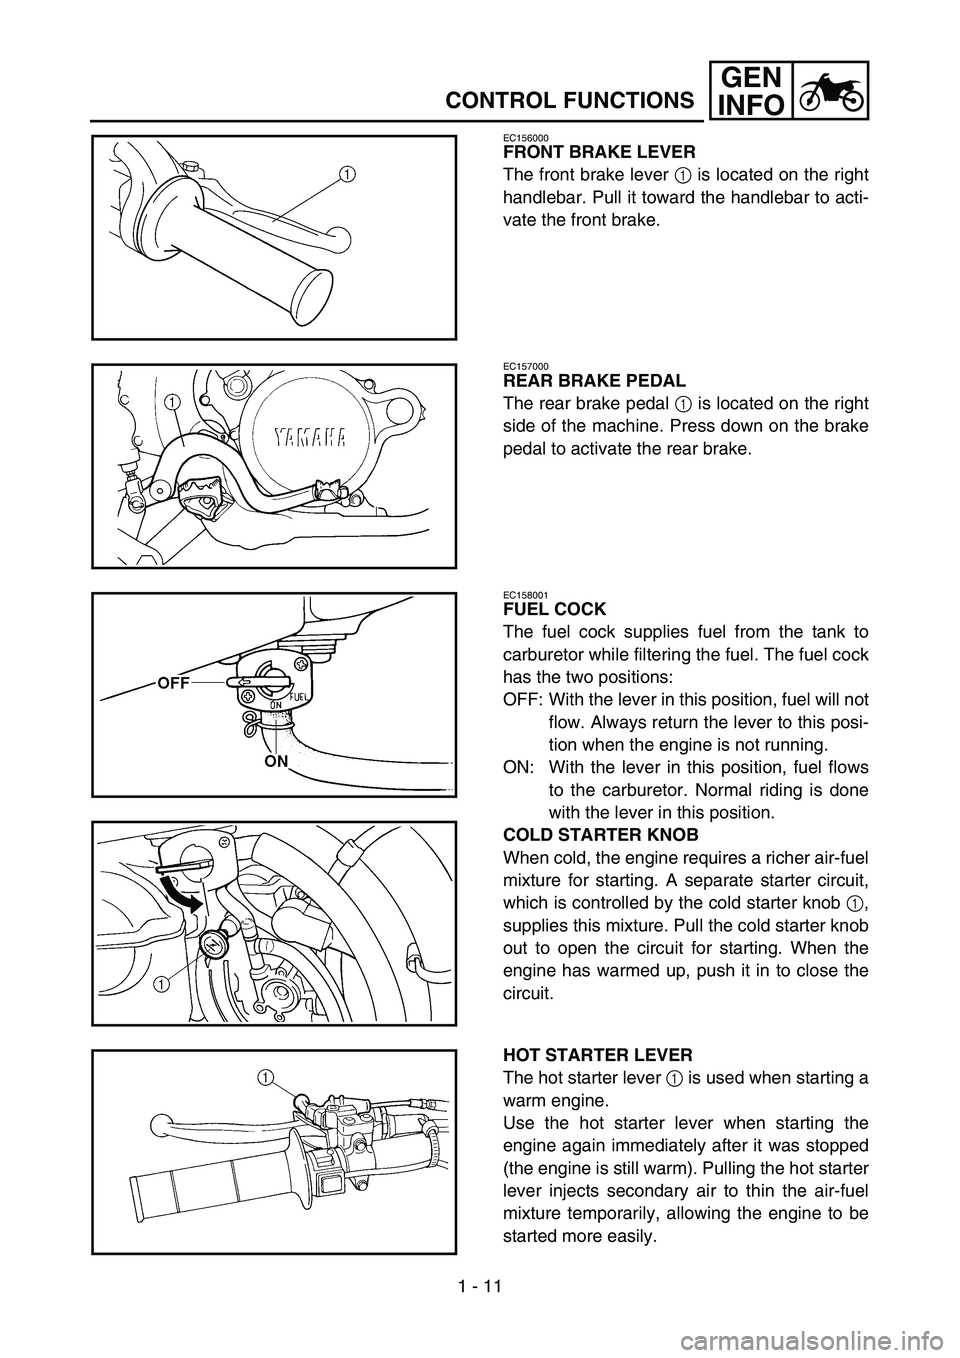
EC156000
FRONT BRAKE LEVER
The front brake lever 1 is located on the right
handlebar. Pull it toward the handlebar to acti-
vate the front brake.
EC157000
REAR BRAKE PEDAL
The rear brake pedal 1 is located on the right
side of the machine. Press down on the brake
pedal to activate the rear brake.
EC158001
FUEL COCK
The fuel cock supplies fuel from the tank to
carburetor while filtering the fuel. The fuel cock
has the two positions:
OFF: With the lever in this position, fuel will not
flow. Always return the lever to this posi-
tion when the engine is not running.
ON: With the lever in this position, fuel flows
to the carburetor. Normal riding is done
with the lever in this position.
COLD STARTER KNOB
When cold, the engine requires a richer air-fuel
mixture for starting. A separate starter circuit,
which is controlled by the cold starter knob 1,
supplies this mixture. Pull the cold starter knob
out to open the circuit for starting. When the
engine has warmed up, push it in to close the
circuit.
HOT STARTER LEVER
The hot starter lever 1 is used when starting a
warm engine.
Use the hot starter lever when starting the
engine again immediately after it was stopped
(the engine is still warm). Pulling the hot starter
lever injects secondary air to thin the air-fuel
mixture temporarily, allowing the engine to be
started more easily.
Page 54 of 646
1 - 13
GEN
INFO
FUEL
Always use the recommended fuel as stated
below. Also, be sure to use new gasoline the
day of a race.
CAUTION:
Use only unleaded gasoline. The use of
leaded gasoline will cause severe damage
to the engine internal parts such as valves,
piston rings, and exhaust system, etc.
NOTE:
If knocking or pinging occurs, use a different
brand of gasoline or higher octane grade.
WARNING
For refueling, be sure to stop the engine
and use enough care not to spill any fuel.
Also be sure to avoid refueling close to a
fire.
Refuel after the engine, exhaust pipe, etc.
have cooled off.
Recommended fuel:
Premium unleaded gasoline
only with a research octane
number of 95 or higher.
FUEL
Page 56 of 646
1 - 14
GEN
INFO
STARTING AND BREAK-IN
STARTING AND BREAK-IN
WARNING
Never start or run the engine in a closed
area. The exhaust fumes are poisonous;
they can cause loss of consciousness and
death in a very short time. Always operate
the machine in a well-ventilated area.
CAUTION:
The carburetor on this machine has a
built-in accelerator pump. Therefore,
when starting the engine, do not operate
the throttle or the spark plug will foul.
Unlike a two-stroke engine, this engine
cannot be kick started when the throttle is
open because the kick starter may kick
back. Also, if the throttle is open the air/
fuel mixture may be too lean for the
engine to start.
Before starting the machine, perform the
checks in the pre-operation check list.
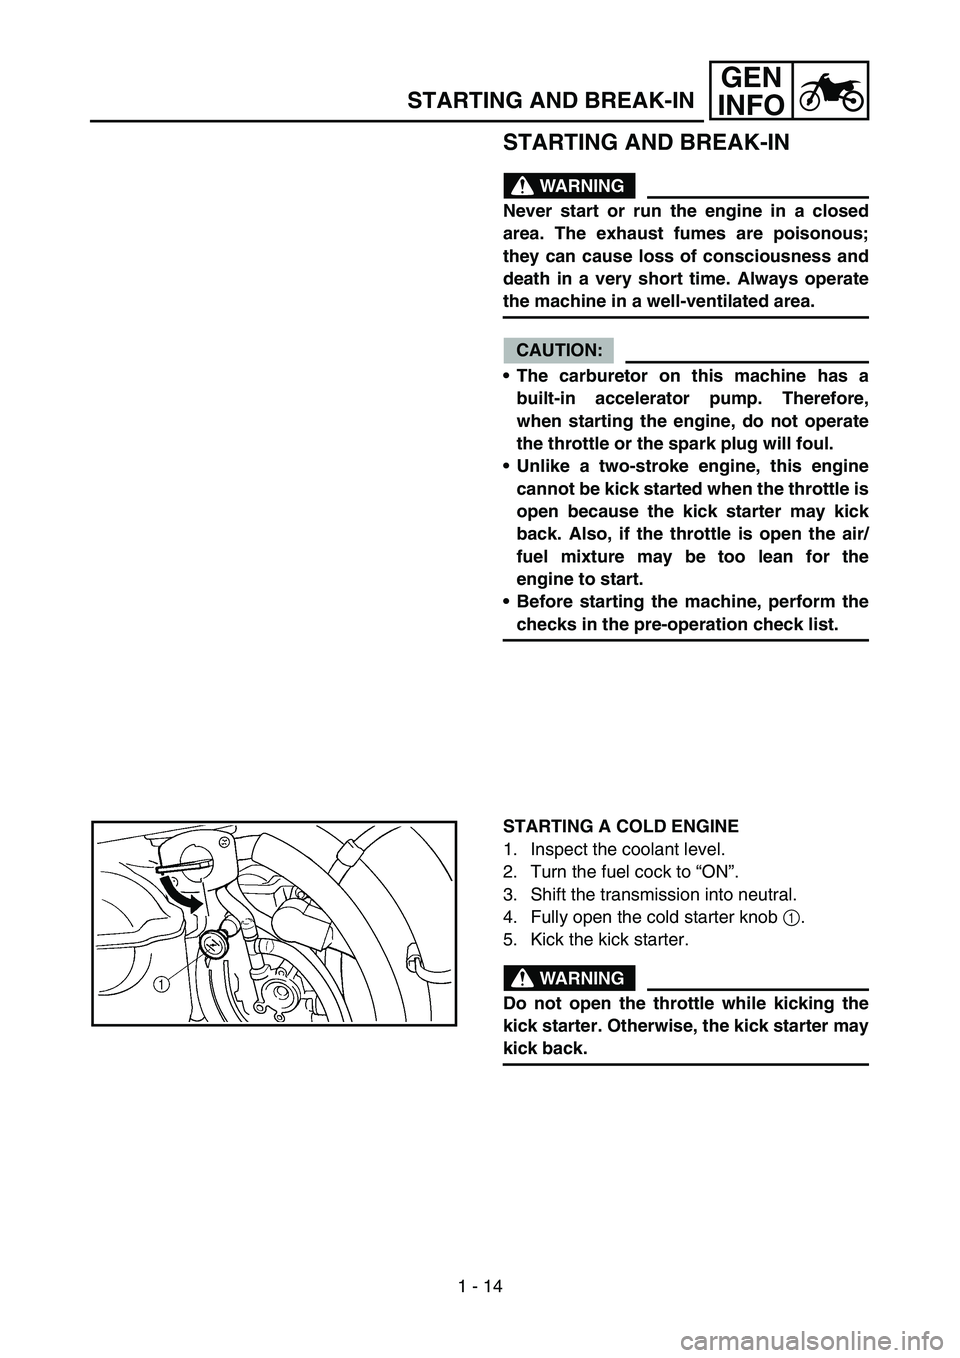
STARTING A COLD ENGINE
1. Inspect the coolant level.
2. Turn the fuel cock to “ON”.
3. Shift the transmission into neutral.
4. Fully open the cold starter knob 1.
5. Kick the kick starter.
WARNING
Do not open the throttle while kicking the
kick starter. Otherwise, the kick starter may
kick back.
Page 58 of 646
1 - 15
GEN
INFO
STARTING AND BREAK-IN
6. Return the cold starter knob to its original
position and run the engine at 3,000 ~
5,000 r/min for 1 or 2 minutes.
NOTE:
Since this model is equipped with an accelera-
tor pump, if the engine is raced (the throttle
opened and closed), the air/fuel mixture will be
too rich and the engine may stall. Also unlike a
two-stroke engine, this model can idle.
CAUTION:
Do not warm up the engine for extended
periods of time.
Page 60 of 646
1 - 16
GEN
INFO
STARTING AND BREAK-IN
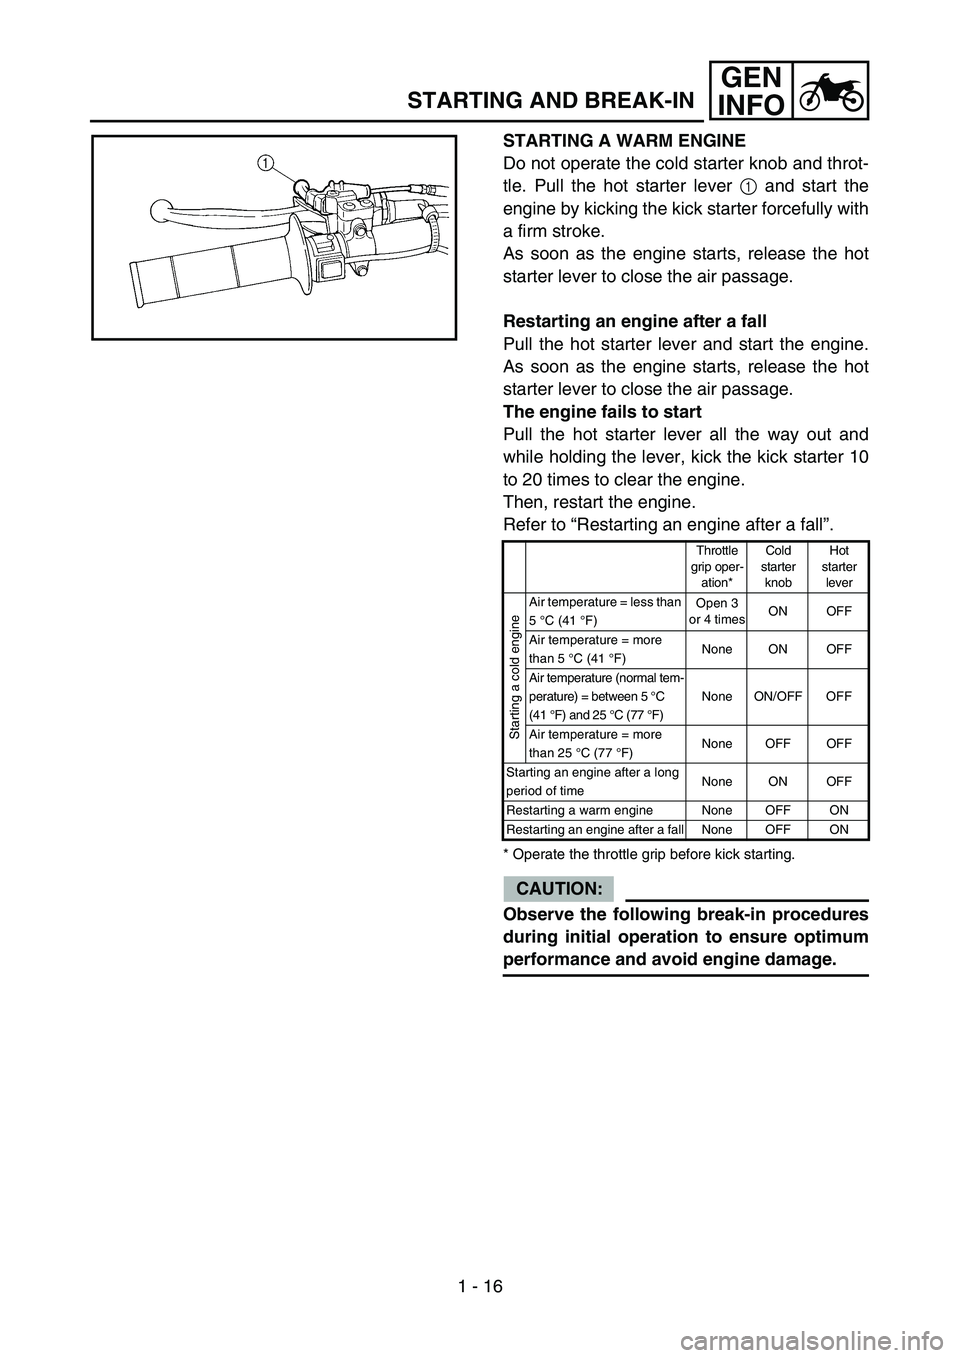
STARTING A WARM ENGINE
Do not operate the cold starter knob and throt-
tle. Pull the hot starter lever 1 and start the
engine by kicking the kick starter forcefully with
a firm stroke.
As soon as the engine starts, release the hot
starter lever to close the air passage.
Restarting an engine after a fall
Pull the hot starter lever and start the engine.
As soon as the engine starts, release the hot
starter lever to close the air passage.
The engine fails to start
Pull the hot starter lever all the way out and
while holding the lever, kick the kick starter 10
to 20 times to clear the engine.
Then, restart the engine.
Refer to “Restarting an engine after a fall”.
* Operate the throttle grip before kick starting.
CAUTION:
Observe the following break-in procedures
during initial operation to ensure optimum
performance and avoid engine damage.
Throttle
grip oper-
ation*Cold
starter
knobHot
starter
lever
Starting a cold engine
Air temperature = less than
5 °C (41 °F)Open 3
or 4 timesON OFF
Air temperature = more
than 5 °C (41 °F)None ON OFF
Air temperature (normal tem-
perature) = between 5°C
(41°F) and 25 °C (77°F)None ON/OFF OFF
Air temperature = more
than 25 °C (77 °F)None OFF OFF
Starting an engine after a long
period of timeNone ON OFF
Restarting a warm engine None OFF ON
Restarting an engine after a fall None OFF ON
Page 62 of 646
1 - 17
GEN
INFO
BREAK-IN PROCEDURES
1. Before starting the engine, fill the fuel tank
with the fuel.
2. Perform the pre-operation checks on the
machine.
3. Start and warm up the engine. Check the
idle speed, and check the operation of the
controls and the “ENGINE STOP” button.
Then, restart the engine and check its
operation within no more than 5 minutes
after it is restarted.
4. Operate the machine in the lower gears at
moderate throttle openings for five to eight
minutes.
5. Check how the engine runs when the
machine is ridden with the throttle 1/4 to 1/
2 open (low to medium speed) for about
one hour.
6. Restart the engine and check the operation
of the machine throughout its entire operat-
ing range. Restart the machine and oper-
ate it for about 10 to 15 more minutes. The
machine will now be ready to race.
CAUTION:
After the break-in or before each race,
you must check the entire machine for
loose fittings and fasteners as per
“TORQUE-CHECK POINTS”.
Tighten all such fasteners as required.
When any of the following parts have
been replaced, they must be broken in.
CYLINDER AND CRANKSHAFT:
About one hour of break-in operation is
necessary.
PISTON, RING, VALVES, CAMSHAFTS
AND GEARS:
These parts require about 30 minutes of
break-in operation at half-throttle or less.
Observe the condition of the engine care-
fully during operation.
STARTING AND BREAK-IN