engine YAMAHA YZ450F 2005 Workshop Manual
[x] Cancel search | Manufacturer: YAMAHA, Model Year: 2005, Model line: YZ450F, Model: YAMAHA YZ450F 2005Pages: 646, PDF Size: 16.06 MB
Page 186 of 646
3 - 21
INSP
ADJ
VALVE CLEARANCE ADJUSTMENT
Round off the last digit of the installed pad
number to the nearest increment.
Last digit of pad
numberRounded value
0, 1 or 2 0
4, 5 or 6 5
8 or 9 10
EXAMPLE:
Installed pad number = 148
Rounded off value = 150
NOTE:
Pads can only be selected in 0.05 mm incre-
ments.
Locate the rounded-off value and the mea-
sured valve clearance in the chart “PAD
SELECTION TABLE”. The field where
these two coordinates intersect shows the
new pad number to use.
NOTE:
Use the new pad number only as a guide
when verifying the valve clearance adjust-
ment.
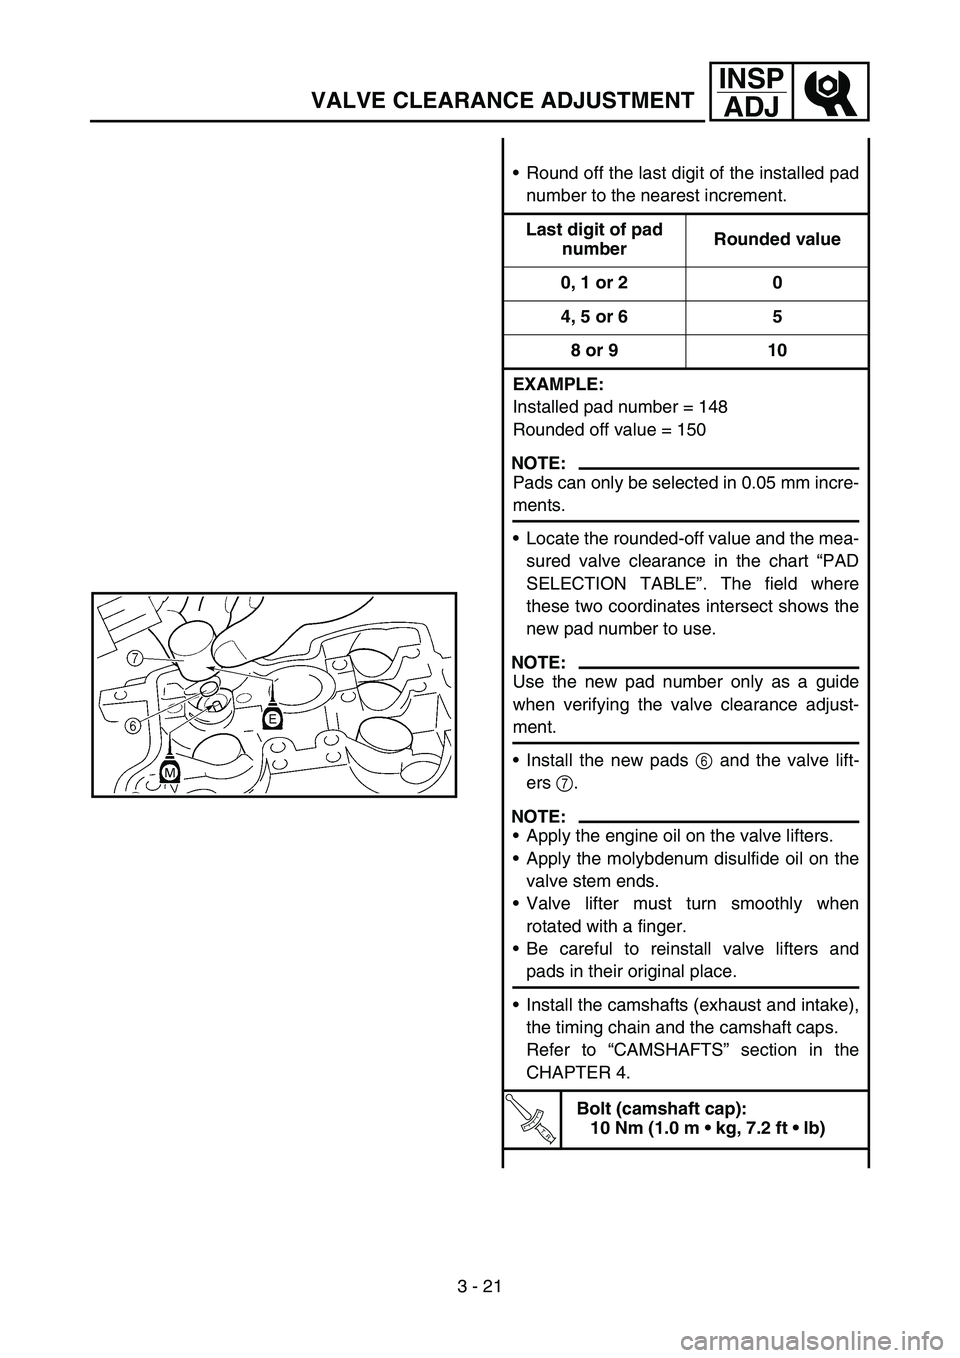
Install the new pads 6 and the valve lift-
ers 7.
NOTE:
Apply the engine oil on the valve lifters.
Apply the molybdenum disulfide oil on the
valve stem ends.
Valve lifter must turn smoothly when
rotated with a finger.
Be careful to reinstall valve lifters and
pads in their original place.
Install the camshafts (exhaust and intake),
the timing chain and the camshaft caps.
Refer to “CAMSHAFTS” section in the
CHAPTER 4.
T R..
Bolt (camshaft cap):
10 Nm (1.0 m kg, 7.2 ft lb)
Page 210 of 646
3 - 32
INSP
ADJ
DRIVE CHAIN SLACK ADJUSTMENT
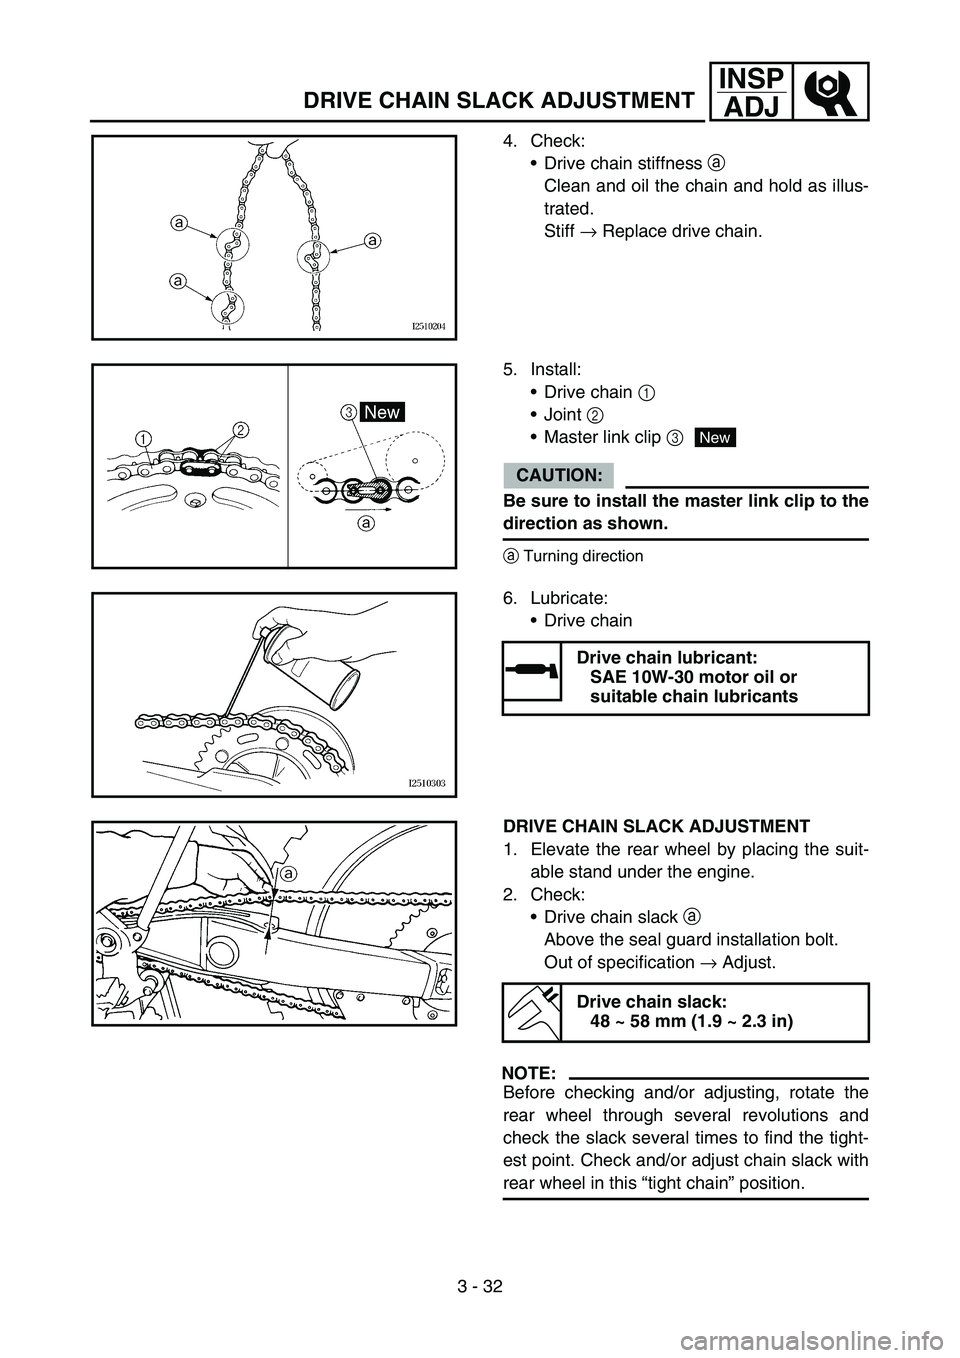
4. Check:
Drive chain stiffness a
Clean and oil the chain and hold as illus-
trated.
Stiff → Replace drive chain.
5. Install:
Drive chain 1
Joint 2
Master link clip 3
CAUTION:
Be sure to install the master link clip to the
direction as shown.
aTurning direction
New
6. Lubricate:
Drive chain
Drive chain lubricant:
SAE 10W-30 motor oil or
suitable chain lubricants
DRIVE CHAIN SLACK ADJUSTMENT
1. Elevate the rear wheel by placing the suit-
able stand under the engine.
2. Check:
Drive chain slack a
Above the seal guard installation bolt.
Out of specification → Adjust.
NOTE:
Before checking and/or adjusting, rotate the
rear wheel through several revolutions and
check the slack several times to find the tight-
est point. Check and/or adjust chain slack with
rear wheel in this “tight chain” position.
Drive chain slack:
48 ~ 58 mm (1.9 ~ 2.3 in)
Page 212 of 646
3 - 33
INSP
ADJ
FRONT FORK INSPECTION
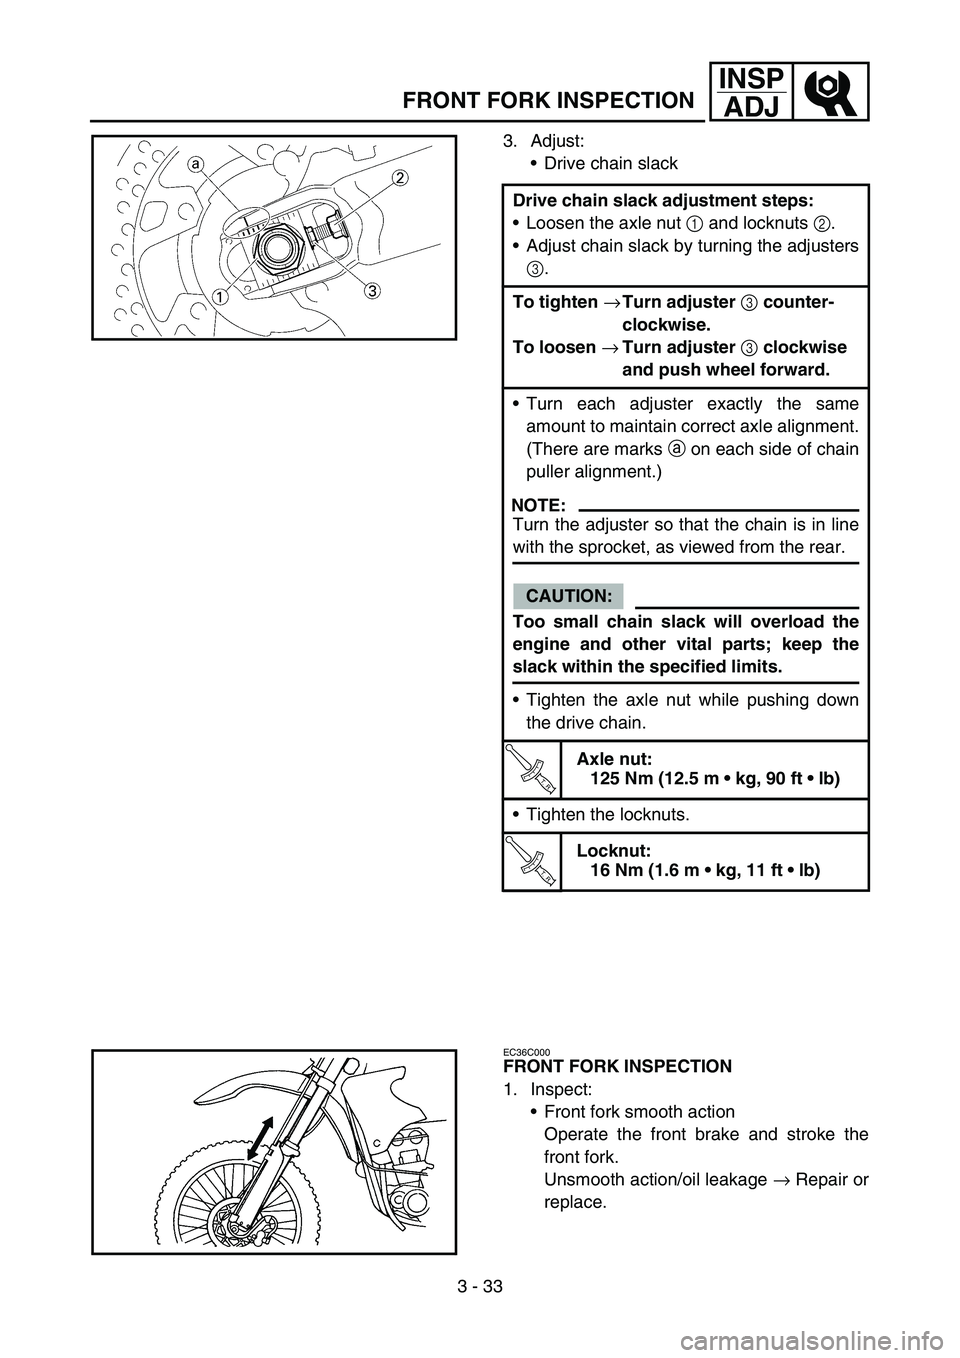
3. Adjust:
Drive chain slack
Drive chain slack adjustment steps:
Loosen the axle nut 1 and locknuts 2.
Adjust chain slack by turning the adjusters
3.
To tighten
→Turn adjuster
3 counter-
clockwise.
To loosen
→Turn adjuster
3 clockwise
and push wheel forward.
Turn each adjuster exactly the same
amount to maintain correct axle alignment.
(There are marks a on each side of chain
puller alignment.)
NOTE:
Turn the adjuster so that the chain is in line
with the sprocket, as viewed from the rear.
CAUTION:
Too small chain slack will overload the
engine and other vital parts; keep the
slack within the specified limits.
Tighten the axle nut while pushing down
the drive chain.
T R..
Axle nut:
125 Nm (12.5 m kg, 90 ft lb)
Tighten the locknuts.
T R..
Locknut:
16 Nm (1.6 m kg, 11 ft lb)
EC36C000
FRONT FORK INSPECTION
1. Inspect:
Front fork smooth action
Operate the front brake and stroke the
front fork.
Unsmooth action/oil leakage → Repair or
replace.
Page 214 of 646
3 - 34
INSP
ADJFRONT FORK OIL SEAL AND DUST SEAL CLEANING/
FRONT FORK INTERNAL PRESSURE RELIEVING/
FRONT FORK REBOUND DAMPING FORCE ADJUSTMENT
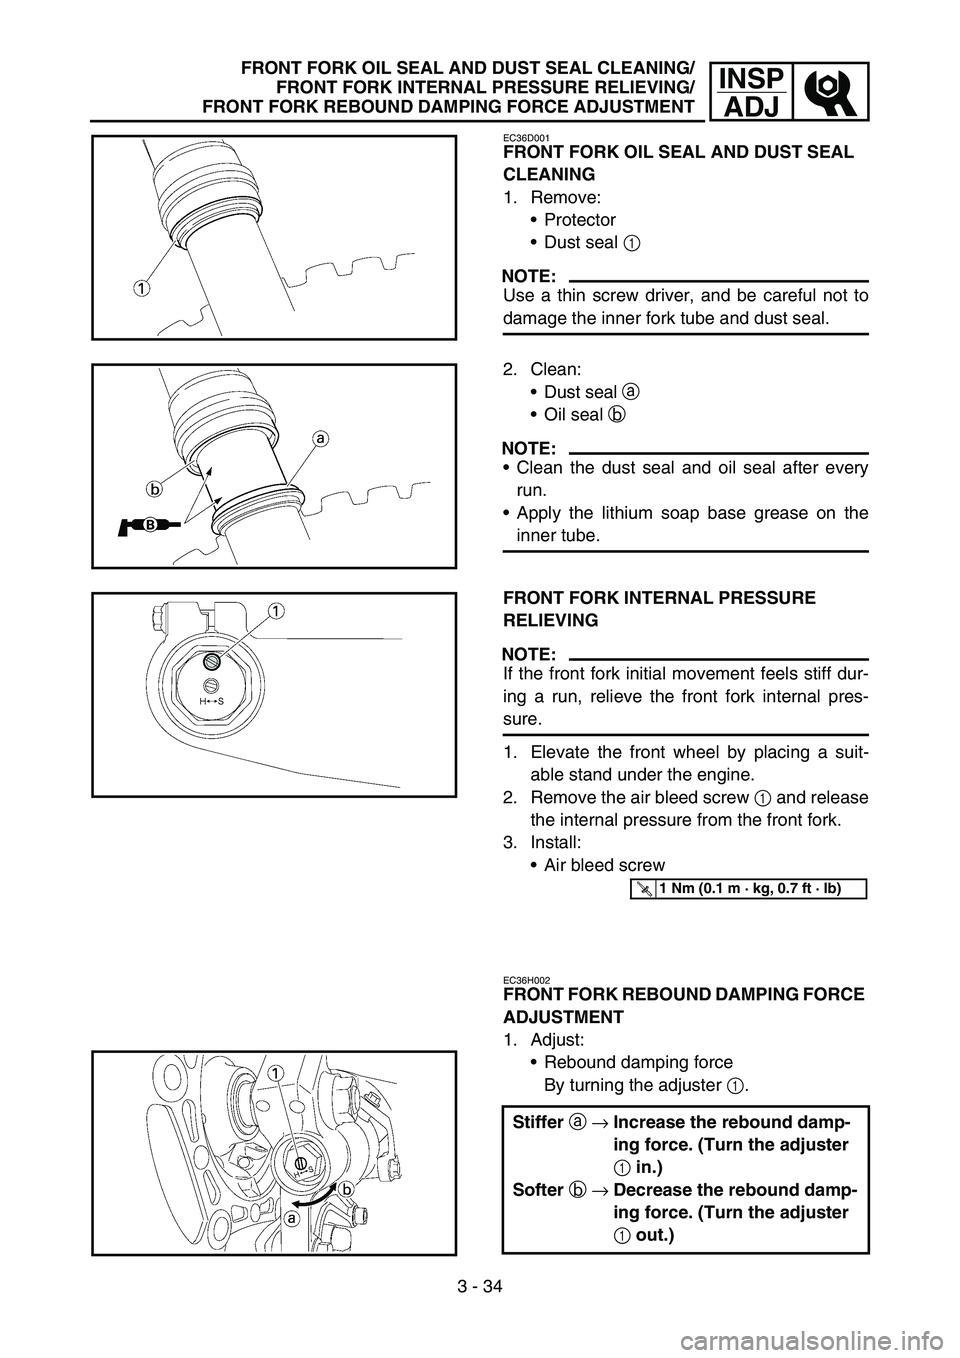
EC36D001
FRONT FORK OIL SEAL AND DUST SEAL
CLEANING
1. Remove:
Protector
Dust seal 1
NOTE:
Use a thin screw driver, and be careful not to
damage the inner fork tube and dust seal.
2. Clean:
Dust seal a
Oil seal b
NOTE:
Clean the dust seal and oil seal after every
run.
Apply the lithium soap base grease on the
inner tube.
FRONT FORK INTERNAL PRESSURE
RELIEVING
NOTE:
If the front fork initial movement feels stiff dur-
ing a run, relieve the front fork internal pres-
sure.
1. Elevate the front wheel by placing a suit-
able stand under the engine.
2. Remove the air bleed screw 1 and release
the internal pressure from the front fork.
3. Install:
Air bleed screw
EC36H002
FRONT FORK REBOUND DAMPING FORCE
ADJUSTMENT
1. Adjust:
Rebound damping force
By turning the adjuster 1.
Stiffer a →Increase the rebound damp-
ing force. (Turn the adjuster
1 in.)
Softer b →Decrease the rebound damp-
ing force. (Turn the adjuster
1 out.)
T R..1 Nm (0.1 m · kg, 0.7 ft · lb)
Page 220 of 646
3 - 37
INSP
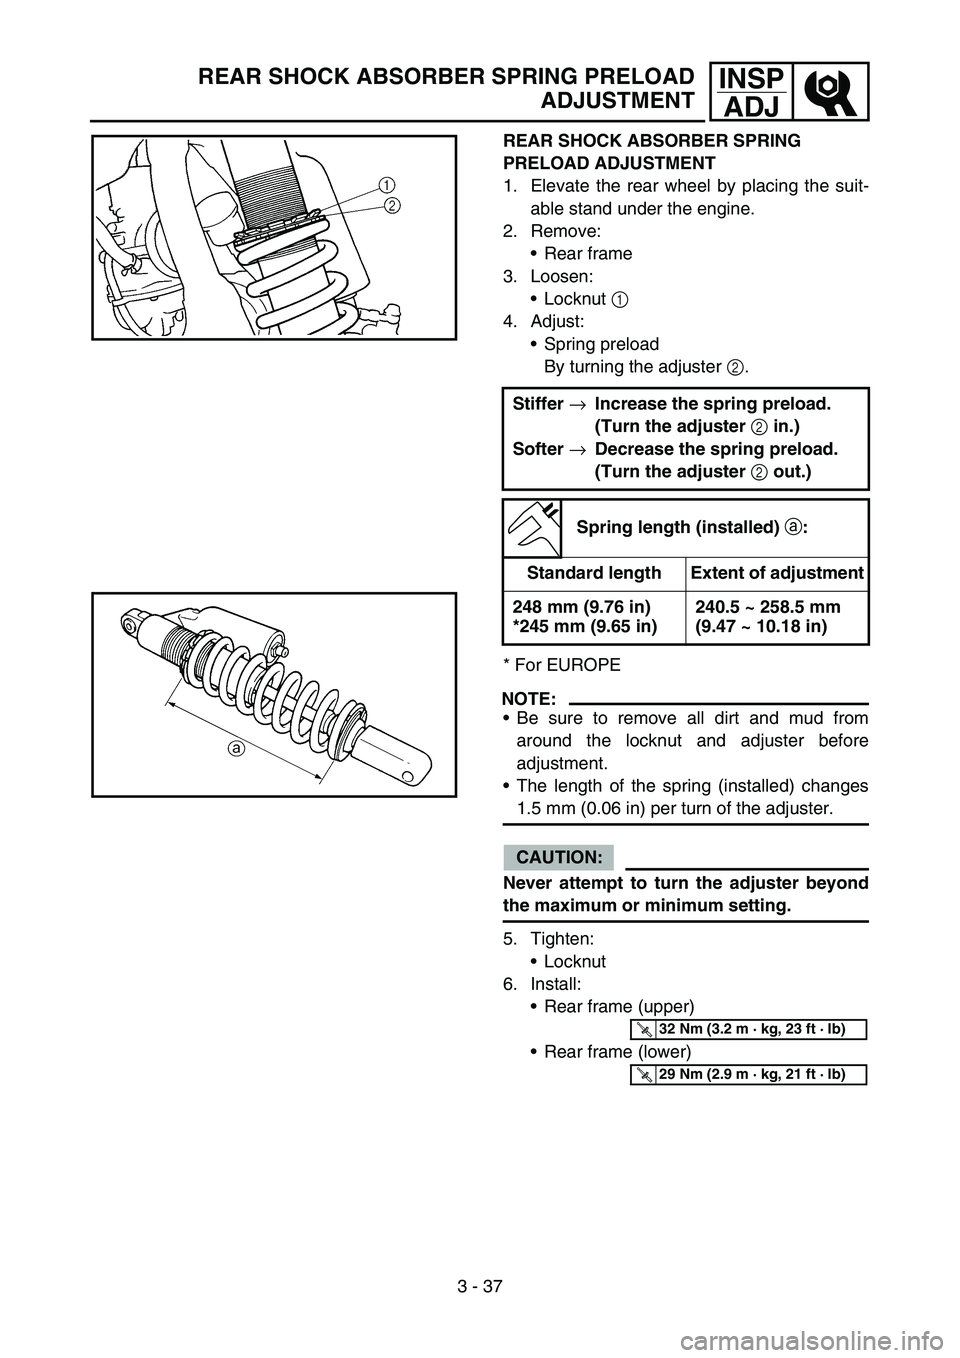
ADJREAR SHOCK ABSORBER SPRING PRELOAD
ADJUSTMENT
REAR SHOCK ABSORBER SPRING
PRELOAD ADJUSTMENT
1. Elevate the rear wheel by placing the suit-
able stand under the engine.
2. Remove:
Rear frame
3. Loosen:
Locknut 1
4. Adjust:
Spring preload
By turning the adjuster 2.
* For EUROPE
NOTE:
Be sure to remove all dirt and mud from
around the locknut and adjuster before
adjustment.
The length of the spring (installed) changes
1.5 mm (0.06 in) per turn of the adjuster.
CAUTION:
Never attempt to turn the adjuster beyond
the maximum or minimum setting.
5. Tighten:
Locknut
6. Install:
Rear frame (upper)
Rear frame (lower) Stiffer
→Increase the spring preload.
(Turn the adjuster
2 in.)
Softer
→Decrease the spring preload.
(Turn the adjuster
2 out.)
Spring length (installed)
a:
Standard length Extent of adjustment
248 mm (9.76 in)
*245 mm (9.65 in)240.5 ~ 258.5 mm
(9.47 ~ 10.18 in)
T R..32 Nm (3.2 m · kg, 23 ft · lb)
T R..29 Nm (2.9 m · kg, 21 ft · lb)
Page 230 of 646
3 - 42
INSP
ADJ
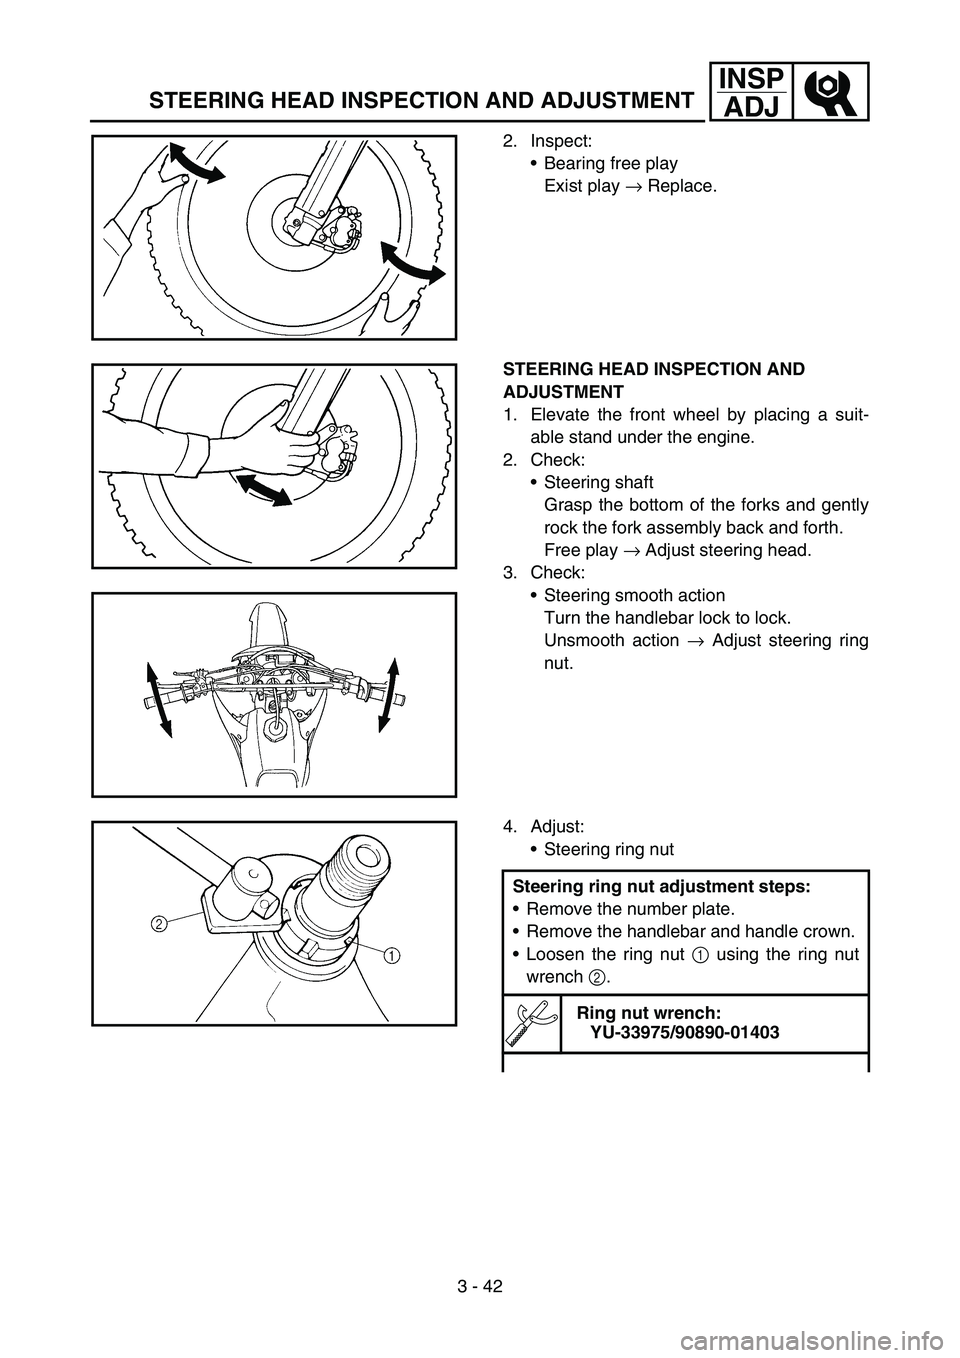
STEERING HEAD INSPECTION AND ADJUSTMENT
2. Inspect:
Bearing free play
Exist play → Replace.
STEERING HEAD INSPECTION AND
ADJUSTMENT
1. Elevate the front wheel by placing a suit-
able stand under the engine.
2. Check:
Steering shaft
Grasp the bottom of the forks and gently
rock the fork assembly back and forth.
Free play → Adjust steering head.
3. Check:
Steering smooth action
Turn the handlebar lock to lock.
Unsmooth action → Adjust steering ring
nut.
4. Adjust:
Steering ring nut
Steering ring nut adjustment steps:
Remove the number plate.
Remove the handlebar and handle crown.
Loosen the ring nut 1 using the ring nut
wrench 2.
Ring nut wrench:
YU-33975/90890-01403
Page 238 of 646

3 - 46
INSP
ADJ
ELECTRICAL/SPARK PLUG INSPECTION
EC370000
ELECTRICAL
EC371001
SPARK PLUG INSPECTION
1. Remove:
Spark plug
2. Inspect:
Electrode 1
Wear/damage → Replace.
Insulator color 2
Normal condition is a medium to light tan
color.
Distinctly different color → Check the
engine condition.
NOTE:
When the engine runs for many hours at low
speeds, the spark plug insulator will become
sooty, even if the engine and carburetor are in
good operating condition.
3. Measure:
Plug gap a
Use a wire gauge or thickness gauge.
Out of specification → Regap.
Spark plug gap:
0.7 ~ 0.8 mm (0.028 ~ 0.031 in)
4. Clean the plug with a spark plug cleaner if
necessary.
5. Tighten:
Spark plug
NOTE:
Before installing a spark plug, clean the gas-
ket surface and plug surface.
Finger-tighten a the spark plug before torqu-
ing to specification b.
T R..13 Nm (1.3 m · kg, 9.4 ft · lb)
Page 240 of 646
3 - 47
INSP
ADJ
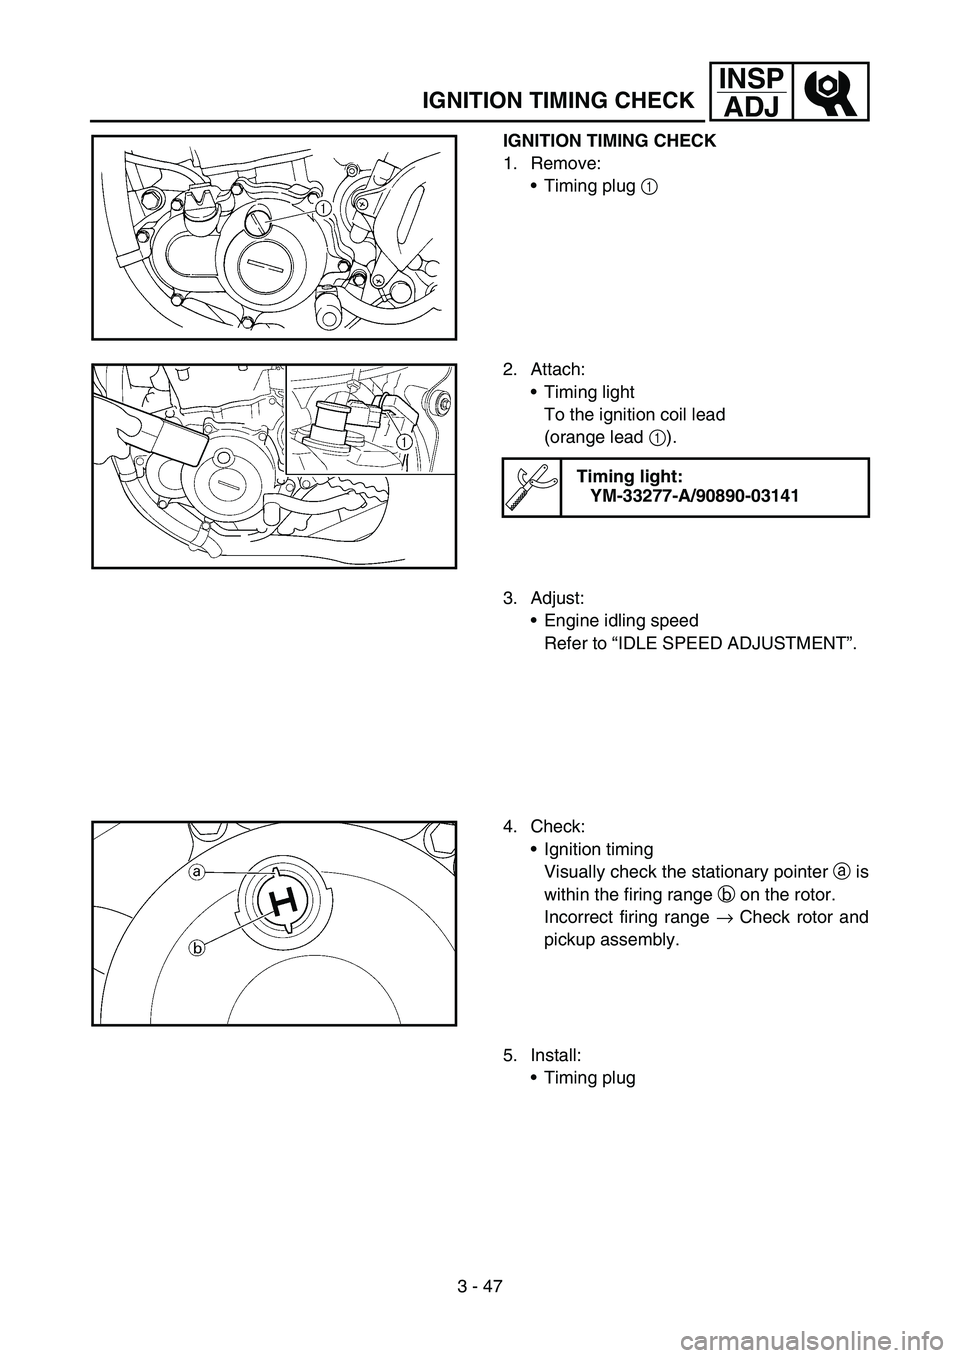
IGNITION TIMING CHECK
IGNITION TIMING CHECK
1. Remove:
Timing plug 1
2. Attach:
Timing light
To the ignition coil lead
(orange lead 1).
Timing light:
YM-33277-A/90890-03141
3. Adjust:
Engine idling speed
Refer to “IDLE SPEED ADJUSTMENT”.
4. Check:
Ignition timing
Visually check the stationary pointer a is
within the firing range b on the rotor.
Incorrect firing range → Check rotor and
pickup assembly.
5. Install:
Timing plug
Page 242 of 646
4 - 1
ENG
EC400000
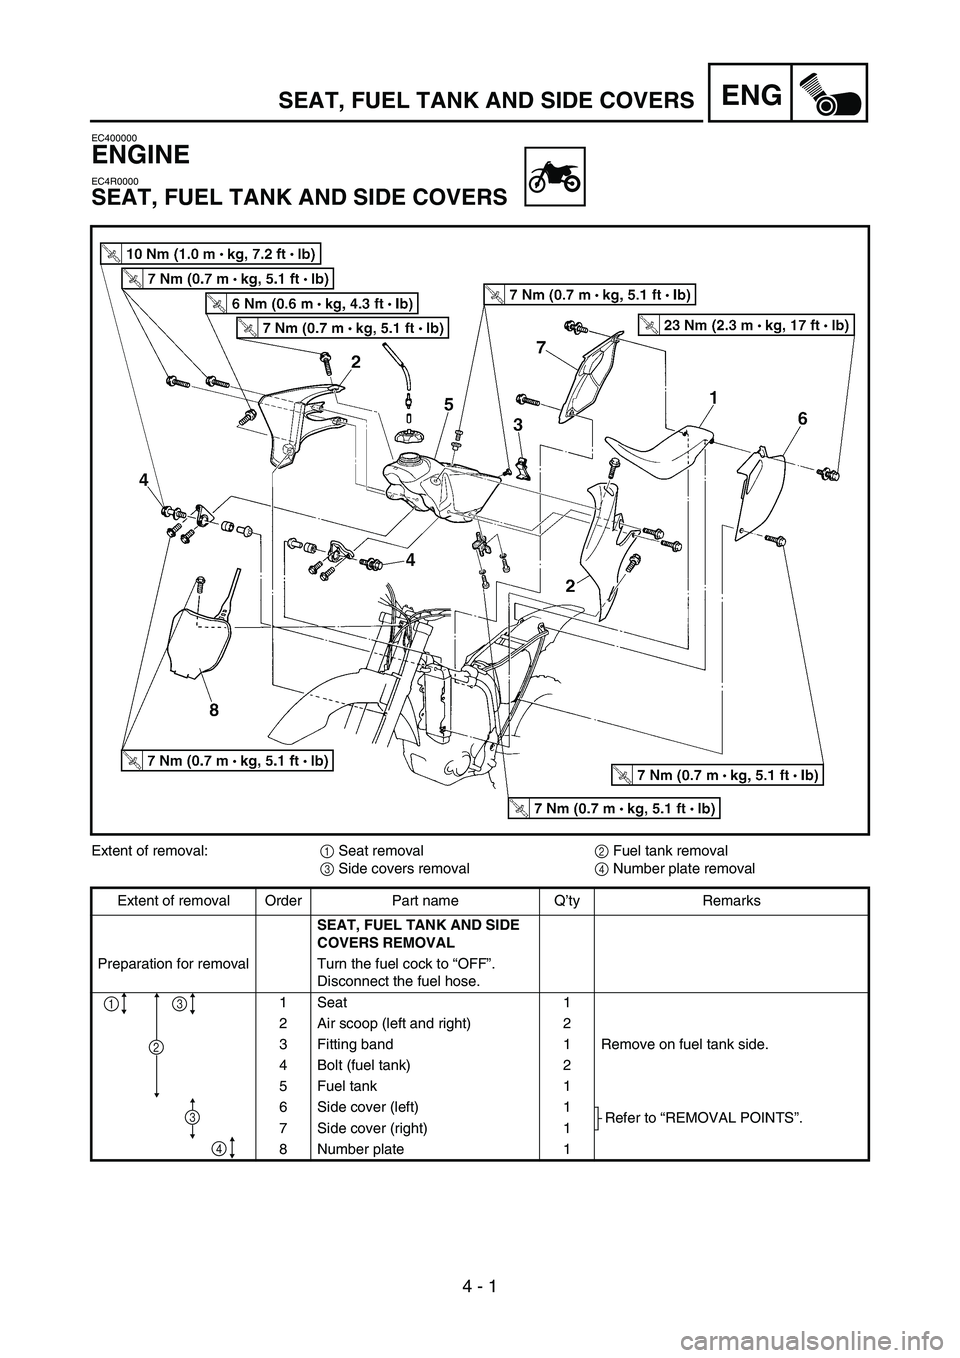
ENGINE
EC4R0000
SEAT, FUEL TANK AND SIDE COVERS
Extent of removal:
1 Seat removal
2 Fuel tank removal
3 Side covers removal
4 Number plate removal
Extent of removal Order Part name Q’ty Remarks
SEAT, FUEL TANK AND SIDE
COVERS REMOVAL
Preparation for removal Turn the fuel cock to “OFF”.
Disconnect the fuel hose.
1Seat 1
2 Air scoop (left and right) 2
3 Fitting band 1 Remove on fuel tank side.
4 Bolt (fuel tank) 2
5 Fuel tank 1
6 Side cover (left) 1
Refer to “REMOVAL POINTS”.
7 Side cover (right) 1
8 Number plate 1
13
4
2
3
SEAT, FUEL TANK AND SIDE COVERS
Page 250 of 646
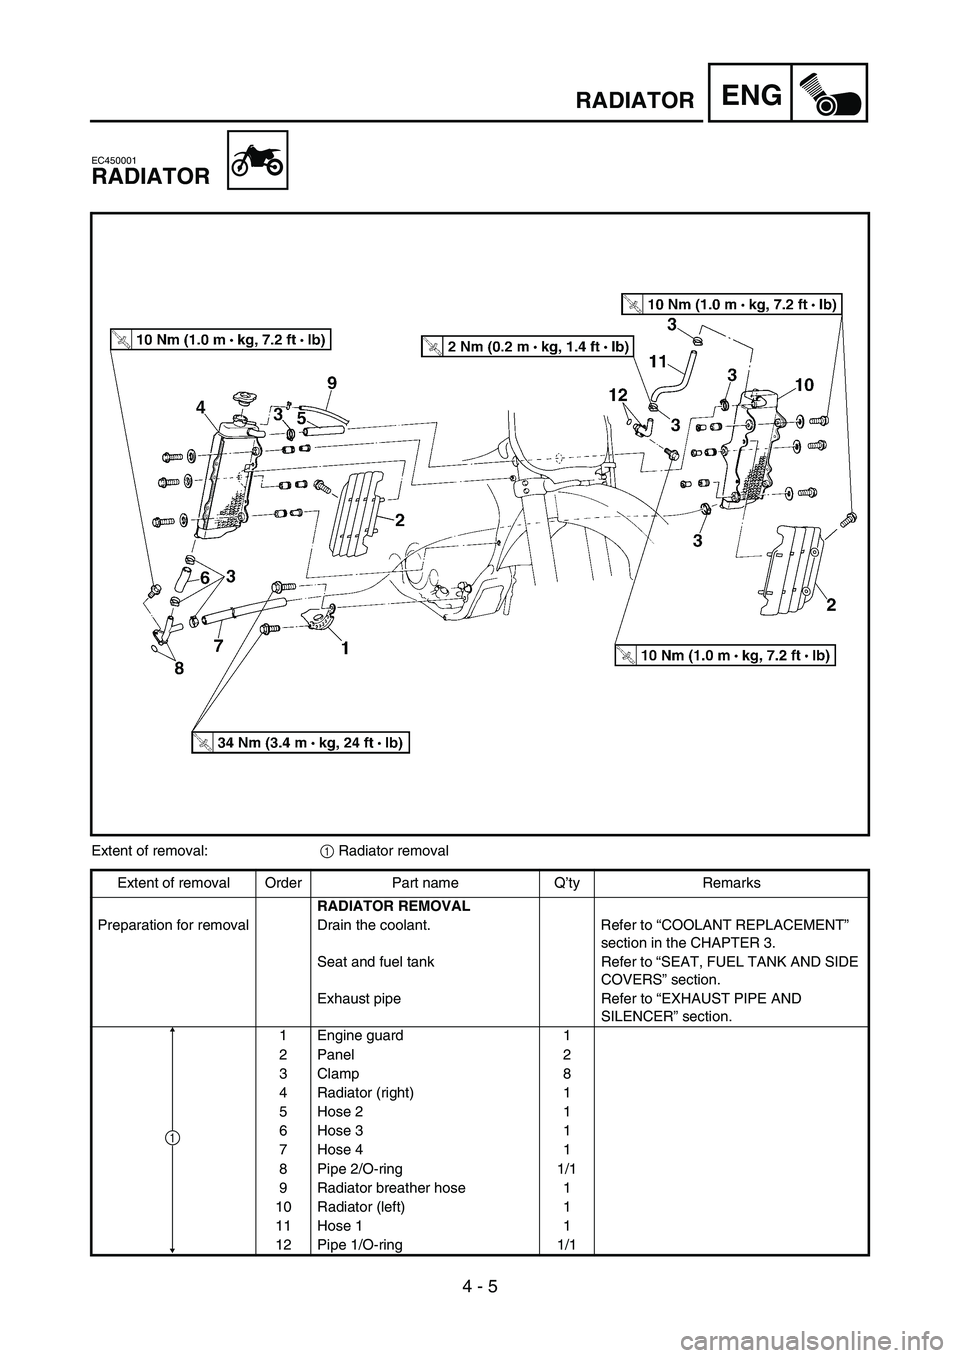
4 - 5
ENGRADIATOR
EC450001
RADIATOR
Extent of removal:
1 Radiator removal
Extent of removal Order Part name Q’ty Remarks
RADIATOR REMOVAL
Preparation for removal Drain the coolant. Refer to “COOLANT REPLACEMENT”
section in the CHAPTER 3.
Seat and fuel tank Refer to “SEAT, FUEL TANK AND SIDE
COVERS” section.
Exhaust pipe Refer to “EXHAUST PIPE AND
SILENCER” section.
1 Engine guard 1
2 Panel 2
3Clamp 8
4 Radiator (right) 1
5 Hose 2 1
6 Hose 3 1
7 Hose 4 1
8 Pipe 2/O-ring 1/1
9 Radiator breather hose 1
10 Radiator (left) 1
11 Hose 1 1
12 Pipe 1/O-ring 1/1
1