YAMAHA YZ65 2021 Service Manual
Manufacturer: YAMAHA, Model Year: 2021, Model line: YZ65, Model: YAMAHA YZ65 2021Pages: 92, PDF Size: 5.04 MB
Page 41 of 92
Instrument and control functions
4-15
4
TIP
When turning the damping force
adjuster in direction (a), the 0 click
position and the 1 click position
may be the same.
When turning the damping force
adjuster in direction (b), it may
click beyond the stated specifica-
tions, however such adjustments
are ineffective and may damage
the suspension.
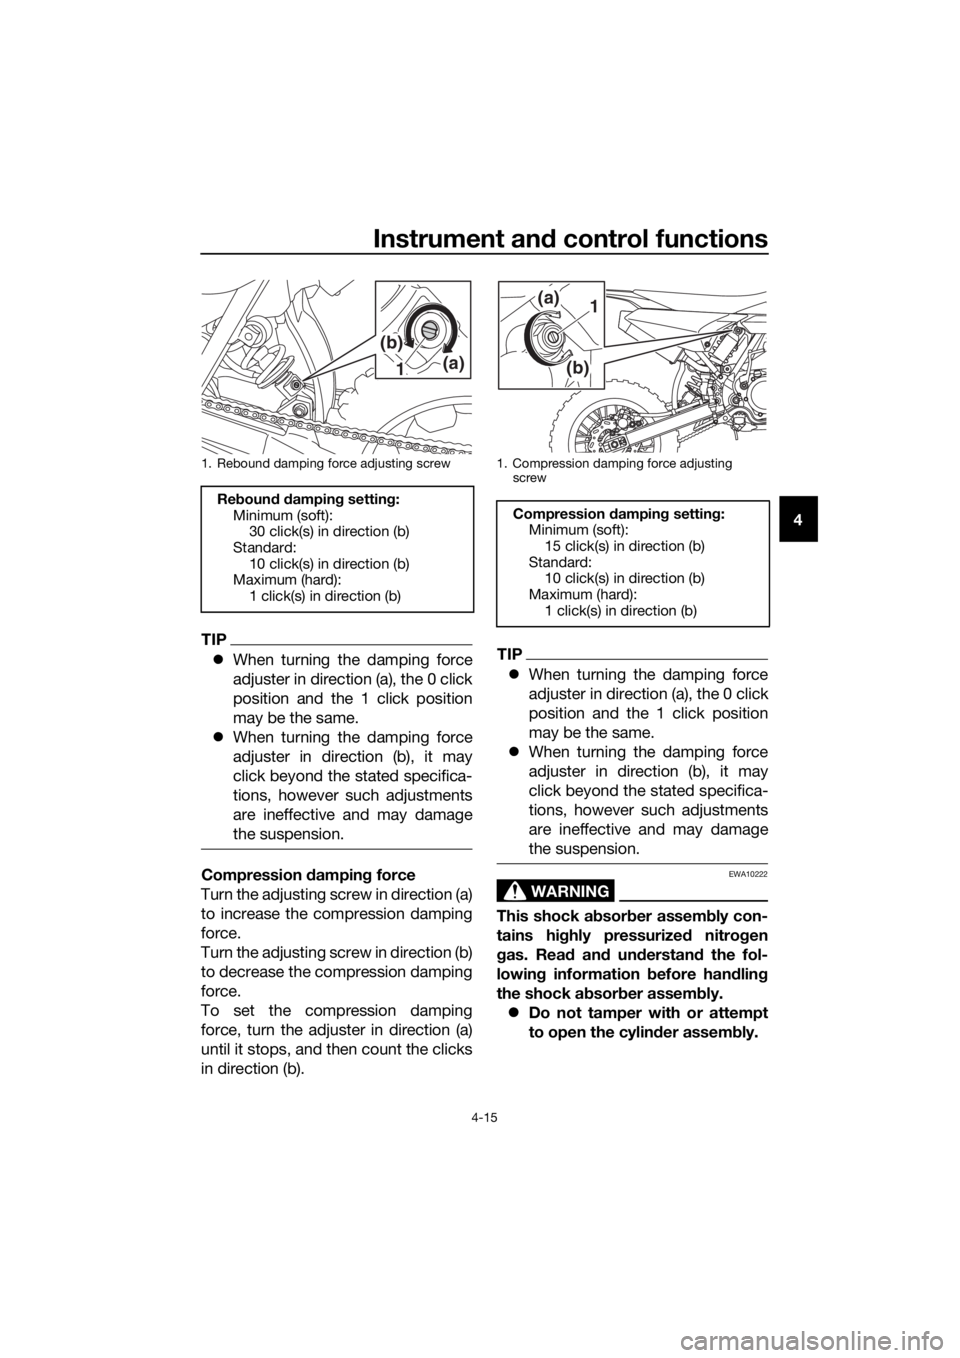
Compression dampin g force
Turn the adjusting screw in direction (a)
to increase the compression damping
force.
Turn the adjusting screw in direction (b)
to decrease the compression damping
force.
To set the compression damping
force, turn the adjuster in direction (a)
until it stops, and then count the clicks
in direction (b).
TIP
When turning the damping force
adjuster in direction (a), the 0 click
position and the 1 click position
may be the same.
When turning the damping force
adjuster in direction (b), it may
click beyond the stated specifica-
tions, however such adjustments
are ineffective and may damage
the suspension.
WARNING
EWA10222
This shock ab sorber assem bly con-
tains hig hly pressurize d nitro gen
g as. Rea d an d un derstan d the fol-
lowin g information before han dlin g
the shock a bsor ber assem bly.
Do not tamper with or attempt
to open the cylind er assembly.
1. Rebound damping force adjusting screw
Re boun d d ampin g settin g:
Minimum (soft): 30 click(s) in direction (b)
Standard: 10 click(s) in direction (b)
Maximum (hard):
1 click(s) in direction (b)
1(a)
(b)
1. Compression damping force adjusting
screw
Compression dampin g settin g:
Minimum (soft): 15 click(s) in direction (b)
Standard: 10 click(s) in direction (b)
Maximum (hard):
1 click(s) in direction (b)
(b)
(a)1
UBR882E0.book Page 15 Wednesday, February 26, 2020 11:39 AM
Page 42 of 92
Instrument and control functions
4-16
4
Do not su bject the shock a b-
sor ber assem bly to an open
flame or other hig h heat source.
This may cause the unit to ex-
plo de due to excessive g as
pressure.
Do not deform or damag e the
cylin der in any way. Cylin der
d amag e will result in poor
d ampin g performance.
Do not dispose of a damag ed or
worn-out shock a bsor ber as-
sem bly yourself. Take the shock
a b sor ber assem bly to a Yamaha
d ealer for any service.
EAU41382
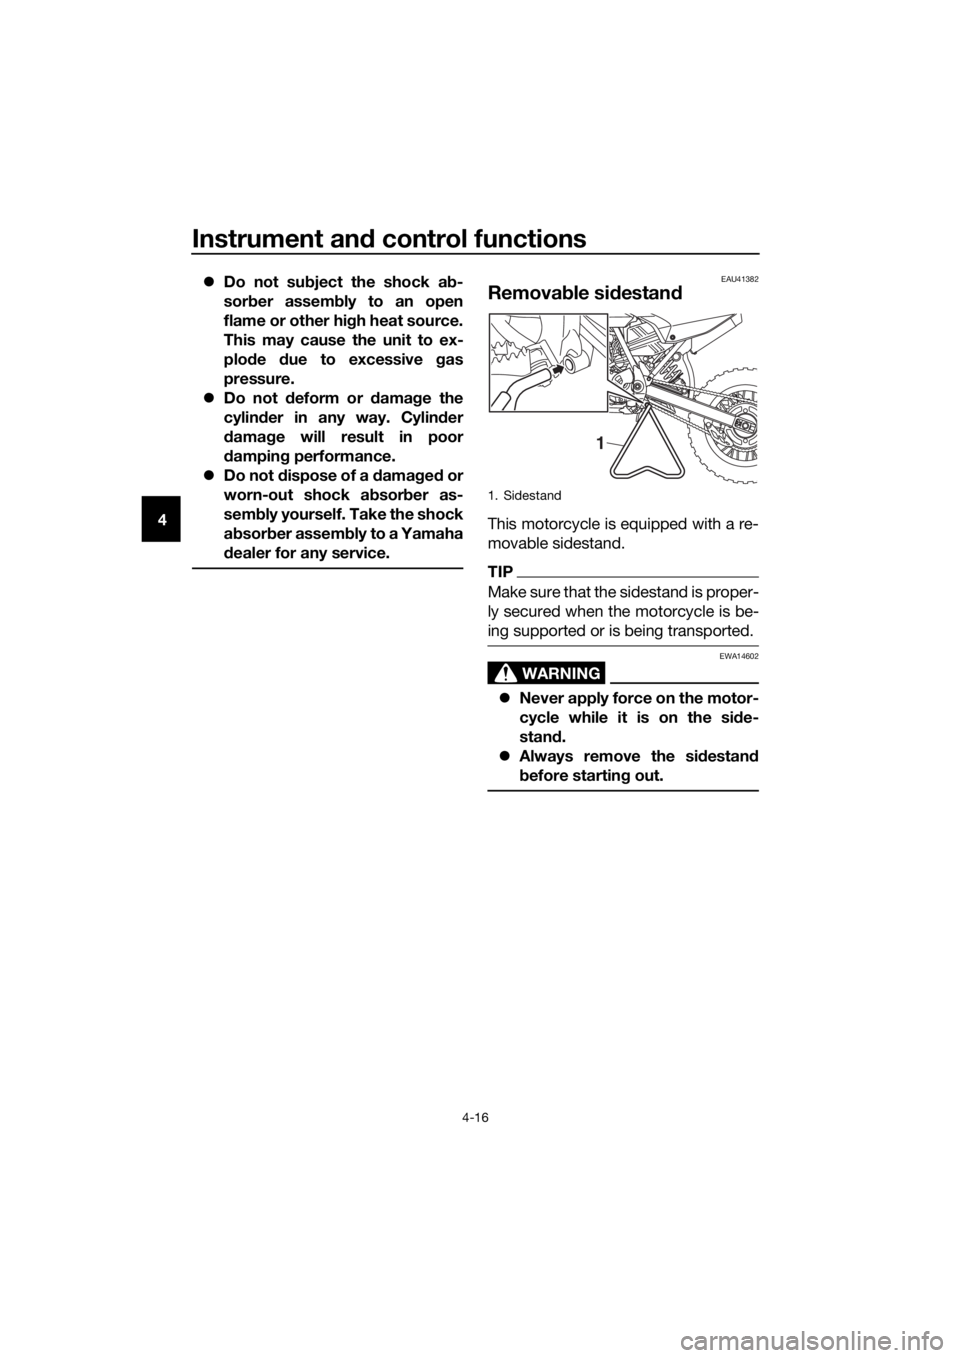
Remova ble si destan d
This motorcycle is equipped with a re-
movable sidestand.
TIP
Make sure that the sidestand is proper-
ly secured when the motorcycle is be-
ing supported or is being transported.
WARNING
EWA14602
Never apply force on the motor-
cycle while it is on the si de-
stan d.
Always remove the si destan d
b efore startin g out.
1. Sidestand
1
UBR882E0.book Page 16 Wednesday, February 26, 2020 11:39 AM
Page 43 of 92
Instrument and control functions
4-17
4
EAU84180
YPVS system
This model’s engine is fitted with
Yamaha Power Valve System (YPVS). This system boosts engine power by
means of a valve that controls exhaust
port opening aperture.
NOTICE
ECA26380
The YPVS system has been exten-
sively teste d an d set-up b y Yamaha.
Chan gin g the YPVS setting s without
sufficient technical knowle dge can
result in re duce d en gine perfor-
mance or even en gine damag e.
UBR882E0.book Page 17 Wednesday, February 26, 2020 11:39 AM
Page 44 of 92
For your safety – pre-operation checks
5-1
5
EAU63441
Inspect your vehicle each time you use it to make sure the vehicle is in safe oper-
ating condition. Always follow the inspection and maintenance procedures and
schedules described in the Owner’s Manual.
WARNING
EWA11152
Failure to inspect or maintain the vehicle properly increases the possibility
of an acci dent or equipment d amage. Do not operate the vehicle if you fin d
any pro blem. If a pro blem cannot be correcte d b y the proce dures provi ded
in this manual, have the vehicle inspecte d b y a Yamaha dealer.
Before using this vehicle, check the following points:
ITEM CHECKSPAGE
Fuel • Check fuel level in fuel tank.
• Always use a fresh mixture of gasoline and oil.
• Check fuel line for leakage.
• Check fuel tank breather hose for obstructions, cracks
or damage, and check hose connection. 4-4, 4-6
Transmission oil • Check for leakage. 7-7
Coolant • Check coolant level.
• If necessary, add recommended coolant to specified
level.
• Check cooling system for leakage. 7-8
Front brake • Check operation.
• If soft or spongy, have Yamaha dealer bleed hydraulic
system.
• Check brake pads for wear.
• Replace if necessary.
• Check fluid level in reservoir.
• If necessary, add specified brake fluid to specified level.
• Check hydraulic system for leakage. 7-18,
7-19
Rear brake • Check operation.
• If soft or spongy, have Yamaha dealer bleed hydraulic
system.
• Check brake pads for wear.
• Replace if necessary.
• Check fluid level in reservoir.
• If necessary, add specified brake fluid to specified level.
• Check hydraulic system for leakage. 7-18,
7-19
Clutch • Check operation.
• Lubricate cable if necessary.
• Check lever free play.
• Adjust if necessary. 7-16
Throttle grip • Make sure that operation is smooth.
• Check throttle grip free play.
• If necessary, adjust throttle grip free play. 7-13,
7-23
UBR882E0.book Page 1 Wednesd ay, February 26, 2020 11:39 AM
Page 45 of 92

For your safety – pre-operation checks
5-2
5
Drive chain• Check chain slack.
• Adjust if necessary.
• Check chain condition.
• Lubricate if necessary. 7-21,
7-22
Drive sprocket • Check the drive sprocket nut torque.
• Tighten if necessary.
—
Wheels an d tires •Check for damage.
• Check tire condition and tread depth.
• Check air pressure.
• Correct if necessary.
• Check for loose spokes and tighten if necessary. 7-14,
7-16
Shift ped al • Make sure that operation is smooth.
• Check the shift pedal bolt torque.
• Correct if necessary. 7-18
Brake ped al • Make sure that operation is smooth.
• Lubricate pedal pivoting point if necessary. 7-24
Brake an d clutch le-
vers • Make sure that operation is smooth.
• Lubricate lever pivoting points if necessary.
7-24
Steerin g • Check that the handlebar can be turned smoothly and
has no excessive play. 7-26
Front fork and rear
shock a bsor ber as-
sem bly • Check that they operate smoothly and there is no oil
leakage. 4-9,
4-11,
4-12, 7-26
Chassis fasteners • Make sure that all nuts, bolts and screws are properly
tightened.
• Check all cotter pins for damage and correct install- ment.
• Tighten or replace if necessary. —
Movin g parts an d ca-
b les • Check the control cables for damage.
• Check that the control cables move smoothly.
• Check that the control cables are not caught when the
handlebars are turned or when the front forks travel up
and down.
• Lubricate moving parts and cables if necessary. 7-23,
7-24,
7-25, 7-25
Exhaust system • Check that the exhaust pipe and muffler are tightly
mounted and have no cracks.
• Check for leakage. —
En gine stop switch • Check operation. 4-1
I g nition system • Check that all leads and cables are properly connected. 7-6
ITEM
CHECKSPAGE
UBR882E0.book Page 2 Wednesday, February 26, 2020 11:39 AM
Page 46 of 92
Operation and important rid ing points
6-1
6
EAU15952
Read the Owner’s Manual carefully to
become familiar with all controls. If
there is a control or function you do not
understand, ask your Yamaha dealer.
WARNING
EWA10272
Failure to familiarize yourself with
the controls can lead to loss of con-
trol, which coul d cause an acci dent
or injury.
EAU41506
En gine break-in
WARNING
EWA10322
Failure to properly maintain the vehi-
cle or performin g maintenance ac-
tivities incorrectly may increase
your risk of injury or death during
service or while usin g the vehicle. If
you are not familiar with vehicle ser-
vice, have a Yamaha d ealer perform
service.
TIP
Before starting the engine for the first
time, the air filter must be lubricated.
(See page 7-10.)
En gine break-in proced ure
1. Fill the fuel tank with a break-in oil- fuel mixture as follows.
2. Start and warm up the engine. Check the operation of the con-
trols and the engine stop switch.
(See page 4-1.)
3. Operate the motorcycle in the low- er gears at moderate throttle
openings for 5 to 8 minutes. Stop
the engine and check the spark
plug condition (see page 7-6); it
will show a rich condition during
break-in.
4. Allow the engine to cool. Restart the engine and operate the motor-
cycle as in the step above for 5
minutes. Then, very briefly shift to
Recommen ded 2-stroke en gine oil:
YA M A L U B E 2 R
Mixin g ratio ( gasoline to oil):
15:1
UBR882E0.book Page 1 Wednesd ay, February 26, 2020 11:39 AM
Page 47 of 92

Operation and important ri din g points
6-2
6
the higher gears and check the
full-throttle response. Stop the en-
gine and check the spark plug.
5. After again allowing the engine to cool, restart and run the motorcy-
cle for 5 more minutes. Full throttle
and the higher gears may be used,
but sustained full-throttle opera-
tion should be avoided. Stop the
engine and check the spark plug
again.
6. Allow the engine to cool, remove the cylinder head and cylinder,
and inspect the piston and cylin-
der. Remove any high spots on
the piston with #600-grit wet
sandpaper. Clean all components
and carefully reassemble the cyl-
inder head and cylinder.
7. Drain the break-in oil-fuel mixture from the fuel tank and refill with
the normal oil-fuel mixture. (See
page 4-4.)
8. Start the engine and check its power delivery and throttle re-
sponse throughout all gear rang-
es. Stop the engine and check the
spark plug condition. It should be-
gin to lighten in color.
9. Restart the motorcycle and ride it for about 10 to 15 more minutes.
Stop the engine and check the
spark plug condition. (See page
7-6.)
10. Lastly, thoroughly check the mo- torcycle for loose parts, oil leak-
age and any other problems.
Check all fittings and fasteners
and tighten as necessary.
TIP
Be sure to inspect and make adjust-
ments thoroughly. In particular, check
control cable slack, drive chain slack
and for loose spokes.
Notes on en gine overhauls
If the following parts have been re-
placed, they must be broken in as fol-
lows. Piston, rings or transmission
gears: 30 minutes of break-in op-
eration at half-throttle or less.
Cylinder or crankshaft: 60 minutes
of break-in operation is necessary.
TIP
Observe the condition of the engine
carefully during break-in operation.
NOTICE
ECA10271
If any en gine trou ble shoul d occur
d urin g the en gine break-in perio d,
imme diately have a Yamaha dealer
check the vehicle.
UBR882E0.book Page 2 Wednesd ay, February 26, 2020 11:39 AM
Page 48 of 92
Operation and important rid ing points
6-3
6
EAU41308
Startin g an d warmin g up a
col d en gine
1. Turn the fuel cock lever to “ON”.
2. Shift the transmission into the
neutral position.
3. Turn the starter (choke) on and completely close the throttle. (See
page 4-7.)
4. Start the engine by pushing the kickstarter lever down.
5. When the engine is warm, turn the starter (choke) off.
TIP
The engine is warm when it responds
quickly to the throttle with the starter
(choke) turned off.
NOTICE
ECA11043
For maximum en gine life, never ac-
celerate har d when the en gine is
col d!
EAU16661
Startin g a warm en gine
Follow the same procedure as for
starting a cold engine with the excep-
tion that the starter (choke) is not re-
quired when the engine is warm.
Instead, start the engine with the throt-
tle slightly open.
TIP
If the engine does not start after sever-
al kicks, try again with the throttle 1/4
to 1/2 open.
UBR882E0.book Page 3 Wednesd ay, February 26, 2020 11:39 AM
Page 49 of 92
Operation and important ri din g points
6-4
6
EAU16674
Shiftin g
Shifting gears lets you control the
amount of engine power available for
starting off, accelerating, climbing hills,
etc.
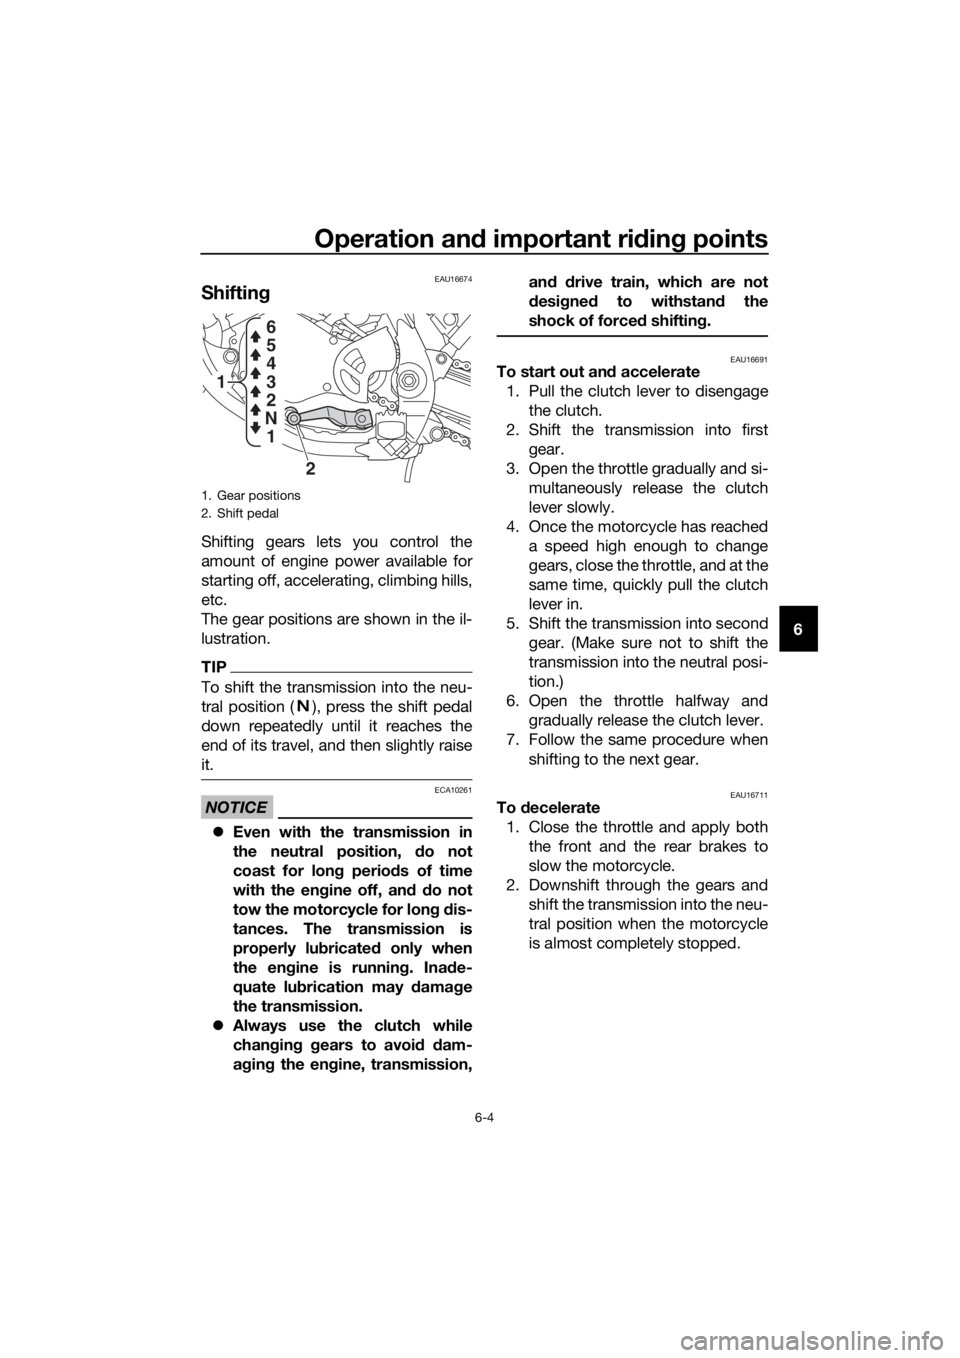
The gear positions are shown in the il-
lustration.
TIP
To shift the transmission into the neu-
tral position ( ), press the shift pedal
down repeatedly until it reaches the
end of its travel, and then slightly raise
it.
NOTICE
ECA10261
Even with the transmission in
the neutral position, d o not
coast for lon g period s of time
with the en gine off, an d d o not
tow the motorcycle for lon g d is-
tances. The transmission is
properly lu bricated only when
the en gine is runnin g. Ina de-
quate lu brication may damag e
the transmission.
Always use the clutch while
chan gin g g ears to avoi d d am-
a g in g the en gine, transmission, an
d d rive train, which are not
d esi gne d to withstan d the
shock of force d shiftin g.
EAU16691To start out an d accelerate
1. Pull the clutch lever to disengage the clutch.
2. Shift the transmission into first gear.
3. Open the throttle gradually and si- multaneously release the clutch
lever slowly.
4. Once the motorcycle has reached a speed high enough to change
gears, close the throttle, and at the
same time, quickly pull the clutch
lever in.
5. Shift the transmission into second gear. (Make sure not to shift the
transmission into the neutral posi-
tion.)
6. Open the throttle halfway and gradually release the clutch lever.
7. Follow the same procedure when
shifting to the next gear.
EAU16711To decelerate
1. Close the throttle and apply both the front and the rear brakes to
slow the motorcycle.
2. Downshift through the gears and shift the transmission into the neu-
tral position when the motorcycle
is almost completely stopped.
1. Gear positions
2. Shift pedal
2
1
1
N 2 3
4
5
6
UBR882E0.book Page 4 Wednesd
ay, February 26, 2020 11:39 AM
Page 50 of 92

Operation and important rid ing points
6-5
6
EAU17192
Parkin g
When parking, stop the engine, and
then turn the fuel cock lever to “OFF”.
WARNING
EWA10312
Since the en gine an d exhaust
system can become very hot,
park in a place where pe destri-
ans or chil dren are not likely to
touch them an d b e burne d.
Do not park on a slope or on soft
groun d, otherwise the vehicle
may overturn, increasin g the
risk of a fuel leak an d fire.
Do not park near grass or other
flamma ble materials which
mi ght catch fire.
UBR882E0.book Page 5 Wednesd ay, February 26, 2020 11:39 AM