YAMAHA YZF-R7 1999 Owners Manual
Manufacturer: YAMAHA, Model Year: 1999, Model line: YZF-R7, Model: YAMAHA YZF-R7 1999Pages: 381, PDF Size: 18.88 MB
Page 141 of 381

ENG
4 - 9
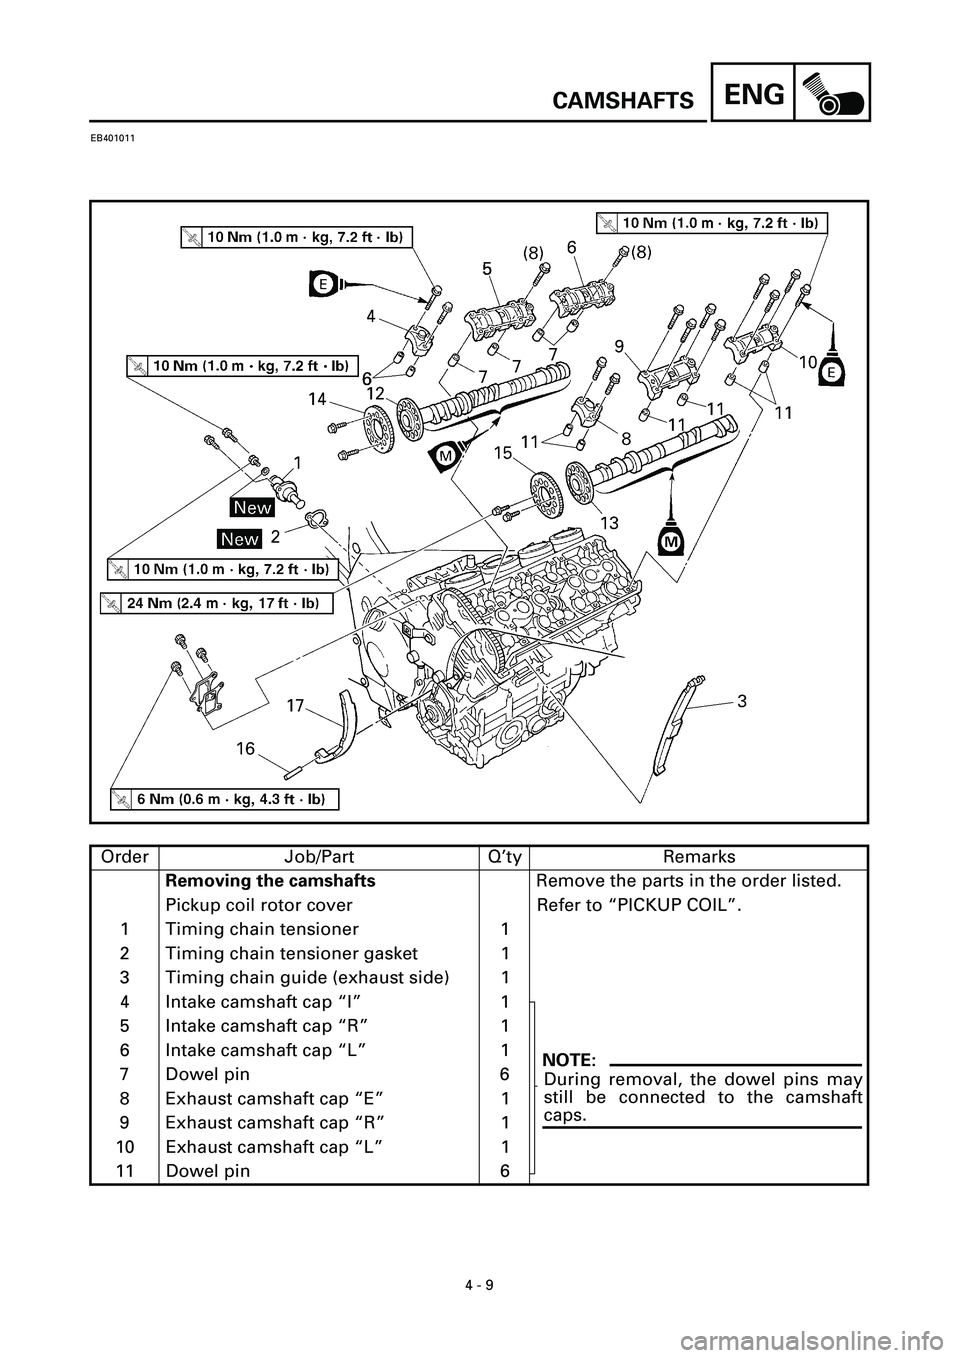
CAMSHAFTS
EB401011
Order Job/Part Q’ty Remarks
Removing the camshafts
Remove the parts in the order listed.
Pickup coil rotor cover Refer to “PICKUP COIL”.
1 Timing chain tensioner 1
2 Timing chain tensioner gasket 1
3 Timing chain guide (exhaust side) 1
4 Intake camshaft cap “I” 1
5 Intake camshaft cap “R” 1
6 Intake camshaft cap “L” 1
7 Dowel pin 6
8 Exhaust camshaft cap “E” 1
9 Exhaust camshaft cap “R” 1
10 Exhaust camshaft cap “L” 1
11 Dowel pin 6
NOTE:
During removal, the dowel pins may
still be connected to the camshaft
caps.
Page 142 of 381

ENG
4 - 10
CAMSHAFTS
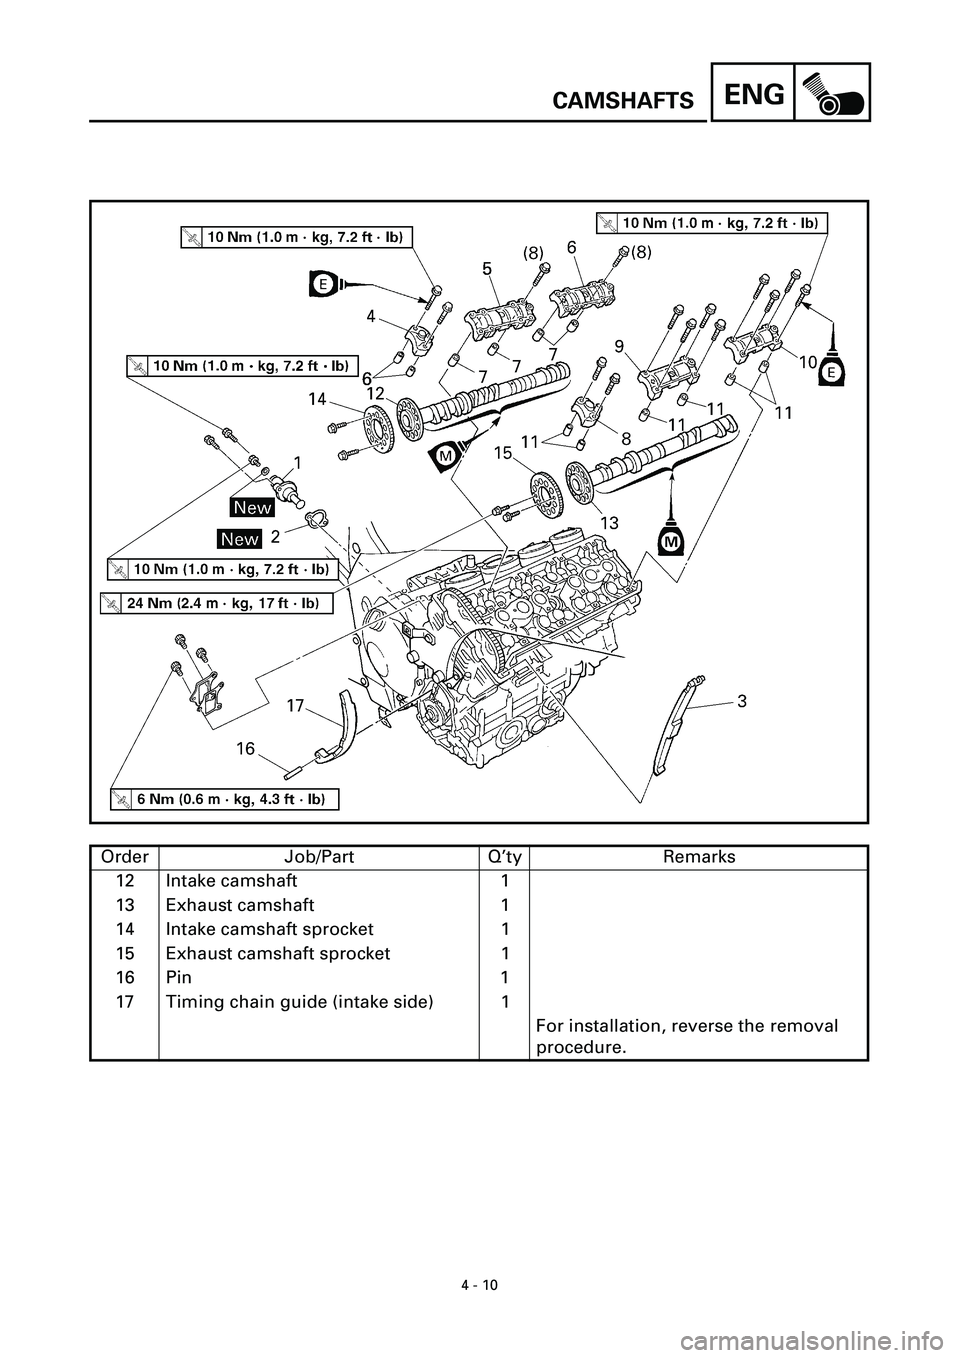
Order Job/Part Q’ty Remarks
12 Intake camshaft 1
13 Exhaust camshaft 1
14 Intake camshaft sprocket 1
15 Exhaust camshaft sprocket 1
16 Pin 1
17 Timing chain guide (intake side) 1
For installation, reverse the removal
procedure.
Page 143 of 381

4 - 11
ENG
CAMSHAFTS
EB401101
REMOVING THE CAMSHAFTS
1. Align:
• TDC mark on the pickup coil rotor
(with the crankcase mating surface)
t t t t t t t t t t t t t t t t t t t t t t t t t t t
a. Turn the crankshaft clockwise.
b. When piston #1 is at TDC on the com-
pression stroke, align the TDC
mark
a
on the pickup coil rotor with
the crankcase mating surface
b
.
NOTE:
TDC on the compression stroke can be
found when the camshaft lobes are
turned away from each other.
s s s s s s s s s s s s s s s s s s s s s s s s s s s
2. Remove:
• float chamber air vent hose holder
• timing chain tensioner
3. Remove:
• timing chain guide (exhaust side)
4. Remove:
• camshaft caps
• dowel pins
ACHTUNG:CAUTION:
To prevent damage to the cylinder
head, camshafts or camshaft caps,
loosen the camshaft cap bolts in stages
and in a crisscross pattern, working
from the outside in.
H H
T
T
a
a
b
b
5. Remove:
• intake camshaft
1
• exhaust camshaft
2
NOTE:
To prevent the timing chain from falling
into the crankcase, fasten it with a
wire 3.
6. Remove:
• camshaft sprockets 1
(with the flywheel puller 2)
Flywheel puller
90890-01080
Page 144 of 381

4 - 12
ENGCAMSHAFTS
EB401401
CHECKING THE CAMSHAFTS
1. Check:
• camshaft lobes
Blue discoloration/pitting/scratches ®
Replace the camshaft.
2. Measure:
• camshaft lobe dimensions a and b
Out of specification ® Replace the
camshaft.
Camshaft lobe dimensions
limit
Intake camshaft
a 33.31 mm (1.3114 in)
b 24.90 mm (0.9803 in)
Exhaust camshaft
a 32.95 mm (1.2972 in)
b 24.936 mm (0.9817 in)
3. Measure:
• camshaft runout
Out of specification ® Replace.
Maximum camshaft runout
0.03 mm (0.0012 in)
4. Measure:
• camshaft journal-to-camshaft cap
clearance
Out of specification ® Measure the
camshaft journal diameter.
Camshaft journal-to-camshaft
cap clearance
0.035 ~ 0.069 mm
(0.0014 ~ 0.0027 in)
Page 145 of 381

4 - 13
ENGCAMSHAFTS
t t t t t t t t t t t t t t t t t t t t t t t t t t t
a. Install the camshaft into the cylinder
head (without the dowel pins and
camshaft caps).
b. Position a strip of Plastigauge
® 1
onto the camshaft journal as shown.
c. Install the dowel pins and camshaft
caps.
NOTE:
• Tighten the camshaft cap bolts in
stages and in a crisscross pattern,
working from the inner caps out.
• Do not turn the camshaft when mea-
suring the camshaft journal-to-cam-
shaft cap clearance with the
Plastigauge®.
d. Remove the camshaft caps and then
measure the width of the Plasti-
gauge
® 1.
s s s s s s s s s s s s s s s s s s s s s s s s s s s
T R..
Camshaft cap bolt
10 Nm (1.0 m • kg, 7.2 ft • lb)
5. Measure:
• camshaft journal diameter a
Out of specification ® Replace the
camshaft.
Within specification ® Replace the cylin-
der head and the camshaft caps as a set.
Camshaft journal diameter
24.452 ~ 24.465 mm
(0.9627 ~ 0.9632 in)
EB401421
CHECKING THE TIMING CHAIN,
CAMSHAFT SPROCKETS, AND TIMING
CHAIN GUIDES
The following procedure applies to all of
the camshaft sprockets and timing chain
guides.
1. Check:
• timing chain
Damage/stiffness ® Replace the tim-
ing chain and camshaft sprockets as a
set.
Page 146 of 381

4 - 14
ENGCAMSHAFTS
2. Check:
• camshaft sprocket
More than 1/4 tooth wear a ® Replace
the camshaft sprockets and the timing
chain as a set.
a1/4 tooth
bCorrect
1Timing chain roller
2Camshaft sprocket
3. Check:
• timing chain guide (exhaust side) 1
• timing chain guide (intake side) 2
• timing chain guide (top side) 3
Damage/wear ® Replace the defective
part(-s).
EB401430
CHECKING THE TIMING CHAIN
TENSIONER
1. Check:
• timing chain tensioner
Cracks/damage/rough movement ®
Replace.
t t t t t t t t t t t t t t t t t t t t t t t t t t t
a. Lightly press the timing chain ten-
sioner rod into the timing chain ten-
sioner housing by hand.
NOTE:
While pressing the timing chain ten-
sioner rod, wind it clockwise with a thin
screwdriver 1 until it stops.
b. Remove the screwdriver and slowly
release the timing chain tensioner
rod.
c. Make sure that the timing chain ten-
sioner rod comes out of the timing
chain tensioner housing smoothly. If
there is rough movement, replace the
timing chain tensioner.
s s s s s s s s s s s s s s s s s s s s s s s s s s s
Page 147 of 381

4 - 15
ENGCAMSHAFTS
EB401701
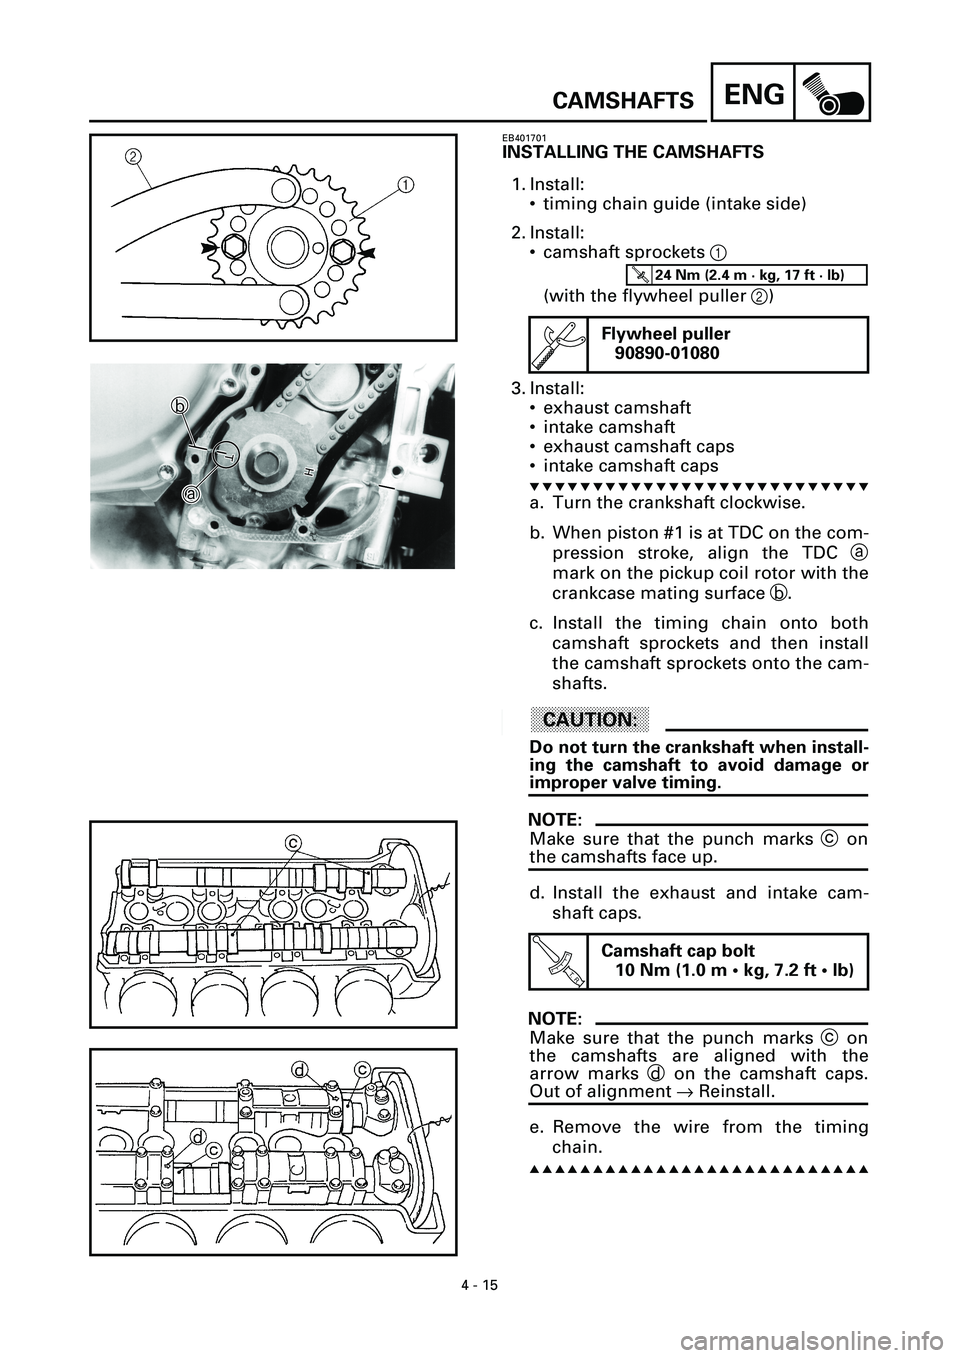
INSTALLING THE CAMSHAFTS
1. Install:
• timing chain guide (intake side)
2. Install:
• camshaft sprockets 1
(with the flywheel puller 2)
3. Install:
• exhaust camshaft
• intake camshaft
• exhaust camshaft caps
• intake camshaft caps
t t t t t t t t t t t t t t t t t t t t t t t t t t t
a. Turn the crankshaft clockwise.
b. When piston #1 is at TDC on the com-
pression stroke, align the TDC a
mark on the pickup coil rotor with the
crankcase mating surface b.
c. Install the timing chain onto both
camshaft sprockets and then install
the camshaft sprockets onto the cam-
shafts.
ACHTUNG:CAUTION:
Do not turn the crankshaft when install-
ing the camshaft to avoid damage or
improper valve timing.
NOTE:
Make sure that the punch marks c on
the camshafts face up.
d. Install the exhaust and intake cam-
shaft caps.
NOTE:
Make sure that the punch marks c on
the camshafts are aligned with the
arrow marks d on the camshaft caps.
Out of alignment ® Reinstall.
e. Remove the wire from the timing
chain.
s s s s s s s s s s s s s s s s s s s s s s s s s s s
Flywheel puller
90890-01080
T R..
Camshaft cap bolt
10 Nm (1.0 m • kg, 7.2 ft • lb)
T R..24 Nm (2.4 m · kg, 17 ft · lb)
H H
T
T
a
a
b
b
Page 148 of 381

4 - 16
ENGCAMSHAFTS
4. Install:
• timing chain guide (exhaust side)
5. Install:
• timing chain tensioner
t t t t t t t t t t t t t t t t t t t t t t t t t t t
a. Lightly press the timing chain ten-
sioner rod into the timing chain ten-
sioner housing by hand.
b. While pressing the timing chain ten-
sioner rod, wind it clockwise with a
thin screwdriver 1 until it stops.
c. With the screwdriver still inserted
into the timing chain tensioner, install
the timing chain tensioner and gasket
onto the cylinder block. Then, tighten
the timing chain tensioner bolts to the
specified torque.
WARNINGWARNING
Always use a new gasket.
NOTE:
The “UP” mark on the timing chain ten-
sioner should face up.
d. Remove the screwdriver, make sure
that the timing chain tensioner rod
releases, and tighten the cap bolt to
the specified torque.
s s s s s s s s s s s s s s s s s s s s s s s s s s s
T R..
Timing chain tensioner bolt
10 Nm (1.0 m • kg, 7.2 ft • lb)
T R..
Cap bolt
10 Nm (1.0 m • kg, 7.2 ft • lb)
6. Turn:
• crankshaft
(several turns counterclockwise)
Page 149 of 381

4 - 17
ENGCAMSHAFTS
7. Check:
• TDC mark a
Make sure that the TDC mark is
aligned with the crankcase mating sur-
face b.
• camshaft punch mark c
Make sure that the camshaft punch
mark is aligned with the arrow mark d
on the camshaft cap.
Out of alignment ® Adjust.
Refer to the installation steps above.
H H
T
T
a
a
b
b
8. Measure:
• valve clearance
Out of specification ® Adjust.
Refer to “ADJUSTING THE VALVE
CLEARANCE” in chapter 3.
9. Install:
• cylinder head cover gasket
• cylinder head cover
NOTE:
• Apply bond TB1541 onto the mating
surfaces of the cylinder head cover
and cylinder head cover gasket.
• Apply bond 1215B onto the mating
surfaces of the cylinder head cover
gasket and cylinder head.
• Tighten the cylinder head cover bolts
in stages and in a crisscross pattern.
Page 150 of 381

ENG
4 - 18
CYLINDER HEAD
EB402000
CYLINDER HEAD
Order Job/Part Q’ty Remarks
Removing the cylinder headRemove the parts in the order listed.
Engine Refer to “ENGINE”.
Intake and exhaust camshafts Refer to “CAMSHAFTS”.
1 Cylinder head 1
2 Cylinder head gasket 1
3 Dowel pin 2
For installation, reverse the removal
procedure.