YAMAHA YZF-R7 1999 Owners Manual
YZF-R7 1999
YAMAHA
YAMAHA
https://www.carmanualsonline.info/img/51/54468/w960_54468-0.png
YAMAHA YZF-R7 1999 Owners Manual
Trending: rear view mirror, fuel pump, spark plugs replace, bolt pattern, air suspension, tow, engine oil capacity
Page 181 of 381
4 - 49
ENGSHIFT SHAFT
EB408401
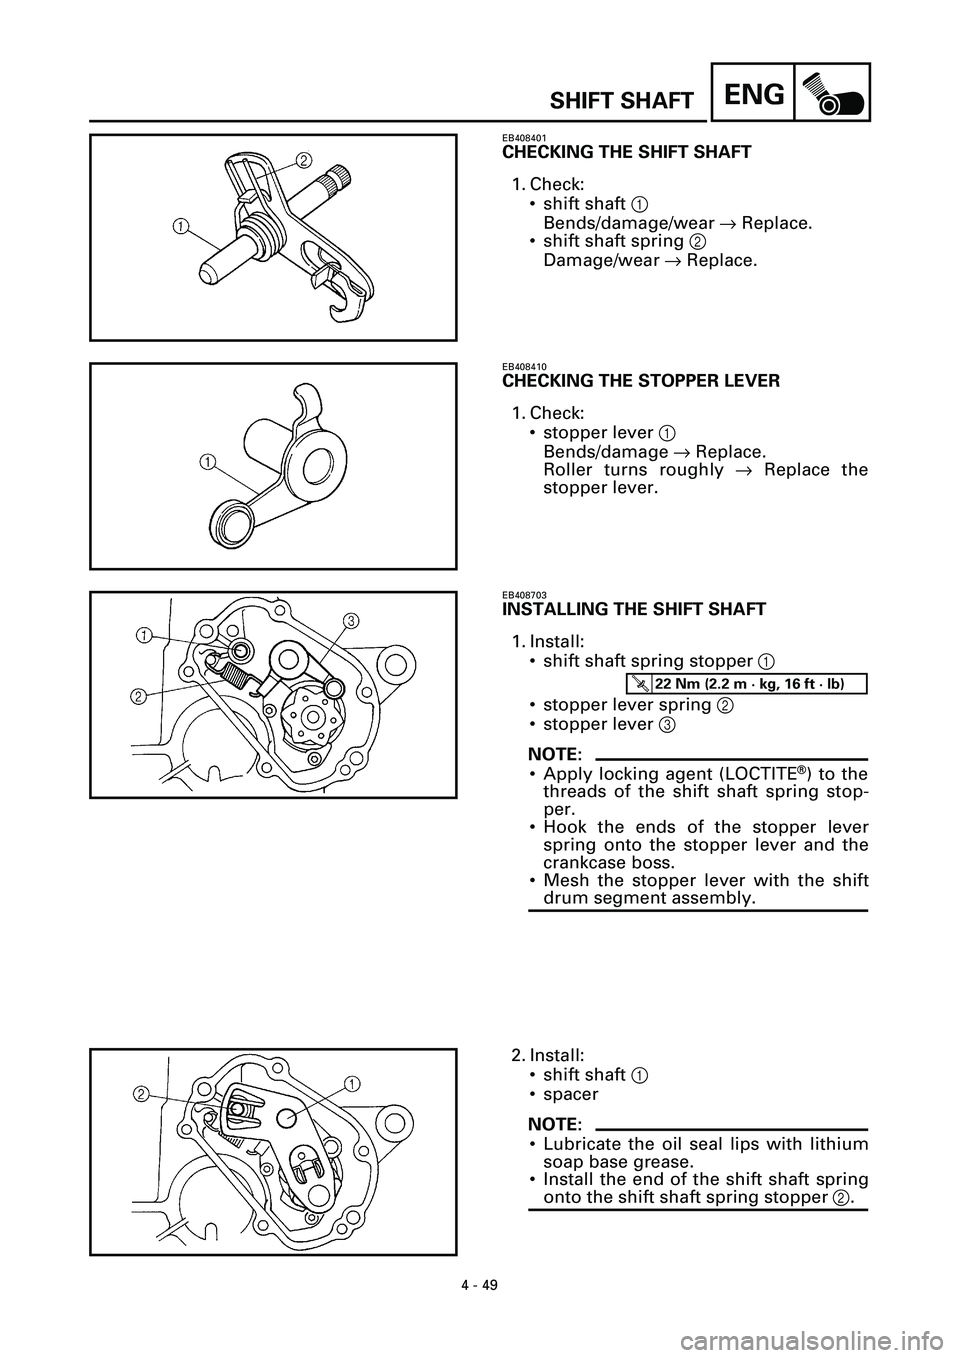
CHECKING THE SHIFT SHAFT
1. Check:
• shift shaft 1
Bends/damage/wear ® Replace.
• shift shaft spring 2
Damage/wear ® Replace.
EB408410
CHECKING THE STOPPER LEVER
1. Check:
• stopper lever 1
Bends/damage ® Replace.
Roller turns roughly ® Replace the
stopper lever.
EB408703
INSTALLING THE SHIFT SHAFT
1. Install:
• shift shaft spring stopper 1
• stopper lever spring 2
• stopper lever 3
NOTE:
• Apply locking agent (LOCTITE®) to the
threads of the shift shaft spring stop-
per.
• Hook the ends of the stopper lever
spring onto the stopper lever and the
crankcase boss.
• Mesh the stopper lever with the shift
drum segment assembly.
T R..22 Nm (2.2 m · kg, 16 ft · lb)
2. Install:
• shift shaft 1
• spacer
NOTE:
• Lubricate the oil seal lips with lithium
soap base grease.
• Install the end of the shift shaft spring
onto the shift shaft spring stopper 2.
Page 182 of 381
ENG
4 - 50
OIL PAN AND OIL PUMP
EB411000
OIL PAN AND OIL PUMP
Order Job/Part Q’ty Remarks
Removing the oil pan and oil pumpRemove the parts in the order listed.
Engine oil Drain.
Refer to “CHANGING THE ENGINE
OIL” in chapter 3.
Coolant Drain.
Refer to “CHANGING THE COOLANT”
in chapter 3.
Radiator assembly and water pump
outlet pipeRefer to “RADIATOR AND THERMO-
STAT” and “OIL COOLER” in chapter 5.
Exhaust pipe assembly Refer to “ENGINE”.
1 Oil level switch connector 1 Disconnect.
2 Oil level switch 1
3 Oil level switch lead holder 1
4 Oil pan 1
5 Oil pan gasket 1
6 Dowel pin 2
Page 183 of 381
ENG
4 - 51
OIL PAN AND OIL PUMP
EB411001
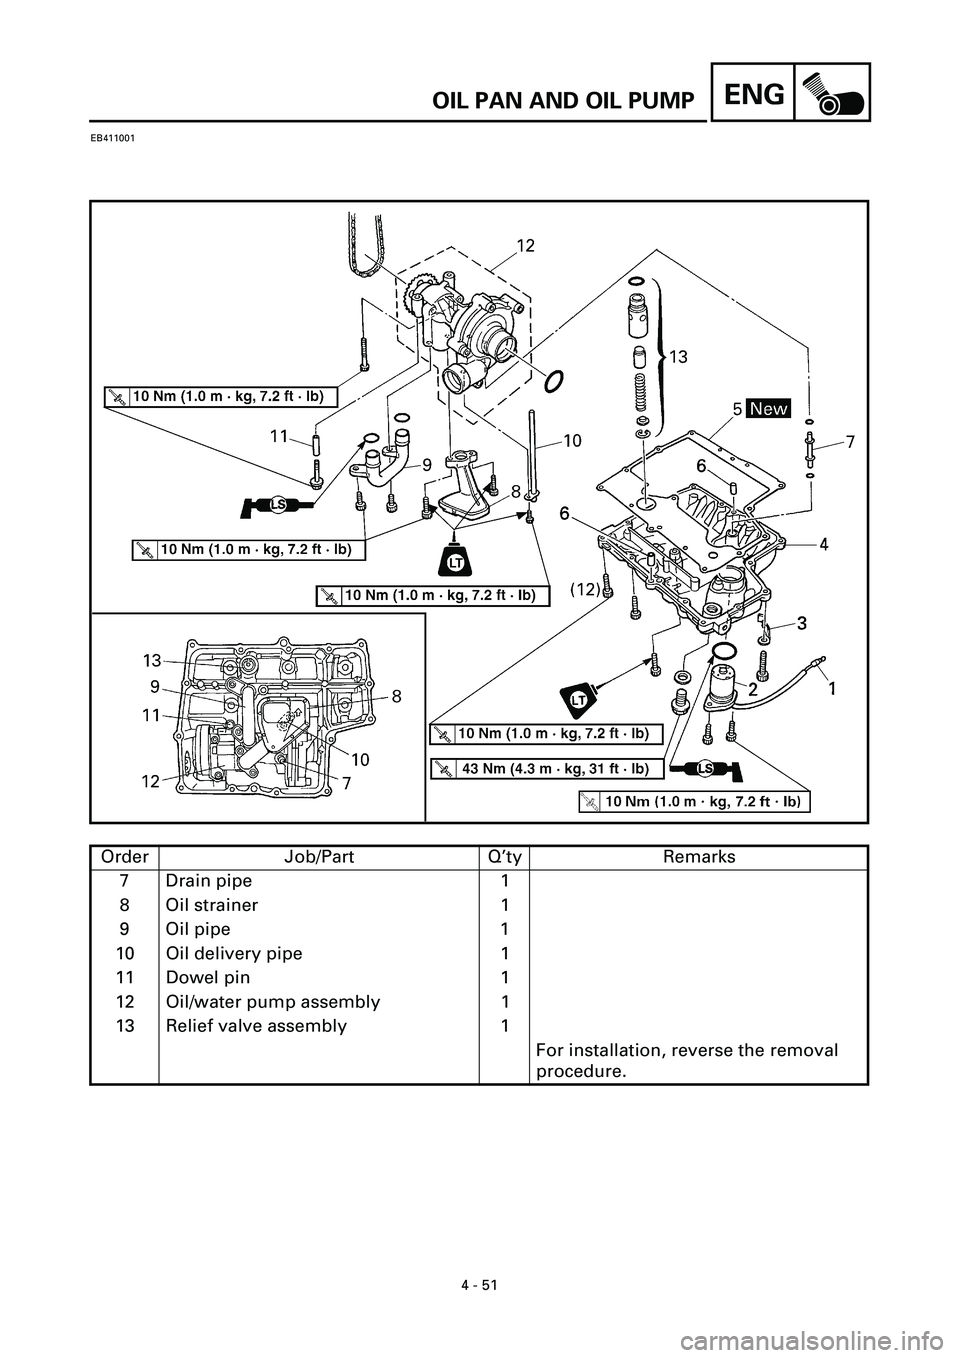
Order Job/Part Q’ty Remarks
7 Drain pipe 1
8 Oil strainer 1
9 Oil pipe 1
10 Oil delivery pipe 1
11 Dowel pin 1
12 Oil/water pump assembly 1
13 Relief valve assembly 1
For installation, reverse the removal
procedure.
Page 184 of 381
ENG
4 - 52
OIL PAN AND OIL PUMP
EB411003
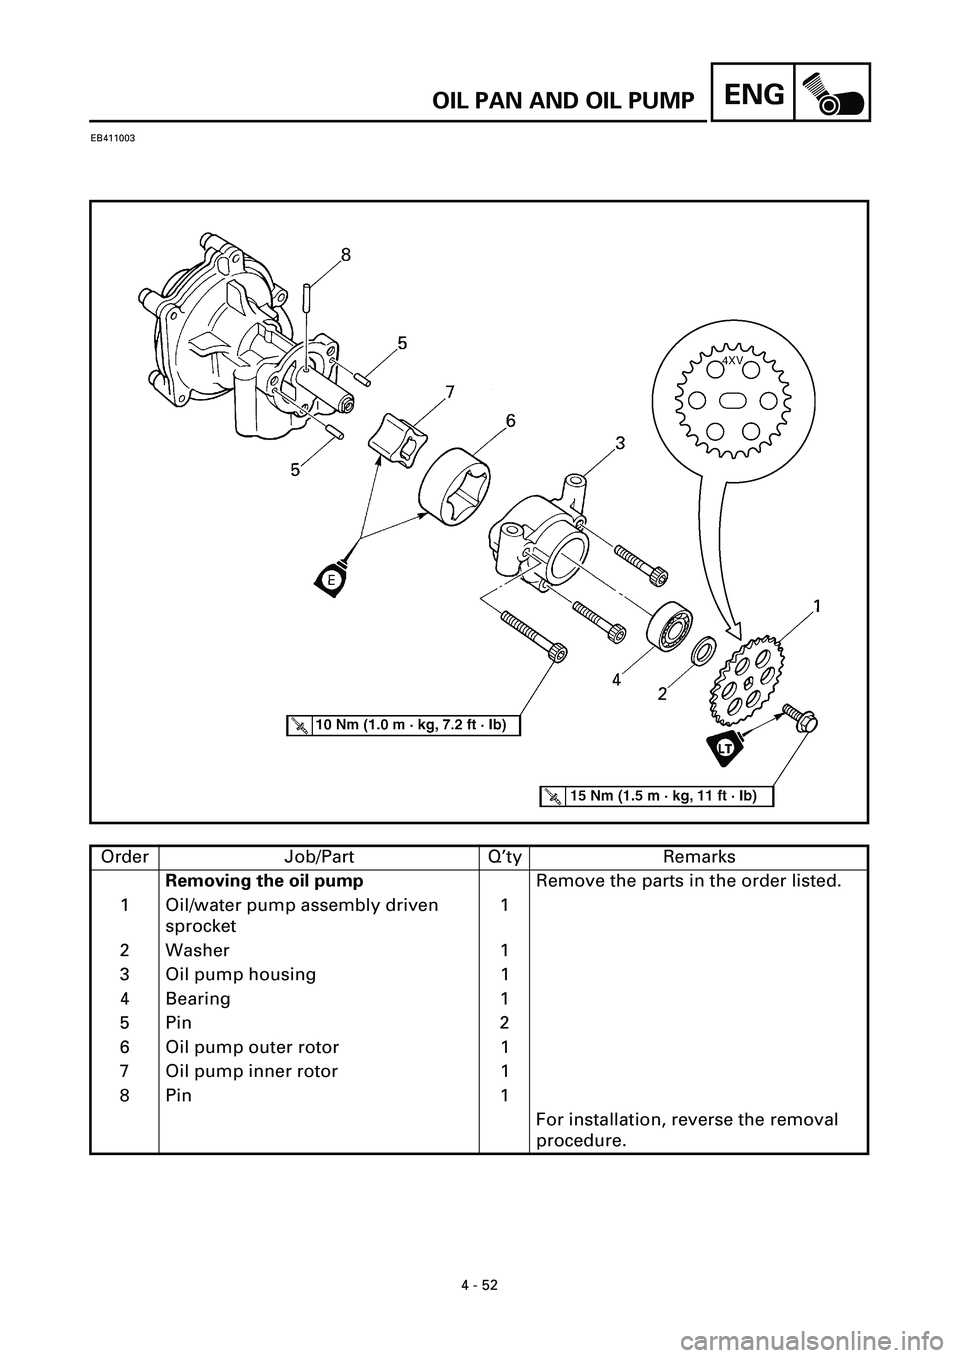
Order Job/Part Q’ty Remarks
Removing the oil pumpRemove the parts in the order listed.
1 Oil/water pump assembly driven
sprocket1
2 Washer 1
3 Oil pump housing 1
4 Bearing 1
5 Pin 2
6 Oil pump outer rotor 1
7 Oil pump inner rotor 1
8 Pin 1
For installation, reverse the removal
procedure.
Page 185 of 381
4 - 53
ENGOIL PAN AND OIL PUMP
EB411100
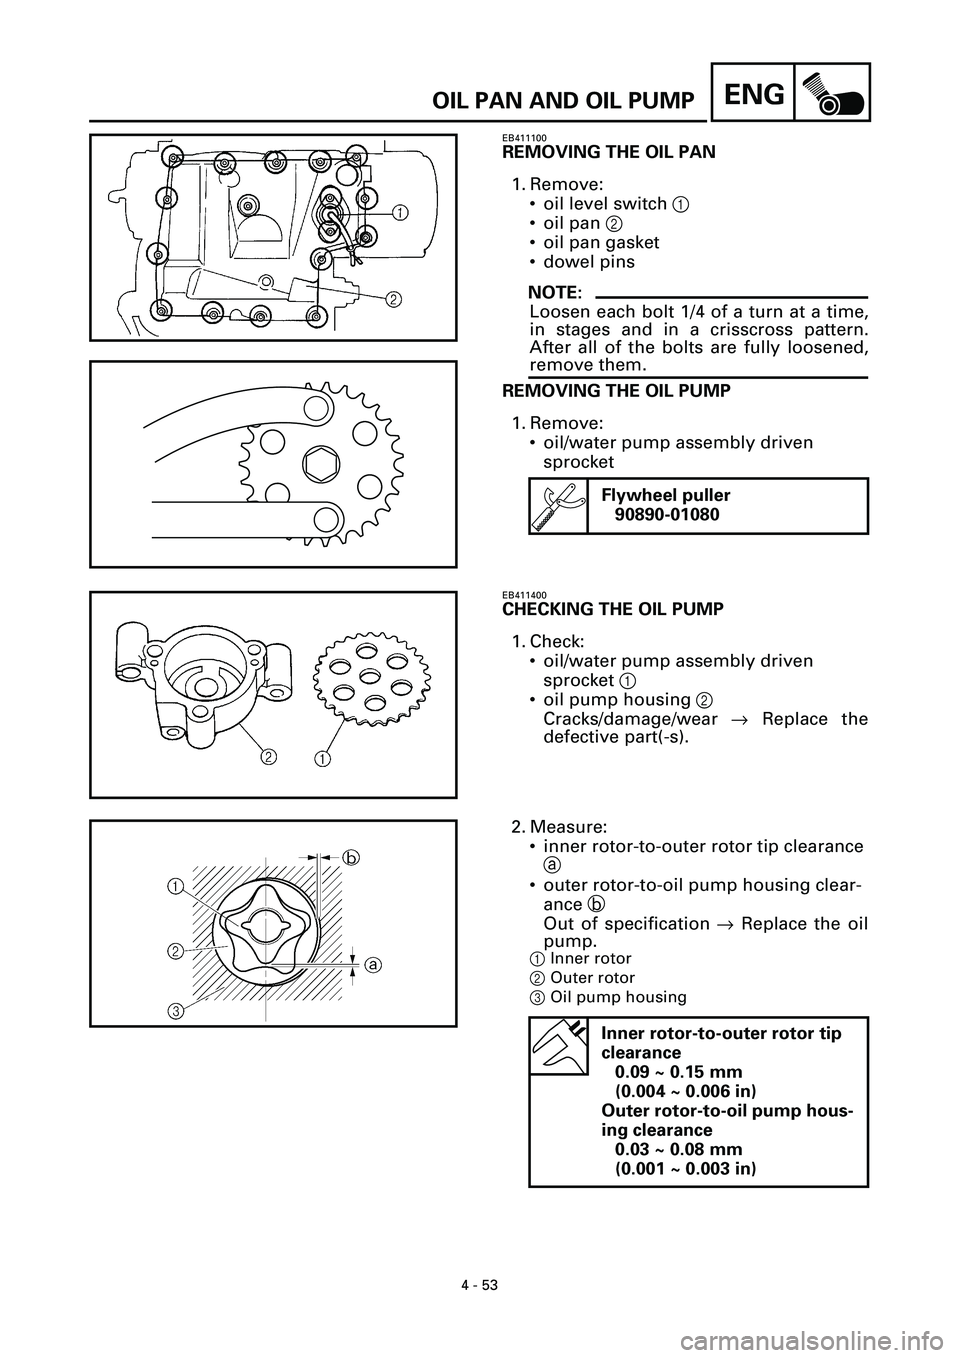
REMOVING THE OIL PAN
1. Remove:
• oil level switch 1
• oil pan 2
• oil pan gasket
• dowel pins
NOTE:
Loosen each bolt 1/4 of a turn at a time,
in stages and in a crisscross pattern.
After all of the bolts are fully loosened,
remove them.
REMOVING THE OIL PUMP
1. Remove:
• oil/water pump assembly driven
sprocket
Flywheel puller
90890-01080
EB411400
CHECKING THE OIL PUMP
1. Check:
• oil/water pump assembly driven
sprocket 1
• oil pump housing 2
Cracks/damage/wear ® Replace the
defective part(-s).
2. Measure:
• inner rotor-to-outer rotor tip clearance
a
• outer rotor-to-oil pump housing clear-
ance b
Out of specification ® Replace the oil
pump.
1 Inner rotor
2 Outer rotor
3 Oil pump housing
Inner rotor-to-outer rotor tip
clearance
0.09 ~ 0.15 mm
(0.004 ~ 0.006 in)
Outer rotor-to-oil pump hous-
ing clearance
0.03 ~ 0.08 mm
(0.001 ~ 0.003 in)
Page 186 of 381
4 - 54
ENGOIL PAN AND OIL PUMP
3. Check:
• oil pump operation
Unsmooth ® Repair or replace the
defective part(-s).
Refer to “WATER PUMP” in chapter 5.
EB411410
CHECKING THE RELIEF VALVE
1. Check:
• relief valve body 1
• relief valve 2
• spring 3
• O-ring 4
Damage/wear ® Replace the defective
part(-s).
EB411421
CHECKING THE OIL DELIVERY PIPE AND
OIL PIPE
1. Check:
• oil delivery pipe 1
• oil pipe 2
Damage ® Replace.
Obstruction ® Wash and blow out
with compressed air.
EB411430
CHECKING THE OIL STRAINER
1. Check:
• oil strainer 1
Damage ® Replace.
Contaminants ® Clean with engine oil.
EB411701
ASSEMBLING THE OIL PUMP
1. Lubricate:
• inner rotor
• outer rotor
• impeller shaft
(with the recommended lubricant)
Recommended lubricant
Engine oil
Page 187 of 381
4 - 55
ENGOIL PAN AND OIL PUMP
2. Check:
• oil pump operation
Refer to “CHECKING THE OIL PUMP”.
EB411710
INSTALLING THE OIL PUMP
1. Install:
• oil pump 1
NOTE:
Install the oil/water pump assembly
drive chain onto the oil/water pump
assembly driven sprocket.
T R..12 Nm (1.2 m · kg, 8.7 ft · lb)
EB411720
INSTALLING THE OIL STRAINER
1. Install:
• oil strainer 1
NOTE:
The arrow a on the oil strainer housing
must point towards the front of the
engine.
T R..10 Nm (1.0 m · kg, 7.2 ft · lb)
EB411730
INSTALLING THE OIL PAN
1. Install:
• dowel pins
• oil pan gasket
• oil pan 1
• oil level switch 2
• engine oil drain bolt 3
WARNINGWARNING
Always use new copper washers.
NOTE:
• Tighten the oil pan bolts in stages and
in a crisscross pattern.
• Lubricate the oil level switch O-ring
with lithium soap base grease.
New
T R..10 Nm (1.0 m · kg, 7.2 ft · lb)
T R..43 Nm (4.3 m · kg, 31 ft · lb)
Page 188 of 381
ENG
4 - 56
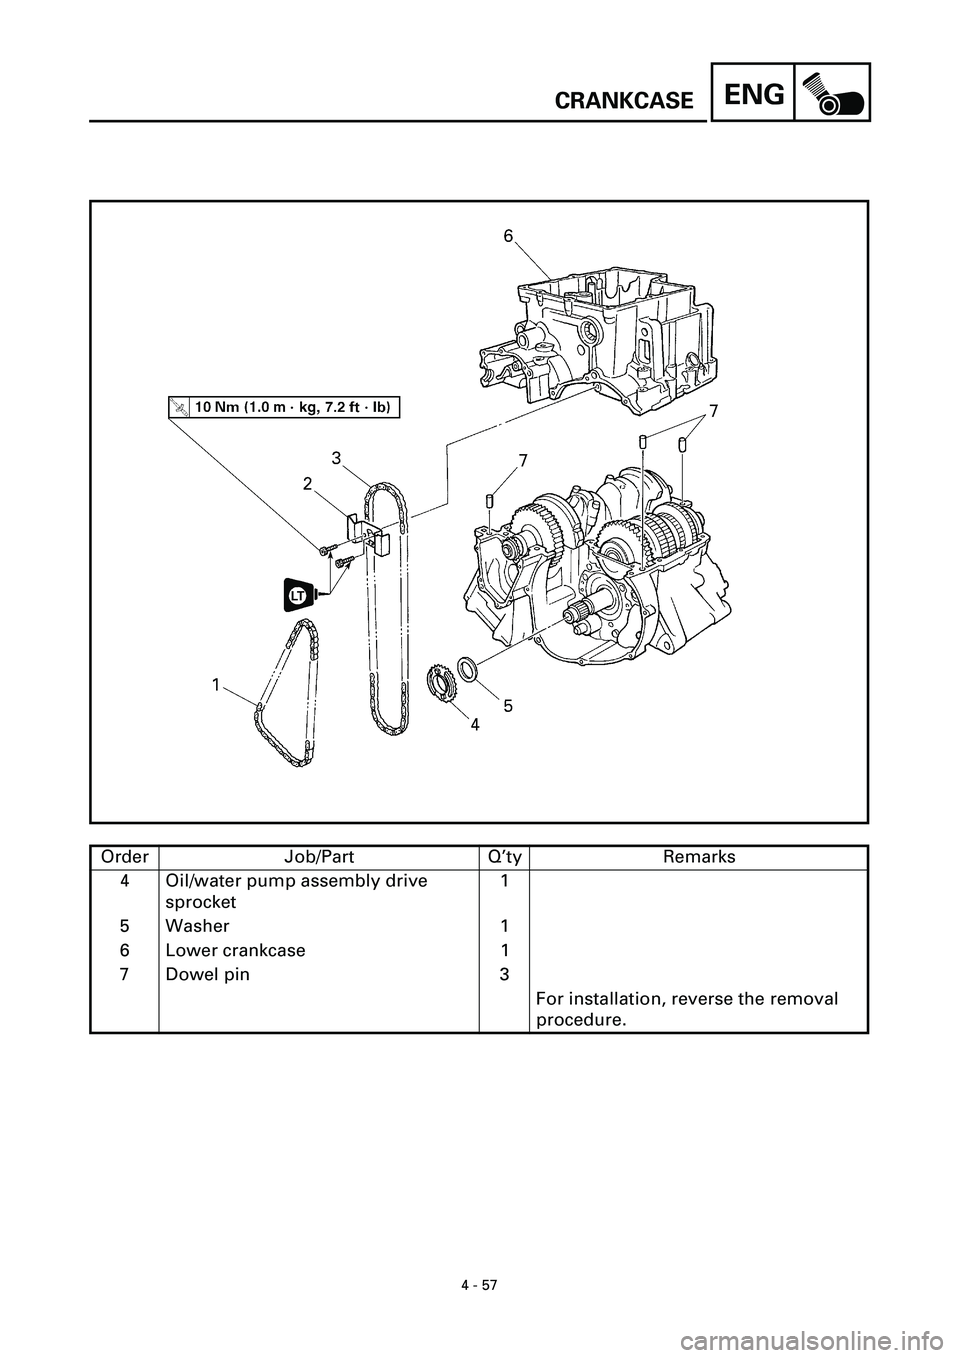
CRANKCASE
CRANKCASE
Order Job/Part Q’ty Remarks
Separating the crankcaseRemove the parts in the order listed.
Engine Refer to “ENGINE”.
Cylinder head Refer to “CYLINDER HEAD”.
Pickup coil and pickup coil rotor Refer to “PICKUP COIL”.
Stator coil assembly Refer to “GENERATOR”.
Clutch housing and starter clutch
idle gearRefer to “CLUTCH”.
Oil/water pump assembly Refer to “OIL PAN AND OIL PUMP”.
1 Timing chain 1
2 Oil/water pump assembly drive
chain guide1
3 Oil/water pump assembly drive
chain1
Page 189 of 381
ENG
4 - 57
CRANKCASE
Order Job/Part Q’ty Remarks
4 Oil/water pump assembly drive
sprocket1
5 Washer 1
6 Lower crankcase 1
7 Dowel pin 3
For installation, reverse the removal
procedure.
Page 190 of 381
ENG
4 - 58
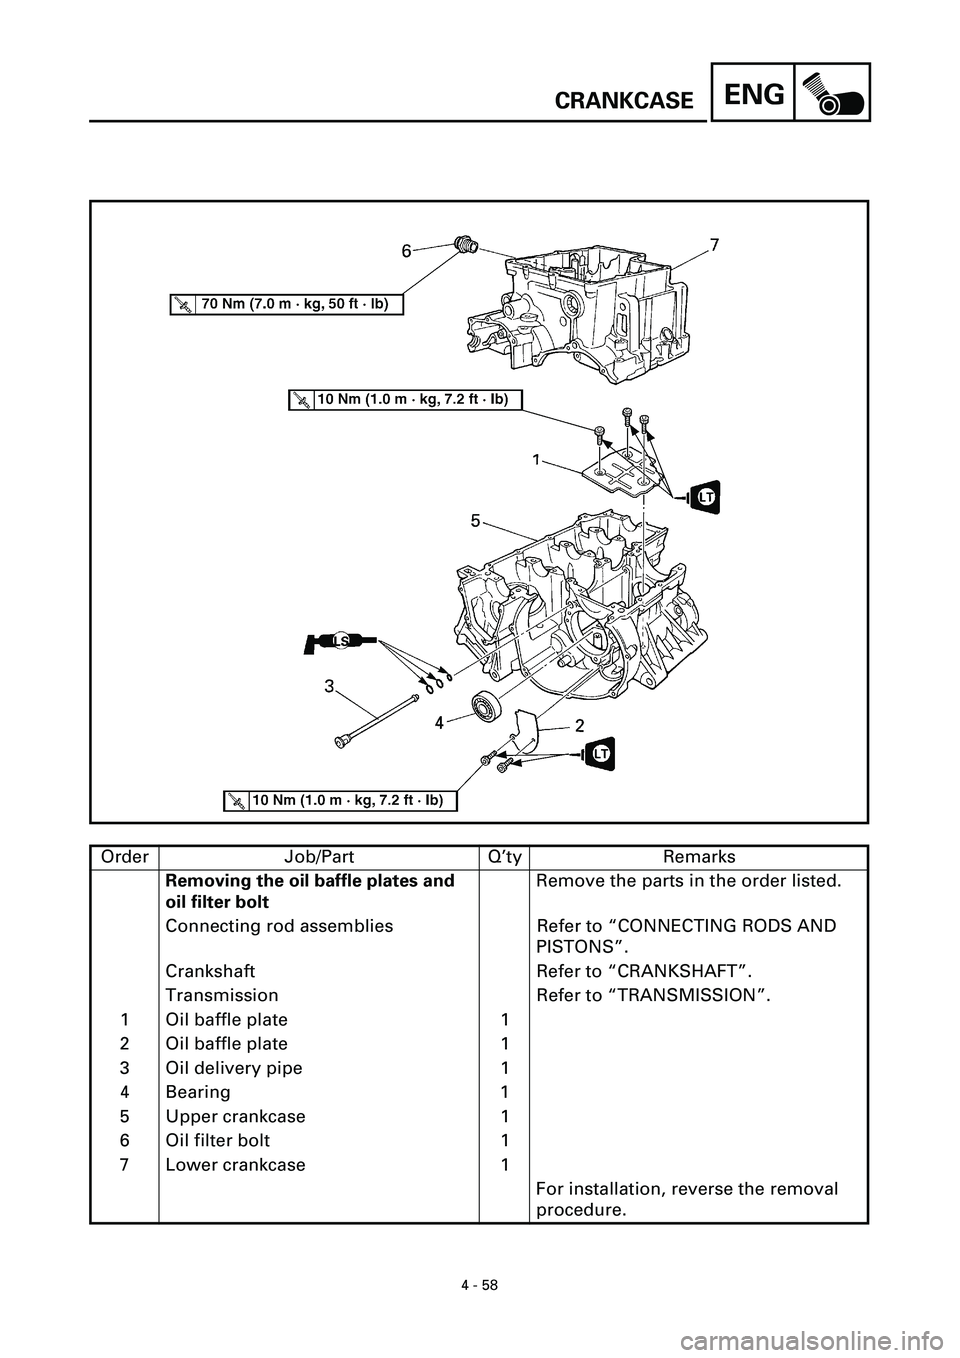
CRANKCASE
Order Job/Part Q’ty Remarks
Removing the oil baffle plates and
oil filter boltRemove the parts in the order listed.
Connecting rod assemblies Refer to “CONNECTING RODS AND
PISTONS”.
Crankshaft Refer to “CRANKSHAFT”.
Transmission Refer to “TRANSMISSION”.
1 Oil baffle plate 1
2 Oil baffle plate 1
3 Oil delivery pipe 1
4 Bearing 1
5 Upper crankcase 1
6 Oil filter bolt 1
7 Lower crankcase 1
For installation, reverse the removal
procedure.
Trending: steering, air suspension, tire type, light, oil type, drain bolt, rear view mirror
