technical specifications Abarth 500 2015 Owner handbook (in English)
[x] Cancel search | Manufacturer: ABARTH, Model Year: 2015, Model line: 500, Model: Abarth 500 2015Pages: 215, PDF Size: 19.08 MB
Page 5 of 215
Dear Customer,
We would like to congratulate and thank you for choosing an Abarth 500. We have written this handbook to help you get to know all the
features of your car and use it in the best possible way. You should read it right through before taking to the road for the first time.
Here you will find information, advice and important warnings regarding use of your car and how to achieve the best performance from the
technological features of your Abarth 500. It also provides a description of special features and essential information for the care and
maintenance of your car over time as well as for safe driving.
We urge you to read the warnings and indications found throughout the text with care, marked with the following symbols:
personal safety;
vehicle integrity;
environmental protection.
NOTE These symbols, when necessary, are reported at the end of each paragraph and are followed by a number. That number recalls the
corresponding warning at the end of the relevant section.
In the attached Warranty Booklet you will also find a description of the Services that Abarth offers to its customers, the Warranty Certificate and
the detail of the terms and conditions for maintaining its validity.
We are sure that these will help you to get in touch with and appreciate your new car and the service provided by the people at Abarth.
Enjoy reading. Happy motoring!
This Owner Handbook describes all versions of the Abarth 500; please consider only the information relevant to your
car’s trim level, engine and version. All data contained in this publication is purely indicative. Fiat Group Automobiles can
modify the specifications of the vehicle model described in this publication at any time, for technical or marketing
purposes. For further information, contact an Abarth Dealership.
Page 51 of 215

IMPORTANT To return the backrest to
its correct position, we recommend
operating from the outside through the
doors.
TOTAL EXTENSION
Tilting the rear seat completely forwards
allows maximum loading volume.
Proceed as follows:
❒remove the rear seat head restraints
(where provided)
❒check that the seat belts are correctly
extended and not twisted
❒operate the levers A and B fig. 53 to
release the backrests and guide
them onto the cushion.
IMPORTANT To return the backrest to
its correct position, we recommend
operating from the outside through the
doors.REPOSITIONING THE
REAR SEAT
Raise the backrests and push them
back until the locking click of both
retainers is heard.
Position the seat belt buckles upwards
and set the cushion to the position of
normal use.
IMPORTANT When returning the
backrest to its normal position, make
sure that it is correctly fastened and
that you hear the lock click.
Make sure the backrest is properly
secured at both sides to prevent it
moving forward in the event of sharp
braking that may cause injuries to
passengers.
WARNING
22) Never exceed the maximum
allowed load in the luggage
compartment (see "Technical
specifications" chapter). Also
make sure that the objects you
place in the luggage compartment
have been properly secured, to
avoid them from being thrown
forward consequent to sudden
braking and injuring your
passengers.
23) If you are travelling in areas with
few filling stations and you want
to transport fuel in a spare tank,
comply with the law by using only
an approved, suitably secured
tank. Anyway, by doing so, you
increase the risk of fire in the
event of an accident with your
vehicle.
24) Do not travel with the tailgate
open: exhaust gas may enter
the passenger compartment.
47
Page 54 of 215

ROOF RACK/SKI
RACK
FASTENERS
The fasteners are located in the area
indicated in fig. 57.
To use the front fasteners, remove the
cap A fig. 57, accessible with the door
open.
The rear fixing areas B can be found
according to measurements shown in
fig. 58.
29) 30)
Lineaccessori Abarth provides a
specific roof rack/ski rack for the
tailgate.IMPORTANT Follow the instructions
contained in the assembly kit carefully.
Assembly must be performed by
qualified personnel.
WARNING
29) Strictly adhere to the laws in
force concerning maximum
clearance. Never exceed the
maximum permitted loads; see
chapter "Technical
specifications".
30) Evenly distribute the load and
take into account, when driving,
the increased responsiveness
of the car to side wind. Check that
the attachment fixing screws are
tight after a few kilometres.
57AB0A0054
130 mm30 mm
58AB0A0055
50
GETTING TO KNOW YOUR CAR
Page 61 of 215
Low tyre pressure
The system warns the driver if one or
more tyres are flat by switching on
the
warning light on the instrument
panel.
The display will also show the following
information:
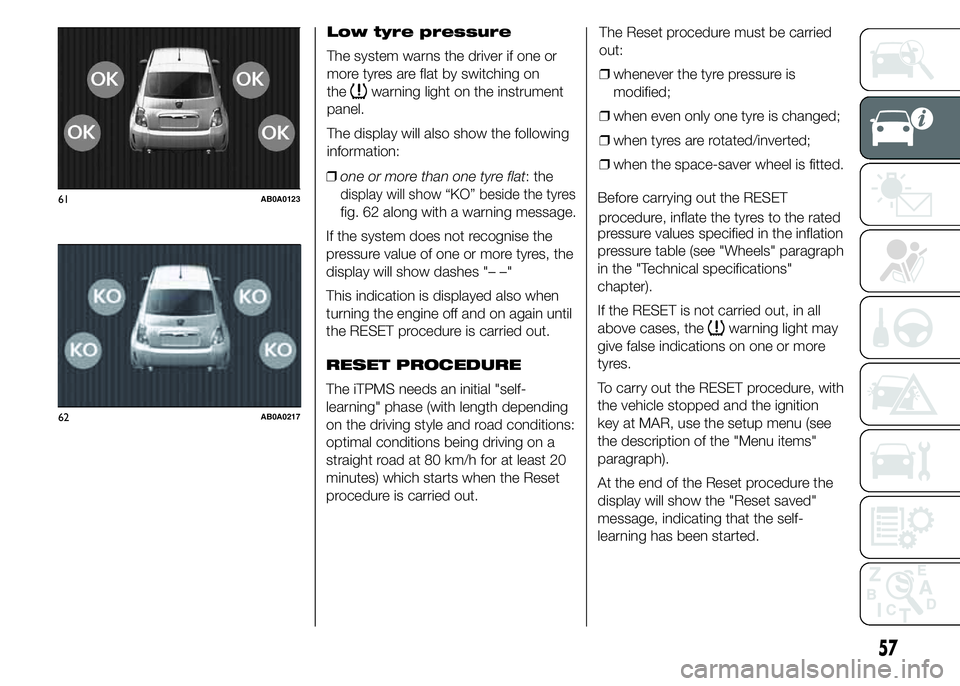
❒one or morethan one tyre flat: the
display will show “KO” beside the tyres
fig. 62 along with a warning message.
If the system does not recognise the
pressure value of one or more tyres, the
display will show dashes "– –"
This indication is displayed also when
turning the engine off and on again until
the RESET procedure is carried out.
RESET PROCEDURE
The iTPMS needs an initial "self-
learning" phase (with length depending
on the driving style and road conditions:
optimal conditions being driving on a
straight road at 80 km/h for at least 20
minutes) which starts when the Reset
procedure is carried out.The Reset procedure must be carried
out:
❒whenever the tyre pressure is
modified;
❒when even only one tyre is changed;
❒when tyres are rotated/inverted;
❒when the space-saver wheel is fitted.
Before carrying out the RESET
pressure values specified in the inflation
pressure table (see "Wheels" paragraph
in the "Technical specifications"
chapter).
If the RESET is not carried out, in all
above cases, the
warning light may
give false indications on one or more
tyres.
To carry out the RESET procedure, with
the vehicle stopped and the ignition
key at MAR, use the setup menu (see
the description of the "Menu items"
paragraph).
At the end of the Reset procedure the
display will show the "Reset saved"
message, indicating that the self-
learning has been started.
61AB0A0123
62AB0A0217
57
p. rocedure, inflate the tyres to the rated
Page 102 of 215

Warning lights on
displayWhat it means What to do
amberiTPMS
(for versions/markets, where provided)
When the key is turned to MAR-ON, the warning
light switches on but it should switch off after a
few seconds.IMPORTANT Do not continue driving with one or
more flat tyres as handling may be compromised.
Stop the vehicle, avoiding sharp braking and
steering.
Low tyre pressure
The warning light switches to indicate that the
pressure of one or more tyres is lower than the
recommended value, in order to guarantee long
tyre life and low fuel consumption, or to indicate a
slow loss of pressure.
In this way the iTPMS warns the driver that one or
more tyres may be flat and probably punctured.In this case it is advisable to restore the correct
pressure value (see the "Wheels" paragraph in the
"Technical specifications" section).
Once the normal operating conditions of the
vehicle are restored, carry out the Reset
procedure.
iTPMS failure/iTPMS temporarily deactivated
The warning light flashes for about 75 seconds
and then stays on constantly (together with a
message on the display) (see “Operating
conditions” paragraph) to indicate that the system
is temporarily deactivated or faulty.
The system goes back to normal operation when
the operating conditions allow it. If this is not the
case, carry out the Reset procedure after
restoring the normal operating conditions.If the malfunction warning persists, contact an
Abarth Dealership as soon as possible.
98
KNOWING THE INSTRUMENT PANEL
Page 131 of 215
SNOW TYRES
Use snow tyres of the same size as the
standard tyres provided with the car.
An Abarth Dealership will be happy to
provide advice concerning the most
suitable type of tyre for the Customer's
requirements.
103)
For the type of tyre to be used, inflation
pressures and the specifications of
snow tyres, follow the instructions given
in the "Wheels" paragraph in the
"Technical specifications" chapter.
The winter features of these tyres are
reduced considerably when the tread
depth is below 4 mm. Replace them in
this case.
Due to the specific characteristics of
snow tyres, in normal weather
conditions or on long motorway
journeys, the performance of these
tyres is lower than that of standard
tyres. Their usage should therefore be
restricted in accordance with their
type approval.IMPORTANT When using snow tyres
with a maximum speed index below the
one that can be reached by the car
(increased by 5%), place a notice in the
passenger compartment, plainly in
view, which states the maximum speed
allowed by the snow tyres (as per EC
Directive).
All four tyres should be the same (brand
and track) to ensure greater safety
when driving and braking as well as a
good manoeuvrability.
Remember that you should not change
the rotation direction of the tyres.
WARNING
103) The max. speed for snow tyres
with "Q" marking is 160 km/h. The
Highway Code speed limits must
however be always strictly
observed.
SNOW CHAINS
The use of snow chains should be in
compliance with local regulations of
each country.
Snow chains can be fitted to the tyres
of the front wheels (drive wheels) only.
Check the tension of the snow chains
after the first few metres have been
driven.
22)
IMPORTANT
22) Keep your speed down when
snow chains are fitted; do not
exceed 50 km/h. Avoid potholes,
steps and pavements and avoid
driving for long distances on
roads not covered with snow to
prevent damaging the car and the
roadbed.
127
Page 136 of 215

❒switch on the compressor, bringing
the switch G to position1(on);
❒inflate the tyre to the pressure
specified (see the "Cold tyre inflation
pressure" paragraph in the "Technical
specifications" chapter).IMPORTANT To get a more precise
reading, it is advisable to check the
value with compressor off.
❒if the pressure does not reach at least
1.5 bar in 5 minutes, switch the
compressor off and disconnect the
filling pipe B from the tyre valve, then
remove the plug H;
❒move the car by about 10 m, to
distribute the sealant inside the tyre,
then inflate again.
IMPORTANT If after this operation it is
still impossible after 5 minutes to reach
at least 1.5 bar, do not start driving
since the tyre is excessively damaged
and the Fix&Go kit cannot guarantee
proper seal; contact an Abarth
Dealership.
❒If the tyre was inflated to the
prescribed pressure, start driving
immediately.
111)
❒after having driven for about 10
minutes, stop, apply the handbrake
and recheck the tyre pressure.
112) 113)
100AB0A0083
101AB0A0084
102AB0A0085
132
IN AN EMERGENCY
Page 142 of 215

WARNING
114) Changes or repairs to the electrical system carried out incorrectly and without due consideration for the technical
specifications of the system may lead to malfunctioning and generate a fire hazard.
115) Halogen bulbs contain pressurised gas. If they break, glass fragments could fly everywhere.
IMPORTANT
25) Halogen bulbs must be handled by holding the metallic part only. Touching the transparent part of the bulb with
your fingers may reduce the intensity of the emitted light and even reduce the lifespan of the bulb. In the event of
accidental contact, wipe the bulb with a cloth moistened with alcohol and let the bulb dry.
26) Where possible, it is advisable to have bulbs changed at an Abarth Dealership. The correct operation and alignment
of the external lights are absolutely essential for the safety of the car and of compliance with the law.
138
IN AN EMERGENCY
Page 162 of 215
PERIODIC CHECKS
Every 1,000 km or before long
journeys, check and, if necessary, top
up the following:
❒engine coolant level;
❒brake fluid level;
❒windscreen washer fluid level;
❒tyre inflation pressure and condition;
❒operation of lighting system
(headlights, direction indicators,
hazard warning lights, etc.);
❒operation of screen washer/wiper
system and positioning/wear of
windscreen/rear window wiper
blades.
Every 3,000 km check and, if
necessary, top up: engine oil level.
You are advised to use PETRONAS
LUBRICANTS products, which have
been designed and produced
specifically for Abarth cars (see table
"Capacities" in the "Technical
specifications" chapter).
HEAVY-DUTY USE OF
THE CAR
If the car is used mainly under one of
the following conditions:
❒towing a trailer or caravan;
❒dusty roads;
❒short, repeated journeys (less than
7-8 km) at sub-zero outside
temperatures;
❒engine often idling or driving long
distances at low speeds or long
periods of inactivity;
the following checks must be carried
out more often than indicated in the
Scheduled Servicing Plan:
❒check front disc brake pad condition
and wear;
❒check cleanliness of bonnet and
luggage compartment locks,
cleanliness and lubrication of linkage;
❒visually inspect condition of: engine,
gearbox, transmission, pipes and
hoses (exhaust - fuel system -
brakes) and rubber elements (boots -
sleeves - bushes - etc.);
❒check battery charge and battery
fluid level (electrolyte);
❒visually inspect condition of the
accessory drive belts;❒check and, if necessary, change
engine oil and replace oil filter;
❒check and, if necessary, replace
pollen filter;
❒check and, if necessary, replace air
cleaner.
158
SERVICING AND MAINTENANCE
Page 164 of 215
ENGINE OIL
30)
3)
Check the oil level a few minutes (about
five) after the engine has stopped,
with the car parked on level ground.
Take out the engine oil dipstick B, clean
it with a lint-free cloth and reinsert it.
Extract the engine oil dipstick again and
check that the level is between the
MIN and MAX marks on the dipstick.
The range between the MIN and MAX
marks corresponds to about 1 litre
of oil.
If the oil level is near or under the MIN
mark, add oil through the filler A until
it reaches the MAX mark.
The oil level must never exceed the
MAX mark.
Engine oil consumption
The maximum engine oil consumption
is usually 400 grams every 1,000 km.
When the car is new, the engine needs
to be run in; therefore the engine oil
consumption can only be considered
stabilised after the first 5,000 -
6,000 km.IMPORTANT The oil consumption
depends on driving style and the
conditions under which the car is used.
IMPORTANT After adding or changing
the oil, let the engine run for a few
seconds and wait a few minutes after
switching it off before checking the
level.
ENGINE COOLANT
The coolant level must be checked
when the engine is cold and must
range between the MIN and MAX
marks on the reservoir.
If the level is too low, unscrew reservoir
cap C fig. 128 and add the fluid
described in the "Technical
specifications" chapter.
31)
132)
WINDSCREEN/REAR
WINDOW WASHER FLUID
Check fluid level through the reservoir.
If the level is too low, lift reservoir cap D
fig. 128 and add the fluid described in
the "Technical specifications" chapter.
After topping up, close cap D, making
sure it is correctly locked.BRAKE FLUID
Check that the fluid is at the maximum
level (the fluid level in the reservoir
must not exceed the MAX mark).
If the fluid level in the reservoir is too
low, undo reservoir cap E fig. 128 and
add the fluid described in the "Technical
specifications" chapter.
134) 135)
32)
IMPORTANT Carefully clean the cap of
the reservoir E and the surrounding
surface.
Take great care to ensure that
impurities do not enter the reservoir
when the cap is opened.
For topping-up, always use a funnel
with integrated filter with mesh equal to
or lower than 0.12 mm.
IMPORTANT Brake fluid is hygroscopic
(i.e. it absorbs moisture). For this
reason, if the car is mainly used in areas
with a high degree of atmospheric
humidity, the fluid must be replaced at
more frequent intervals than specified in
the "Scheduled Servicing Plan".
160
SERVICING AND MAINTENANCE