reset Abarth 500 2020 Owner handbook (in English)
[x] Cancel search | Manufacturer: ABARTH, Model Year: 2020, Model line: 500, Model: Abarth 500 2020Pages: 196, PDF Size: 3.53 MB
Page 46 of 196
NOTE Buttons+and–activate different
functions according to the following
situations:
within the menu, they allow you to
scroll up or down through the options;
during setting operations, they
increase or decrease values.
The menu comprises the following
functions:
LIGHTING: adjusts the dashboard
and instrument panel lighting
SPEED BEEP: sets the vehicle
speed limit (km/h or mph). The driver is
alerted when this speed is exceeded.
TRIP B ACTIVATION/DATA: activates
(”On”) and deactivates (”Off”) the Trip
B display (partial trip counter)
SET TIME: set the display clock
SET DATE: sets the display date
AUTOCLOSE: enables or disables
automatic door locking on exceeding a
speed of 20 km/h
MEASUREMENT UNITS: sets the
measurement units for distance and
fuel consumption
LANGUAGE: sets the display
language
WARNING VOLUME: sets the
volume (on 8 levels) of the audible
warning (buzzer) that accompanies the
failure/warning display
SEAT BELT BUZZER: reactivation of
the SBR buzzer (displayed only if the
SBR system was disabled by the
Abarth Dealership)
SERVICE: displays mileage intervals
for scheduled servicing
AIRBAG/PASSENGER BAG:
enables/disables the passenger side
airbag
DAYTIME RUNNING LIGHTS:
enables/disables daytime running lights
ITPMS RESET: resets the iTPMS
system (”self-learning”, see the “iTPMS
System” paragraph)
SEE RADIO (if present): enables/
disables duplicating some of the radio
information shown on theUconnect™
system display on the instrument panel
display.
SEE PHONE (if present): enables/
disables duplicating some of the call
information shown on theUconnect™
system display on the instrument panel
display.
SEE NAVIGATION (if present):
enables/disables duplicating some of
the navigation information shown on
theUconnect™system display on the
instrument panel display.
EXIT MENU
TRIP COMPUTER
The Trip computer is used to display
information on car operation when the
key is turned to MAR.
This function is characterised by two
separate memories, called "Trip A" and
"Trip B", where the car's "complete
missions" (journeys) are recorded in a
reciprocally independent manner, as
well as, for versions where present,
"Instant info" and "Best average
consumption".
Both memories can be reset: i.e. start
of a new journey.
"Trip A" can be used to display the
values relating to:
Range (where present)
Distance travelled A
Average consumption A
Instantaneous fuel consumption
(where present)
Average speed A
Trip time A (driving time)
Reset Trip A.
“Best average consumption": in ECO
mode, displays a screen summarising
the best average consumption (where
provided). The
icon indicates the
best performance. This information can
be reset by resetting Trip A.
"Trip B" allows the display of the
following parameters:
44
KNOWING THE INSTRUMENT PANEL
Page 47 of 196
Distance travelled B
Average consumption B
Average speed B
Trip time B (driving time)
Reset Trip B.
The "Trip B" function can be disabled
(see the "Menu items" paragraph).
"Range" and "Instant consumption"
values cannot be reset.
“Instantaneous info" displays the
following values (where present, when
they are not displayed in the main
screen):
Range
Instantaneous consumption
VALUES DISPLAYED
Range (where present)
This indicates the distance that can still
be travelled with the fuel in the tank,
assuming that driving style remains
unvaried. The display will show the
reading "----"when the following
events take place:
range value lower than 50 km (or 30
mi)
car parked with engine running for a
long period.IMPORTANT The range can be affected
by several factors: driving style (see
“Driving style” paragraph in the
“Starting and driving” chapter), type of
route (motorway, towns and cities,
mountain roads, etc.), conditions of use
(load, tyre pressures, etc.). Trip
planning must therefore take the above
into account.
Distance travelled
This value shows the distance covered
from the start of the new journey.
Average consumption
This value shows the approximate
average fuel consumption from the start
of the new journey.
Instantaneous fuel consumption
(where present)
This value shows the fuel consumption.
The value is constantly updated. The
message "----"will appear on the
display if the car is parked with the
engine running.
Average speed
This value shows the car's average
speed based on the overall time
elapsed since the start of the new
journey.Journey time
Time elapsed since the start of the new
journey.
TRIP BUTTON
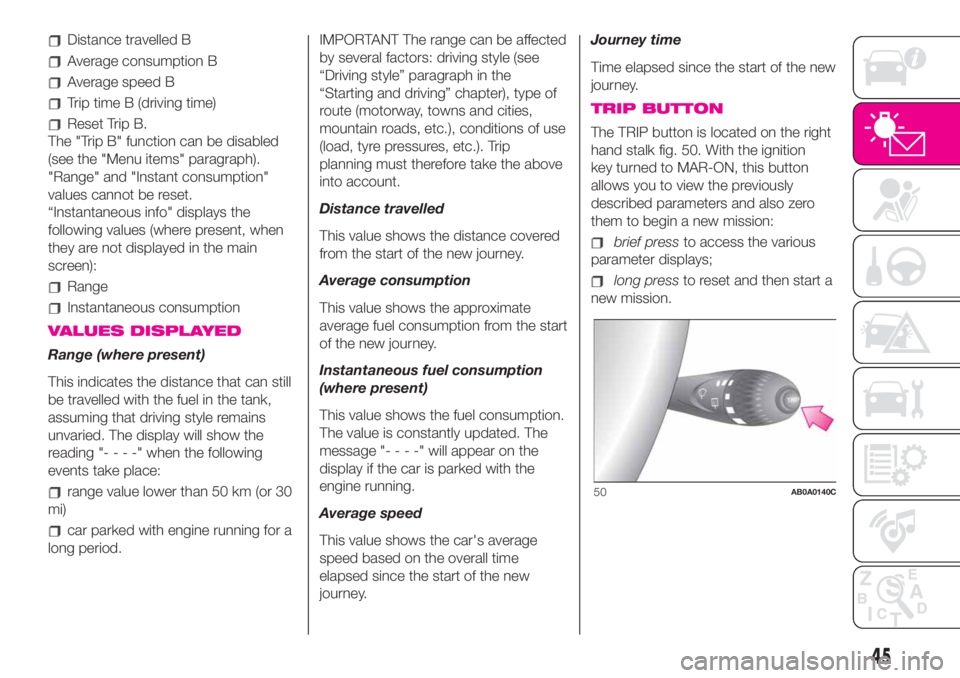
The TRIP button is located on the right
hand stalk fig. 50. With the ignition
key turned to MAR-ON, this button
allows you to view the previously
described parameters and also zero
them to begin a new mission:
brief pressto access the various
parameter displays;
long pressto reset and then start a
new mission.
50AB0A0140C
45
Page 48 of 196
New mission
This begins after a reset:
“manual” resetting by the user, by
pressing the relevant button;
“automatic” resetting, when the “trip
distance” reaches 99999.9 km or
when the “trip time” reaches 999:59
(999 hours and 59 minutes);
after disconnection/reconnection of
the battery.
IMPORTANT The reset operation when
“Trip A” or “Trip B” details are being
displayed resets the information
associated with the function displayed.
Start of journey
procedure
With the ignition key in the MAR
position, reset by pressing the TRIP
button and keeping it pressed for more
than 2 seconds.
Trip exit
You can automatically exit the TRIP
function once all the values have been
displayed or by holding the MENU
button
down for more than 1
second.
46
KNOWING THE INSTRUMENT PANEL
Page 54 of 196
Warning light What it means
amberiTPMS
(where provided)
Tyre pressure low
The warning light switches to indicate that the pressure of one or more tyres is lower than the
recommended value, in order to guarantee long tyre life and low fuel consumption, or to indicate a slow
loss of pressure.
In this way the iTPMS warns the driver that one or more tyres may be flat and probably punctured. In this
case it is advisable to restore the correct pressure value. Once the normal operating conditions of the
vehicle are restored, carry out the Tyre reset procedure.
IMPORTANT Do not continue driving with one or more flat tyres as handling may be compromised. Stop
the vehicle, avoiding sharp braking and steering.
iTPMS failure/iTPMS temporarily deactivated
The warning light flashes for about 75 seconds and then stays on constantly (along with a dedicated
message on the display) to indicate that the system is temporarily deactivated or faulty. The system goes
back to normal operation when the operating conditions allow it. If this is not the case, carry out the Tyre
reset procedure after restoring the normal operating conditions.
If the malfunction warning persists, contact an Abarth Dealership as soon as possible.
Warning light What it means
greenSIDE LIGHTS AND DIPPED BEAM HEADLIGHTS/FOLLOW ME HOME
Side lights and dipped beam headlights
The warning light switches on when the side lights or dipped headlights are turned on.
Follow Me Home
The warning light comes on, on some versions along with a dedicated message on the display, when the
"Follow me home" device is used.
52
KNOWING THE INSTRUMENT PANEL
Page 58 of 196

Symbol What it means
amberPOSSIBLE ICE ON ROAD
The symbol is displayed when the outside temperature falls to or below 3°C.
On some versions the display shows the dedicated message.
amberPARKING SENSOR FAILURE
(where provided)
The symbol is shown on the display together with a dedicated message if there is a fault in the parking
sensors.
amberSERVICE (SCHEDULED SERVICING) EXPIRED
When the scheduled servicing is nearly due ("scheduled service deadline"), the display will show the
symbol followed by the number of kilometres/miles until the car must be serviced. This is displayed
automatically, with ignition key at MAR, 2000 km (or equivalent value in miles) before servicing or, for some
markets, 30 days before servicing. It is also displayed each time the key is turned to MAR or, for some
markets, every 200 km (or equivalent value in miles).
Go to an Abarth Dealership, where the "Service Schedule" operations will be performed and the message
will be reset.
amberASR SYSTEM
On some versions, the display will the show symbol together with a dedicated message on the display,
when the ASR system is deactivated.
amberHILL HOLDER FAILURE
(where provided)
The display will show the symbol together with a dedicated message when there is a fault in the Hill Holder
system.
In this case, contact an Abarth Dealership as soon as possible.
amberFUEL CUT-OFF SYSTEM
The display will show the symbol and a dedicated message if the fuel cut-off system intervenes.
For the fuel cut-off system re-activation procedure, see the "Fuel cut-off system" paragraph, in the "In an
emergency" chapter.
56
KNOWING THE INSTRUMENT PANEL
Page 67 of 196
Low tyre pressure
The system warns the driver if one or
more tyres are flat by switching on
the
warning light on the instrument
panel.
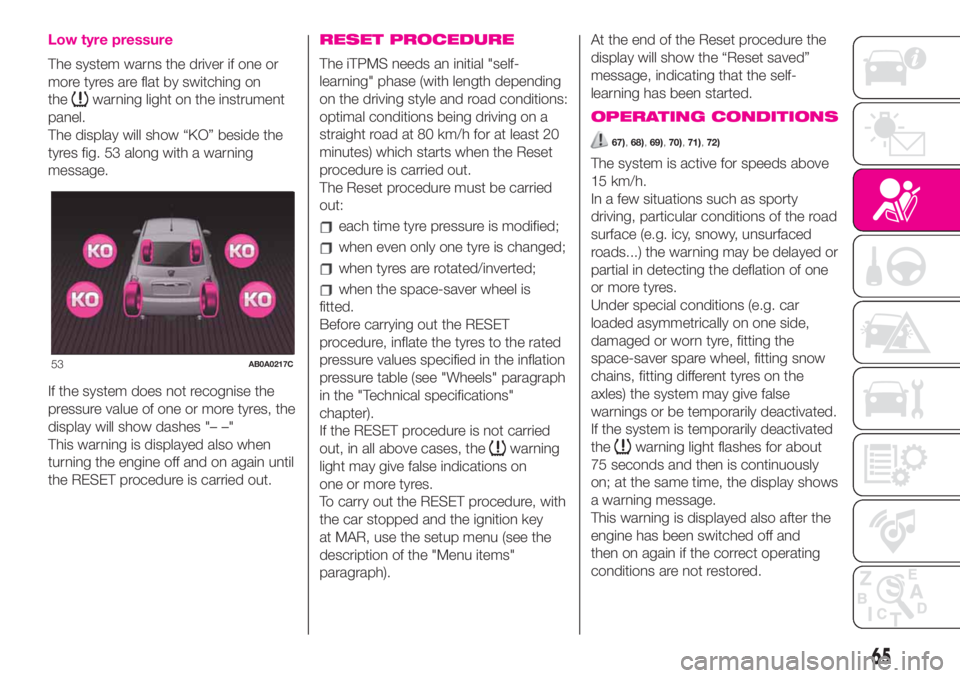
The display will show “KO” beside the
tyres fig. 53 along with a warning
message.
If the system does not recognise the
pressure value of one or more tyres, the
display will show dashes "– –"
This warning is displayed also when
turning the engine off and on again until
the RESET procedure is carried out.
RESET PROCEDURE
The iTPMS needs an initial "self-
learning" phase (with length depending
on the driving style and road conditions:
optimal conditions being driving on a
straight road at 80 km/h for at least 20
minutes) which starts when the Reset
procedure is carried out.
The Reset procedure must be carried
out:
each time tyre pressure is modified;
when even only one tyre is changed;
when tyres are rotated/inverted;
when the space-saver wheel is
fitted.
Before carrying out the RESET
procedure, inflate the tyres to the rated
pressure values specified in the inflation
pressure table (see "Wheels" paragraph
in the "Technical specifications"
chapter).
If the RESET procedure is not carried
out, in all above cases, the
warning
light may give false indications on
one or more tyres.
To carry out the RESET procedure, with
the car stopped and the ignition key
at MAR, use the setup menu (see the
description of the "Menu items"
paragraph).At the end of the Reset procedure the
display will show the “Reset saved”
message, indicating that the self-
learning has been started.
OPERATING CONDITIONS
67),68),69),70),71),72)
The system is active for speeds above
15 km/h.
In a few situations such as sporty
driving, particular conditions of the road
surface (e.g. icy, snowy, unsurfaced
roads...) the warning may be delayed or
partial in detecting the deflation of one
or more tyres.
Under special conditions (e.g. car
loaded asymmetrically on one side,
damaged or worn tyre, fitting the
space-saver spare wheel, fitting snow
chains, fitting different tyres on the
axles) the system may give false
warnings or be temporarily deactivated.
If the system is temporarily deactivated
the
warning light flashes for about
75 seconds and then is continuously
on; at the same time, the display shows
a warning message.
This warning is displayed also after the
engine has been switched off and
then on again if the correct operating
conditions are not restored.
53AB0A0217C
65
Page 68 of 196
In the case of abnormal signals, it is
recommended to perform the RESET
procedure. If the warnings reappear
once the RESET procedure has started,
check that the same type of tyre is
used on all four wheels and that the
tyres are not damaged; if the
space-saver spare wheel is being used,
refit a wheel with a tyre of normal
dimensions in place of the space-saver
wheel as soon as possible; if possible
remove the snow chains; make sure
that the load is distributed correctly and
repeat the RESET procedure, driving
on a clean and surfaced road. If the
warning persist, contact an Abarth
Dealership.
WARNING
67)If the system signals a pressure drop
on one or more tyres, it is recommended
to always check the pressure on all tyres.
68)The iTPMS does not relieve the driver
from the obligation to check the tyre
pressure every month; it is not to
be considered a system to replace
maintenance or a safety system.
69)Tyre pressure must be checked with
tyres cold. Should it become necessary for
whatever reason to check pressure with
warm tyres, do not reduce pressure even
though it is higher than the prescribed
value, but repeat the check when tyres are
cold.70)The iTPMS cannot indicate sudden
tyre pressure drops (for example when
a tyre bursts). In this case, stop the vehicle,
braking with caution and avoiding abrupt
steering.
71)The system only warns that the tyre
pressure is low: it is not able to inflate
them.
72)Insufficient tyre inflation increases fuel
consumption, reduces the tread duration
and may affect the capacity to drive safely.
OCCUPANT
PROTECTION
SYSTEMS
Some of the most important safety
equipment of the car comprise the
following protection systems:
seat belts;
SBR (Seat Belt Reminder) system;
head restraints;
child restraint systems;
Front airbags and side bags (where
present).
Read the information given the
following pages with the utmost care. It
is of fundamental importance that the
protection systems are used in the
correct way to guarantee the maximum
possible safety level for the driver and
the passengers.
For the description of the head restraint
adjustment see the "Head restraints"
paragraph in the "Knowing your car"
chapter.
66
SAFETY
Page 158 of 196
Switching the system
on/off
The system is switched on/off by
pressing the
(ON/OFF) button/knob.
Turn the button/knob clockwise to
increase the radio volume or
anticlockwise to decrease it.
Radio mode
After the desired radio station is
selected, the following information is
shown on the display:
At the top: the list of radio stations
stored (preset) is displayed; the station
currently playing is highlighted.
In the middle: display of the name of
the current radio station and the
buttons for selecting the previous or
next radio station.
At the bottom: display of the following
buttons:
“Browse”: list of the radio stations
available;
“AM/FM”, “AM/DAB”, “FM/DAB”:
selection of the desired frequency band
(button reconfigurable according to
the band selected: AM, FM or DAB);
“Tune”: manual radio station tuning
(not available for DAB radio)
“Info”: additional information on the
source being listened to;
“Audio”: access to the “Audio
Settings” screen.
Audio menu
The following adjustments can be
carried out using the “Audio” menu:
“Equaliser” (where provided);
“Balance/Fader” (left/right and
front/rear audio balance adjustment);
“Speed/Volume” (speed-dependent
automatic volume control);
“Loudness” (where provided);
“Auto-On Radio”;
“Radio Off Delay”.
To exit the “Audio” menu, press the
/
Done button.
Media mode
Audio source selection
Press the "Source" button to select the
desired audio source among those
available: AUX, USB orBluetooth®.
Applications used on portable devices
may be not compatible with the
Uconnect™system.
Track selection (Browse)
With Media mode active, briefly press
buttons
/to play the
previous/next track or keep buttons
/pressed to fast rewind/
forward the track.For languages not supported by the
system which feature special
characters (e.g. Greek), the keyboard is
not available. In these cases this
function will be limited.
Bluetooth® source
Pairing a Bluetooth® audio device
To pair aBluetooth® audio device,
proceed as follows:
activate theBluetooth® function on
the device;
press the MEDIA button on the front
panel;
if the “Media” source is active, press
the “Source” button;
select theBluetooth® Media
source;
press the “Add Device” button;
search forUconnect™on theBlu-
etooth® audio device (during the pair-
ing stage a screen is displayed showing
the progress of the operation);
when requested by the audio
device, enter the PIN code shown on
the system display or confirm on the
device the PIN displayed;
156
MULTIMEDIA
Page 172 of 196
Switching the system
on/off
The system is switched on/off by
pressing the
button/knob.
Turn the button/knob clockwise to
increase the radio volume or
anticlockwise to decrease it. The
electronic volume adjustment control
rotates continuously (360°) in both
directions, without stop positions.
Radio mode
After the desired radio station is
selected, the following information is
shown on the display:
At the top: the list of radio stations
stored (preset) is displayed; the station
currently playing is highlighted.
In the middle: display of the name of
the current radio station and the
buttons for selecting the previous or
next radio station.
On the left:display of the "AM", "FM”,
“DAB” buttons for selecting the desired
frequency band (reconfigurable button
depending on the selected band:
AM, FM or DAB);
On the right:display of the following
buttons:
“Info”: additional information on the
source being listened to;
“Map": navigation map view
(Uconnect™ 7" HD Nav LIVE
versions only).
At the bottom:display of the following
buttons:
“Browse": list of the radio stations
available;
/: select previous/next
radio station;
“Tune”: manual radio station tuning;
“Audio”: access to the “Audio
Settings” screen.
Audio menu
To access the "Audio" menu press the
"Audio" button located at the bottom of
the display.
The following adjustments can be
carried out using the “Audio” menu:
"Balance/Fader" (left/right and
front/rear audio balance adjustment);
“Equaliser” (where provided);
“Speed Adj Volume” (speed-
dependent automatic volume control);
“Loudness” (where provided);
"AUX volume compensation" (off in
radio mode, selectable only with AUX
source active);
“AutoPlay”;
“Auto-On Radio”.
Media mode
Press the "Media" button to select the
desired audio source among those
available: USB,Bluetooth®, AUX.
IMPORTANT NOTE Applications used
on portable devices may be not
compatible with theUconnect™
system
After Media mode is selected, the
following information is shown on the
display:
At the top:information on the track
being played and the following graphic
buttons:
“Repeat”: to repeat the track being
played;
“Shuffle”: to play the tracks in
random order.
In the middle:information on the track
being played.
On the left:display of the following
buttons:
Selected device or audio source;
“Select Source”: select the required
audio source.
On the right:display of the following
buttons:
“Info”: additional information on the
track being played;
“Tracks”: list of available tracks.
170
MULTIMEDIA
Page 174 of 196
After updating the phone software, for
proper operation, it is recommended to
remove the phone from the list of
devices linked to the radio, delete the
previous system pairing also from
the list ofBluetooth® devices on the
phone and make a new pairing.
USB SOURCE
To activate the USB mode, insert the
corresponding device into the USB port
on the central console.
If a USB device is inserted with the
system on, it will start playing the tracks
found on the device.
AUX SOURCE
To activate AUX mode, insert an
appropriate device in the AUX socket
on the car.
When a device is inserted using the
AUX output socket the system starts
reproducing the AUX source
connected, if it is already being played.
Adjust the volume using the
button/
knob on the front panel or using the
volume adjustment control on the
connected device.
The "AUX volume compensation"
function can be selected in Radio mode
only when the AUX source is active.IMPORTANT The functions of the
device connected with the AUX socket
are directly managed by the device
itself: it is not possible to change
track/folder/playlist or control playing
start/end/pause with the controls on
the front panel or on the steering wheel.
Do not leave the cable of your portable
player connected to the AUX socket
after disconnection, to avoid possible
hiss from the speakers.
TRIP COMPUTER
Press the "Trip" button on the display to
view the car's trip information.
This function is composed of the
“Instant info” items (“Range” and
“Current fuel consumption”) and the
two separate trips called “Trip A” and
“Trip B” for monitoring the vehicle's
"complete journey" in a reciprocally
independent manner.
Both functions can be reset (reset -
start of a new journey): to reset the
desired "Trip" hold down the "Trip A" or
"Trip B" buttons.
PHONE MODE
PHONE MODE ACTIVATION
Press the “Phone” button on the
display to activate the Phone mode.
NOTE To consult the list of mobile
phones and supported functions, visit
the www.driveuconnect.eu website.Use the buttons on the display to:
dial the phone number (using the
graphic keypad on the display);
display and call the contacts in the
mobile phone phonebook;
display and call contacts from the
registers of previous calls;
pair up to 10 phones/audio device
to make access and connection easier
and quicker;
transfer calls from the system to the
mobile phone and vice versa and
deactivate the microphone audio for
private conversations.
The mobile phone audio is transmitted
through the vehicle’s audio system;
the system automatically mutes the
radio when the Phone function is used.
PAIRING A MOBILE PHONE
IMPORTANT Only perform this
operation with the vehicle stationary
and in safe conditions; this function is
deactivated when the vehicle is moving.
The pairing procedure for a mobile
phone is described below: always
consult the handbook for the mobile
phone in any case.
To pair the mobile phone, proceed as
follows:
activate theBluetooth® function on
the mobile phone;
172
MULTIMEDIA