Acura MDX 2012 Owner's Manual
Manufacturer: ACURA, Model Year: 2012, Model line: MDX, Model: Acura MDX 2012Pages: 621, PDF Size: 11.15 MB
Page 141 of 621

Make any steering wheel adjustment
before you start driving.
Adjusting the steering wheel
position while driving may
cause you to lose control of the
vehicle and be seriously injured
in a crash.
Adjust the steering wheel only
when the vehicle is stopped.
Move the steering wheel in, out, up,
or down by pushing and holding the
adjustment switch in that direction.Release the switch when the steering
wheel reaches the desired position.
Make sure the steering wheel points
towards your chest, not toward your
face, and that you can see the
instrument panel gauges and
indicators.
ADJUSTMENT SWITCH
Steering Wheel Adjustments134
Page 142 of 621

When you remove the key from the
ignition switch, the steering wheel
automatically moves fully in and up.
To change the‘‘AUTO TILT &
TELESCOPE STEERING WHEEL’’
setting, see page 109.
The steering wheel then returns to
its original position when you insert
the key back in the ignition switch.
Steering wheel movement is also
controlled by the driving position
memory system (see page 168).If your vehicle's battery is
disconnected or goes dead, or the
fuse for the power tilt and telescopic
steering wheel is removed, the
power tilt and telescopic steering
wheel system needs to be reset when
you reconnect the battery or install
the fuse.
Insert the key into the ignition
switch, and remove it. The steering
wheel automatically moves fully in
and up to let you know the system is
reset.
Steering Wheel Adjustments
135
Instruments and Controls
Page 143 of 621

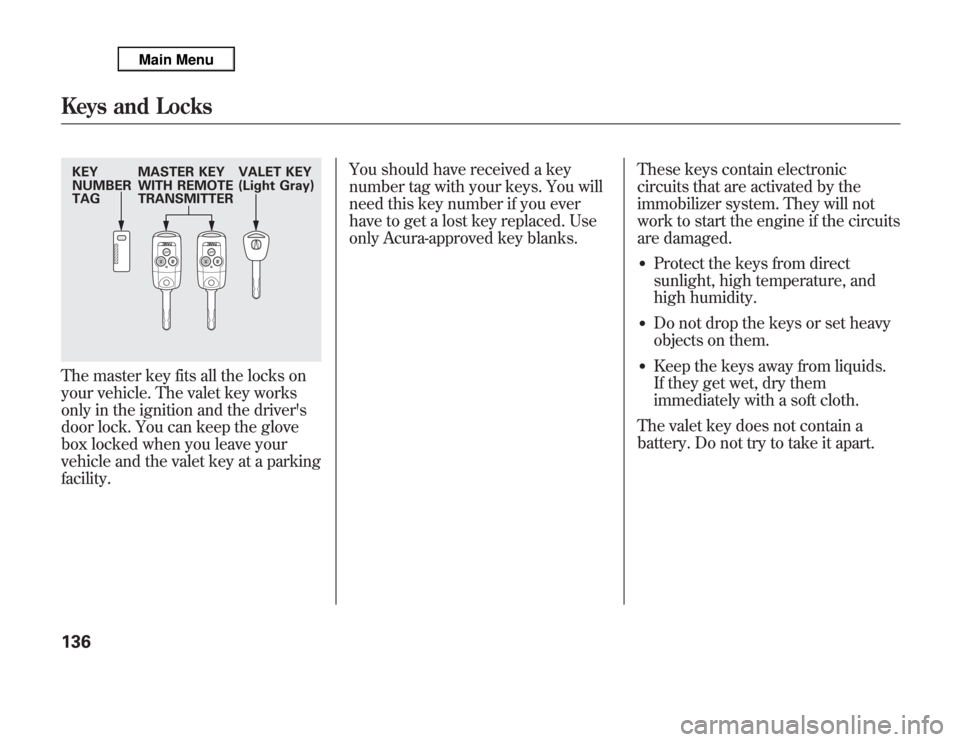
The master key fits all the locks on
your vehicle. The valet key works
only in the ignition and the driver's
door lock. You can keep the glove
box locked when you leave your
vehicle and the valet key at a parking
facility.You should have received a key
number tag with your keys. You will
need this key number if you ever
have to get a lost key replaced. Use
only Acura-approved key blanks.These keys contain electronic
circuits that are activated by the
immobilizer system. They will not
work to start the engine if the circuits
are damaged.
●
Protect the keys from direct
sunlight, high temperature, and
high humidity.
●
Do not drop the keys or set heavy
objects on them.
●
Keep the keys away from liquids.
If they get wet, dry them
immediately with a soft cloth.
The valet key does not contain a
battery. Do not try to take it apart.
KEY
NUMBER
TAGMASTER KEY
WITH REMOTE
TRANSMITTERVALET KEY
(Light Gray)Keys and Locks136
Page 144 of 621

Retractable Master KeyThe master key can be retracted into
the remote transmitter. To use the
key, push the release button to
release the key from the transmitter.
The key should be fully extended. To
retract the key, push the release
button and at the same time push the
key into the remote transmitter until
it is securely latched.Always use the fully-extended key
when you insert it to the ignition
switch. If the key does not fully
extend, the immobilizer system may
not operate properly and may
prevent the engine from starting.The key may come in contact with
your finger while being retracted or
extended. Make sure your fingers do
not touch the pivot of the key when
retracting or extending the key.
RELEASE BUTTON
Push
Keys and Locks
137
Instruments and Controls
Page 145 of 621

The Immobilizer System protects
your vehicle from theft. If an
improperly coded key (or other
device) is used, the engine's fuel
system is disabled.
When you turn the ignition switch to
the ON (II) position, the immobilizer
system indicator should come on
briefly, then go off. If the indicator
starts to blink, it means the system
does not recognize the coding of the
key. Turn the ignition switch to the
LOCK (0) position, remove the key,
reinsert it, and turn the ignition
switch to the ON (II) position again.
The system may not recognize your
key's coding if another immobilizer
key or other metal object (i.e. key
chain) is near the ignition switch
when you insert the key.If the system repeatedly does not
recognize the coding of your key,
contact your dealer.
Do not attempt to alter this system or
add other devices to it. Electrical
problems could result that may make
your vehicle inoperable.
If you have lost your key and you
cannot start the engine, contact your
dealer.
Always take the ignition key with you
whenever you leave the vehicle alone.
As required by the FCC:
This device complies with Part 15 of the
FCC rules. Operation is subject to the
following two conditions: (1) This device
may not cause harmful interference, and
(2) this device must accept any
interference received, including
interference that may cause undesired
operation.
Changes or modifications not expressly
approved by the party responsible for
compliance could void the user's
authority to operate the equipment.
This device complies with Industry
Canada Standard RSS-210.
Operation is subject to the following two
conditions: (1) this device may not cause
interference, and (2) this device must
accept any interference that may cause
undesired operation of the device.
Immobilizer System138
Page 146 of 621

The ignition switch has four positions:
LOCK (0), ACCESSORY (I), ON (II),
and START (III).
LOCK (0)-You can insert or remove
the key only in this position. To turn
the key to the LOCK (0) position, the
shift lever must be in Park, and you
must push the key in slightly.
If the front wheels are turned, the anti-
theft lock may make it difficult to turn
the key. Firmly turn the steering wheel
to the left or right as you turn the key.
ACCESSORY (I)-You can operate
the audio system and the accessory
power sockets in this position.
ON (II)-This is the normal key
position when driving. Several of the
indicators on the instrument panel
come on as a test when you turn the
ignition switch from the
ACCESSORY (I) to the ON (II)
position.
START (III)-Use this position
only to start the engine. The switch
returns to the ON (II) position when
you let go of the key.You will hear a reminder beeper if
you leave the key in the ignition
switch in the LOCK (0) or the
ACCESSORY (I) position and open
the driver's door. Remove the key to
turn off the beeper.
The shift lever must be in Park
before you can remove the key from
the ignition switch.
Ignition Switch
139
Instruments and Controls
Page 147 of 621

To lock all doors and the tailgate,
press the bottom of the master door
lock switch on either front door, pull
the lock tab above the driver's door
handle, or use the key on the outside
lock on the driver's door.
Pressing the top of either master
door lock switch will unlock all doors
and the tailgate.
The lock tab on any passenger's door
locks and unlocks that door.
All doors and the tailgate can be
locked from the outside by using the
key in the driver's door lock. To
unlock only the driver's door, insert
the key, turn the key, and release it.
The remaining doors and the tailgate
unlock when you turn the key a
second time within a few seconds.To change the‘‘KEY AND REMOTE
UNLOCK MODE’’setting, see page
119.
When the vehicle speed reaches
about 10 mph (about 16 km/h) or
more, all the doors lock
automatically.
To change the‘‘AUTO DOOR
LOCK’’setting, see page 116.
When you shift to P after driving, the
driver's door unlocks.
To change the‘‘AUTO DOOR
UNLOCK’’setting, see page 117.
UNLOCK
LOCK
LOCK
UNLOCK
Door Locks140
Page 148 of 621

Lockout PreventionWith any door and the tailgate open
and the key in the ignition, both
master door lock switches are
disabled. They are not disabled if all
the doors and the tailgate are closed.
If you try to lock an open driver's
door by pulling the lock tab rearward
the lock tab on the driver's door pops
out.Childproof Door Locks
The childproof door locks are
designed to prevent children seated
in the rear from accidentally opening
the rear doors. Each rear door has a
lock lever near the edge. With the
lever in the LOCK position (lever is
down), the door cannot be opened
from the inside regardless of the
position of the lock tab. To open the
door, push the lock tab forward and
use the outside door handle.Tailgate
To open the tailgate, push up inside
the handle, then lift up. To close the
tailgate, use the inner handle to pull
it down, then press down on the back
edge.
Keep the tailgate closed at all times
while driving to avoid damaging the
tailgate and to prevent exhaust gas
from getting into the interior. See
Carbon Monoxide Hazardon page
61.
LOCK
Door Locks, Tailgate
141
Instruments and Controls
Page 149 of 621

Power TailgateThe tailgate can be opened and closed
with the remote transmitter (see page
145) or the button in the driver's door
pocket when both front doors are
unlocked.
Press and hold the tailgate button on the
remote transmitter or the button for
about 1 second to open or close the
tailgate. Each time you press the button
on the remote transmitter or the button,
you will hear a beep, and some front and
rear lights will flash.
If you push the same button again
while the tailgate is opening or
closing, you will hear three beeps,
and the tailgate will stop moving,
reverse direction, and stop at the
fully opened or closed position.
The tailgate can also be closed by
pressing the button on the tailgate. If
you press the button again while the
tailgate is closing, you will hear three
beeps, and the tailgate will stop
moving, reverse direction, and stop
at the fully opened position.
POWER TAILGATE BUTTON
TAILGATE BUTTON
Tailgate142
Page 150 of 621

Auto-ReverseThe power tailgate has an auto-
reverse feature. If it meets resistance
while opening or closing, it will beep
three times and reverse direction.
However, the tailgate may not
reverse immediately. Always make
sure passengers and objects are clear
of the tailgate before opening or
closing it.
Closing a power tailgate while
anyone is in the path of the
tailgate can cause serious
injury.
Make sure everyone is clear
before closing the power
tailgate.Also check that passengers,
especially children, do not have their
hands on the edge of the tailgate or
on the tailgate sill. The auto reverse
feature stops working when the
tailgate is about to latch so the motor
can pull the tailgate shut.
If your vehicle's battery is
disconnected, goes dead, or the fuse
is removed while the tailgate is fully
open, the power tailgate needs to be
reset. After connecting the battery or
installing the fuse, close the tailgate
fully by hand.
The power tailgate may not open or
close under the these conditions:
●
The vehicle is parked on a steep
hill.
●
When the vehicle is swayed in a
strong wind.
●
When the tailgate or the roof is
covered with snow or ice.
Do not install any accessories on the
tailgate. It may cause the tailgate to
malfunction. If there is snow or ice
on the tailgate, make sure to remove
it before you operate the tailgate.
If you push the tailgate release
button inside the handle while the
tailgate is opening or closing, it will
stop moving. You need to open or
close it the rest of the way manually.
The tailgate has sensors on both
sides. Be careful not to damage
them. If the sensors are damaged,
the power tailgate does not function
properly.
CONTINUEDTailgate
143
Instruments and Controls