back up Acura MDX 2015 Service Manual
[x] Cancel search | Manufacturer: ACURA, Model Year: 2015, Model line: MDX, Model: Acura MDX 2015Pages: 505, PDF Size: 18.62 MB
Page 167 of 505
166
uuAdjusting the Seats uAdjusting the Seat Positions
Controls
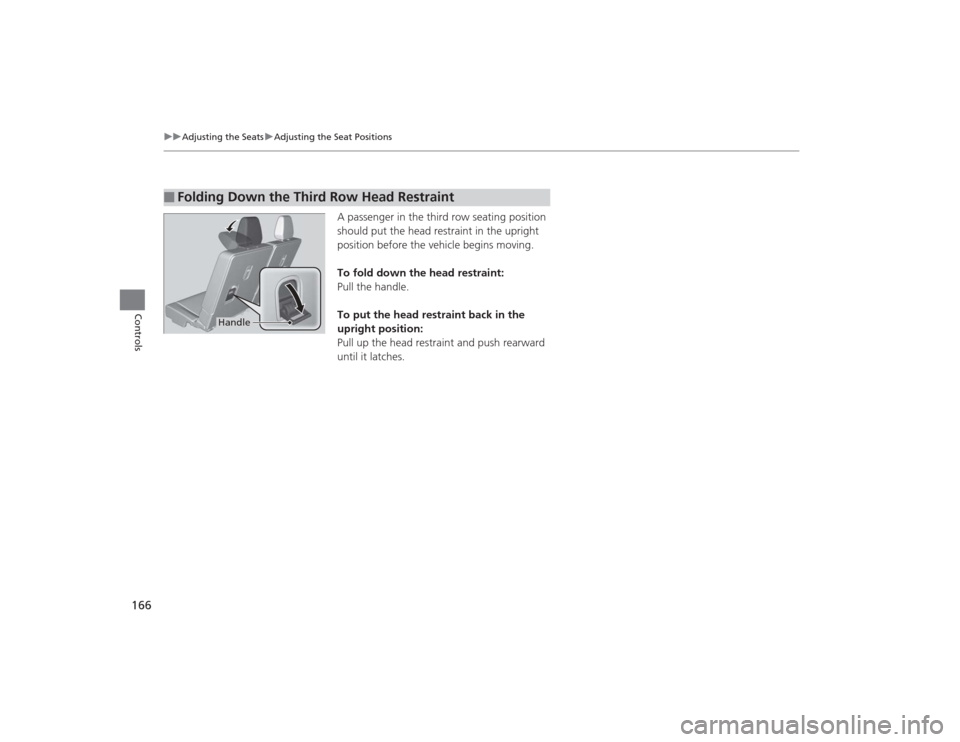
A passenger in the third row seating position
should put the head restraint in the upright
position before the vehicle begins moving.
To fold down the head restraint:
Pull the handle.
To put the head restraint back in the
upright position:
Pull up the head restraint and push rearward
until it latches.
■
Folding Down the Third Row Head Restraint
Handle
Page 168 of 505

167
uuAdjusting the Seats uAdjusting the Seat Positions
Controls
After all occupants have adjusted their seats and head restraints, and put on their
seat belts, it is very important that they continue to sit upright, well back in their
seats, with their feet on the floor until the vehicle is safely parked and the engine is
off.
Sitting improperly can increase the chance of injury during a crash. For example, if
an occupant slouches, lies down, turns sideways, sits forward, leans forward or
sideways, or puts one or both feet up, the chance of injury during a crash is greatly
increased.
In addition, an occupant who is out of position in the front seat can be seriously or
fatally injured in a crash by striking interior parts of the vehicle or being struck by an
inflating front airbag.■
Maintain a Proper Sitting Position
1Maintain a Proper Sitting Position
3
WARNING
Sitting improperly or out of position can
result in serious injury or death in a crash.
Always sit upright, well back in the seat,
with your feet on the floor.
Page 169 of 505

168
uuAdjusting the Seats uRear Seats
Controls
Rear Seats
Pressing the button on the seat-back, or seat
cushion tilts the second row outer seat's seat-
back forward.
u The whole seat slides forward.
Pulling up on the strap also tilts the seat-back
forward.
■
Third Row Seat Access
1 Third Row Seat Access
The button is disabled when the vehicle is moving.
When you enter the third row seat, be careful not to
trip over the second row seat belt.
Strap
Page 170 of 505

Continued
169
uuAdjusting the Seats uRear Seats
Controls
Separately fold down the left and right halves of the second row seat to make room
for cargo.
1. Store the center seat belt first. Insert the latch plate into the slot on the side of the
anchor buckle.
2. Retract the seat belt into the holder on the ceiling.
2 Seat Belt with Detachable Anchor P. 36
3.Lower the center head restraint to its lowest position. Put the armrest back into
the seat-back.
4.Pull up on the seat-back angle adjustment
lever.
To return the seat to the original position, pull
up the seat-back in the upright position.■
Folding Down the Second Row Seat
1 Folding Down the Second Row Seat
Make sure that the folded seat-back does not press
against the front passenger seat, as this can cause the
weight sensors in the front passenger seat to work
improperly.
2 Passenger Airbag Off Indicator P. 52
The front seats must be far enough forward so they
do not interfere with the second row seats as they
fold down.
To lock the seat-back upright, push it backwards until
it locks.
Make sure the seat-back, head restraints and seat
cushion are securely latched back into place before
driving. Also, make sure all rear shoulder belts are
positioned in front of the seat-back, and the center
shoulder belt is re-positioned in the holding slot.
Lever
Page 171 of 505
uuAdjusting the Seats uRear Seats
170Controls
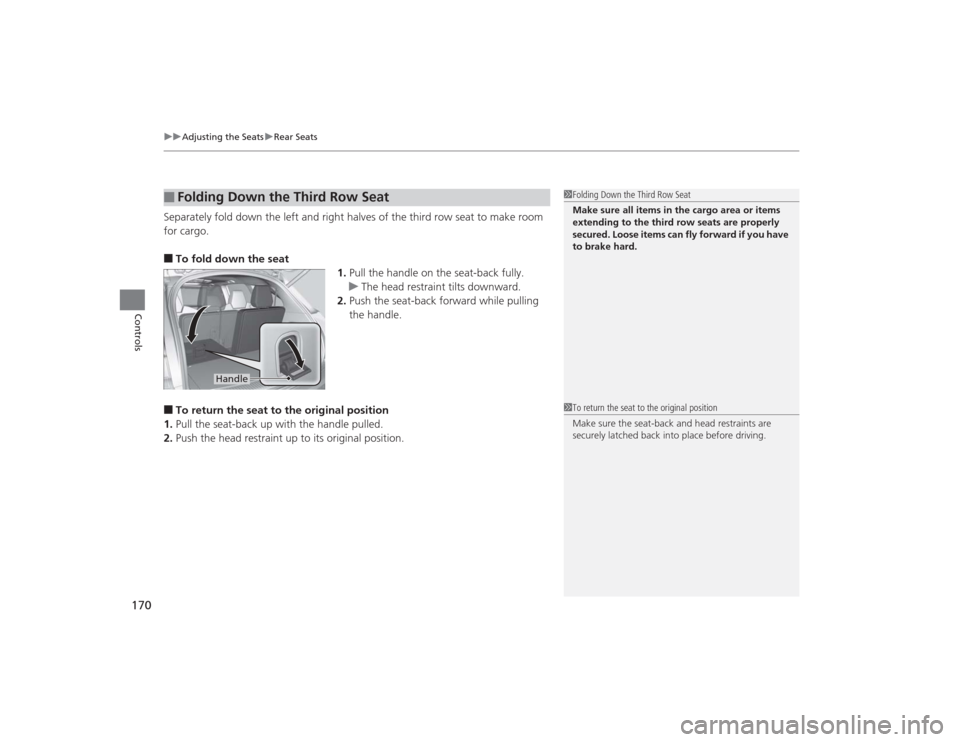
Separately fold down the left and right halves of the third row seat to make room
for cargo.■To fold down the seat
1.Pull the handle on the seat-back fully.
u The head restraint tilts downward.
2. Push the seat-back forward while pulling
the handle.■To return the seat to the original position
1. Pull the seat-back up with the handle pulled.
2. Push the head restraint up to its original position.■
Folding Down the Third Row Seat
1Folding Down the Third Row Seat
Make sure all items in the cargo area or items
extending to the third row seats are properly
secured. Loose items can fly forward if you have
to brake hard.
Handle
1To return the seat to the original position
Make sure the seat-back and head restraints are
securely latched back into place before driving.
Page 172 of 505

171
uuAdjusting the Seats uArmrest
Controls
Armrest
The console lid can be used as an armrest.
To adjust:
Slide the armrest to a desired position.
Pull down the armrest in the center seat-back.
■
Using the Front Seat Armrest
■
Using the Rear Seat Armrest
Page 194 of 505
193
uuClimate Control System uRear Climate Control System
Continued
Controls
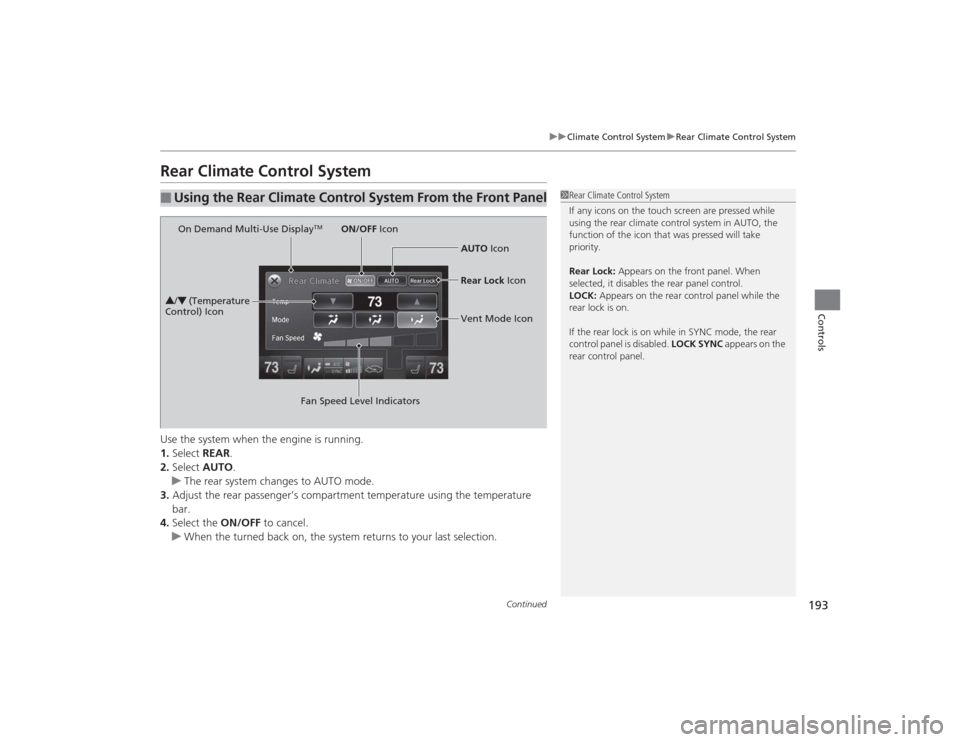
Rear Climate Control SystemUse the system when the engine is running.
1. Select REAR.
2. Select AUTO.
u The rear system changes to AUTO mode.
3. Adjust the rear passenger’s compartment temperature using the temperature
bar.
4. Select the ON/OFF to cancel.
u When the turned back on, the system returns to your last selection.■
Using the Rear Climate Control System From the Front Panel
1Rear Climate Control System
If any icons on the touch screen are pressed while
using the rear climate control system in AUTO, the
function of the icon that was pressed will take
priority.
Rear Lock: Appears on the front panel. When
selected, it disables the rear panel control.
LOCK: Appears on the rear control panel while the
rear lock is on.
If the rear lock is on while in SYNC mode, the rear
control panel is disabled. LOCK SYNC appears on the
rear control panel.
On Demand Multi-Use Display
TM
3 /4 (Temperature
Control) Icon
Fan Speed Level IndicatorsON/OFF
Icon
AUTO Icon
Rear Lock Icon
Vent Mode Icon
Page 202 of 505
201
uuAudio System uUSB Port
Features
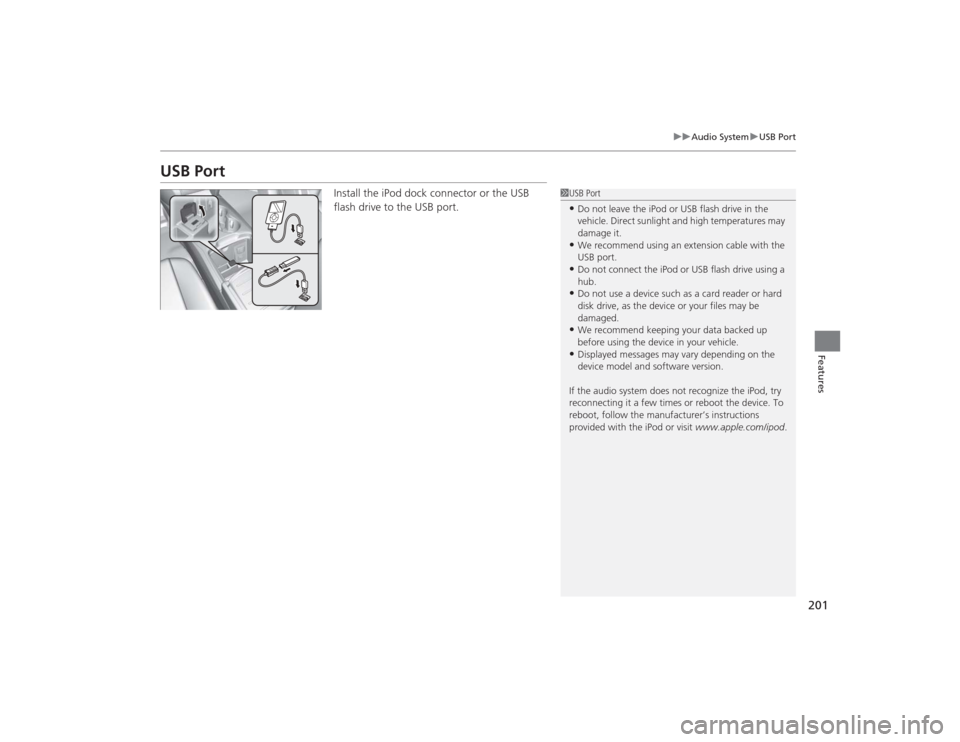
USB Port
Install the iPod dock connector or the USB
flash drive to the USB port.
1USB Port•Do not leave the iPod or USB flash drive in the
vehicle. Direct sunlight and high temperatures may
damage it.•We recommend using an extension cable with the
USB port.•Do not connect the iPod or USB flash drive using a
hub.•Do not use a device such as a card reader or hard
disk drive, as the device or your files may be
damaged.•We recommend keeping your data backed up
before using the device in your vehicle.•Displayed messages may vary depending on the
device model and software version.
If the audio system does not recognize the iPod, try
reconnecting it a few times or reboot the device. To
reboot, follow the manufacturer’s instructions
provided with the iPod or visit www.apple.com/ipod.
Page 205 of 505
204
uuAudio System uAudio Remote Controls
Features
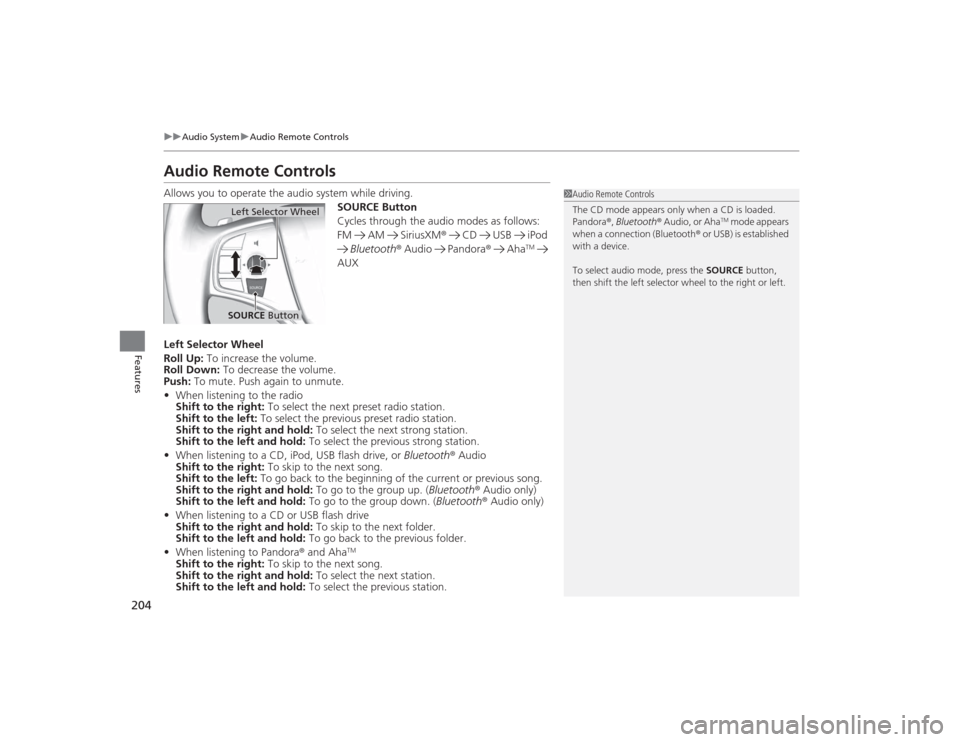
Audio Remote ControlsAllows you to operate the audio system while driving.
SOURCE Button
Cycles through the audio modes as follows:
FM AM SiriusXM® CD USB iPod
Bluetooth ® Audio Pandora ® Aha
TM
AUX
Left Selector Wheel
Roll Up: To increase the volume.
Roll Down: To decrease the volume.
Push: To mute. Push again to unmute.
• When listening to the radio
Shift to the right: To select the next preset radio station.
Shift to the left: To select the previous preset radio station.
Shift to the right and hold: To select the next strong station.
Shift to the left and hold: To select the previous strong station.
• When listening to a CD, iPod, USB flash drive, or Bluetooth® Audio
Shift to the right: To skip to the next song.
Shift to the left: To go back to the beginning of the current or previous song.
Shift to the right and hold: To go to the group up. (Bluetooth ® Audio only)
Shift to the left and hold: To go to the group down. (Bluetooth® Audio only)
• When listening to a CD or USB flash drive
Shift to the right and hold: To skip to the next folder.
Shift to the left and hold: To go back to the previous folder.
• When listening to Pandora ® and Aha
TM
Shift to the right: To skip to the next song.
Shift to the right and hold: To select the next station.
Shift to the left and hold: To select the previous station.
1Audio Remote Controls
The CD mode appears only when a CD is loaded.
Pandora ®, Bluetooth ® Audio, or Aha
TM mode appears
when a connection (Bluetooth ® or USB) is established
with a device.
To select audio mode, press the SOURCE button,
then shift the left selector wheel to the right or left.
Left Selector WheelSOURCE Button
Page 206 of 505
205Features
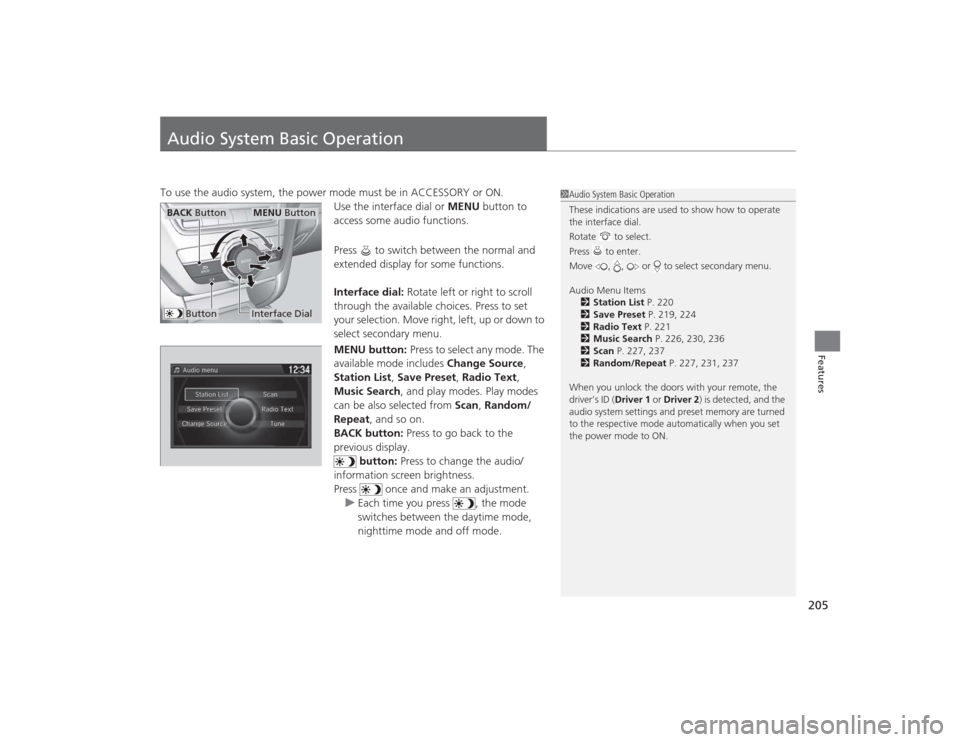
Audio System Basic OperationTo use the audio system, the power mode must be in ACCESSORY or ON.Use the interface dial or MENU button to
access some audio functions.
Press to switch between the normal and
extended display for some functions.
Interface dial: Rotate left or right to scroll
through the available choices. Press to set
your selection. Move right, left, up or down to
select secondary menu.
MENU button: Press to select any mode. The
available mode includes Change Source,
Station List , Save Preset , Radio Text,
Music Search , and play modes. Play modes
can be also selected from Scan, Random/
Repeat , and so on.
BACK button: Press to go back to the
previous display.
button: Press to change the audio/
information screen brightness.
Press once and make an adjustment. u Each time you press , the mode
switches between the daytime mode,
nighttime mode and off mode.
1Audio System Basic Operation
These indications are used to show how to operate
the interface dial.
Rotate to select.
Press to enter.
Move , , or to select secondary menu.
Audio Menu Items
2 Station List P. 220
2 Save Preset P. 219, 224
2 Radio Text P. 221
2 Music Search P. 226, 230, 236
2 Scan P. 227, 237
2 Random/Repeat P. 227, 231, 237
When you unlock the doors with your remote, the
driver’s ID ( Driver 1 or Driver 2) is detected, and the
audio system settings and preset memory are turned
to the respective mode au tomatically when you set
the power mode to ON.
Interface DialMENU Button
BACK Button
Button