Acura MDX 2017 Navigation Manual
Manufacturer: ACURA, Model Year: 2017, Model line: MDX, Model: Acura MDX 2017Pages: 369, PDF Size: 29.59 MB
Page 11 of 369
10
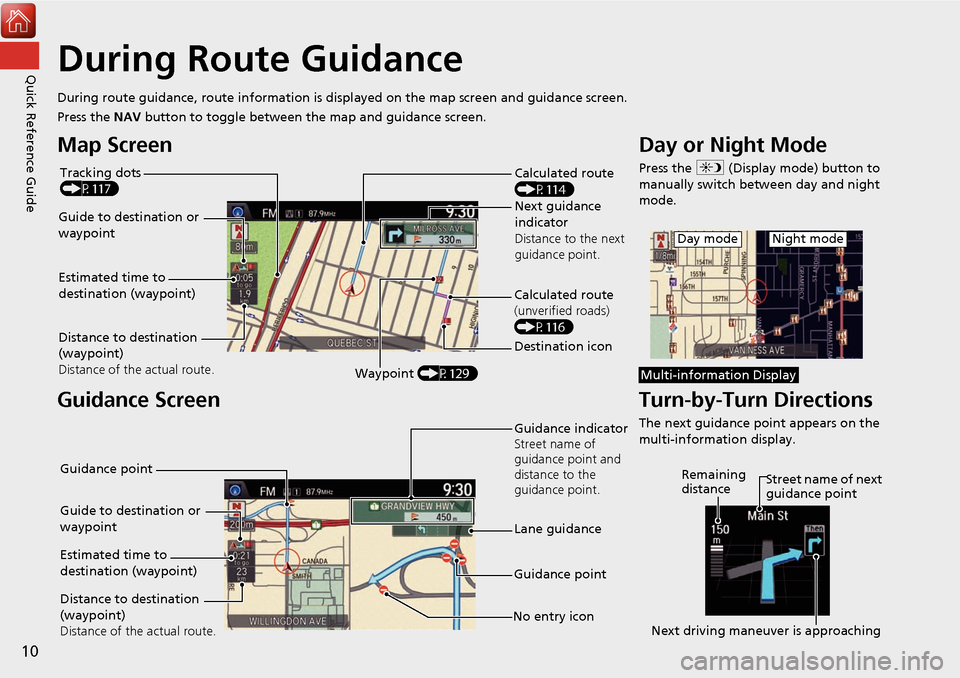
Quick Reference GuideDuring Route Guidance
During route guidance, route information is displayed on the map screen and guidance screen.
Press the NAV button to toggle between the map and guidance screen.
Map Screen
Guidance Screen
Calculated route
(P114)
Guide to destination or
waypoint Next guidance
indicator
Distance to the next
guidance point.
Distance to destination
(waypoint)
Distance of the actual route. Estimated time to
destination (waypoint)
Waypoint (P129) Destination icon Calculated route
(unverified roads)
(P116)
Tracking dots
(P117)
Guidance indicator
Street name of
guidance point and
distance to the
guidance point.
Lane guidance
No entry icon
Guide to destination or
waypoint
Distance to destination
(waypoint)
Distance of the actual route. Estimated time to
destination (waypoint)
Guidance point
Guidance point
Day or Night Mode
Press the
a (Display mode) button to
manually switch between day and night
mode.
Turn-by-Turn Directions
The next guidance point appears on the
multi-information display.
Night modeDay mode
Multi-information Display
Street name of next
guidance point
Remaining
distance
Next driving maneuver is approaching
Page 12 of 369
11
Quick Reference GuideNavigation—Home Addresses and Going Home
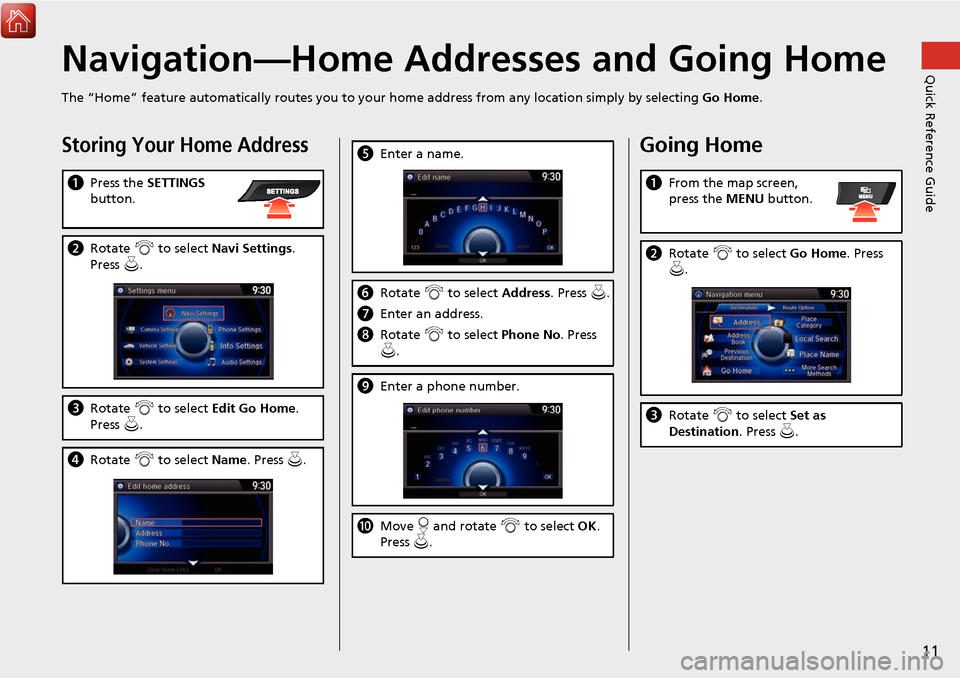
The “Home” feature automatically routes you to your home address from any location simply by selecting Go Home.
Storing Your Home Address
aPress the SETTINGS
button.
b Rotate i to select Navi Settings .
Press u.
c Rotate i to select Edit Go Home.
Press u.
d Rotate i to select Name. Press u .
eEnter a name.
fRotate i to select Address. Press u.
g Enter an address.
h Rotate i to select Phone No . Press
u .
i Enter a phone number.
jMove r and rotate i to select OK .
Press u.
Going Home
a From the map screen,
press the MENU button.
bRotate i to select Go Home . Press
u .
c Rotate i to select Set as
Destination . Press u.
Page 13 of 369
12
Quick Reference GuideNavigation—Entering a Destination
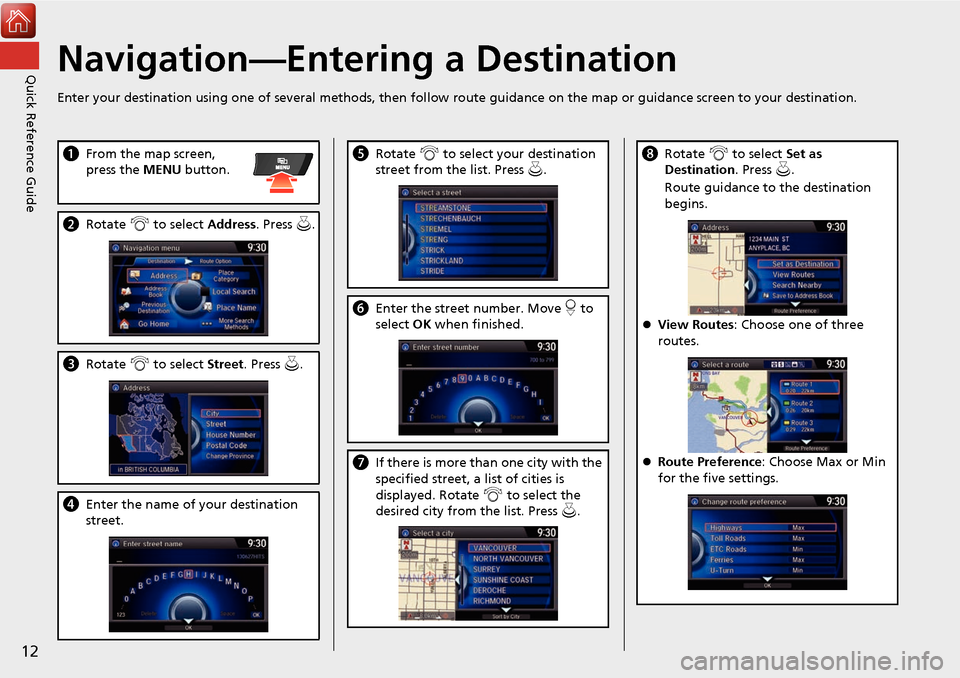
Enter your destination using one of several methods, then follow route guidance on the map or guidance screen to your destination.
aFrom the map screen,
press the MENU button.
bRotate i to select Address. Press u.
c Rotate i to select Street . Press u.
dEnter the name of your destination
street.
e Rotate i to select your destination
street from the list. Press u.
f Enter the street number. Move r to
select OK when finished.
g If there is more than one city with the
specified street, a list of cities is
displayed. Rotate i to select the
desired city from the list. Press u.
h Rotate i to select Set as
Destination . Press u.
Route guidance to the destination
begins.
View Routes : Choose one of three
routes.
Route Preference: Choose Max or Min
for the five settings.
Page 14 of 369
13
Quick Reference GuideNavigation—Changing Route or Destination
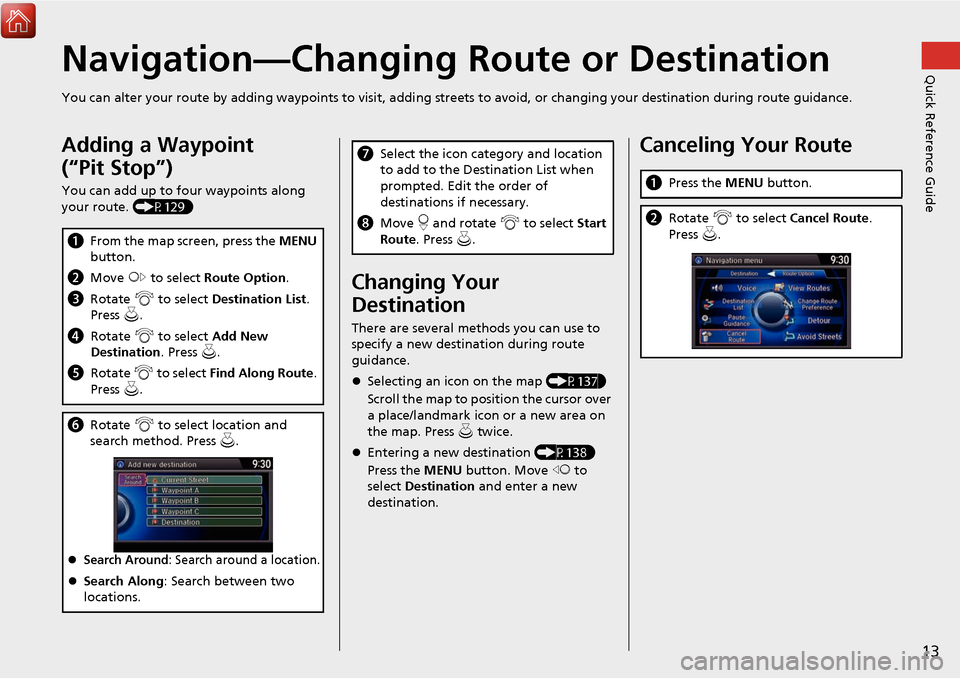
You can alter your route by adding waypoints to visit, adding streets to avoid, or changing your destination during route guida nce.
Adding a Waypoint
(“Pit Stop”)
You can add up to four waypoints along
your route. (P129)
aFrom the map screen, press the MENU
button.
b Move y to select Route Option .
c Rotate i to select Destination List .
Press u.
d Rotate i to select Add New
Destination . Press u.
e Rotate i to select Find Along Route .
Press u.
f Rotate i to select location and
search method. Press u .
Search Around: Search around a location.
Search Along : Search between two
locations.
Changing Your
Destination
There are several methods you can use to
specify a new destination during route
guidance.
Selecting an icon on the map (P137)
Scroll the map to position the cursor over
a place/landmark icon or a new area on
the map. Press u twice.
Entering a new destination (P138)
Press the MENU button. Move w to
select Destination and enter a new
destination.
g Select the icon category and location
to add to the Destination List when
prompted. Edit the order of
destinations if necessary.
h Move r and rotate i to select Start
Route . Press u .Canceling Your Route
aPress the MENU button.
bRotate i to select Cancel Route.
Press u.
Page 15 of 369
14
Quick Reference GuideAcuraLink®
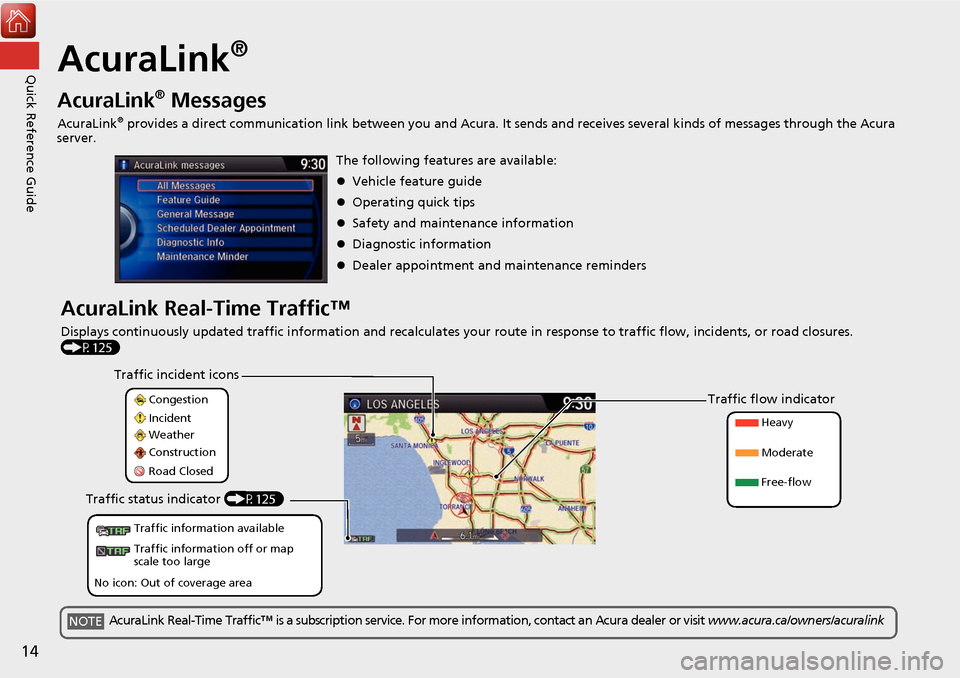
AcuraLink® Messages
AcuraLink® provides a direct communication link between you and Acura. It sends and receives several kinds of messages through the Acura
server.
AcuraLink Real-Time Traffic™
Displays continuously updated traffic information and recalculates your route in response to traffic flow, incidents, or road closures.
(P125) The following features are available:
Vehicle feature guide
Operating quick tips
Safety and maintenance information
Diagnostic information
Dealer appointment and maintenance reminders
Congestion
Incident
Weather
Construction
Road Closed Heavy
Moderate
Free-flow
Traffic incident icons
Traffic flow indicator
Traffic status indicator (P125)
Traffic information available
Traffic information off or map
scale too large
No icon: Out of coverage area
AcuraLink Real-Time Traffic™ is a subscription service. For more information, contact an Acura dealer or visit www.acura.ca/owners/acuralinkNOTE
Page 16 of 369
15
Quick Reference GuideRear Entertainment System (P277)
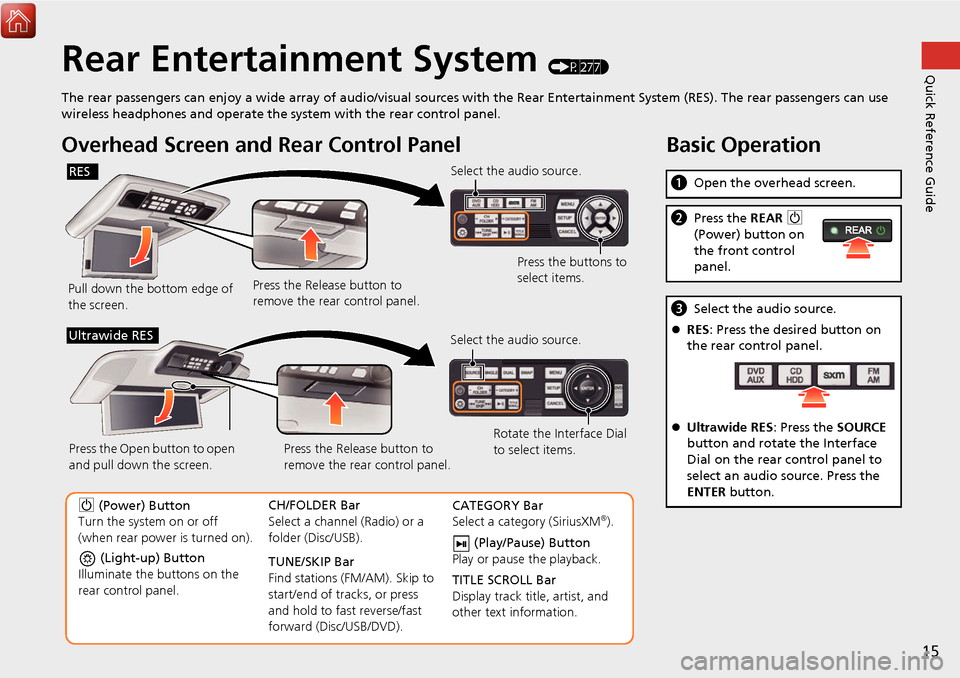
The rear passengers can enjoy a wide array of audio/visual sources with the Rear Entertainment System (RES). The rear passengers can use
wireless headphones and operate the system with the rear control panel.
Overhead Screen and Rear Control Panel
Pull down the bottom edge of
the screen. Select the audio source.
Press the buttons to
select items.
Press the Release button to
remove the rear control panel.
RES
(Light-up) Button
Illuminate the buttons on the
rear control panel.
9 (Power) Button
Turn the system on or off
(when rear power is turned on). CH/FOLDER Bar
Select a channel (Radio) or a
folder (Disc/USB).
TUNE/SKIP Bar
Find stations (FM/AM). Skip to
start/end of tracks, or press
and hold to fast reverse/fast
forward (Disc/USB/DVD).CATEGORY Bar
Select a category (SiriusXM®).
(Play/Pause) Button
Play or pause the playback.
TITLE SCROLL Bar
Display track title, artist, and
other text information.
Select the audio source.
Rotate the Interface Dial
to select items.
Press the Release button to
remove the rear control panel.
Press the Open button to open
and pull down the screen.
Ultrawide RES
Basic Operation
a
Open the overhead screen.
bPress the REAR 9
(Power) button on
the front control
panel.
c Select the audio source.
RES : Press the desired button on
the rear control panel.
Ultrawide RES : Press the SOURCE
button and rotate the Interface
Dial on the rear control panel to
select an audio source. Press the
ENTER button.
Page 17 of 369
16
Quick Reference GuideVoice Help
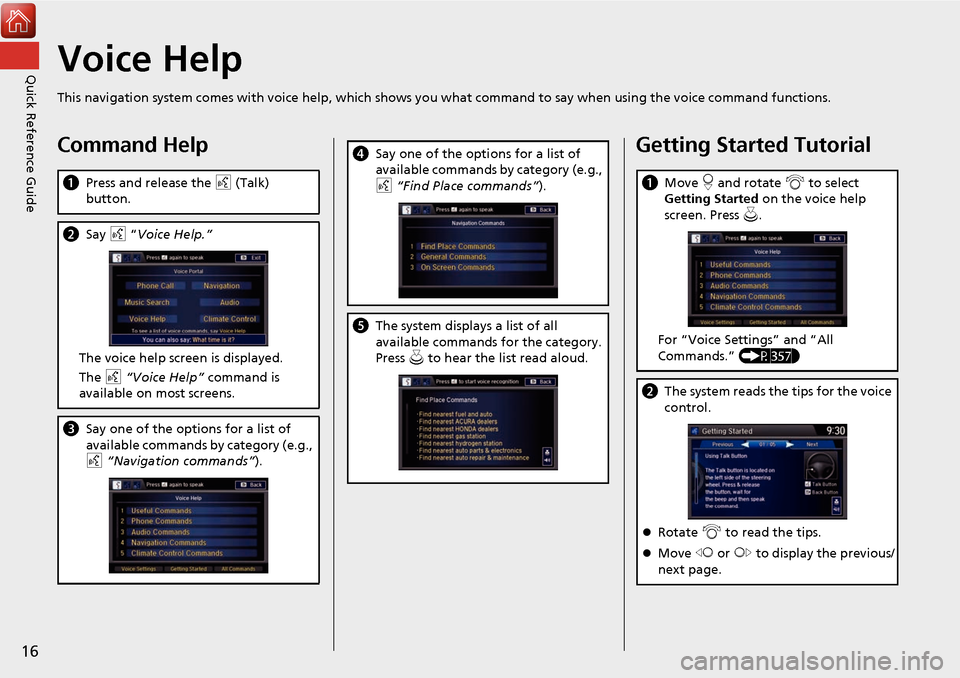
This navigation system comes with voice help, which shows you what command to say when using the voice command functions.
Command Help
aPress and release the d (Talk)
button.
b Say d “Voice Help.”
The voice help screen is displayed.
The d “Voice Help” command is
available on most screens.
c Say one of the options for a list of
available commands by category (e.g.,
d “Navigation commands” ).
dSay one of the options for a list of
available commands by category (e.g.,
d “Find Place commands” ).
eThe system displays a list of all
available commands for the category.
Press u to hear the list read aloud.
Getting Started Tutorial
a Move r and rotate i to select
Getting Started on the voice help
screen. Press u .
For “Voice Settings” and “All
Commands.” (P357)
bThe system reads the tips for the voice
control.
Rotate i to read the tips.
Move w or y to display the previous/
next page.
Page 18 of 369
17
Quick Reference GuideTroubleshootingFor more Information (P329)
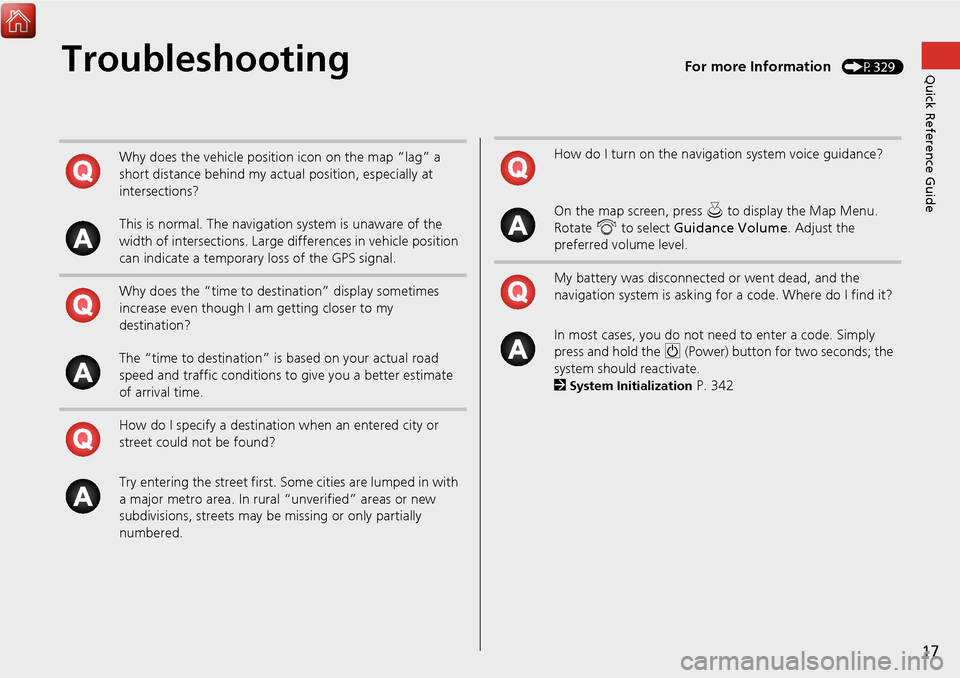
Why does the vehicle position icon on the map “lag” a
short distance behind my actual position, especially at
intersections?
This is normal. The navigation system is unaware of the
width of intersections. Large differences in vehicle position
can indicate a temporary loss of the GPS signal.
Why does the “time to destination” display sometimes
increase even though I am getting closer to my
destination?
The “time to destination” is based on your actual road
speed and traffic conditions to give you a better estimate
of arrival time.
How do I specify a destination when an entered city or
street could not be found?
Try entering the street first. So me cities are lumped in with
a major metro area. In rural “unverified” areas or new
subdivisions, streets may be missing or only partially
numbered.How do I turn on the navigation system voice guidance?
On the map screen, press u to display the Map Menu.
Rotate i to select Guidance Volume . Adjust the
preferred volume level.
My battery was disconnected or went dead, and the
navigation system is asking for a code. Where do I find it?
In most cases, you do not need to enter a code. Simply
press and hold the 9 (Power) button for two seconds; the
system should reactivate.
2
System Initialization P. 342
Page 19 of 369
18
How to Use This Manual
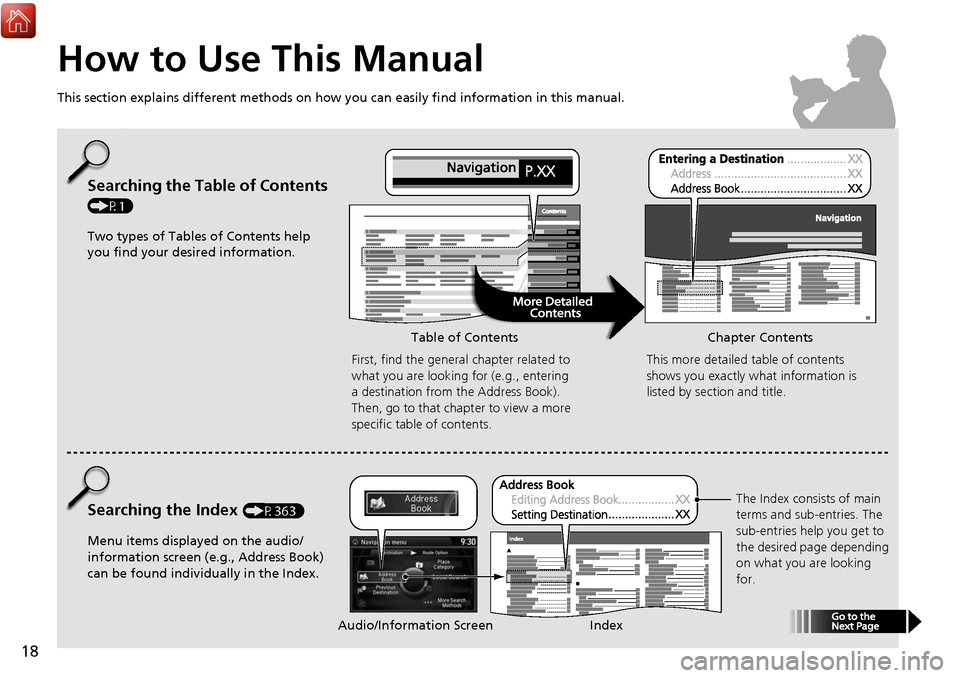
This section explains different methods on how you can easily find information in this manual.
Searching the Table of Contents
(P1)
Two types of Tables of Contents help
you find your desired information.First, find the general chapter related to
what you are looking for (e.g., entering
a destination from the Address Book).
Then, go to that chapter to view a more
specific table of contents.
Searching the Index (P363)
Menu items displayed on the audio/
information screen (e.g., Address Book)
can be found individually in the Index. This more detailed table of contents
shows you exactly what information is
listed by section and title.
The Index consists of main
terms and sub-entries. The
sub-entries help you get to
the desired page depending
on what you are looking
for.
Table of Contents Chapter Contents
Audio/Information Screen Index
Page 20 of 369
19
Entering a DestinationAddress Book
Navigation
Address Book
Hbutton Address Book
Select an address stored in your address bo ok to use as the destination.
1.Rotate i to select your
destination from the list. Press u.
2. Set the route to your destination.
2 Calculating the Route P. 114Move w or y to display only
the entries in the categories you
have created.
2 Selecting an Address Book
Category P. 44
1 Address Book
If you have PIN-protec ted your address book,
enter your PIN when prompted. Press u to
select OK. PINs are optional.
2 PIN Numbers P. 49
Move r and rotate i to select the following
items:
Add New Address : Adds an entry to the
address book.
2 Adding an Address Book Entry P. 41
Sort: Selects Sort by Name or Sort by
Distance .
Delete All : Deletes all entries in the address
book.
Driver 1 or Driver 2 : Displays the address
book for the selected user.
MENU
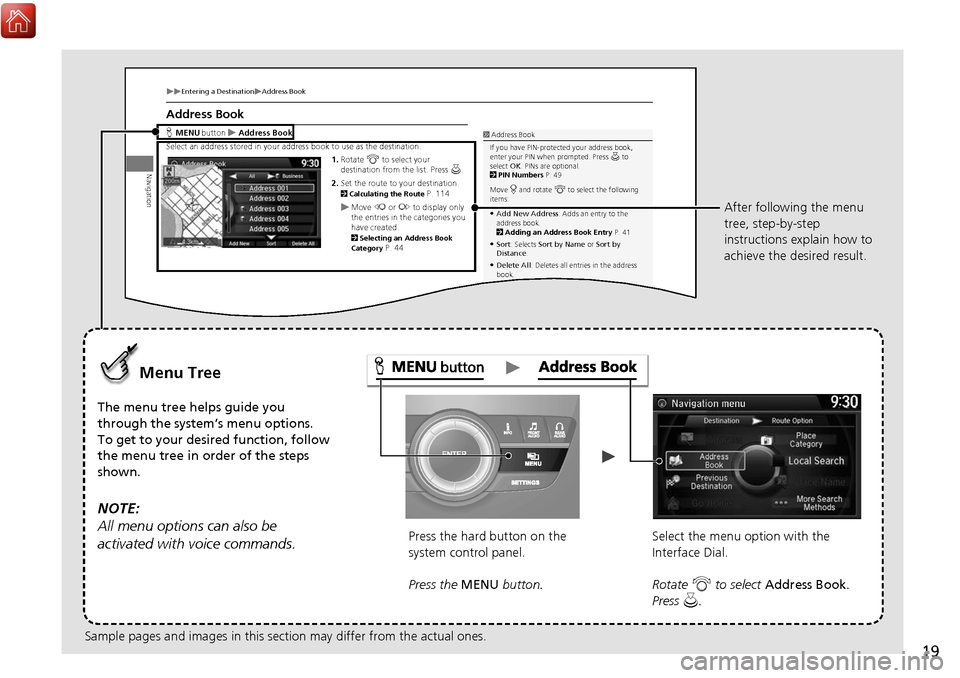
Menu Tree
The menu tree helps guide you
through the system’s menu options.
To get to your desired function, follow
the menu tree in order of the steps
shown.
NOTE:
All menu options can also be
activated with voice commands.
Press the hard button on the
system control panel.
Press the MENU button. Select the menu option with the
Interface Dial.
Rotate
i to select Address Book .
Press u. After following the menu
tree, step-by-step
instructions explain how to
achieve the desired result.
Sample pages and images in this section may differ from the actual ones.