display ACURA MDX 2022 Service Manual
[x] Cancel search | Manufacturer: ACURA, Model Year: 2022, Model line: MDX, Model: ACURA MDX 2022Pages: 712, PDF Size: 22.65 MB
Page 193 of 712
uuSeats uFront Seats
192
Controls
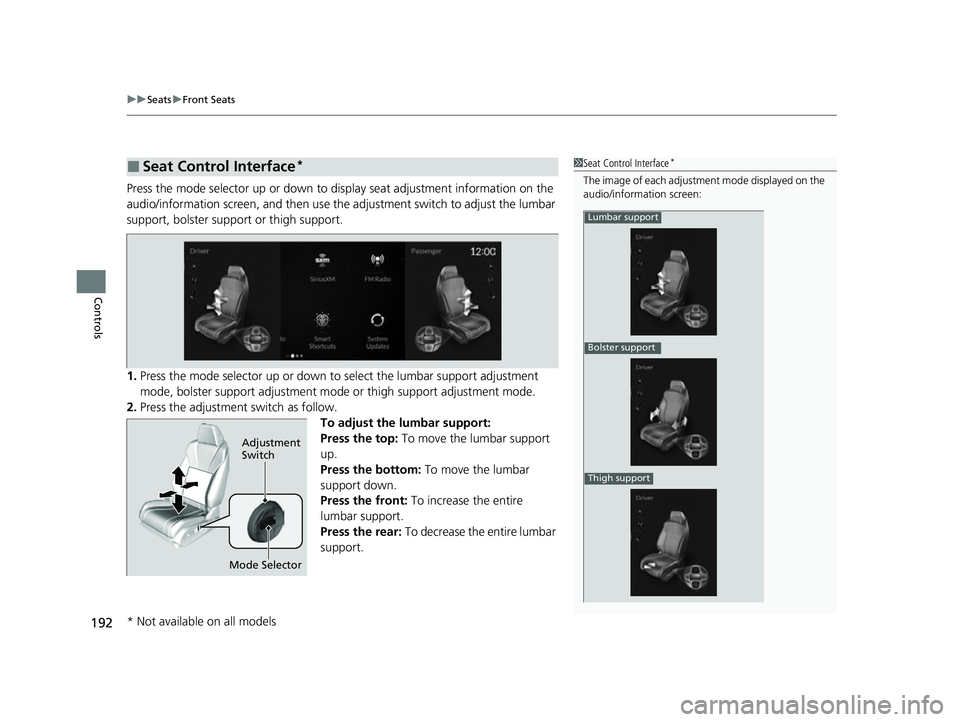
Press the mode selector up or down to display seat adjustment information on the
audio/information screen, and then use the adjustment switch to adjust the lumbar
support, bolster support or thigh support.
1. Press the mode selector up or down to select the lumbar support adjustment
mode, bolster support adjustment mode or thigh support adjustment mode.
2. Press the adjustment switch as follow.
To adjust the lumbar support:
Press the top: To move the lumbar support
up.
Press the bottom: To move the lumbar
support down.
Press the front: To increase the entire
lumbar support.
Press the rear: To decrease the entire lumbar
support.
■Seat Control Interface*1 Seat Control Interface*
The image of each adjustment mode displayed on the
audio/information screen:
Lumbar support
Bolster support
Thigh support
Mode Selector
Adjustment
Switch
* Not available on all models
22 ACURA MDX-31TYA6000_02.book 192 ページ 2020年11月5日 木曜日 午前11時39分
Page 194 of 712
Continued193
uuSeats uFront Seats
Controls
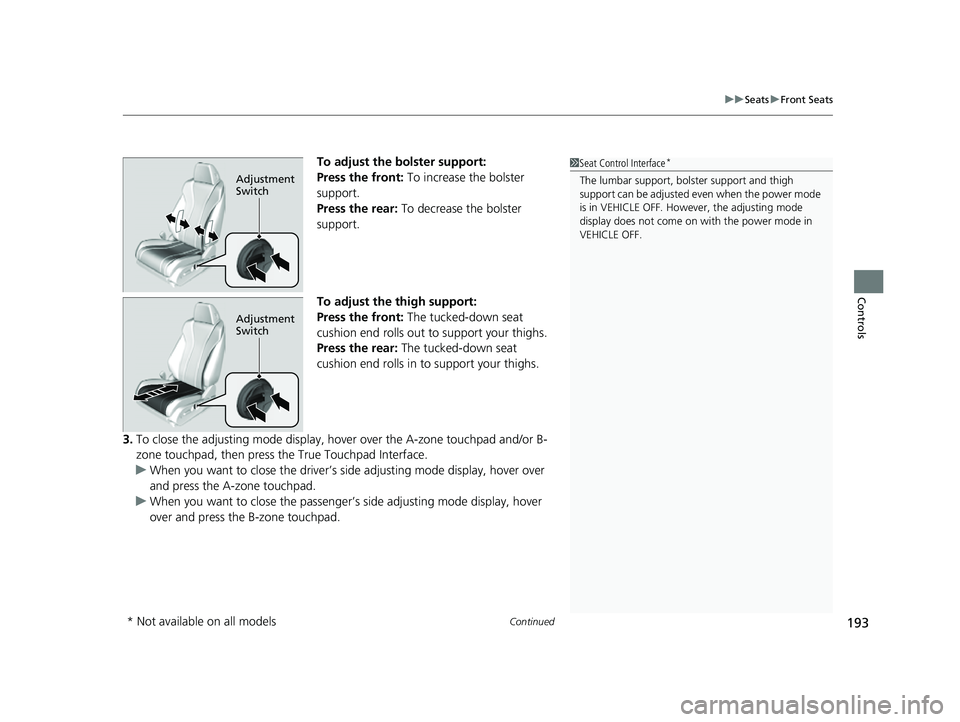
To adjust the bolster support:
Press the front: To increase the bolster
support.
Press the rear: To decrease the bolster
support.
To adjust the thigh support:
Press the front: The tucked-down seat
cushion end rolls out to support your thighs.
Press the rear: The tucked-down seat
cushion end rolls in to support your thighs.
3. To close the adjusting mode display, hov er over the A-zone touchpad and/or B-
zone touchpad, then press the True Touchpad Interface.
u When you want to close the driver’s side adjusting mode display, hover over
and press the A-zone touchpad.
u When you want to close the passenger’ s side adjusting mode display, hover
over and press the B-zone touchpad.1 Seat Control Interface*
The lumbar support, bolster support and thigh
support can be adjusted even when the power mode
is in VEHICLE OFF. However, the adjusting mode
display does not come on with the power mode in
VEHICLE OFF.Adjustment
Switch
Adjustment
Switch
* Not available on all models
22 ACURA MDX-31TYA6000_02.book 193 ページ 2020年11月5日 木曜日 午前11時39分
Page 230 of 712
229Continued
Controls
Climate Control System
Using Automatic Climate Control
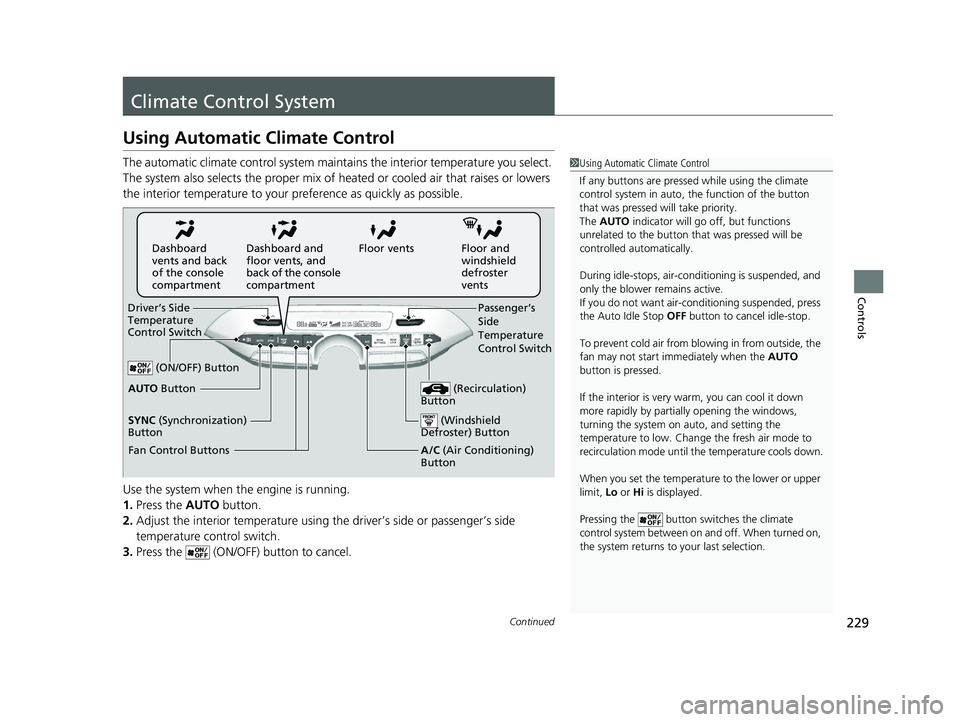
The automatic climate control system maintains the interior temperature you select.
The system also selects the proper mix of heat ed or cooled air that raises or lowers
the interior temperature to your pr eference as quickly as possible.
Use the system when the engine is running.
1. Press the AUTO button.
2. Adjust the interior temperature using the driver’s side or passenger’s side
temperature control switch.
3. Press the (ON/OFF) button to cancel.1Using Automatic Climate Control
If any buttons are presse d while using the climate
control system in auto, the function of the button
that was pressed will take priority.
The AUTO indicator will go off, but functions
unrelated to the button th at was pressed will be
controlled automatically.
During idle-stops, air-conditioning is suspended, and
only the blower remains active.
If you do not want air-cond itioning suspended, press
the Auto Idle Stop OFF button to cancel idle-stop.
To prevent cold air from bl owing in from outside, the
fan may not start i mmediately when the AUTO
button is pressed.
If the interior is very warm, you can cool it down
more rapidly by partial ly opening the windows,
turning the system on auto, and setting the
temperature to low. Change the fresh air mode to
recirculation mode until the temperature cools down.
When you set the temperature to the lower or upper
limit, Lo or Hi is displayed.
Pressing the button switches the climate
control system between on and off. When turned on,
the system returns to your last selection.
Floor and
windshield
defroster
vents
Floor vents
Dashboard and
floor vents, and
back of the console
compartment
Dashboard
vents and back
of the console
compartment
Driver’s Side
Temperature
Control Switch Passenger’s
Side
Temperature
Control Switch
A/C (Air Conditioning)
Button
(ON/OFF) Button
Fan Control Buttons
(Recirculation)
Button
(Windshield
Defroster) Button
AUTO Button
SYNC (Synchronization)
Button
22 ACURA MDX-31TYA6000_02.book 229 ページ 2020年11月5日 木曜日 午前11時39分
Page 234 of 712
233
uuClimate Control System uRear Climate Control System
Continued
Controls
Rear Climate Control System
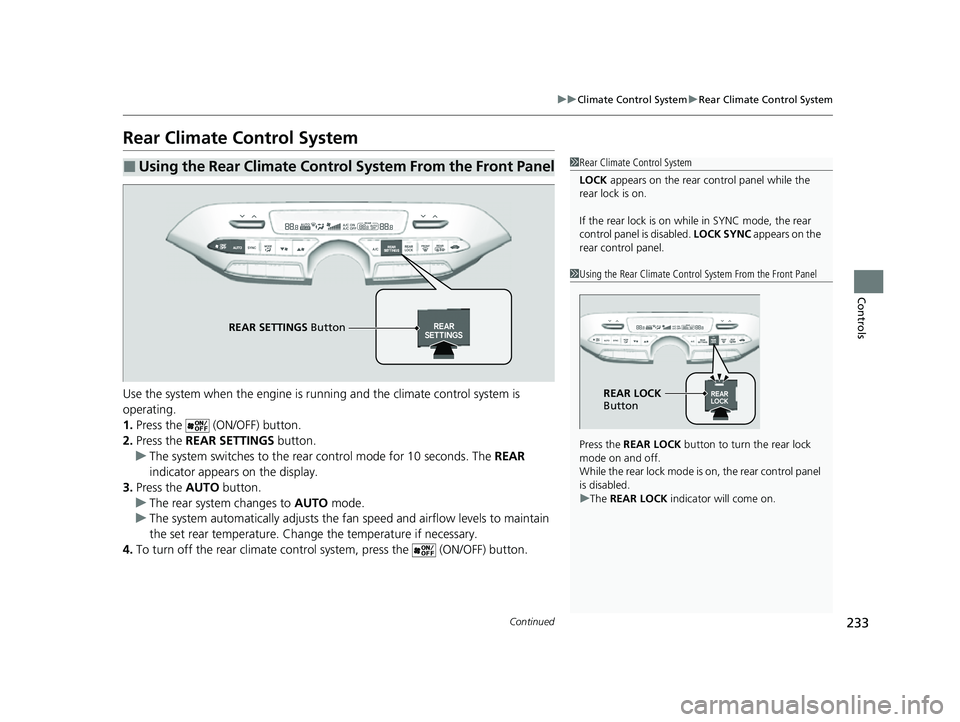
Use the system when the engine is runni ng and the climate control system is
operating.
1. Press the (ON/OFF) button.
2. Press the REAR SETTINGS button.
u The system switches to the rear control mode for 10 seconds. The REAR
indicator appears on the display.
3. Press the AUTO button.
u The rear system changes to AUTO mode.
u The system automatically adjusts the fan speed and airfl ow levels to maintain
the set rear temperature. Change the temperature if necessary.
4. To turn off the rear climate control system, press the (ON/OFF) button.
■Using the Rear Climate Control System From the Front Panel1Rear Climate Control System
LOCK appears on the rear control panel while the
rear lock is on.
If the rear lock is on while in SYNC mode, the rear
control panel is disabled. LOCK SYNC appears on the
rear control panel.
1 Using the Rear Climate Control System From the Front Panel
Press the REAR LOCK button to turn the rear lock
mode on and off.
While the rear lock mode is on, the rear control panel
is disabled.
u The REAR LOCK indicator will come on.
REAR LOCK
Button
REAR SETTINGS Button
22 ACURA MDX-31TYA6000_02.book 233 ページ 2020年11月5日 木曜日 午前11時39分
Page 238 of 712
237
Features
This chapter describes how to operate technology features.
Audio System
About Your Audio System ................ 238
USB Ports ......................................... 239
Audio System Theft Protection ......... 241
Audio Remote Controls .................... 242
Audio System Basic Operation ........ 244
True Touchpad Interface .................. 245
Audio/Information Screen ................ 248
Smart Shortcuts ............................... 262
System Updates ............................... 265
Adjusting the Sound ........................ 271
Display Setup ................................... 272 Alexa Built-In ................................... 273
Voice Control Operation .................. 274
Playing AM/FM Radio ....................... 277
Playing SiriusXM
® Radio ................... 281
Playing an iPod ................................ 294
Playing a USB Flash Drive ................. 297
Playing Bluetooth ® Audio................. 300
Playing Social Playlist ........................ 303
Wi-Fi Connection ............................. 305
AT&T Hotspot .................................. 307
Apple CarPlay .................................. 308
Android Auto................................... 313 Audio Error Messages
...................... 318
General Information on the Audio System ............................................. 322
Customized Features ........................ 345
HomeLink ® Universal Transceiver ... 373
Bluetooth ® HandsFreeLink® ............. 376
AcuraLink® ........................................ 405
CabinTalk ®
*....................................... 414
* Not available on all models
22 ACURA MDX-31TYA6000_02.book 237 ページ 2020年11月5日 木曜日 午前11時39分
Page 240 of 712
239
uuAudio System uUSB Ports
Continued
Features
USB Ports
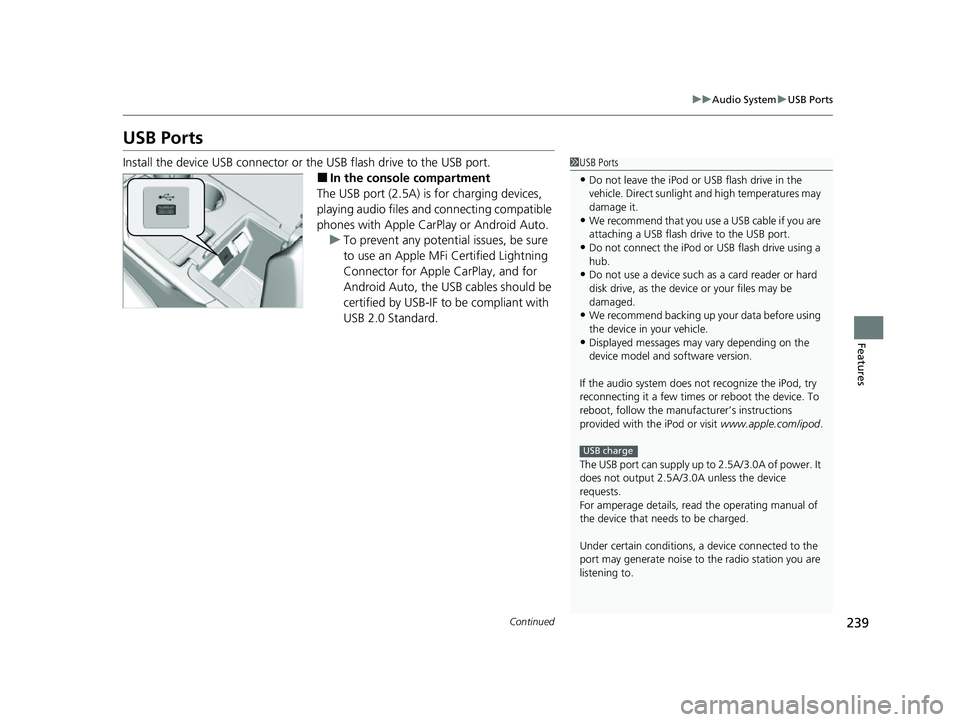
Install the device USB connector or the USB flash drive to the USB port.
■In the consol e compartment
The USB port (2.5A) is for charging devices,
playing audio files and connecting compatible
phones with Apple CarPlay or Android Auto. u To prevent any potenti al issues, be sure
to use an Apple MFi Certified Lightning
Connector for Apple CarPlay, and for
Android Auto, the USB cables should be
certified by USB-IF to be compliant with
USB 2.0 Standard.
1 USB Ports
•Do not leave the iPod or USB flash drive in the
vehicle. Direct sunlight and high temperatures may
damage it.
•We recommend that you us e a USB cable if you are
attaching a USB flash drive to the USB port.
•Do not connect the iPod or USB flash drive using a
hub.
•Do not use a device such as a card reader or hard
disk drive, as the device or your files may be
damaged.
•We recommend backing up yo ur data before using
the device in your vehicle.
•Displayed messages may vary depending on the
device model and software version.
If the audio system does not recognize the iPod, try
reconnecting it a few times or reboot the device. To
reboot, follow the manufac turer’s instructions
provided with the iPod or visit www.apple.com/ipod.
The USB port can supply up to 2.5A/3.0A of power. It
does not output 2.5A/3.0A unless the device
requests.
For amperage details, read the operating manual of
the device that ne eds to be charged.
Under certain condi tions, a device connected to the
port may generate noise to the radio station you are
listening to.
USB charge
22 ACURA MDX-31TYA6000_02.book 239 ページ 2020年11月5日 木曜日 午前11時39分
Page 242 of 712
241
uuAudio System uAudio System Theft Protection
Features
Audio System Theft Protection
The audio system is disabled when it is disconnected from the power source, such as
when the battery is disconnected or goes dead. In certain conditions, the system
may display a code entry screen. If this occurs, reactivate the audio system.
■Reactivating the audio system
1. Set the power mode to ON.
2. Turn on the audio system.
3. Press and hold the audio system powe r knob for more than two seconds.
u The audio system is reac tivated when the audio co ntrol unit establishes a
connection with the vehicl e control unit. If the control unit fails to recognize
the audio unit, you must go to a deal er and have the audio unit checked.
22 ACURA MDX-31TYA6000_02.book 241 ページ 2020年11月5日 木曜日 午前11時39分
Page 243 of 712
242
uuAudio System uAudio Remote Controls
Features
Audio Remote Controls
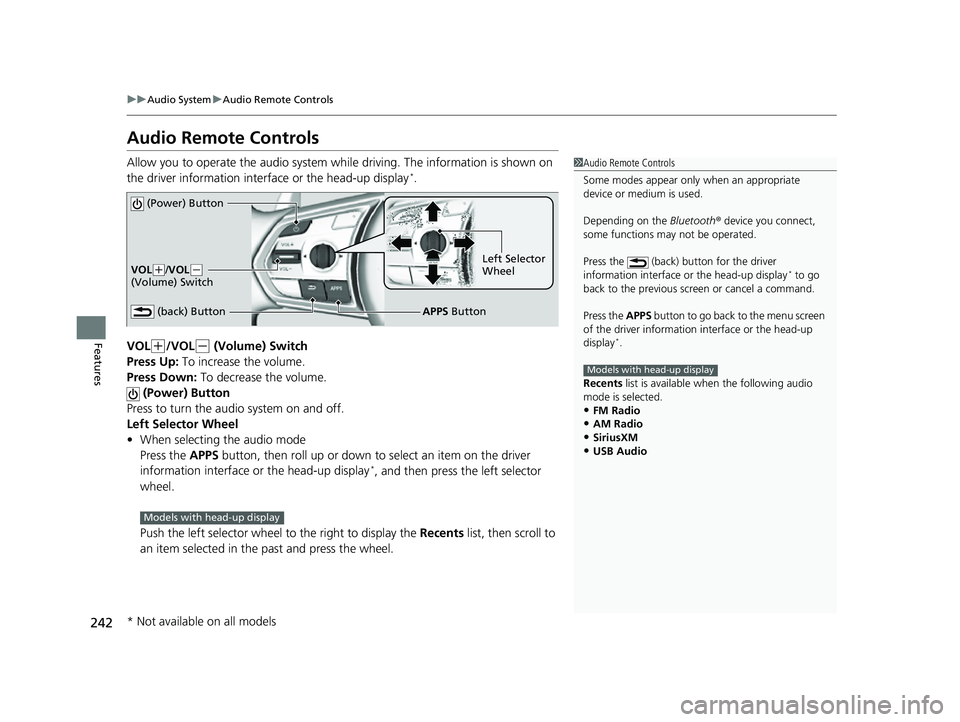
Allow you to operate the audio system while driving. The information is shown on
the driver information interface or the head-up display*.
VOL
(+/VOL(- (Volume) Switch
Press Up: To increase the volume.
Press Down: To decrease the volume.
(Power) Button
Press to turn the audio system on and off.
Left Selector Wheel
• When selecting the audio mode
Press the APPS button, then roll up or down to select an item on the driver
information interface or the head-up display
*, and then press the left selector
wheel.
Push the left selector wheel to the right to display the Recents list, then scroll to
an item selected in the past and press the wheel.
1 Audio Remote Controls
Some modes appear only when an appropriate
device or medium is used.
Depending on the Bluetooth® device you connect,
some functions ma y not be operated.
Press the (back) button for the driver
information interface or the head-up display
* to go
back to the previous screen or cancel a command.
Press the APPS button to go back to the menu screen
of the driver information interface or the head-up
display
*.
Recents list is available wh en the following audio
mode is selected.
•FM Radio•AM Radio
•SiriusXM
•USB Audio
Models with head-up display
(Power) Button
VOL( +/VOL(-
(Volume) Switch
(back) ButtonLeft Selector
Wheel
APPS Button
Models with head-up display
* Not available on all models
22 ACURA MDX-31TYA6000_02.book 242 ページ 2020年11月5日 木曜日 午前11時39分
Page 244 of 712
243
uuAudio System uAudio Remote Controls
Features
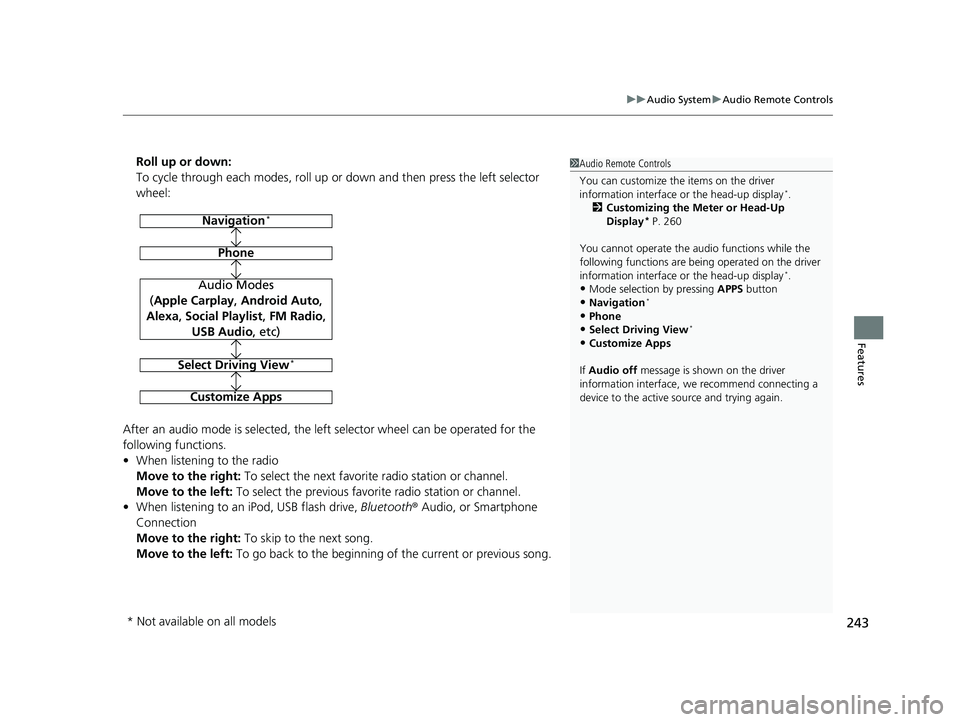
Roll up or down:
To cycle through each modes, roll up or down and then press the left selector
wheel:
After an audio mode is selected, the left selector wheel can be operated for the
following functions.
• When listening to the radio
Move to the right: To select the next favorite radio station or channel.
Move to the left: To select the previous favori te radio station or channel.
• When listening to an iPod, USB flash drive, Bluetooth® Audio, or Smartphone
Connection
Move to the right: To skip to the next song.
Move to the left: To go back to the beginning of the current or previous song.1Audio Remote Controls
You can customize the items on the driver
information interface or the head-up display
*.
2 Customizing the Meter or Head-Up
Display
* P. 260
You cannot operate the a udio functions while the
following functions are bei ng operated on the driver
information interface or the head-up display
*.•Mode selection by pressing APPS button
•Navigation*
•Phone
•Select Driving View*
•Customize Apps
If Audio off message is shown on the driver
information interface, we recommend connecting a
device to the active source and trying again.
Navigation*
Phone
Audio Modes
(Apple Carplay , Android Auto,
Alexa, Social Playlist , FM Radio,
USB Audio , etc)
Select Driving View*
Customize Apps
* Not available on all models
22 ACURA MDX-31TYA6000_02.book 243 ページ 2020年11月5日 木曜日 午前11時39分
Page 245 of 712
244
Features
Audio System Basic Operation
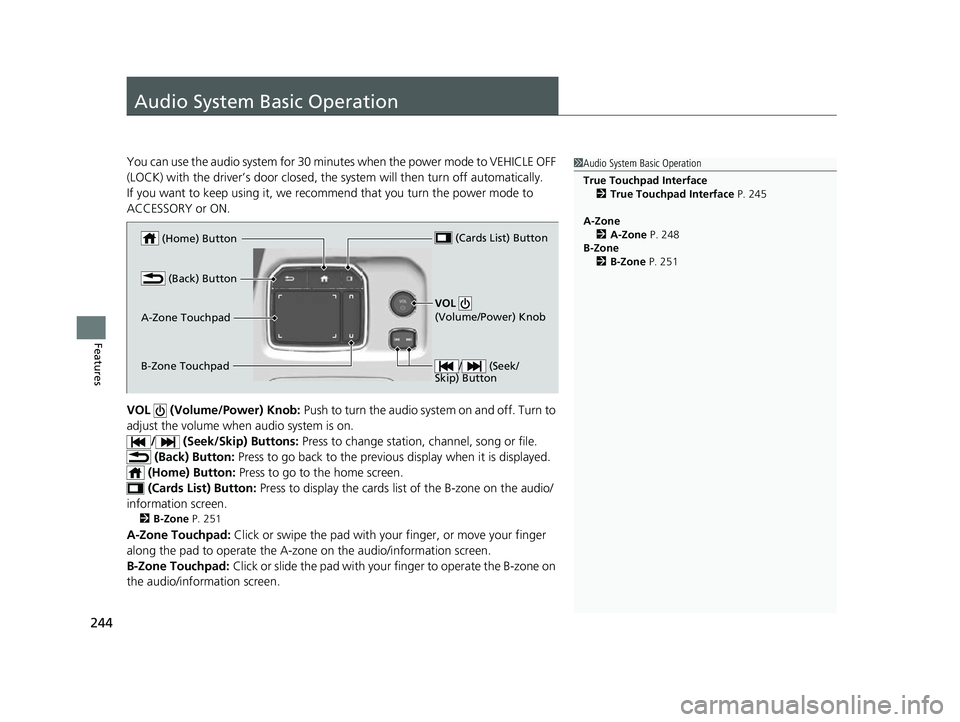
You can use the audio system for 30 minutes when the power mode to VEHICLE OFF
(LOCK) with the driver’s door closed, the system will then turn off automatically.
If you want to keep using it, we reco mmend that you turn the power mode to
ACCESSORY or ON.
VOL (Volume/Power) Knob: Push to turn the audio system on and off. Turn to
adjust the volume when audio system is on.
/ (Seek/Skip) Buttons: Press to change station, channel, song or file.
(Back) Button: Press to go back to the previous display when it is displayed.
(Home) Button: Press to go to the home screen.
(Cards Li st) Button: Press to display the cards list of the B-zone on the audio/
information screen.
2 B-Zone P. 251
A-Zone Touchpad: Click or swipe the pad with your finger, or move your finger
along the pad to operate the A-zone on the audio/information screen.
B-Zone Touchpad: Click or slide the pad with your finger to operate the B-zone on
the audio/information screen.
1 Audio System Basic Operation
True Touchpad Interface
2 True Touchpad Interface P. 245
A-Zone 2 A-Zone P. 248
B-Zone 2 B-Zone P. 251
(Home) Button
(Back) Button
A-Zone Touchpad (Cards List) Button
/ (Seek/
Skip) Button
VOL
(Volume/Power) Knob
B-Zone Touchpad
22 ACURA MDX-31TYA6000_02.book 244 ページ 2020年11月5日 木曜日 午前11時39分