AUX ACURA NSX 1991 Service Repair Manual
[x] Cancel search | Manufacturer: ACURA, Model Year: 1991, Model line: NSX, Model: ACURA NSX 1991Pages: 1640, PDF Size: 60.48 MB
Page 491 of 1640

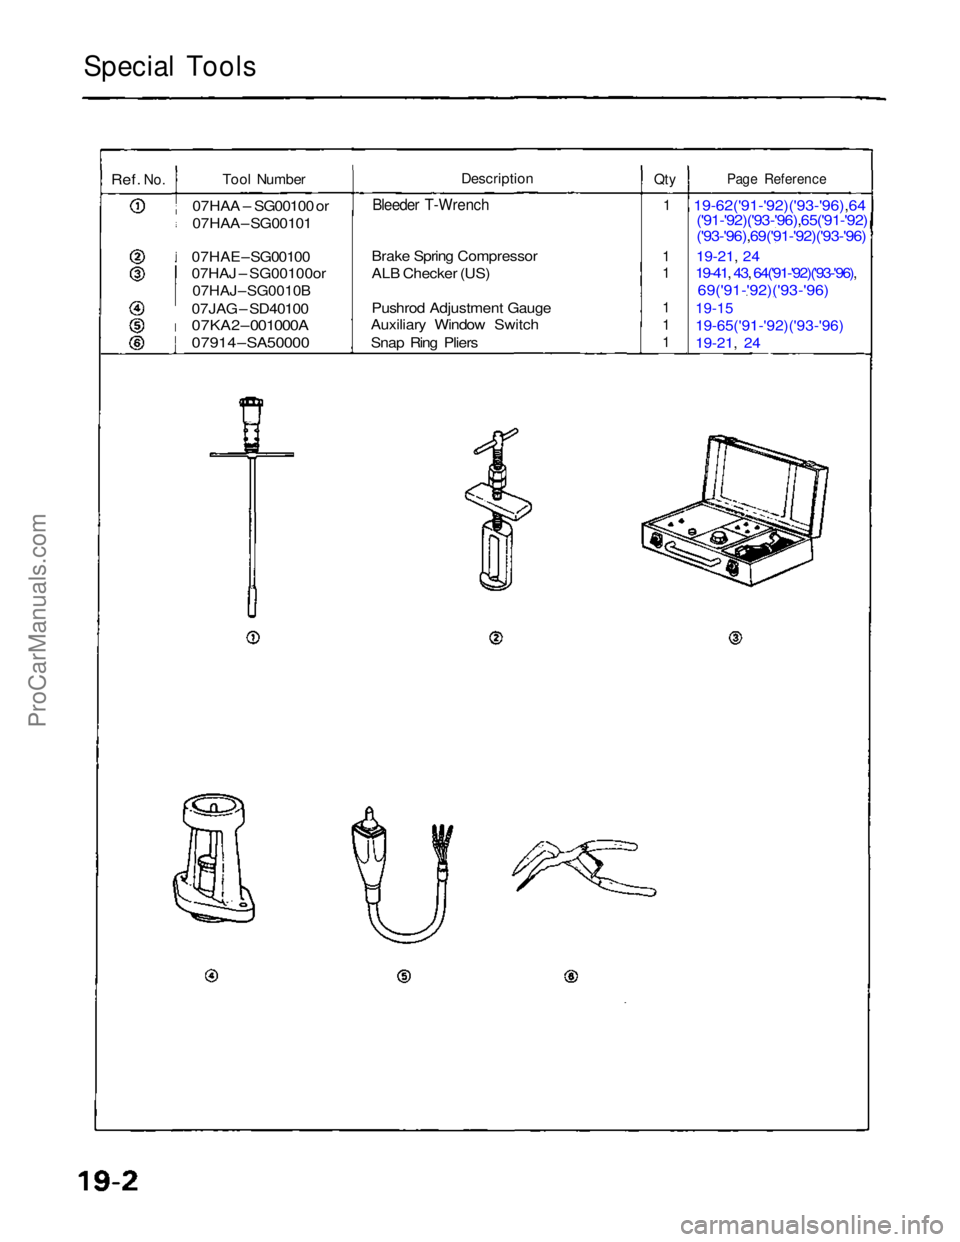
Special Tools
Ref.
No.
Tool Number
07HAA – SG00100 or
07HAA – SG00101
07HAE – SG00100
07HAJ – SG00100or
07HAJ – SG0010B
07JAG – SD40100
07KA2 – 001000A
07914 – SA50000
Description
Bleeder T-Wrench
Brake Spring Compressor
ALB Checker (US)
Pushrod Adjustment Gauge
Auxiliary Window Switch
Snap Ring Pliers
Qty
1
1
1
1
1
1
Page Reference
19-62('91-'92)('93-'96),64('91-'92)('93-'96),65('91-'92)
('93-'96),69('91-'92)('93-'96)
19-21, 24
19-41, 43, 64('91-'92)('93-'96),
69('91-'92)('93-'96)
19-15
19-65('91-'92)('93-'96)
19-21,
24
ProCarManuals.com
Page 537 of 1640

Solenoid Flushin g
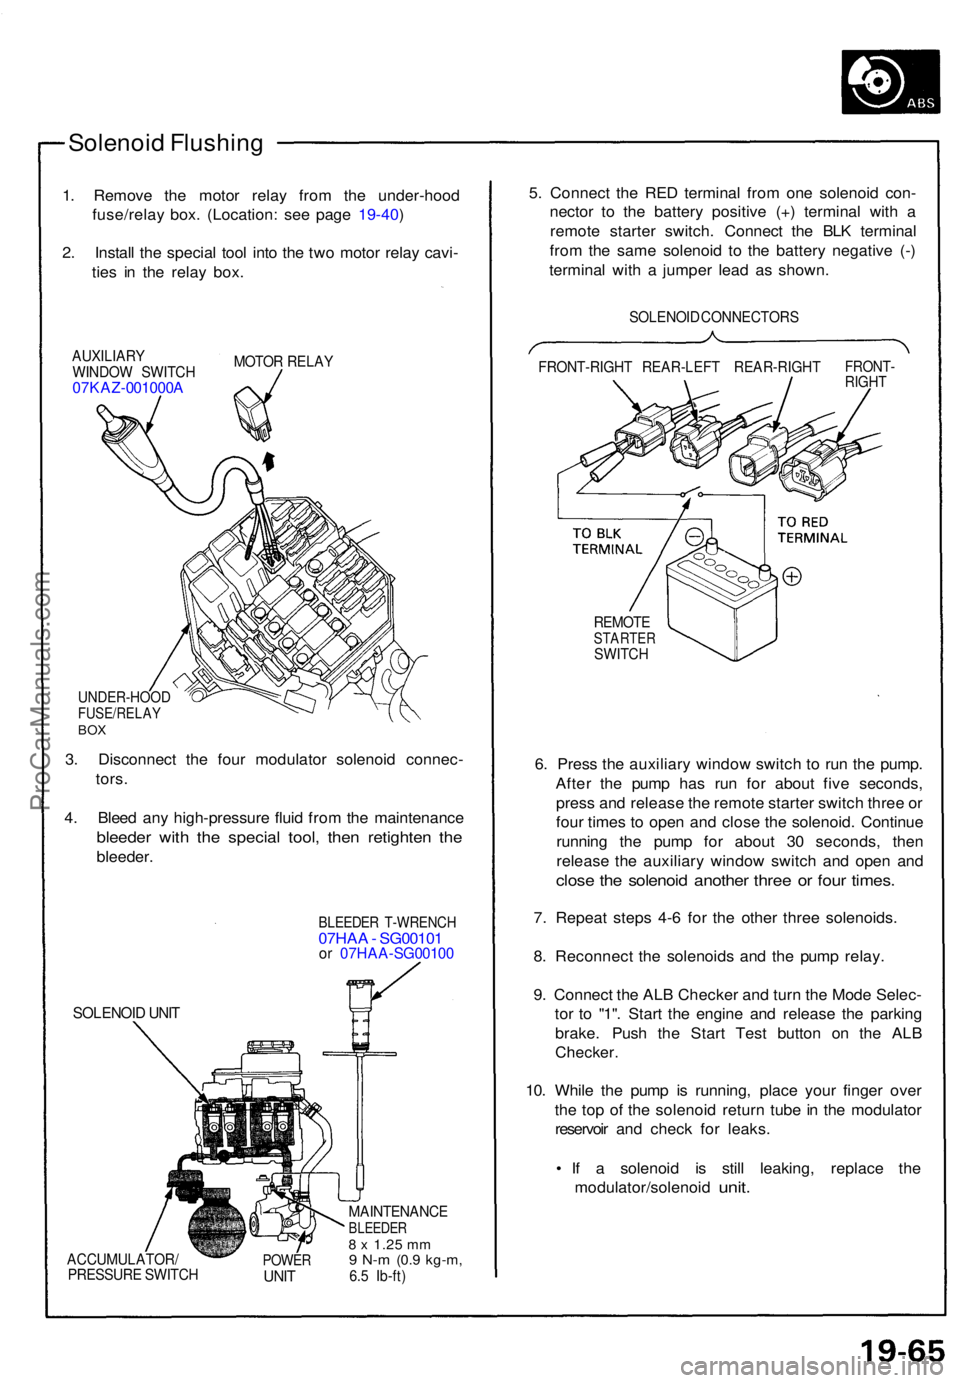
1. Remov e th e moto r rela y fro m th e under-hoo d
fuse/rela y box . (Location : se e pag e 19-40 )
2 . Instal l th e specia l too l int o th e tw o moto r rela y cavi -
tie s i n th e rela y box .
AUXILIAR Y
WINDO W SWITC H
07KAZ-001000 A
MOTOR RELA Y
UNDER-HOO DFUSE/RELAYBOX
3. Disconnec t th e fou r modulato r solenoi d connec -
tors .
4 . Blee d an y high-pressur e flui d fro m th e maintenanc e
bleeder wit h th e specia l tool , the n retighte n th e
bleeder .
SOLENOI D UNI T
BLEEDE R T-WRENC H07HAA - SG0010 1or 07HA A-SG0010 0
ACCUMULATOR /
PRESSUR E SWITC HPOWERUNIT
MAINTENANC EBLEEDER8 x 1.2 5 mm9 N- m (0. 9 kg-m ,6.5 Ib-ft )
5. Connec t th e RE D termina l fro m on e solenoi d con -
necto r t o th e batter y positiv e (+ ) termina l wit h a
remot e starte r switch . Connec t th e BL K termina l
fro m th e sam e solenoi d t o th e batter y negativ e (- )
termina l wit h a jumpe r lea d a s shown .
SOLENOI D CONNECTOR S
FRONT-RIGH T REAR-LEF T REAR-RIGH T
FRONT-RIGHT
REMOT ESTARTE RSWITCH
6. Pres s th e auxiliar y windo w switc h t o ru n th e pump .
Afte r th e pum p ha s ru n fo r abou t fiv e seconds ,
pres s an d releas e th e remot e starte r switc h thre e o r
fou r time s t o ope n an d clos e th e solenoid . Continu e
runnin g th e pum p fo r abou t 3 0 seconds , the n
releas e th e auxiliar y windo w switc h an d ope n an d
clos e th e solenoi d anothe r thre e o r fou r times .
7. Repea t step s 4- 6 fo r th e othe r thre e solenoids .
8 . Reconnec t th e solenoid s an d th e pum p relay .
9 . Connec t th e AL B Checke r an d tur n th e Mod e Selec -
to r t o "1" . Star t th e engin e an d releas e th e parkin g
brake . Pus h th e Star t Tes t butto n o n th e AL B
Checker .
10. Whil e th e pum p i s running , plac e you r finge r ove r
th e to p o f th e solenoi d retur n tub e in th e modulato r
reservoi r an d chec k fo r leaks .
• I f a solenoi d i s stil l leaking , replac e th e
modulator/solenoi d
unit.
ProCarManuals.com
Page 1575 of 1640

Solenoid Flushing
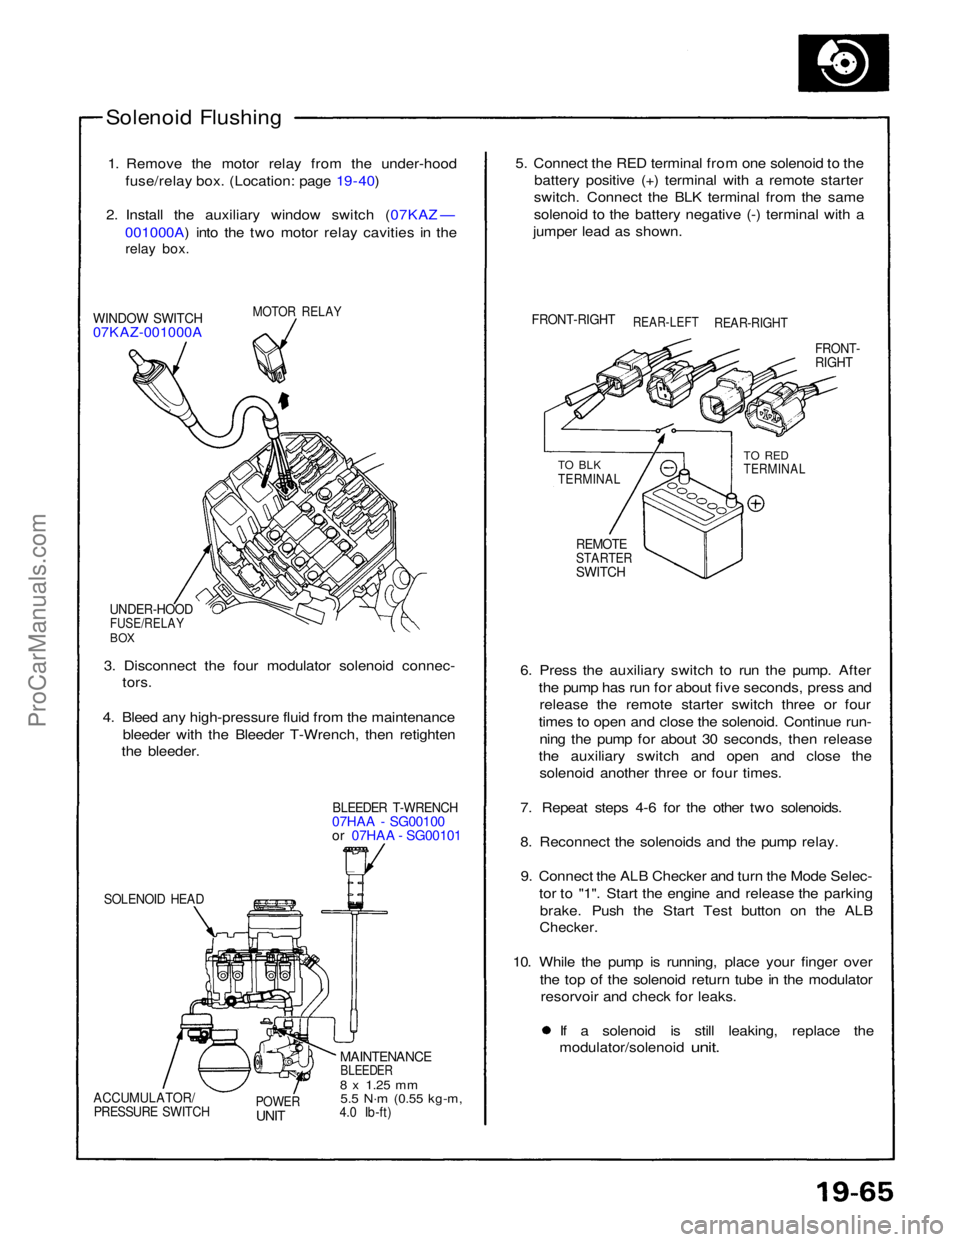
1. Remove the motor relay from the under-hood fuse/relay box. (Location: page 19 - 40)
2. Install the auxiliary window switch (07KAZ — 001000A) into the two motor relay cavities in the
relay box.
MOTOR RELAY
WINDOW SWITCH
07KAZ-001000A
UNDER-HOOD
FUSE/RELAY
BOX
3. Disconnect the four modulator solenoid connec- tors.
4. Bleed any high-pressure fluid from the maintenance bleeder with the Bleeder T-Wrench, then retighten
the bleeder.
BLEEDER T-WRENCH
07HAA - SG00100
or 07HAA - SG00101
SOLENOID HEAD
MAINTENANCE
BLEEDER
8 x
1.25
mm
5.5 N·m
(0.55 kg-m,
4.0 Ib-ft)
POWER
UNIT
ACCUMULATOR/
PRESSURE SWITCH
6. Press the auxiliary switch to run the pump. After
the pump has run for about five seconds, press andrelease the remote starter switch three or four
times to open and close the solenoid. Continue run- ning the pump for about 30 seconds, then release
the auxiliary switch and open and close the solenoid another three or four times.
7. Repeat steps 4-6 for the other two solenoids.
8. Reconnect the solenoids and the pump relay. 9. Connect the ALB Checker and turn the Mode Selec- tor to "1". Start the engine and release the parkingbrake. Push the Start Test button on the ALB
Checker.
10. While the pump is running, place your finger over the top of the solenoid return tube in the modulatorresorvoir and check for leaks. If a solenoid is still leaking, replace the
modulator/solenoid
unit.
REMOTE
STARTER
SWITCH
TO BLK
TERMINAL
TO RED
TERMINAL
FRONT-
RIGHT
FRONT-RIGHT
REAR-LEFT
REAR-RIGHT
5. Connect the RED terminal from one solenoid to the
battery positive (+) terminal with a remote starter
switch. Connect the BLK terminal from the same
solenoid to the battery negative (-) terminal with a
jumper lead as shown.ProCarManuals.com