ECU ACURA NSX 1997 Service Manual PDF
[x] Cancel search | Manufacturer: ACURA, Model Year: 1997, Model line: NSX, Model: ACURA NSX 1997Pages: 1503, PDF Size: 57.08 MB
Page 1171 of 1503
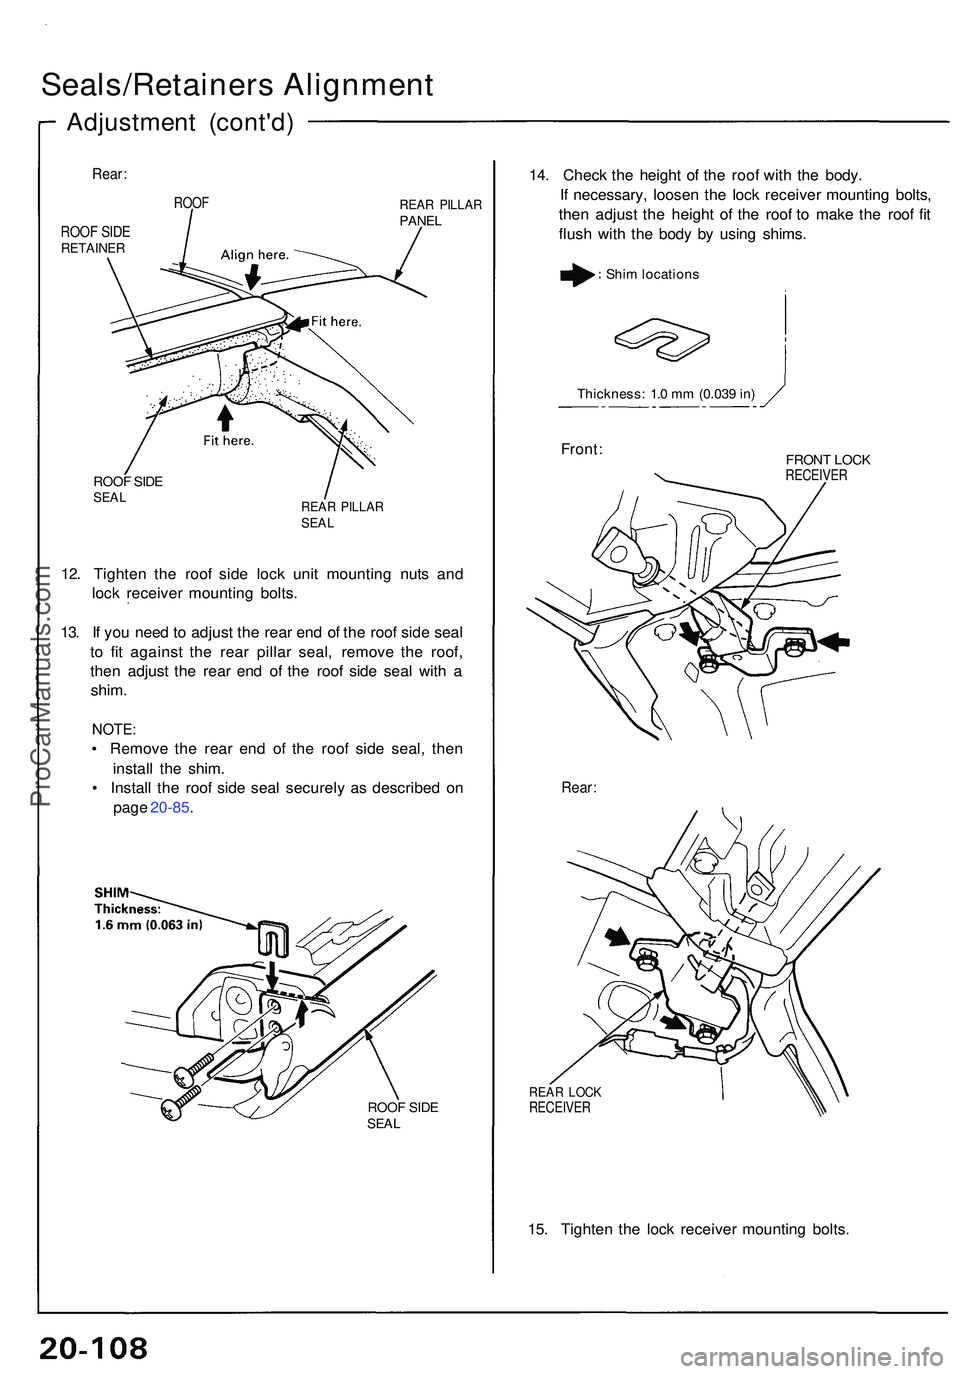
Seals/Retainers Alignmen t
Adjustmen t (cont'd )
Rear:
ROO F SID ERETAINE R
ROOFREAR PILLA RPANEL
ROOF SID ESEA LREA R PILLA RSEAL
12. Tighte n th e roo f sid e loc k uni t mountin g nut s an d
loc k receive r mountin g bolts .
13 . I f yo u nee d t o adjus t th e rea r en d o f th e roo f sid e sea l
t o fi t agains t th e rea r pilla r seal , remov e th e roof ,
the n adjus t th e rea r en d o f th e roo f sid e sea l wit h a
shim .
NOTE :
• Remov e th e rea r en d o f th e roo f sid e seal , the n
instal l th e shim .
• Instal l th e roo f sid e sea l securel y a s describe d o n
pag e 20-85 .
ROOF SID ESEA L
14. Chec k th e heigh t o f th e roo f wit h th e body .
I f necessary , loose n th e loc k receive r mountin g bolts ,
the n adjus t th e heigh t o f th e roo f t o mak e th e roo f fi t
flus h wit h th e bod y b y usin g shims .
Thickness : 1. 0 m m (0.03 9 in )
Front :FRON T LOC KRECEIVE R
Rear:
REAR LOC KRECEIVE R
15. Tighte n th e loc k receive r mountin g bolts .
Shim location s
ProCarManuals.com
Page 1172 of 1503
16. Chec k tha t eac h roo f sid e loc k handl e work s
smoothly .
17 . Remov e th e roof .
18 . I f th e roo f sid e retaine r ha s no t bee n replaced , an d
o r th e EP T seale r o n th e roo f sid e retaine r ha s no t
bee n replaced , d o th e followin g (se e pag e 20-84 ):
a . Remov e th e roo f sid e sea l an d roo f sid e retaine r
fro m th e roof ,
b . Replac e th e EP T seale r o n th e roo f sid e retaine r
an d roof .
c . Replac e th e buty l tape s o n th e roo f sid e seal ,
d . Reinstal l th e roo f sid e retainer , the n appl y ne w
sealant ,
e. Reinstal l th e roo f sid e seal .
19 . Chec k th e lip s o f th e roo f sid e seal , an d glu e th e
peele d li p securel y wit h sealant , the n wip e th e
exces s sealan t of f wit h a sof t sho p towe l dampene d
wit h alcohol .
20 . Afte r applyin g th e sealant , le t th e roo f stan d fo r a t
leas t thre e hours .
21 . Instal l th e roo f o n th e body , the n mak e sur e th e
seal s fi t flush .
NOTE : Mak e sur e bot h roo f sid e loc k handle s ar e
locke d securely .
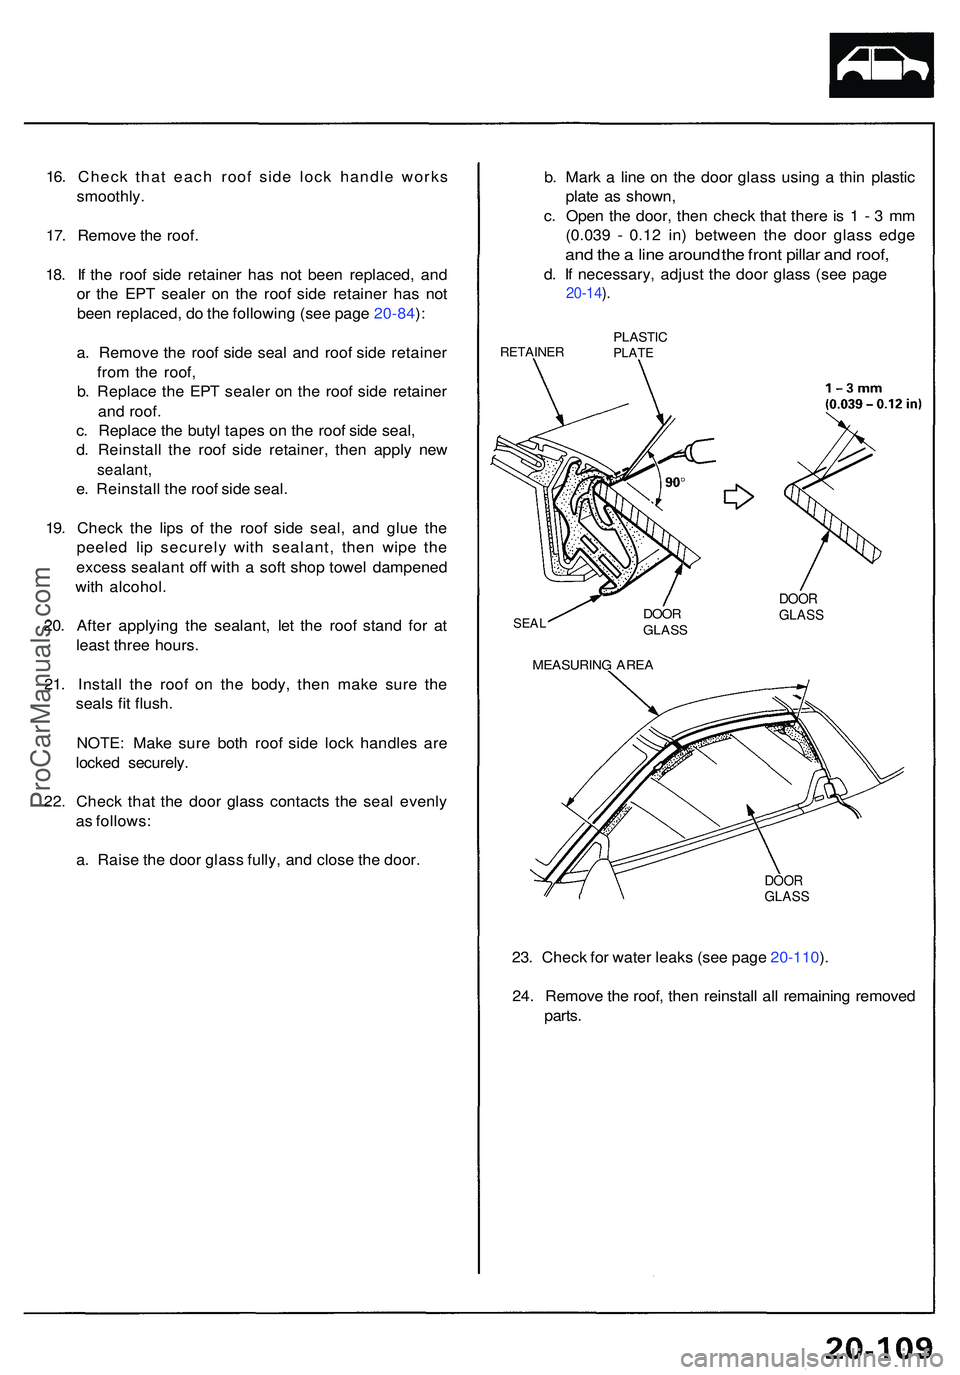
22 . Chec k tha t th e doo r glas s contact s th e sea l evenl y
a s follows :
a . Rais e th e doo r glas s fully , an d clos e th e door . b
. Mar k a lin e o n th e doo r glas s usin g a thi n plasti c
plat e a s shown ,
c . Ope n th e door , the n chec k tha t ther e is 1 - 3 m m
(0.03 9 - 0.1 2 in ) betwee n th e doo r glas s edg e
and th e a lin e aroun d th e fron t pilla r an d roof ,
d. I f necessary , adjus t th e doo r glas s (se e pag e
20-14 ).
RETAINE RPLASTICPLATE
SEAL
MEASURIN G ARE A
DOORGLAS S
DOORGLAS S
DOORGLAS S
23. Chec k fo r wate r leak s (se e pag e 20-110 ).
24 . Remov e th e roof , the n reinstal l al l remainin g remove d
parts .
ProCarManuals.com
Page 1173 of 1503
Water Leak Test
NOTE: When the following parts have been replaced or
removed, and or the roof side lock unit, door glass and
door have been adjusted, this water leak test should be
done.
• Roof side seals
• Roof side lock units
• Front and rear pillar seals
• Door and door glass
1. Make sure that the roof is locked securely.
2. Raise the glass fully, and close the doors.
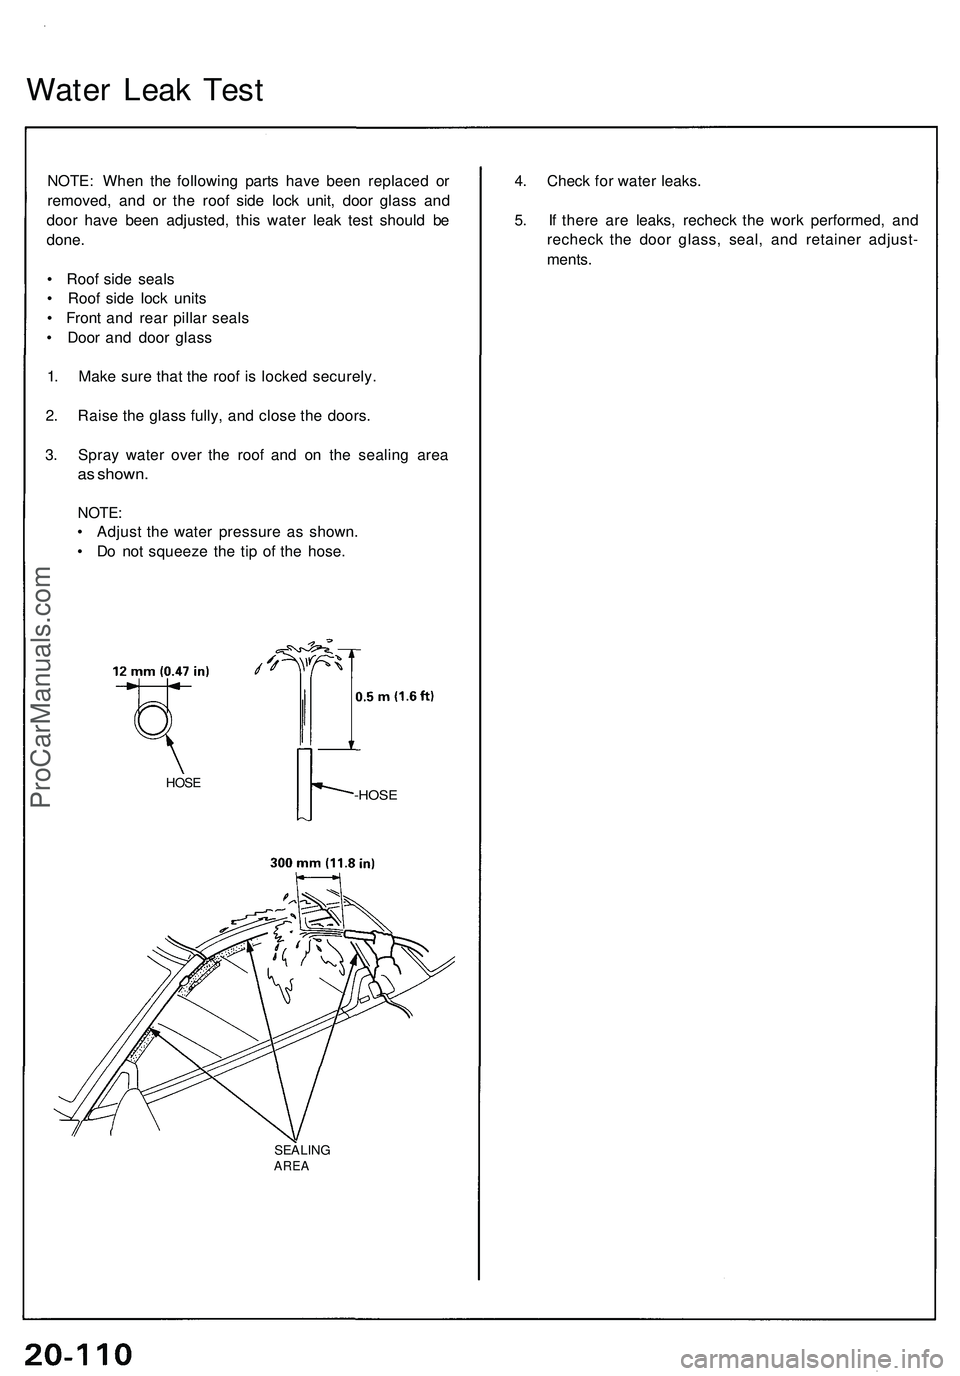
3. Spray water over the roof and on the sealing area
as shown.
NOTE:
• Adjust the water pressure as shown.
• Do not squeeze the tip of the hose.
HOSE
-HOSE
SEALING
AREA
4. Check for water leaks.
5. If there are leaks, recheck the work performed, and
recheck the door glass, seal, and retainer adjust-
ments.ProCarManuals.com
Page 1175 of 1503
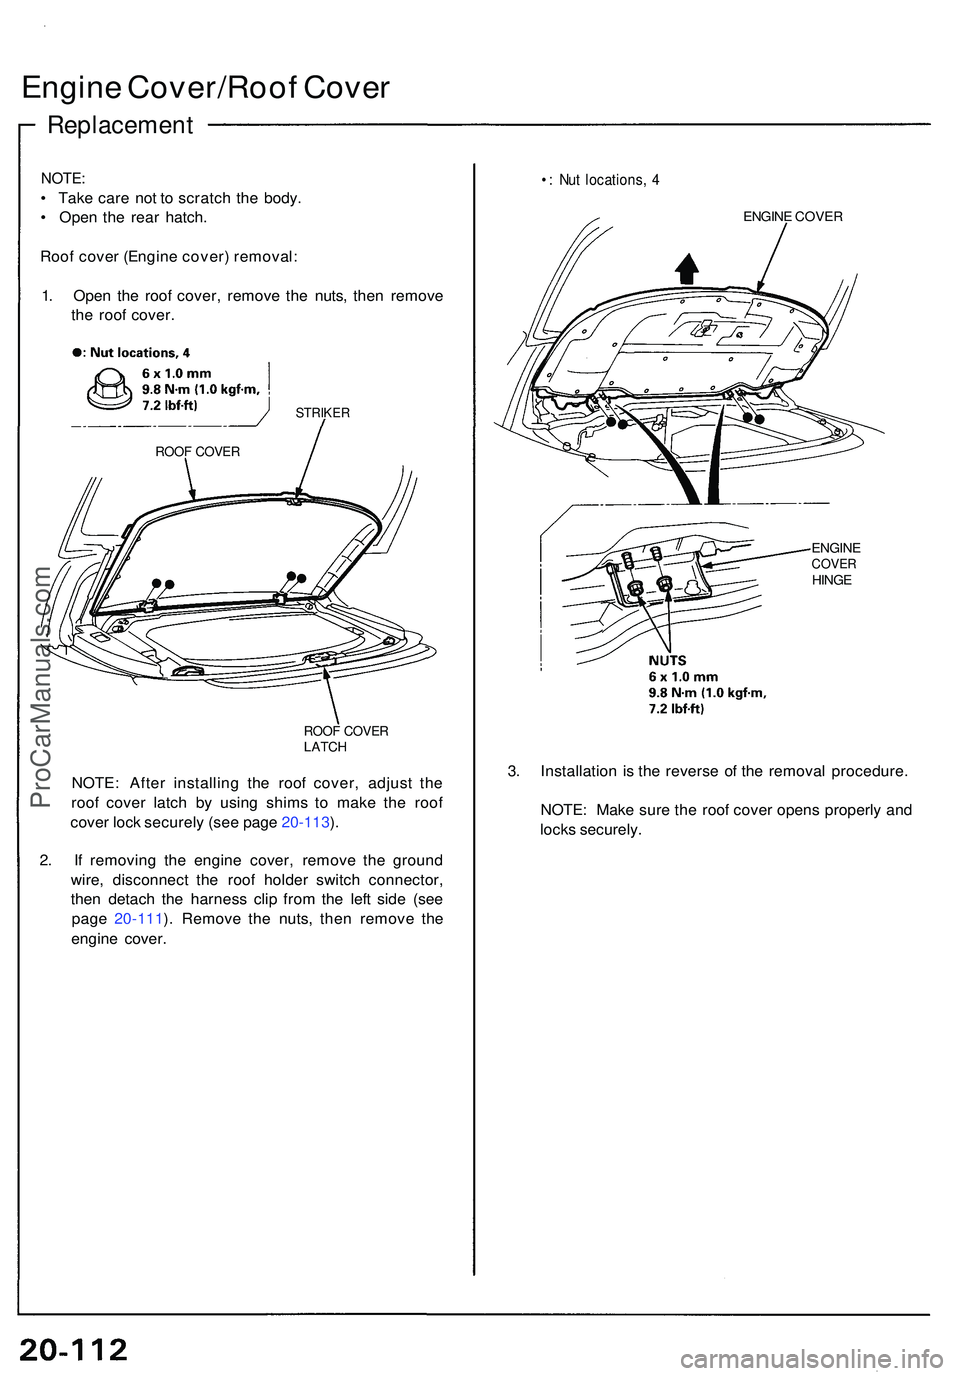
Engine Cover/Roo f Cove r
Replacemen t
ROOF COVE RLATCH
NOTE : Afte r installin g th e roo f cover , adjus t th e
roo f cove r latc h b y usin g shim s t o mak e th e roo f
cove r loc k securel y (se e pag e 20-113 ).
2 . I f removin g th e engin e cover , remov e th e groun d
wire , disconnec t th e roo f holde r switc h connector ,
the n detac h th e harnes s cli p fro m th e lef t sid e (se e
pag e 20-111 ). Remov e th e nuts , the n remov e th e
engine cover.
• : Nu t locations , 4
ENGIN E COVE R
ENGIN E
COVERHINGE
3. Installatio n i s th e revers e o f th e remova l procedure .
NOTE : Mak e sur e th e roo f cove r open s properl y an d
lock s securely .
NOTE:
• Tak e car e no t t o scratc h th e body .
• Ope n th e rea r hatch .
Roo f cove r (Engin e cover ) removal :
1 . Ope n th e roo f cover , remov e th e nuts , the n remov e
th e roo f cover .
ROOF COVE R
STRIKE R
ProCarManuals.com
Page 1177 of 1503
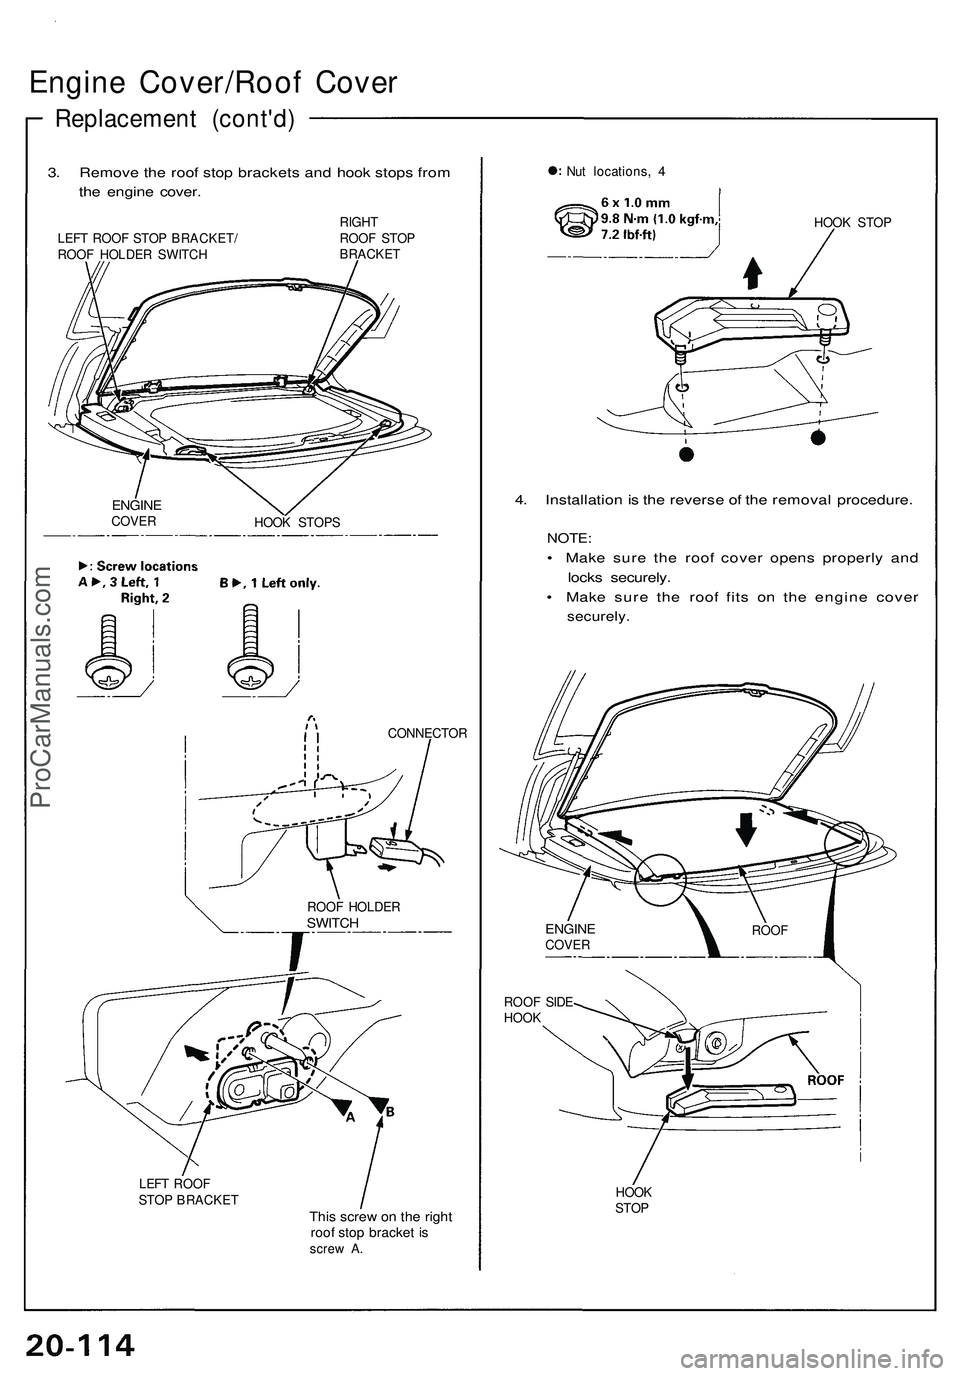
Engine Cover/Roo f Cove r
Replacemen t (cont'd )
3. Remov e th e roo f sto p bracket s an d hoo k stop s fro m
th e engin e cover .
LEFT ROO F STO P BRACKET /
ROO F HOLDE R SWITC H RIGH
T
ROO F STO PBRACKE T
ENGINECOVER
HOOK STOP S
CONNECTO R
LEF T ROO F
STO P BRACKE T
This scre w o n th e righ troof sto p bracke t i sscre w A . Nu
t locations , 4
HOOK STO P
4. Installatio n is th e revers e o f th e remova l procedure .
NOTE:
• Mak e sur e th e roo f cove r open s properl y an d
lock s securely .
• Mak e sur e th e roo f fit s o n th e engin e cove r
securely .
HOOK
STO P
ROO
F HOLDE R
SWITCH
ROOF SID E
HOO K
ENGIN ECOVER ROO
F
ProCarManuals.com
Page 1221 of 1503
Compressor
Replacemen t
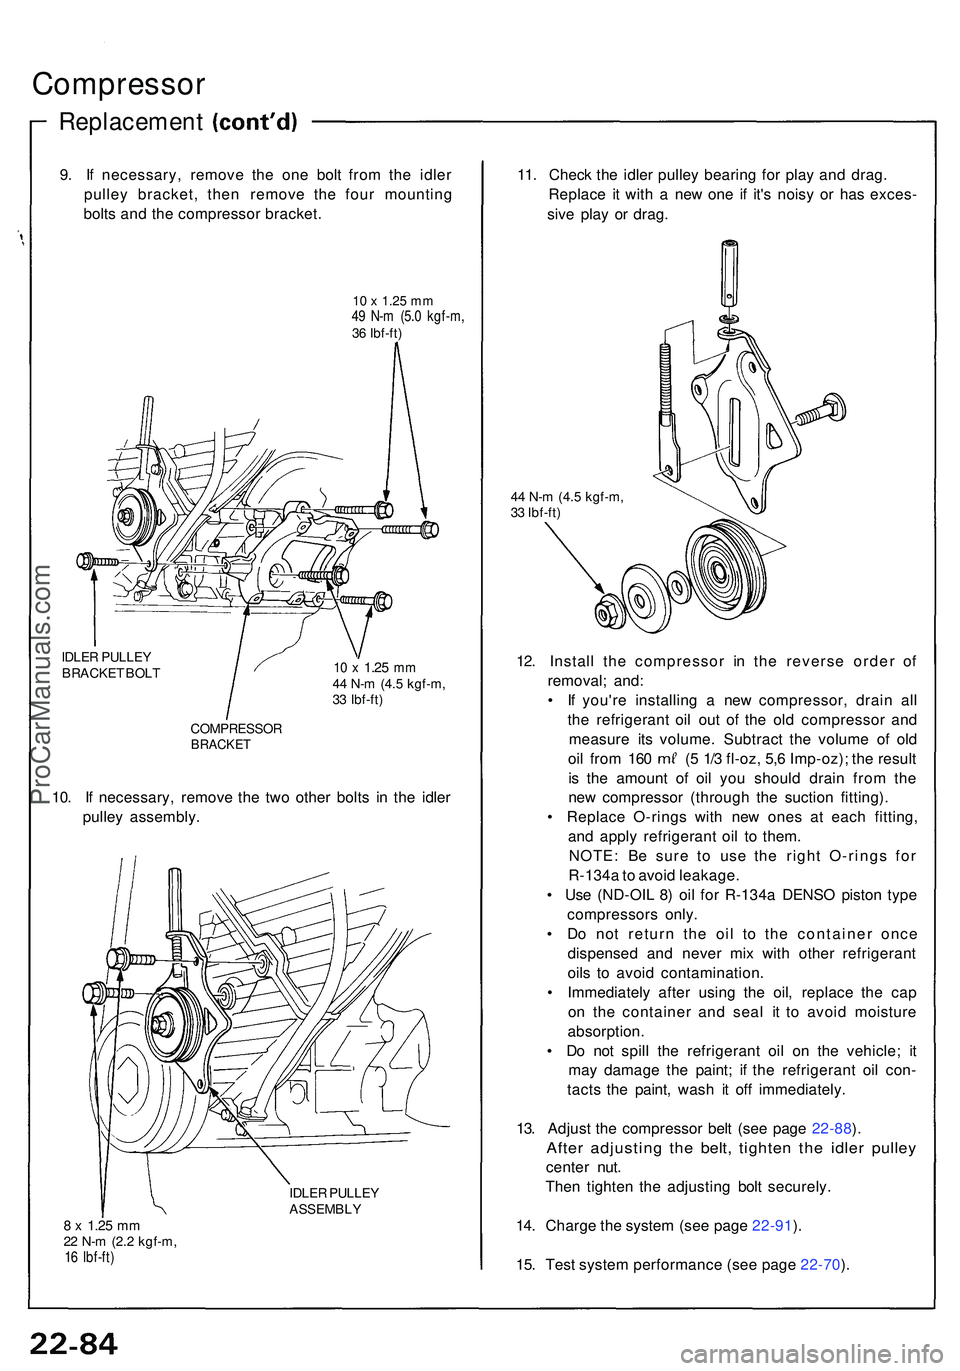
9. I f necessary , remov e th e on e bol t fro m th e idle r
pulle y bracket , the n remov e th e fou r mountin g
bolt s an d th e compresso r bracket .
10 x 1.25 mm49 N- m (5. 0 kgf-m ,36 Ibf-ft )
IDLE R PULLE Y
BRACKE T BOL T
10 x 1.2 5 mm44 N- m (4. 5 kgf-m ,
3 3 Ibf-ft )
COMPRESSO R
BRACKET
10. I f necessary , remov e th e tw o othe r bolt s i n th e idle r
pulle y assembly .
IDLER PULLE Y
ASSEMBL Y
8 x 1.2 5 mm22 N- m (2. 2 kgf-m ,16 Ibf-ft )
11. Chec k th e idle r pulle y bearin g fo r pla y an d drag .
Replac e i t wit h a ne w on e i f it' s nois y o r ha s exces -
siv e pla y o r drag .
44 N- m (4. 5 kgf-m ,
3 3 Ibf-ft )
12. Instal l th e compresso r i n th e revers e orde r o f
removal ; and :
• I f you'r e installin g a ne w compressor , drai n al l
th e refrigeran t oi l ou t o f th e ol d compresso r an d
measur e it s volume . Subtrac t th e volum e o f ol d
oil fro m 16 0 ( 5 1/ 3 fl-oz , 5, 6 Imp-oz) ; th e resul t
i s th e amoun t o f oi l yo u shoul d drai n fro m th e
ne w compresso r (throug h th e suctio n fitting) .
• Replac e O-ring s wit h ne w one s a t eac h fitting ,
an d appl y refrigeran t oi l t o them .
NOTE : B e sur e t o us e th e righ t O-ring s fo r
R-134 a to avoi d leakage .
• Us e (ND-OI L 8 ) oi l fo r R-134 a DENS O pisto n typ e
compressor s only .
• D o no t retur n th e oi l t o th e containe r onc e
dispense d an d neve r mi x wit h othe r refrigeran t
oil s t o avoi d contamination .
• Immediatel y afte r usin g th e oil, replac e th e ca p
o n th e containe r an d sea l i t t o avoi d moistur e
absorption .
• D o no t spil l th e refrigeran t oi l o n th e vehicle ; i t
ma y damag e th e paint ; i f th e refrigeran t oi l con -
tact s th e paint , was h i t of f immediately .
13 . Adjus t th e compresso r bel t (se e pag e 22-88 ).
Afte r adjustin g th e belt , tighte n th e idle r pulle y
center nut .
The n tighte n th e adjustin g bol t securely .
14 . Charg e th e syste m (se e pag e 22-91 ).
15 . Tes t syste m performanc e (se e pag e 22-70 ).
ProCarManuals.com
Page 1232 of 1503
Troubleshooting
Tips and Precautions (cont'd)
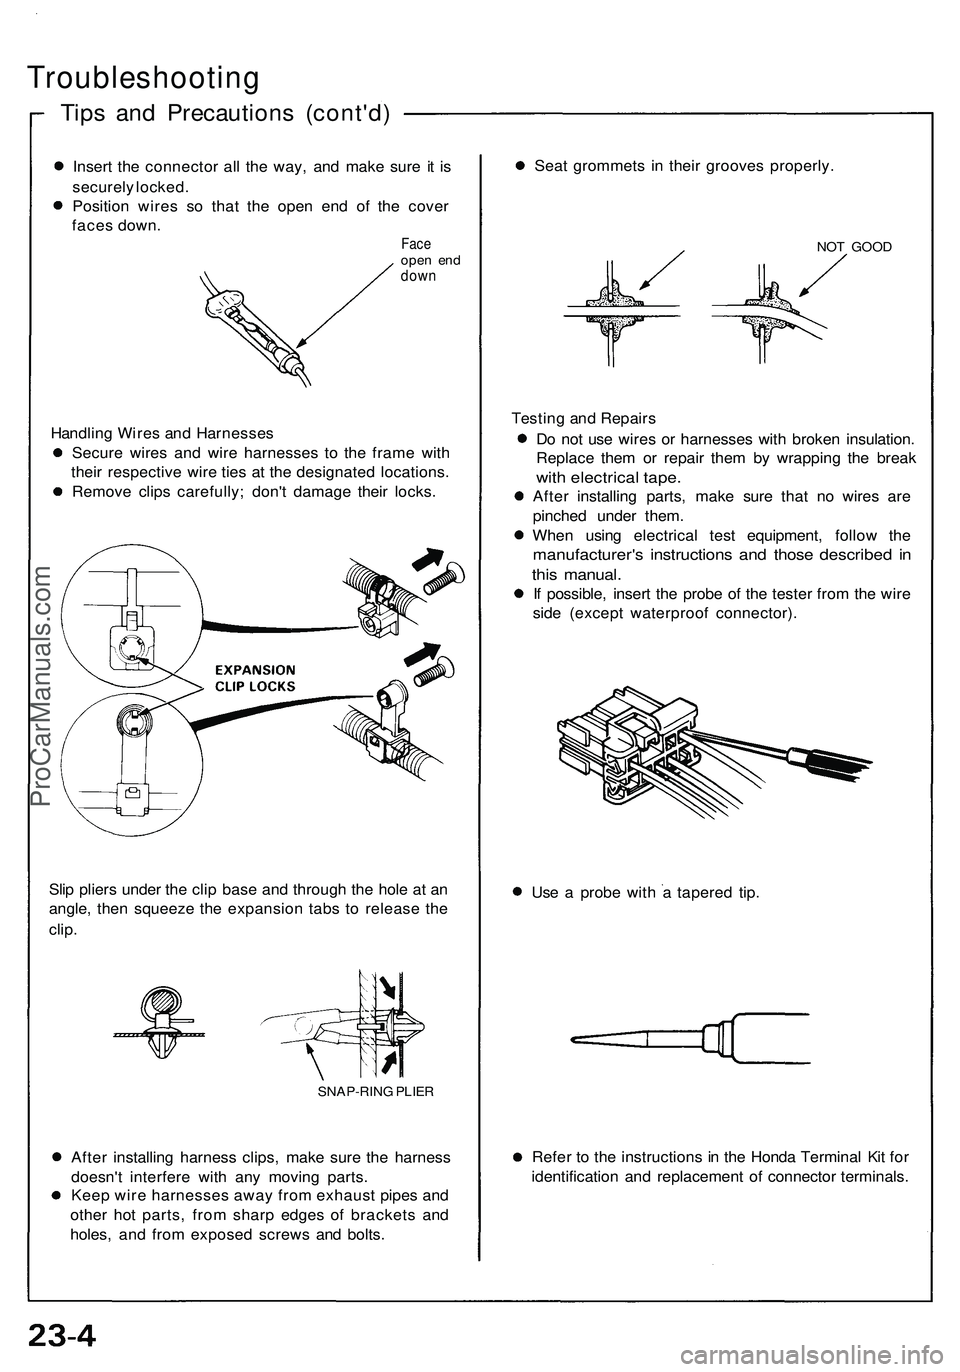
Insert the connector all the way, and make sure it is
securely locked.
Position wires so that the open end of the cover
faces down.
Face
open end
down
Handling Wires and Harnesses
Secure wires and wire harnesses to the frame with
their respective wire ties at the designated locations.
Remove clips carefully; don't damage their locks.
Slip pliers under the clip base and through the hole at an
angle, then squeeze the expansion tabs to release the
clip.
After installing harness clips, make sure the harness
doesn't interfere with any moving parts.
Keep wire harnesses away from exhaust pipes and
other hot parts, from sharp edges of brackets and
holes, and from exposed screws and bolts.
Seat grommets in their grooves properly.
NOT GOOD
Testing and Repairs
Do not use wires or harnesses with broken insulation.
Replace them or repair them by wrapping the break
with electrical tape.
After installing parts, make sure that no wires are
pinched under them.
When using electrical test equipment, follow the
manufacturer's instructions and those described in
this manual.
If possible, insert the probe of the tester from the wire
side (except waterproof connector).
Use a probe with a tapered tip.
Refer to the instructions in the Honda Terminal Kit for
identification and replacement of connector terminals.
SNAP-RING PLIERProCarManuals.com
Page 1233 of 1503
Five-step Troubleshootin g —————
1. Verif y Th e Complain t
Tur n o n al l th e component s i n th e proble m circui t t o
verif y th e custome r complaint . Not e th e symp -
toms . D o no t begi n disassembl y o r testin g unti l yo u
hav e narrowe d dow n th e proble m area .
2 . Analyz e Th e Schemati c
Loo k u p th e schemati c fo r th e proble m circuit .
Determin e ho w th e circui t i s suppose d t o wor k b y
tracin g th e curren t path s fro m th e powe r fee d
throug h th e circui t component s t o ground . I f
severa l circuit s fai l a t th e sam e time , th e fus e o r
groun d i s a likel y cause .
Base d o n th e symptom s an d you r understandin g o f
th e circui t operation , identif y on e o r mor e possibl e
cause s o f th e problem .
3 . Isolat e Th e Proble m B y Testin g Th e Circui t
Mak e circui t test s t o chec k th e diagnosi s yo u mad e
i n ste p 2 . Kee p i n min d tha t a logical , simpl e pro -
cedur e i s th e ke y t o efficien t troubleshooting . Tes t
fo r th e mos t likel y caus e o f failur e first . Tr y t o mak e
test s a t point s tha t ar e easil y accessible . 4
. Fi x Th e Proble m
Onc e th e specifi c proble m is identified , mak e th e
repair . B e sur e t o us e prope r tool s an d saf e
procedures .
5. Mak e Sur e Th e Circui t Work s
Tur n o n al l component s i n th e repaire d circui t i n al l
mode s t o mak e sur e you'v e fixe d th e entir e pro -
blem . I f th e proble m wa s a blow n fuse , b e sur e t o
tes t al l o f th e circuit s o n tha t fuse . Mak e sur e n o
ne w problem s tur n u p an d th e origina l proble m
doe s no t recur .
ProCarManuals.com
Page 1236 of 1503
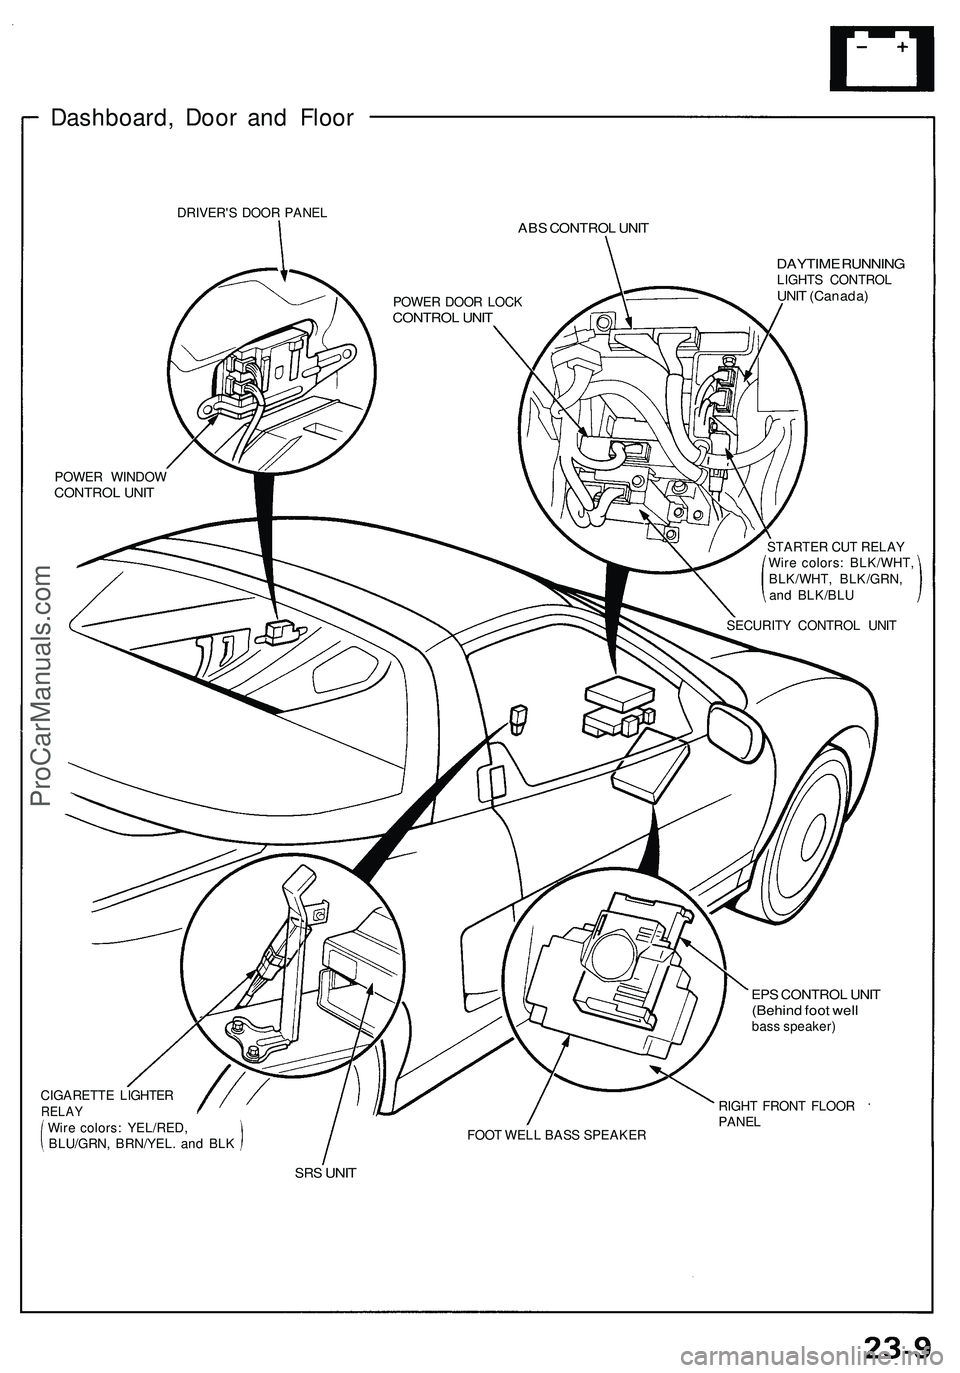
Dashboard, Doo r an d Floo r
DRIVER' S DOO R PANE LABS CONTRO L UNI T
DAYTIM E RUNNIN GLIGHTS CONTRO LUNIT (Canada )
POWER WINDO WCONTRO L UNI T
SECURIT Y CONTRO L UNI T
POWE
R DOO R LOC K
CONTRO L UNI T
CIGARETT E LIGHTE RRELAYWire colors : YEL/RED ,
BLU/GRN , BRN/YEL . an d BL K FOO
T WEL L BAS S SPEAKE R
EPS CONTRO L UNI T(Behin d foo t wel lbass speaker )
RIGH T FRON T FLOO R
PANEL
SRS UNI T
STARTE R CU T RELA Y
Wir e colors : BLK/WHT ,
BLK/WHT , BLK/GRN ,
an d BLK/BL U
ProCarManuals.com
Page 1251 of 1503
— If the starter still does not crank the engine,
remove the starter and diagnose its internal
problems.
— If the starter cranks the engine, check for an
open in the BLK/WHT wire and connectors be-
tween the starter and ignition switch. Check the
ignition switch.
On cars with automatic transmission, check the
A/T gear position switch (neutral position
switch) and connector.
On cars with manual transmission, check the
starter cut relay, clutch interlock switch and
connectors.
NOTE: Check the No. 29 (50 A) fuse and the
starter cut relay, and inspect the security alarm
system.
3. Check for wear or damage:
The starter should crank the engine smoothly and
steadily.
If the starter engages, but cranks the engine er-
ratically, remove the starter motor. Inspect the
starter, drive gear and flywheel ring gear for
damage.
Check the drive gear overrunning clutch for binding
or slipping when the armature is rotated with the
drive gear held. Replace the gears if damaged.
4. Check cranking voltage and current draw:
Voltage should be no less than 8.5 volts.
Current should be no more than 350 amperes.
If voltage is too low, or current draw too high,
check for:
Low battery.
Open circuit in starter armature commutator
segments.
Starter armature dragging.
Shorted armature winding.
Excessive drag in engine.
5. Check cranking rpm:
Engine speed during cranking should be above 100
rpm.
If speed is too low, check for:
Loose battery or starter terminals.
Excessively worn starter brushes.
Open circuit in commutator segments.
Dirty or damaged helical spline or drive gear.
Defective drive gear overrunning clutch.
6. Check the starter disengagement:
Depress the clutch pedal all the way (M/T) or shift to
or position (A/T), turn the ignition switch to
"Start (III)", and release to ON (II).
The starter drive gear should disengage from the
flywheel ring gear.
If the drive gear hangs up on the flywheel ring gear,
check:
Solenoid plunger and switch for malfunction.
Drive gear assembly for dirt or damaged over-
running clutch.ProCarManuals.com