wheel ACURA RL KA9 1996 Service Repair Manual
[x] Cancel search | Manufacturer: ACURA, Model Year: 1996, Model line: RL KA9, Model: ACURA RL KA9 1996Pages: 1954, PDF Size: 61.44 MB
Page 1309 of 1954
Yaw Rate/Latera l
Acceleration Senso r
Pulsers /
Wheel Sensor s
Removal/Installatio n
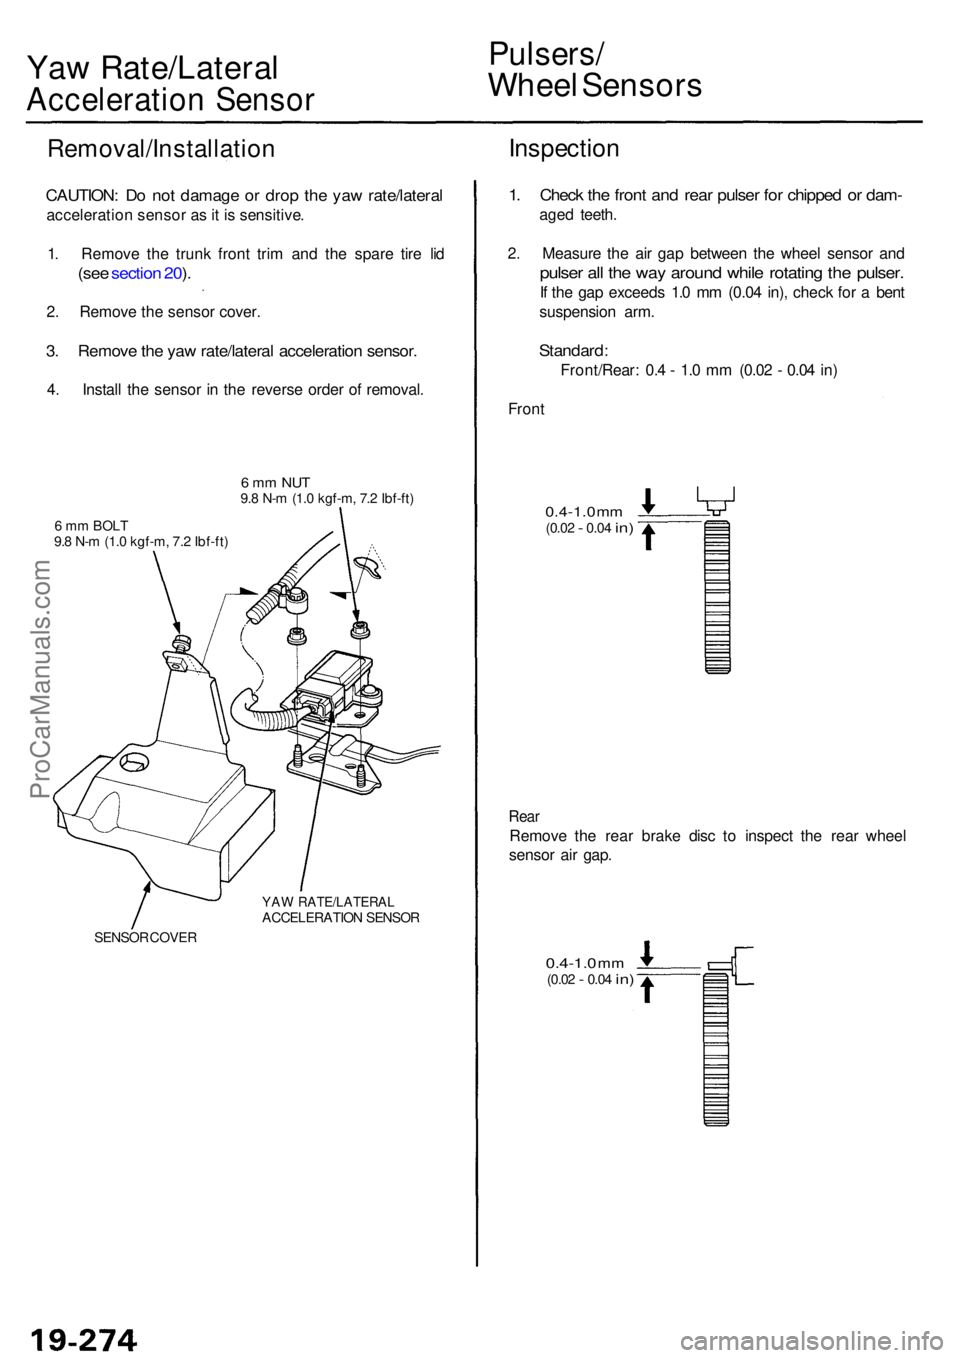
CAUTION: D o no t damag e o r dro p th e ya w rate/latera l
acceleratio n senso r a s it i s sensitive .
1 . Remov e th e trun k fron t tri m an d th e spar e tir e li d
(se e sectio n 20 ).
2 . Remov e th e senso r cover .
3. Remov e th e ya w rate/latera l acceleratio n sensor .
4. Instal l th e senso r i n th e revers e orde r o f removal .
6 m m NU T9.8 N- m (1. 0 kgf-m , 7. 2 Ibf-ft )
6 m m BOL T
9. 8 N- m (1. 0 kgf-m , 7. 2 Ibf-ft )
YAW RATE/LATERA LACCELERATION SENSO R
SENSO R COVE R
Inspectio n
1. Chec k th e fron t an d rea r pulse r fo r chippe d o r dam -
aged teeth .
2 . Measur e th e ai r ga p betwee n th e whee l senso r an d
pulse r al l th e wa y aroun d whil e rotatin g th e pulser .
If th e ga p exceed s 1. 0 m m (0.0 4 in) , chec k fo r a ben t
suspensio n arm .
Standard :
Front/Rear : 0. 4 - 1. 0 m m (0.0 2 - 0.0 4 in )
Fron t
0.4-1. 0 m m(0.0 2 - 0.04 in)
Rea r
Remov e th e rea r brak e dis c t o inspec t th e rea r whee l
senso r ai r gap .
0.4-1. 0 mm(0.0 2 - 0.04 in)
ProCarManuals.com
Page 1310 of 1954
Wheel Senso r Replacemen t
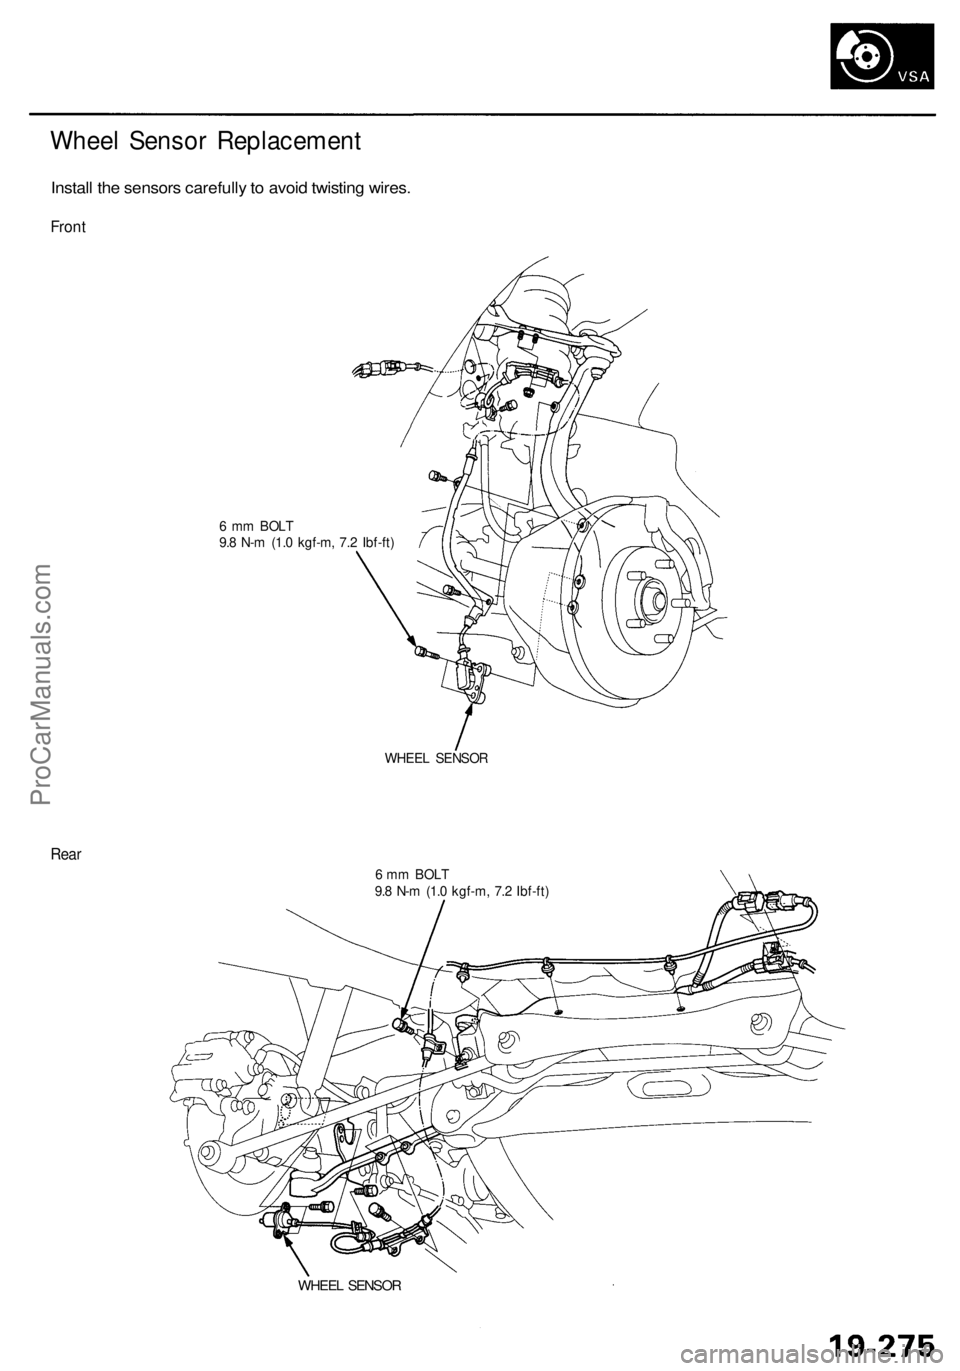
Install th e sensor s carefull y to avoi d twistin g wires .
Front
6 m m BOL T
9. 8 N- m (1. 0 kgf-m , 7. 2 Ibf-ft )
WHEE L SENSO R
Rear
6 m m BOL T
9. 8 N- m (1. 0 kgf-m , 7. 2 Ibf-ft )
WHEE L SENSO R
ProCarManuals.com
Page 1795 of 1954
Precautions/Procedures
General Precaution s
• Carefull y inspec t an y SR S par t befor e yo u instal l it . D o
no t instal l an y par t tha t show s sign s o f bein g droppe d
o r improperl y handled , suc h a s dents , crack s o r defor -
mation :
Airbag s (fronta l airbag s an d sid e airbags )
Cabl e ree l
SRS uni t
Sea t bel t tensioner s
• Us e onl y a digita l multimete r t o chec k th e system . I f
it' s no t a Hond a multimeter , mak e sur e it s outpu t i s
1 0 m A (0.0 1 A ) o r les s whe n switche d t o th e smalles t
valu e i n th e ohmmete r range . A teste r wit h a highe r
output coul d damag e th e airba g circui t o r caus e acci -
denta l deploymen t an d possibl e injury .
• D o no t instal l use d SR S part s fro m anothe r vehicle .
Whe n makin g SR S repairs , us e onl y ne w parts .
• Excep t whe n performin g electrica l inspections ,
alway s disconnec t bot h th e negativ e cabl e an d posi -
tive cabl e fro m th e battery , an d wai t a t leas t 3 min -
utes befor e beginnin g work .
• Replacemen t o f th e combinatio n ligh t an d wiper /
washe r switche s an d cruis e contro l switc h ca n b e
don e withou t removin g th e steerin g wheel :
For combinatio n ligh t an d wiper/washe r switc h
replacement , se e sectio n 23 .
Fo r cruis e contro l set/resume/cance l switc h
replacement , se e sectio n 4 .
• Wheneve r th e ignitio n switc h is O N (II) , o r ha s bee n
turne d OF F fo r les s tha n 3 minutes , b e carefu l no t t o
bum p th e SR S unit ; th e airbag s coul d accidentall y
deplo y an d caus e damag e o r injury .
• Wheneve r th e airbag s hav e bee n activated , replac e
th e sea t bel t tensioner s an d th e SR S unit .
• Th e origina l radi o ha s a code d thef t protectio n circuit .
B e sur e to ge t th e customer' s cod e numbe r befor e dis -
connectin g th e batter y cables .
• Th e PC M memor y mus t b e rese t afte r reconnectin g th e
batter y (se e pag e 11-125 ).
Airba g Handlin g an d Storag e
Do no t tr y t o disassembl e an y o f th e airbags , fronta l o r
side . The y hav e n o serviceabl e parts . Onc e a n airba g
ha s bee n operate d (deployed) , i t canno t b e repaire d o r
reused .
For temporar y storag e o f a n airba g durin g service ,
please observ e th e followin g precautions :
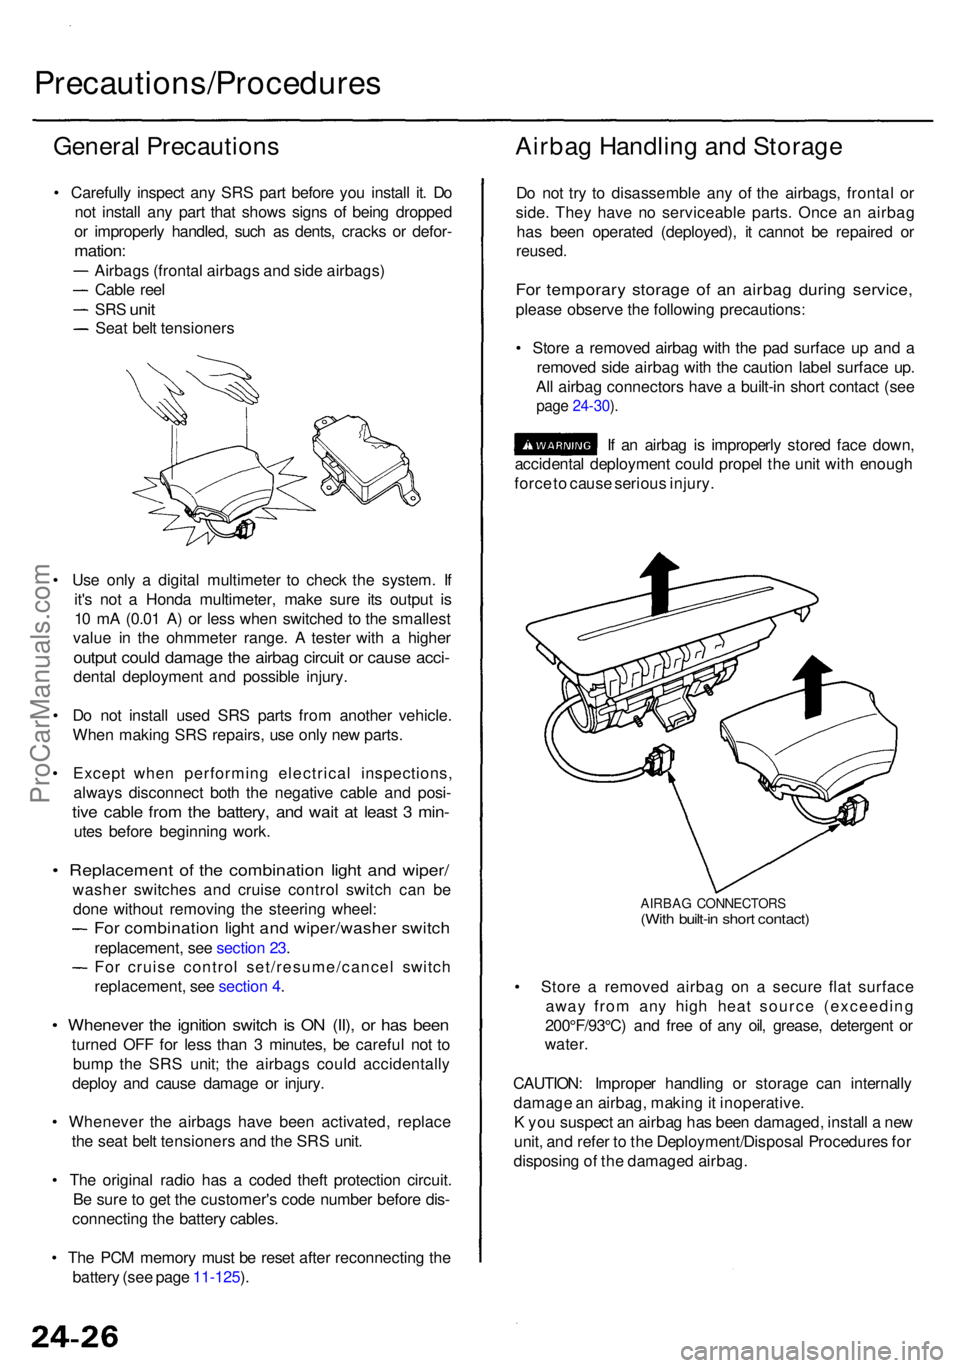
• Stor e a remove d airba g wit h th e pa d surfac e u p an d a
remove d sid e airba g wit h th e cautio n labe l surfac e up .
Al l airba g connector s hav e a built-i n shor t contac t (se e
page 24-30 ).
If a n airba g is improperl y store d fac e down ,
accidenta l deploymen t coul d prope l th e uni t wit h enoug h
forc e to caus e seriou s injury .
AIRBA G CONNECTOR S(With built-i n shor t contact )
• Stor e a remove d airba g o n a secur e fla t surfac e
awa y fro m an y hig h hea t sourc e (exceedin g
200°F/93°C ) an d fre e o f an y oil , grease , detergen t o r
water .
CAUTION : Imprope r handlin g o r storag e ca n internall y
damag e a n airbag , makin g it inoperative .
K yo u suspec t a n airba g ha s bee n damaged , instal l a ne w
unit , an d refe r t o th e Deployment/Disposa l Procedure s fo r
disposin g o f th e damage d airbag .
ProCarManuals.com
Page 1802 of 1954
1. Disconnec t th e batter y negativ e cable , the n discon -
nec t th e positiv e cabl e fro m th e battery , an d wai t a t
leas t 3 minutes .
2 . Disconnec t th e driver' s an d fron t passenger' s airba g
connectors . Disconnec t th e driver' s an d fron t pas -
senger' s sea t bel t tensione r connectors , the n dis -
connec t th e driver' s an d fron t passenger' s sid e
airba g connectors .
NOTE : Fo r disconnectin g th e spring-loade d loc k typ e
connector , refe r t o pag e 24-29 .
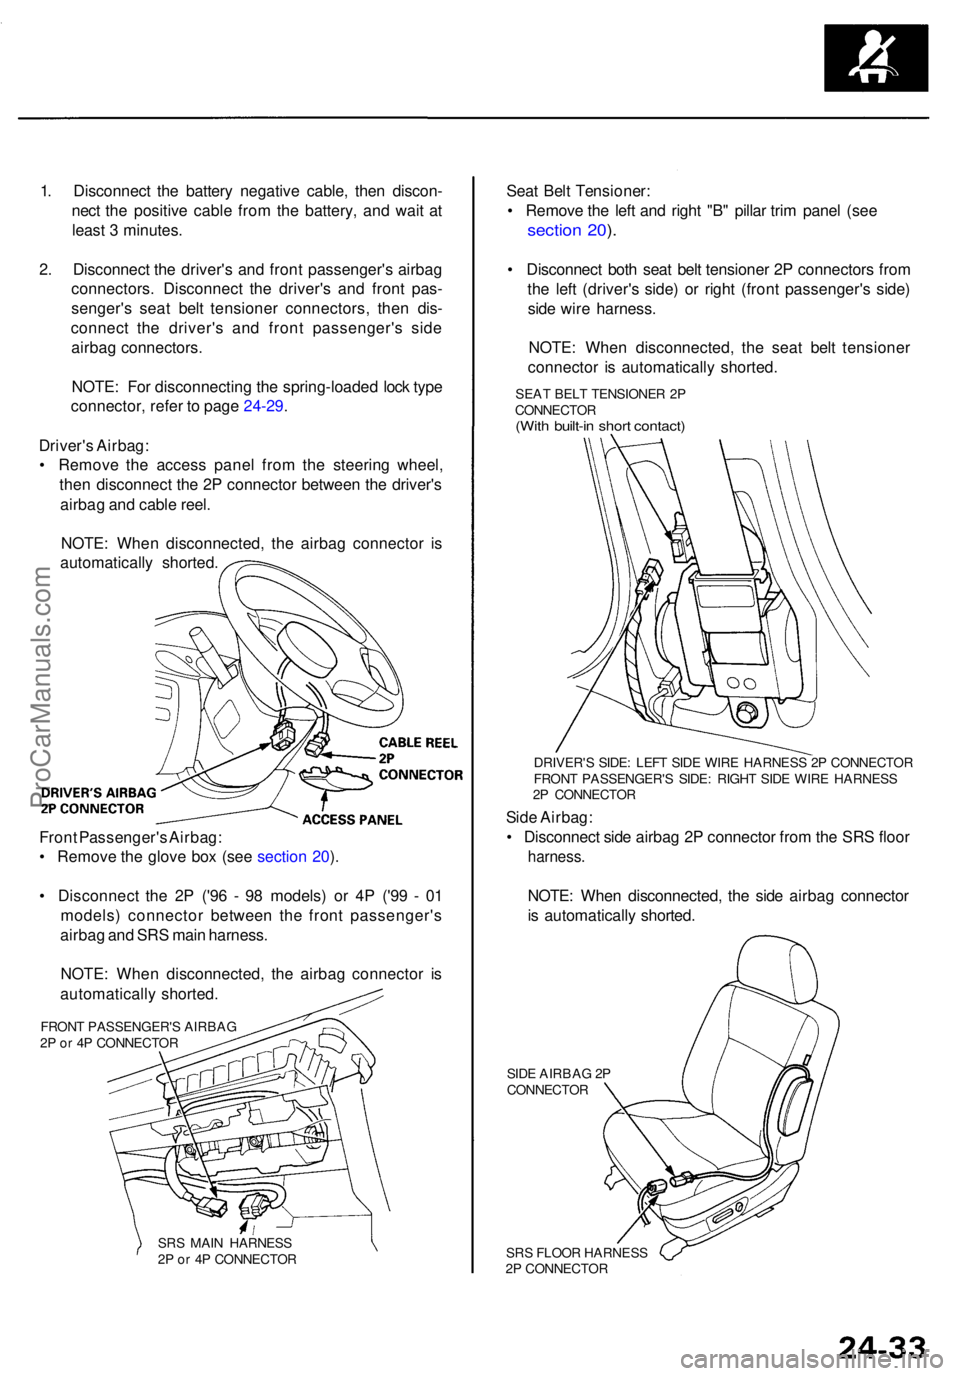
Driver' s Airbag :
• Remov e th e acces s pane l fro m th e steerin g wheel ,
the n disconnec t th e 2 P connecto r betwee n th e driver' s
airba g an d cabl e reel .
NOTE : Whe n disconnected , th e airba g connecto r i s
automaticall y shorted .
Fron t Passenger' s Airbag :
• Remov e th e glov e bo x (se e sectio n 20 ).
• Disconnec t th e 2 P ('9 6 - 9 8 models ) o r 4 P ('9 9 - 0 1
models ) connecto r betwee n th e fron t passenger' s
airba g an d SR S mai n harness .
NOTE : Whe n disconnected , th e airba g connecto r i s
automaticall y shorted .
DRIVER' S SIDE : LEF T SID E WIR E HARNES S 2 P CONNECTO R
FRON T PASSENGER' S SIDE : RIGH T SID E WIR E HARNES S
2 P CONNECTO R
Side Airbag :
• Disconnec t sid e airba g 2 P connecto r fro m th e SR S floo r
harness .
NOTE: Whe n disconnected , th e sid e airba g connecto r
i s automaticall y shorted .
Sea
t Bel t Tensioner :
• Remov e th e lef t an d righ t "B " pilla r tri m pane l (se e
sectio n 20 ).
• Disconnec t bot h sea t bel t tensione r 2 P connector s fro m
th e lef t (driver' s side ) o r righ t (fron t passenger' s side )
sid e wir e harness .
NOTE : Whe n disconnected , th e sea t bel t tensione r
connecto r i s automaticall y shorted .
SIDE AIRBA G 2P
CONNECTO R
SR S FLOO R HARNES S
2 P CONNECTO R
SR
S MAI N HARNES S
2 P o r 4 P CONNECTO R
FRON
T PASSENGER' S AIRBA G
2 P o r 4 P CONNECTO R SEA
T BEL T TENSIONE R 2 P
CONNECTO R
(With built-i n shor t contact )
ProCarManuals.com
Page 1803 of 1954
Precautions/Procedures
Steering-related Precaution s
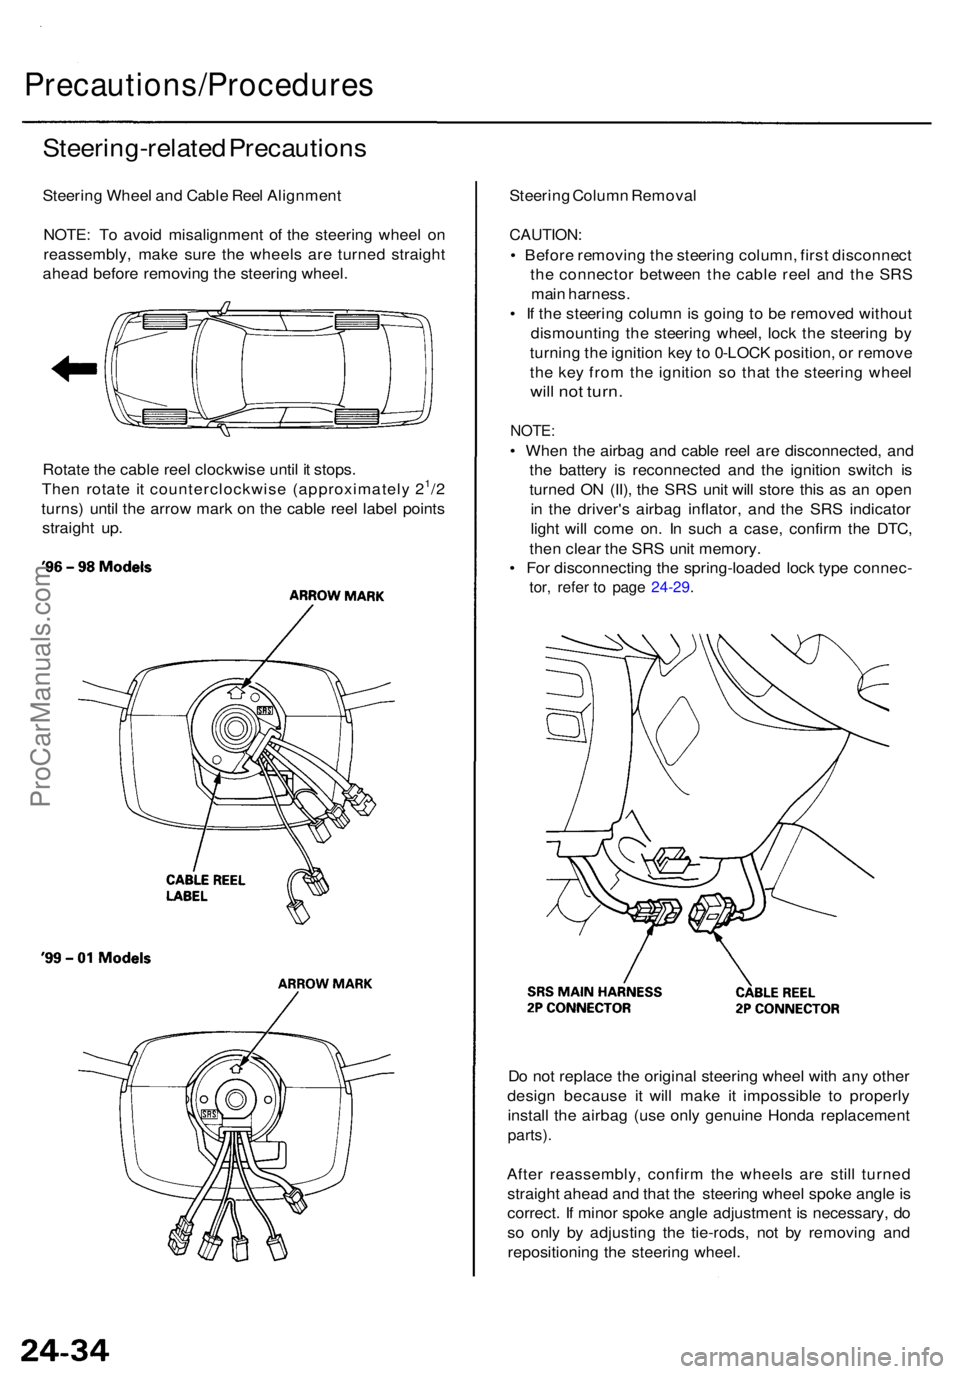
Steering Whee l an d Cabl e Ree l Alignmen t
NOTE : T o avoi d misalignmen t o f th e steerin g whee l o n
reassembly , mak e sur e th e wheel s ar e turne d straigh t
ahea d befor e removin g th e steerin g wheel .
Rotat e th e cabl e ree l clockwis e unti l i t stops .
The n rotat e i t counterclockwis e (approximatel y 2
1/2
turns ) unti l th e arro w mar k o n th e cabl e ree l labe l point s
straigh t up . Steerin
g Colum n Remova l
CAUTION :
• Befor e removin g th e steerin g column , firs t disconnec t
th e connecto r betwee n th e cabl e ree l an d th e SR S
mai n harness .
• I f th e steerin g colum n is goin g to b e remove d withou t
dismountin g th e steerin g wheel , loc k th e steerin g b y
turnin g th e ignitio n ke y to 0-LOC K position , o r remov e
th e ke y fro m th e ignitio n s o tha t th e steerin g whee l
will no t turn .
NOTE :
• Whe n th e airba g an d cabl e ree l ar e disconnected , an d
th e batter y i s reconnecte d an d th e ignitio n switc h i s
turne d O N (II) , th e SR S uni t wil l stor e thi s a s a n ope n
i n th e driver' s airba g inflator , an d th e SR S indicato r
ligh t wil l com e on . I n suc h a case , confir m th e DTC ,
the n clea r th e SR S uni t memory .
• Fo r disconnectin g th e spring-loade d loc k typ e connec -
tor, refe r t o pag e 24-29 .
Do no t replac e th e origina l steerin g whee l wit h an y othe r
desig n becaus e i t will mak e i t impossibl e t o properl y
instal l th e airba g (us e onl y genuin e Hond a replacemen t
parts).
After reassembly , confir m th e wheel s ar e stil l turne d
straigh t ahea d an d tha t th e steerin g whee l spok e angl e is
correct . I f mino r spok e angl e adjustmen t i s necessary , d o
s o onl y b y adjustin g th e tie-rods , no t b y removin g an d
repositionin g th e steerin g wheel .
ProCarManuals.com
Page 1931 of 1954
Airbag
Replacemen t
Store a remove d airba g wit h th e pa d sur -
fac e up . I f th e airba g i s improperl y store d fac e down ,
accidenta l deploymen t coul d prope l th e uni t wit h
enoug h forc e to caus e seriou s injury .
CAUTION :
• D o no t instal l use d SR S part s fro m anothe r vehicle .
Whe n repairing , us e onl y ne w SR S parts .
• Carefull y inspec t th e airba g befor e yo u instal l it . D o
no t instal l a n airba g tha t show s sign s o f bein g
droppe d o r improperl y handled , suc h a s dents ,
crack s o r deformation .
• Alway s disconnec t th e airba g connector(s ) whe n th e
harnes s is disconnected .
• D o no t disassembl e o r tampe r wit h th e airbag .
1 . Mak e sur e yo u hav e th e anti-thef t cod e fo r th e
radio , the n writ e dow n th e frequencie s fo r th e
radio' s prese t buttons .
2 . Disconnec t th e batter y negativ e cable , the n discon -
nec t th e positiv e cabl e fro m th e battery , an d wai t a t
leas t 3 minutes .
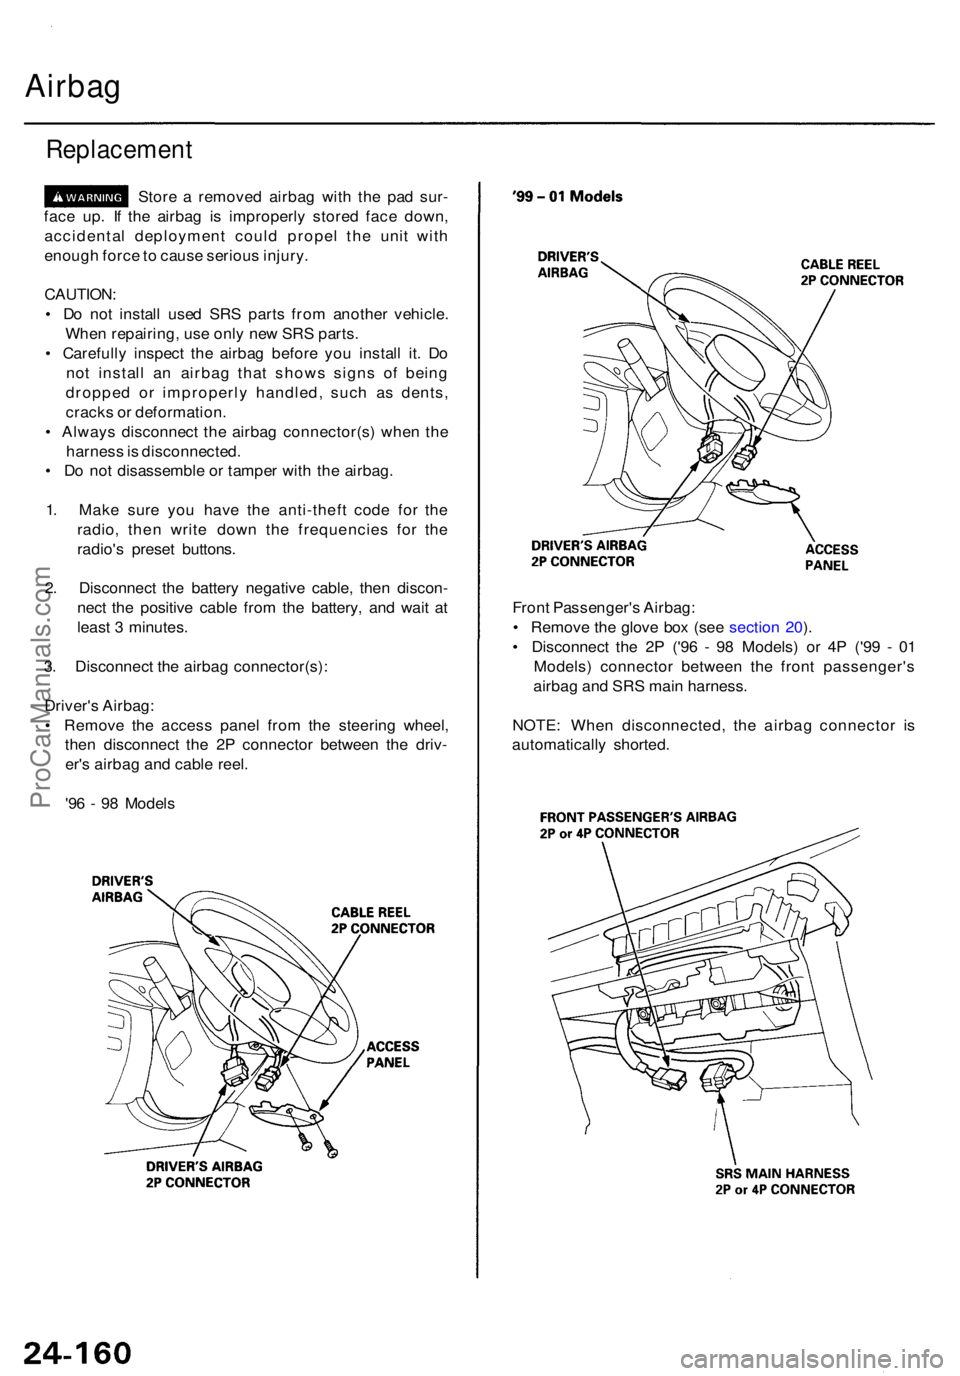
3 . Disconnec t th e airba g connector(s) :
Driver' s Airbag :
• Remov e th e acces s pane l fro m th e steerin g wheel ,
the n disconnec t th e 2 P connecto r betwee n th e driv -
er' s airba g an d cabl e reel .
'9 6 - 9 8 Model s Fron
t Passenger' s Airbag :
• Remov e th e glov e bo x (se e sectio n 20 ).
• Disconnec t th e 2 P ('9 6 - 9 8 Models ) o r 4 P ('9 9 - 0 1
Models ) connecto r betwee n th e fron t passenger' s
airba g an d SR S mai n harness .
NOTE : Whe n disconnected , th e airba g connecto r i s
automaticall y shorted .
ProCarManuals.com
Page 1933 of 1954
Airbag
Replacement (cont'd)
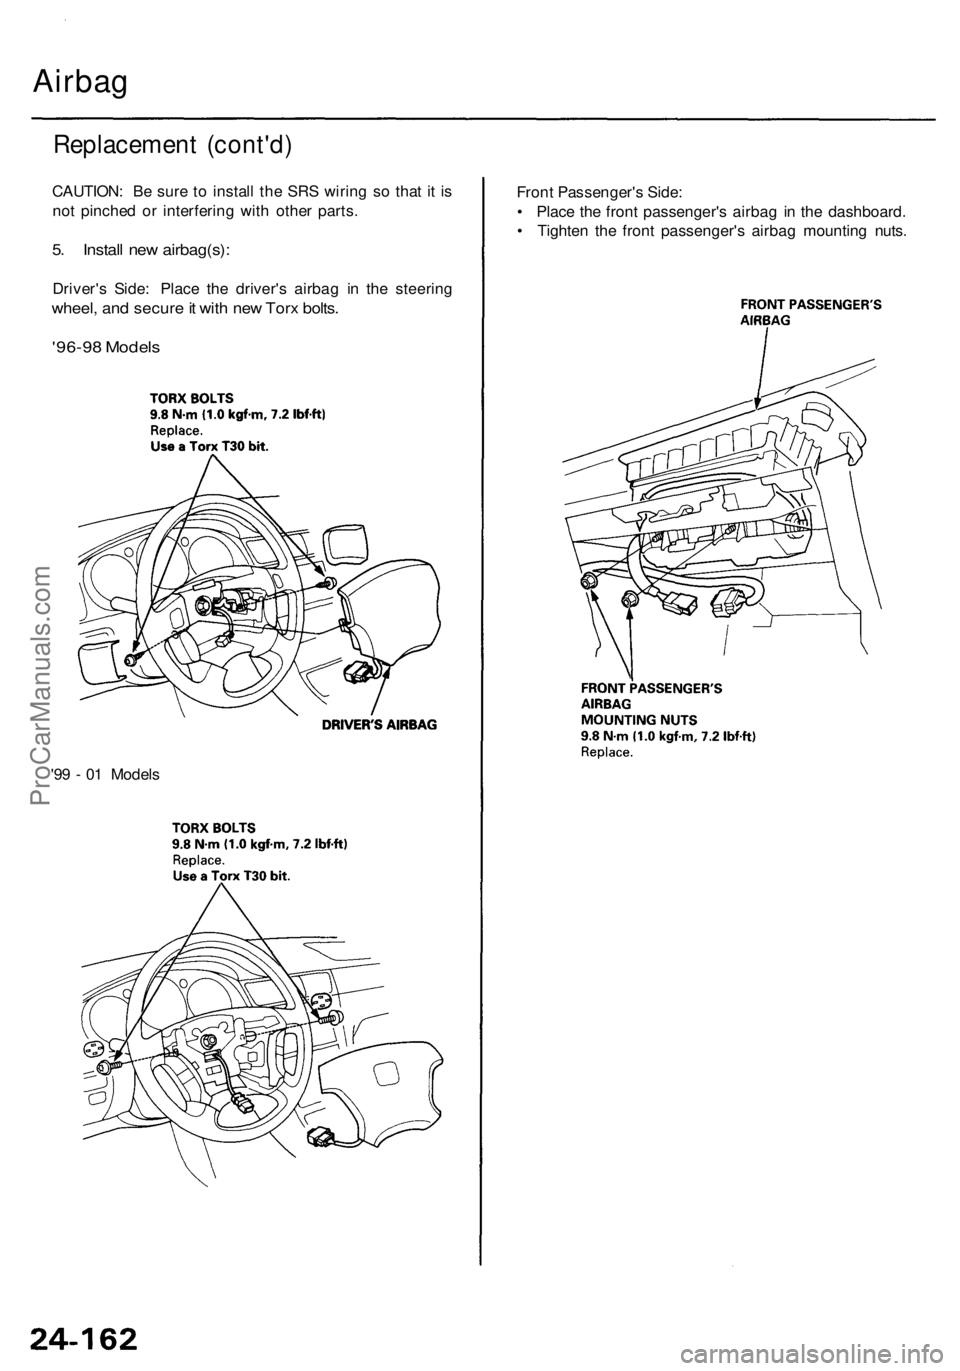
CAUTION: Be sure to install the SRS wiring so that it is
not pinched or interfering with other parts.
5. Install new airbag(s):
Driver's Side: Place the driver's airbag in the steering
wheel, and secure it with new Torx bolts.
'96-98 Models
Front Passenger's Side:
• Place the front passenger's airbag in the dashboard.
• Tighten the front passenger's airbag mounting nuts.
'99 - 01 ModelsProCarManuals.com
Page 1934 of 1954
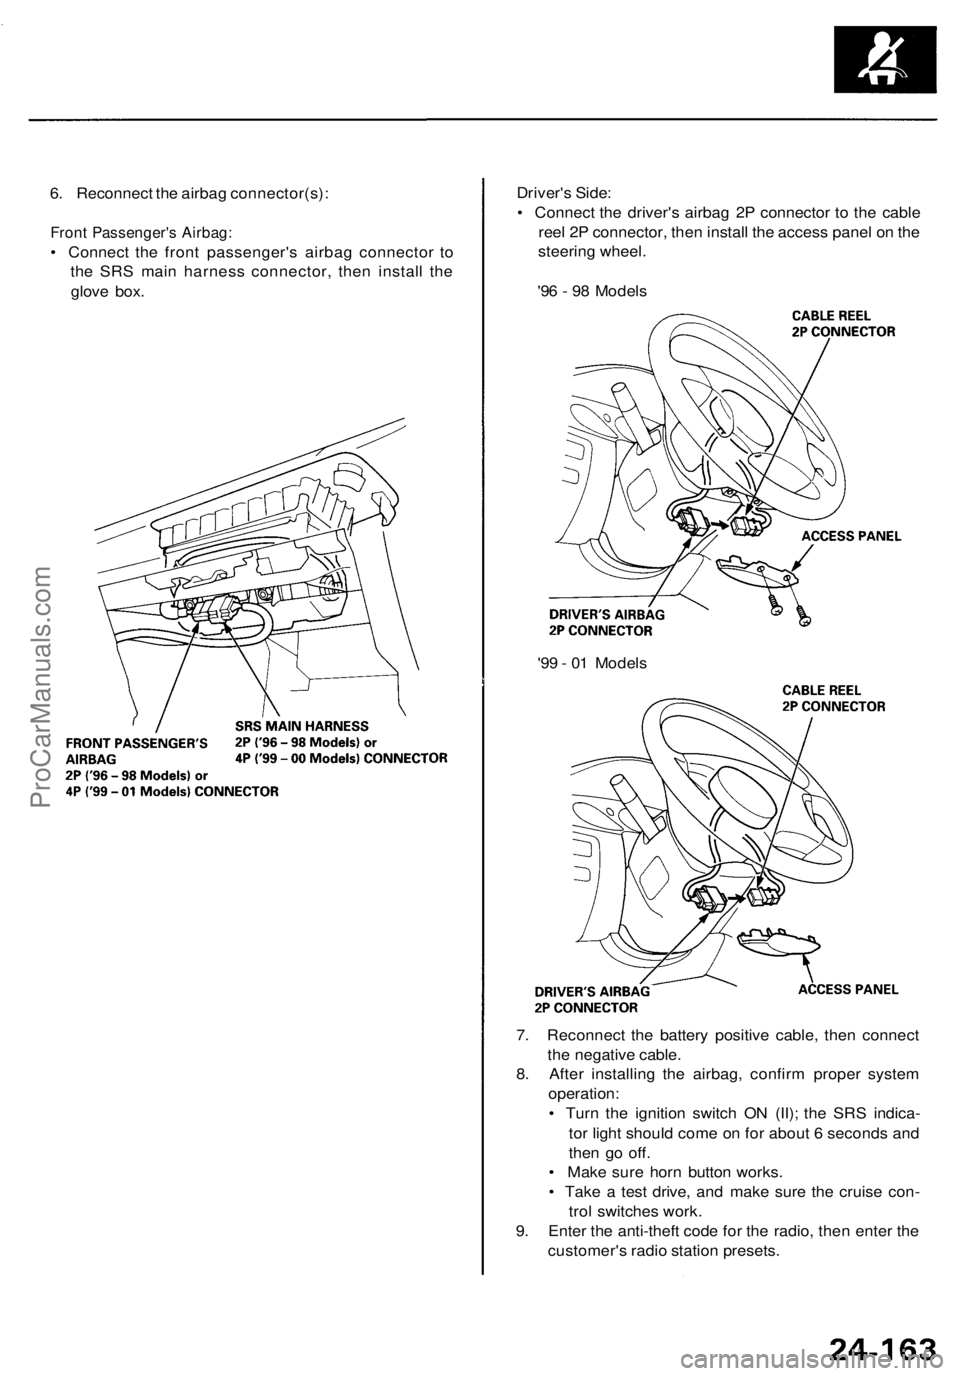
6. Reconnect the airbag connector(s):
Front Passenger's Airbag:
• Connect the front passenger's airbag connector to
the SRS main harness connector, then install the
glove box.
Driver's Side:
• Connect the driver's airbag 2P connector to the cable
reel 2P connector, then install the access panel on the
steering wheel.
'96 - 98 Models
7. Reconnect the battery positive cable, then connect
the negative cable.
8. After installing the airbag, confirm proper system
operation:
• Turn the ignition switch ON (II); the SRS indica-
tor light should come on for about 6 seconds and
then go off.
• Make sure horn button works.
• Take a test drive, and make sure the cruise con-
trol switches work.
9. Enter the anti-theft code for the radio, then enter the
customer's radio station presets.
'99 - 01 ModelsProCarManuals.com
Page 1947 of 1954
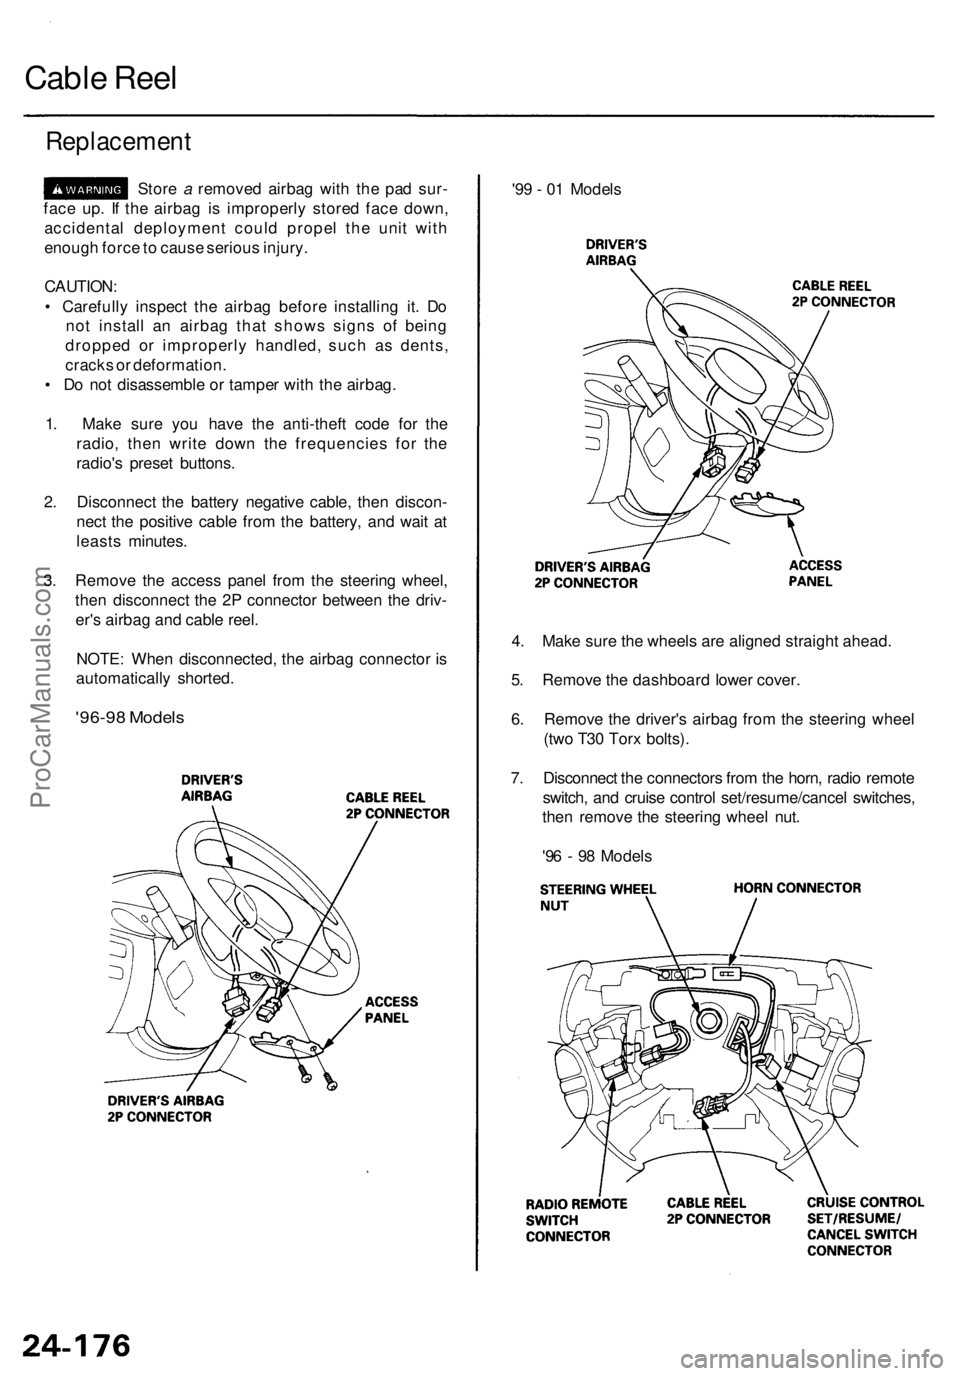
'96-98 Model s
4. Mak e sur e th e wheel s ar e aligne d straigh t ahead .
5 . Remov e th e dashboar d lowe r cover .
6 . Remov e th e driver' s airba g fro m th e steerin g whee l
(tw o T3 0 Tor x bolts) .
7 . Disconnec t th e connector s fro m th e horn , radi o remot e
switch , an d cruis e contro l set/resume/cance l switches ,
the n remov e th e steerin g whee l nut .
'9 6 - 9 8 Model s
Replacemen t
Store a remove d airba g wit h th e pa d sur -
fac e up . I f th e airba g i s improperl y store d fac e down ,
accidenta l deploymen t coul d prope l th e uni t wit h
enoug h forc e to caus e seriou s injury .
CAUTION :
• Carefull y inspec t th e airba g befor e installin g it . D o
no t instal l a n airba g tha t show s sign s o f bein g
droppe d o r improperl y handled , suc h a s dents ,
crack s o r deformation .
• D o no t disassembl e o r tampe r wit h th e airbag .
1 . Mak e sur e yo u hav e th e anti-thef t cod e fo r th e
radio , the n writ e dow n th e frequencie s fo r th e
radio' s prese t buttons .
2 . Disconnec t th e batter y negativ e cable , the n discon -
nec t th e positiv e cabl e fro m th e battery , an d wai t a t
least s minutes .
3 . Remov e th e acces s pane l fro m th e steerin g wheel ,
the n disconnec t th e 2 P connecto r betwee n th e driv -
er' s airba g an d cabl e reel .
NOTE : Whe n disconnected , th e airba g connecto r i s
automaticall y shorted . '9
9 - 0 1 Model s
Cable Ree l
ProCarManuals.com
Page 1948 of 1954
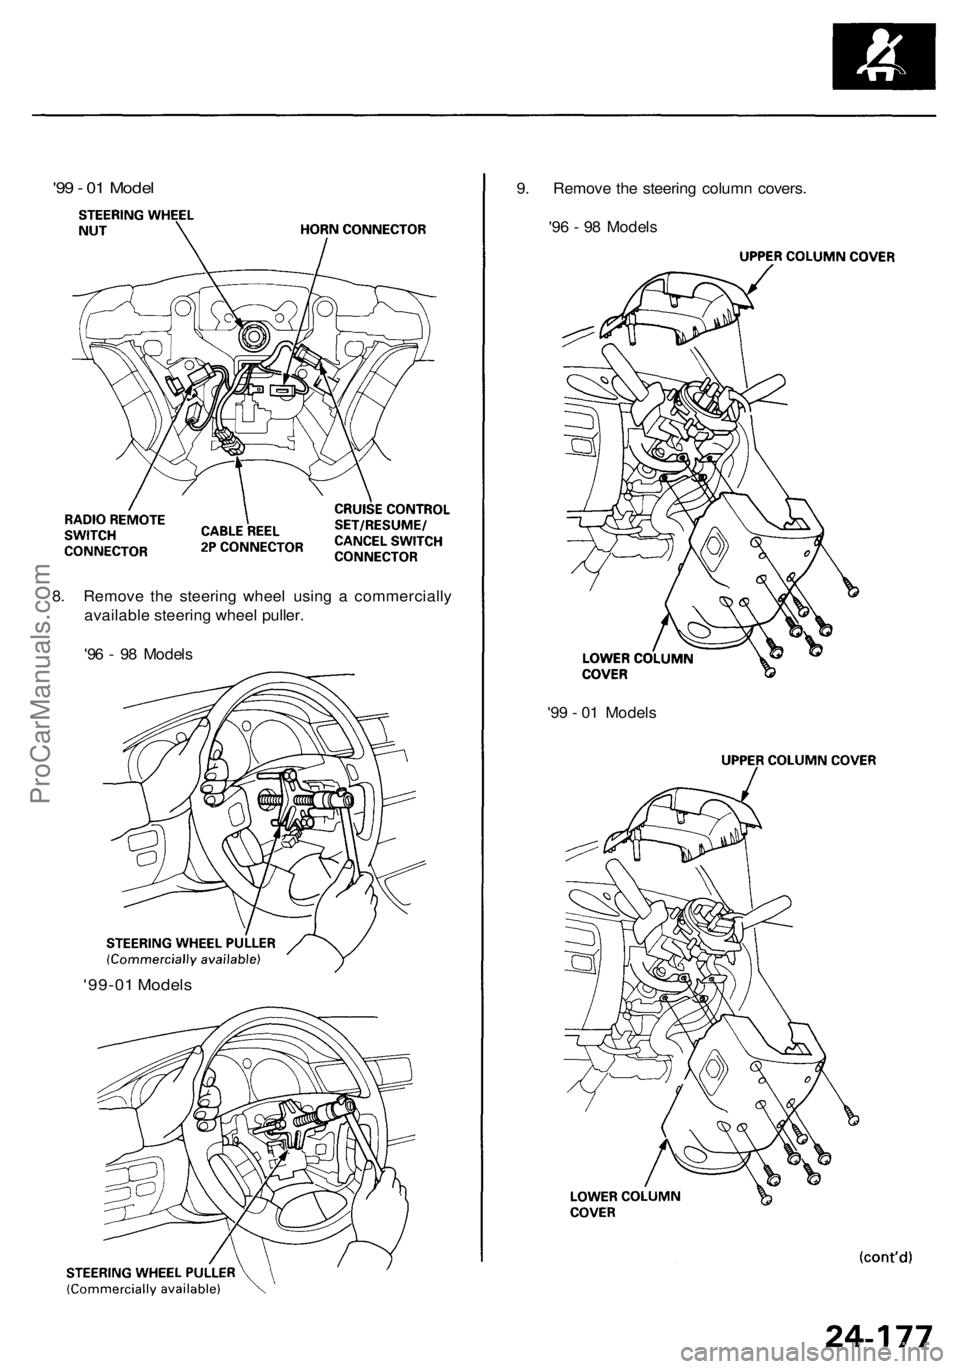
'99-01 Models
'99 - 01 Models
8. Remove the steering wheel using a commercially
available steering wheel puller.
'96 - 98 Models
'99 - 01 Model
9. Remove the steering column covers.
'96 - 98 ModelsProCarManuals.com