relay ACURA RL KA9 1996 Service Repair Manual
[x] Cancel search | Manufacturer: ACURA, Model Year: 1996, Model line: RL KA9, Model: ACURA RL KA9 1996Pages: 1954, PDF Size: 61.44 MB
Page 1670 of 1954
Rear Windo w Defogge r
Function Tes t
CAUTION : B e carefu l no t t o scratc h o r damag e th e defog -
ge r wire s wit h th e teste r probe .
1. Chec k fo r voltag e betwee n th e positiv e termina l an d
bod y groun d wit h th e ignitio n switc h an d defogge r
switc h ON .
Ther e shoul d b e batter y voltage .
• I f ther e is n o voltage , chec k for :
fault y defogge r relay ,
fault y defogge r switch .
fault y defogge r coil .
a n ope n in th e YEL/BL U wire .
• I f ther e i s batter y voltage , g o t o ste p 2 .
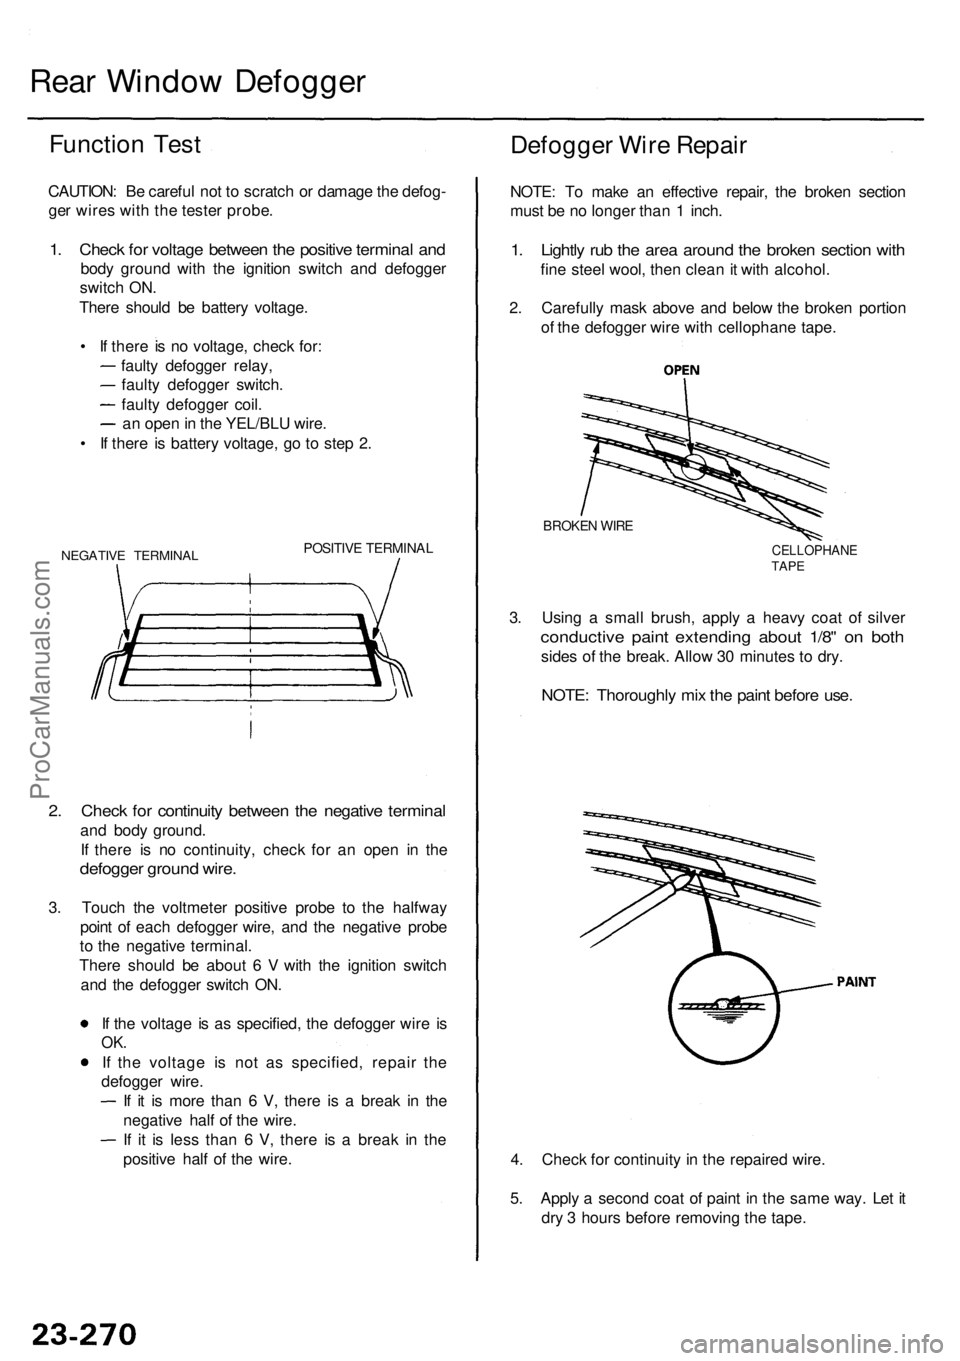
NEGATIV E TERMINA LPOSITIVE TERMINA L
2. Chec k fo r continuit y betwee n th e negativ e termina l
and bod y ground .
I f ther e i s n o continuity , chec k fo r a n ope n i n th e
defogge r groun d wire .
3. Touc h th e voltmete r positiv e prob e t o th e halfwa y
poin t o f eac h defogge r wire , an d th e negativ e prob e
t o th e negativ e terminal .
Ther e shoul d b e abou t 6 V with th e ignitio n switc h
an d th e defogge r switc h ON .
I f th e voltag e i s a s specified , th e defogge r wir e i s
OK .
If th e voltag e i s no t a s specified , repai r th e
defogge r wire .
I f i t i s mor e tha n 6 V , ther e i s a brea k i n th e
negativ e hal f o f th e wire .
I f i t i s les s tha n 6 V , ther e i s a brea k i n th e
positiv e hal f o f th e wire .
Defogge r Wir e Repai r
NOTE: T o mak e a n effectiv e repair , th e broke n sectio n
mus t b e n o longe r tha n 1 inch .
1. Lightl y ru b th e are a aroun d th e broke n sectio n wit h
fine stee l wool , the n clea n it wit h alcohol .
2 . Carefull y mas k abov e an d belo w th e broke n portio n
o f th e defogge r wir e wit h cellophan e tape .
3 . Usin g a smal l brush , appl y a heav y coa t o f silve r
conductiv e pain t extendin g abou t 1/8 " o n bot h
sides o f th e break . Allo w 3 0 minute s t o dry .
BROKE N WIR E
CELLOPHAN ETAPE
NOTE : Thoroughl y mi x th e pain t befor e use .
4. Chec k fo r continuit y in th e repaire d wire .
5 . Appl y a secon d coa t o f pain t i n th e sam e way . Le t i t
dr y 3 hour s befor e removin g th e tape .
ProCarManuals.com
Page 1691 of 1954
Power Window s
Component Location Index
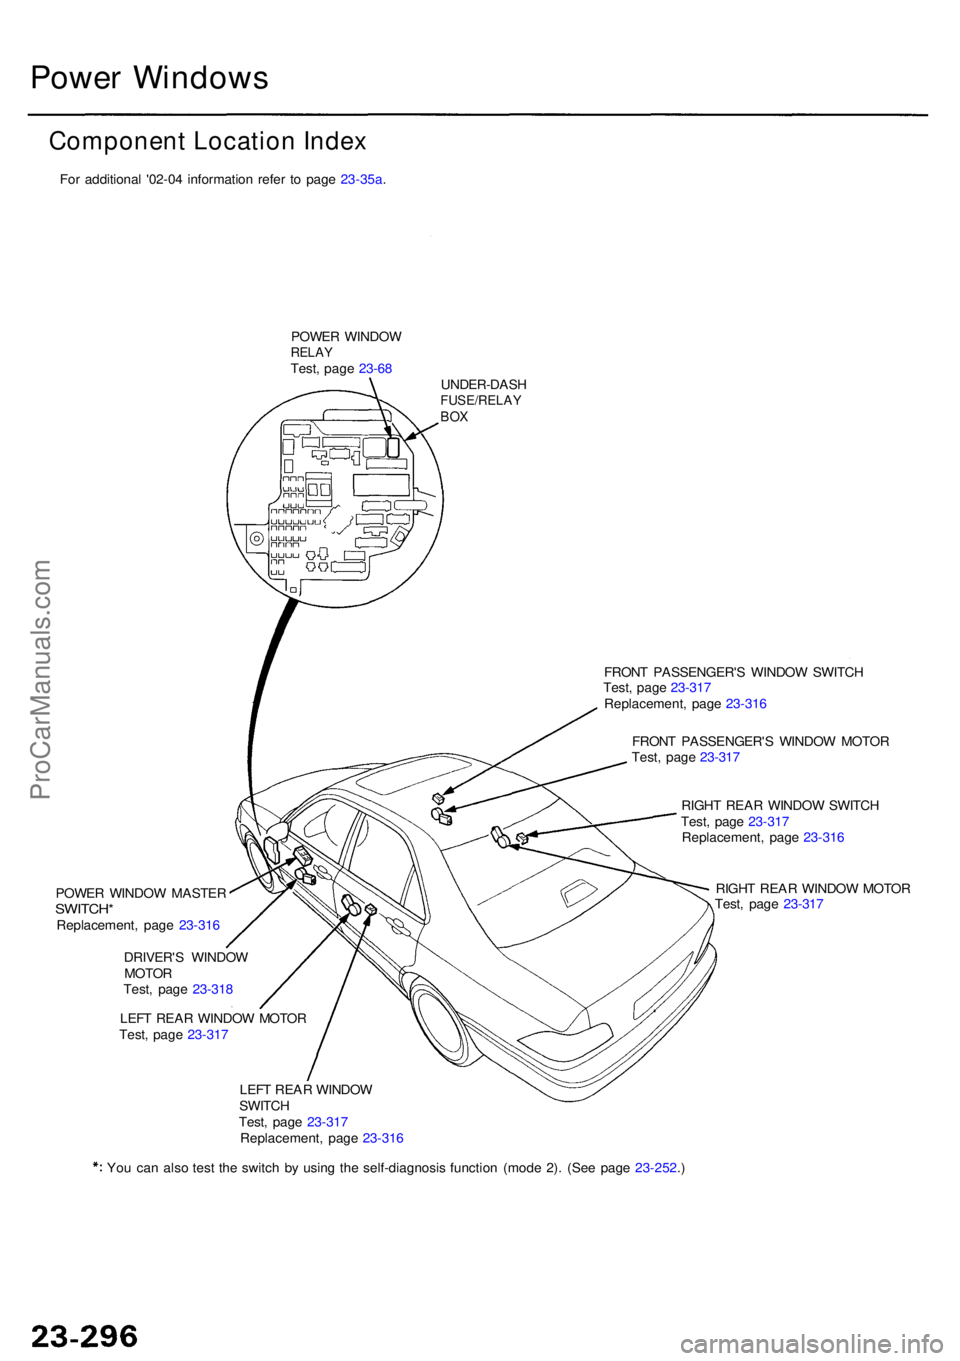
POWER WINDO WRELAYTest, pag e 23-6 8
UNDER-DAS H
FUSE/RELAYBOX
FRON T PASSENGER' S WINDO W SWITC H
Test , pag e 23-31 7
Replacement , pag e 23-31 6
FRON T PASSENGER' S WINDO W MOTO R
Test , pag e 23-31 7
RIGH T REA R WINDO W SWITC H
Test , pag e 23-31 7
Replacement , pag e 23-31 6
RIGH T REA R WINDO W MOTO R
Test , pag e 23-31 7
POWE
R WINDO W MASTE R
SWITCH*Replacement , pag e 23-31 6
DRIVER' S WINDO W
MOTO R
Test , pag e 23-31 8
LEF T REA R WINDO W MOTO R
Test , pag e 23-31 7
LEF T REA R WINDO W
SWITC H
Test , pag e 23-31 7
Replacement , pag e 23-31 6
Yo u ca n als o tes t th e switc h b y usin g th e self-diagnosi s functio n (mod e 2) . (Se e pag e 23-252 .)For additional '02-04 information refer to page 23-35a.
ProCarManuals.com
Page 1692 of 1954
*1: '96-9 7 model s*2: '9 8 - 0 0 model s
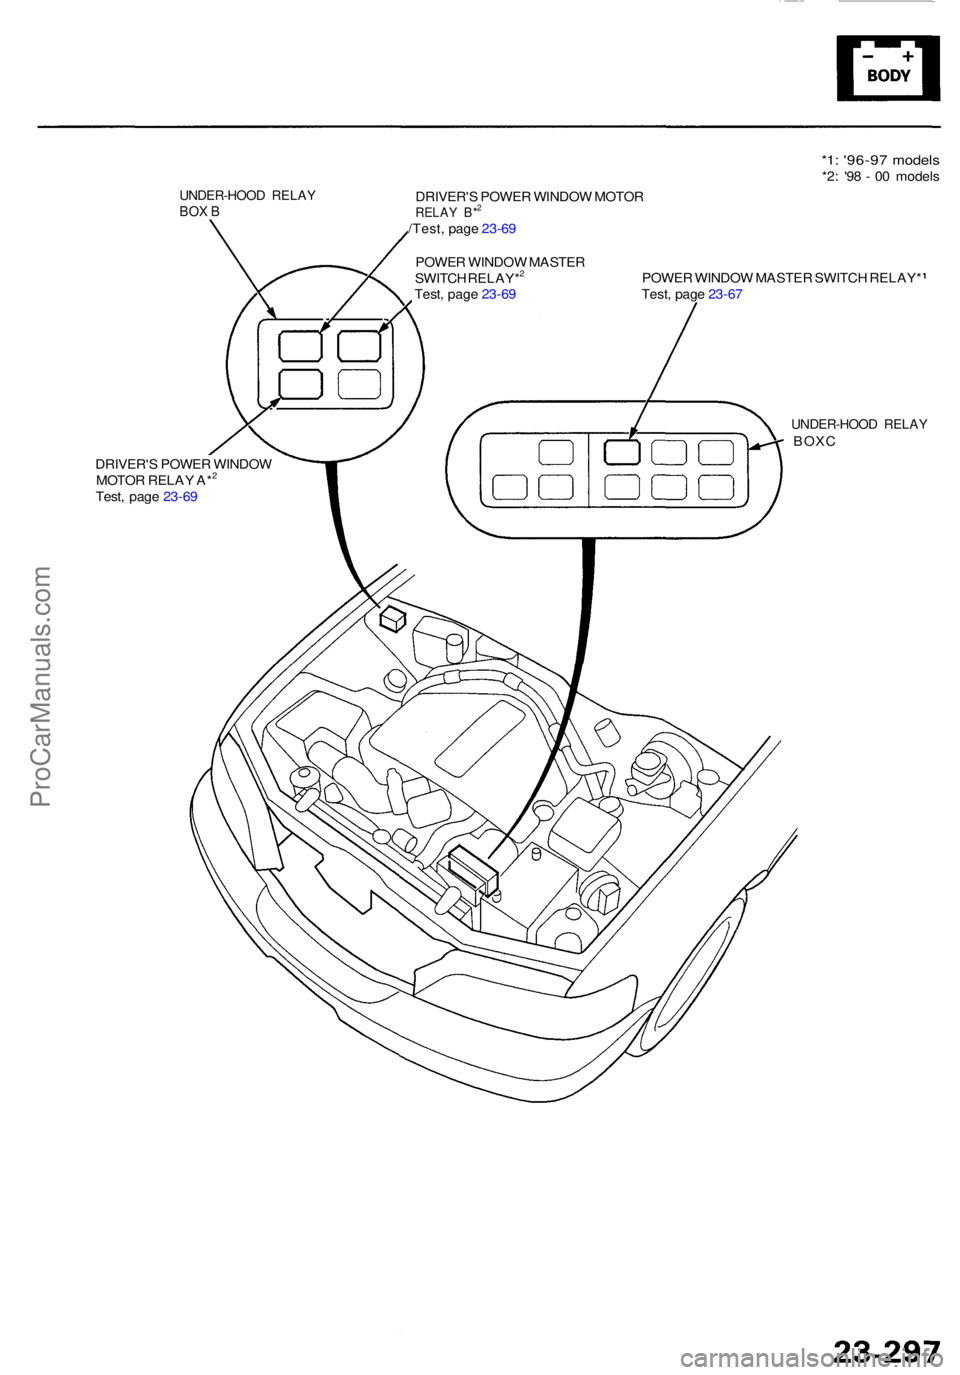
UNDER-HOO D RELA YBOX BDRIVER' S POWE R WINDO W MOTO RRELAY B*2
/Test , pag e 23-6 9
POWE R WINDO W MASTE R
SWITC H RELAY*
2
Test , pag e 23-6 9 POWE
R WINDO W MASTE R SWITC H RELAY *
Test , pag e 23-6 7
DRIVER' S POWE R WINDO W
MOTO R RELA Y A*
2
Test , pag e 23-6 9
UNDER-HOO D RELA Y BOXC
ProCarManuals.com
Page 1702 of 1954
Wiper/Washer
Component Locatio n Inde x
SRS component s ar e locate d in thi s area . Revie w th e SR S componen t locations , precautions , an d procedure s in th e SR S
( sectio n 24 ) befor e performin g repair s o r service .
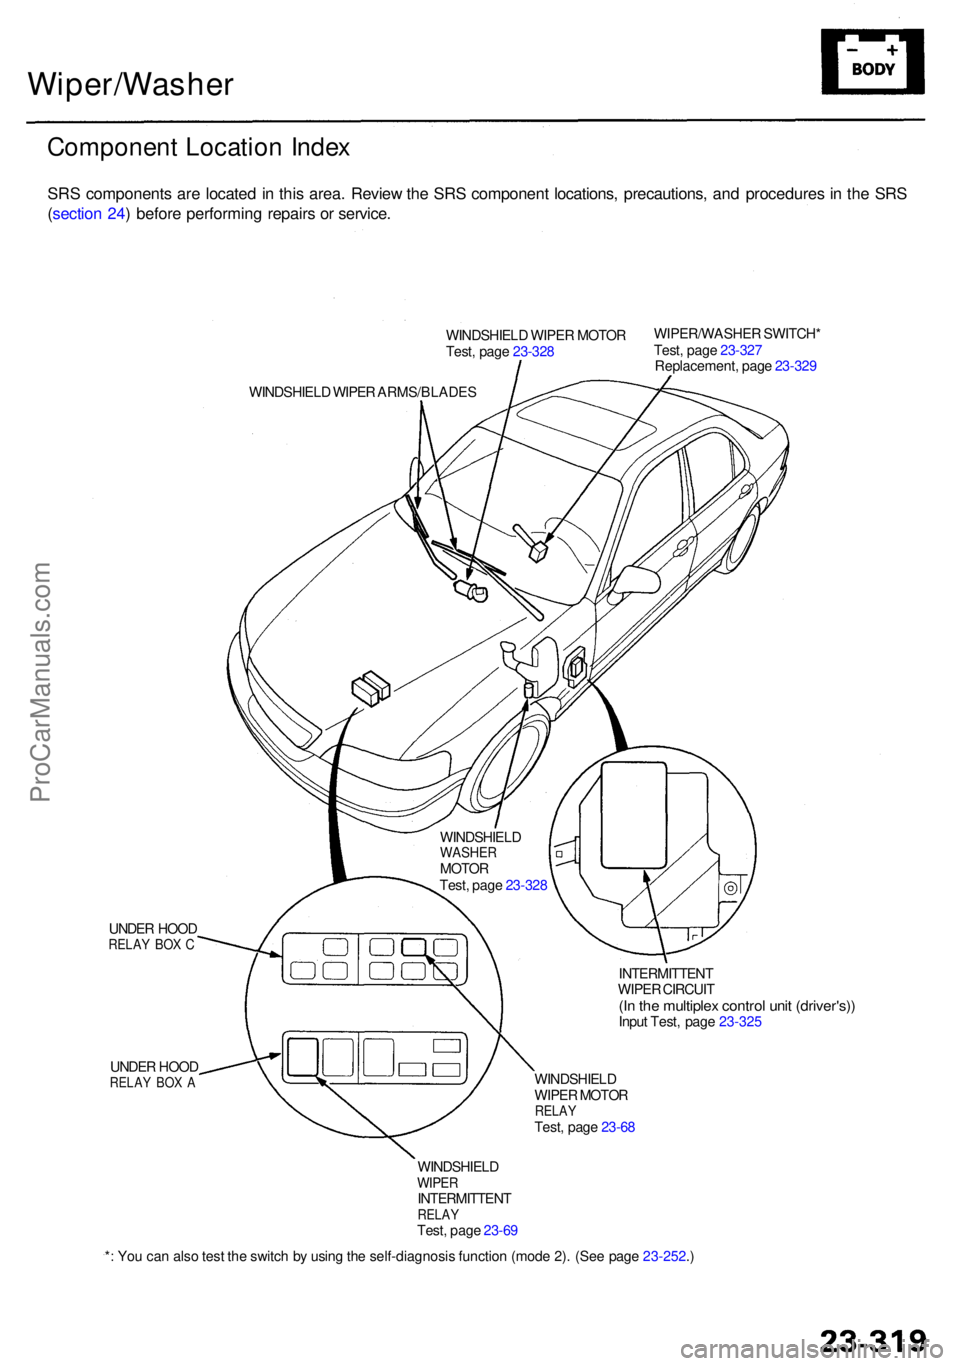
WINDSHIEL D WIPE R MOTO R
Test , pag e 23-32 8 WIPER/WASHE
R SWITCH *
Test , pag e 23-32 7
Replacement , pag e 23-32 9
WINDSHIEL D WIPE R ARMS/BLADE S
UNDE R HOO D
RELA Y BO X C
UNDE R HOO DRELA Y BO X A
INTERMITTEN T
WIPE R CIRCUI T
(In th e multiple x contro l uni t (driver's) )Input Test , pag e 23-32 5
WINDSHIEL D
WIPE R MOTO R
RELAYTest, pag e 23-6 8
* : Yo u ca n als o tes t th e switc h b y usin g th e self-diagnosi s functio n (mod e 2) . (Se e pag e 23-252 .)
WINDSHIEL
D
WASHERMOTORTest, pag e 23-32 8
WINDSHIEL D
WIPERINTERMITTEN TRELAYTest, pag e 23-6 9
ProCarManuals.com
Page 1709 of 1954
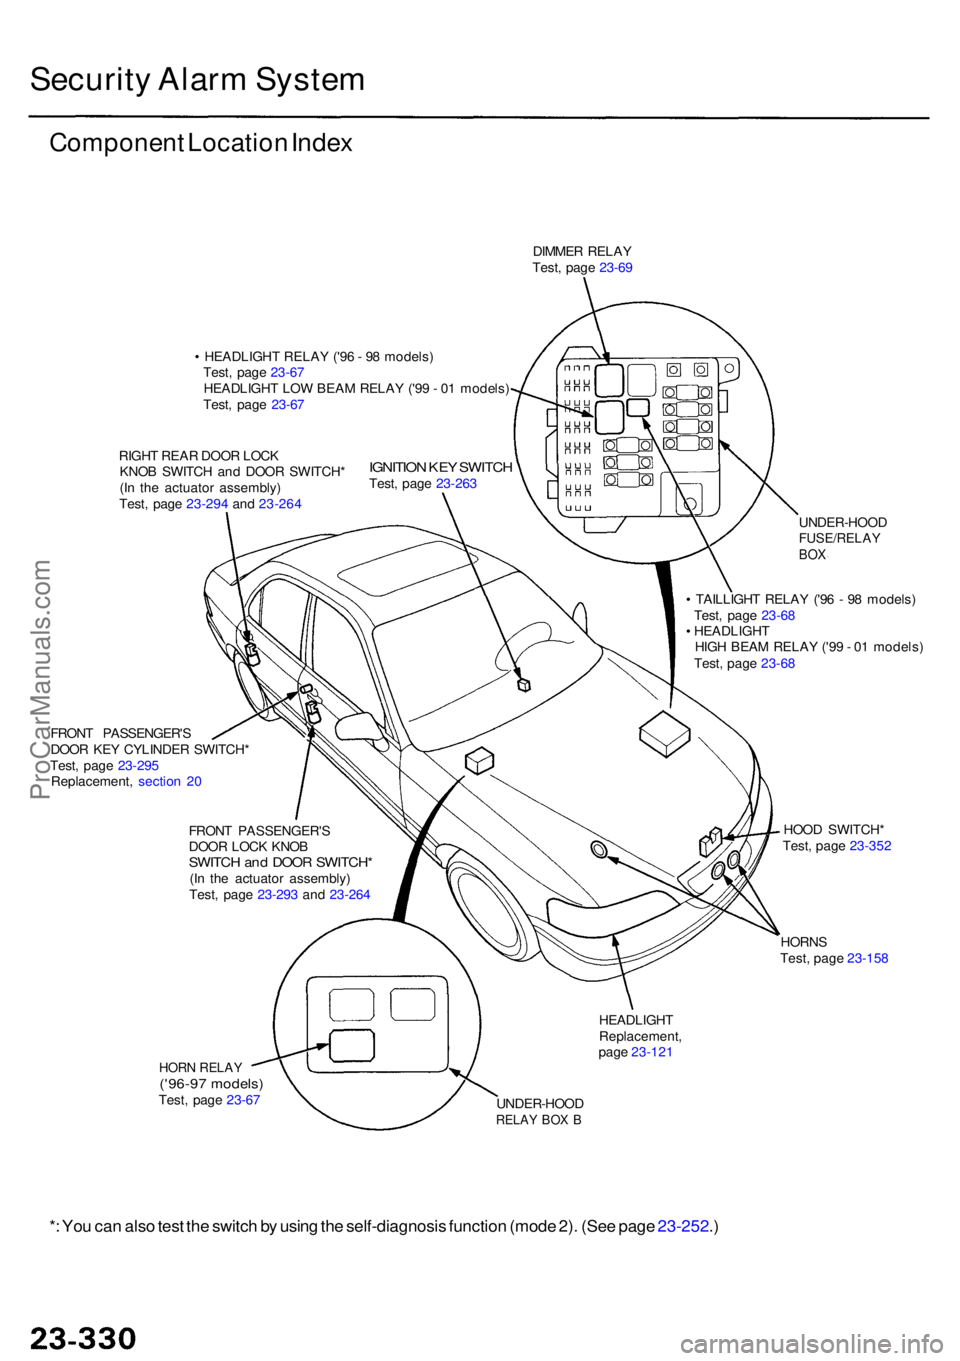
Security Alar m Syste m
Componen t Locatio n Inde x
DIMME R RELA Y
Test , pag e 23-6 9
• HEADLIGH T RELA Y ('9 6 - 9 8 models )
Test , pag e 23-6 7
HEADLIGH T LO W BEA M RELA Y ('9 9 - 0 1 models )
Test , pag e 23-6 7
RIGH T REA R DOO R LOC K
KNO B SWITC H an d DOO R SWITCH *
(I n th e actuato r assembly )
Test , pag e 23-29 4 an d 23-26 4
IGNITIO N KE Y SWITC HTest, pag e 23-26 3
FRON T PASSENGER' S
DOO R KE Y CYLINDE R SWITCH *
Test , pag e 23-29 5
Replacement , sectio n 2 0
FRON T PASSENGER' S
DOO R LOC K KNO B
SWITC H an d DOO R SWITCH *(In th e actuato r assembly )
Test , pag e 23-29 3 an d 23-26 4 UNDER-HOO
D
FUSE/RELAYBOX
• TAILLIGH T RELA Y ('9 6 - 9 8 models )
Test , pag e 23-6 8
• HEADLIGH T
HIG H BEA M RELA Y ('9 9 - 0 1 models )
Test , pag e 23-6 8
HOO D SWITCH *
Test , pag e 23-35 2
HORN S
Test , pag e 23-15 8
HEADLIGH TReplacement ,
pag e 23-12 1
UNDER-HOO D
RELAY BO X B
HOR N RELA Y('96-97 models )Test, pag e 23-6 7
*: Yo u ca n als o tes t th e switc h b y usin g th e self-diagnosi s functio n (mod e 2) . (Se e pag e 23-252 .)
ProCarManuals.com
Page 1722 of 1954
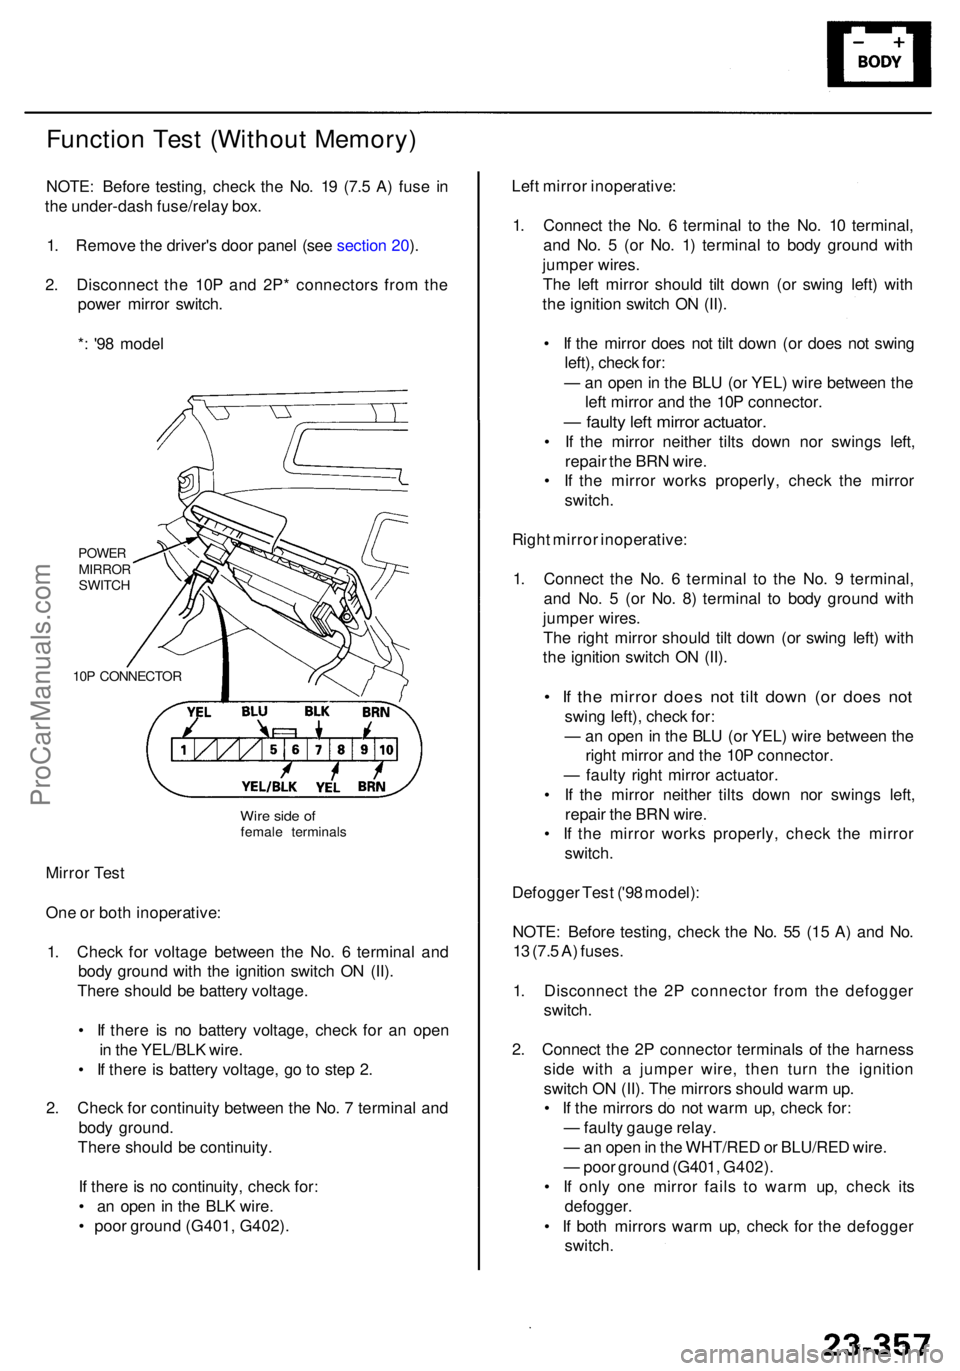
Function Tes t (Withou t Memory )
NOTE: Befor e testing , chec k th e No . 1 9 (7. 5 A ) fus e i n
th e under-das h fuse/rela y box .
1 . Remov e th e driver' s doo r pane l (se e sectio n 20 ).
2 . Disconnec t th e 10 P an d 2P * connector s fro m th e
powe r mirro r switch .
* : '9 8 mode l
POWE RMIRRO RSWITCH
10 P CONNECTO R
Mirror Tes t
On e o r bot h inoperative :
1 . Chec k fo r voltag e betwee n th e No . 6 termina l an d
bod y groun d wit h th e ignitio n switc h O N (II) .
Ther e shoul d b e batter y voltage .
• I f ther e i s n o batter y voltage , chec k fo r a n ope n
i n th e YEL/BL K wire .
• I f ther e is batter y voltage , g o to ste p 2 .
2 . Chec k fo r continuit y betwee n th e No . 7 termina l an d
bod y ground .
Ther e shoul d b e continuity .
I f ther e is n o continuity , chec k for :
• a n ope n in th e BL K wire .
• poo r groun d (G401 , G402) . Lef
t mirro r inoperative :
1 . Connec t th e No . 6 termina l t o th e No . 1 0 terminal ,
an d No . 5 (o r No . 1 ) termina l t o bod y groun d wit h
jumpe r wires .
Th e lef t mirro r shoul d til t dow n (o r swin g left ) wit h
th e ignitio n switc h O N (II) .
• I f th e mirro r doe s no t til t dow n (o r doe s no t swin g
left) , chec k for :
— an ope n in th e BL U (o r YEL ) wir e betwee n th e
lef t mirro r an d th e 10 P connector .
— fault y lef t mirro r actuator .
• I f th e mirro r neithe r tilt s dow n no r swing s left ,
repai r th e BR N wire .
• I f th e mirro r work s properly , chec k th e mirro r
switch .
Righ t mirro r inoperative :
1 . Connec t th e No . 6 termina l t o th e No . 9 terminal ,
an d No . 5 (o r No . 8 ) termina l t o bod y groun d wit h
jumpe r wires .
Th e righ t mirro r shoul d til t dow n (o r swin g left ) wit h
th e ignitio n switc h O N (II) .
• I f th e mirro r doe s no t til t dow n (o r doe s no t
swin g left) , chec k for :
— an ope n in th e BL U (o r YEL ) wir e betwee n th e
righ t mirro r an d th e 10 P connector .
— fault y righ t mirro r actuator .
• I f th e mirro r neithe r tilt s dow n no r swing s left ,
repai r th e BR N wire .
• I f th e mirro r work s properly , chec k th e mirro r
switch .
Defogge r Tes t ('9 8 model) :
NOTE : Befor e testing , chec k th e No . 5 5 (1 5 A ) an d No .
1 3 (7. 5 A ) fuses .
1 . Disconnec t th e 2 P connecto r fro m th e defogge r
switch .
2 . Connec t th e 2 P connecto r terminal s o f th e harnes s
sid e wit h a jumpe r wire , the n tur n th e ignitio n
switc h O N (II) . Th e mirror s shoul d war m up .
• I f th e mirror s d o no t war m up , chec k for :
— fault y gaug e relay .
— an ope n in th e WHT/RE D o r BLU/RE D wire .
— poo r groun d (G401 , G402) .
• I f onl y on e mirro r fail s t o war m up , chec k it s
defogger .
• I f bot h mirror s war m up , chec k fo r th e defogge r
switch .
Wire sid e o ffemal e terminal s
ProCarManuals.com
Page 1758 of 1954
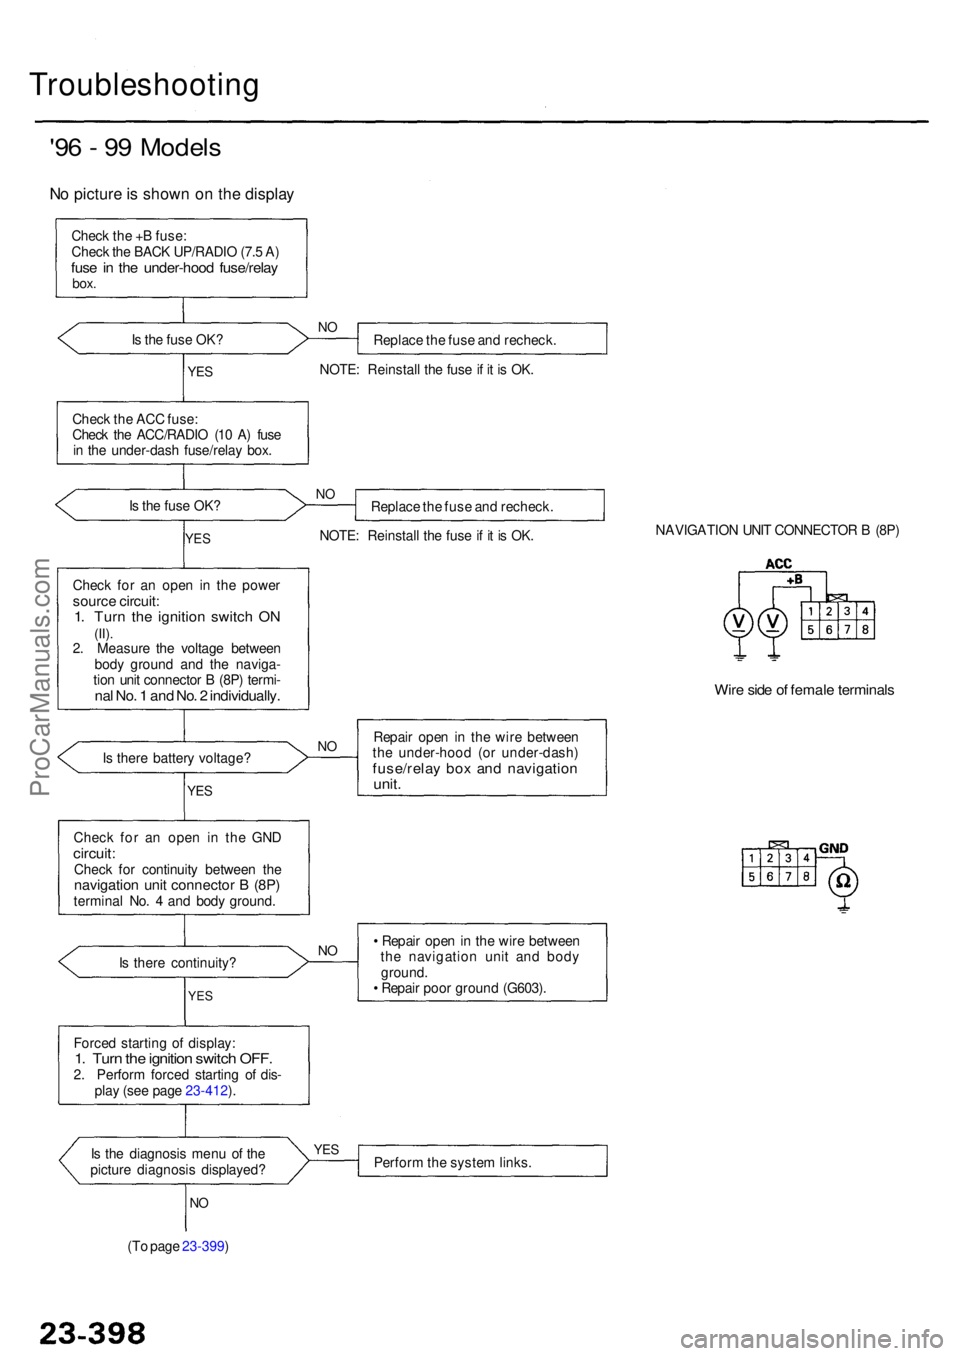
Troubleshooting
'96 - 9 9 Model s
No pictur e is show n o n th e displa y
Check th e + B fuse :
Chec k th e BAC K UP/RADI O (7. 5 A )
fus e in th e under-hoo d fuse/rela ybox.
Is th e fus e OK ?
Replace th e fus e an d recheck .NO
NOTE : Reinstal l th e fus e if i t i s OK .YES
Chec k th e AC C fuse :
Chec k th e ACC/RADI O (1 0 A ) fus e
i n th e under-das h fuse/rela y box .
I s th e fus e OK ?
NOReplac e th e fus e an d recheck .
NOTE : Reinstal l th e fus e if i t i s OK .
YES
Chec k fo r a n ope n i n th e powe rsource circuit :1. Tur n th e ignitio n switc h O N(II).2. Measur e th e voltag e betwee n
bod y groun d an d th e naviga -
tio n uni t connecto r B (8P ) termi -
nal No . 1 an d No . 2 individually .
NAVIGATIO N UNI T CONNECTO R B (8P )
Wire sid e o f femal e terminal s
Repair ope n in th e wir e betwee n
th e under-hoo d (o r under-dash )
fuse/relay bo x an d navigatio nunit.
Is ther e batter y voltage ?NO
YE S
Chec k fo r a n ope n i n th e GN Dcircuit :Check fo r continuit y betwee n th enavigatio n uni t connecto r B (8P )termina l No . 4 an d bod y ground .
I s ther e continuity ?
NO• Repai r ope n in th e wir e betwee n
th e navigatio n uni t an d bod y
ground .
• Repai r poo r groun d (G603) .
YES
Force d startin g o f display :1. Tur n th e ignitio n switc h OFF .2. Perfor m force d startin g o f dis -
pla y (se e pag e 23-412 ).
I s th e diagnosi s men u o f th e
pictur e diagnosi s displayed ?
YESPerfor m th e syste m links .
NO
(T o pag e 23-399 )
ProCarManuals.com
Page 1761 of 1954
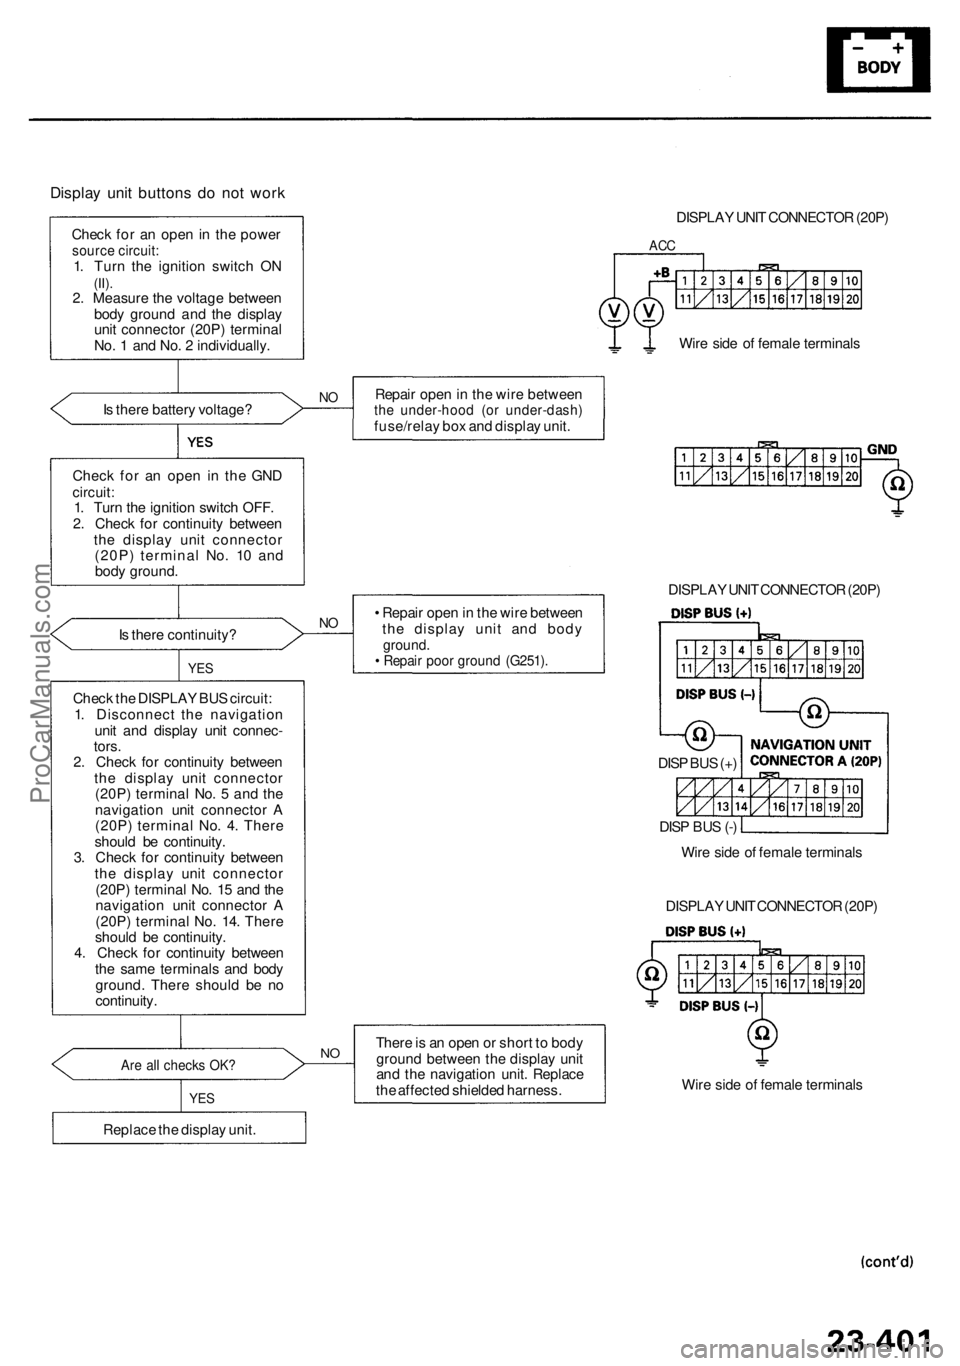
Display uni t button s d o no t wor k
Chec k fo r a n ope n in th e powe rsource circuit :1. Tur n th e ignitio n switc h O N(II).2. Measur e th e voltag e betwee n
bod y groun d an d th e displa y
uni t connecto r (20P ) termina l
No . 1 an d No . 2 individually .
I s ther e batter y voltage ?
NORepai r ope n in th e wir e betwee nthe under-hoo d (o r under-dash )fuse/relay bo x an d displa y unit .
Chec k fo r a n ope n i n th e GN D
circuit :1. Tur n th e ignitio n switc h OFF .
2 . Chec k fo r continuit y betwee n
th e displa y uni t connecto r
(20P ) termina l No . 1 0 an d
bod y ground .
I s ther e continuity ?
NO• Repai r ope n in th e wir e betwee n
th e displa y uni t an d bod y
ground .• Repai r poo r groun d (G251) .
Check th e DISPLA Y BU S circuit :
1 . Disconnec t th e navigatio n
uni t an d displa y uni t connec -
tors .
2 . Chec k fo r continuit y betwee n
th e displa y uni t connecto r
(20P ) termina l No . 5 an d th e
navigatio n uni t connecto r A
(20P ) termina l No . 4 . Ther e
shoul d b e continuity .
3 . Chec k fo r continuit y betwee n
th e displa y uni t connecto r
(20P ) termina l No . 1 5 an d th e
navigatio n uni t connecto r A
(20P ) termina l No . 14 . Ther e
shoul d b e continuity .
4 . Chec k fo r continuit y betwee n
th e sam e terminal s an d bod y
ground . Ther e shoul d b e n o
continuity .
YES
Are al l check s OK ?
YES
Replac e th e displa y unit .
NOTher e is a n ope n o r shor t t o bod y
groun d betwee n th e displa y uni t
an d th e navigatio n unit . Replac e
th e affecte d shielde d harness . Wir
e sid e o f femal e terminal s
DISPLA
Y UNI T CONNECTO R (20P )
DISPLA
Y UNI T CONNECTO R (20P )
ACC
Wir e sid e o f femal e terminal s
DISPLA Y UNI T CONNECTO R (20P )
Wir e sid e o f femal e terminal s
DIS
P BU S (+ )
DIS P BU S (- )
ProCarManuals.com
Page 1810 of 1954
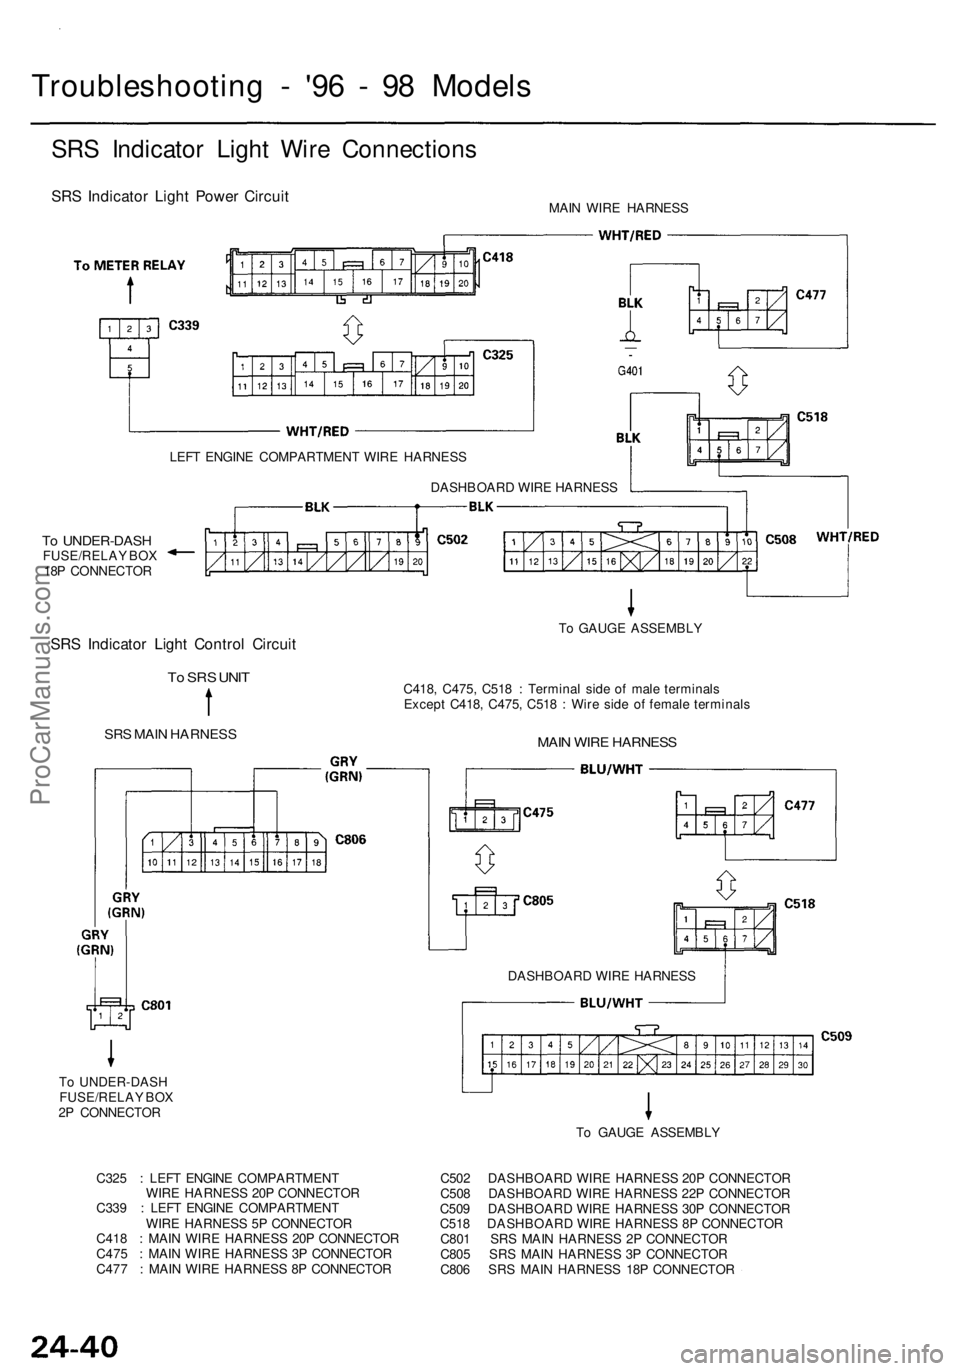
To UNDER-DASH
FUSE/RELAY BOX
2P CONNECTOR
Troubleshooting - '96 - 98 Models
SRS Indicator Light Wire Connections
SRS Indicator Light Power Circuit
MAIN WIRE HARNESS
LEFT ENGINE COMPARTMENT WIRE HARNESS
To UNDER-DASH
FUSE/RELAY BOX
18P CONNECTOR
SRS Indicator Light Control Circuit
To SRS UNIT
SRS MAIN HARNESS
C418, C475, C518 : Terminal side of male terminals
Except C418, C475, C518 : Wire side of female terminals
MAIN WIRE HARNESS
To GAUGE ASSEMBLY
DASHBOARD WIRE HARNESS
DASHBOARD WIRE HARNESS
To GAUGE ASSEMBLY
C325 : LEFT ENGINE COMPARTMENT
WIRE HARNESS 20P CONNECTOR
C339 : LEFT ENGINE COMPARTMENT
WIRE HARNESS 5P CONNECTOR
C418 : MAIN WIRE HARNESS 20P CONNECTOR
C475 : MAIN WIRE HARNESS 3P CONNECTOR
C477 : MAIN WIRE HARNESS 8P CONNECTOR
C502 DASHBOARD WIRE HARNESS 20P CONNECTOR
C508 DASHBOARD WIRE HARNESS 22P CONNECTOR
C509 DASHBOARD WIRE HARNESS 30P CONNECTOR
C518 DASHBOARD WIRE HARNESS 8P CONNECTOR
C801 SRS MAIN HARNESS 2P CONNECTOR
C805 SRS MAIN HARNESS 3P CONNECTOR
C806 SRS MAIN HARNESS 18P CONNECTORProCarManuals.com
Page 1811 of 1954
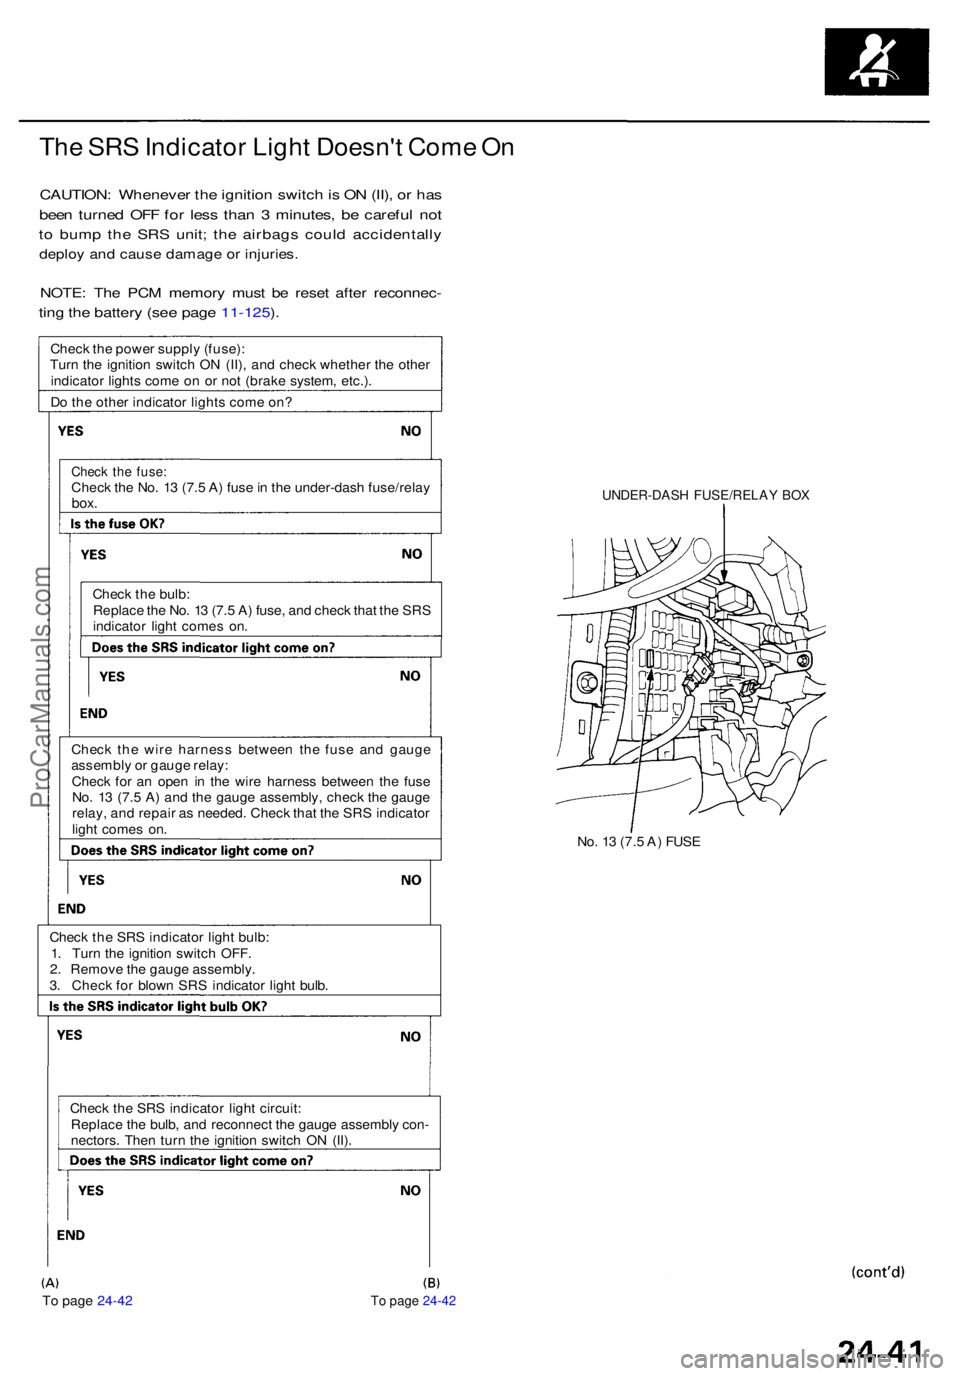
To page 24-42 To page 24-42
The SR S Indicato r Ligh t Doesn' t Com e O n
CAUTION : Wheneve r th e ignitio n switc h is O N (II) , o r ha s
bee n turne d OF F fo r les s tha n 3 minutes , b e carefu l no t
to bum p th e SR S unit ; th e airbag s coul d accidentall y
deploy an d caus e damag e o r injuries .
NOTE: Th e PC M memor y mus t b e rese t afte r reconnec -
ting th e batter y (se e pag e 11-125 ).
Chec k th e powe r suppl y (fuse) :
Tur n th e ignitio n switc h O N (II) , an d chec k whethe r th e othe r
indicato r light s com e o n o r no t (brak e system , etc.) .
D o th e othe r indicato r light s com e on ?
Chec k th e fuse :Chec k th e No . 1 3 (7. 5 A ) fus e in th e under-das h fuse/rela ybox.
Chec k th e bulb :
Replac e th e No . 1 3 (7. 5 A ) fuse , an d chec k tha t th e SR S
indicato r ligh t come s on .
Chec k th e wir e harnes s betwee n th e fus e an d gaug e
assembl y o r gaug e relay :
Chec k fo r a n ope n i n th e wir e harnes s betwee n th e fus e
No . 1 3 (7. 5 A ) an d th e gaug e assembly , chec k th e gaug e
relay , an d repai r a s needed . Chec k tha t th e SR S indicato r
ligh t come s on .
Chec k th e SR S indicato r ligh t bulb :
1 . Tur n th e ignitio n switc h OFF .
2 . Remov e th e gaug e assembly .
3 . Chec k fo r blow n SR S indicato r ligh t bulb .
Chec k th e SR S indicato r ligh t circuit :
Replac e th e bulb , an d reconnec t th e gaug e assembl y con -
nectors . The n tur n th e ignitio n switc h O N (II) .
UNDER-DAS H FUSE/RELA Y BO X
No. 1 3 (7. 5 A ) FUS E
ProCarManuals.com