relay ACURA RL KA9 1996 Service Manual Online
[x] Cancel search | Manufacturer: ACURA, Model Year: 1996, Model line: RL KA9, Model: ACURA RL KA9 1996Pages: 1954, PDF Size: 61.44 MB
Page 1254 of 1954
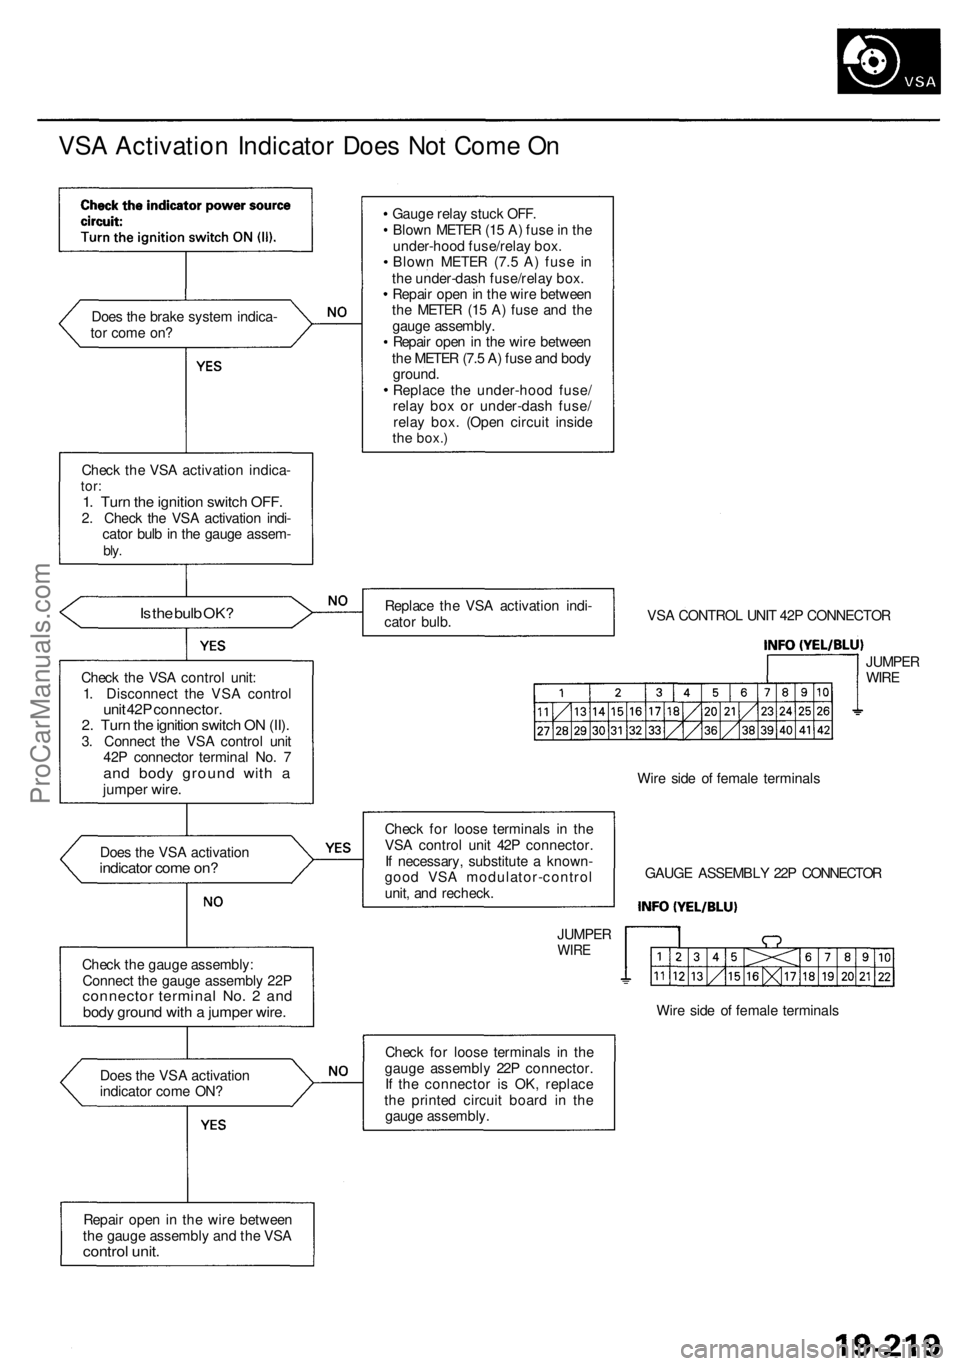
VSA Activation Indicator Does Not Come On
Does the brake system indica-
tor come on?
Check the VSA activation indica-
tor:
1. Turn the ignition switch OFF.
2. Check the VSA activation indi-
cator bulb in the gauge assem-
bly.
Is the bulb OK?
Check the VSA control unit:
1. Disconnect the VSA control
unit 42P connector.
2. Turn the ignition switch ON (II).
3. Connect the VSA control unit
42P connector terminal No. 7
and body ground with a
jumper wire.
Does the VSA activation
indicator come on?
Check the gauge assembly:
Connect the gauge assembly 22P
connector terminal No. 2 and
body ground with a jumper wire.
Does the VSA activation
indicator come ON?
Repair open in the wire between
the gauge assembly and the VSA
control unit.
Gauge relay stuck OFF.
Blown METER (15 A) fuse in the
under-hood fuse/relay box.
Blown METER (7.5 A) fuse in
the under-dash fuse/relay box.
Repair open in the wire between
the METER (15 A) fuse and the
gauge assembly.
Repair open in the wire between
the METER (7.5 A) fuse and body
ground.
Replace the under-hood fuse/
relay box or under-dash fuse/
relay box. (Open circuit inside
the
box.)
Replace the VSA activation indi-
cator bulb.
VSA CONTROL UNIT 42P CONNECTOR
JUMPER
WIRE
Check for loose terminals in the
VSA control unit 42P connector.
If necessary, substitute a known-
good VSA modulator-control
unit, and recheck.
JUMPER
WIRE
Wire side of female terminals
GAUGE ASSEMBLY 22P CONNECTOR
Wire side of female terminals
Check for loose terminals in the
gauge assembly 22P connector.
If the connector is OK, replace
the printed circuit board in the
gauge assembly.ProCarManuals.com
Page 1269 of 1954
Troubleshooting
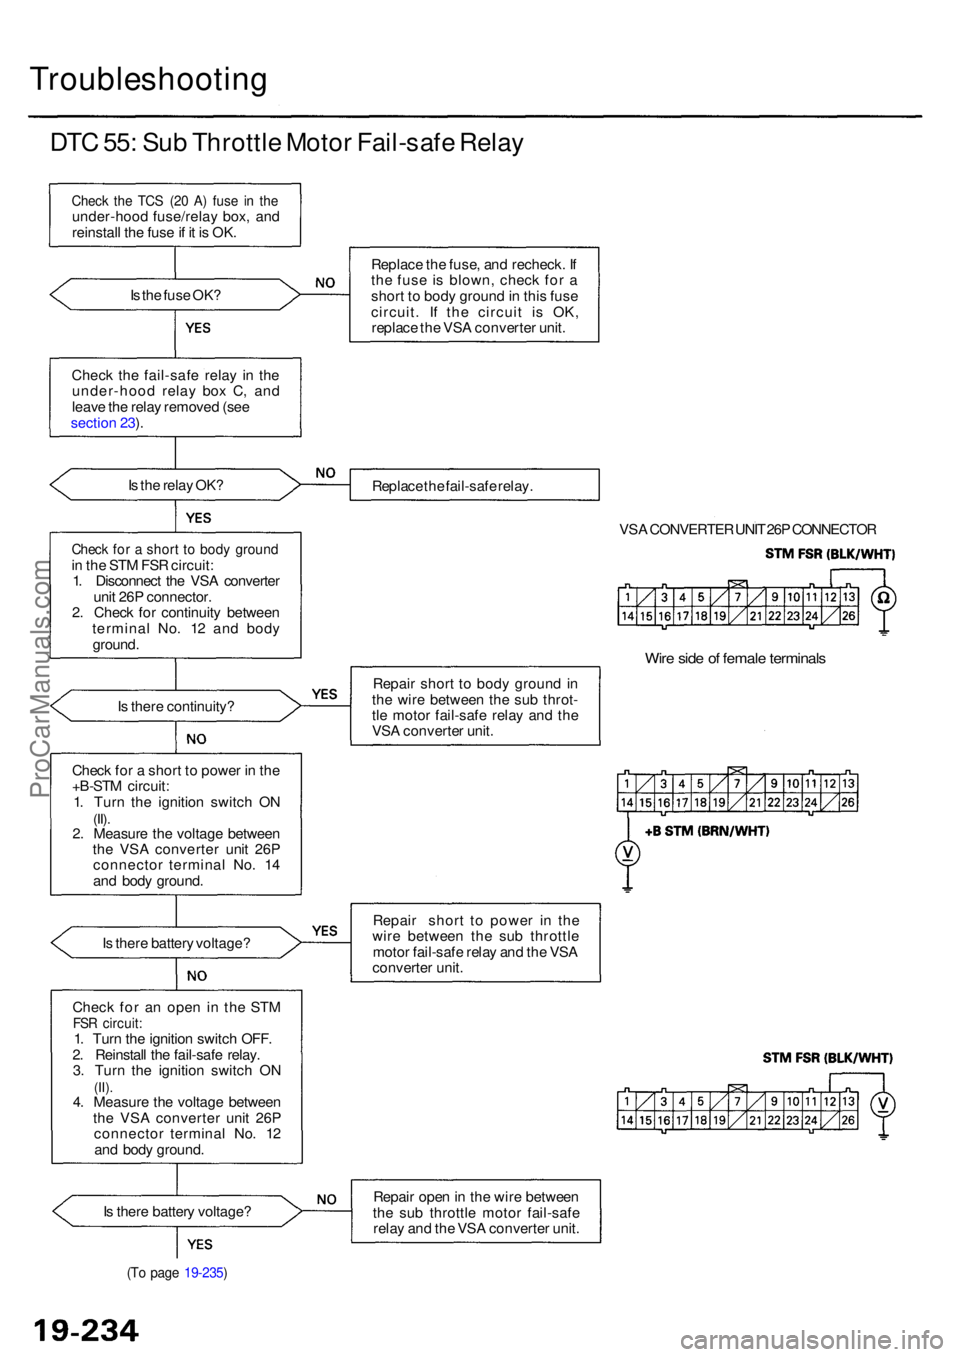
DTC 55 : Su b Throttl e Moto r Fail-saf e Rela y
Chec k th e TC S (2 0 A ) fus e i n th eunder-hoo d fuse/rela y box , an d
reinstal l th e fus e if i t i s OK .
I s th e fus e OK ?
Chec k th e fail-saf e rela y i n th e
under-hoo d rela y bo x C , an d
leav e th e rela y remove d (se e
sectio n 23 ).
I s th e rela y OK ?
Chec k fo r a shor t t o bod y groun din th e ST M FS R circuit :
1 . Disconnec t th e VS A converte r
uni t 26 P connector .
2 . Chec k fo r continuit y betwee n
termina l No . 1 2 an d bod y
ground .
I s ther e continuity ?
Chec k fo r a shor t t o powe r i n th e
+B-ST M circuit :
1 . Tur n th e ignitio n switc h O N
(II).2. Measur e th e voltag e betwee n
th e VS A converte r uni t 26 P
connecto r termina l No . 1 4
an d bod y ground .
I s ther e batter y voltage ?
Chec k fo r a n ope n i n the STM
FSR circuit :1. Tur n th e ignitio n switc h OFF .
2 . Reinstal l th e fail-saf e relay .
3 . Tur n th e ignitio n switc h O N
(II).4. Measur e th e voltag e betwee n
th e VS A converte r uni t 26 P
connecto r termina l No . 1 2
an d bod y ground .
I s ther e batter y voltage ?
(To pag e 19-235 )
Replac e th e fuse , an d recheck . I f
th e fus e i s blown , chec k fo r a
shor t t o bod y groun d in thi s fus e
circuit . I f th e circui t i s OK ,
replac e th e VS A converte r unit .
Replac e th e fail-saf e relay .
VSA CONVERTE R UNI T 26 P CONNECTO R
Wire sid e o f femal e terminal s
Repair shor t t o bod y groun d in
th e wir e betwee n th e su b throt -
tl e moto r fail-saf e rela y an d th e
VS A converte r unit .
Repai r shor t t o powe r i n th e
wir e betwee n th e su b throttl e
moto r fail-saf e rela y an d th e VS A
converte r unit .
Repai r ope n in th e wir e betwee n
th e su b throttl e moto r fail-saf e
rela y an d th e VS A converte r unit .
ProCarManuals.com
Page 1297 of 1954
Troubleshooting
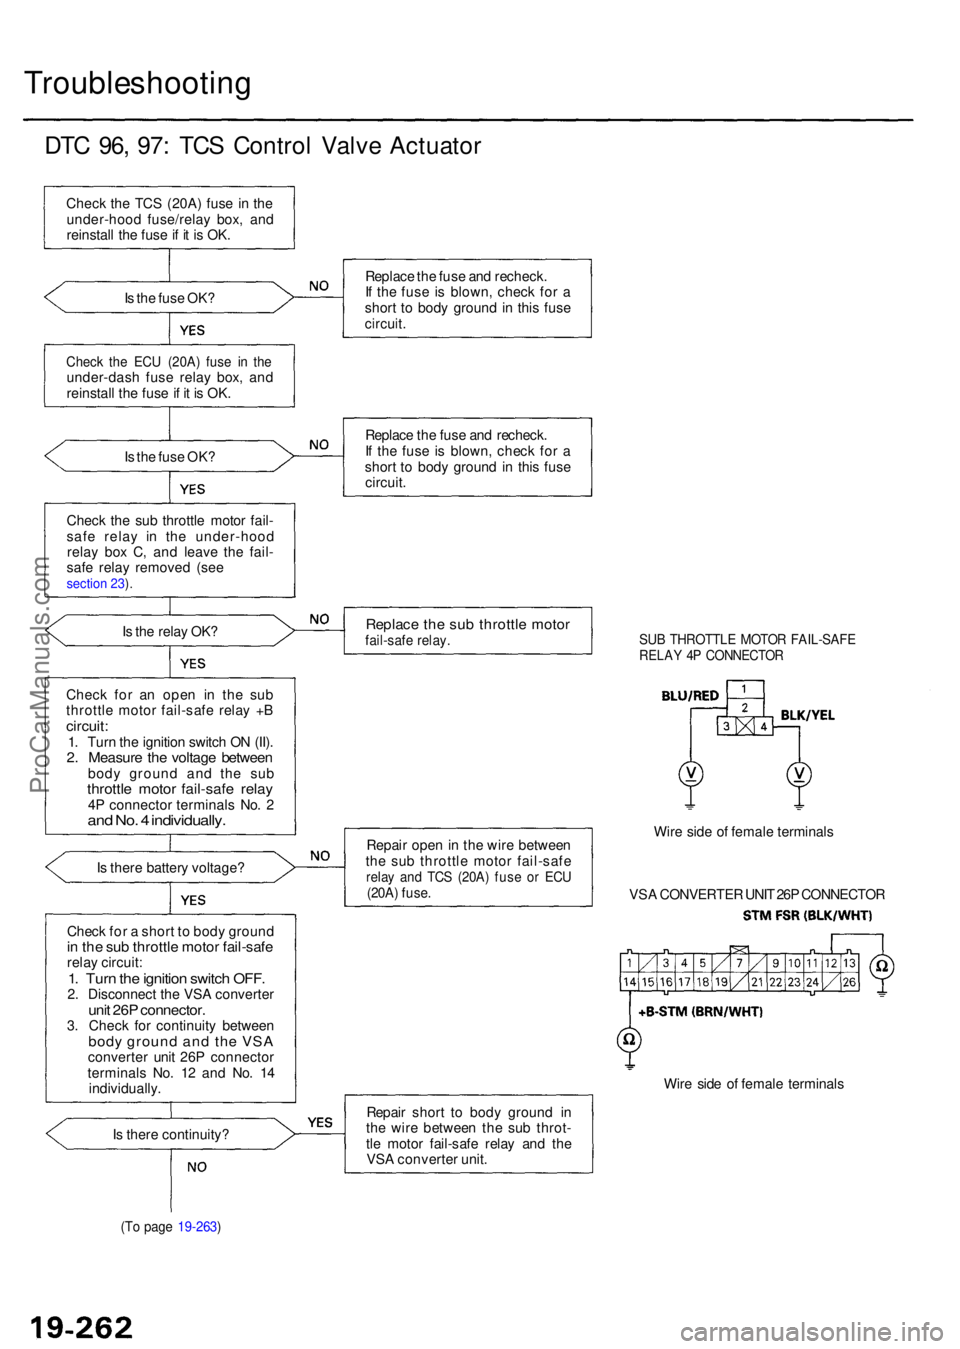
DTC 96 , 97 : TC S Contro l Valv e Actuato r
Check th e TC S (20A ) fus e i n th e
under-hoo d fuse/rela y box , an d
reinstal l th e fus e if i t i s OK .
I s th e fus e OK ?
Chec k th e EC U (20A ) fus e i n th eunder-das h fus e rela y box , an d
reinstal l th e fus e if i t i s OK .
I s th e fus e OK ?
Chec k th e su b throttl e moto r fail -
saf e rela y i n th e under-hoo d
rela y bo x C , an d leav e th e fail -
saf e rela y remove d (se e
section 23 ).
Is th e rela y OK ?
Chec k fo r a n ope n i n th e su b
throttl e moto r fail-saf e rela y + B
circuit :1. Tur n th e ignitio n switc h O N (II) .2. Measur e th e voltag e betwee nbody groun d an d th e su bthrottl e moto r fail-saf e rela y4P connecto r terminal s No . 2an d No . 4 individually .
Is ther e batter y voltage ?
Chec k fo r a shor t t o bod y groun d
in th e su b throttl e moto r fail-saf erelay circuit :1. Tur n th e ignitio n switc h OFF .2. Disconnec t th e VS A converte runit 26 P connector .3. Chec k fo r continuit y betwee nbody groun d an d th e VS Aconverte r uni t 26 P connecto r
terminal s No . 1 2 an d No . 1 4
individually .
I s ther e continuity ?
(To pag e 19-263 )
Replace th e fus e an d recheck .
I f th e fus e i s blown , chec k fo r a
shor t t o bod y groun d in thi s fus e
circuit .
Replac e th e fus e an d recheck .
I f th e fus e i s blown , chec k fo r a
shor t t o bod y groun d in thi s fus e
circuit .
Replac e th e su b throttl e moto rfail-saf e relay .SUB THROTTL E MOTO R FAIL-SAF ERELAY 4 P CONNECTO R
Repair ope n in th e wir e betwee n
th e su b throttl e moto r fail-saf e
relay an d TC S (20A ) fus e o r EC U(20A ) fuse .
Wire sid e o f femal e terminal s
VS A CONVERTE R UNI T 26 P CONNECTO R
Wir e sid e o f femal e terminal s
Repai r shor t t o bod y groun d i n
th e wir e betwee n th e su b throt -
tl e moto r fail-saf e rela y an d th e
VS A converte r unit .
ProCarManuals.com
Page 1346 of 1954
Troubleshooting
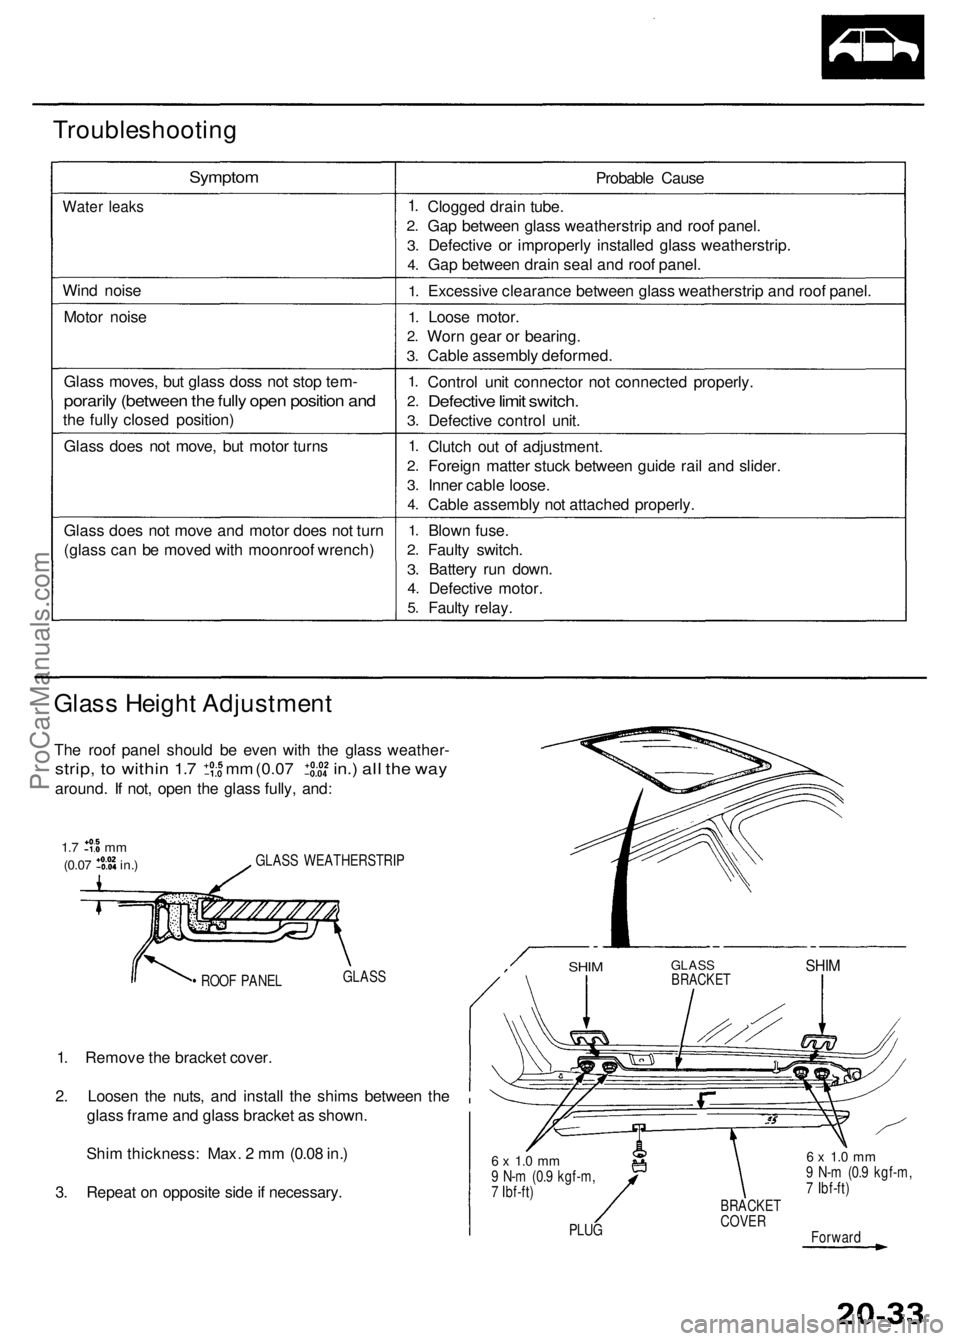
Symptom
Water leak s
Wind nois e
Moto r nois e
Glas s moves , bu t glas s dos s no t sto p tem -
poraril y (betwee n th e full y ope n positio n an d
the full y close d position )
Glas s doe s no t move , bu t moto r turn s
Glas s doe s no t mov e an d moto r doe s no t tur n
(glas s ca n b e move d wit h moonroo f wrench ) Probabl
e Caus e
1.
2 .
3.
4 .
1.
1 .
2 .
3.
1.
2 .
3.
1.
2 .
3.
4 .
1.
2 .
3.
4 .
5.
Clogge d drai n tube .
Ga p betwee n glas s weatherstri p an d roo f panel .
Defectiv e o r improperl y installe d glas s weatherstrip .
Ga p betwee n drai n sea l an d roo f panel .
Excessiv e clearanc e betwee n glas s weatherstri p an d roo f panel .
Loos e motor .
Wor n gea r o r bearing .
Cabl e assembl y deformed .
Contro l uni t connecto r no t connecte d properly .
Defective limi t switch .
Defectiv e contro l unit .
Clutc h ou t o f adjustment .
Foreig n matte r stuc k betwee n guid e rai l an d slider .
Inne r cabl e loose .
Cabl e assembl y no t attache d properly .
Blow n fuse .
Fault y switch .
Batter y ru n down .
Defectiv e motor .
Fault y relay .
Glass Heigh t Adjustmen t
The roo f pane l shoul d b e eve n wit h th e glas s weather -
strip, t o withi n 1. 7 m m (0.0 7 in. ) al l th e wa y
around . I f not , ope n th e glas s fully , and :
GLAS S WEATHERSTRI P
• ROO F PANE L GLAS
S
1. Remov e th e bracke t cover .
2 . Loose n th e nuts , an d instal l th e shim s betwee n th e
glas s fram e an d glas s bracke t a s shown .
Shi m thickness : Max . 2 m m (0.0 8 in. )
3 . Repea t o n opposit e sid e if necessary .
6 x 1. 0 m m9 N- m (0. 9 kgf-m ,
7 Ibf-ft )
PLUG BRACKE
T
COVE R
6 x 1. 0 m m9 N- m (0. 9 kgf-m ,
7 Ibf-ft )
Forwar d
1.7 m m
(0.07 in. )
SHIMGLAS SBRACKE TSHIM
ProCarManuals.com
Page 1422 of 1954
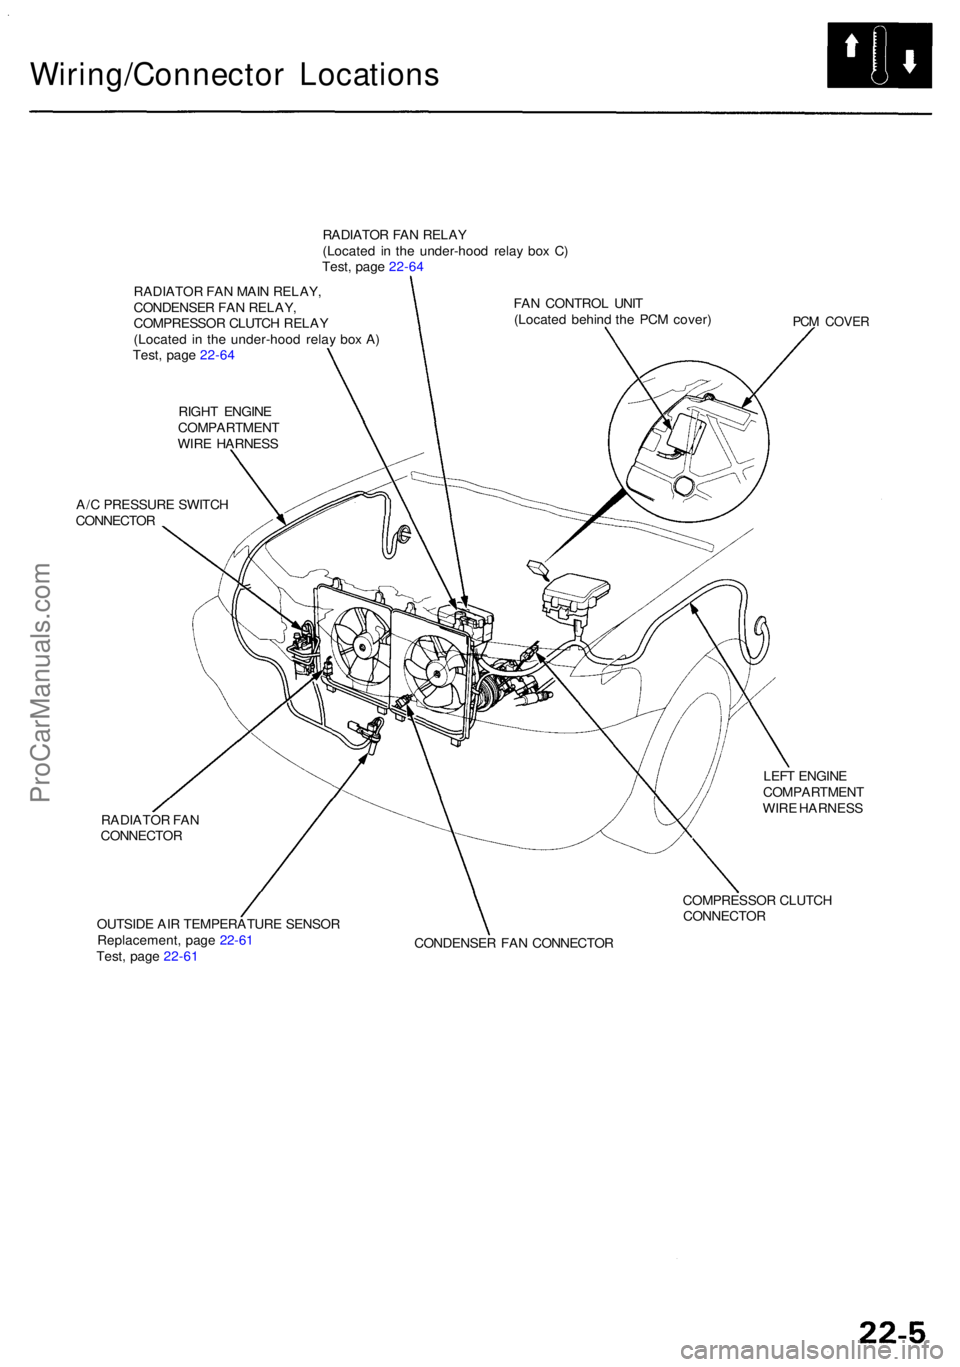
Wiring/Connector Location s
RADIATOR FA N RELA Y
(Locate d i n th e under-hoo d rela y bo x C )
Test , pag e 22-6 4
RADIATO R FA N MAI N RELAY ,
CONDENSE R FA N RELAY ,
COMPRESSO R CLUTC H RELA Y
(Locate d i n th e under-hoo d rela y bo x A )
Test , pag e 22-6 4
RIGH T ENGIN E
COMPARTMEN T
WIR E HARNES S
A/ C PRESSUR E SWITC H
CONNECTO R
RADIATO R FA N
CONNECTO R
OUTSID E AI R TEMPERATUR E SENSO R
Replacement , pag e 22-6 1
Test , pag e 22-6 1 FA
N CONTRO L UNI T
(Locate d behin d th e PC M cover )
PCM COVE R
LEFT ENGIN E
COMPARTMEN T
WIR E HARNES S
COMPRESSO R CLUTC H
CONNECTO R
CONDENSE R FA N CONNECTO R
ProCarManuals.com
Page 1445 of 1954
Troubleshooting
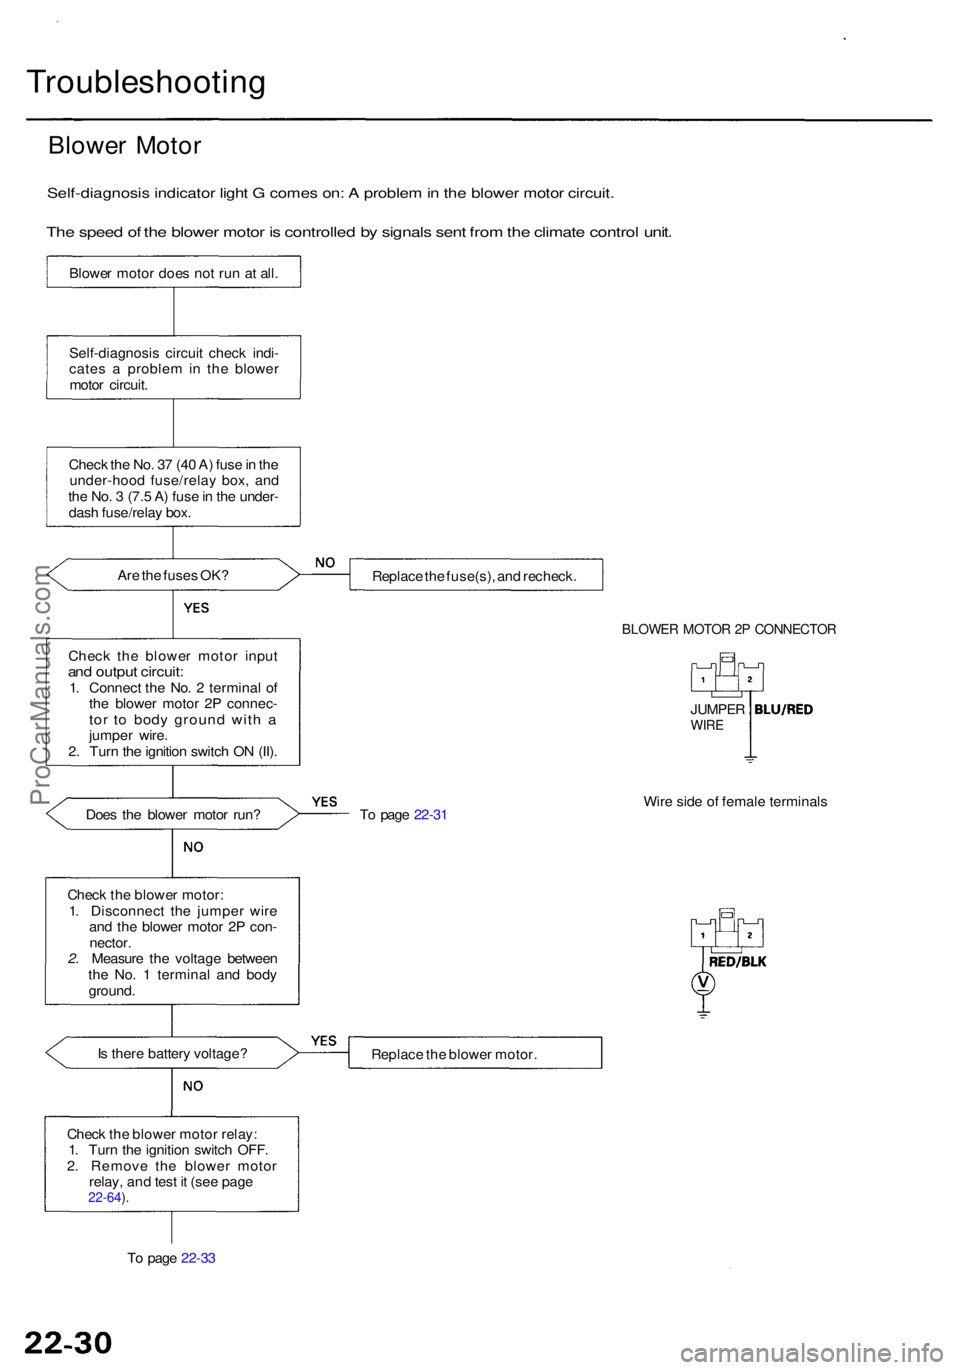
Blower Moto r
Self-diagnosi s indicato r ligh t G come s on : A proble m in th e blowe r moto r circuit .
The spee d o f th e blowe r moto r i s controlle d b y signal s sen t fro m th e climat e contro l unit .
Blowe r moto r doe s no t ru n a t all .
Self-diagnosi s circui t chec k indi -
cate s a proble m in th e blowe r
moto r circuit .
Chec k th e No . 3 7 (4 0 A ) fus e in th e
under-hoo d fuse/rela y box , an d
th e No . 3 (7. 5 A ) fus e in th e under -
das h fuse/rela y box .
Ar e th e fuse s OK ?
Chec k th e blowe r moto r inpu t
and outpu t circuit :1. Connec t th e No . 2 termina l o f
th e blowe r moto r 2 P connec -
tor t o bod y groun d wit h ajumpe r wire .
2 . Tur n th e ignitio n switc h O N (II) .
Doe s th e blowe r moto r run ?
Chec k th e blowe r motor :
1 . Disconnec t th e jumpe r wir e
an d th e blowe r moto r 2 P con -
nector .
2. Measur e th e voltag e betwee n
th e No . 1 termina l an d bod y
ground .
I s ther e batter y voltage ?
Chec k th e blowe r moto r relay :
1 . Tur n th e ignitio n switc h OFF .
2 . Remov e th e blowe r moto r
relay , an d tes t i t (se e pag e
22-64 ).
T o pag e 22-3 3 Replac
e th e fuse(s) , an d recheck .
BLOWER MOTO R 2 P CONNECTO R
JUMPERWIRE
To pag e 22-3 1 Wir
e sid e o f femal e terminal s
Replac e th e blowe r motor .
ProCarManuals.com
Page 1446 of 1954
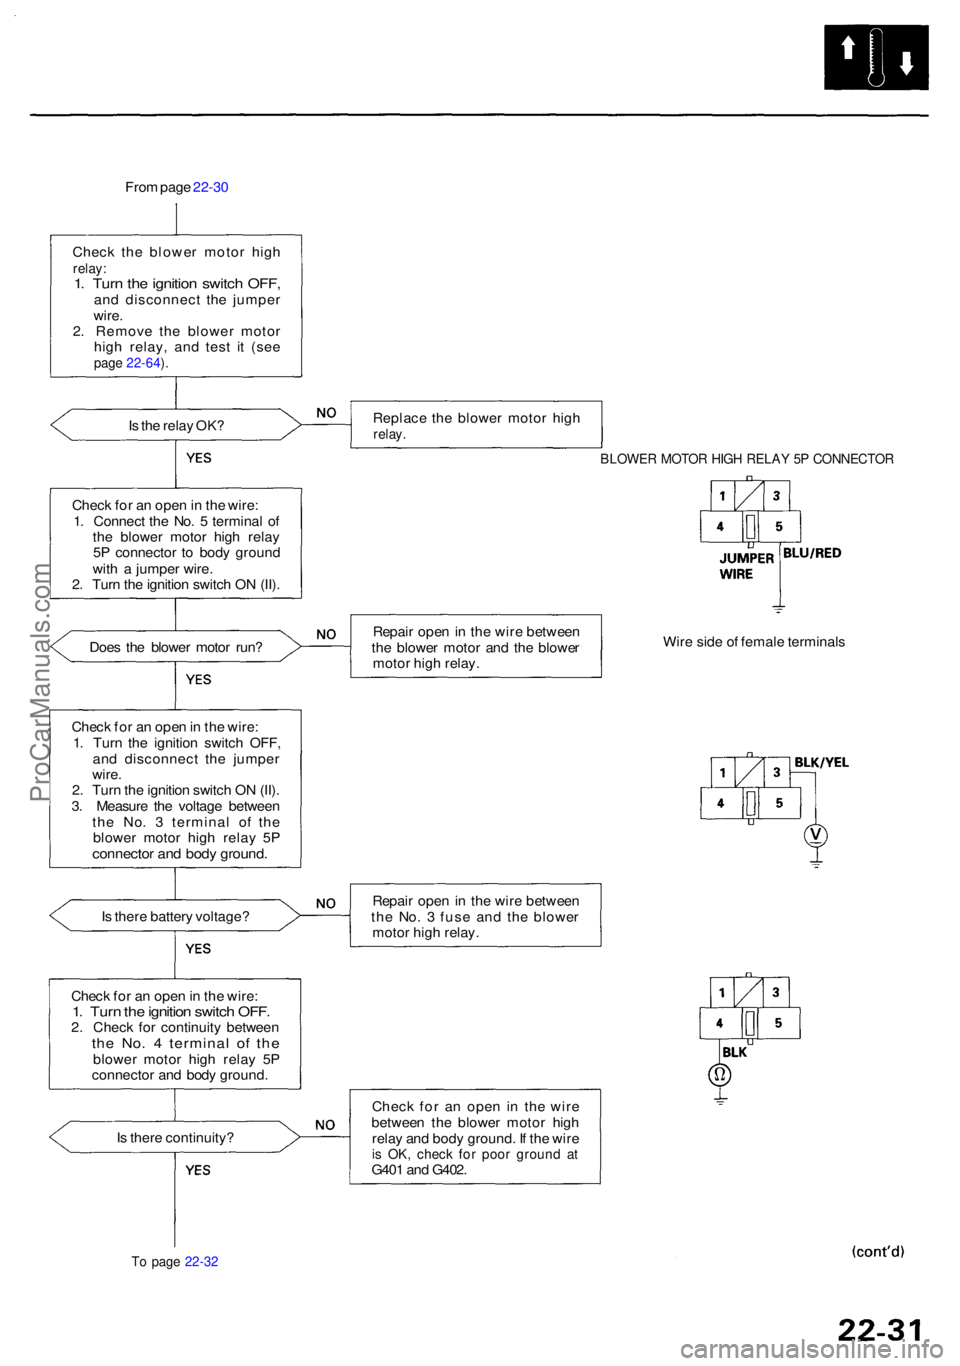
From pag e 22-3 0
Chec k th e blowe r moto r hig h
relay :1. Tur n th e ignitio n switc h OFF ,and disconnec t th e jumpe r
wire .
2 . Remov e th e blowe r moto r
hig h relay , an d tes t i t (se e
page 22-64 ).
Is th e rela y OK ?
Chec k fo r a n ope n in th e wire :
1 . Connec t th e No . 5 termina l o f
th e blowe r moto r hig h rela y
5 P connecto r t o bod y groun d
wit h a jumpe r wire .
2 . Tur n th e ignitio n switc h O N (II) .
Doe s th e blowe r moto r run ?
I s ther e batter y voltage ?
Chec k fo r a n ope n in th e wire :
1. Tur n th e ignitio n switc h OFF .2. Chec k fo r continuit y betwee nthe No . 4 termina l o f th eblowe r moto r hig h rela y 5 P
connecto r an d bod y ground .
I s ther e continuity ?
To pag e 22-3 2
Replac e th e blowe r moto r hig hrelay .
BLOWE R MOTO R HIG H RELA Y 5 P CONNECTO R
Repair ope n in th e wir e betwee n
th e blowe r moto r an d th e blowe r
moto r hig h relay . Wir
e side of femal e terminal s
Repai r ope n in th e wir e betwee n
th e No . 3 fus e an d th e blowe r
moto r hig h relay .
Chec k fo r a n ope n i n th e wir e
betwee n th e blowe r moto r hig h
rela y an d bod y ground . I f th e wir e
is OK , chec k fo r poo r groun d a tG40 1 an d G402 .
Chec
k fo r a n ope n in th e wire :
1 . Tur n th e ignitio n switc h OFF ,
an d disconnec t th e jumpe r
wire .
2 . Tur n th e ignitio n switc h O N (II) .
3 . Measur e th e voltag e betwee n
th e No . 3 termina l o f th e
blowe r moto r hig h rela y 5 P
connecto r an d bod y ground .
ProCarManuals.com
Page 1447 of 1954
Troubleshooting
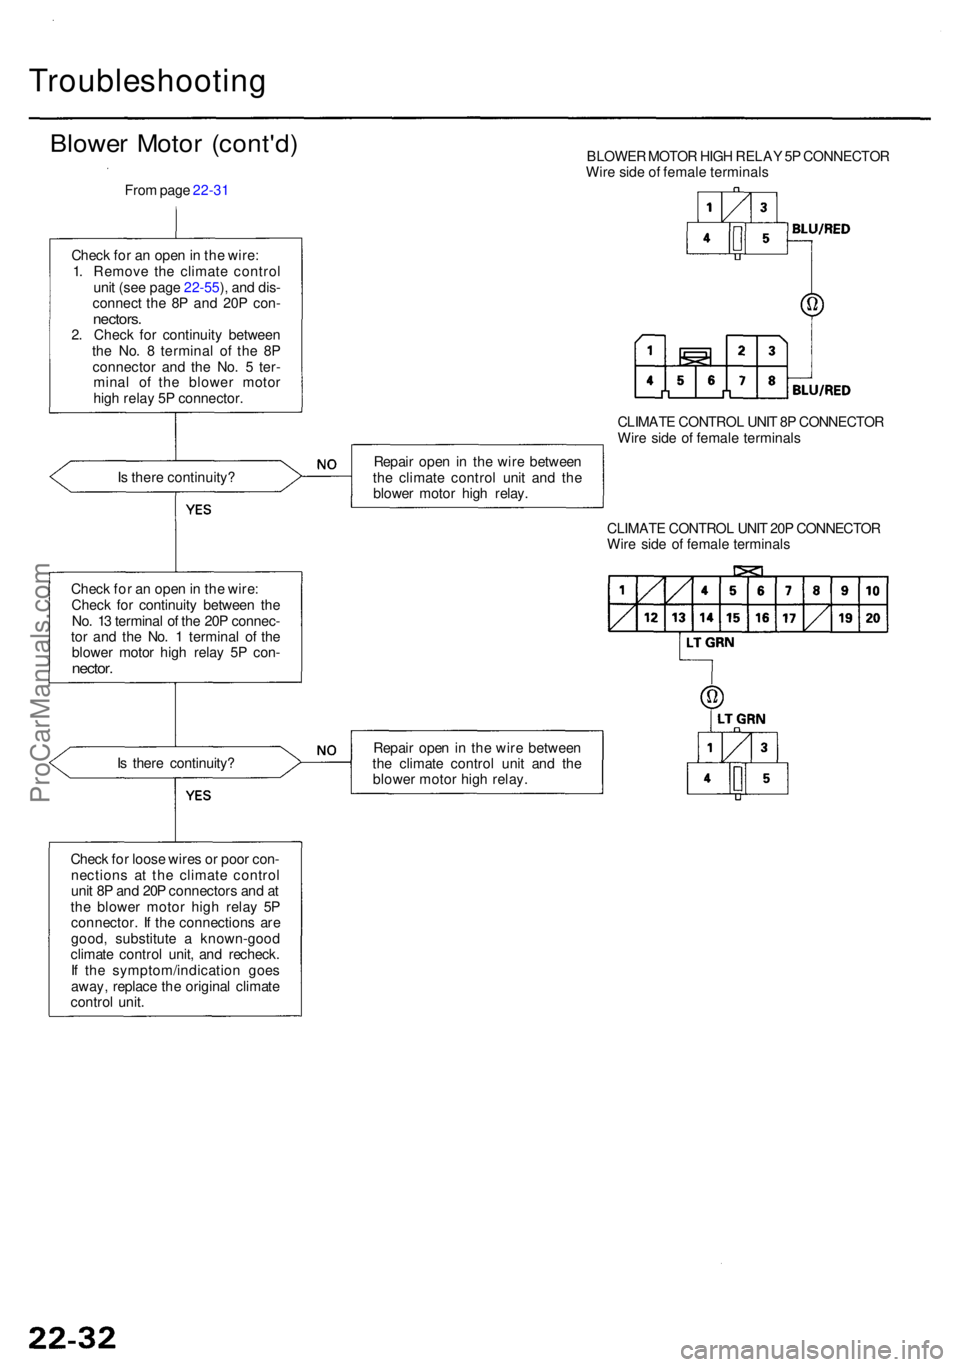
Blower Moto r (cont'd )
From pag e 22-3 1 BLOWE
R MOTO R HIG H RELA Y 5P CONNECTO R
Wir e sid e o f femal e terminal s
Chec k fo r a n ope n in th e wire :
1 . Remov e th e climat e contro l
uni t (se e pag e 22-55 ), an d dis -
connect the 8 P an d 20 P con -
nectors .2. Chec k fo r continuit y betwee n
th e No . 8 termina l o f th e 8 P
connecto r an d th e No . 5 ter -
mina l o f th e blowe r moto r
hig h rela y 5 P connector .
I s ther e continuity ? Repai
r ope n in th e wir e betwee n
th e climat e contro l uni t an d th e
blowe r moto r hig h relay . CLIMAT
E CONTRO L UNI T 8 P CONNECTO R
Wir e sid e o f femal e terminal s
Chec k fo r a n ope n in th e wire :
Chec k fo r continuit y betwee n th e
No . 1 3 termina l o f th e 20 P connec -
to r an d th e No . 1 termina l o f th e
blowe r moto r hig h rela y 5 P con -
nector .
CLIMAT E CONTRO L UNI T 20 P CONNECTO R
Wir e sid e o f femal e terminal s
I s ther e continuity ? Repai
r ope n in th e wir e betwee n
th e climat e contro l uni t an d th e
blowe r moto r hig h relay .
Chec k fo r loos e wire s o r poo r con -
nection s a t th e climat e contro l
uni t 8 P an d 20 P connector s an d a t
th e blowe r moto r hig h rela y 5 P
connector . I f th e connection s ar e
good , substitut e a known-goo d
climat e contro l unit , an d recheck .
I f th e symptom/indicatio n goe s
away , replac e th e origina l climat e
contro l unit .
ProCarManuals.com
Page 1448 of 1954
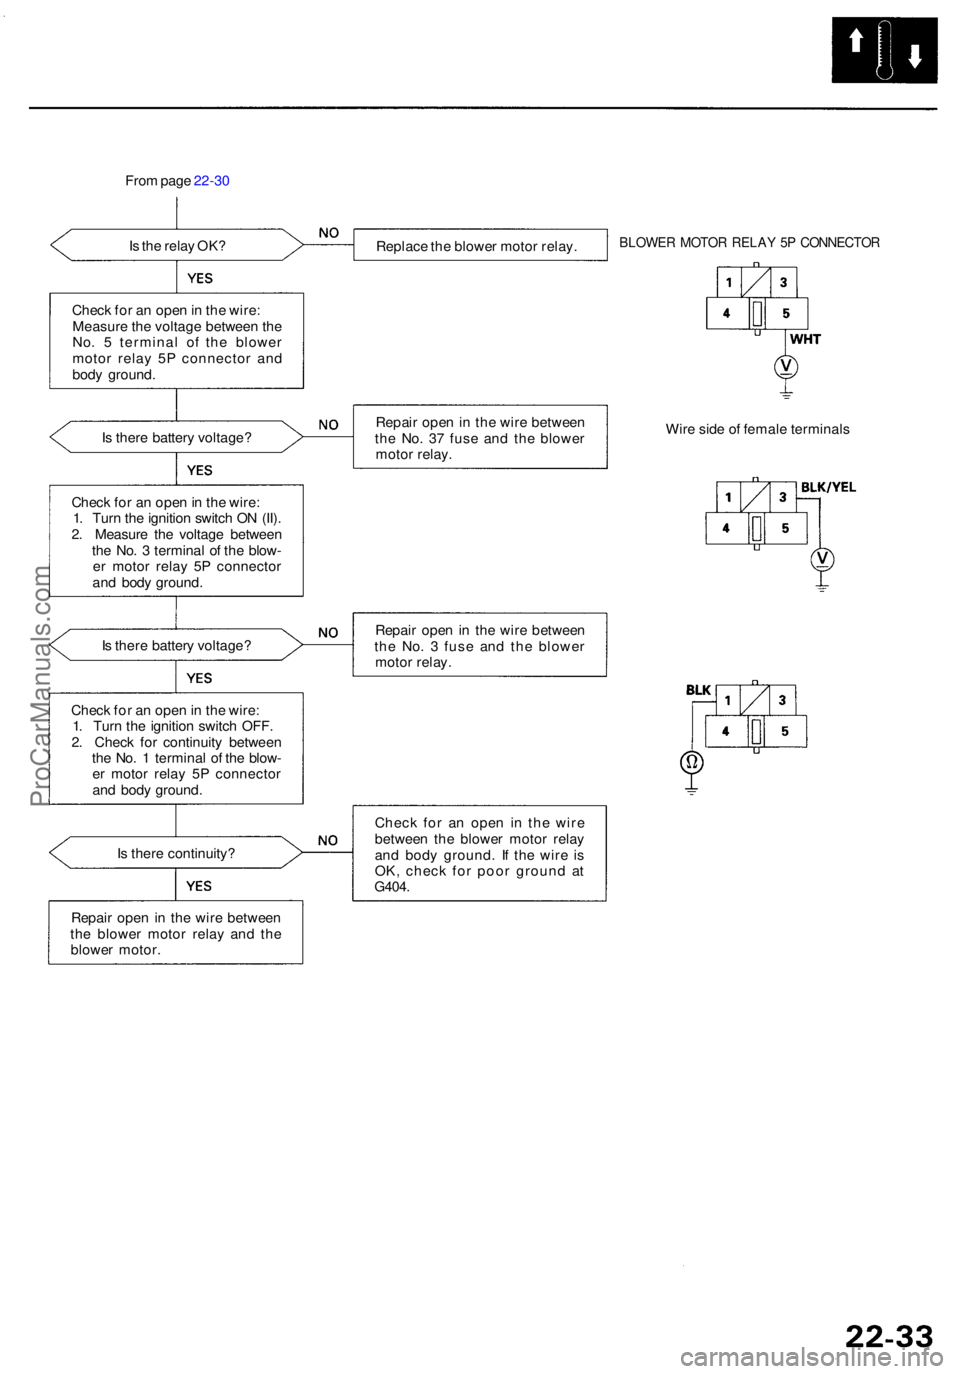
From pag e 22-3 0
I s th e rela y OK ?
Replace th e blowe r moto r relay .
BLOWE R MOTO R RELA Y 5 P CONNECTO R
Check fo r a n ope n in th e wire :
Measur e th e voltag e betwee n th e
No . 5 termina l o f th e blowe r
moto r rela y 5 P connecto r an d
bod y ground .
I s ther e batter y voltage ? Repai
r ope n in th e wir e betwee n
th e No . 3 7 fus e an d th e blowe r
moto r relay . Wir
e sid e o f femal e terminal s
Chec k fo r a n ope n in th e wire :
1 . Tur n th e ignitio n switc h O N (II) .
2 . Measur e th e voltag e betwee n
th e No . 3 termina l o f th e blow -
e r moto r rela y 5 P connecto r
an d bod y ground .
I s ther e batter y voltage ? Repai
r ope n in th e wir e betwee n
th e No . 3 fus e an d th e blowe r
moto r relay .
I s ther e continuity ?
Repai r ope n in th e wir e betwee n
th e blowe r moto r rela y an d th e
blowe r motor . Chec
k fo r a n ope n i n th e wir e
betwee n th e blowe r moto r rela y
an d bod y ground . I f th e wir e i s
OK , chec k fo r poo r groun d a t
G404 .
Check fo r a n ope n in th e wire :
1 . Tur n th e ignitio n switc h OFF .
2 . Chec k fo r continuit y betwee n
th e No . 1 termina l o f th e blow -
e r moto r rela y 5 P connecto r
an d bod y ground .
ProCarManuals.com
Page 1456 of 1954
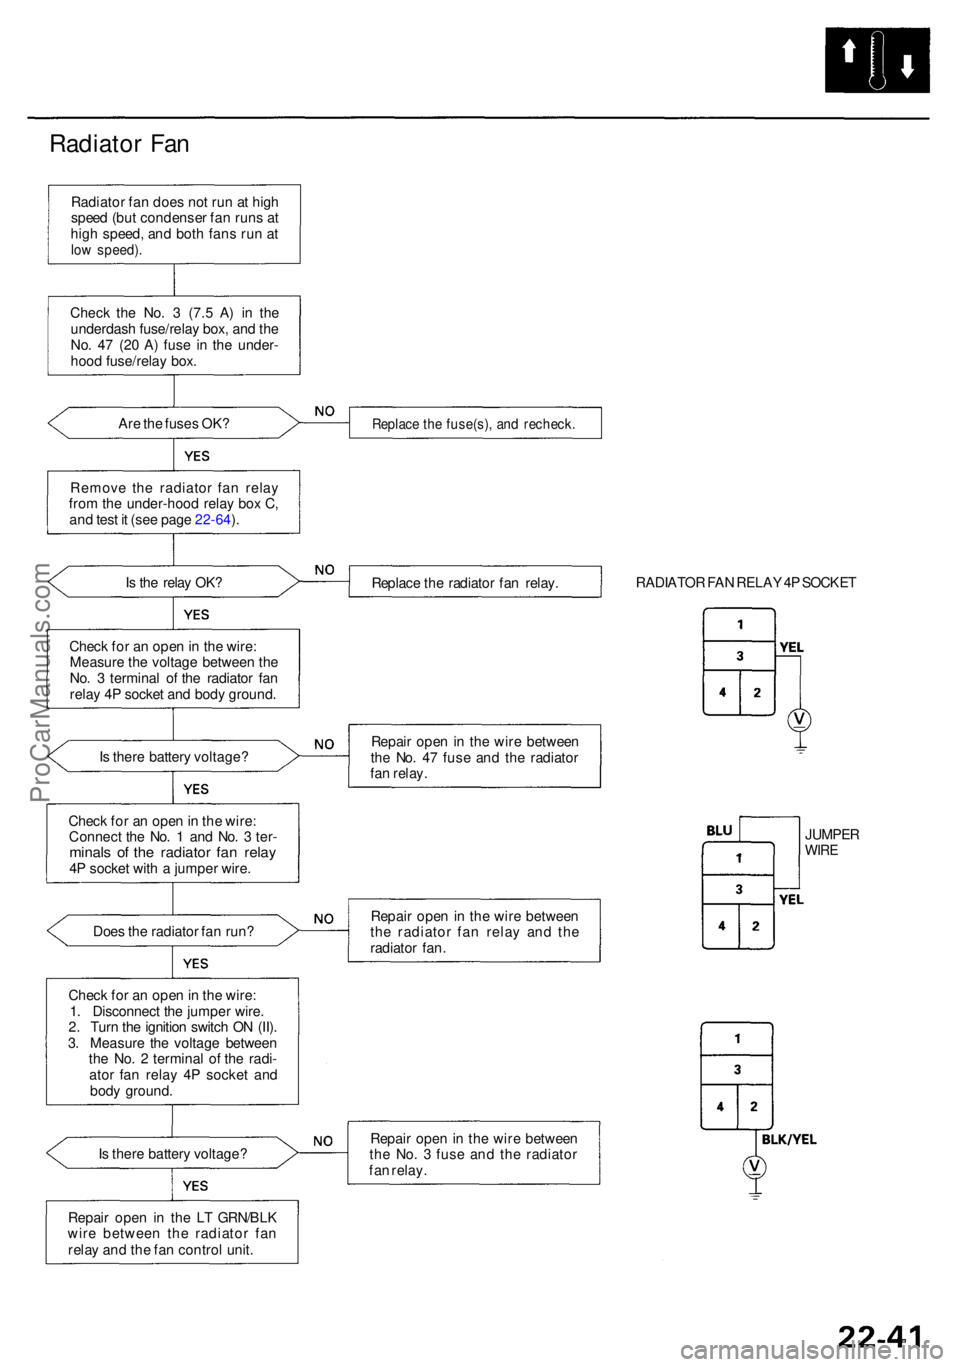
Radiator Fa n
Radiato r fa n doe s no t ru n a t hig h
spee d (bu t condense r fa n run s a t
hig h speed , an d bot h fan s ru n a t
lo w speed) .
Check th e No . 3 (7. 5 A ) i n th e
underdas h fuse/rela y box , an d th e
No . 4 7 (2 0 A ) fus e i n th e under -
hoo d fuse/rela y box .
Ar e th e fuse s OK ?
Remov e th e radiato r fa n rela y
fro m th e under-hoo d rela y bo x C ,
an d tes t i t (se e pag e 22-64 ).
I s th e rela y OK ?
Chec k fo r a n ope n in th e wire :
Measur e th e voltag e betwee n th e
No . 3 termina l o f th e radiato r fa n
rela y 4 P socke t an d bod y ground .
I s ther e batter y voltage ?
Chec k fo r a n ope n in th e wire :
Connec t th e No . 1 an d No . 3 ter -
minal s o f th e radiato r fa n rela y4P socke t wit h a jumpe r wire .
Doe s th e radiato r fa n run ?
Chec k fo r a n ope n in th e wire :
1 . Disconnec t th e jumpe r wire .
2 . Tur n th e ignitio n switc h O N (II) .
3 . Measur e th e voltag e betwee n
th e No . 2 termina l o f th e radi-
ato r fa n rela y 4 P socke t an d
bod y ground .
I s ther e batter y voltage ?
Repai r ope n i n th e L T GRN/BL K
wir e betwee n th e radiato r fa n
rela y an d th e fa n contro l unit .
Replac e th e fuse(s) , an d recheck .
Replace th e radiato r fa n relay . RADIATO
R FA N RELA Y 4P SOCKE T
Repai r ope n in th e wir e betwee n
th e No . 4 7 fus e an d th e radiato r
fa n relay .
Repai r ope n in th e wir e betwee n
th e radiato r fa n rela y an d th e
radiato r fan .
JUMPE RWIRE
Repai r ope n in th e wir e betwee n
th e No . 3 fus e an d th e radiato r
fa n relay .
ProCarManuals.com