door lock ACURA RL KA9 1996 Service Repair Manual
[x] Cancel search | Manufacturer: ACURA, Model Year: 1996, Model line: RL KA9, Model: ACURA RL KA9 1996Pages: 1954, PDF Size: 61.44 MB
Page 32 of 1954
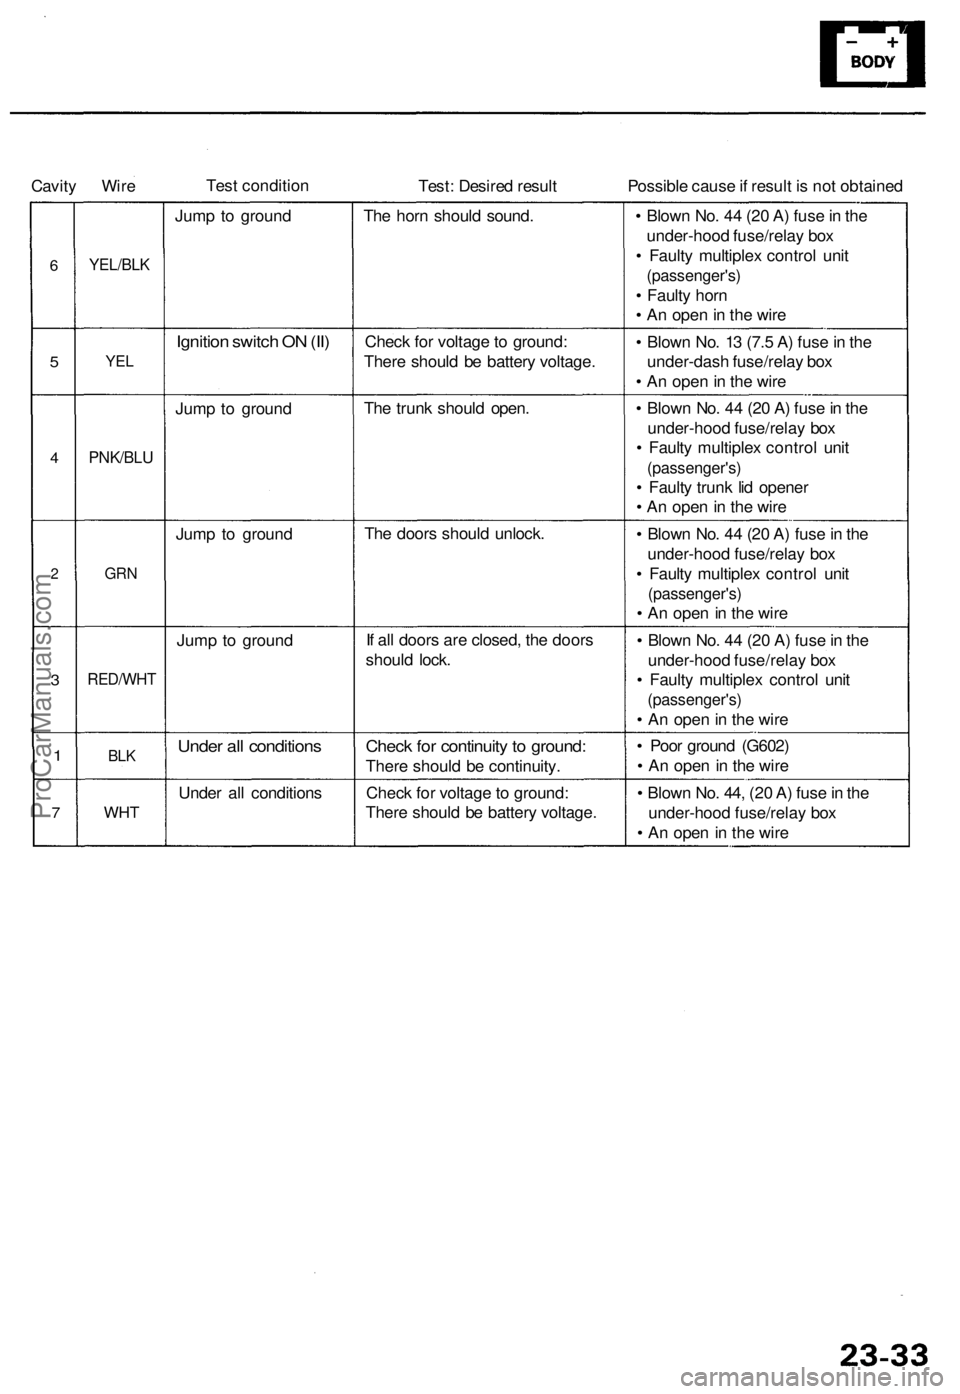
Cavity Wire
Test condition
Test: Desired result
Possible cause if result is not obtained
6
5
4
2
3
1
7
YEL/BLK
YEL
PNK/BLU
GRN
RED/WHT
BLK
WHT
Jump to ground
Ignition switch ON (II)
Jump to ground
Jump to ground
Jump to ground
Under all conditions
Under all conditions
The horn should sound.
Check for voltage to ground:
There should be battery voltage.
The trunk should open.
The doors should unlock.
If all doors are closed, the doors
should lock.
Check for continuity to ground:
There should be continuity.
Check for voltage to ground:
There should be battery voltage.
• Blown No. 44 (20 A) fuse in the
under-hood fuse/relay box
• Faulty multiplex control unit
(passenger's)
• Faulty horn
• An open in the wire
• Blown No. 13 (7.5 A) fuse in the
under-dash fuse/relay box
• An open in the wire
• Blown No. 44 (20 A) fuse in the
under-hood fuse/relay box
• Faulty multiplex control unit
(passenger's)
• Faulty trunk lid opener
• An open in the wire
• Blown No. 44 (20 A) fuse in the
under-hood fuse/relay box
• Faulty multiplex control unit
(passenger's)
• An open in the wire
• Blown No. 44 (20 A) fuse in the
under-hood fuse/relay box
• Faulty multiplex control unit
(passenger's)
• An open in the wire
• Poor ground (G602)
• An open in the wire
• Blown No. 44, (20 A) fuse in the
under-hood fuse/relay box
• An open in the wireProCarManuals.com
Page 33 of 1954
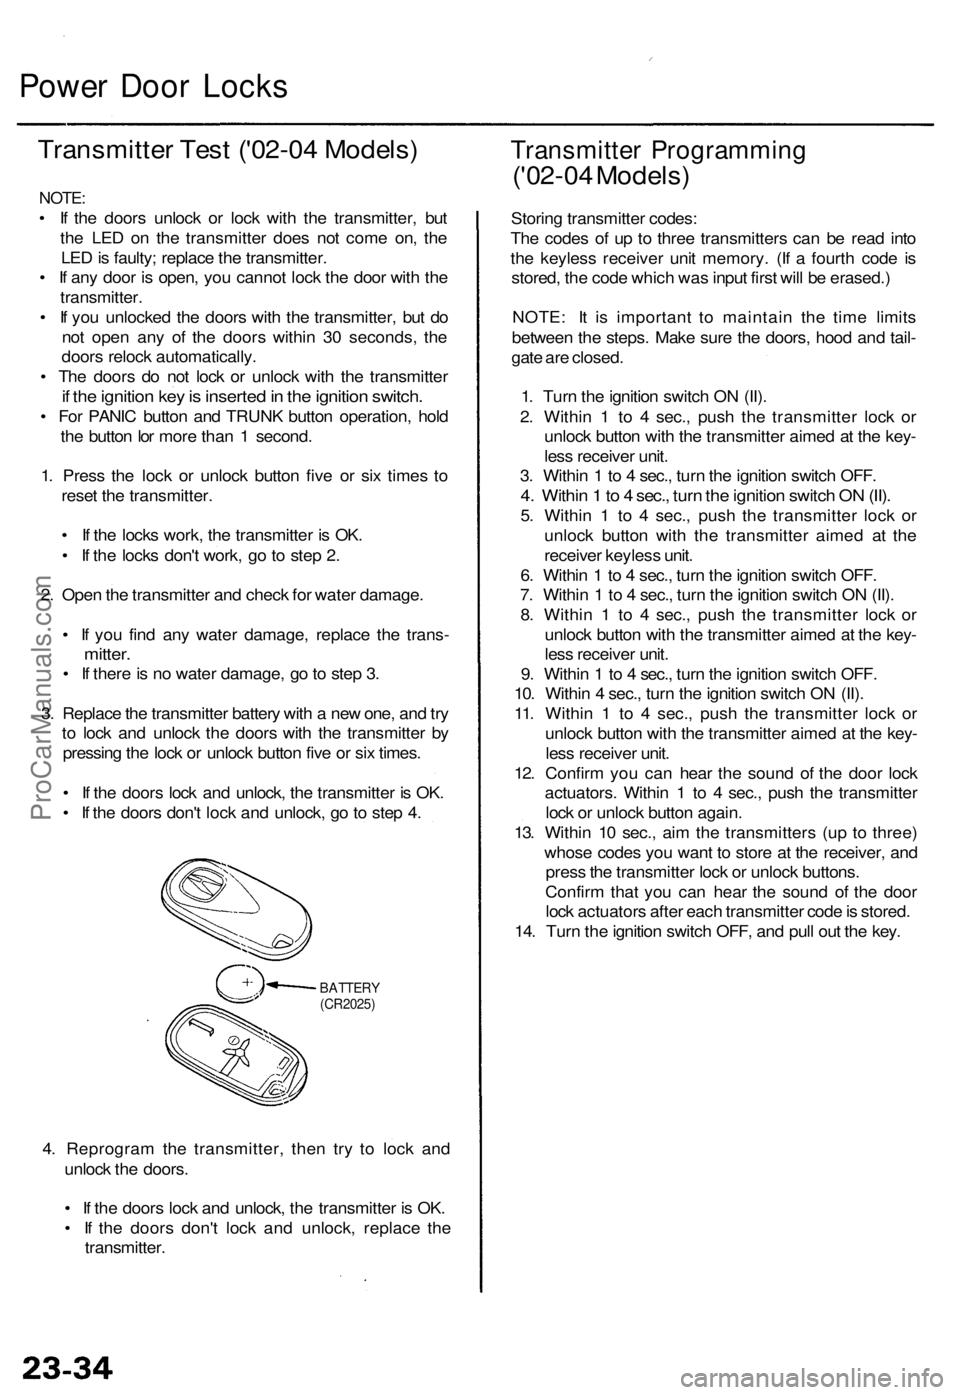
Power Doo r Lock s
Transmitte r Tes t ('0 2-04 Models )
NOTE:
• I f th e door s unloc k o r loc k wit h th e transmitter , bu t
th e LE D o n th e transmitte r doe s no t com e on , th e
LE D is faulty ; replac e th e transmitter .
• I f an y doo r i s open , yo u canno t loc k th e doo r wit h th e
transmitter .
• I f yo u unlocke d th e door s wit h th e transmitter , bu t d o
no t ope n an y o f th e door s withi n 3 0 seconds , th e
door s reloc k automatically .
• Th e door s d o no t loc k o r unloc k wit h th e transmitte r
if th e ignitio n ke y is inserte d in th e ignitio n switch .
• Fo r PANI C butto n an d TRUN K butto n operation , hol d
th e butto n lo r mor e tha n 1 second .
1 . Pres s th e loc k o r unloc k butto n fiv e o r si x time s t o
rese t th e transmitter .
• I f th e lock s work , th e transmitte r i s OK .
• I f th e lock s don' t work , g o to ste p 2 .
2 . Ope n th e transmitte r an d chec k fo r wate r damage .
• I f yo u fin d an y wate r damage , replac e th e trans -
mitter.
• I f ther e is n o wate r damage , g o to ste p 3 .
3 . Replac e th e transmitte r batter y wit h a ne w one , an d tr y
t o loc k an d unloc k th e door s wit h th e transmitte r b y
pressin g th e loc k o r unloc k butto n fiv e o r si x times .
• I f th e door s loc k an d unlock , th e transmitte r i s OK .
• I f th e door s don' t loc k an d unlock , g o to ste p 4 .
BATTER Y(CR2025)
4. Reprogra m th e transmitter , the n tr y t o loc k an d
unloc k th e doors .
• I f th e door s loc k an d unlock , th e transmitte r i s OK .
• I f th e door s don' t loc k an d unlock , replac e th e
transmitter .
Transmitte r Programmin g
('02-04 Models )
Storing transmitte r codes :
Th e code s o f u p t o thre e transmitter s ca n b e rea d int o
th e keyles s receive r uni t memory . (I f a fourt h cod e i s
stored , th e cod e whic h wa s inpu t firs t wil l b e erased. )
NOTE : I t i s importan t t o maintai n th e tim e limit s
betwee n th e steps . Mak e sur e th e doors , hoo d an d tail -
gat e ar e closed .
1 . Tur n th e ignitio n switc h O N (II) .
2 . Withi n 1 to 4 sec. , pus h th e transmitte r loc k o r
unloc k butto n wit h th e transmitte r aime d a t th e key -
les s receive r unit .
3 . Withi n 1 to 4 sec. , tur n th e ignitio n switc h OFF .
4. Withi n 1 to 4 sec. , tur n th e ignitio n switc h O N (II) .
5. Withi n 1 to 4 sec. , pus h th e transmitte r loc k o r
unloc k butto n with the transmitte r aime d a t th e
receive r keyles s unit .
6 . Withi n 1 to 4 sec. , tur n th e ignitio n switc h OFF .
7 . Withi n 1 to 4 sec. , tur n th e ignitio n switc h O N (II) .
8 . Withi n 1 to 4 sec. , pus h th e transmitte r loc k o r
unloc k butto n wit h th e transmitte r aime d a t th e key -
les s receive r unit .
9 . Withi n 1 to 4 sec. , tur n th e ignitio n switc h OFF .
10 . Withi n 4 sec. , tur n th e ignitio n switc h O N (II) .
11 . Withi n 1 to 4 sec. , pus h th e transmitte r loc k o r
unloc k butto n wit h th e transmitte r aime d a t th e key -
les s receive r unit .
12 . Confir m yo u ca n hea r th e soun d o f th e doo r loc k
actuators . Withi n 1 to 4 sec. , pus h th e transmitte r
loc k o r unloc k butto n again .
13 . Withi n 1 0 sec. , ai m th e transmitter s (u p t o three )
whos e code s yo u wan t t o stor e a t th e receiver , an d
pres s th e transmitte r loc k o r unloc k buttons .
Confir m tha t yo u can hea r th e soun d o f th e doo r
loc k actuator s afte r eac h transmitte r cod e is stored .
14 . Tur n th e ignitio n switc h OFF , an d pul l ou t th e key .
ProCarManuals.com
Page 45 of 1954

Description
Basic operation:
1. OnStar system is activated.
2. Data is transmitted to service provider.
GPS SATELLITES
Two-way cellular communication
with call center.
Dispatch
Rescue/Police
911 CALL
CENTER
3. Call center associate makes appropriate response:
— Accident/Emergency notification (Police, Fire and EMS, etc.)
— Airbag deployment (Accident)
— Roadside assistance
— Stolen vehicle tracking
— Remote door lock/unlock command
— Misplaced vehicle (Flashes parking lights/honks horn)
— Route guidance
— Ride Assist
— Concierge services/convenience
Buttons and indicator:
DOT BUTTON
ONSTAR INDICATOR
Solid Green Light: System OK
Flashing Green Light: Call in
progress
Solid Red Light: System
malfunction
Flashing Red Light: Call
in progress, but malfunction
in system exist.
ONSTAR BUTTON
EMERGENCY BUTTON
Activation and termination
of voice recognition
(VR) for virtual advisor and cellular phone.
Used to connect to call
center (voice based information
service).
Used for emergencies.
Emergency calls have priority
over all others.
ONSTAR CALL
CENTER
(Human Advisor)
Requests for
dispatchProCarManuals.com
Page 46 of 1954
OnStar Syste m ('0 2 Mode l USA )
Descriptio n (cont'd )
Stolen vehicl e tracking :
If th e vehicl e i s stolen , th e owne r ca n repor t i t t o th e cal l center . The y wil l notif y th e authoritie s an d trac k th e vehicl e loca -
tio n t o assis t i n recovery .
Virtual advisor :
1. Virtua l adviso r setup . A subscribe r set s u p a persona l profil e o n thei r hom e compute r throug h th e interne t a t th e
OnSta r we b site .
— Stoc k portfoli o
— Traffi c
— Sport s
— New s
— Weather
— E-mai l
2 . Subscribe r call s OnSta r cal l center .
3 . OnSta r receive s an d processe s request .
4 . Profil e accesse d fo r requeste d information .
5 . OnSta r send s informatio n bac k t o subscriber . A compute r voic e relay s th e requeste d information .
Cellular phone :
The use r can mak e a hands-fre e cellula r phon e cal l wit h on e touc h (b y pressin g th e "dot " button) , an d b y usin g voic e
recognitio n commands .
Remote operation :
Vehicle door s ca n b e locke d remotel y if forgotte n o r unlocke d whe n key s ar e accidentall y lef t insid e th e vehicle . I f th e vehi -
cl e is misplace d in a parkin g lot , vehicl e aler t (honk s th e hor n an d Flashe s th e parkin g lights ) ca n b e requeste d remotely .
NOTE : Durin g norma l vehicl e operation , th e syste m is i n hig h powe r mode . Afte r th e ignitio n switc h i s turne d OF F th e sys -
te m wil l g o int o lo w powe r mod e fo r 4 8 hours , afte r tha t th e syste m wil l switc h t o slee p mod e t o conserv e batter y power .
Whe n
in lo w powe r mode , the syste m will switc h back to th e hig h powe r mod e for 1 minut e out o f ever y 10 minute s for a
perio d o f 4 8 hours . Remot e operatio n is onl y availabl e durin g th e 1 minut e perio d o f hig h powe r operation . Whe n th e sys -
te m is i n slee p mode , remot e operatio n i s no t possible .
Registerin g replacemen t components :
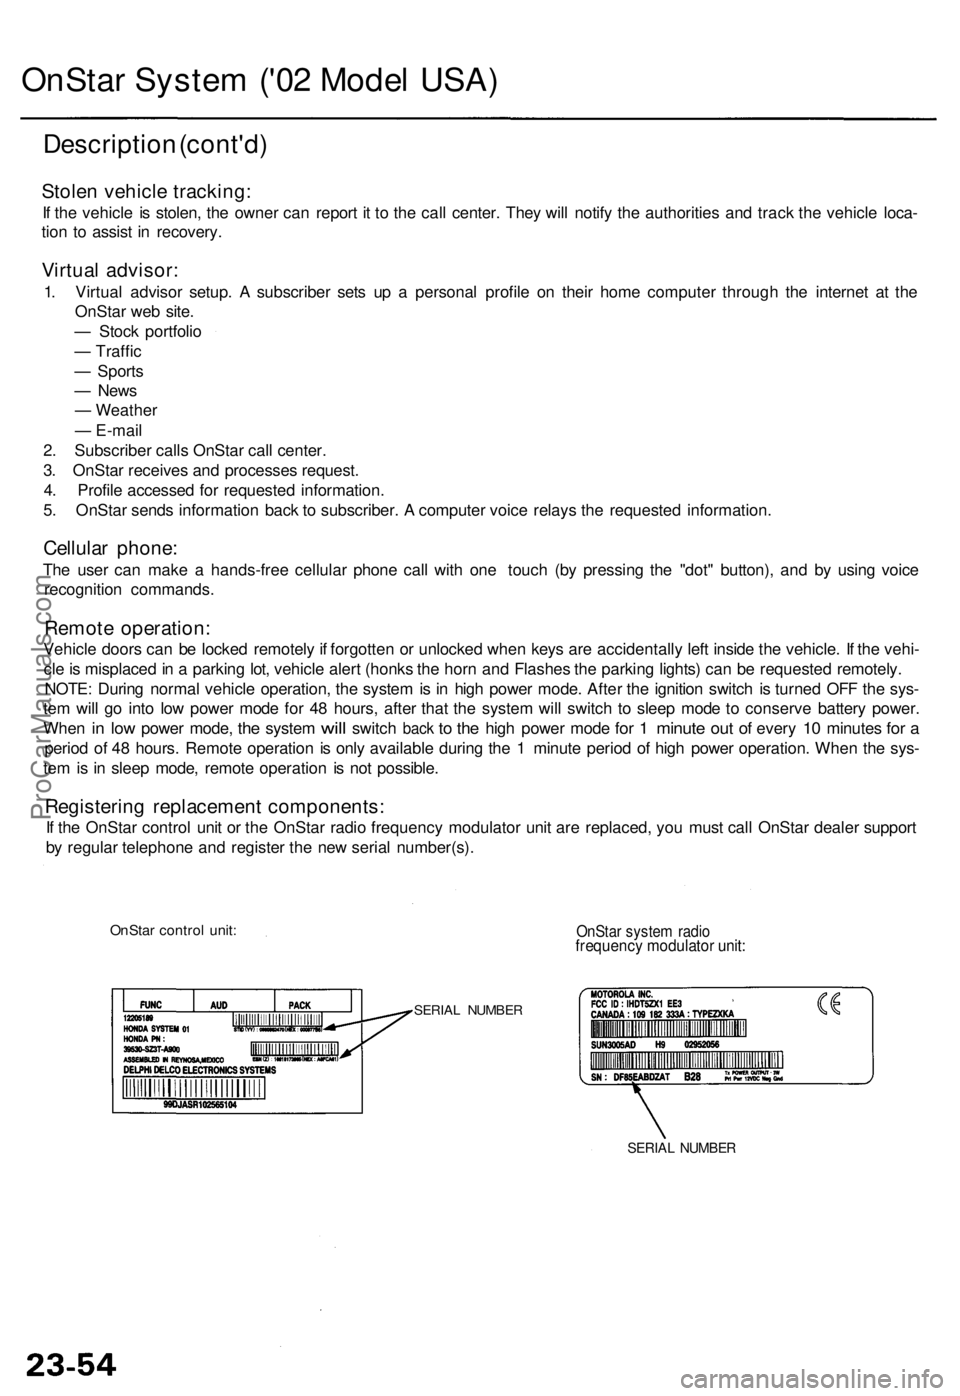
If th e OnSta r contro l uni t o r th e OnSta r radi o frequenc y modulato r uni t ar e replaced , yo u mus t cal l OnSta r deale r suppor t
b y regula r telephon e an d registe r th e ne w seria l number(s) .
OnStar contro l unit :OnSta r syste m radi ofrequenc y modulato r unit :
SERIA L NUMBE R
SERIAL NUMBE R
ProCarManuals.com
Page 48 of 1954
OnStar Syste m ('0 2 Mode l USA )
Troubleshootin g
1. Chec k th e No . 5 6 (7. 5 A ) fus e i n th e under-hoo d
fuse/rela y bo x an d th e No . 4 (1 0 A ) fus e i n th e
under-das h fuse/rela y box .
Are the fuses OK?
YES - G o to ste p 2 .
NO - Fin d an d repai r th e caus e o f th e blow n fuse .
2. Remov e the rea r sea t (Refe r to th e '96-'0 1 3.5R L
Servic e Manual , P/ N 61SZ305 , fo r th e item s no t
show n in thi s section) .
3 . Chec k fo r continuit y betwee n th e A3 2 termina l o f
th e OnSta r contro l uni t an d bod y ground .
Is there continuity?
YES - G o to ste p 4 .
NO - Repai r ope n i n th e BL K wir e betwee n th e
OnSta r contro l uni t an d G601 .
4 . Chec k fo r continuit y betwee n th e B 1 termina l o f th e
OnSta r syste m interfac e uni t an d bod y ground .
Is there continuity?
YES - G o to ste p 5 .
NO - Repai r ope n i n th e BL K wir e betwee n th e
OnSta r syste m interfac e uni t an d G401 , G402 .
5 . Wit h th e ignitio n switc h OFF , pres s an d hol d th e
"dot " button . Tur n th e ignitio n switc h fro m OF F t o
AC C thre e time s an d bac k t o ACC , the n releas e th e
"dot " button .
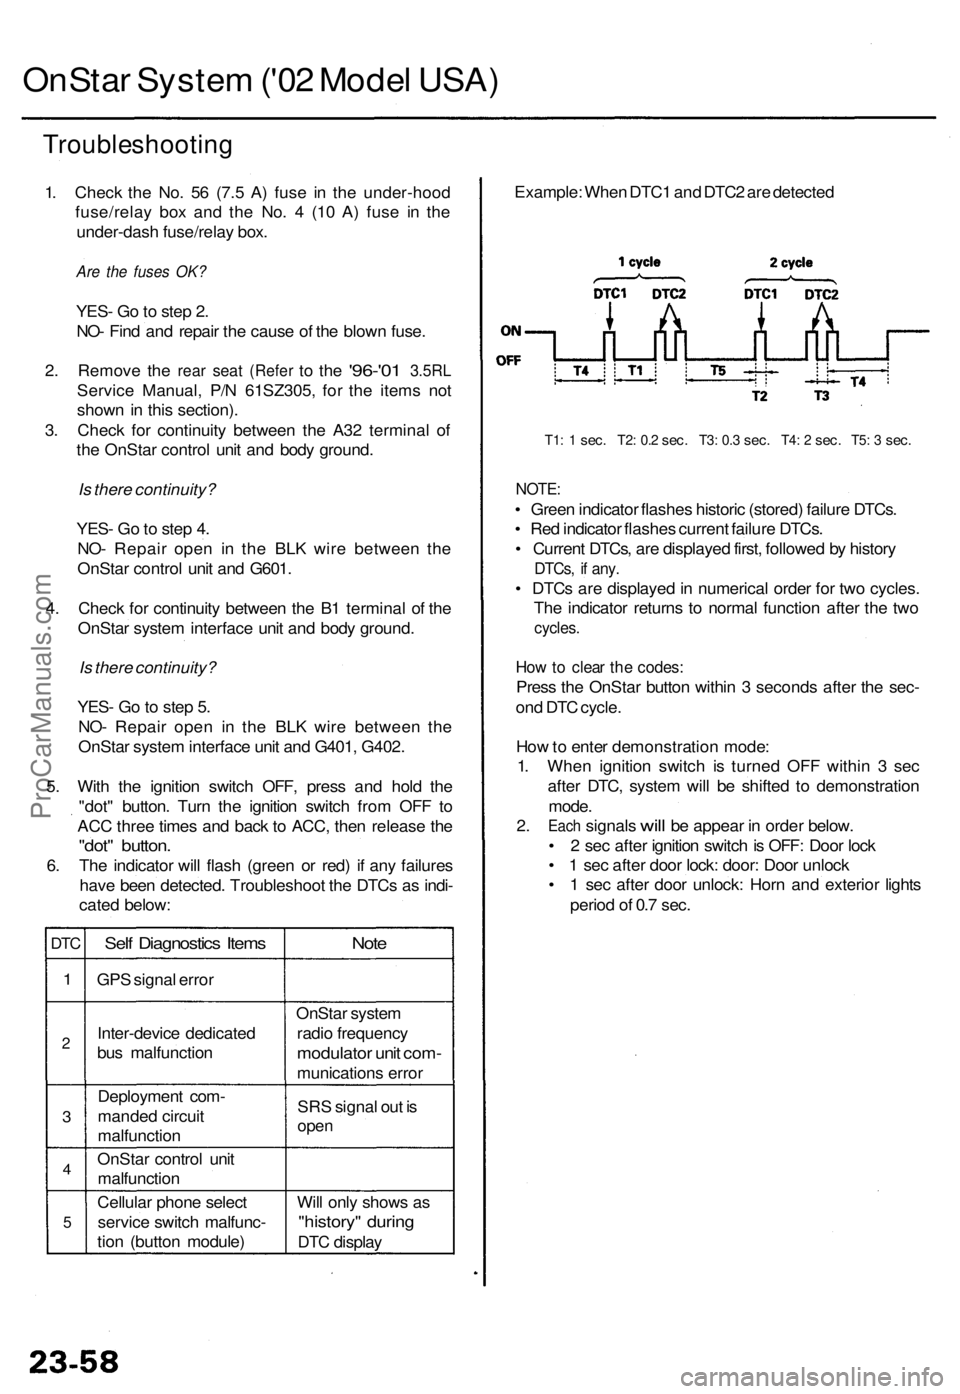
6. Th e indicato r wil l flas h (gree n o r red ) i f an y failure s
hav e bee n detected . Troubleshoo t th e DTC s a s indi -
cate d below :
DTC
1
2
3
4
5
Sel f Diagnostic s Item s
GPS signa l erro r
Inter-devic e dedicate d
bu s malfunctio n
Deploymen t com -
mande d circui t
malfunctio n
OnSta r contro l uni t
malfunctio n
Cellula r phon e selec t
servic e switc h malfunc -
tio n (butto n module )
Note
OnSta r syste m
radi o frequenc y
modulator uni t com -
munication s erro r
SR S signa l ou t i s
ope n
Will onl y show s a s
"history " durin g
DTC displa y Example
: Whe n DTC 1 an d DTC 2 ar e detecte d
T1: 1 sec . T2 : 0. 2 sec . T3 : 0. 3 sec . T4 : 2 sec . T5 : 3 sec .
NOTE :
• Gree n indicato r flashe s histori c (stored ) failur e DTCs .
• Re d indicato r flashe s curren t failur e DTCs .
• Curren t DTCs , ar e displaye d first , followe d b y histor y
DTCs, i f any .
• DTC s ar e displaye d in numerica l orde r fo r tw o cycles .
Th e indicato r return s t o norma l functio n afte r th e tw o
cycles .
How to clea r th e codes :
Press th e OnSta r butto n withi n 3 second s afte r th e sec -
on d DT C cycle .
Ho w to ente r demonstratio n mode :
1 . Whe n ignitio n switc h i s turne d OF F withi n 3 se c
afte r DTC , syste m wil l b e shifte d t o demonstratio n
mode .
2. Eac h signals will be appea r in orde r below .
• 2 sec afte r ignitio n switc h is OFF : Doo r loc k
• 1 sec afte r doo r lock : door : Doo r unloc k
• 1 sec afte r doo r unlock : Hor n an d exterio r light s
perio d o f 0. 7 sec .
ProCarManuals.com
Page 50 of 1954
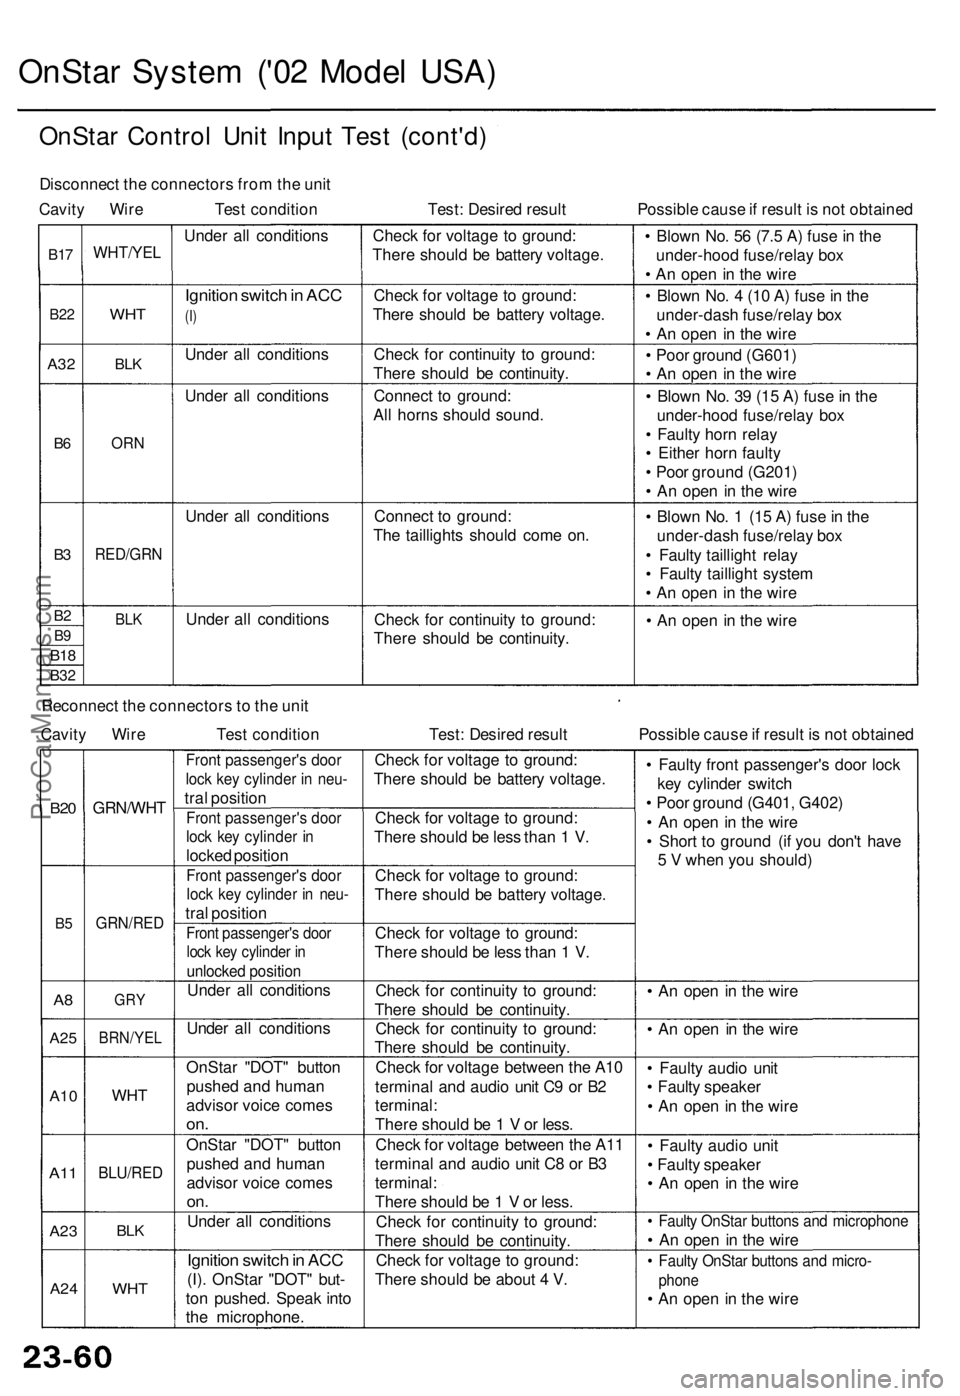
OnStar System ('02 Model USA)
OnStar Control Unit Input Test (cont'd)
Disconnect the connectors from the unit
Cavity Wire Test condition
Test: Desired result
Possible cause if result is not obtained
B17
B22
A32
B6
B3
B2
B9
B18
B32
WHT/YEL
WHT
BLK
ORN
RED/GRN
BLK
Under all conditions
Ignition switch in ACC
(I)
Under all conditions
Under all conditions
Under all conditions
Under all conditions
Check for voltage to ground:
There should be battery voltage.
Check for voltage to ground:
There should be battery voltage.
Check for continuity to ground:
There should be continuity.
Connect to ground:
All horns should sound.
Connect to ground:
The taillights should come on.
Check for continuity to ground:
There should be continuity.
• Blown No. 56 (7.5 A) fuse in the
under-hood fuse/relay box
• An open in the wire
• Blown No. 4 (10 A) fuse in the
under-dash fuse/relay box
• An open in the wire
• Poor ground (G601)
• An open in the wire
• Blown No. 39 (15 A) fuse in the
under-hood fuse/relay box
• Faulty horn relay
• Either horn faulty
• Poor ground (G201)
• An open in the wire
• Blown No. 1 (15 A) fuse in the
under-dash fuse/relay box
• Faulty taillight relay
• Faulty taillight system
• An open in the wire
• An open in the wire
Reconnect the connectors to the unit
Cavity Wire
Test condition
Test: Desired result
Possible cause if result is not obtained
B20
B5
A8
A25
A10
A11
A23
A24
GRN/WHT
GRN/RED
GRY
BRN/YEL
WHT
BLU/RED
BLK
WHT
Front passenger's door
lock key cylinder in neu-
tral position
Front passenger's door
lock key cylinder in
locked position
Front passenger's door
lock key cylinder in neu-
tral position
Front passenger's door
lock key cylinder in
unlocked position
Under all conditions
Under all conditions
OnStar "DOT" button
pushed and human
advisor voice comes
on.
OnStar "DOT" button
pushed and human
advisor voice comes
on.
Under all conditions
Ignition switch in ACC
(I). OnStar "DOT" but-
ton pushed. Speak into
the microphone.
Check for voltage to ground:
There should be battery voltage.
Check for voltage to ground:
There should be less than 1 V.
Check for voltage to ground:
There should be battery voltage.
Check for voltage to ground:
There should be less than 1 V.
Check for continuity to ground:
There should be continuity.
Check for continuity to ground:
There should be continuity.
Check for voltage between the A10
terminal and audio unit C9 or B2
terminal:
There should be 1 V or less.
Check for voltage between the A11
terminal and audio unit C8 or B3
terminal:
There should be 1 V or less.
Check for continuity to ground:
There should be continuity.
Check for voltage to ground:
There should be about 4 V.
• Faulty front passenger's door lock
key cylinder switch
• Poor ground (G401, G402)
• An open in the wire
• Short to ground (if you don't have
5 V when you should)
• An open in the wire
• An open in the wire
• Faulty audio unit
• Faulty speaker
• An open in the wire
• Faulty audio unit
• Faulty speaker
• An open in the wire
• Faulty OnStar buttons and microphone
• An open in the wire
• Faulty OnStar buttons and micro-
phone
• An open in the wireProCarManuals.com
Page 1314 of 1954
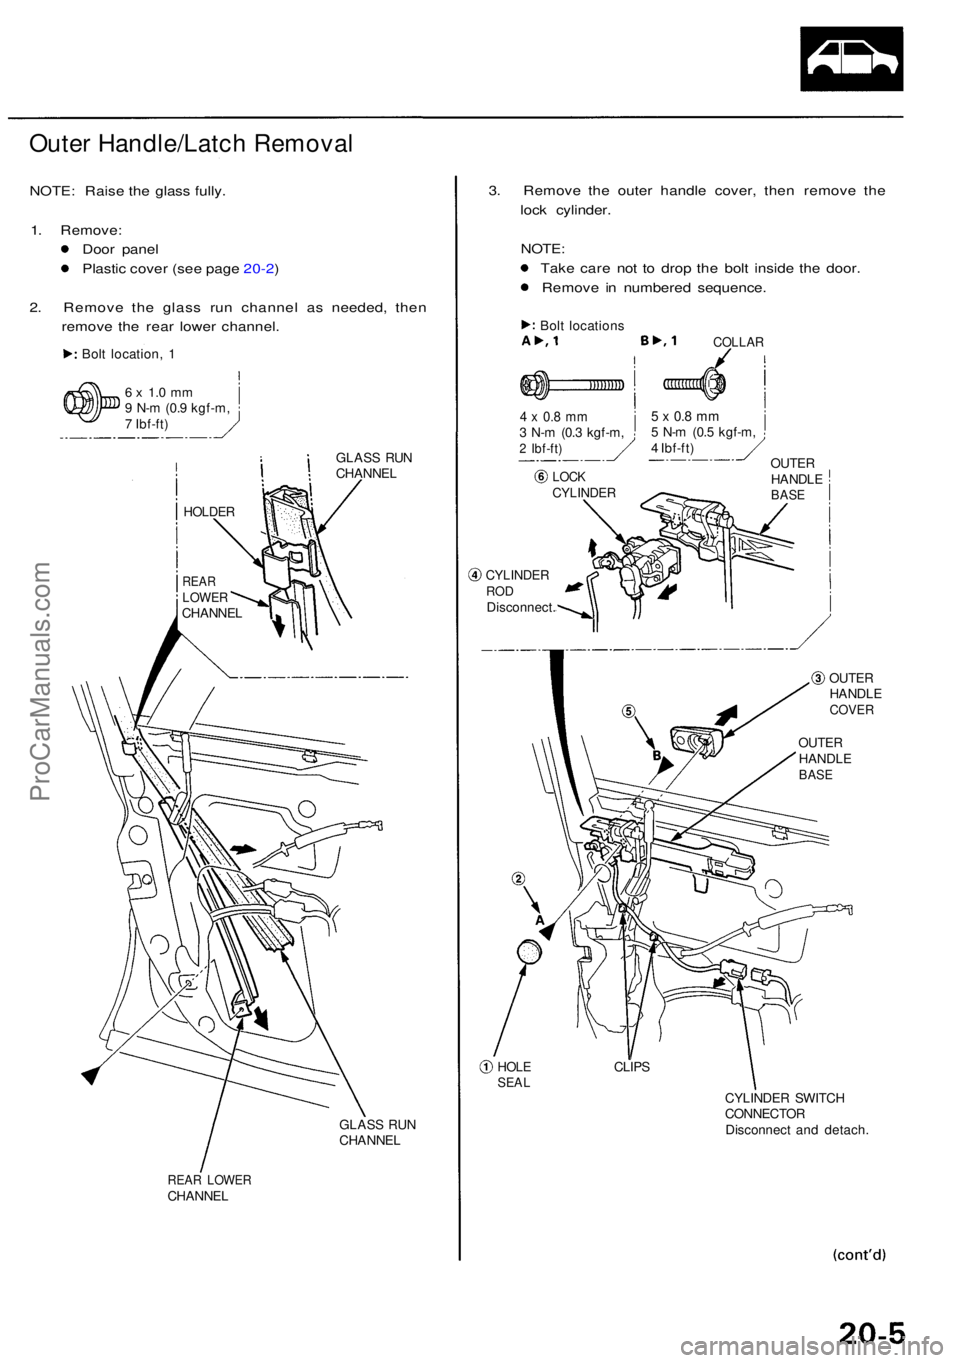
Outer Handle/Latc h Remova l
NOTE: Rais e th e glas s fully .
1 . Remove :
Doo r pane l
Plasti c cove r (se e pag e 20-2 )
2 . Remov e th e glas s ru n channe l a s needed , the n
remov e th e rea r lowe r channel .
Bolt location , 1
6 x 1. 0 m m9 N- m (0. 9 kgf-m ,
7 Ibf-ft )
GLASS RU N
CHANNE L
GLAS S RU N
CHANNE L
REAR LOWE RCHANNE L
3. Remov e th e oute r handl e cover , the n remov e th e
loc k cylinder .
NOTE :
Tak e car e no t t o dro p th e bol t insid e th e door .
Remov e i n numbere d sequence .
Bolt location s
4 x 0. 8 m m3 N- m (0. 3 kgf-m ,2 Ibf-ft )
CYLINDE RRODDisconnect .
COLLAR
5 x 0. 8 m m5 N- m (0. 5 kgf-m ,
4 Ibf-ft )
OUTE RHANDL EBASE
HOLESEA L
OUTE RHANDL ECOVER
OUTERHANDL EBASE
CLIP S
CYLINDE R SWITC H
CONNECTO R
Disconnec t an d detach .
LOCKCYLINDE R
HOLDER
REARLOWE RCHANNE L
ProCarManuals.com
Page 1315 of 1954
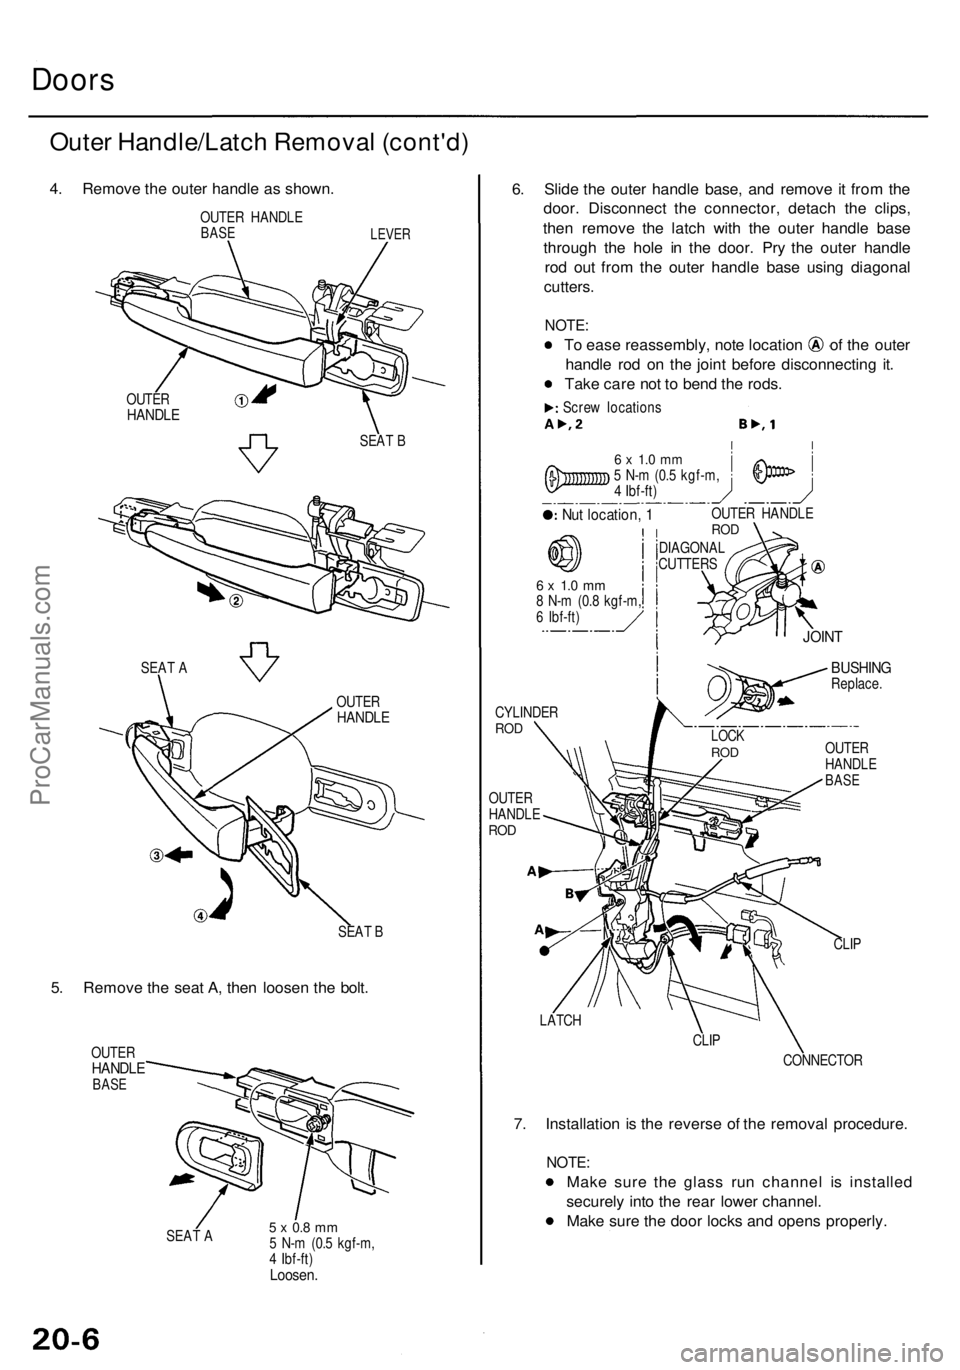
Doors
Outer Handle/Latc h Remova l (cont'd )
4. Remov e th e oute r handl e a s shown .
OUTER HANDL EBASELEVE R
SEAT B
5. Remov e th e sea t A , the n loose n th e bolt .
OUTE RHANDL EBASE
SEAT A5 x 0. 8 m m5 N- m (0. 5 kgf-m ,
4 Ibf-ft )
Loosen .
6. Slid e th e oute r handl e base , an d remov e i t fro m th e
door . Disconnec t th e connector , detac h th e clips ,
the n remov e th e latc h wit h th e oute r handl e bas e
throug h th e hol e i n th e door . Pr y th e oute r handl e
ro d ou t fro m th e oute r handl e bas e usin g diagona l
cutters .
NOTE:
To eas e reassembly , not e locatio n o f th e oute r
handl e ro d o n th e join t befor e disconnectin g it .
Tak e car e no t t o ben d th e rods .
Screw location s
6 x 1. 0 m m5 N- m (0. 5 kgf-m ,
4 Ibf-ft )
Nut location , 1OUTE R HANDL EROD
DIAGONA L
CUTTER S
6 x 1. 0 m m8 N- m (0. 8 kgf-m ,6 Ibf-ft )
CYLINDE RROD
OUTE R
HANDL E
ROD
BUSHIN GReplace .
OUTE R
HANDL E
BASE
CLIP
LATC H
CLIP
CONNECTO R
7. Installatio n i s th e revers e o f th e remova l procedure .
NOTE:
Make sur e th e glas s ru n channe l i s installe d
securel y int o th e rea r lowe r channel .
Mak e sur e th e doo r lock s an d open s properly .
SEAT B
OUTE
R
HANDL E
OUTERHANDL E
SEAT A
LOC KROD
JOIN T
ProCarManuals.com
Page 1319 of 1954
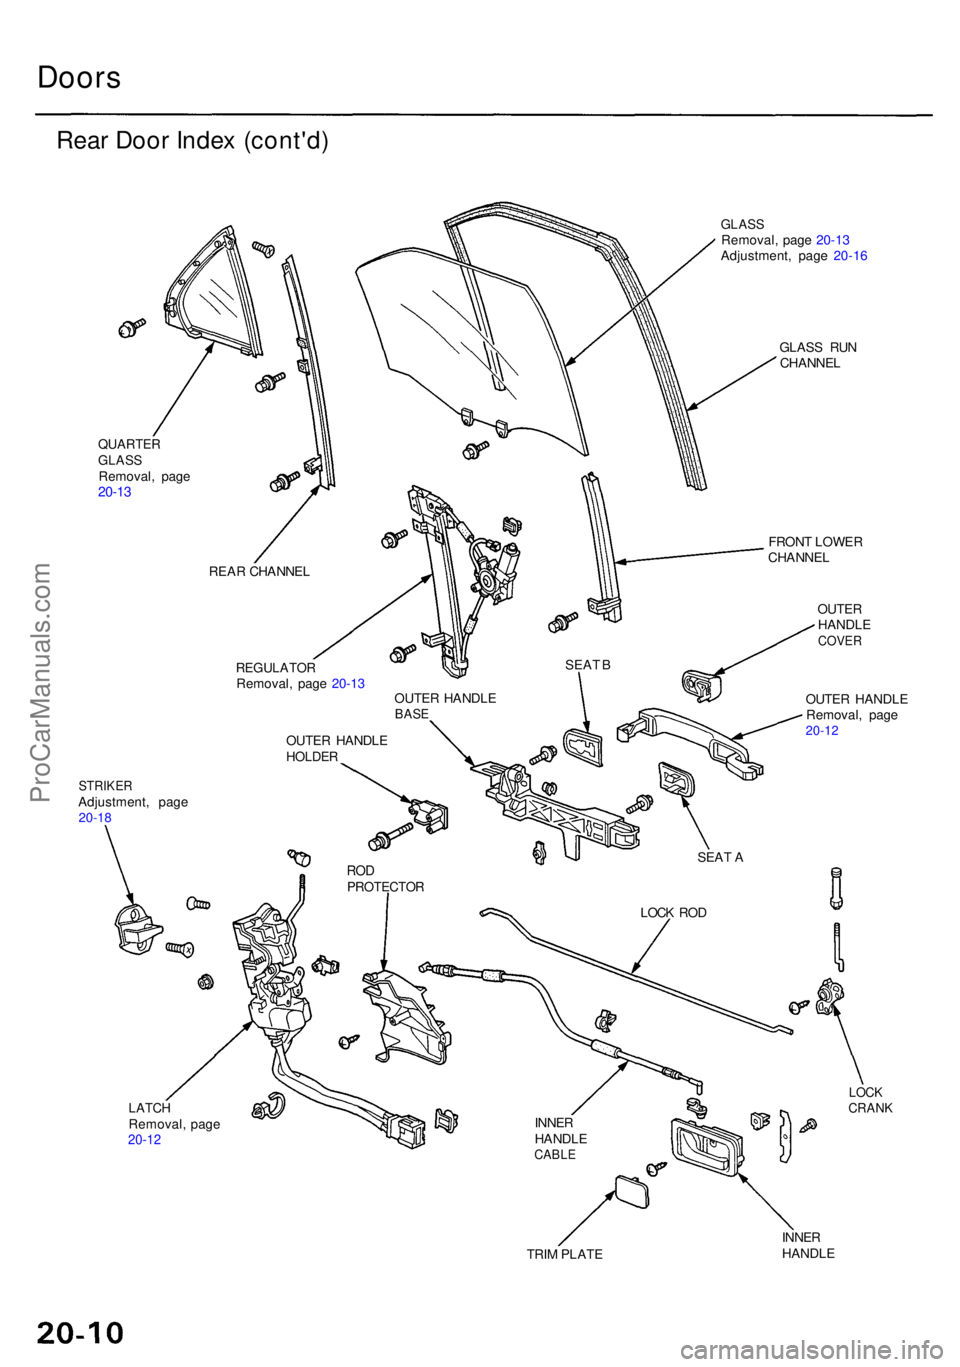
Doors
Rear Doo r Inde x (cont'd )
QUARTE RGLASSRemoval , pag e20-13
STRIKE RAdjustment , pag e20-18
GLAS SRemoval , pag e 20-1 3
Adjustment , pag e 20-1 6
GLAS S RU N
CHANNE L
LATCHRemoval , pag e20-12
FRON T LOWE R
CHANNE L
OUTERHANDL ECOVER
OUTER HANDL E
Removal , pag e
20-12
LOCKCRAN K
TRIM PLAT E INNE
R
HANDL E
REA
R CHANNE L
REGULATO RRemoval, pag e 20-1 3
OUTE R HANDL E
HOLDER
OUTER HANDL EBASE
RODPROTECTO R
INNER
HANDL E
CABLE
LOCK RO D
SEA
T A
SEA
T B
ProCarManuals.com
Page 1322 of 1954
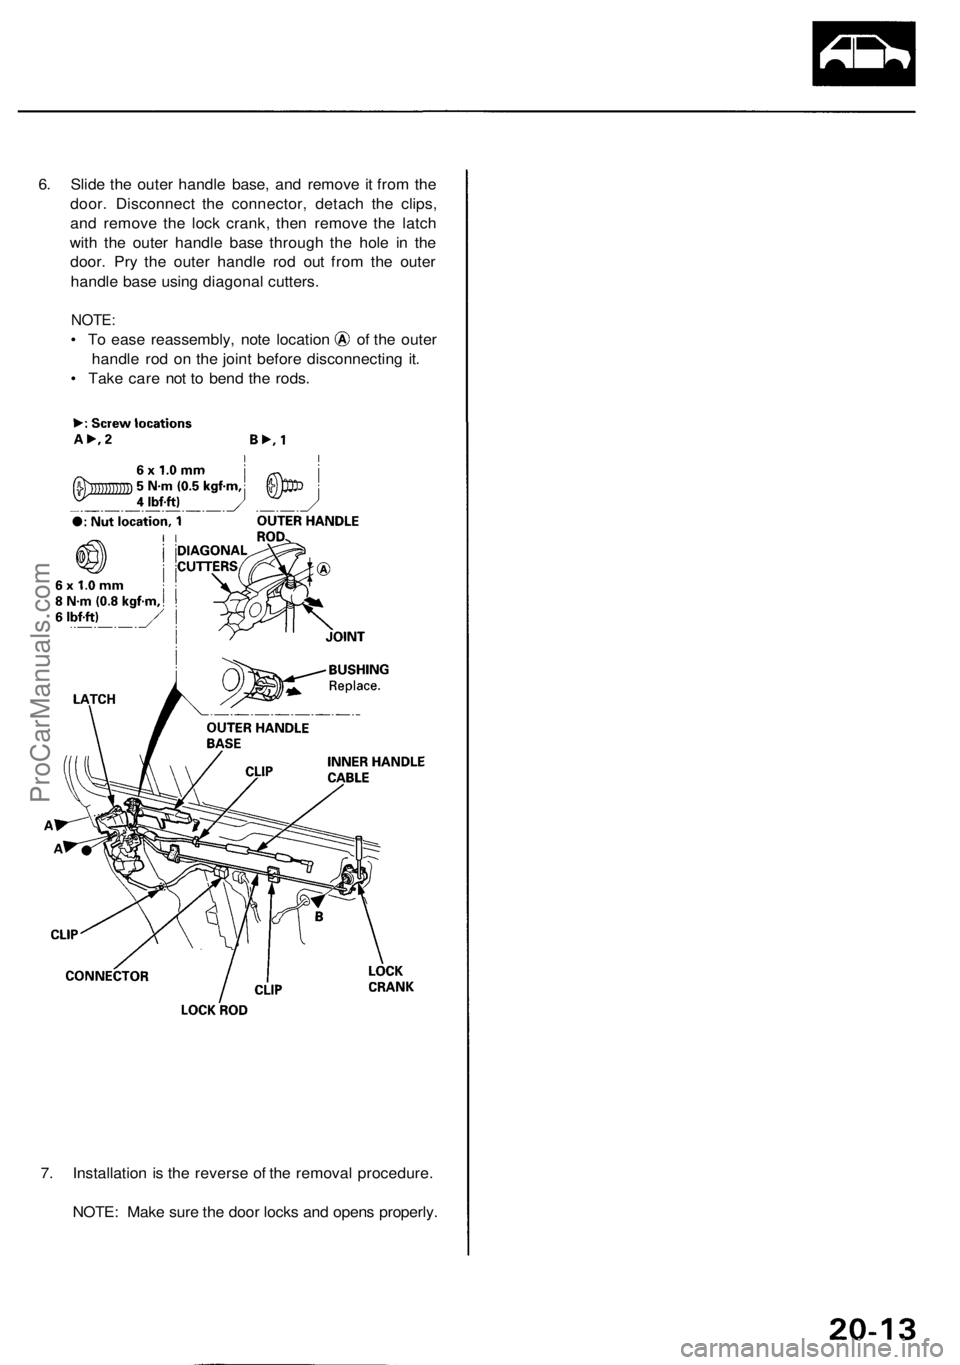
6. Slide the outer handle base, and remove it from the
door. Disconnect the connector, detach the clips,
and remove the lock crank, then remove the latch
with the outer handle base through the hole in the
door. Pry the outer handle rod out from the outer
handle base using diagonal cutters.
NOTE:
• To ease reassembly, note location of the outer
handle rod on the joint before disconnecting it.
• Take care not to bend the rods.
7. Installation is the reverse of the removal procedure.
NOTE: Make sure the door locks and opens properly.ProCarManuals.com