ACURA TL 1995 Service Repair Manual
Manufacturer: ACURA, Model Year: 1995, Model line: TL, Model: ACURA TL 1995Pages: 1771, PDF Size: 62.49 MB
Page 591 of 1771
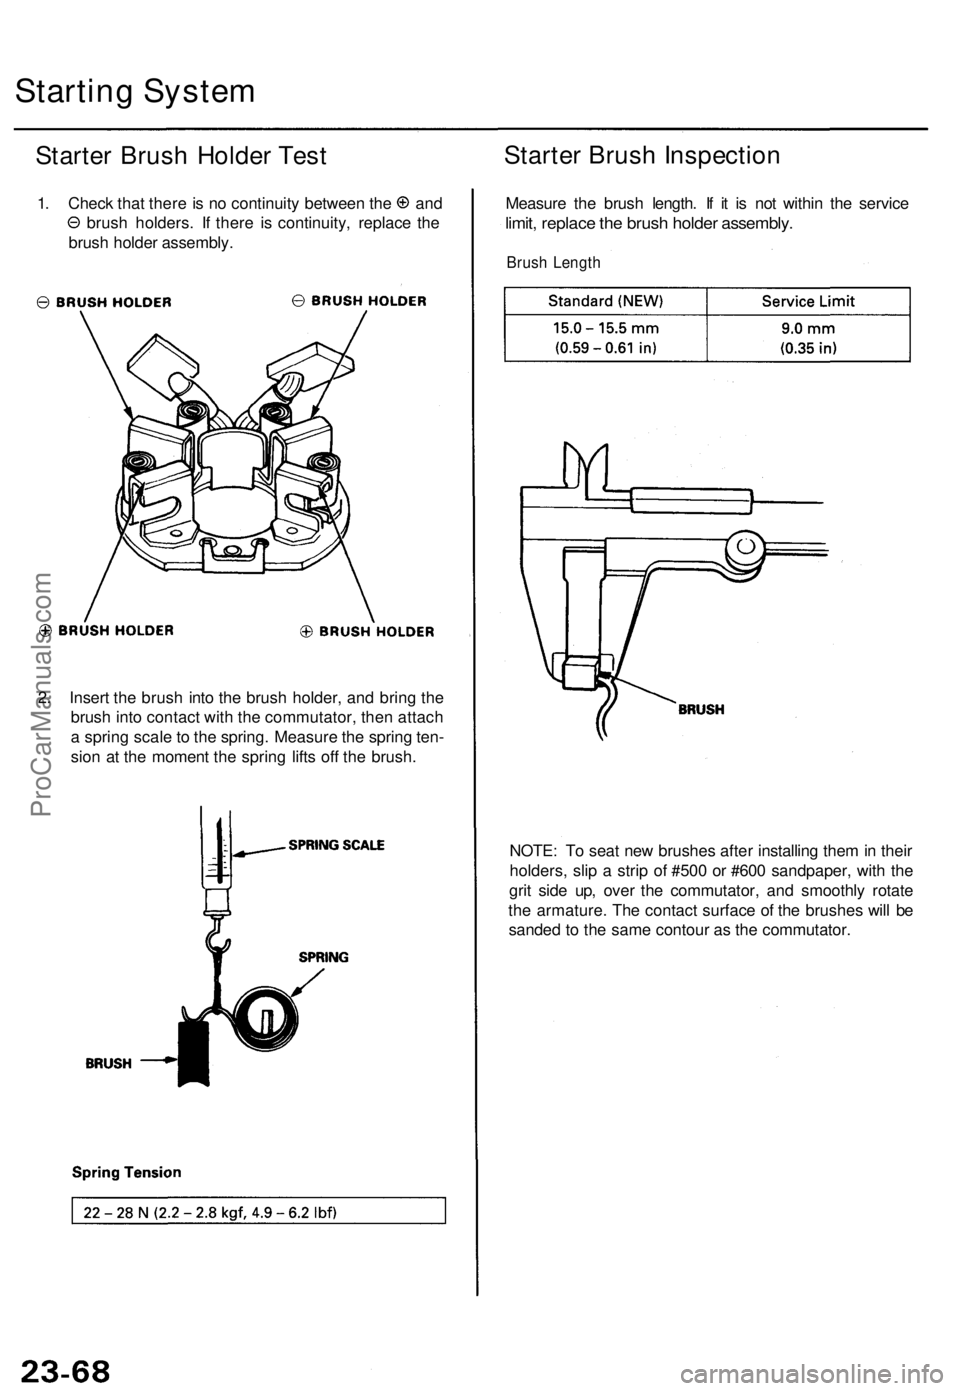
NOTE: T o sea t ne w brushe s afte r installin g the m in thei r
holders , sli p a stri p o f #50 0 o r #60 0 sandpaper , wit h th e
gri t sid e up , ove r th e commutator , an d smoothl y rotat e
th e armature . Th e contac t surfac e o f th e brushe s wil l b e
sande d t o th e sam e contou r a s th e commutator .
2
. Inser t th e brus h int o th e brus h holder , an d brin g th e
brus h int o contac t wit h th e commutator , the n attac h
a sprin g scal e to th e spring . Measur e th e sprin g ten -
sio n a t th e momen t th e sprin g lift s of f th e brush .
Startin g Syste m
Starter Brus h Holde r Tes t
1. Chec k tha t ther e is n o continuit y betwee n th e an d
brush holders . I f ther e i s continuity , replac e th e
brus h holde r assembly .
Starter Brus h Inspectio n
Measure th e brus h length . I f i t i s no t withi n th e servic e
limit, replac e th e brus h holde r assembly .
Brush Lengt h
ProCarManuals.com
Page 592 of 1771
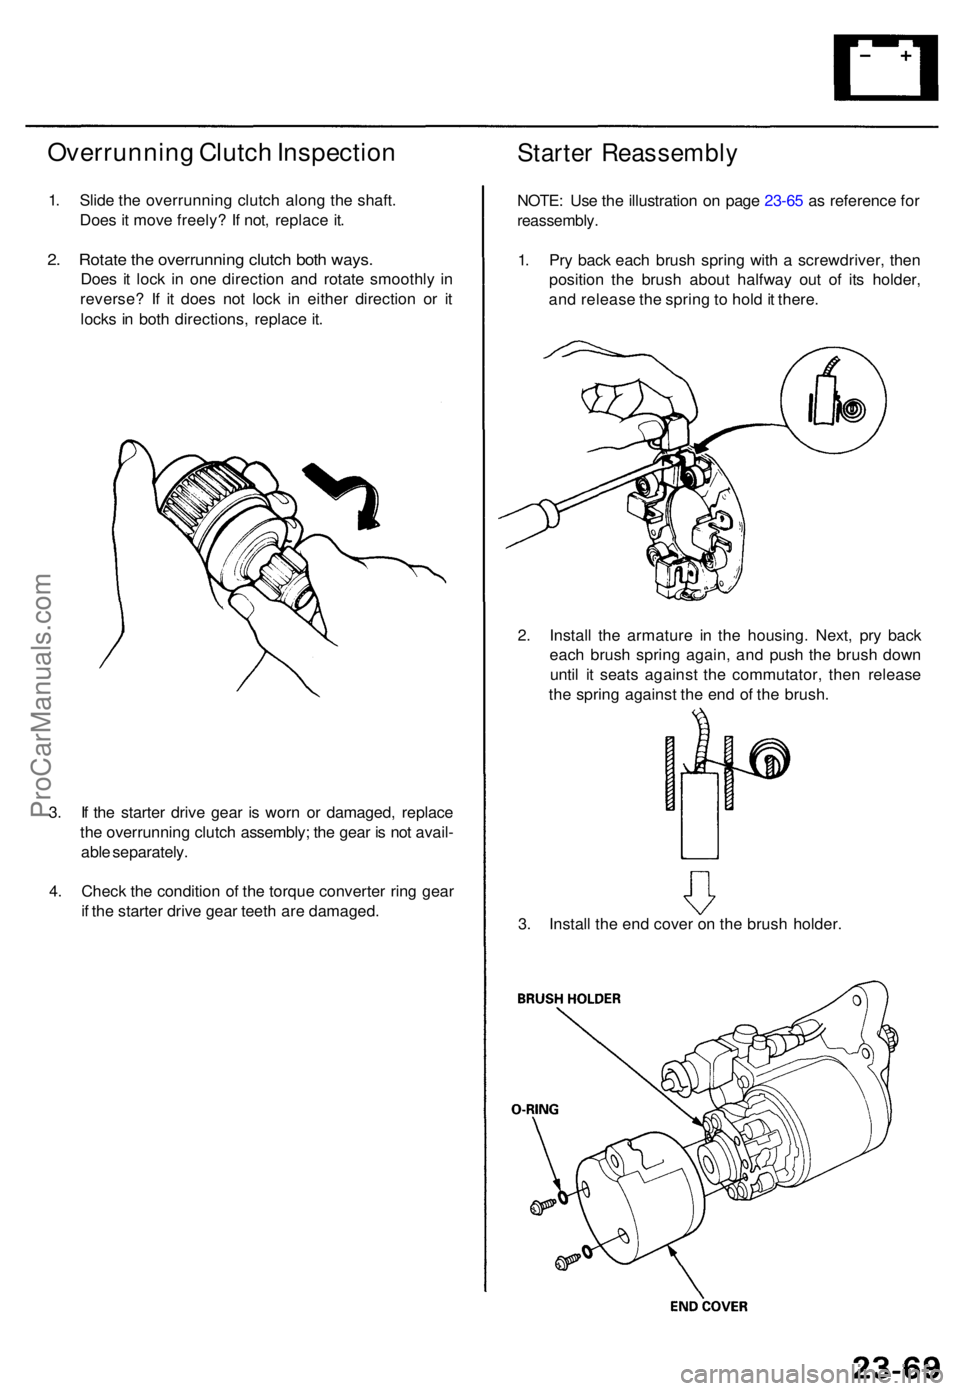
Overrunning Clutc h Inspectio n
1. Slid e th e overrunnin g clutc h alon g th e shaft .
Doe s i t mov e freely ? I f not , replac e it .
2. Rotat e th e overrunnin g clutc h bot h ways .
Does i t loc k i n on e directio n an d rotat e smoothl y i n
reverse ? I f i t doe s no t loc k i n eithe r directio n o r i t
lock s i n bot h directions , replac e it .
Starte r Reassembl y
NOTE: Us e th e illustratio n o n pag e 23-6 5 a s referenc e fo r
reassembly .
1. Pr y bac k eac h brus h sprin g wit h a screwdriver , the n
positio n th e brus h abou t halfwa y ou t o f it s holder ,
an d releas e th e sprin g to hol d it there .
2 . Instal l th e armatur e i n th e housing . Next , pr y bac k
eac h brus h sprin g again , an d pus h th e brus h dow n
unti l i t seat s agains t th e commutator , the n releas e
th e sprin g agains t th e en d o f th e brush .
3 . Instal l th e en d cove r o n th e brus h holder .
3
. I f th e starte r driv e gea r i s wor n o r damaged , replac e
th e overrunnin g clutc h assembly ; th e gea r i s no t avail -
abl e separately .
4 . Chec k th e conditio n o f th e torqu e converte r rin g gea r
i f th e starte r driv e gea r teet h ar e damaged .
ProCarManuals.com
Page 593 of 1771
Starting Syste m
Performanc e Tes t
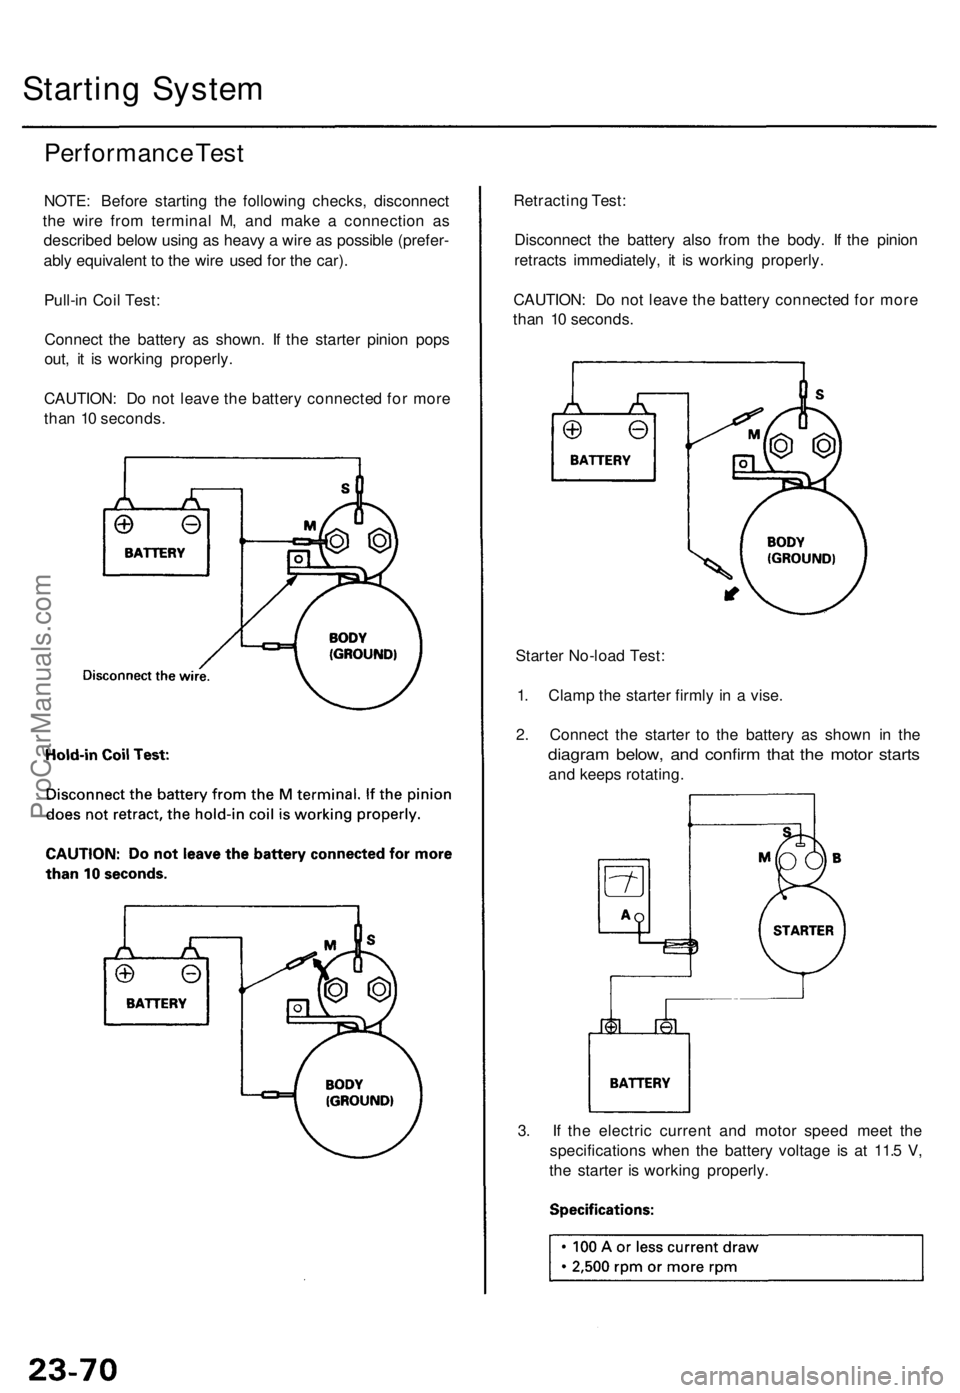
NOTE : Befor e startin g th e followin g checks , disconnec t
th e wir e fro m termina l M , an d mak e a connectio n a s
describe d belo w usin g a s heav y a wir e a s possibl e (prefer -
abl y equivalen t t o th e wir e use d fo r th e car) .
Pull-i n Coi l Test :
Connec t th e batter y a s shown . I f th e starte r pinio n pop s
out , i t i s workin g properly .
CAUTION : D o no t leav e th e batter y connecte d fo r mor e
tha n 1 0 seconds . Retractin
g Test :
Disconnec t th e batter y als o fro m th e body . I f th e pinio n
retract s immediately , i t i s workin g properly .
CAUTION : D o no t leav e th e batter y connecte d fo r mor e
tha n 1 0 seconds .
Starte r No-loa d Test :
1 . Clam p th e starte r firml y i n a vise .
2 . Connec t th e starte r t o th e batter y a s show n i n th e
diagra m below , an d confir m tha t th e moto r start s
and keep s rotating .
3 . I f th e electri c curren t an d moto r spee d mee t th e
specification s whe n th e batter y voltag e i s a t 11. 5 V ,
th e starte r i s workin g properly .
ProCarManuals.com
Page 594 of 1771
Ignition Syste m
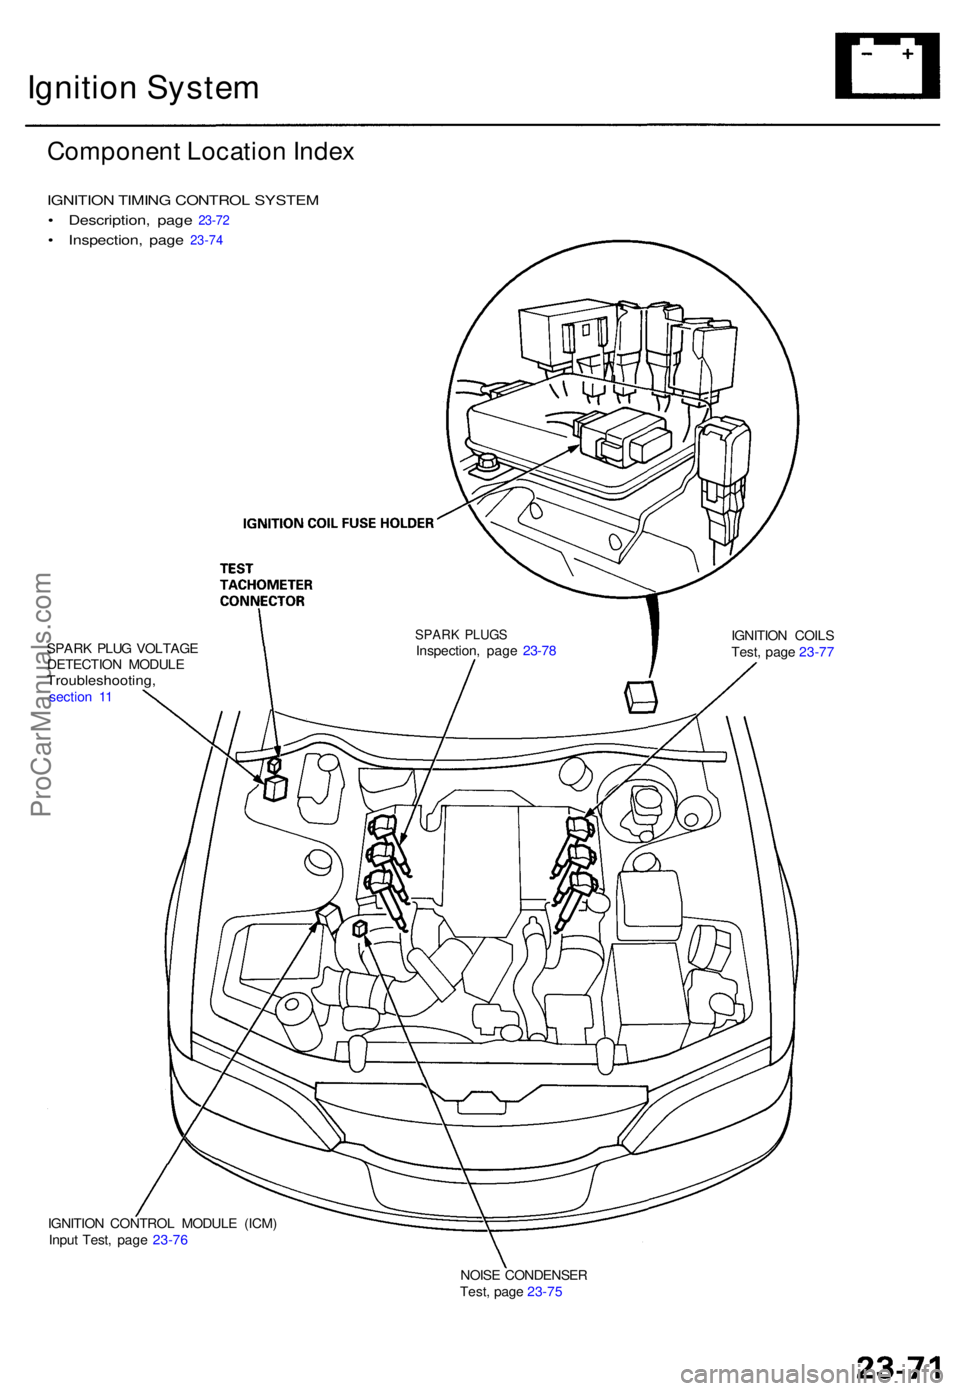
Componen t Locatio n Inde x
IGNITIO N TIMIN G CONTRO L SYSTE M
• Description , pag e 23-7 2
• Inspection , pag e 23-74
SPAR K PLU G VOLTAG E
DETECTIO N MODUL E
Troubleshooting ,section 1 1
SPAR K PLUG SInspection , pag e 23-7 8 IGNITIO
N COIL S
Test , pag e 23-7 7
NOIS E CONDENSE R
Test , pag e 23-75
IGNITIO
N CONTRO L MODUL E (ICM )
Inpu t Test , pag e 23-7 6
ProCarManuals.com
Page 595 of 1771
Ignition Syste m
Descriptio n
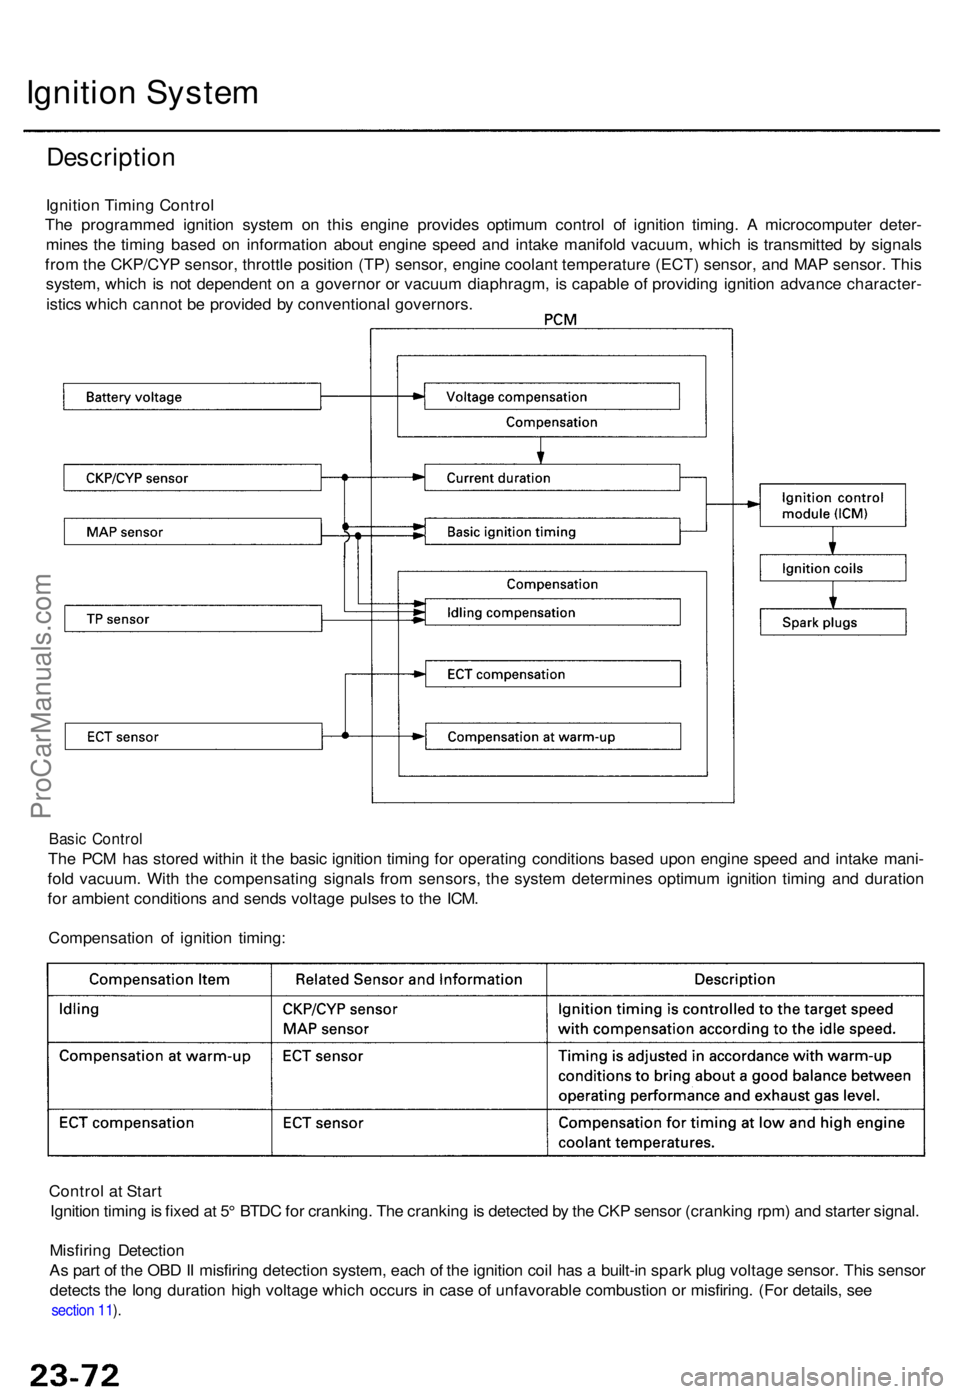
Ignition Timin g Contro l
Th e programme d ignitio n syste m o n thi s engine provide s optimu m contro l o f ignitio n timing . A microcompute r deter -
mine s th e timin g base d o n informatio n abou t engin e spee d an d intak e manifol d vacuum , whic h i s transmitte d b y signal s
fro m th e CKP/CY P sensor , throttl e positio n (TP ) sensor , engin e coolan t temperatur e (ECT ) sensor , an d MA P sensor . Thi s
system , whic h i s no t dependen t o n a governo r o r vacuu m diaphragm , i s capabl e o f providin g ignitio n advanc e character -
istic s whic h canno t b e provide d b y conventiona l governors .
Basic Contro l
The PC M ha s store d withi n it th e basi c ignitio n timin g fo r operatin g condition s base d upo n engin e spee d an d intak e mani -
fol d vacuum . Wit h th e compensatin g signal s fro m sensors , th e syste m determine s optimu m ignitio n timin g an d duratio n
fo r ambien t condition s an d send s voltag e pulse s t o th e ICM .
Compensatio n o f ignitio n timing :
Contro l a t Star t
Ignitio n timin g is fixe d a t 5 ° BTD C fo r cranking . Th e crankin g is detecte d b y th e CK P senso r (crankin g rpm ) an d starte r signal .
Misfirin g Detectio n
A s par t o f th e OB D II misfirin g detectio n system , eac h o f th e ignitio n coi l ha s a built-i n spar k plu g voltag e sensor . Thi s senso r
detect s th e lon g duratio n hig h voltag e whic h occur s in cas e o f unfavorabl e combustio n o r misfiring . (Fo r details , se e
section 11 ).
ProCarManuals.com
Page 596 of 1771
Ignition Syste m
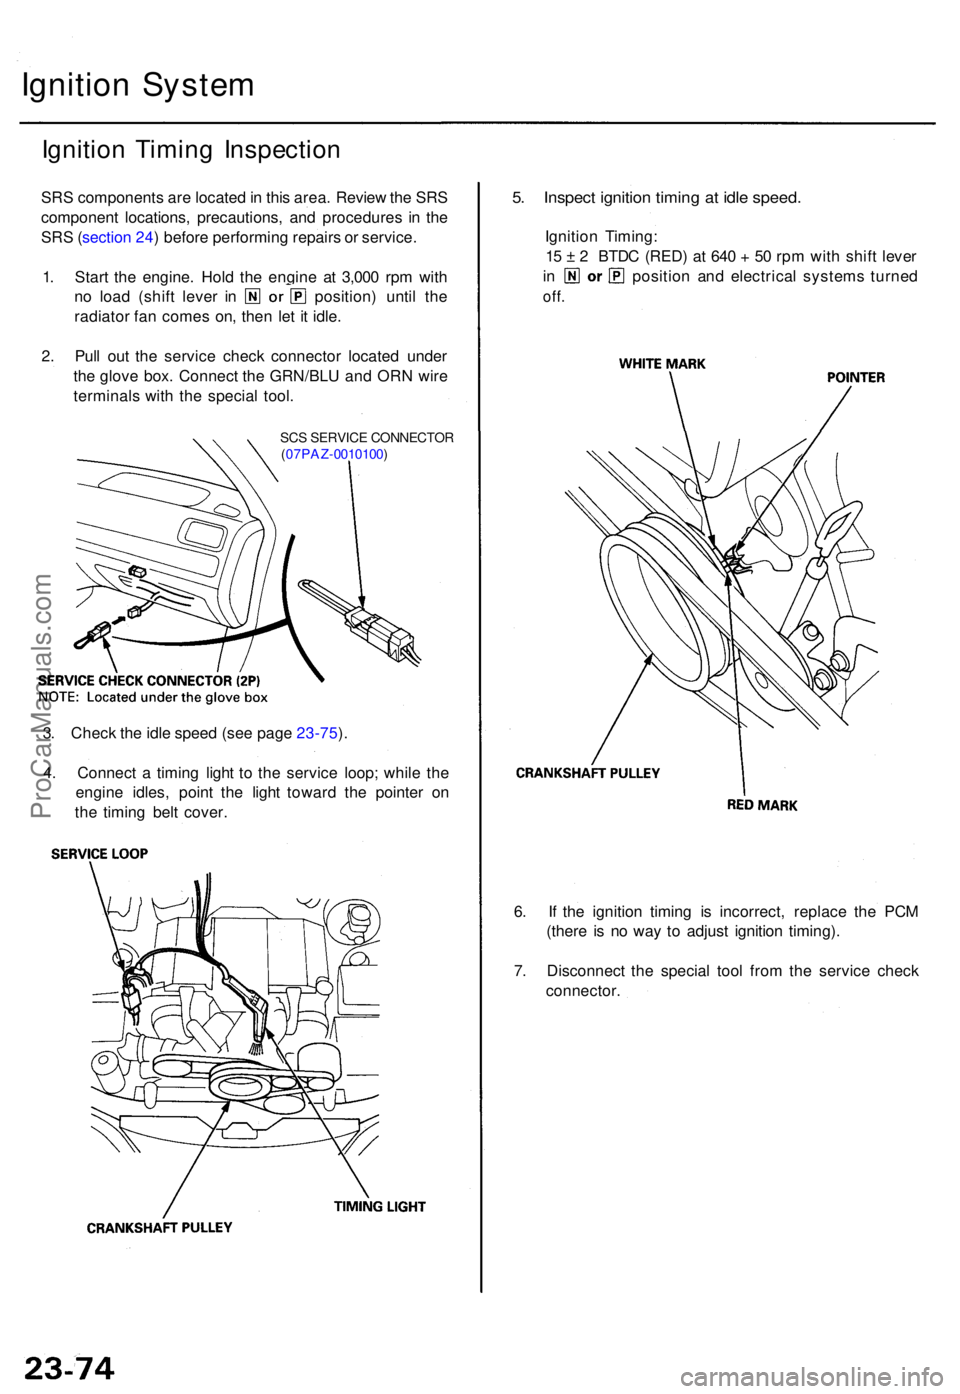
Ignition Timin g Inspectio n
SRS component s ar e locate d in thi s area . Revie w th e SR S
componen t locations , precautions , an d procedure s i n th e
SR S (sectio n 24 ) befor e performin g repair s o r service .
1 . Star t th e engine . Hol d th e engin e a t 3,00 0 rp m wit h
no loa d (shif t leve r i n position ) unti l th e
radiato r fa n come s on , the n le t i t idle .
2 . Pul l ou t th e servic e chec k connecto r locate d unde r
th e glov e box . Connec t th e GRN/BL U an d OR N wir e
terminal s wit h th e specia l tool .
SCS SERVIC E CONNECTO R
( 07PAZ -0010100 )
5. Inspec t ignitio n timin g a t idl e speed .
Ignition Timing :
1 5 ± 2 BTD C (RED ) a t 64 0 + 50 rp m wit h shif t leve r
in positio n an d electrica l system s turne d
off.
6. I f th e ignitio n timin g i s incorrect , replac e th e PC M
(ther e i s n o wa y t o adjus t ignitio n timing) .
7 . Disconnec t th e specia l too l fro m th e servic e chec k
connector .
3
. Chec k th e idl e spee d (se e pag e 23-75 ).
4 . Connec t a timin g ligh t t o th e servic e loop ; whil e th e
engin e idles , poin t th e ligh t towar d th e pointe r o n
th e timin g bel t cover .
ProCarManuals.com
Page 597 of 1771
Idle Spee d Chec k
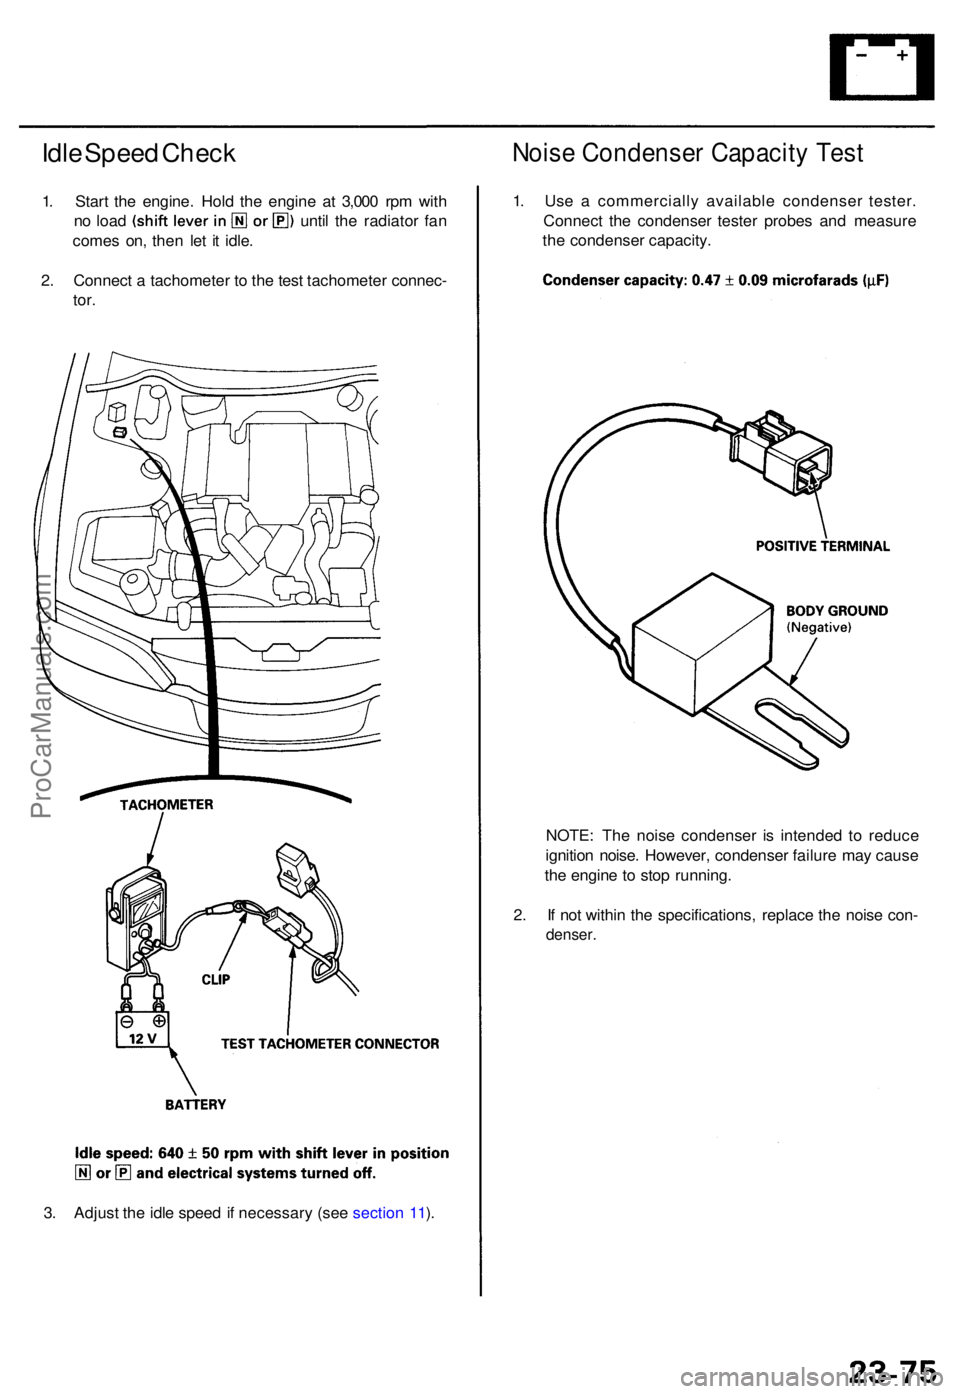
1. Star t th e engine . Hol d th e engin e a t 3,00 0 rp m wit h
no loa d unti l th e radiato r fa n
come s on , the n le t i t idle .
2 . Connec t a tachomete r t o th e tes t tachomete r connec -
tor.
Nois e Condense r Capacit y Tes t
1. Us e a commerciall y availabl e condense r tester .
Connec t th e condense r teste r probe s an d measur e
th e condense r capacity .
NOTE : Th e nois e condense r i s intende d t o reduc e
ignitio n noise . However , condense r failur e ma y caus e
th e engin e t o sto p running .
2 . I f no t withi n th e specifications , replac e th e nois e con -
denser .
3. Adjus t th e idl e spee d if necessar y (se e sectio n 11 ).
ProCarManuals.com
Page 598 of 1771
Ignition Syste m
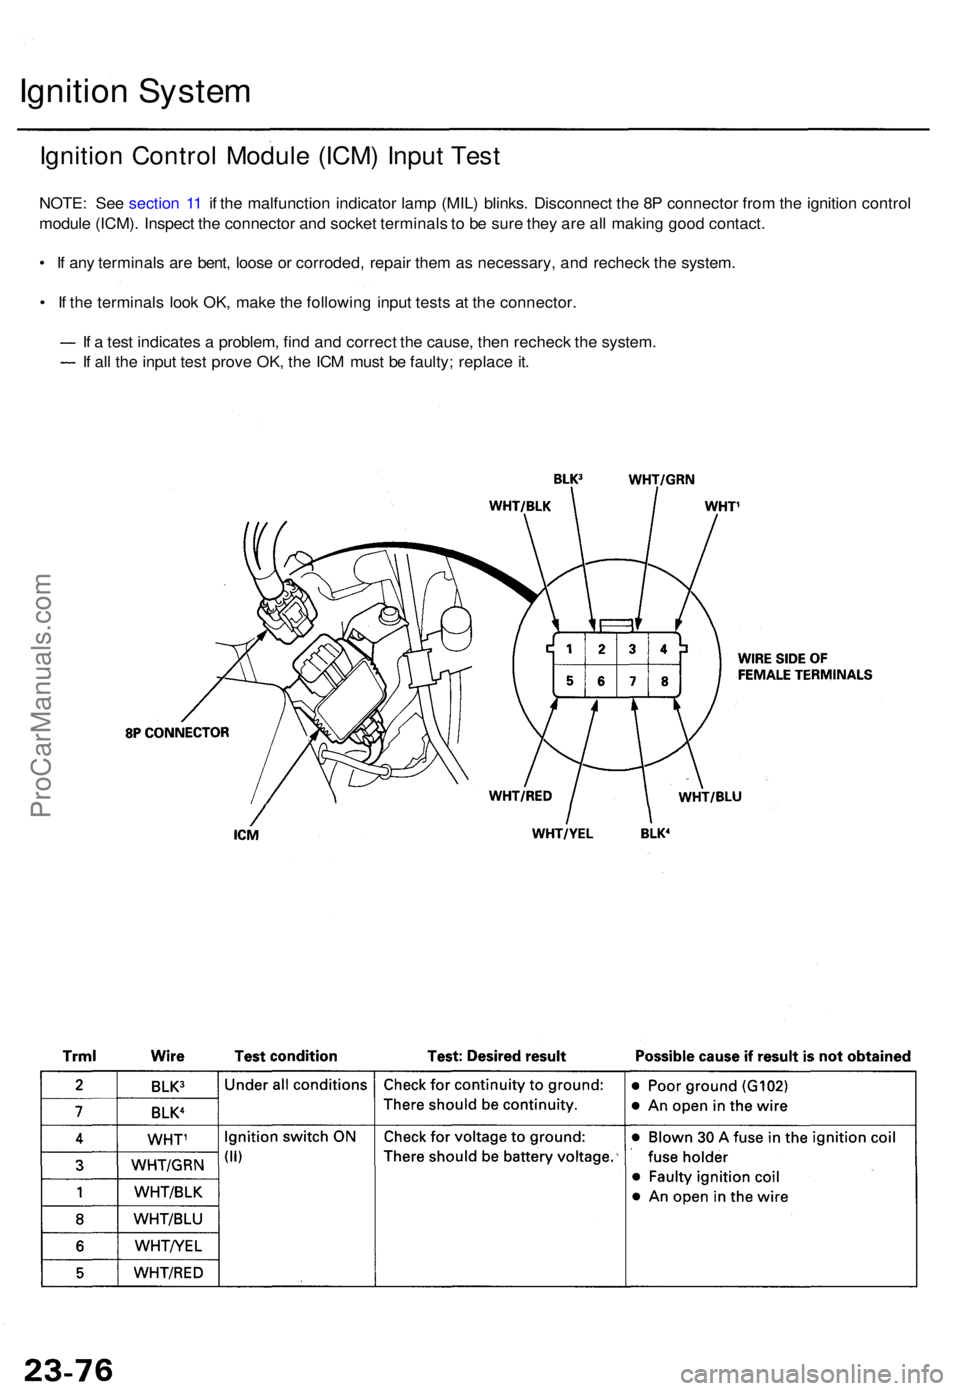
Ignition Contro l Modul e (ICM ) Inpu t Tes t
NOTE : Se e sectio n 1 1 i f th e malfunctio n indicator lamp (MIL ) blinks . Disconnec t th e 8 P connecto r fro m th e ignitio n contro l
modul e (ICM) . Inspec t th e connecto r an d socke t terminal s to b e sur e the y ar e al l makin g goo d contact .
• I f an y terminal s ar e bent , loos e o r corroded , repai r the m a s necessary , an d rechec k th e system .
• I f th e terminal s loo k OK , mak e th e followin g inpu t test s a t th e connector .
I f a tes t indicate s a problem , fin d an d correc t th e cause , the n rechec k th e system .
I f al l th e inpu t tes t prov e OK , th e IC M mus t b e faulty ; replac e it .
ProCarManuals.com
Page 599 of 1771
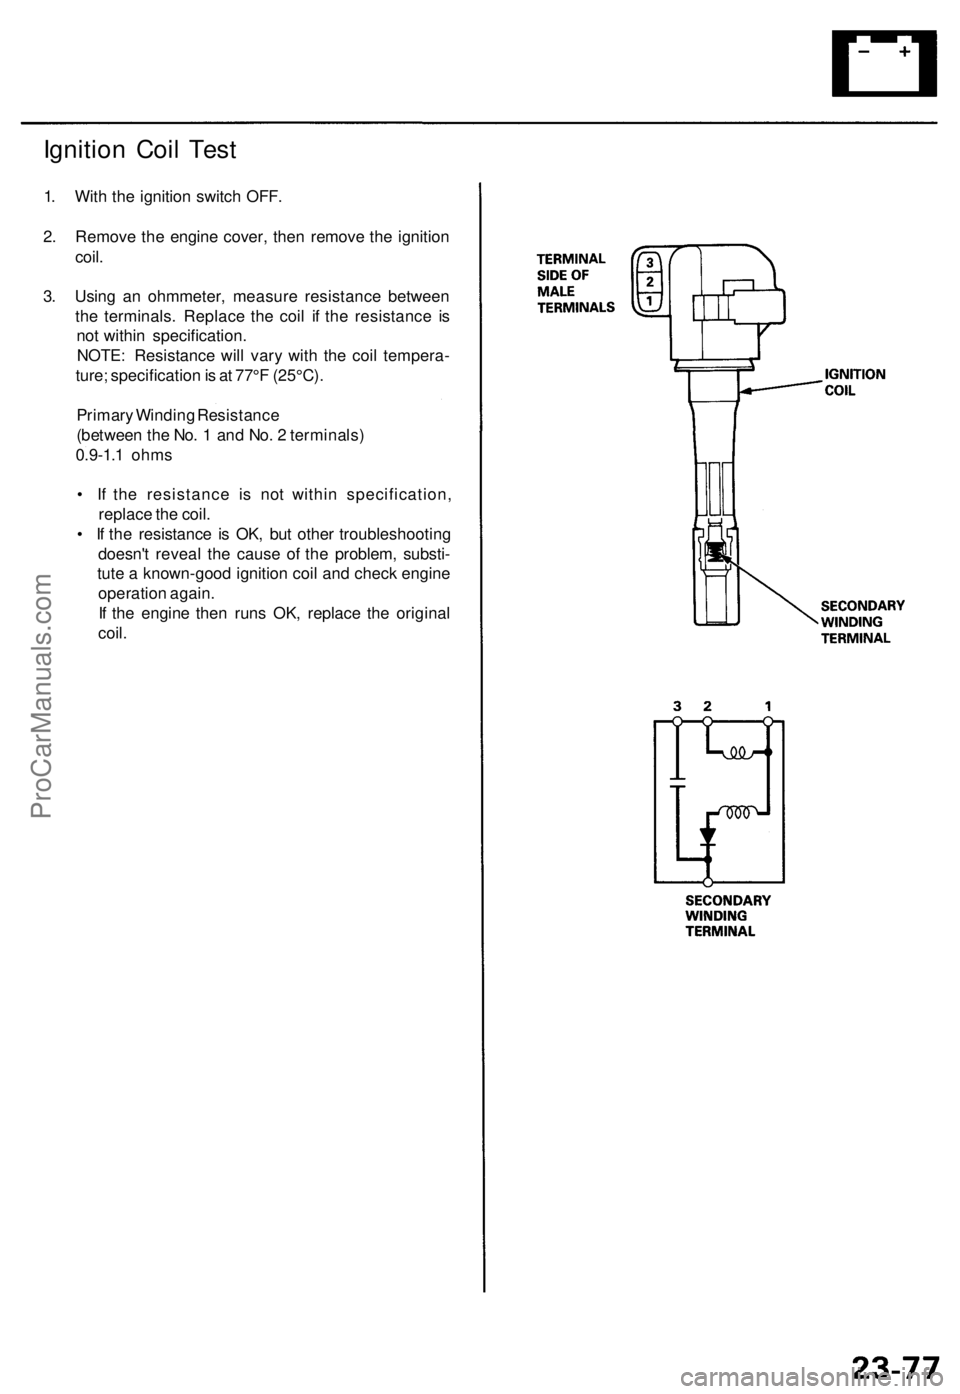
Ignition Coi l Tes t
1. Wit h th e ignitio n switc h OFF .
2 . Remov e th e engin e cover , the n remov e th e ignitio n
coil .
3 . Usin g a n ohmmeter , measur e resistanc e betwee n
th e terminals . Replac e th e coi l i f th e resistanc e i s
no t withi n specification .
NOTE : Resistanc e wil l var y wit h th e coi l tempera -
ture ; specificatio n is a t 77° F (25°C) .
Primar y Windin g Resistanc e
(betwee n th e No . 1 an d No . 2 terminals )
0.9 -1. 1 ohm s
• I f th e resistanc e i s no t withi n specification ,
replac e th e coil .
• I f th e resistanc e i s OK , bu t othe r troubleshootin g
doesn' t revea l th e caus e o f th e problem , substi -
tut e a known-goo d ignitio n coi l an d chec k engin e
operatio n again .
I f th e engin e the n run s OK , replac e th e origina l
coil .
ProCarManuals.com
Page 600 of 1771
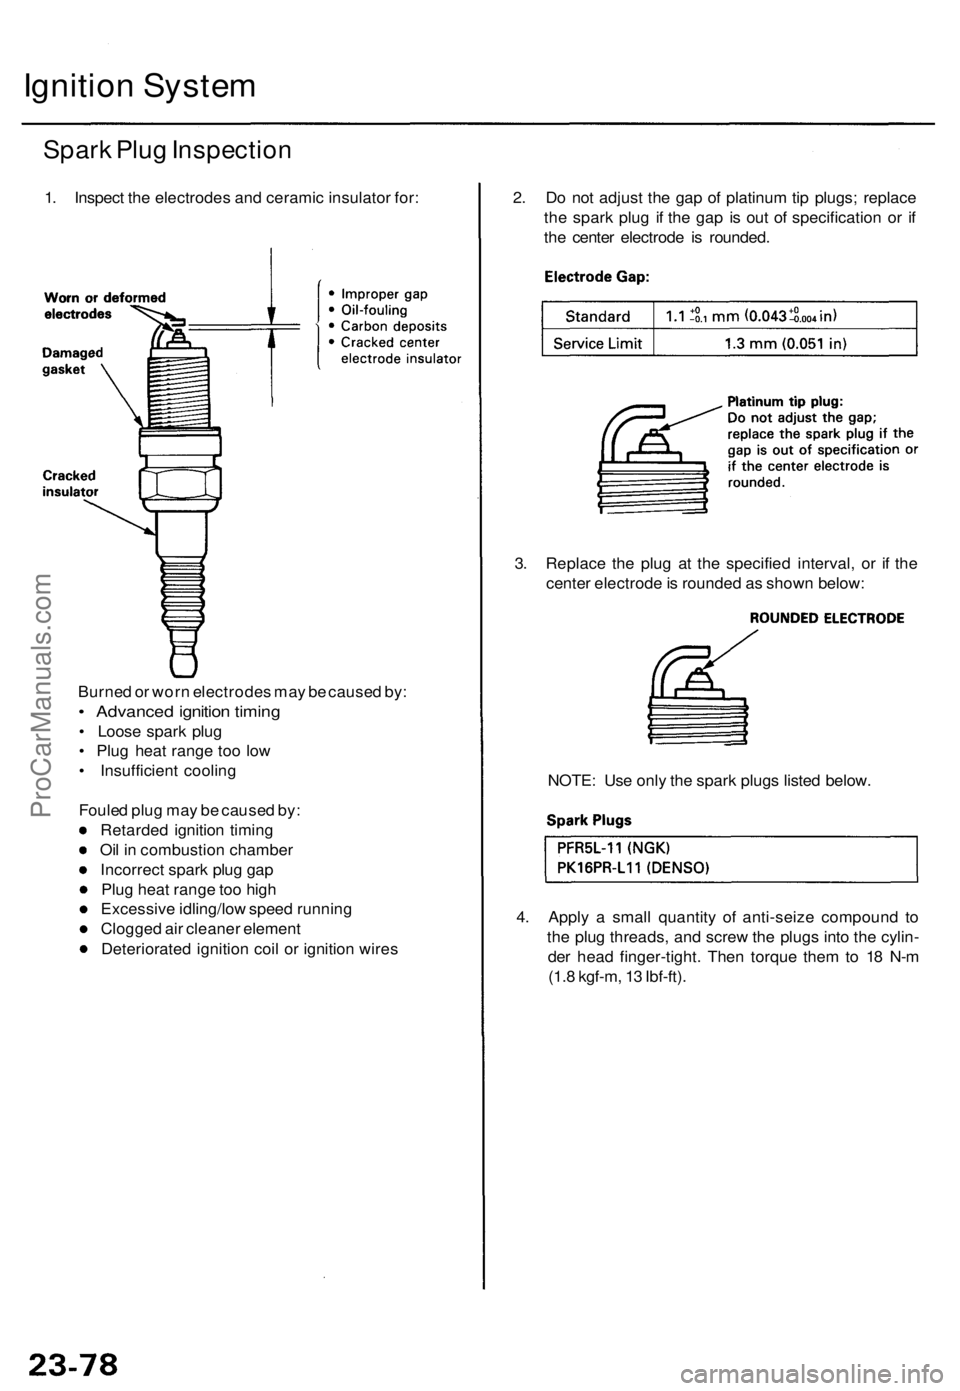
Ignition Syste m
Spark Plu g Inspectio n
1. Inspec t th e electrode s an d cerami c insulato r for : 2. D o no t adjus t th e ga p o f platinu m tip plugs ; replac e
th e spar k plu g i f th e ga p i s ou t o f specificatio n o r i f
th e cente r electrod e i s rounded .
3 . Replac e th e plu g a t th e specifie d interval , o r i f th e
cente r electrod e is rounde d a s show n below :
4 . Appl y a smal l quantit y o f anti-seiz e compoun d t o
th e plu g threads , an d scre w th e plug s int o th e cylin -
de r hea d finger-tight . The n torqu e the m to 1 8 N- m
(1. 8 kgf-m , 1 3 Ibf-ft) .
NOTE
: Us e onl y th e spar k plug s liste d below .
Burne
d o r wor n electrode s ma y b e cause d by :
• Advance d ignitio n timin g
• Loos e spar k plu g
• Plu g hea t rang e to o lo w
• Insufficien t coolin g
Foule d plu g ma y b e cause d by :
Retarde d ignitio n timin g
Oi l i n combustio n chambe r
Incorrec t spar k plu g ga p
Plu g hea t rang e to o hig h
Excessiv e idling/lo w spee d runnin g
Clogge d ai r cleane r elemen t
Deteriorate d ignitio n coi l o r ignitio n wire s
ProCarManuals.com