center console ACURA TL 1995 Service Repair Manual
[x] Cancel search | Manufacturer: ACURA, Model Year: 1995, Model line: TL, Model: ACURA TL 1995Pages: 1771, PDF Size: 62.49 MB
Page 542 of 1771
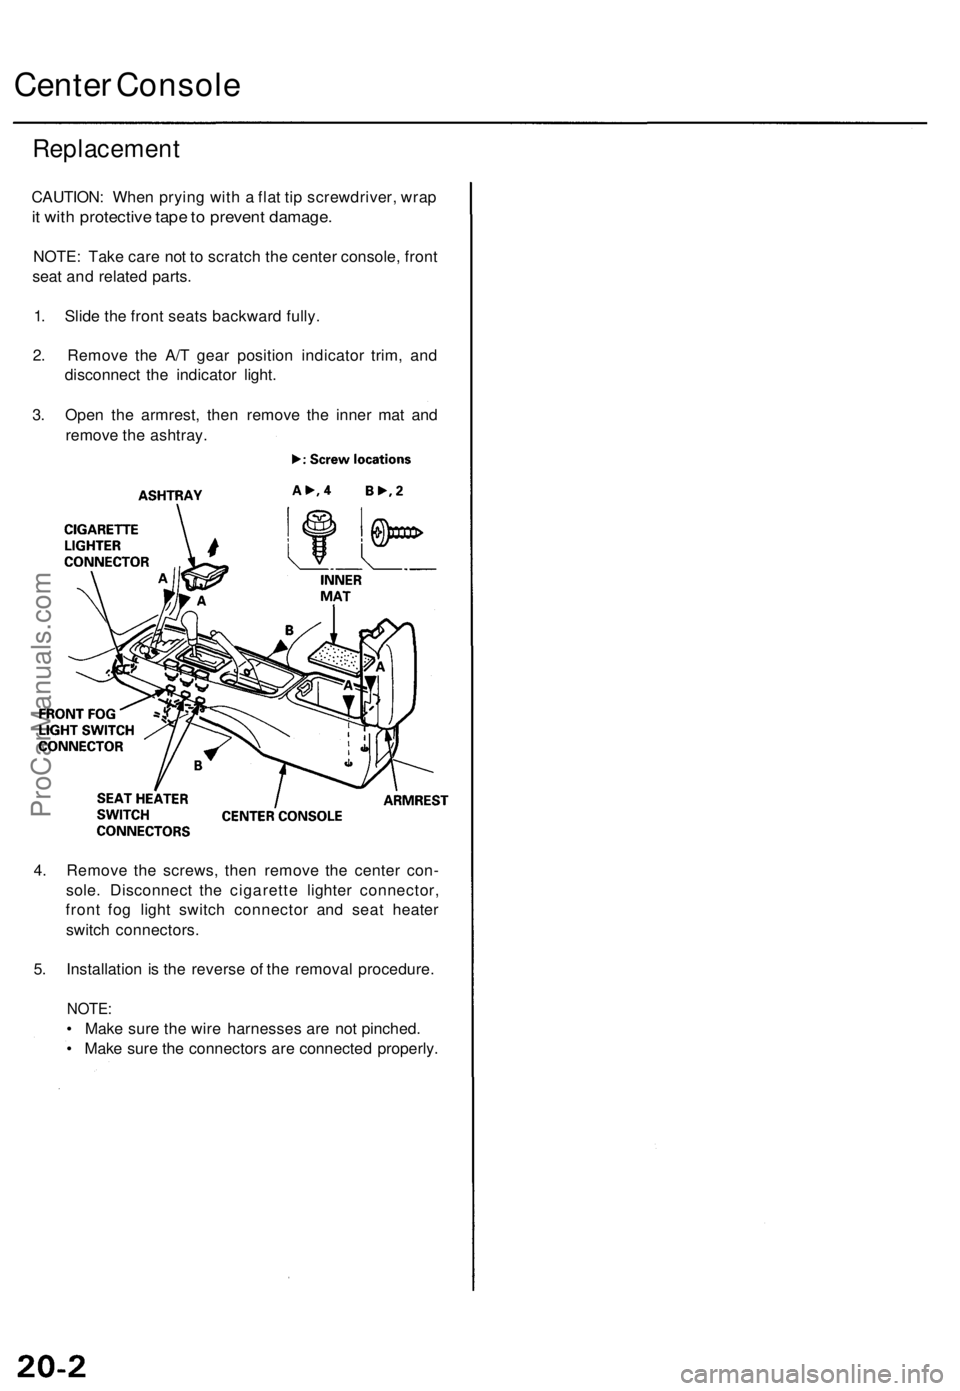
Center Console
Replacement
CAUTION: When prying with a flat tip screwdriver, wrap
it with protective tape to prevent damage.
NOTE: Take care not to scratch the center console, front
seat and related parts.
1. Slide the front seats backward fully.
2. Remove the A/T gear position indicator trim, and
disconnect the indicator light.
3. Open the armrest, then remove the inner mat and
remove the ashtray.
4. Remove the screws, then remove the center con-
sole. Disconnect the cigarette lighter connector,
front fog light switch connector and seat heater
switch connectors.
5. Installation is the reverse of the removal procedure.
NOTE:
• Make sure the wire harnesses are not pinched.
• Make sure the connectors are connected properly.ProCarManuals.com
Page 629 of 1771
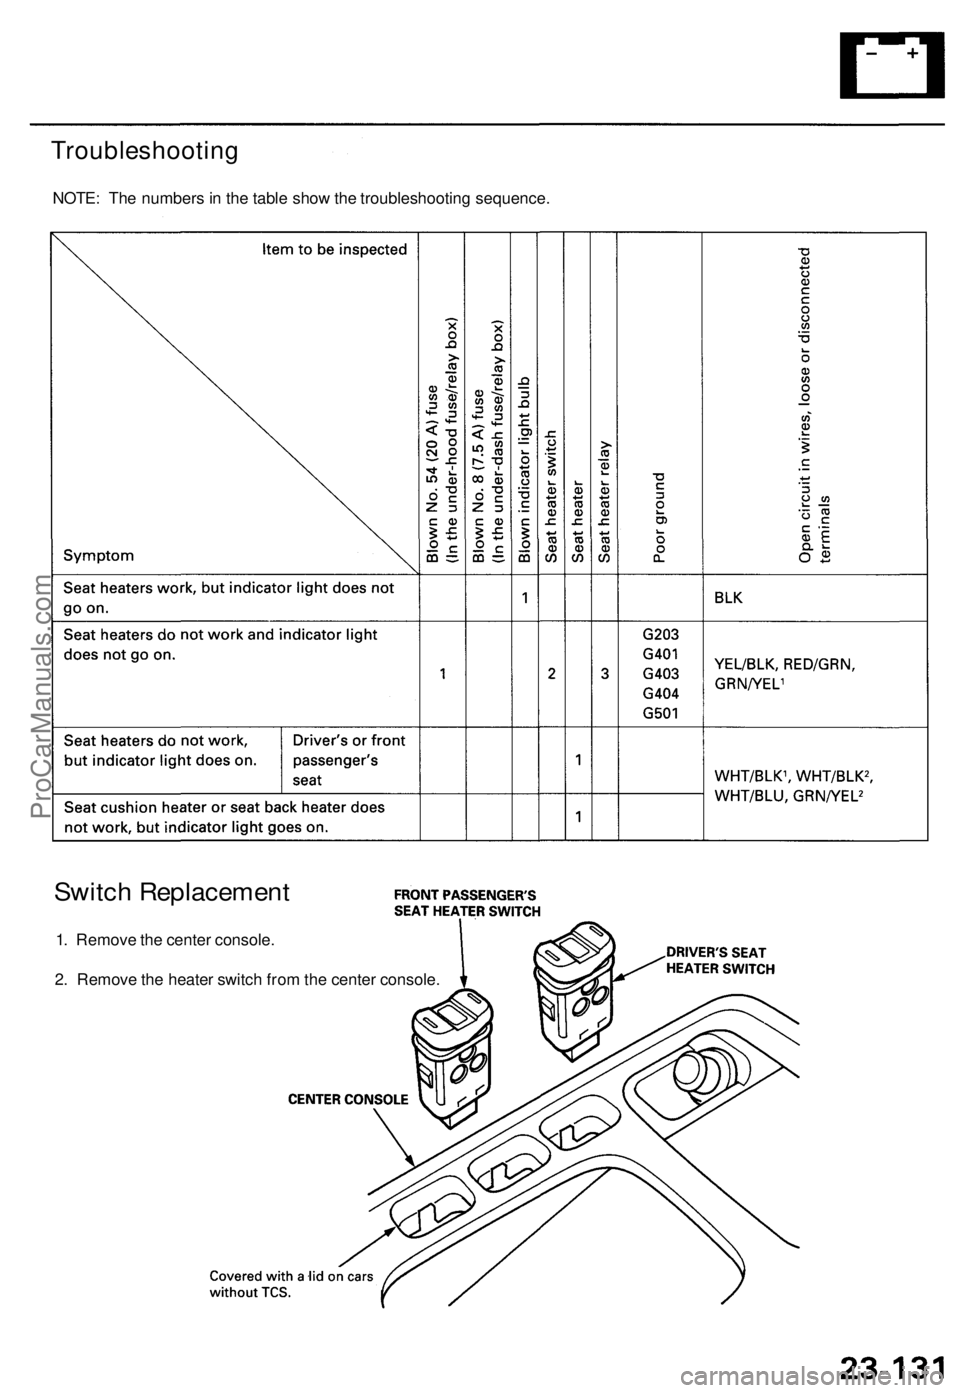
Troubleshooting
NOTE: The numbers in the table show the troubleshooting sequence.
Switch Replacement
1. Remove the center console.
2. Remove the heater switch from the center console.ProCarManuals.com
Page 630 of 1771
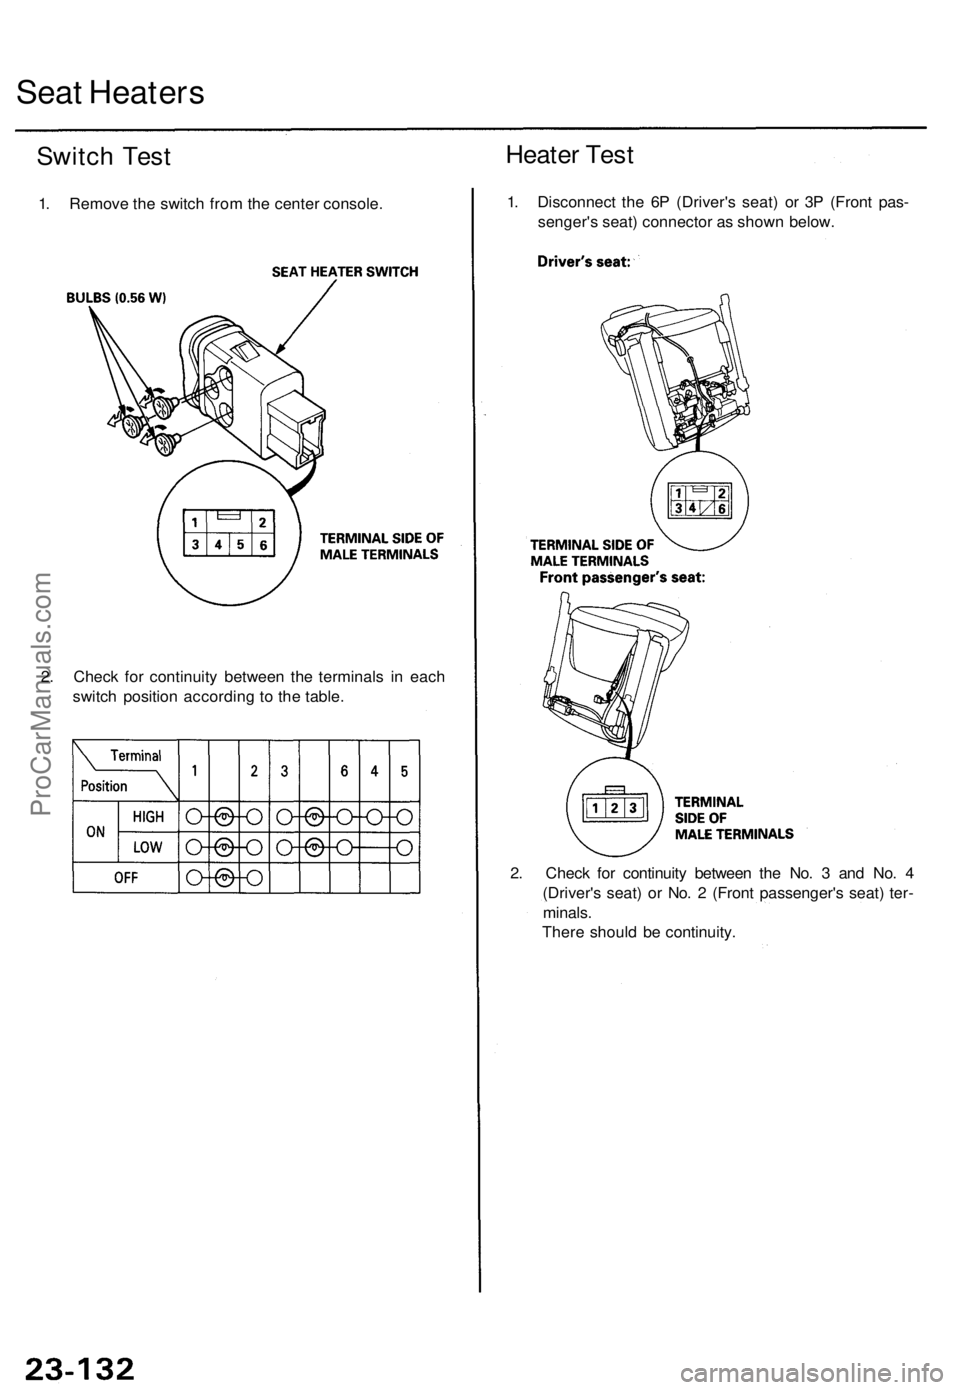
Seat Heaters
Switch Test
1. Remove the switch from the center console.
Heater Test
1. Disconnect the 6P (Driver's seat) or 3P (Front pas-
senger's seat) connector as shown below.
2. Check for continuity between the No. 3 and No. 4
(Driver's seat) or No. 2 (Front passenger's seat) ter-
minals.
There should be continuity.
2. Check for continuity between the terminals in each
switch position according to the table.ProCarManuals.com
Page 1415 of 1771
Center Console
Replacement
CAUTION: When prying with a flat tip screwdriver, wrap
it with protective tape to prevent damage.
NOTE: Take care not to scratch the center console, front
seat and related parts.
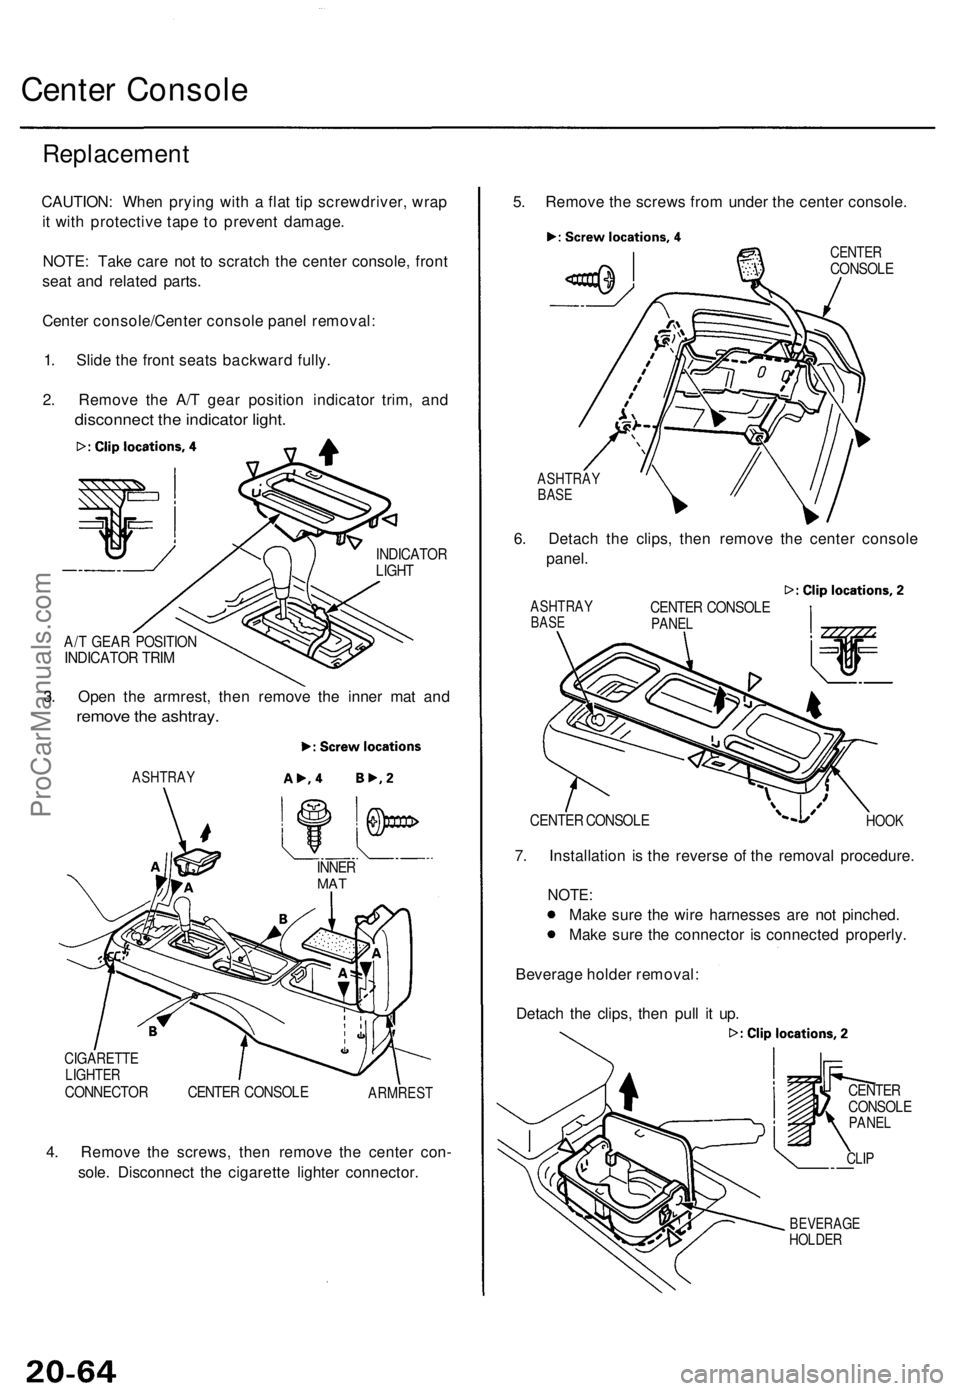
Center console/Center console panel removal:
1. Slide the front seats backward fully.
2. Remove the A/T gear position indicator trim, and
disconnect the indicator light.
INDICATOR
LIGHT
A/T GEAR POSITION
INDICATOR TRIM
3. Open the armrest, then remove the inner mat and
remove the ashtray.
ASHTRAY
CIGARETTE
LIGHTER
CONNECTOR CENTER CONSOLE
ARMREST
4. Remove the screws, then remove the center con-
sole. Disconnect the cigarette lighter connector.
5. Remove the screws from under the center console.
CENTER
CONSOLE
ASHTRAY
BASE
6. Detach the clips, then remove the center console
panel.
ASHTRAY
BASE
CENTER CONSOLE
PANEL
7. Installation is the reverse of the removal procedure.
NOTE:
Make sure the wire harnesses are not pinched.
Make sure the connector is connected properly.
Beverage holder removal:
Detach the clips, then pull it up.
CENTER
CONSOLE
PANEL
CLIP
BEVERAGE
HOLDER
INNER
MAT
HOOK
CENTER CONSOLEProCarManuals.com
Page 1605 of 1771
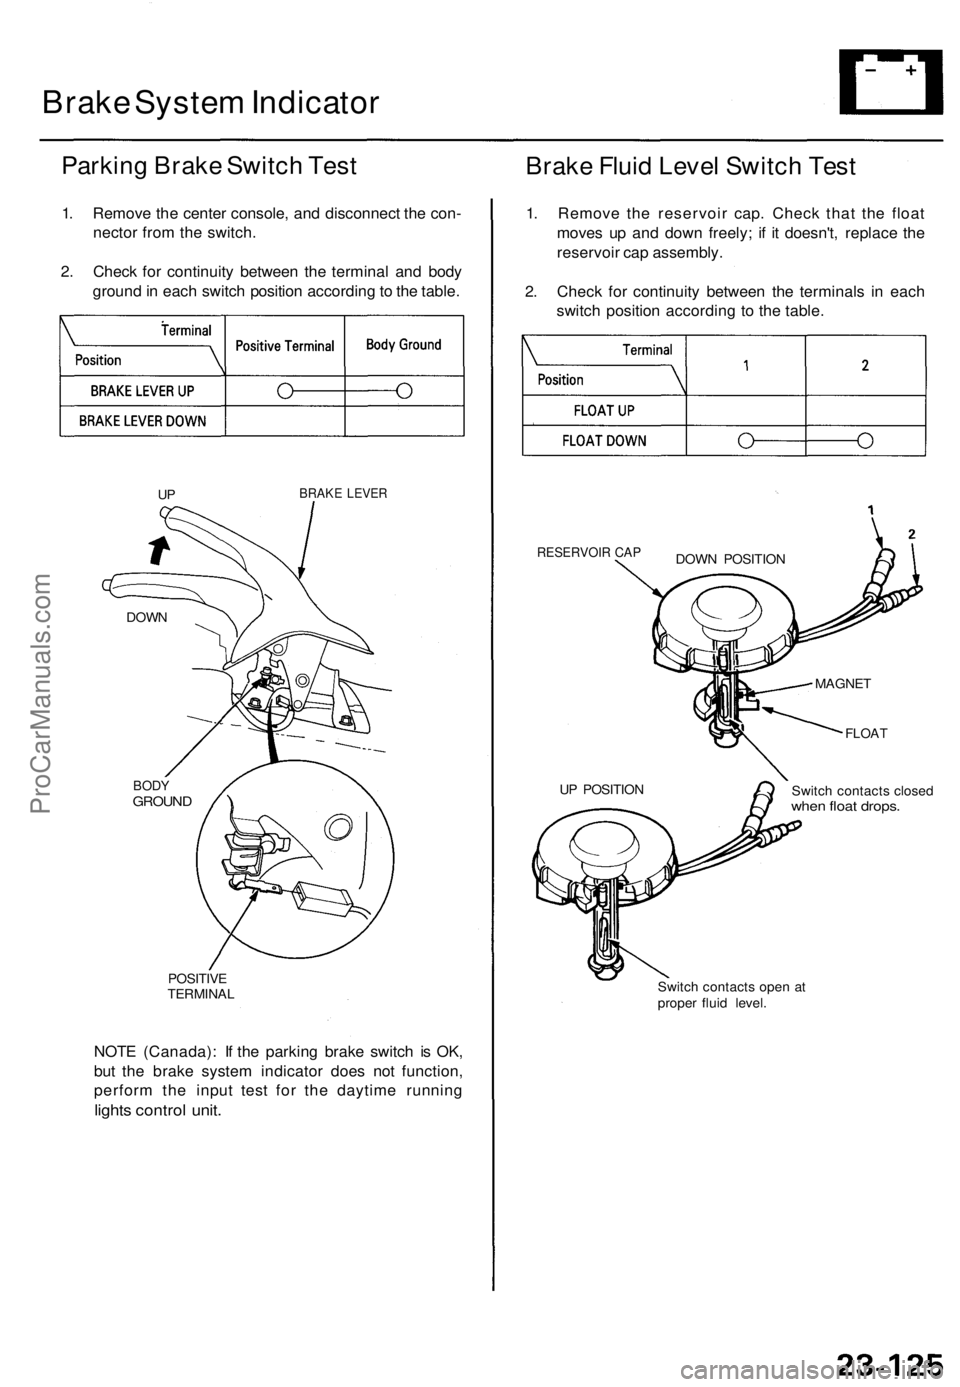
Brake System Indicator
Parking Brake Switch Test
1. Remove the center console, and disconnect the con-
nector from the switch.
2. Check for continuity between the terminal and body
ground in each switch position according to the table.
BRAKE LEVER
BODY
GROUND
POSITIVE
TERMINAL
NOTE (Canada): If the parking brake switch is OK,
but the brake system indicator does not function,
perform the input test for the daytime running
lights control unit.
Brake Fluid Level Switch Test
1. Remove the reservoir cap. Check that the float
moves up and down freely; if it doesn't, replace the
reservoir cap assembly.
2. Check for continuity between the terminals in each
switch position according to the table.
RESERVOIR CAP
FLOAT
Switch contacts closed
when float drops.
Switch contacts open at
proper fluid level.
UP POSITION
MAGNET
DOWN POSITION
DOWN
UPProCarManuals.com
Page 1643 of 1771
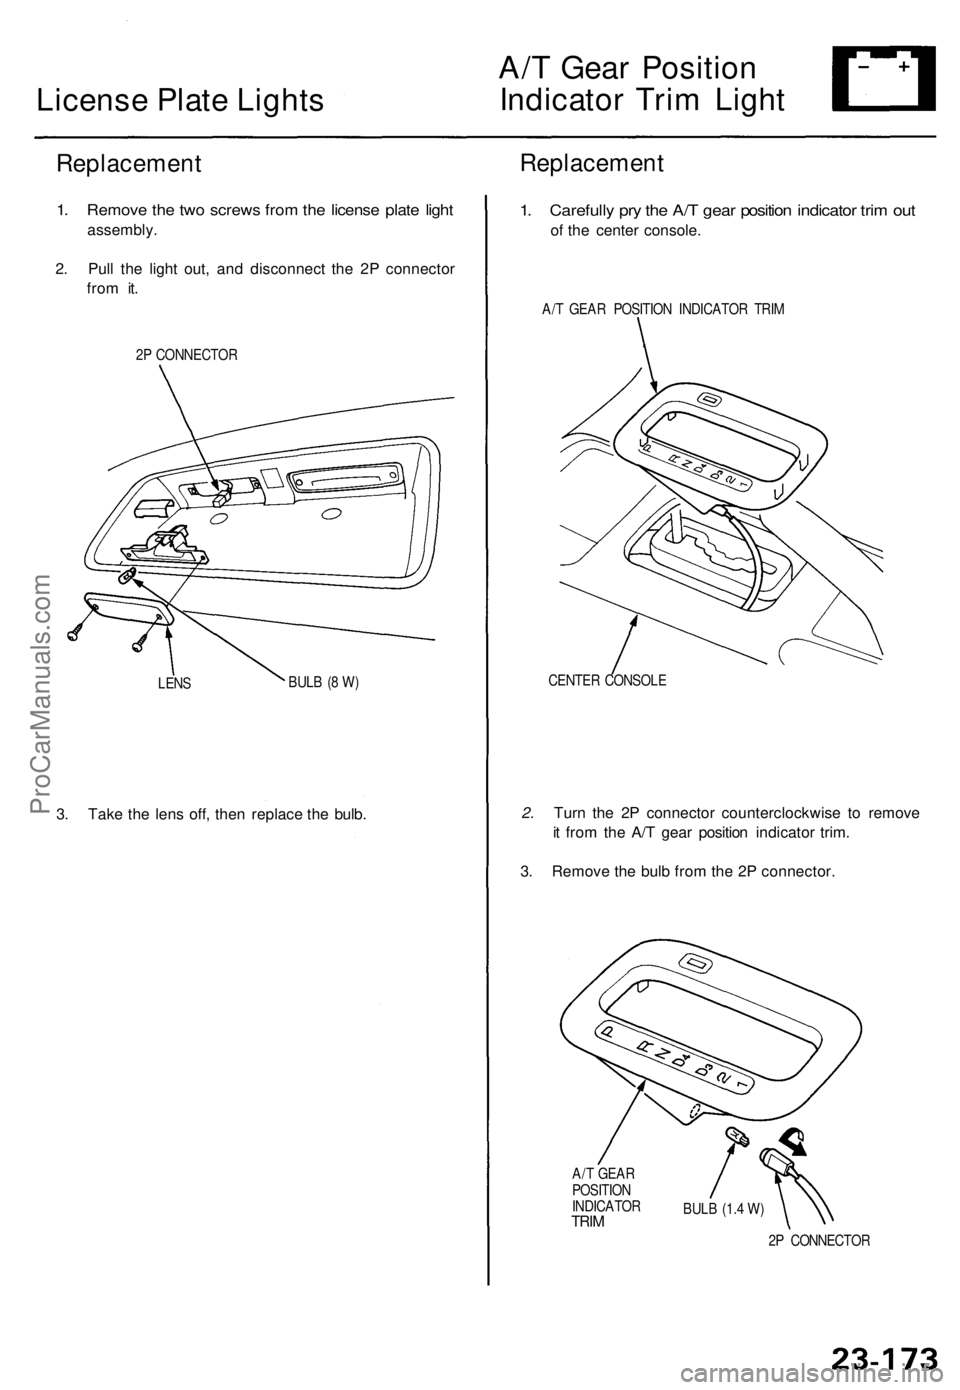
License Plate Lights
A/T Gear Position
Indicator Trim Light
Replacement
1. Remove the two screws from the license plate light
assembly.
2. Pull the light out, and disconnect the 2P connector
from it.
2P CONNECTOR
LENS
BULB (8 W)
3. Take the lens off, then replace the bulb.
Replacement
1. Carefully pry the A/T gear position indicator trim out
of the center console.
A/T GEAR POSITION INDICATOR TRIM
CENTER CONSOLE
2. Turn the 2P connector counterclockwise to remove
it from the A/T gear position indicator trim.
3. Remove the bulb from the 2P connector.
A/T GEAR
POSITION
INDICATOR
TRIM
BULB (1.4 W)
2P CONNECTORProCarManuals.com