climate ACURA TL 1995 Service Repair Manual
[x] Cancel search | Manufacturer: ACURA, Model Year: 1995, Model line: TL, Model: ACURA TL 1995Pages: 1771, PDF Size: 62.49 MB
Page 128 of 1771
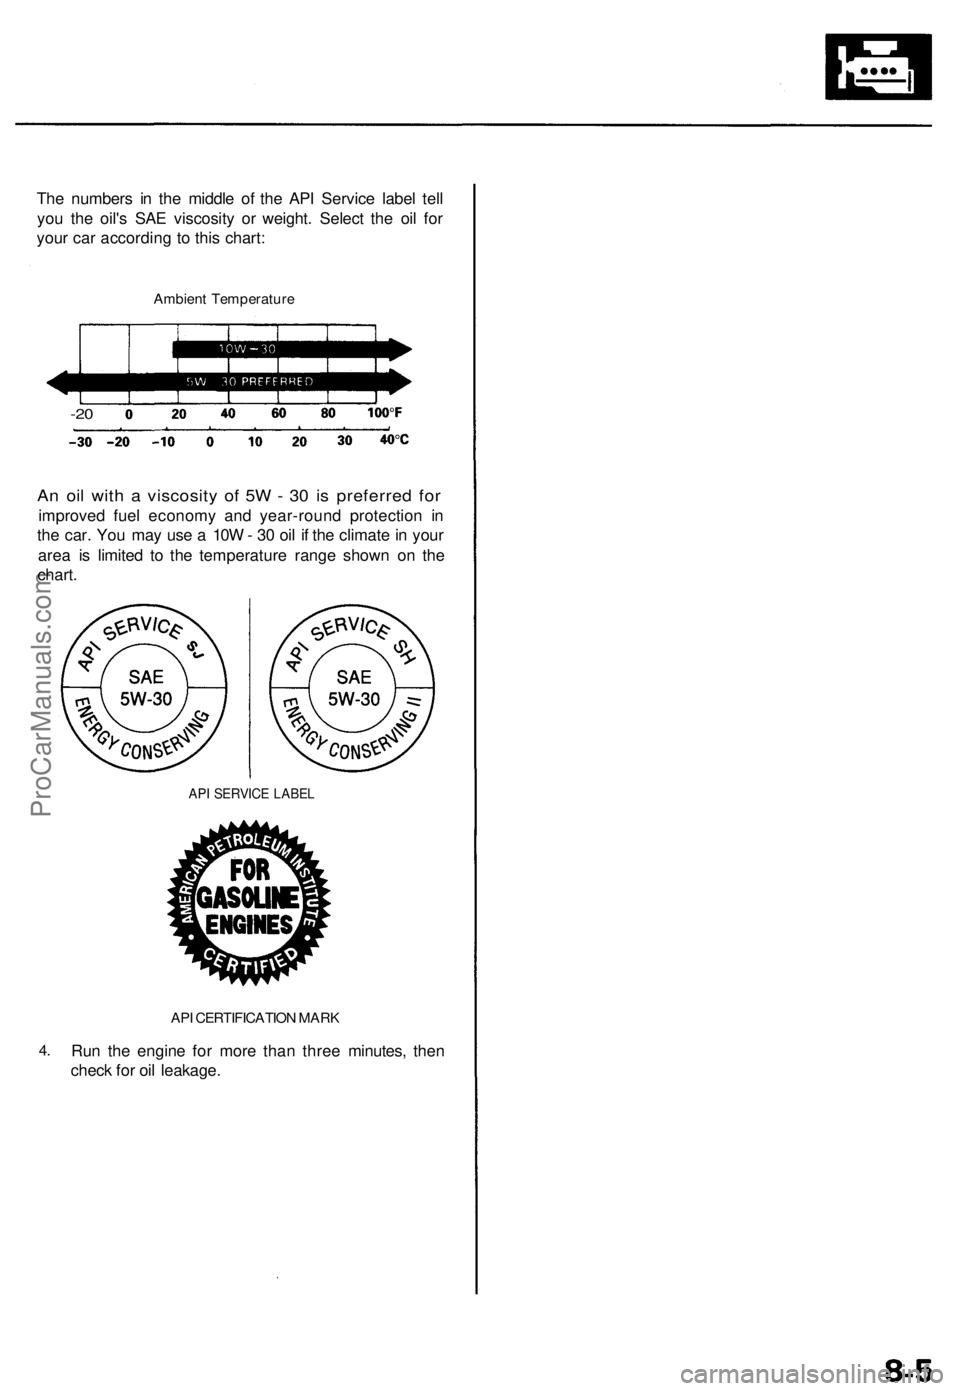
The numbers in the middle of the API Service label tell
you the oil's SAE viscosity or weight. Select the oil for
your car according to this chart:
Ambient Temperature
-20
An oil with a viscosity of 5W - 30 is preferred for
improved fuel economy and year-round protection in
the car. You may use a 10W - 30 oil if the climate in your
area is limited to the temperature range shown on the
chart.
API SERVICE LABEL
4.
API CERTIFICATION MARK
Run the engine for more than three minutes, then
check for oil leakage.ProCarManuals.com
Page 512 of 1771
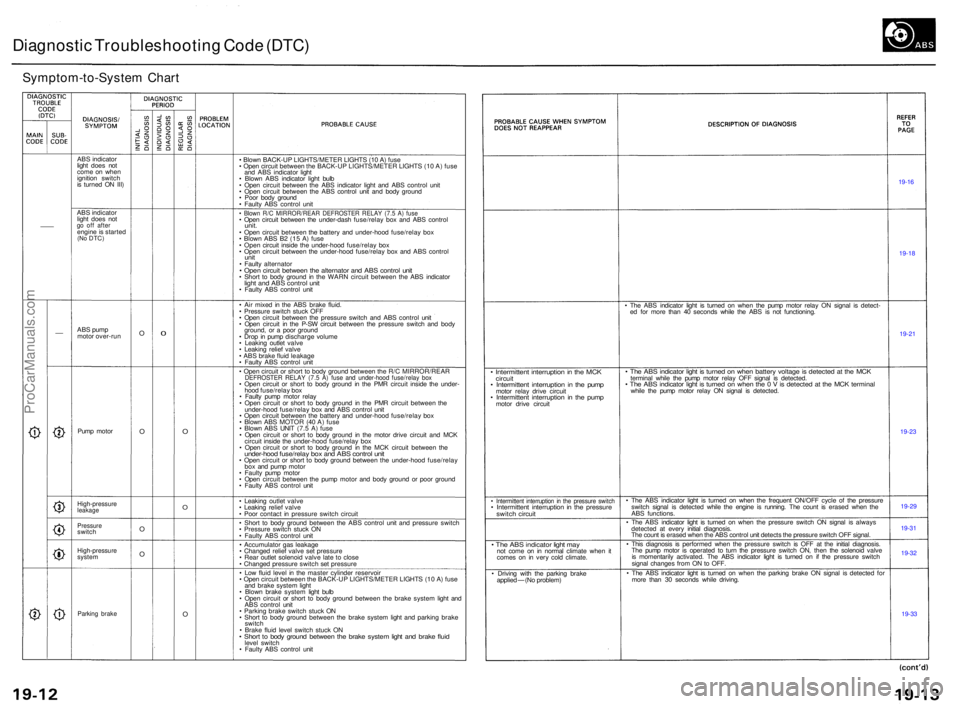
Diagnostic Troubleshootin g Cod e (DTC )
Symptom-to-Syste m Char t
ABS indicato r
ligh t doe s no t
com e o n whe n
ignitio n switc h
i s turne d O N III )
AB S indicato r
ligh t doe s no t
go of f afte rengin e is starte d(No DTC )
ABS pum p
moto r over-ru n
Pum p moto r
High-pressur eleakage
Pressur eswitch
High-pressur esystem
Parkin g brak e
O
O
O
O0
O
O
O
• Blow n BACK-U P LIGHTS/METE R LIGHT S (1 0 A ) fus e
• Ope n circui t betwee n th e BACK-U P LIGHTS/METE R LIGHT S (1 0 A ) fus e
an d AB S indicato r ligh t
• Blow n AB S indicato r ligh t bul b
• Ope n circui t betwee n th e AB S indicato r ligh t an d AB S contro l uni t
• Ope n circui t betwee n th e AB S contro l uni t an d bod y groun d
• Poo r bod y groun d
• Fault y AB S contro l uni t
• Blow n R/ C MIRROR/REA R DEFROSTE R RELA Y (7. 5 A ) fus e• Ope n circui t betwee n th e under-das h fuse/rela y bo x an d AB S contro lunit.• Ope n circui t betwee n th e batter y an d under-hoo d fuse/rela y bo x
• Blow n AB S B 2 (1 5 A ) fus e
• Ope n circui t insid e th e under-hoo d fuse/rela y bo x
• Ope n circui t betwee n th e under-hoo d fuse/rela y bo x an d AB S contro l
unit• Fault y alternato r• Ope n circui t betwee n th e alternato r an d AB S contro l uni t• Shor t t o bod y groun d i n th e WAR N circui t betwee n th e AB S indicato rlight an d AB S contro l uni t• Fault y AB S contro l uni t
• Ai r mixe d i n th e AB S brak e fluid .
• Pressur e switc h stuc k OF F
• Ope n circui t betwee n th e pressur e switc h an d AB S contro l uni t
• Ope n circui t i n th e P-S W circui t betwee n th e pressur e switc h an d bod y
ground , o r a poo r groun d
• Dro p in pum p discharg e volum e
• Leakin g outle t valv e
• Leakin g relie f valv e
• AB S brak e flui d leakag e
• Fault y AB S contro l uni t
• Ope n circui t o r shor t t o bod y groun d betwee n th e R/ C MIRROR/REA R
DEFROSTER RELA Y (7. 5 A ) fus e an d under-hoo d fuse/rela y bo x• Ope n circui t o r shor t t o bod y groun d i n th e PM R circui t insid e th e under -
hoo d fuse/rela y bo x
• Fault y pum p moto r rela y
• Ope n circui t o r shor t t o bod y groun d i n th e PM R circui t betwee n th e
under-hoo d fuse/rela y bo x an d AB S contro l uni t
• Ope n circui t betwee n th e batter y an d under-hoo d fuse/rela y bo x
• Blow n AB S MOTO R (4 0 A ) fus e
• Blow n AB S UNI T (7. 5 A ) fus e
• Ope n circui t o r shor t t o bod y groun d i n th e moto r driv e circui t an d MC K
circui t insid e th e under-hoo d fuse/rela y bo x
• Ope n circui t o r shor t t o bod y groun d i n th e MC K circui t betwee n th e
under-hoo d fuse/rela y bo x an d AB S contro l uni t• Ope n circui t o r shor t t o bod y groun d betwee n th e under-hoo d fuse/rela y
bo x an d pum p moto r
• Fault y pum p moto r
• Ope n circui t betwee n th e pum p moto r an d bod y groun d o r poo r groun d
• Fault y AB S contro l uni t
• Leakin g outle t valv e
• Leakin g relie f valv e
• Poo r contac t i n pressur e switc h circui t
• Shor t t o bod y groun d betwee n th e AB S contro l uni t an d pressur e switc h
• Pressure switch stuc k O N
• Fault y AB S contro l uni t
• Accumulato r ga s leakag e
• Change d relie f valv e se t pressur e
• Rea r outle t solenoi d valv e lat e t o clos e
• Change d pressur e switc h se t pressur e
• Lo w flui d leve l i n th e maste r cylinde r reservoi r
• Ope n circui t betwee n th e BACK-U P LIGHTS/METE R LIGHT S (1 0 A ) fus e
an d brak e syste m ligh t
• Blow n brak e syste m ligh t bul b
• Ope n circui t o r shor t t o bod y groun d betwee n th e brak e syste m ligh t an d
AB S contro l uni t
• Parkin g brak e switc h stuc k O N
• Shor t t o bod y groun d betwee n th e brak e syste m ligh t an d parkin g brak e
switc h
• Brak e flui d leve l switc h stuc k O N
• Shor t t o bod y groun d betwee n th e brak e syste m ligh t an d brak e flui dleve l switc h
• Fault y AB S contro l uni t
• Intermitten t interruptio n in th e MC Kcircui t• Intermitten t interruptio n in th e pum pmotor rela y driv e circui t• Intermitten t interruptio n i n th e pum pmotor driv e circui t
• Intermitten t interruptio n i n th e pressur e switc h• Intermitten t interruptio n i n th e pressur eswitch circui t
• Th e AB S indicato r ligh t ma ynot com e o n i n norma l climat e whe n i t
come s o n i n ver y col d climate .
• Drivin g wit h th e parkin g brak e
applie d — (No problem ) •
Th e AB S indicato r ligh t i s turne d o n whe n th e pum p moto r rela y O N signa l i s detect -
e d fo r mor e tha n 4 0 second s whil e th e AB S i s no t functioning .
• Th e AB S indicato r ligh t i s turne d o n whe n batter y voltag e is detecte d a t th e MC Ktermina l whil e th e pum p moto r rela y OF F signa l i s detected .• Th e AB S indicato r ligh t i s turne d o n whe n th e 0 V is detecte d a t th e MC K termina lwhile th e pum p moto r rela y O N signa l i s detected .
• Th e AB S indicato r ligh t i s turne d o n whe n th e frequen t ON/OF F cycl e o f th e pressur e
switc h signa l i s detecte d whil e th e engin e i s running . Th e coun t i s erase d whe n th e
AB S functions .
• Th e AB S indicato r ligh t i s turne d o n whe n th e pressur e switc h O N signa l i s alway s
detecte d a t ever y initia l diagnosis .
Th e coun t i s erase d whe n th e AB S contro l uni t detect s th e pressur e switc h OF F signal .
• Thi s diagnosi s i s performe d whe n th e pressur e switc h i s OF F a t th e initia l diagnosis .
Th e pum p moto r i s operate d t o tur n th e pressur e switc h ON , the n th e solenoi d valv e
i s momentaril y activated . Th e AB S indicato r ligh t i s turne d o n i f th e pressur e switc h
signa l change s fro m O N to OFF .
• Th e AB S indicato r ligh t i s turne d o n whe n th e parkin g brak e O N signa l i s detecte d fo r
mor e tha n 3 0 second s whil e driving .
19-16
19-1 8
19-2 1
19-2 3
19-2 9
19-3 1
19-3 2
19-3 3
ProCarManuals.com
Page 807 of 1771
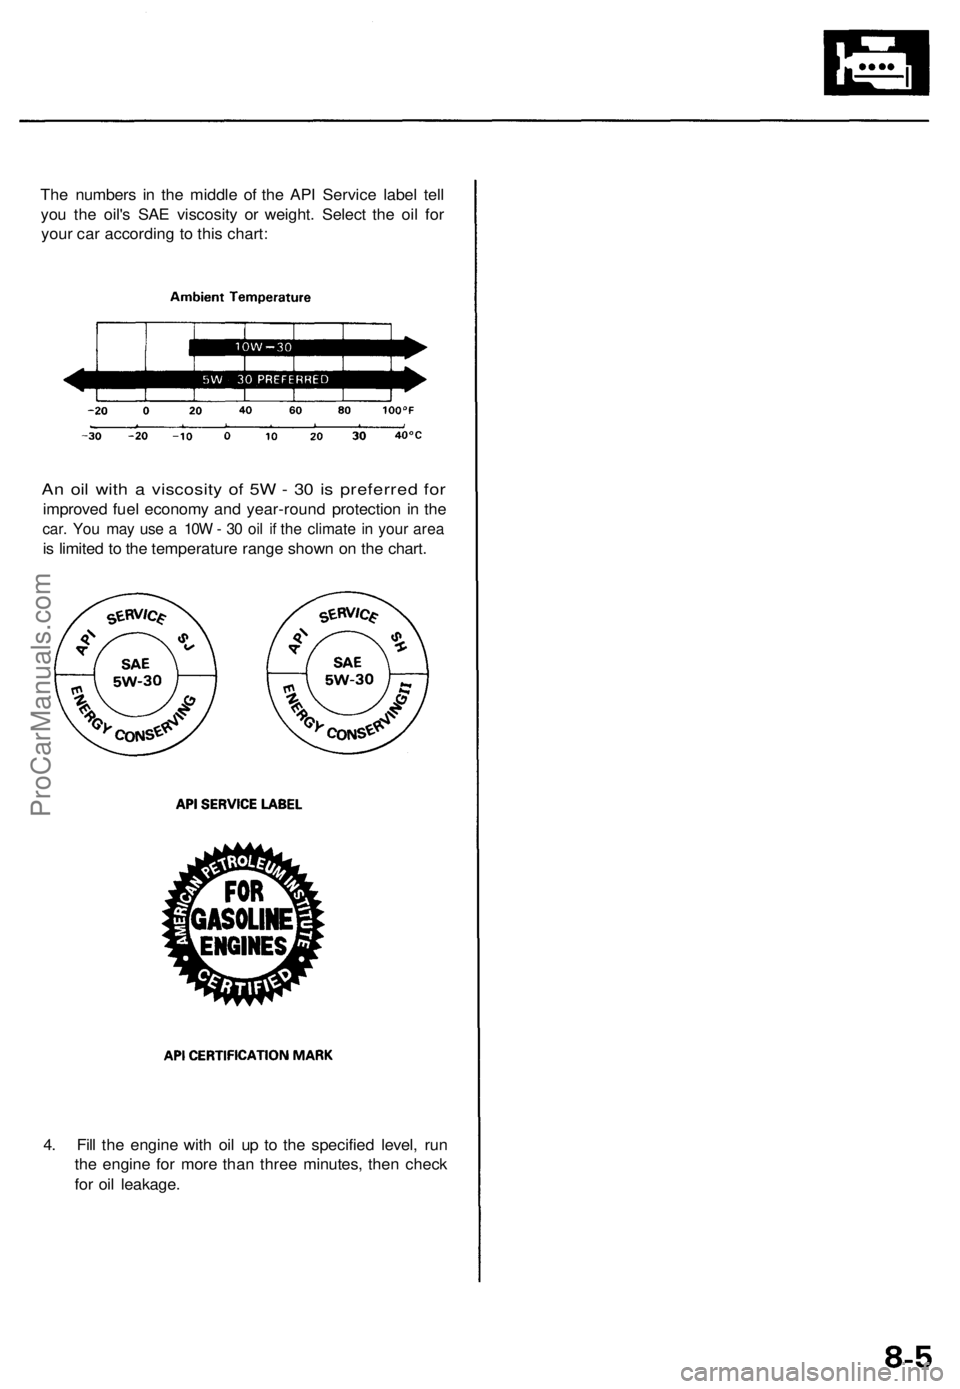
The numbers in the middle of the API Service label tell
you the oil's SAE viscosity or weight. Select the oil for
your car according to this chart:
An oil with a viscosity of 5W - 30 is preferred for
improved fuel economy and year-round protection in the
car. You may use a 10W - 30 oil if the climate in your area
is limited to the temperature range shown on the chart.
4. Fill the engine with oil up to the specified level, run
the engine for more than three minutes, then check
for oil leakage.ProCarManuals.com
Page 1417 of 1771
Dashboard
Component Removal/Installation (cont'd)
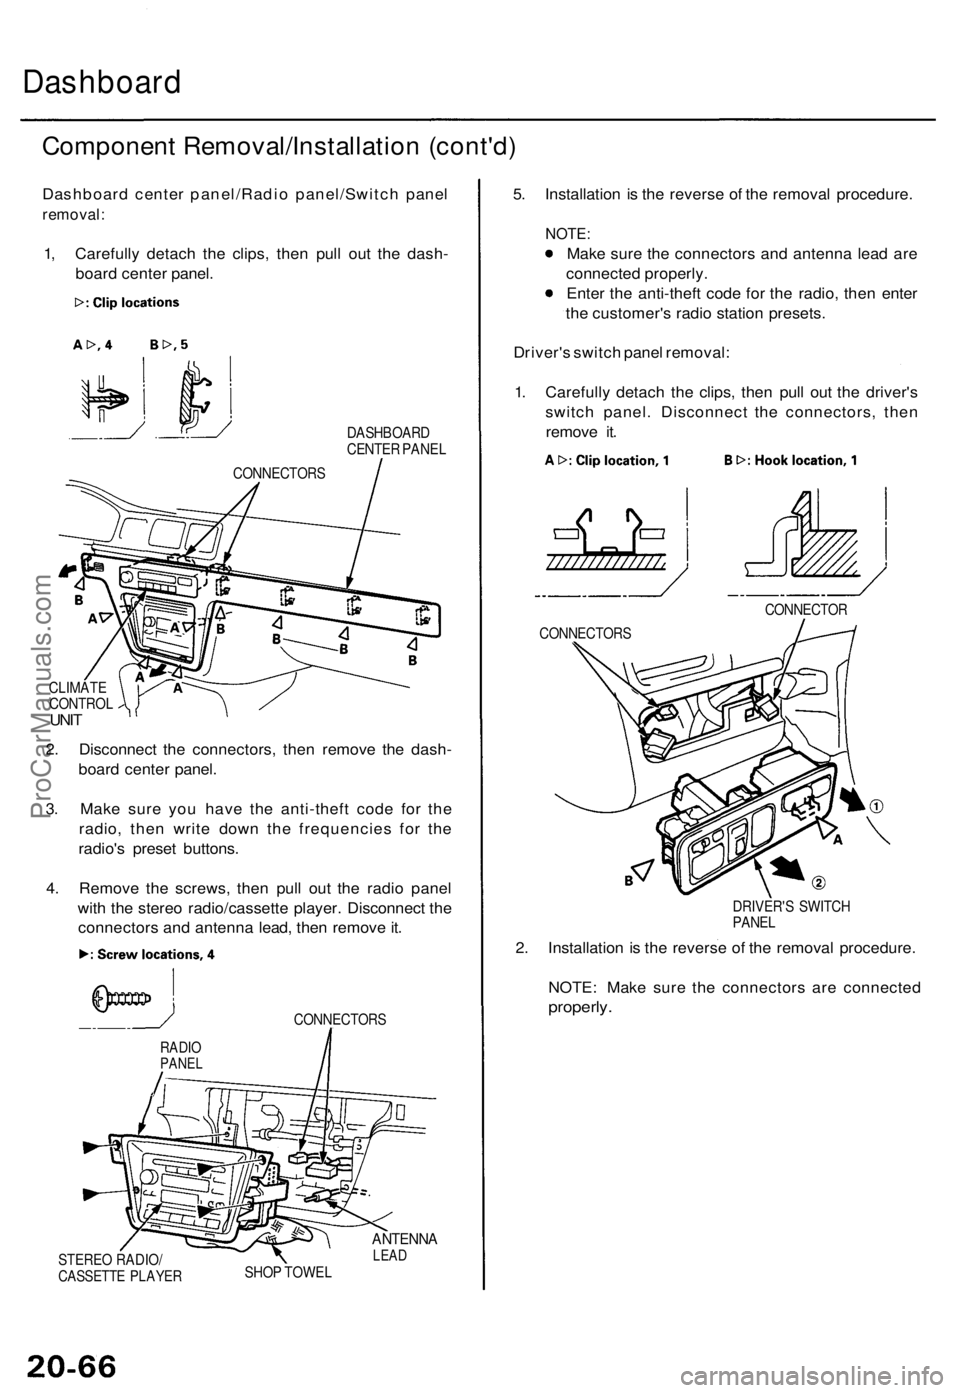
Dashboard center panel/Radio panel/Switch panel
removal:
1, Carefully detach the clips, then pull out the dash-
board center panel.
DASHBOARD
CENTER PANEL
CLIMATE
CONTROL
UNIT
2. Disconnect the connectors, then remove the dash-
board center panel.
3. Make sure you have the anti-theft code for the
radio, then write down the frequencies for the
radio's preset buttons.
4. Remove the screws, then pull out the radio panel
with the stereo radio/cassette player. Disconnect the
connectors and antenna lead, then remove it.
CONNECTORS
STEREO RADIO/
CASSETTE PLAYER
ANTENNA
LEAD
SHOP TOWEL
5. Installation is the reverse of the removal procedure.
NOTE:
Make sure the connectors and antenna lead are
connected properly.
Enter the anti-theft code for the radio, then enter
the customer's radio station presets.
Driver's switch panel removal:
1. Carefully detach the clips, then pull out the driver's
switch panel. Disconnect the connectors, then
remove it.
DRIVER'S SWITCH
PANEL
2. Installation is the reverse of the removal procedure.
NOTE: Make sure the connectors are connected
properly.
RADIO
PANEL
CONNECTOR
CONNECTORS
CONNECTORSProCarManuals.com
Page 1496 of 1771
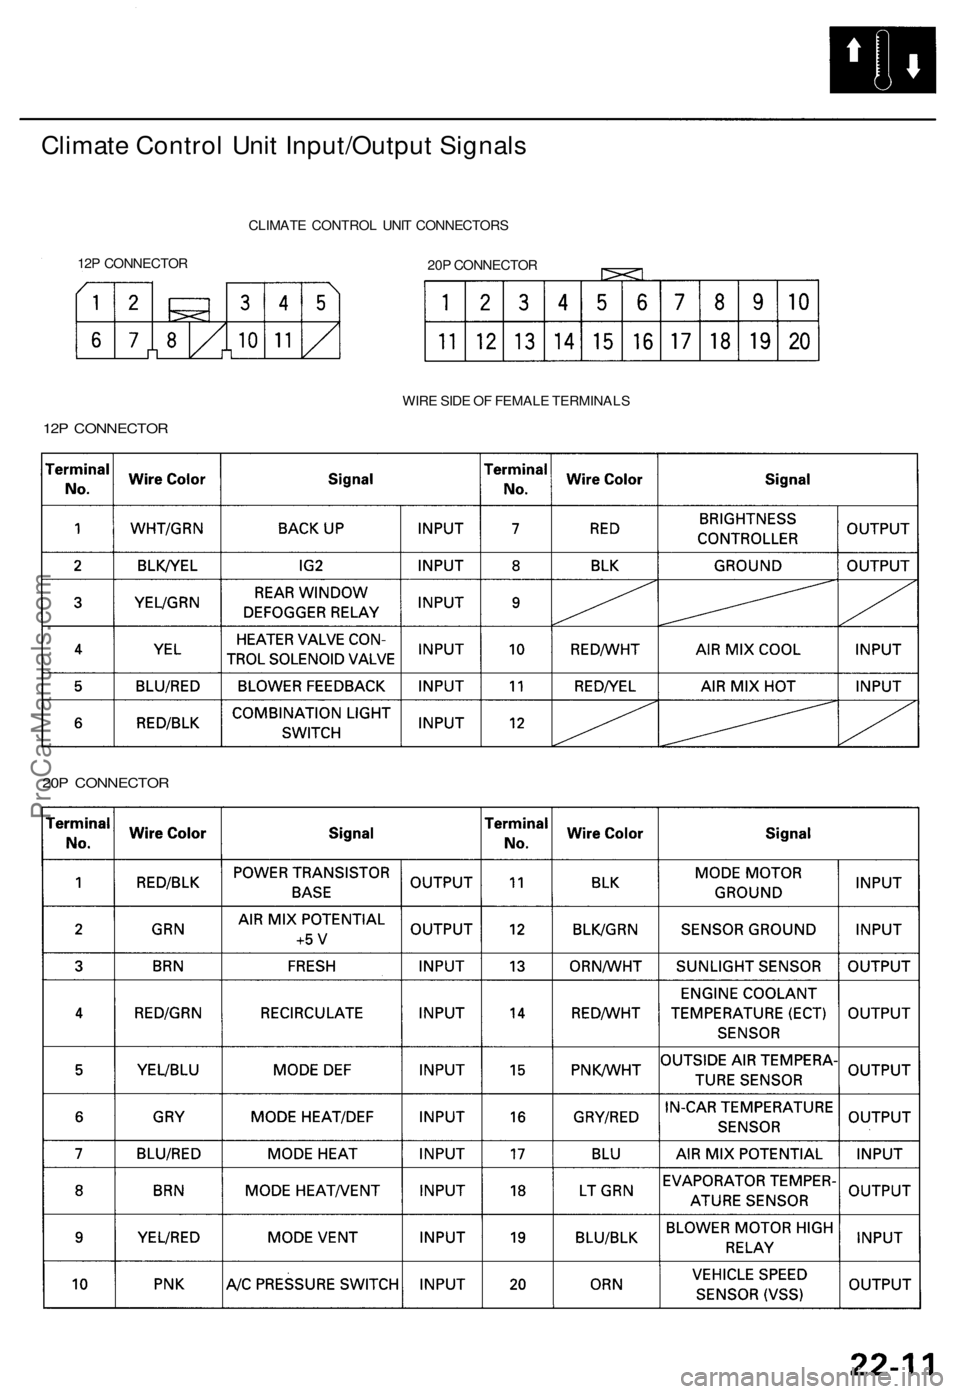
Climate Contro l Uni t Input/Outpu t Signal s
12P CONNECTO RCLIMAT
E CONTRO L UNI T CONNECTOR S
20 P CONNECTO R
WIR E SID E O F FEMAL E TERMINAL S
12P CONNECTO R
20 P CONNECTO R
ProCarManuals.com
Page 1498 of 1771
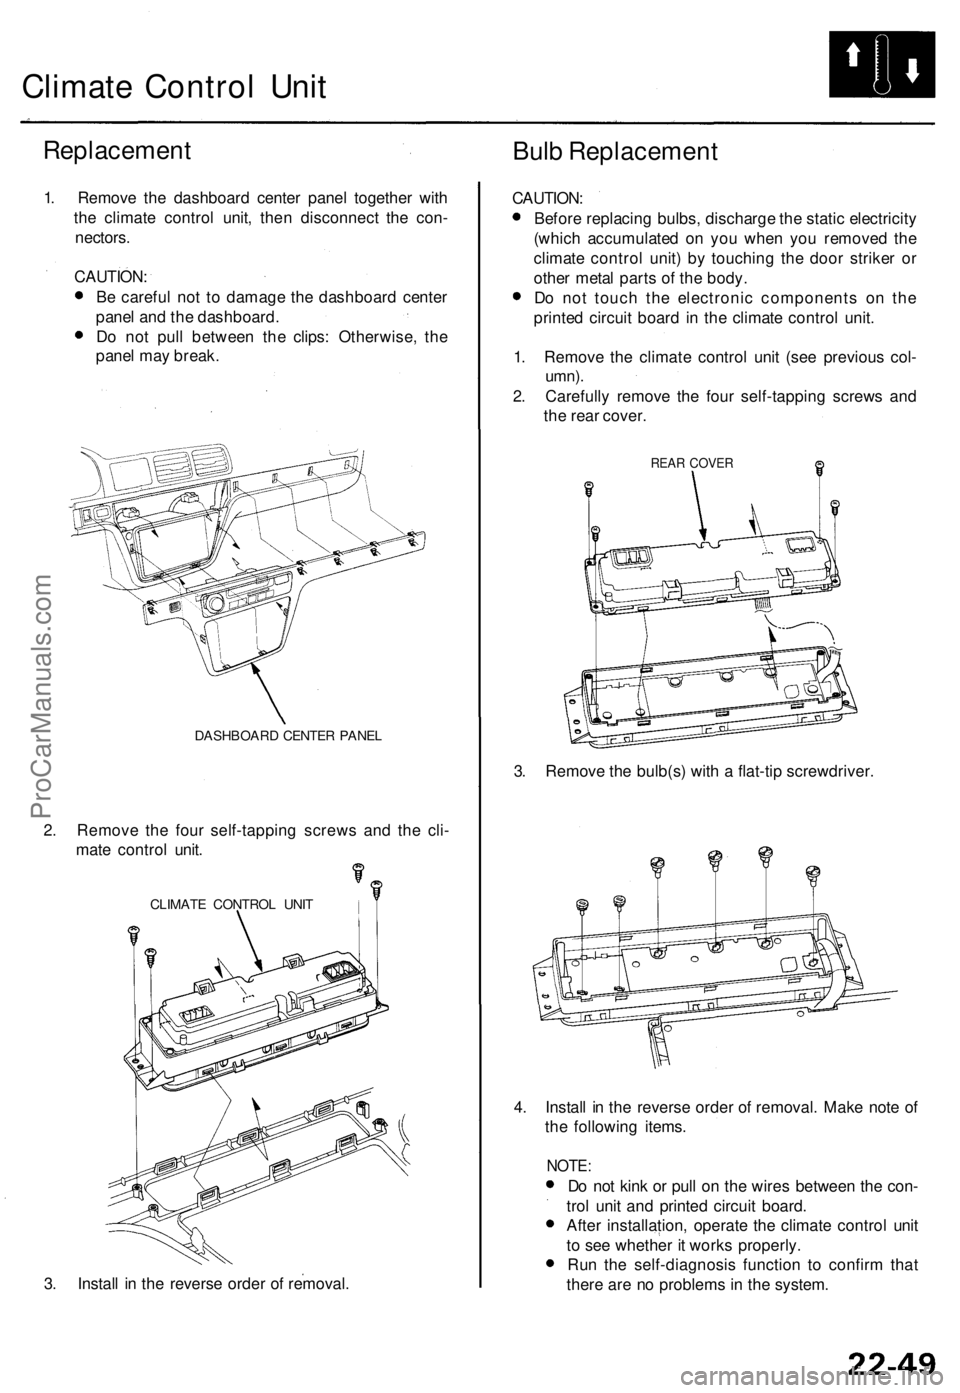
Climate Contro l Uni t
Replacemen t
Bulb Replacemen t
1. Remov e th e dashboar d cente r pane l togethe r wit h
th e climat e contro l unit , the n disconnec t th e con -
nectors .
CAUTION :
B e carefu l no t t o damag e th e dashboar d cente r
pane l an d th e dashboard .
D o no t pul l betwee n th e clips : Otherwise , th e
pane l ma y break .
DASHBOAR D CENTE R PANE L
2. Remov e th e fou r self-tappin g screw s an d th e cli -
mat e contro l unit .
CLIMAT E CONTRO L UNI T
3. Instal l i n th e revers e orde r o f removal . CAUTION
:
Befor e replacin g bulbs , discharg e th e stati c electricit y
(whic h accumulate d o n yo u whe n yo u remove d th e
climat e contro l unit ) b y touchin g th e doo r strike r o r
othe r meta l part s o f th e body .
D o no t touc h th e electroni c component s o n th e
printe d circui t boar d in th e climat e contro l unit .
1 . Remov e th e climat e contro l uni t (se e previou s col -
umn) .
2. Carefull y remov e th e fou r self-tappin g screw s an d
th e rea r cover .
REAR COVE R
3. Remov e th e bulb(s ) wit h a flat-ti p screwdriver .
4 . Instal l i n th e revers e orde r o f removal . Mak e not e o f
th e followin g items .
NOTE:
Do no t kin k o r pul l o n th e wire s betwee n th e con -
tro l uni t an d printe d circui t board .
Afte r installation , operat e th e climat e contro l uni t
t o se e whethe r i t work s properly .
Ru n th e self-diagnosi s functio n t o confir m tha t
ther e ar e n o problem s i n th e system .
ProCarManuals.com
Page 1543 of 1771
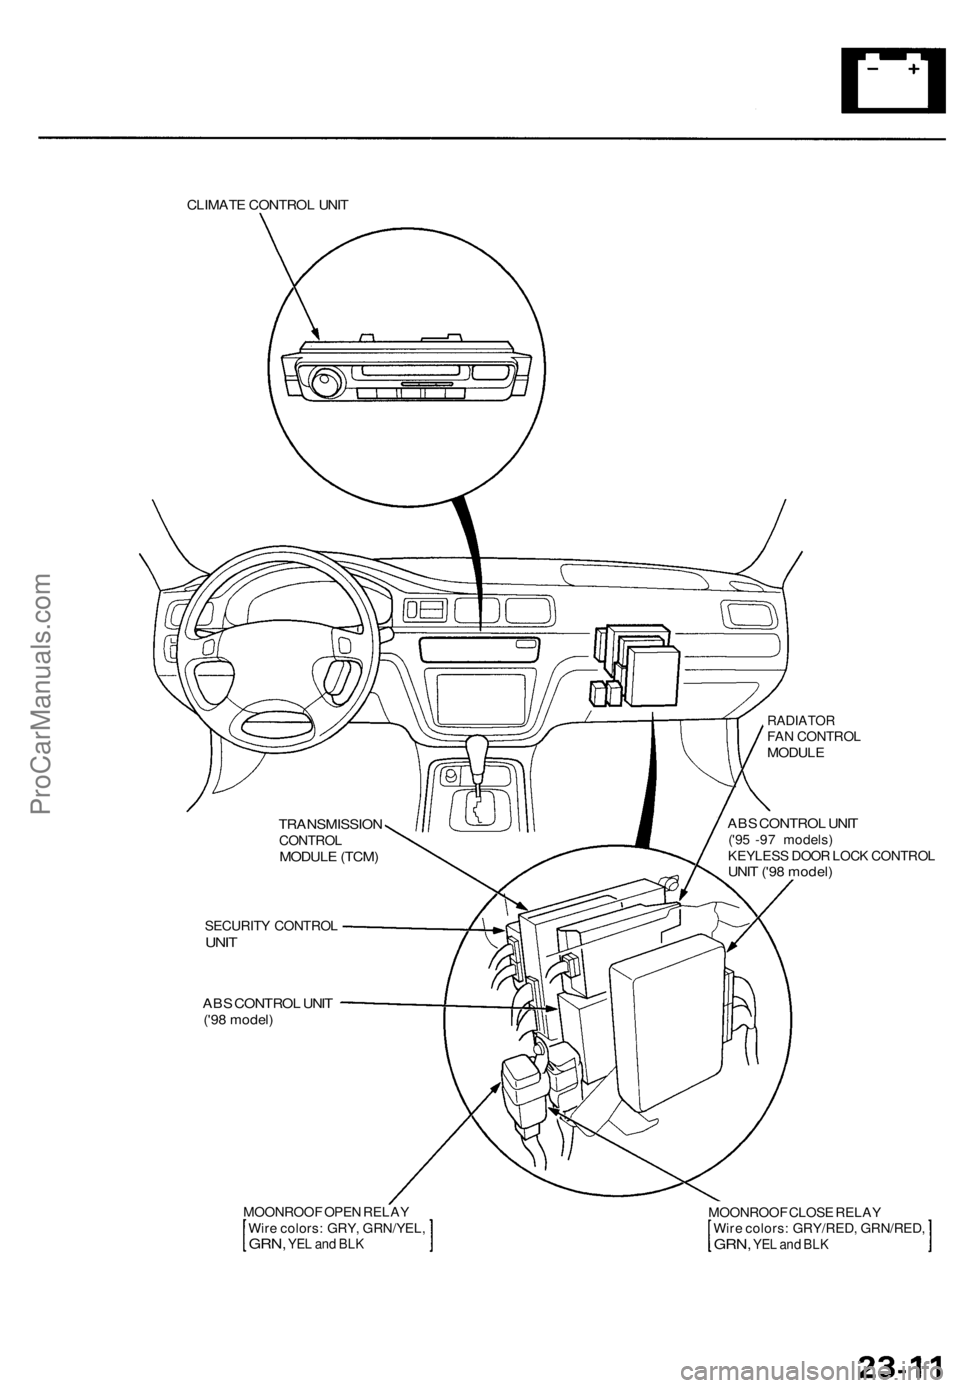
CLIMATE CONTROL UNIT
RADIATOR
FAN CONTROL
MODULE
ABS CONTROL UNIT
('95 -97 models)
KEYLESS DOOR LOCK CONTROL
UNIT ('98 model)
SECURITY CONTROL
UNIT
ABS CONTROL UNIT
('98 model)
MOONROOF OPEN RELAY
Wire colors: GRY, GRN/YEL,
GRN,
YEL and BLK
MOONROOF CLOSE RELAY
Wire colors: GRY/RED, GRN/RED,
GRN,
YEL and BLK
TRANSMISSION
CONTROL
MODULE (TCM)ProCarManuals.com
Page 1674 of 1771
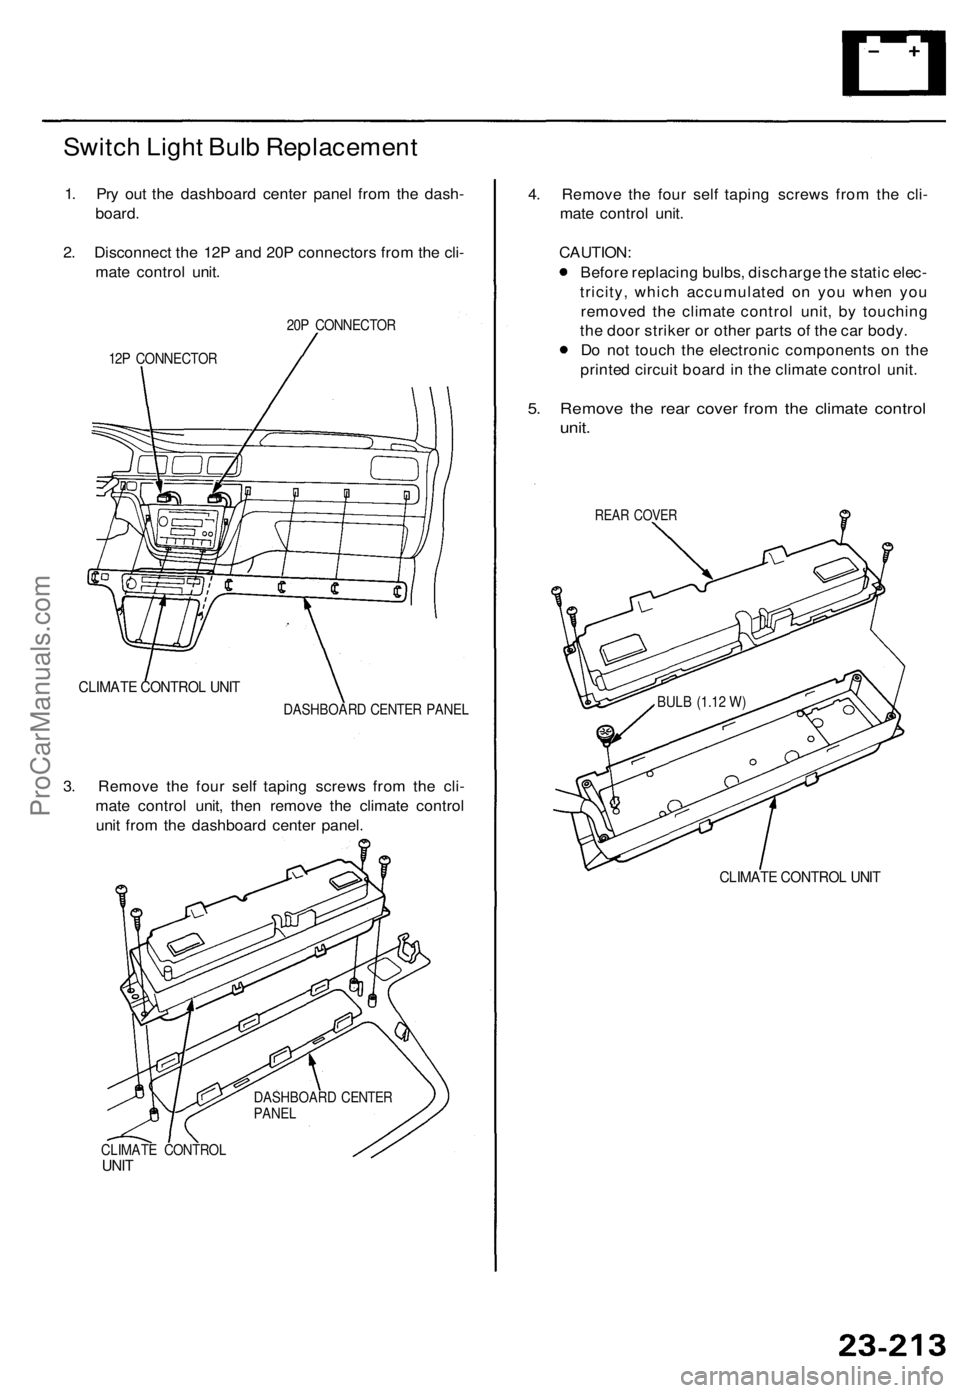
Switch Ligh t Bul b Replacemen t
1. Pr y ou t th e dashboar d cente r pane l fro m th e dash -
board .
2 . Disconnec t th e 12 P an d 20 P connector s fro m th e cli -
mat e contro l unit .
20P CONNECTO R
12 P CONNECTO R
CLIMATE CONTRO L UNI T
DASHBOAR D CENTE R PANE L
3. Remov e th e fou r sel f tapin g screw s fro m th e cli -
mat e contro l unit , the n remov e th e climat e contro l
uni t fro m th e dashboar d cente r panel .
CLIMAT E CONTRO LUNIT
4. Remov e th e fou r sel f tapin g screw s fro m th e cli -
mat e contro l unit .
CAUTION :
Befor e replacin g bulbs , discharg e th e stati c elec -
tricity , whic h accumulate d o n yo u whe n yo u
remove d th e climat e contro l unit , b y touchin g
th e doo r strike r o r othe r part s o f th e ca r body .
D o no t touc h th e electroni c component s o n th e
printe d circui t boar d in th e climat e contro l unit .
5. Remov e th e rea r cove r fro m th e climate control
unit.
REA R COVE R
CLIMAT E CONTRO L UNI T
DASHBOAR D CENTE R
PANE L BUL
B (1.1 2 W )
ProCarManuals.com