Acura TL 2009 Navigation Manua
Manufacturer: ACURA, Model Year: 2009, Model line: TL, Model: Acura TL 2009Pages: 172, PDF Size: 16.82 MB
Page 51 of 172
Entering a Destination
Navigation System51
NOTE:
• To edit Home Address, see Home
Address on page 98 .
• When no Home Address 1 or 2 has been set, the setup screen will be
displayed. For details, see H o m e
Address on page 98 .
• Prior to departure, you can set areas to avoid. The system then includes
them in its calculations for the
destination you have entered. See
Edit Avoid Area on page 107 .
• PINs are optional. If you choose to use a PIN, make sure you remember
it. If you forget your PIN, your dealer
will have to reset it for you , and all
PINs will be cleared.
• If a PIN is desired, enter it using the Personal preference PIN number
feature in SET UP. See pag e 99 for
information on entering your PIN
number.
2009 TL
Page 52 of 172
Driving to Your Destination
52 Navigation System
Driving to Your Destination
A route typically has three phases.
• Initial route calculation ( Calculate
route to screen) (see pag e 52 )
• Change the route while en route (see page 74 ).
• Resume the route when restarting the engine (see Continue Trip to Screen
on page 78 ).
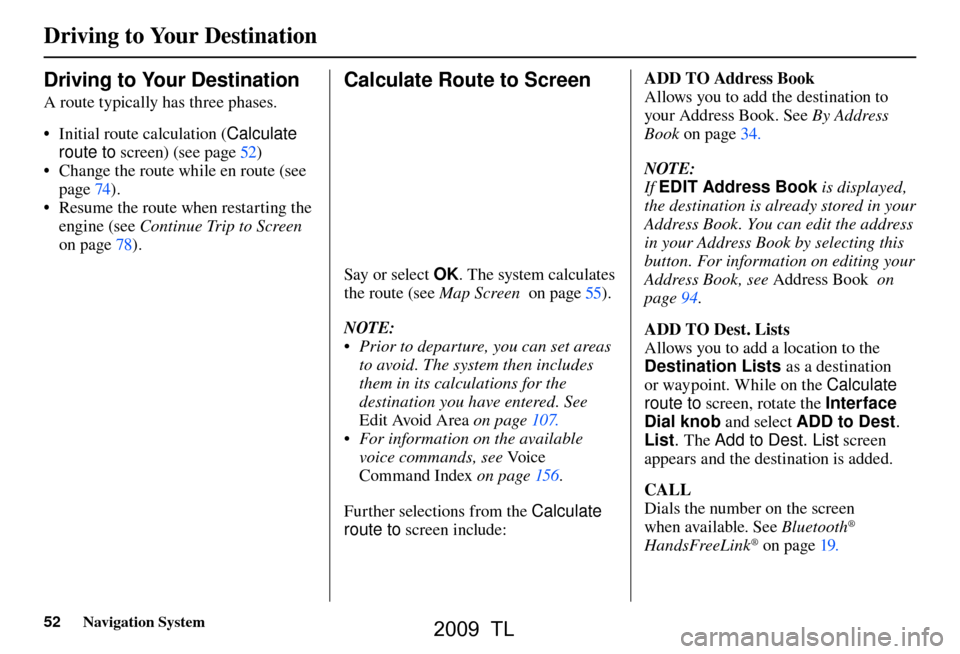
Calculate Route to Screen
Say or select OK . The system calculates
the route (see
Map Screen on page 55 ) .
NOTE:
• Prior to departure, you can set areas to avoid. The system then includes
them in its calculations for the
destination you have entered. See
Edit Avoid Area on page 107 .
• For information on the available voice commands, see Vo i c e
Command Index on page 156 .
Further selections from the Calculate
route to screen include: ADD TO Address Book
Allows you to add the destination to
your Address Book. See
By Address
Book on page 34
.
NOTE:
If EDIT Address Book is displayed,
the destination is already stored in your
Address Book. You can edit the address
in your Address Book by selecting this
button. For information on editing your
Address Book, see Address Book on
page 94 .
ADD TO Dest. Lists
Allows you to add a location to the
Destination Lists as a destination
or waypoint . While on the Calculate
route to screen, rotate the Interface
Dial knob and select ADD to Dest .
List . The Add to Dest. List screen
appears and the destination is added.
CALL
Dials the number on the screen
when available. See Bluetooth
®
HandsFreeLink® on page 19 .
2009 TL
Page 53 of 172
Driving to Your Destination
Navigation System53
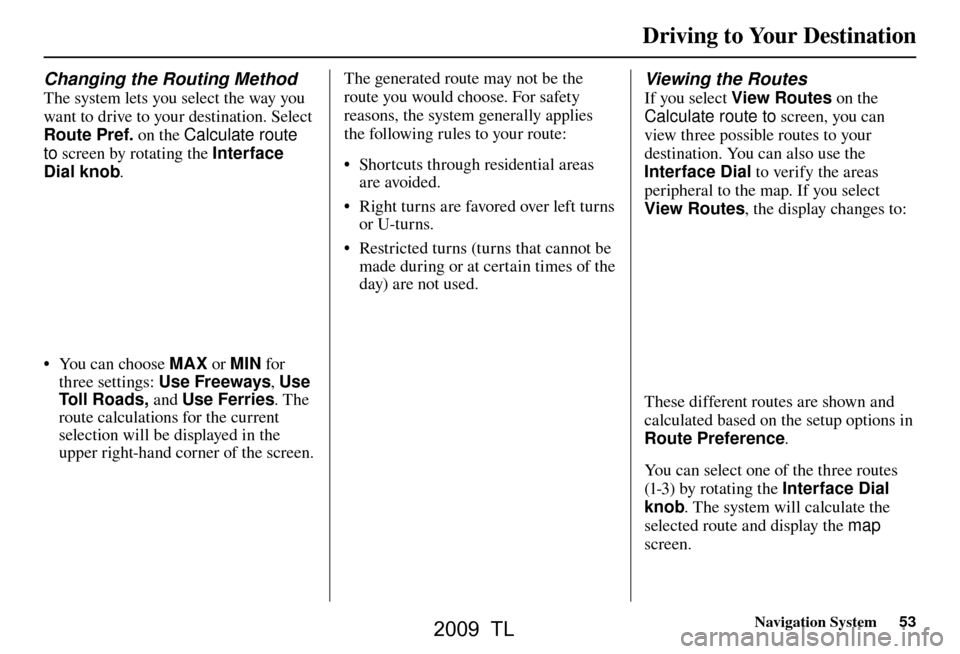
Changing the Routing Method
The system lets you select the way you
want to drive to your destination. Select
Route Pref. on the Calculate route
to screen by rotating the Interface
Dial knob .
• You can choose MAX or MIN for
three settings: Use Freeways , Use
To l l R o a d s , and Use Ferries . The
route calculations for the current
selection will be displayed in the
upper right-hand corner of the screen. The generated route may not be the
route you would choose. For safety
reasons, the system generally applies
the following rules to your route:
• Shortcuts through residential areas
are avoided.
• Right turns are favored over left turns or U-turns.
• Restricted turns (turns that cannot be made during or at certain times of the
day) are not used.
Viewing the Routes
If you select View Routes on the
Calculate route to screen, you can
view three possible routes to your
destination. You can also use the
Interface Dial to verify the areas
peripheral to the map. If you select
View Routes , the display changes to:
These different routes are shown and
calculated based on the setup options in
Route Preference .
You can select one of the three routes
(1-3) by rotating the Interface Dial
knob . The system will calculate the
selected route and display the map
screen.
2009 TL
Page 54 of 172
Driving to Your Destination
54 Navigation System
NOTE:
• The driving distance and time
estimated for the various routes is
displayed.
• It is not unusual for the different methods to pick the same route.
Voice commands cannot be used
while the system is calculating.
• Zoom IN/OUT to view route details or traffi c conditions is not available
on the View Routes screen. After
moving the Interface Dial and
scrolling through the map, you can
then zoom in or out on the map
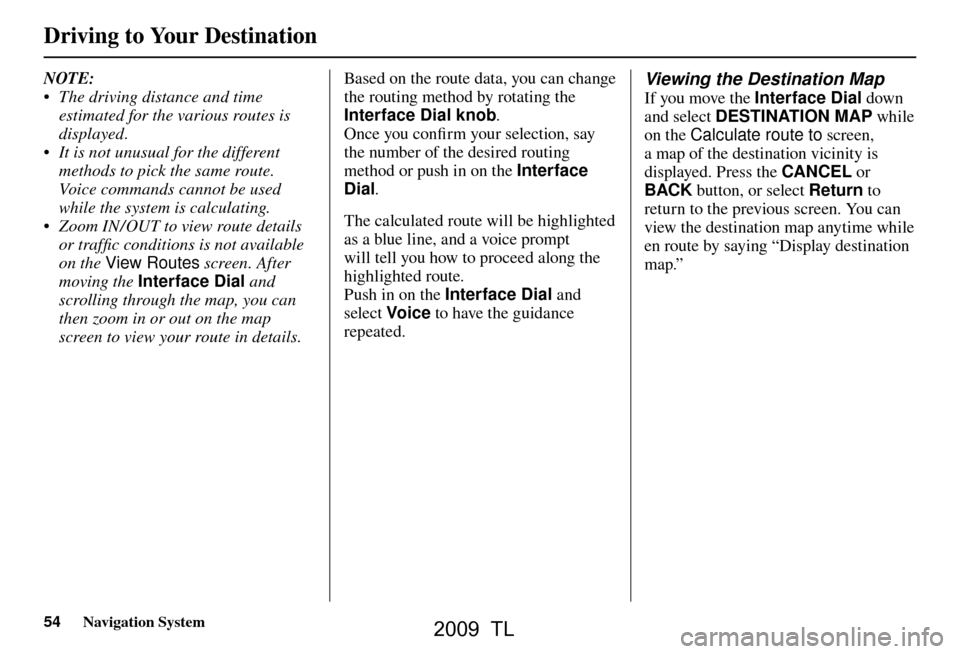
screen to view your route in details. Based on the route data, you can change
the routing method by rotating the
Interface Dial knob
.
Once you confi rm your selection, say
the number of the desired routing
method or push in on the Interface
Dial .
The calculated route will be highlighted
as a blue line, and a voice prompt
will tell you how to proceed along the
highlighted route.
Push in on the Interface Dial and
select Voic e to have the guidance
repeated. Viewing the Destination Map
If you move the Interface Dial down
and select DESTINATION MAP while
on the Calculate route to screen,
a map of the destination vicinity is
displayed. Press the CANCEL or
BACK button, or select Return to
return to the previous screen. You can
view the destination map anytime while
en route by saying “Display destination
map.”
2009 TL
Page 55 of 172
Driving to Your Destination
Navigation System55
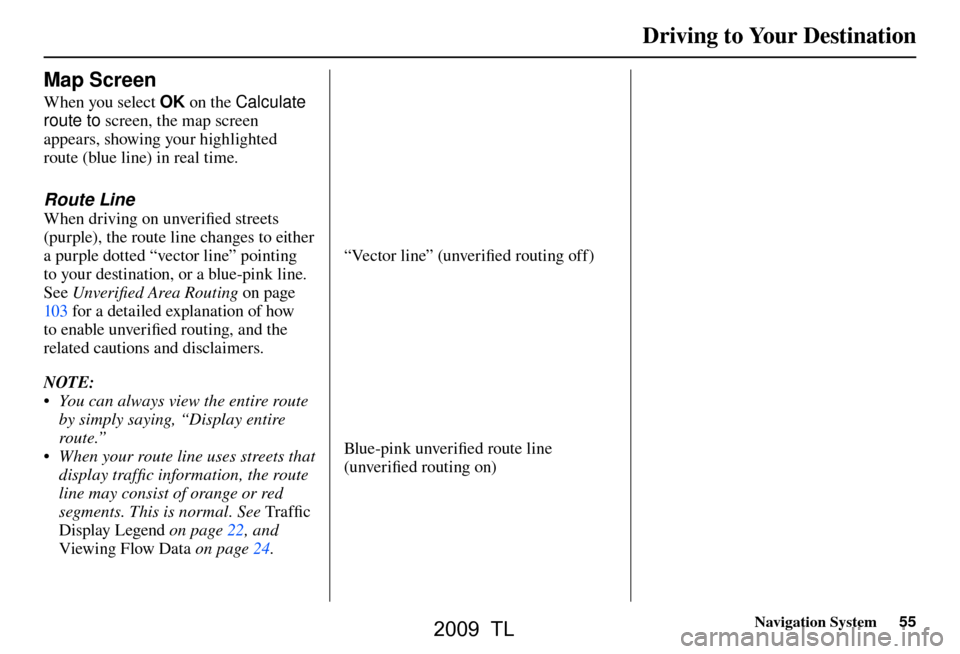
Map Screen
When you select OK on the Calculate
route to screen, the map screen
appears, showing your highlighted
route (blue line) in real time.
Route Line
When driving on unverifi ed streets
(purple), the route line changes to either
a purple dotted “vector line” pointing
to your destination, or a blue-pink line.
See Unverifi ed Area Routing on page
103 f or a detailed explanation of how
to enable unverifi ed routing, and the
related cautions and disclaimers.
NOTE:
• You can always view the entire route by simply saying, “Display entire
route.”
• When your route line uses streets that display traffi c information, the route
line may consist of orange or red
segments. This is normal. See Tra f fi c
Display Legend on page 22 , and
Viewing Flow Data on page 24 .
“Vector line” (unverifi ed routing off)
Blue-pink unverifi ed route line
(unverifi ed routing on)
2009 TL
Page 56 of 172
Driving to Your Destination
56 Navigation System
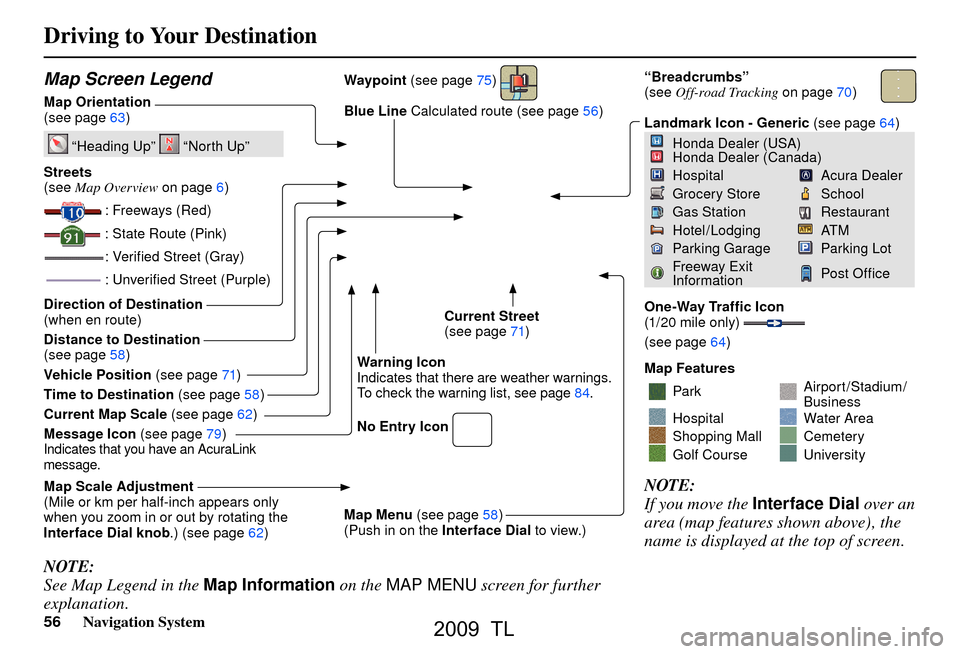
Map Screen Legend
Map Orientation
(see page 63 )
“Heading Up” “North Up”
Streets
(see Map Overview on page 6 )
: Freeways (Red)
: State Route (Pink)
: Veri� ed Street (Gray)
: Unveri� ed Street (Purple)
Direction of Destination
(when en route)
Distance to Destination
(see page 58
)
Vehicle Position (see page 71 )
Time to Destination (see page 58
)
Current Map Scale (see page 62
)
Message Icon (see page 79
)
Indicates that you have an AcuraLink
message.
Map Scale Adjustment
(Mile or km per half-inch appears only
when you zoom in or out by rotating the
Interface Dial knob .) (see page 62 ) Waypoint
(see page 75
)
Blue Line Calculated route (see page 56)
Current Street
(see page 71 )
Warning Icon
Indicates that there are weather warnings.
To check the warning list, see pag e 84 .
No Entry Icon
Map Menu (see page 58
)
(Push in on the Interface Dial to view.)
“Breadcrumbs”
(see Off-road Tracking on page 70 )
Landmark Icon - Generic (see page 64 )
Honda Dealer (USA)
Honda Dealer (Canada)
HospitalAcura Dealer
Grocery StoreSchool
Gas StationRestaurant
Hotel/LodgingAT M
Parking GarageParking Lot
Freeway Exit
InformationPost Of� ce
One-Way Traf� c Icon
(1/20 mile only)
(see page 64 )
Map Features
ParkAirport/Stadium/
Business
HospitalWater Area
Shopping MallCemetery
Golf CourseUniversity
NOTE:
If you move the Interface Dial over an
area (map features shown above), the
name is displayed at the top of screen.
NOTE:
See Map Legend in the Map Information on the MAP MENU screen for further
explanation.
2009 TL
Page 57 of 172
Driving to Your Destination
Navigation System57
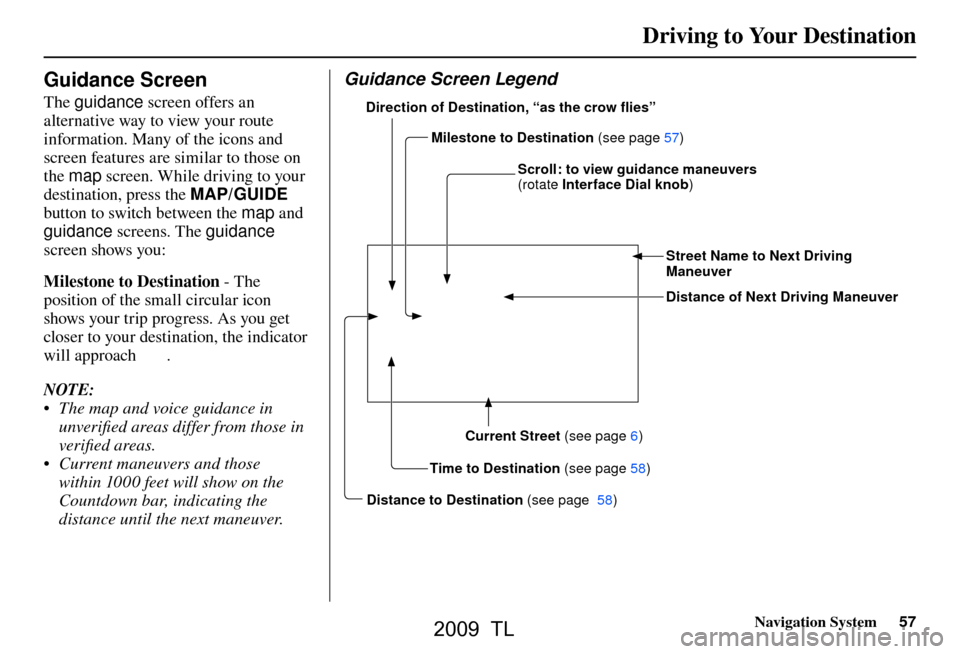
Guidance Screen
The guidance screen offers an
alternative way to view your route
information. Many of the icons and
screen features are similar to those on
the map screen. While driving to your
destination, press the MAP/GUIDE
button to switch between the map and
guidance screens. The guidance
screen shows you:
Milestone to Destination - The
position of the small circular icon
shows your trip progress. As you get
closer to your destination, the indicator
will approach
.
NOTE:
• The map and voice guidance in unverifi ed areas differ from those in
verifi ed areas.
• Current maneuvers and those within 1000 feet will show on the
Countdown bar, indicating the
distance until the next maneuver.
Guidance Screen Legend
Time to Destination (see page 58
)
Milestone to Destination
(see page 57
)
Direction of Destination, “as the crow �
ies”
Distance of Next Driving Maneuver Street Name to Next Driving
Maneuver
Scroll: to view guidance maneuvers
(rotate
Interface Dial knob )
Current Street (see page 6 )
Distance to Destination (see page 58 )
2009 TL
Page 58 of 172
Driving to Your Destination
58 Navigation System
Distance and Time to
Destination
When you select a destination, the
distance to the destination is the actual
road distance of the calculated route,
and not “as the crow fl ies.” When
viewing a list of destinations (points
of interest), such as restaurants, the
distance is “as the crow fl ies” (see Sort
by Distance to Travel on page 41 ).
The displayed time to the destination
may differ from the actual travel time
because the time is calculated based
on the posted road speed data and your
current speed.
NOTE:
If you are en route and the Interface
Dial is moved, the “Time to
Destination” and “Distance to
Destination” indications are replaced
with an indicator showing distance
from the current vehicle location.
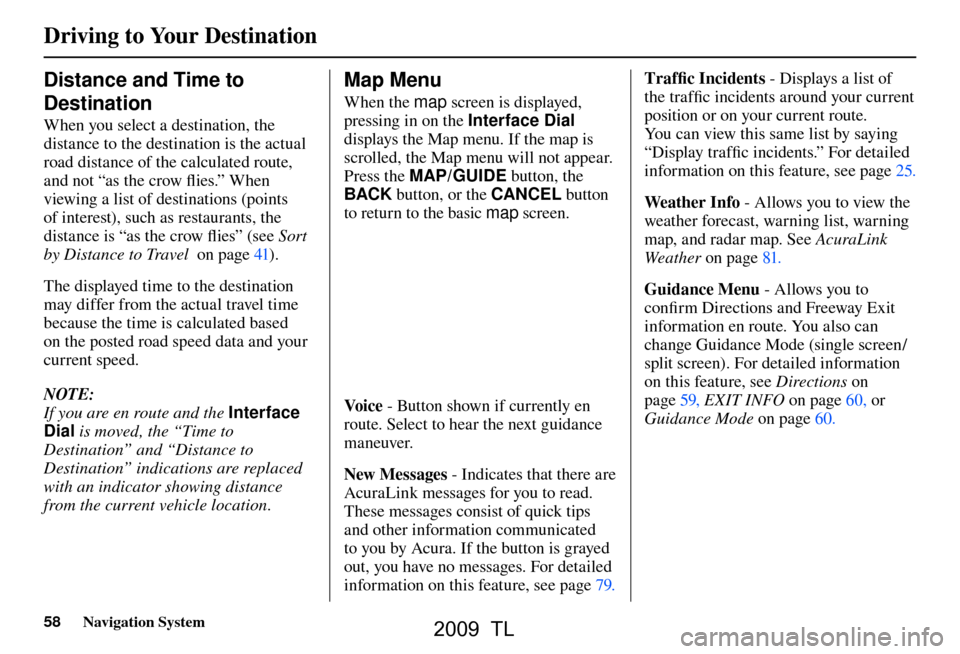
Map Menu
When the map screen is displayed,
pressing in on the Interface Dial
displays the Map menu. If the map is
scrolled, the Map menu will not appear.
Press the MAP/GUIDE button, the
BACK button, or the CANCEL button
to return to the basic map screen.
Vo i c e - Button shown if currently en
route. Select to hear the next guidance
maneuver.
New Messages - Indicates that there are
AcuraLink messages for you to read.
These messages consist of quick tips
and other information communicated
to you by Acura. If the button is grayed
out, you have no messages. For detailed
information on this feature, see page 79 .Traffi
c Incidents - Displays a list of
the traffi c incidents around your current
position or on your current route.
You can view this same list by saying
“Display traffi c incidents.” For detailed
information on this feature, see page 25 .
Weather Info - Al
lows you to view the
weather forecast, warning list, warning
map, and radar map. See AcuraLink
Weather on page 81 .
Guidance Menu - Allows you to
confi rm Directions and Freeway Exit
information en route. You also can
change Guidance Mode (single screen/
split screen). For detailed information
on this feature, see Directions on
page 59 , EXIT INFO on page 60 , or
Guidance Mode on page 60 .
2009 TL
Page 59 of 172
Driving to Your Destination
Navigation System59
Find Nearest … - Selects a subcategory
from the list to search the nearest
POI from your current location. For
detailed information on this feature, see
Subcategories on page 37 .
Map Information - Allows you to
confi rm information on the map or
change the settings of displaying a map.
For detailed information on this feature,
see Map Orientation on page 63 ,
Showing Icons on the Map on page 68 ,
Viewing/ Saving the Current Location
on page 71 or Map Legend on page 61 .
Cancel Route - Cancels your current
route. The map screen will display your
current position.
Directions
You can display a list of the maneuvers
on your route and confi rm the distance
between them.
If you select Guidance Menu from
the Map menu and then select
Directions , the display changes to:
NOTE:
• When you select a maneuver from the
list, a map of the maneuver is shown.
• Maneuvers that occur at freeway exits or contain freeway exit
information will show the exit info
icon (
). Press the CANCEL
button or the
BACK button, or move the Interface
Dial down to return to the previous
screen.
You can scroll one maneuver at a time
by rotating the Interface Dial knob .
The route guidance display disappears
and guidance ends when you reach your
destination. Press the MENU button
to return to the MENU screen ( Dest.
MENU 1 or 2 ).
2009 TL
Page 60 of 172
Driving to Your Destination
60 Navigation System
EXIT INFO (Freeway Exit
Information)
You can search freeway exit
information (gas stations, restaurants,
ATMs, etc.) and add new destinations
or waypoints to the calculated route.
Select the Guidance Menu from the
Map menu screen. Select Exit Info,
and a list of freeway exits for the route
is displayed.
If you select the freeway exit you plan
on taking, a list of businesses in the
area will be displayed. You can choose
a listing to set as a new destination or
waypoint, and say or select OK. On the map screen, you can display
Freeway Exit information using the
Interface Dial
. The Exit Info icon will
only be displayed on the map screen if
there is any freeway exit information
available. Choose the 1/4, 1/2, or 1
mile scale, then move the crosshairs
to the desired Exit Info icon and push
in on the Interface Dial . Choose a
place from the list and set it as a new
destination or waypoint.
NOTE:
To turn on “Freeway exit information”
on the map screen, display the icon bar
and select the
icon (see pag e 68 ) .
Guidance Mode
When en route to a destination, you
have two display options: single-screen
mode (the factory default) or split-
screen mode.
If you select the Guidance M
enu on
the
Map menu screen and then select
Guidance Mode , the Selection
screen will appear.
Single-screen mode - While the map
screen is displayed, only the map is
shown with occasional guidance pop-up
windows as you approach a maneuver.
When you press the MAP/GUIDE
button and switch to the Guidance
screen, only the Directions screen is
displayed.
Split-screen mode - While the map
screen is displayed, the map is on
the left of the screen, and the next
maneuver is on the right side of the
screen. You will see the same screen
setup when you press the MAP/GUIDE
button.
2009 TL