driver Acura TLX 2017 Repair Manual
[x] Cancel search | Manufacturer: ACURA, Model Year: 2017, Model line: TLX, Model: Acura TLX 2017Pages: 553, PDF Size: 33.77 MB
Page 203 of 553
uuClimate Control System uUsing Automatic Climate Control
202
Controls
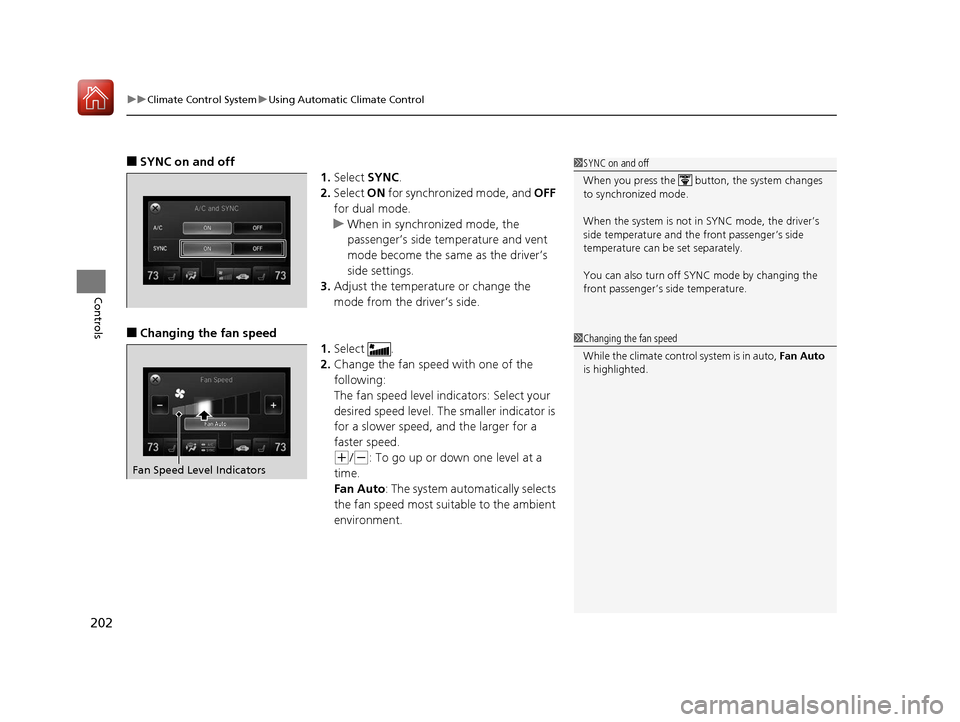
■SYNC on and off
1.Select SYNC.
2. Select ON for synchronized mode, and OFF
for dual mode.
u When in synchronized mode, the
passenger’s side temperature and vent
mode become the same as the driver’s
side settings.
3. Adjust the temperature or change the
mode from the driver’s side.
■Changing the fan speed
1.Select .
2. Change the fan speed with one of the
following:
The fan speed level indicators: Select your
desired speed level. The smaller indicator is
for a slower speed, an d the larger for a
faster speed.
(+/(-: To go up or down one level at a
time.
Fan Auto : The system automatically selects
the fan speed most suitable to the ambient
environment.
1 SYNC on and off
When you press the button, the system changes
to synchronized mode.
When the system is not in SYNC mode, the driver’s
side temperature and th e front passenger’s side
temperature can be set separately.
You can also turn off SYNC mode by changing the
front passenger’s si de temperature.
1Changing the fan speed
While the climate control system is in auto, Fan Auto
is highlighted.
Fan Speed Level Indicators
17 ACURA TLX-31TZ36200.book 202 ページ 2016年6月10日 金曜日 午後6時39分
Page 213 of 553
212
Features
Audio System Basic Operation
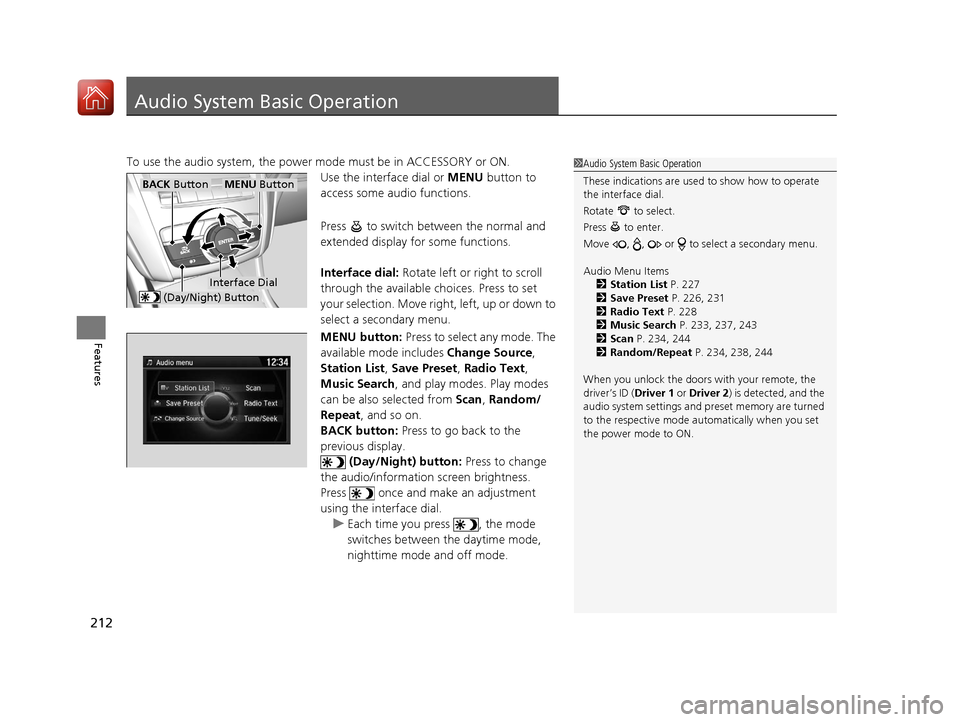
To use the audio system, the power mode must be in ACCESSORY or ON.
Use the interface dial or MENU button to
access some audio functions.
Press to switch between the normal and
extended display fo r some functions.
Interface dial: Rotate left or right to scroll
through the available choices. Press to set
your selection. Move right, left, up or down to
select a secondary menu.
MENU button: Press to select any mode. The
available mode includes Change Source,
Station List , Save Preset , Radio Text ,
Music Search, and play modes. Play modes
can be also selected from Scan, Random/
Repeat , and so on.
BACK button: Press to go back to the
previous display. (Day/Night) button: Press to change
the audio/information screen brightness.
Press once and make an adjustment
using the interface dial. u Each time you press , the mode
switches between the daytime mode,
nighttime mode and off mode.1Audio System Basic Operation
These indications are used to show how to operate
the interface dial.
Rotate to select.
Press to enter.
Move , , or to se lect a secondary menu.
Audio Menu Items 2 Station List P. 227
2 Save Preset P. 226, 231
2 Radio Text P. 228
2 Music Search P. 233, 237, 243
2 Scan P. 234, 244
2 Random/Repeat P. 234, 238, 244
When you unlock the doors with your remote, the
driver’s ID ( Driver 1 or Driver 2) is detected, and the
audio system settings and pr eset memory are turned
to the respective mode automatically when you set
the power mode to ON.
Interface Dial
MENU ButtonBACK Button
(Day/Night) Button
17 ACURA TLX-31TZ36200.book 212 ページ 2016年6月10日 金曜日 午後6時39分
Page 260 of 553
259
uuCustomized Features u
Continued
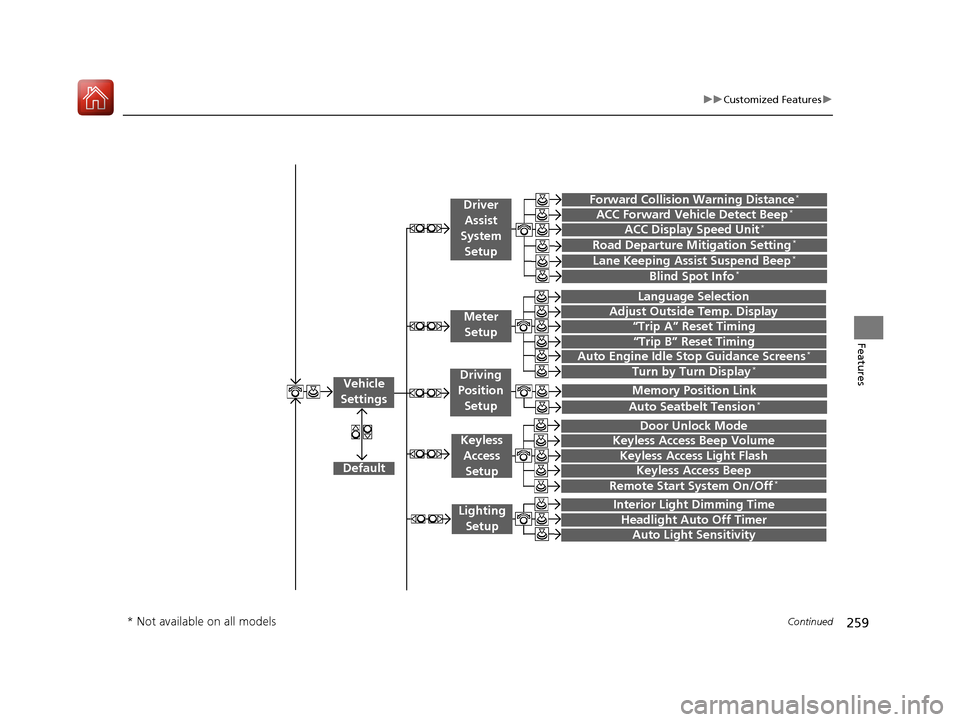
Features“Trip A” Reset Timing
“Trip B” Reset Timing
Language Selection
Adjust Outside Temp. Display
Forward Collision Warning Distance*
ACC Forward Vehicle Detect Beep*
Turn by Turn Display*
Default
Door Unlock Mode
Keyless Access Light Flash
Interior Light Dimming Time
Headlight Auto Off Timer
Auto Light Sensitivity
Vehicle
Settings
Meter Setup
Driver Assist
System
Setup
Keyless Access
Setup
Lighting Setup
Keyless Access Beep
Lane Keeping Assist Suspend Beep*
Blind Spot Info*
Auto Seatbelt Tension*
Driving
Position Setup
Road Departure Mitigation Setting*ACC Display Speed Unit*
Remote Start System On/Off*
Memory Position Link
Keyless Access Beep Volume
Auto Engine Idle Stop Guidance Screens*
* Not available on all models
17 ACURA TLX-31TZ36200.book 259 ページ 2016年6月10日 金曜日 午後6時39分
Page 266 of 553
265
uuCustomized Features u
Continued
Features
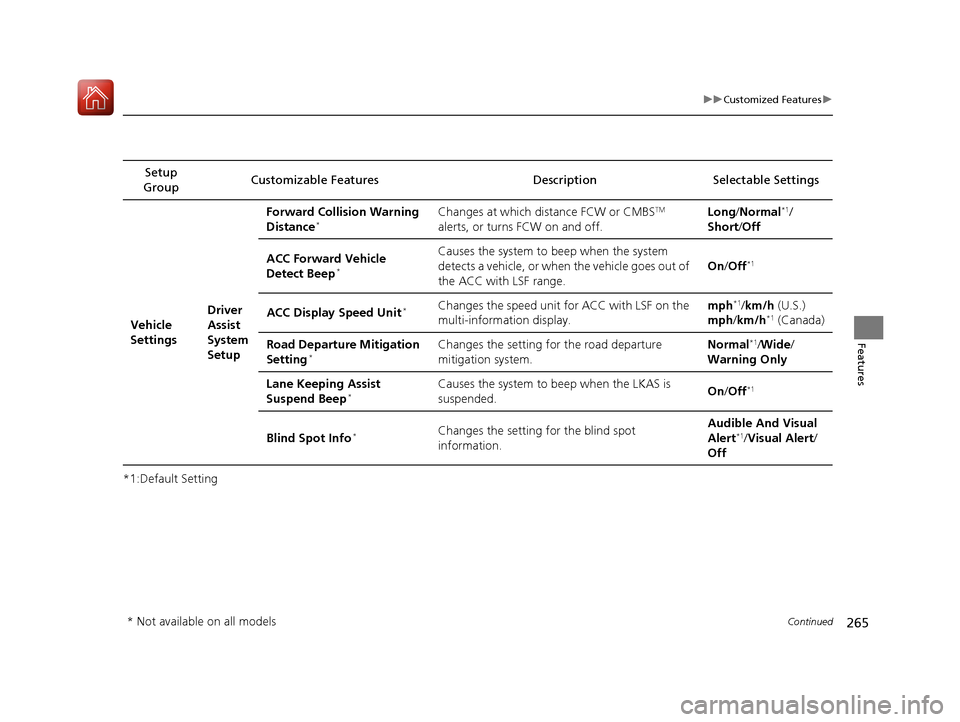
*1:Default SettingSetup
Group Customizable Features Description Selectable Settings
Vehicle
Settings Driver
Assist
System
SetupForward Collision Warning
Distance
*Changes at which distance FCW or CMBSTM
alerts, or turns FCW on and off. Long
/Normal*1/
Short/ Off
ACC Forward Vehicle
Detect Beep
*
Causes the system to beep when the system
detects a vehicle, or when the vehicle goes out of
the ACC with LSF range. On
/Off*1
ACC Display Speed Unit*Changes the speed unit for ACC with LSF on the
multi-information display. mph*1/
km/h (U.S.)
mph /km/h*1 (Canada)
Road Departure Mitigation
Setting
*Changes the setting for the road departure
mitigation system. Normal*1/
Wide /
Warning Only
Lane Keeping Assist
Suspend Beep
*Causes the system to be ep when the LKAS is
suspended. On
/Off*1
Blind Spot Info*Changes the setting for the blind spot
information. Audible And Visual
Alert*1/
Visual Alert /
Off
* Not available on all models
17 ACURA TLX-31TZ36200.book 265 ページ 2016年6月10日 金曜日 午後6時39分
Page 268 of 553
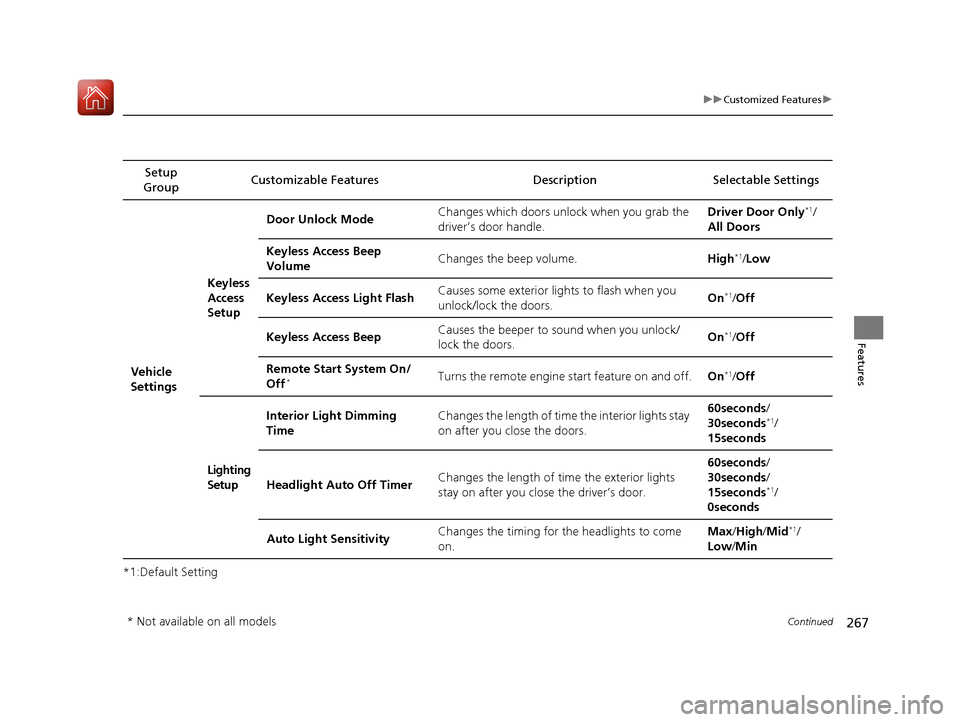
267
uuCustomized Features u
Continued
Features
*1:Default SettingSetup
Group Customizable Features Description Selectable Settings
Vehicle
SettingsKeyless
Access
Setup
Door Unlock Mode
Changes which doors unlock when you grab the
driver’s door handle. Driver Door Only
*1/
All Doors
Keyless Access Beep
Volume Changes the beep volume.
High
*1/Low
Keyless Access Light Flash Causes some exterior lights to flash when you
unlock/lock the doors. On
*1/
Off
Keyless Access Beep Causes the beeper to
sound when you unlock/
lock the doors. On
*1/
Off
Remote Start System On/
Off
*Turns the remote engine start feature on and off. On*1/Off
Lighting
Setup Interior Light Dimming
Time
Changes the length of time the interior lights stay
on after you close the doors. 60seconds
/
30seconds
*1/
15seconds
Headlight Auto Off Timer Changes the length of time the exterior lights
stay on after you close the driver’s door. 60seconds
/
30seconds /
15seconds
*1/
0seconds
Auto Light Sensitivity Changes the timing for the headlights to come
on. Max
/High /Mid
*1/
Low /Min
* Not available on all models
17 ACURA TLX-31TZ36200.book 267 ページ 2016年6月10日 金曜日 午後6時39分
Page 269 of 553
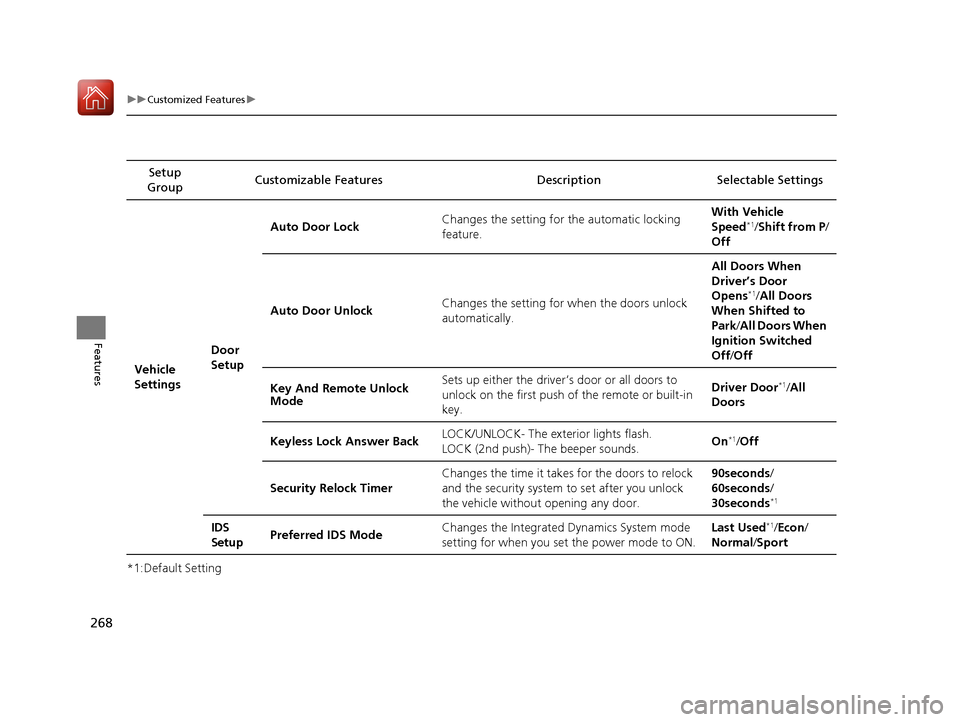
268
uuCustomized Features u
Features
*1:Default SettingSetup
Group Customizable Features Descri
ption Selectable Settings
Vehicle
Settings Door
SetupAuto Door Lock
Changes the setting for the automatic locking
feature. With Vehicle
Speed
*1/
Shift from P/
Off
Auto Door Unlock Changes the setting for when the doors unlock
automatically. All Doors When
Driver’s Door
Opens
*1/
All Doors
When Shifted to
Park /All Doors When
Ignition Switched
Off /Off
Key And Remote Unlock
Mode Sets up either the driver
’s door or all doors to
unlock on the first push of the remote or built-in
key. Driver Door
*1/
All
Doors
Keyless Lock Answer Back LOCK/UNLOCK- The exterior lights flash.
LOCK (2nd push)- The beeper sounds.
On
*1/
Off
Security Relock Timer Changes the time it takes for the doors to relock
and the security system to set after you unlock
the vehicle without opening any door. 90seconds/
60seconds/
30seconds
*1
IDS
Setup
Preferred IDS Mode Changes the Integrated
Dynamics System mode
setting for when you set the power mode to ON. Last Used*1/
Econ /
Normal /Sport
17 ACURA TLX-31TZ36200.book 268 ページ 2016年6月10日 金曜日 午後6時39分
Page 319 of 553
318
uuBefore Driving uDriving Preparation
Driving
• Be sure items placed on the floor behind the front seats cannot roll under the
seats.
u They can interfere with the driver’s ability to operate the pedals, the operation
of the seats, or the operation of the sensors under the seats.
• Everyone in the vehicle must fasten their seat belt.
2Fastening a Seat Belt P. 35
•Make sure that the indicators in the ins trument panel come on when you start the
vehicle, and go off soon after.
u Always have a dealer check the vehicle if a problem is indicated.
2 Indicators P. 70
17 ACURA TLX-31TZ36200.book 318 ページ 2016年6月10日 金曜日 午後6時39分
Page 320 of 553
319
uuBefore Driving uMaximum Load Limit
Continued
Driving
Maximum Load Limit
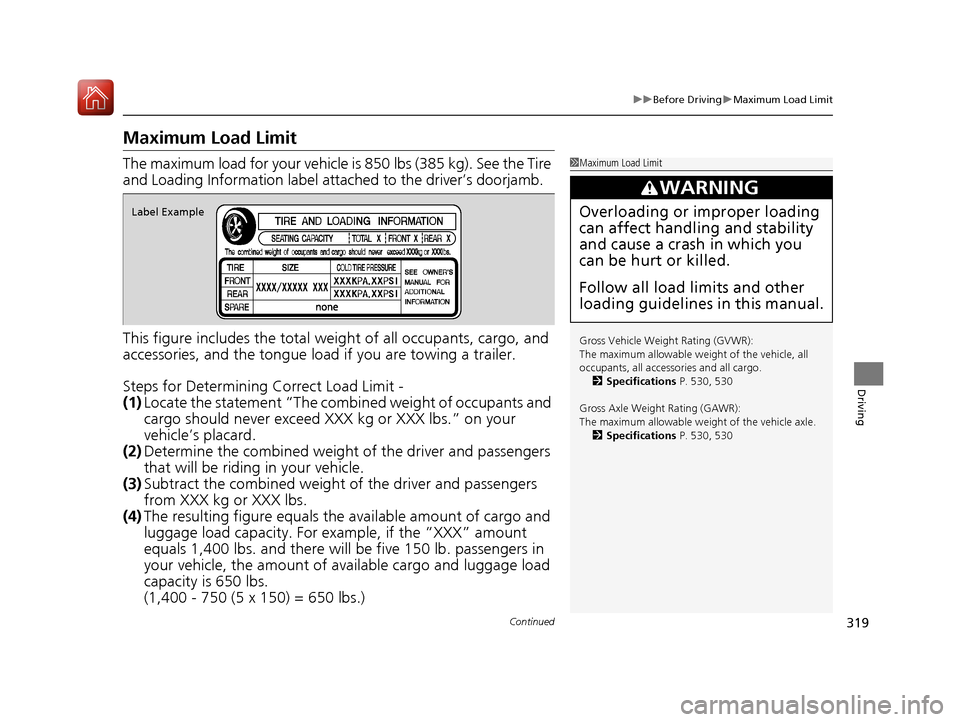
The maximum load for your vehicle is 850 lbs (385 kg). See the Tire
and Loading Information label atta ched to the driver’s doorjamb.
This figure includes the total weig ht of all occupants, cargo, and
accessories, and the tongue load if you are towing a trailer.
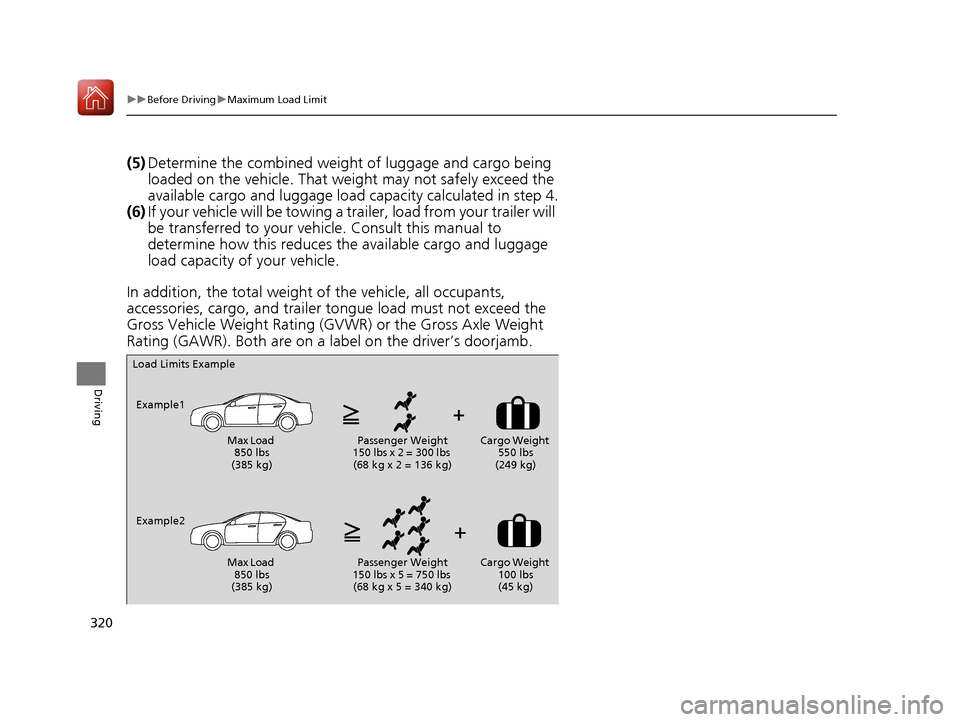
Steps for Determining Correct Load Limit -
(1) Locate the statement “The comb ined weight of occupants and
cargo should never exceed XXX kg or XXX lbs.” on your
vehicle’s placard.
(2) Determine the combined weight of the driver and passengers
that will be riding in your vehicle.
(3) Subtract the combined weight of the driver and passengers
from XXX kg or XXX lbs.
(4) The resulting figure equals the available amount of cargo and
luggage load capacity. For example, if the “XXX” amount
equals 1,400 lbs. and there will be five 150 lb. passengers in
your vehicle, the am ount of available cargo and luggage load
capacity is 650 lbs.
(1,400 - 750 (5 x 150) = 650 lbs.)1 Maximum Load Limit
Gross Vehicle Weight Rating (GVWR):
The maximum allowable weight of the vehicle, all
occupants, all accesso ries and all cargo.
2 Specifications P. 530, 530
Gross Axle Weight Rating (GAWR):
The maximum allowable weight of the vehicle axle. 2 Specifications P. 530, 530
3WARNING
Overloading or improper loading
can affect handling and stability
and cause a crash in which you
can be hurt or killed.
Follow all load limits and other
loading guidelines in this manual.Label Example
17 ACURA TLX-31TZ36200.book 319 ページ 2016年6月10日 金曜日 午後6時39分
Page 321 of 553
320
uuBefore Driving uMaximum Load Limit
Driving
(5) Determine the combined weight of luggage and cargo being
loaded on the vehicle. That we ight may not safely exceed the
available cargo and luggage load capacity calculated in step 4.
(6) If your vehicle will be towing a tra iler, load from your trailer will
be transferred to your vehicl e. Consult this manual to
determine how this reduces the available cargo and luggage
load capacity of your vehicle.
In addition, the total weight of the vehicle, all occupants,
accessories, cargo, and trailer tongue load must not exceed the
Gross Vehicle Weight Rating (GVW R) or the Gross Axle Weight
Rating (GAWR). Both are on a label on the driver’s doorjamb.
Load Limits Example
Example1 Max Load 850 lbs
(385 kg) Passenger Weight
150 lbs x 2 = 300 lbs (68 kg x 2 = 136 kg) Cargo Weight
550 lbs
(249 kg)
Example2 Max Load 850 lbs
(385 kg) Passenger Weight
150 lbs x 5 = 750 lbs (68 kg x 5 = 340 kg) Cargo Weight
100 lbs
(45 kg)
17 ACURA TLX-31TZ36200.book 320 ページ 2016年6月10日 金曜日 午後6時39分
Page 334 of 553

Continued333
uuWhen Driving uShifting
Driving
In freezing or sub-freezing conditions, the gear selection response may be slow.
Always depress the brake pedal before changing the gear position to
(P, and
confirm that
(P is shown on the gear position in dicator before releasing the brake.
■When opening the driver’s door
If you open the driver’s door under the following conditions, the gear position
automatically changes to
(P.
• The vehicle is stationary with the engine running, or moving at 1 mph (2 km/h) or
slower.
• The transmission is in other than
(P.
• You have unfastened the driver side seat belt.
u If you manually change the gear position from
(P with the brake pedal
depressed, the gear position will automatically return to
(P once you release
the brake pedal.
■When turning off the power mode
If you turn the engine off wh ile the vehicle is stationary, and the transmission is in
other than
(P, the gear position au tomatically changes to (P.
1When opening the driver’s door
You should always select
(P before opening the
driver’s door.
Make sure to park the vehicle in a safe place. 2 When Stopped P. 417
If you want to drive the ve hicle after the gear position
has automatically changed to
( P under the described
conditions, close the door, fasten the seat belt,
depress the brake pedal, then change the gear
position.
If you leave the vehicle, tu rn off the engine and lock
the doors.
17 ACURA TLX-31TZ36200.book 333 ページ 2016年6月10日 金曜日 午後6時39分