Alfa Romeo 159 2008 Owner handbook (in English)
Manufacturer: ALFA ROMEO, Model Year: 2008, Model line: 159, Model: Alfa Romeo 159 2008Pages: 303, PDF Size: 5.18 MB
Page 41 of 303
39
SAFETY
DEVICES
WARNING LIGHTS
AND MESSAGES
IN AN
EMERGENCY
CAR
MAINTENANCE
TECHNICAL
SPECIFICATIONS
INDEX
DASHBOARD
AND
CONTROLS
CORRECT USE
OF THE CAR
Selecting the language
(Language)
Display messages can be shown in the
following languages: Italian, English,
German, Portuguese, Spanish, French,
Dutch and Brazilian.
To set the required language proceed as
follows:
❒briefly press button MENU, the pre-
viously set “language” will show on
the display;
❒press button +or–to select the re-
quired language;
❒briefly press button MENUto go
back to the menu screen or press the
button for long to go back to the stan-
dard screen.Adjusting the button volume
(Keys Vol.)
With this function the volume of the
roger-beep accompanying the activation
of certain buttons can be adjusted ac-
cording to 8 levels.
To adjust the volume proceed as follows:
❒briefly press button MENU, the pre-
viously set “level” will show on the
display;
❒press button +or–to select the re-
quired volume;
❒briefly press button MENUto go
back to the menu screen or press the
button for long to go back to the stan-
dard screen. Adjusting the failure/warning
buzzer volume (Beep Vol.)
With this function the volume of the
buzzer accompanying any failure/warn-
ing indication can be adjusted according
to 8 levels.
To adjust the volume proceed as follows:
❒briefly press button MENU, the pre-
viously set “level” will show on the
display;
❒press button +or–to select the re-
quired volume;
❒briefly press button MENUto go
back to the menu screen or press the
button for long to go back to the stan-
dard screen.
Page 42 of 303
Reactivating the S.B.R.
(Seat Belt Reminder) buzzer
(Beep Seatb.) (where provided)
This function is displayed only after the
system has been deactivated by Alfa
Romeo Authorized Services.
Exit Menu (Quit setup)
Selecting this option will bring back to
standard screen.
ILLUMINATION OF REV
COUNTER/INSTRUMENTS
(NIGHT PANEL)
This function enables to turn on/off
(ON/OFF) the lights of the rev counter
and instruments. This function can be ac-
tivated (only with electronic key fitted in-
to ignition device, external lights on, and
speedometer built-in sensor in poor out-
side light setting), by pressing for long but-
ton–. When this function is on, the dis-
play will show a warning message. Once
on, the NIGHT PANELfunction can be
deactivated as follows:
❒by long press on button +(also with
external lights off);
❒removing the electronic key from the
ignition device.
When function is off the display will show
a warning message.
Messages stay on the display for a few
seconds, then they will go off. To stop
displaying before time, briefly press but-
tonMENU. Scheduled Servicing (Service)
Through this function it is possible to dis-
play information connected to proper car
servicing.
Proceed as follows:
❒briefly press button MENU: service
in km or mi, according to previous
setting, will be displayed (see para-
graph “Units”);
❒briefly press buttonMENUto go
back to the menu screen or press the
button for long to go back to the stan-
dard screen.
IMPORTANTThe Service schedule in-
cludes car maintenance every 30,000 km
(or 18,000 mi); this is shown automat-
ically, with the electronic key into the ig-
nition device starting from 2,000 km (or
1,240 mi) from this deadline and it will
be displayed in km or miles according to
the unit set. When a scheduled service in-
terval (“coupon”) is near to come, fitting
the electronic key into the ignition device
will display a message followed by the
number of km/mi to go before car ser-
vicing. Contact Alfa Romeo Authorized Ser-
vices to carry out any service operation
provided by the Service schedule or by the
Annual inspection plan, and to reset the
display.
40
SAFETY
DEVICES
WARNING LIGHTS
AND MESSAGES
IN AN
EMERGENCY
CAR
MAINTENANCE
TECHNICAL
SPECIFICATIONS
INDEX
DASHBOARD
AND
CONTROLS
CORRECT USE
OF THE CAR
Page 43 of 303
41
SAFETY
DEVICES
WARNING LIGHTS
AND MESSAGES
IN AN
EMERGENCY
CAR
MAINTENANCE
TECHNICAL
SPECIFICATIONS
INDEX
DASHBOARD
AND
CONTROLS
CORRECT USE
OF THE CAR
Reset TRIP B
End of partial mission
Start of new partial mission End of partial mission
Start of new
partial mission
Reset TRIP B
End of partial mission
Start of new
partial mission Reset Trip A
End of complete mission
Start of new missionReset Trip A
End of complete mission
Start of new mission
End of partial mission
Start of new
partial mission Reset TRIP B
Reset TRIP B TRIP B
TRIP B
TRIP B Trip A
˙
˙
˙
˙˙
˙
˙ ˙
fig. 27
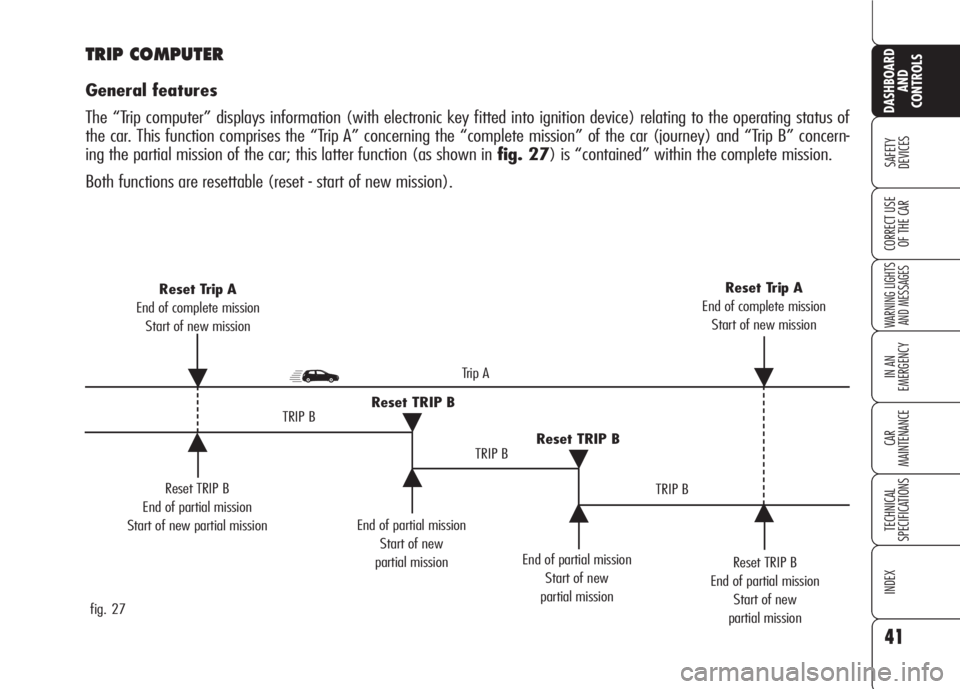
TRIP COMPUTER
General features
The “Trip computer” displays information (with electronic key fitted into ignition device) relating to the operating status of
the car. This function comprises the “Trip A” concerning the “complete mission” of the car (journey) and “Trip B” concern-
ing the partial mission of the car; this latter function (as shown in fig. 27) is “contained” within the complete mission.
Both functions are resettable (reset - start of new mission).
Page 44 of 303
42
SAFETY
DEVICES
WARNING LIGHTS
AND MESSAGES
IN AN
EMERGENCY
CAR
MAINTENANCE
TECHNICAL
SPECIFICATIONS
INDEX
DASHBOARD
AND
CONTROLS
CORRECT USE
OF THE CAR
Values displayed
Average consumption
Represents the indicative average of con-
sumptions from the beginning of the
new mission.
Current consumption
This value shows instant fuel consump-
tion (this value is updated second by
second). If parking the car with engine
on, the display will show “- - - -”.
Average speed
This value shows the car average speed
as a function of the overall time elapsed
since the start of the new mission.
Travel time
This value shows the time elapsed since
the start of the new mission (driving
time).
Range
This value shows the distance in km (or
mi) that the car can still cover before
needing fuel, assuming that driving con-
ditions are kept unvaried.The display will show “- - - -“ in the fol-
lowing cases:
❒value lower than 50 km (30mi);
❒car left parked with engine running
for long.
IMPORTANTThe variation of the au-
tonomy value can be influenced by dif-
ferent factors: driving style (see what is
described in paragraph “Driving style”
in the chapter “Correct use of the car”),
type of route (highways, urban, moun-
tain, etc…), use conditions of the car
(load transported, tire pressure, etc…).
What was described previously must be
taken in consideration when planning
a trip.
Travel Distance
This value shows the distance covered
from the start of the new mission.
Each time the battery is connected and
each time a new mission is started (re-
set), the display will show “0.0”. The “Trip A” displays the figures relating
to:
❒Average consumption
❒Current consumption
❒Average speed
❒Travel time
❒Range
❒Travel Distance
“Trip B” displays information concern-
ing:
❒Travel Distance B
❒Average consumption B
❒Average speed B
❒Travel time B.
Page 45 of 303
43
SAFETY
DEVICES
WARNING LIGHTS
AND MESSAGES
IN AN
EMERGENCY
CAR
MAINTENANCE
TECHNICAL
SPECIFICATIONS
INDEX
DASHBOARD
AND
CONTROLS
CORRECT USE
OF THE CARButtonTRIPshall also be used to reset
the “Trip A” and “Trip B” functions to
start a new mission:
❒short push: to display the different
values;
❒long push: to reset and then start
a new mission.
To scroll the Trip Computer options,
briefly press buttons
-and..
IMPORTANT“Trip A” reset will also
reset the “Trip B” function, whereas
“Trip B” reset will only reset the infor-
mation associated with this function. New mission (reset)
Reset can be:
❒“manual” reset is performed by the
driver by pressing button TRIP;
❒“automatic” reset is performed when
the trip distance reaches 9999.9 km
(or mi), when travel time reaches
99.59 (99 hours and 59 minutes)
or after disconnecting and then re-
connecting the battery.
TRIP BUTTON
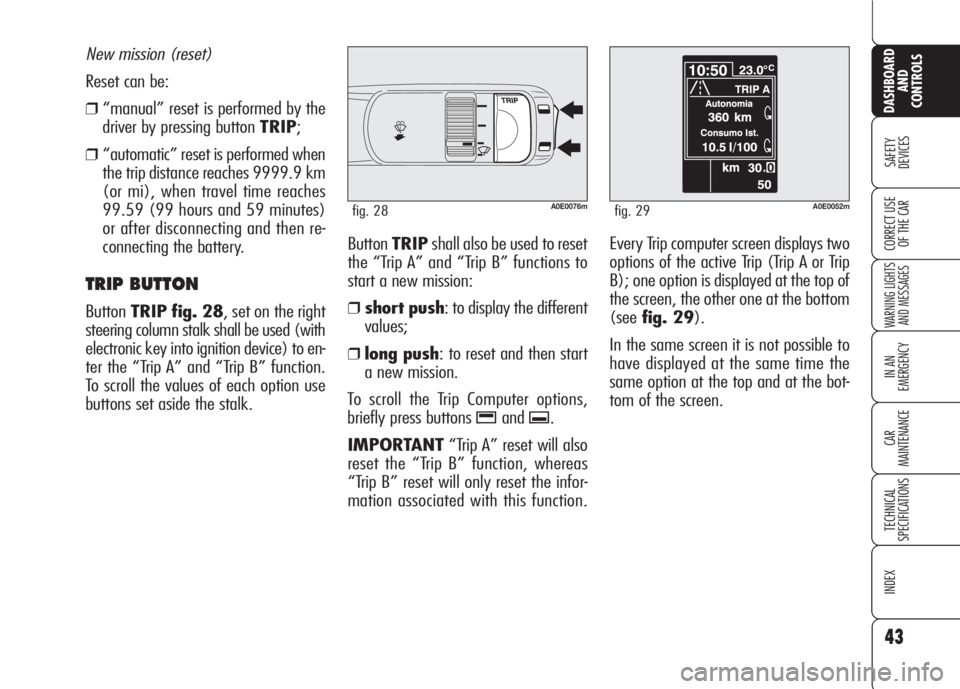
ButtonTRIP fig. 28, set on the right
steering column stalk shall be used (with
electronic key into ignition device) to en-
ter the “Trip A” and “Trip B” function.
To scroll the values of each option use
buttons set aside the stalk.
A0E0076mfig. 28
Every Trip computer screen displays two
options of the active Trip (Trip A or Trip
B); one option is displayed at the top of
the screen, the other one at the bottom
(seefig. 29).
In the same screen it is not possible to
have displayed at the same time the
same option at the top and at the bot-
tom of the screen.
A0E0052mfig. 29
Page 46 of 303
Reset Trip B
As concerns the Trip B values, it is pos-
sible to select through the “Setup
Menu” the reset mode (Manual or Au-
tomatic) (see paragraph “Setup Menu”
on previous pages):
❒manual reset: press and keep pressed
buttonTRIPfor over 2 seconds.
❒automatic reset: it takes place each
time the electronic key is fitted into
the ignition device.
At Trip B reset a warning message will
be displayed.
IMPORTANTTrip B reset will not re-
set “Range” and “Current Consump-
tion”.
44
SAFETY
DEVICES
WARNING LIGHTS
AND MESSAGES
IN AN
EMERGENCY
CAR
MAINTENANCE
TECHNICAL
SPECIFICATIONS
INDEX
DASHBOARD
AND
CONTROLS
CORRECT USE
OF THE CAR
Briefly press button TRIPto select the
two Trip computer modes; use button
-to scroll the options at the top of the
display, use button
.. to scroll the op-
tions at the bottom of the display.
Press briefly button TRIPto go from
Trip A to Trip B.Start of journey procedure
(reset)
Trip A and Trip B reset are independent.
Reset Trip A
With electronic key into ignition device,
to reset the “Trip A” press and keep
pressed button TRIPfor over 2 sec-
onds.
IMPORTANTReset can be automat-
ic only in the following cases:
❒when the “Travel Distance” reaches
9999.9 km or the “Travel Time”
reaches 99.59 (99 hours and 59
minutes);
❒after disconnecting/reconnecting the
battery.
At Trip A reset a warning message will
be displayed.
IMPORTANTTrip A reset will not re-
set “Range” and “Current Consump-
tion”.
Page 47 of 303
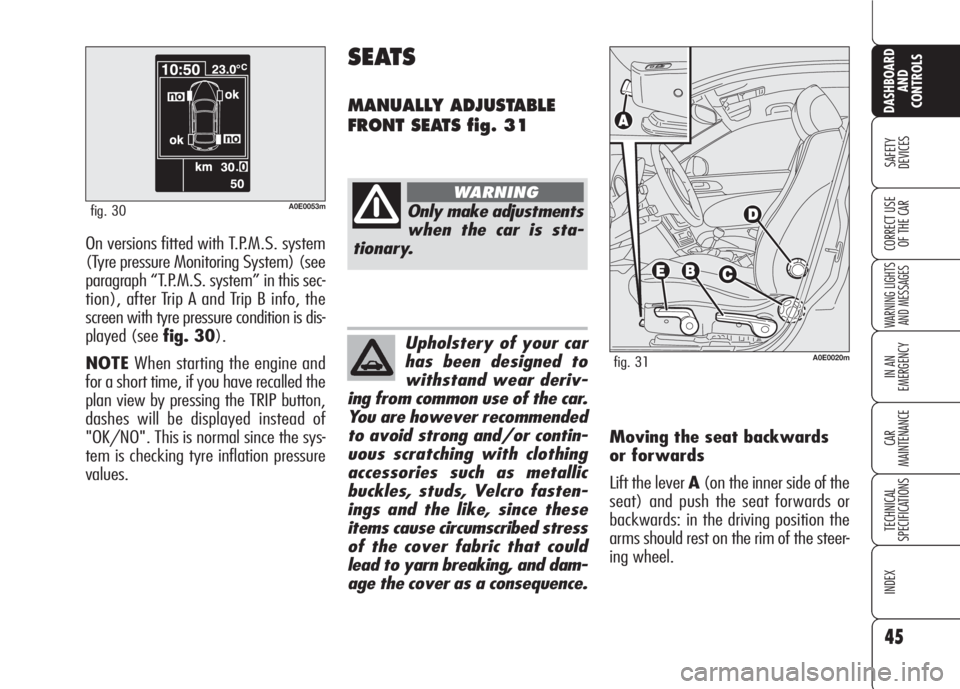
On versions fitted with T.P.M.S. system
(Tyre pressure Monitoring System) (see
paragraph “T.P.M.S. system” in this sec-
tion), after Trip A and Trip B info, the
screen with tyre pressure condition is dis-
played (see fig. 30).
NOTEWhen starting the engine and
for a short time, if you have recalled the
plan view by pressing the TRIP button,
dashes will be displayed instead of
"OK/NO". This is normal since the sys-
tem is checking tyre inflation pressure
values.
45
SAFETY
DEVICES
WARNING LIGHTS
AND MESSAGES
IN AN
EMERGENCY
CAR
MAINTENANCE
TECHNICAL
SPECIFICATIONS
INDEX
CORRECT USE
OF THE CAR
DASHBOARD
AND
CONTROLS
A0E0053mfig. 30
SEATS
MANUALLY ADJUSTABLE
FRONT SEATS fig. 31
Only make adjustments
when the car is sta-
tionary.
WARNING
Upholstery of your car
has been designed to
withstand wear deriv-
ing from common use of the car.
You are however recommended
to avoid strong and/or contin-
uous scratching with clothing
accessories such as metallic
buckles, studs, Velcro fasten-
ings and the like, since these
items cause circumscribed stress
of the cover fabric that could
lead to yarn breaking, and dam-
age the cover as a consequence.
Moving the seat backwards
or forwards
Lift the lever A(on the inner side of the
seat) and push the seat forwards or
backwards: in the driving position the
arms should rest on the rim of the steer-
ing wheel.
A0E0020mfig. 31
Page 48 of 303
46
SAFETY
DEVICES
WARNING
LIGHTS AND
MESSAGES
IN AN
EMERGENCY
CAR
MAINTENANCE
TECHNICAL
SPECIFICATIONS
INDEX
CORRECT USE
OF THE CAR
DASHBOARD
AND
CONTROLS
Height adjustment
(where provided)
Move repeatedly lever Bupwards or
downwards to achieve the required
height.
IMPORTANTAdjustment must be car-
ried out only seated at the driver’s seat.
Back rest angle adjustment
Turn the knob Cuntil obtaining the re-
quired position.
Lumbar adjustment
(where provided)
Turn the knob Duntil obtaining the re-
quired position.
Once you have re-
leased the lever, check
that the seat is firmly locked
in the runners by trying to
move it back and forth. Failure
to lock the seat in place could
result in the seat moving sud-
denly and the driver losing
control of the car.
WARNING
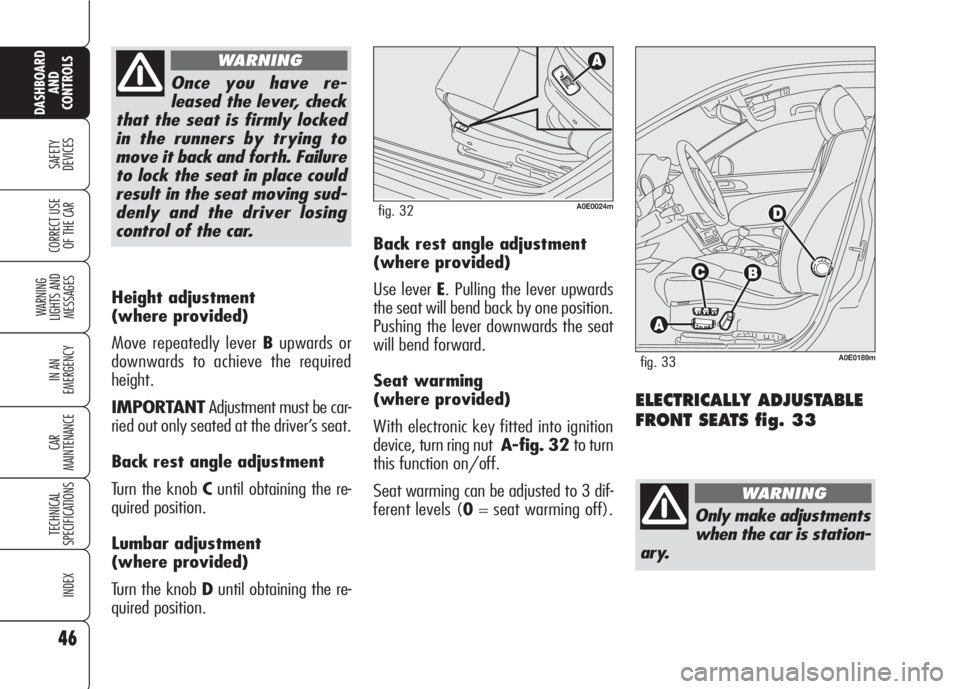
ELECTRICALLY ADJUSTABLE
FRONT SEATS fig. 33
Back rest angle adjustment
(where provided)
Use lever E. Pulling the lever upwards
the seat will bend back by one position.
Pushing the lever downwards the seat
will bend forward.
Seat warming
(where provided)
With electronic key fitted into ignition
device, turn ring nut A-fig. 32 to turn
this function on/off.
Seat warming can be adjusted to 3 dif-
ferent levels (0= seat warming off).
A0E0024mfig. 32
Only make adjustments
when the car is station-
ary.
WARNING
A0E0189mfig. 33
Page 49 of 303
47
SAFETY
DEVICES
WARNING
LIGHTS AND
MESSAGES
IN AN
EMERGENCY
CAR
MAINTENANCE
TECHNICAL
SPECIFICATIONS
INDEX
CORRECT USE
OF THE CAR
DASHBOARD
AND
CONTROLS
Seat controls are the
following:
Multifunction control A:
– front seat height adjustment;
– rear seat height adjustment;
– vertical seat movement;
– longitudinal seat movement;
B:Back rest angle adjustment;
C:Driver’s seat positions store buttons;
D:Lombar adjustment.
IMPORTANTSeat can only be ad-
justed when the electronic key is fitted
into the ignition device and for about 1
minute from removing it or after press-
ing button START/STOP. After open-
ing the door the seat can be adjusted for
about 3 minutes or until closing the
door.Storing driver’s seat/door
mirror positions
ButtonsCallows to store and recall three
different driver’s seat and door mirror po-
sitions. Storing and recalling are only pos-
sible with electronic key fitted into igni-
tion device.
Stored position can only be recalled for
about 3 minutes after opening the doors
and for about 1 minute after removing
the electronic key from the ignition de-
vice.
To store the required seat position, ad-
just it as required then press the button
corresponding to position to store for a
few seconds.
To recall the stored position, press briefly
the corresponding button.
Storing a new position will automatically
clear the one stored previously using the
same button.
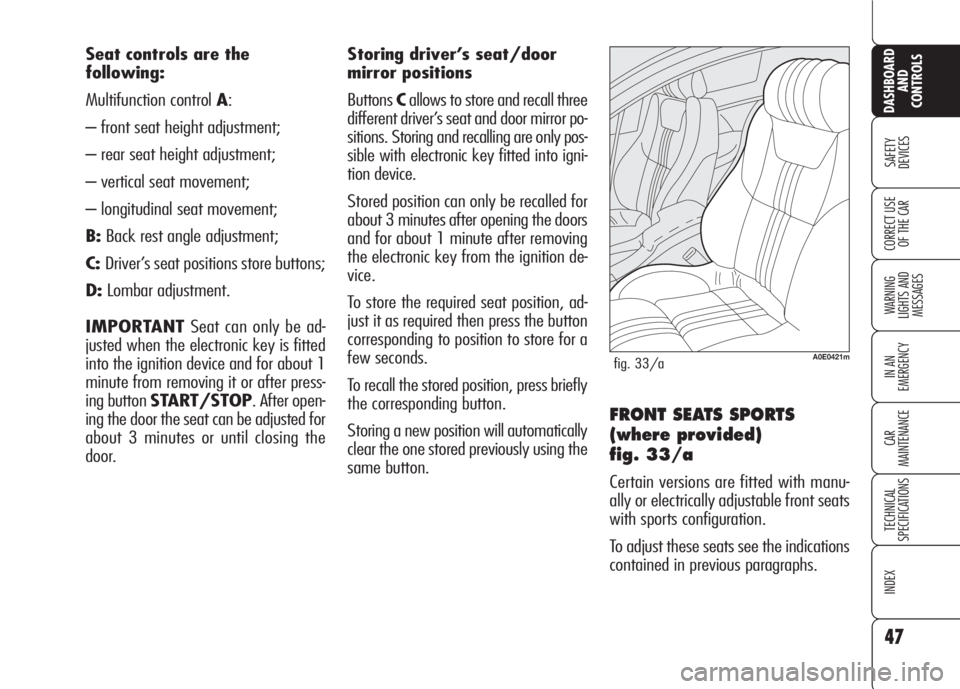
FRONT SEATS SPORTS
(where provided)
fig. 33/a
Certain versions are fitted with manu-
ally or electrically adjustable front seats
with sports configuration.
To adjust these seats see the indications
contained in previous paragraphs.
A0E0421mfig. 33/a
Page 50 of 303
48
SAFETY
DEVICES
WARNING
LIGHTS AND
MESSAGES
IN AN
EMERGENCY
CAR
MAINTENANCE
TECHNICAL
SPECIFICATIONS
INDEX
CORRECT USE
OF THE CAR
DASHBOARD
AND
CONTROLS
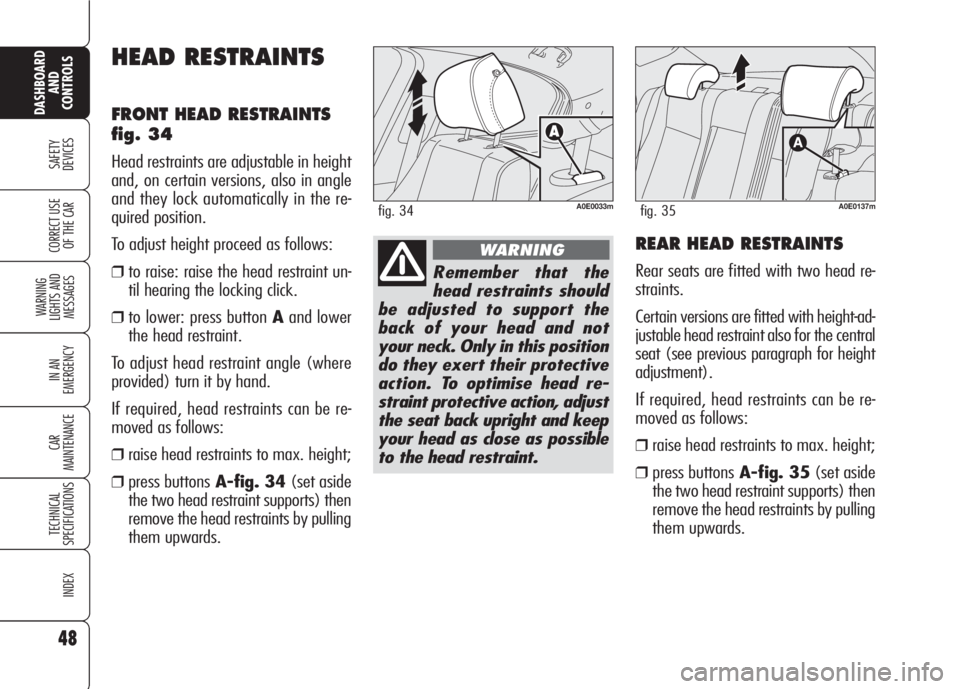
REAR HEAD RESTRAINTS
Rear seats are fitted with two head re-
straints.
Certain versions are fitted with height-ad-
justable head restraint also for the central
seat (see previous paragraph for height
adjustment).
If required, head restraints can be re-
moved as follows:
❒raise head restraints to max. height;
❒press buttonsA-fig. 35(set aside
the two head restraint supports) then
remove the head restraints by pulling
them upwards.
A0E0033mfig. 34
Remember that the
head restraints should
be adjusted to support the
back of your head and not
your neck. Only in this position
do they exert their protective
action. To optimise head re-
straint protective action, adjust
the seat back upright and keep
your head as close as possible
to the head restraint.
WARNING
A0E0137mfig. 35
HEAD RESTRAINTS
FRONT HEAD RESTRAINTS
fig. 34
Head restraints are adjustable in height
and, on certain versions, also in angle
and they lock automatically in the re-
quired position.
To adjust height proceed as follows:
❒to raise: raise the head restraint un-
til hearing the locking click.
❒to lower: press button Aand lower
the head restraint.
To adjust head restraint angle (where
provided) turn it by hand.
If required, head restraints can be re-
moved as follows:
❒raise head restraints to max. height;
❒press buttonsA-fig. 34(set aside
the two head restraint supports) then
remove the head restraints by pulling
them upwards.