tailgate Alfa Romeo 159 2008 Owner handbook (in English)
[x] Cancel search | Manufacturer: ALFA ROMEO, Model Year: 2008, Model line: 159, Model: Alfa Romeo 159 2008Pages: 303, PDF Size: 5.18 MB
Page 14 of 303
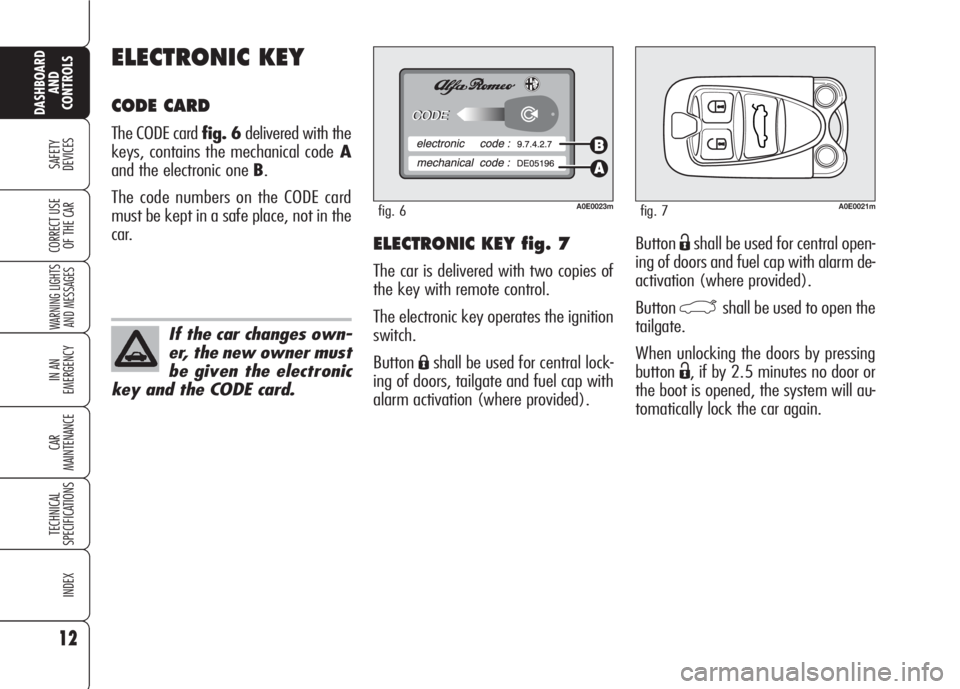
ButtonËshall be used for central open-
ing of doors and fuel cap with alarm de-
activation (where provided).
Button
`shall be used to open the
tailgate.
When unlocking the doors by pressing
button
Ë, if by 2.5 minutes no door or
the boot is opened, the system will au-
tomatically lock the car again.
ELECTRONIC KEY fig. 7
The car is delivered with two copies of
the key with remote control.
The electronic key operates the ignition
switch.
Button
Áshall be used for central lock-
ing of doors, tailgate and fuel cap with
alarm activation (where provided).
ELECTRONIC KEY
CODE CARD
The CODE card fig. 6delivered with the
keys, contains the mechanical codeA
and the electronic one B.
The code numbers on the CODE card
must be kept in a safe place, not in the
car.
12
SAFETY
DEVICES
WARNING LIGHTS
AND MESSAGES
IN AN
EMERGENCY
CAR
MAINTENANCE
TECHNICAL
SPECIFICATIONS
INDEX
DASHBOARD
AND
CONTROLS
CORRECT USE
OF THE CAR
A0E0023mfig. 6
If the car changes own-
er, the new owner must
be given the electronic
key and the CODE card.
A0E0021mfig. 7
Page 15 of 303
13
SAFETY
DEVICES
WARNING LIGHTS
AND MESSAGES
IN AN
EMERGENCY
CAR
MAINTENANCE
TECHNICAL
SPECIFICATIONS
INDEX
DASHBOARD
AND
CONTROLS
CORRECT USE
OF THE CAR
IMPORTANT Never expose the elec-
tronic key to direct sunlight: risk of dam-
ages.
IMPORTANTRemote control fre-
quency may be disturbed by radio trans-
missions outside the car (e.g. mobile
phones, hams, etc…). In this event re-
mote control may be failing.
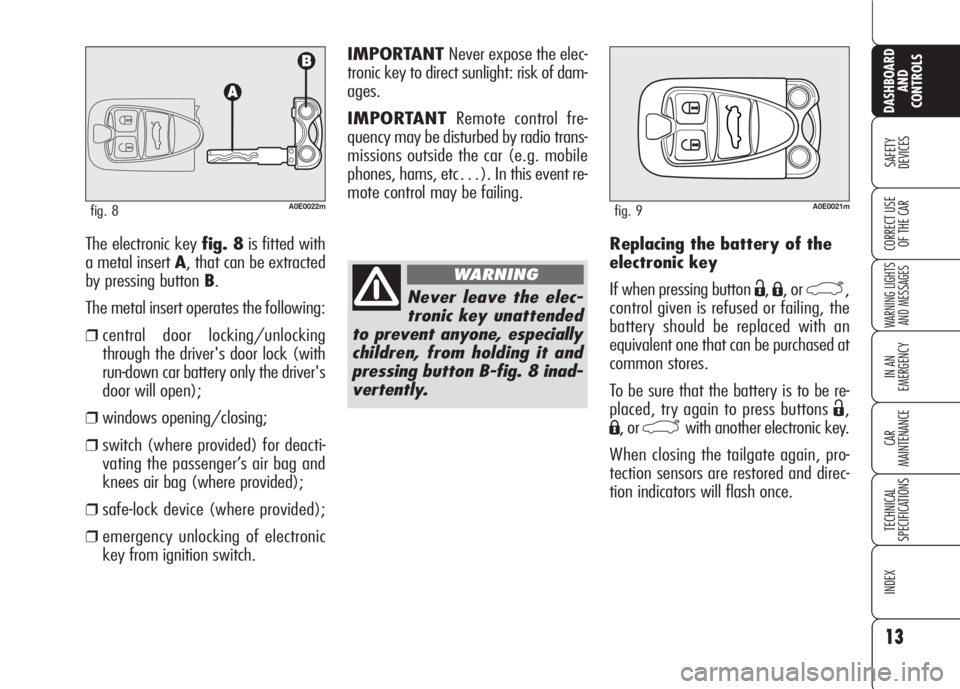
The electronic key fig. 8is fitted with
a metal insert A, that can be extracted
by pressing button B.
The metal insert operates the following:
❒central door locking/unlocking
through the driver's door lock (with
run-down car battery only the driver's
door will open);
❒windows opening/closing;
❒switch (where provided) for deacti-
vating the passenger’s air bag and
knees air bag (where provided);
❒safe-lock device (where provided);
❒emergency unlocking of electronic
key from ignition switch.Replacing the battery of the
electronic key
If when pressing button
Ë,Á, or `,
control given is refused or failing, the
battery should be replaced with an
equivalent one that can be purchased at
common stores.
To be sure that the battery is to be re-
placed, try again to press buttons
Ë,
Á, or `with another electronic key.
When closing the tailgate again, pro-
tection sensors are restored and direc-
tion indicators will flash once.
A0E0022mfig. 8
Never leave the elec-
tronic key unattended
to prevent anyone, especially
children, from holding it and
pressing button B-fig. 8 inad-
vertently.
WARNING
A0E0021mfig. 9
Page 18 of 303
16
SAFETY
DEVICES
WARNING LIGHTS
AND MESSAGES
IN AN
EMERGENCY
CAR
MAINTENANCE
TECHNICAL
SPECIFICATIONS
INDEX
DASHBOARD
AND
CONTROLS
CORRECT USE
OF THE CAR
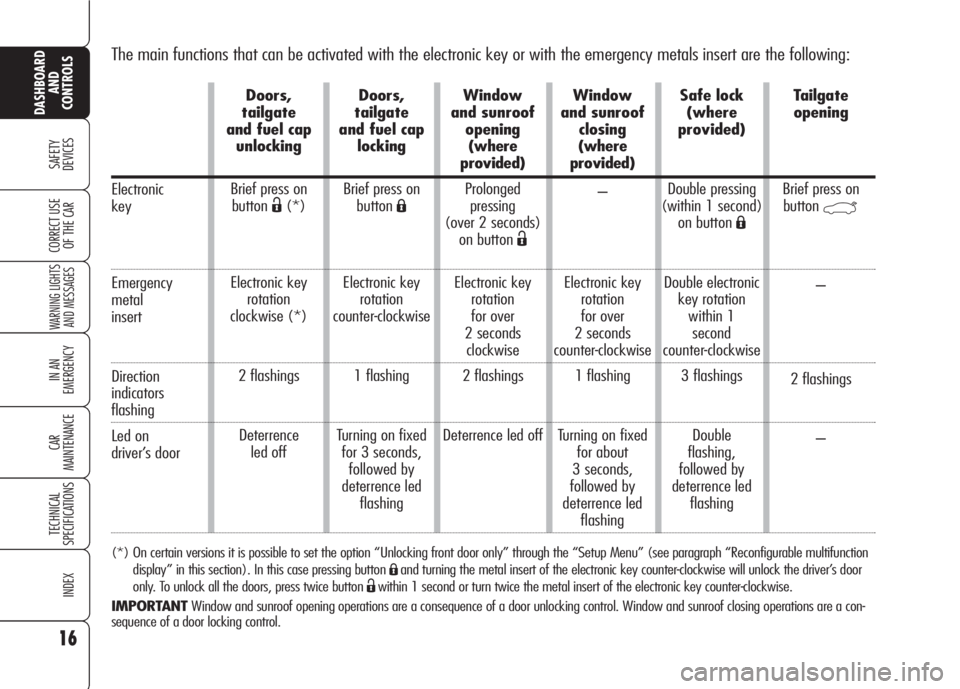
The main functions that can be activated with the electronic key or with the emergency metals insert are the following:
(*) On certain versions it is possible to set the option “Unlocking front door only” through the “Setup Menu” (see paragraph “Reconfigurable multifunction
display” in this section). In this case pressing button
Áand turning the metal insert of the electronic key counter-clockwise will unlock the driver’s door
only. To unlock all the doors, press twice button
Ëwithin 1 second or turn twice the metal insert of the electronic key counter-clockwise.
IMPORTANTWindow and sunroof opening operations are a consequence of a door unlocking control. Window and sunroof closing operations are a con-
sequence of a door locking control.
Electronic
key
Emergency
metal
insert
Direction
indicators
flashing
Led on
driver’s door
Doors,
tailgate
and fuel cap
unlocking
Brief press on
button
Ë(*)
Electronic key
rotation
clockwise (*)
2 flashings
Deterrence
led offDoors,
tailgate
and fuel cap
locking
Brief press on
buttonÁ
Electronic key
rotation
counter-clockwise
1 flashing
Turning on fixed
for 3 seconds,
followed by
deterrence led
flashingWindow
and sunroof
opening
(where
provided)
Prolonged
pressing
(over 2 seconds)
on button
Ë
Electronic key
rotation
for over
2 seconds
clockwise
2 flashings
Deterrence led offWindow
and sunroof
closing
(where
provided)
–
Electronic key
rotation
for over
2 seconds
counter-clockwise
1 flashing
Turning on fixed
for about
3 seconds,
followed by
deterrence led
flashingSafe lock
(where
provided)
Double pressing
(within 1 second)
on button
Á
Double electronic
key rotation
within 1
second
counter-clockwise
3 flashings
Double
flashing,
followed by
deterrence led
flashingTailgate
opening
Brief press on
button
`
–
2 flashings
–
Page 98 of 303

96
SAFETY
DEVICES
WARNING
LIGHTS AND
MESSAGES
IN AN
EMERGENCY
CAR
MAINTENANCE
TECHNICAL
SPECIFICATIONS
INDEX
CORRECT USE
OF THE CAR
DASHBOARD
AND
CONTROLS
With key removed the led will turn off
after about 2 minutes.
When doors are unlocked the led is off;
pressing the button will lock all the
doors. Central door locking will only take
place if all doors are perfectly closed.
DOORS
CENTRAL DOOR LOCKING/
UNLOCKING SYSTEM
Door locking from the outside
With the doors closed, press the elec-
tronic key button
Áor fit and turn the
metal insert (inside the key) into the
lock of the driver’s door. Central door
locking can only be activated if all the
doors are closed. If one or more doors
are open after pressing the electronic
key button
Áthe direction indicators and
the driver’s door led will flash fast for
about 3 seconds.
If one or more doors are open by turning
the metal insert of the electronic key, on-
ly the driver’s door led will flash fast for
about 3 seconds. If the doors are closed
but the tailgate is open, central locking
is actuated: the direction indicators (only
for locking performed by pressing button
Á) and the driver’s door led will flash fast
for about 3 seconds.
A0E0025mfig. 90
Through the “Setup menu” (or the Ra-
dionavigation system for certain versions)
it is possible to activate the function that
enables to unlock only the driver’s door
lock by pressing the electronic key button
Ë(see paragraph “Reconfigurable mul-
tifunction display” in this section).
With this function on (ON) it is howev-
er possible to unlock the other doors by
pressing button
q(fig. 90) set on the
central console.
Door unlocking from
the outside
Press the electronic key button
Ëor, fit
and turn the metal insert (inside the
key) into the lock of the driver’s door.
Door locking/unlocking from
the inside
Press button
q(fig. 90) to lock/un-
lock all the doors.
The button is provided with a circular led
indicating the car condition (doors
locked or unlocked). When doors are
locked the led is on: in this case press-
ing the button again will unlock all the
doors and will turn the led off.
Page 103 of 303
101
SAFETY
DEVICES
WARNING
LIGHTS AND
MESSAGES
IN AN
EMERGENCY
CAR
MAINTENANCE
TECHNICAL
SPECIFICATIONS
INDEX
CORRECT USE
OF THE CAR
DASHBOARD
AND
CONTROLS
On certain versions, improper boot
closing is indicated by the instrument
panel warning light
´, whereas on
other versions the symbol
Rand a
message are displayed (see section
“Warning lights and messages”).
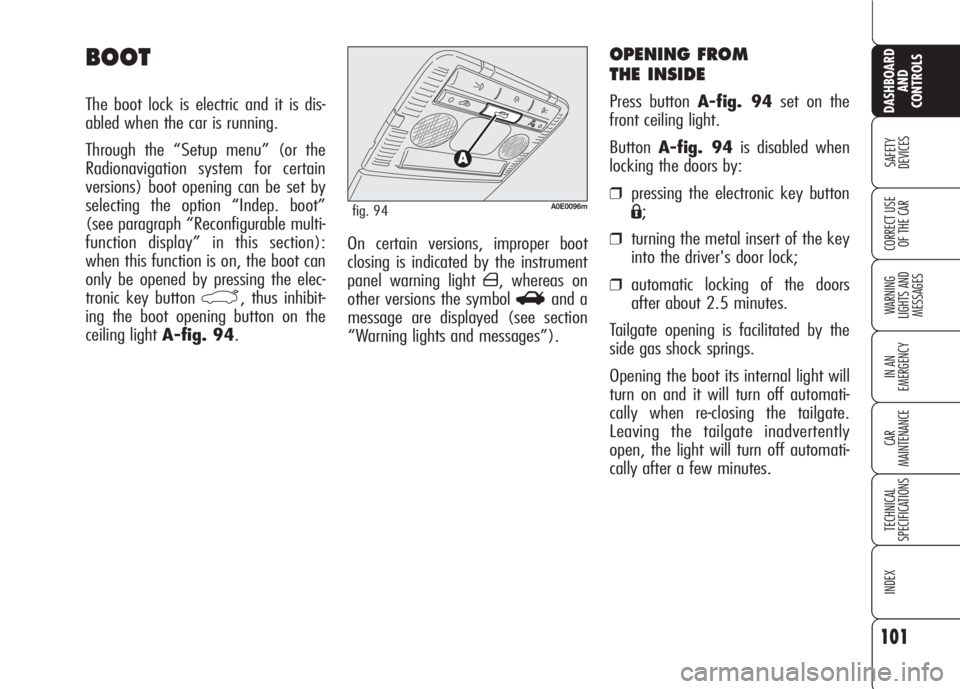
OPENING FROM
THE INSIDE
Press button A-fig. 94set on the
front ceiling light.
ButtonA-fig. 94is disabled when
locking the doors by:
❒pressing the electronic key button
Á;
❒turning the metal insert of the key
into the driver's door lock;
❒automatic locking of the doors
after about 2.5 minutes.
Tailgate opening is facilitated by the
side gas shock springs.
Opening the boot its internal light will
turn on and it will turn off automati-
cally when re-closing the tailgate.
Leaving the tailgate inadvertently
open, the light will turn off automati-
cally after a few minutes.
BOOT
The boot lock is electric and it is dis-
abled when the car is running.
Through the “Setup menu” (or the
Radionavigation system for certain
versions) boot opening can be set by
selecting the option “Indep. boot”
(see paragraph “Reconfigurable multi-
function display” in this section):
when this function is on, the boot can
only be opened by pressing the elec-
tronic key button
`, thus inhibit-
ing the boot opening button on the
ceiling light A-fig. 94.
A0E0096mfig. 94
Page 104 of 303
102
SAFETY
DEVICES
WARNING
LIGHTS AND
MESSAGES
IN AN
EMERGENCY
CAR
MAINTENANCE
TECHNICAL
SPECIFICATIONS
INDEX
CORRECT USE
OF THE CAR
DASHBOARD
AND
CONTROLS
OPENING BY REMOTE
CONTROL
Press the electronic key button `.
Opening is indicated by double flashing
of direction indicators.
Opening the boot with alarm (where
provided) on will cause the following:
❒volumetric protection deactivation;
❒anti-raising protection deactivation;
❒tailgate monitoring sensor.
Re-closing the tailgate will restore all the
above functions and direction indicators
will turn on for about 1 second. Emergency opening of the
boot from the passenger
compartment (foreseen only
on the 3-volume saloon
version)
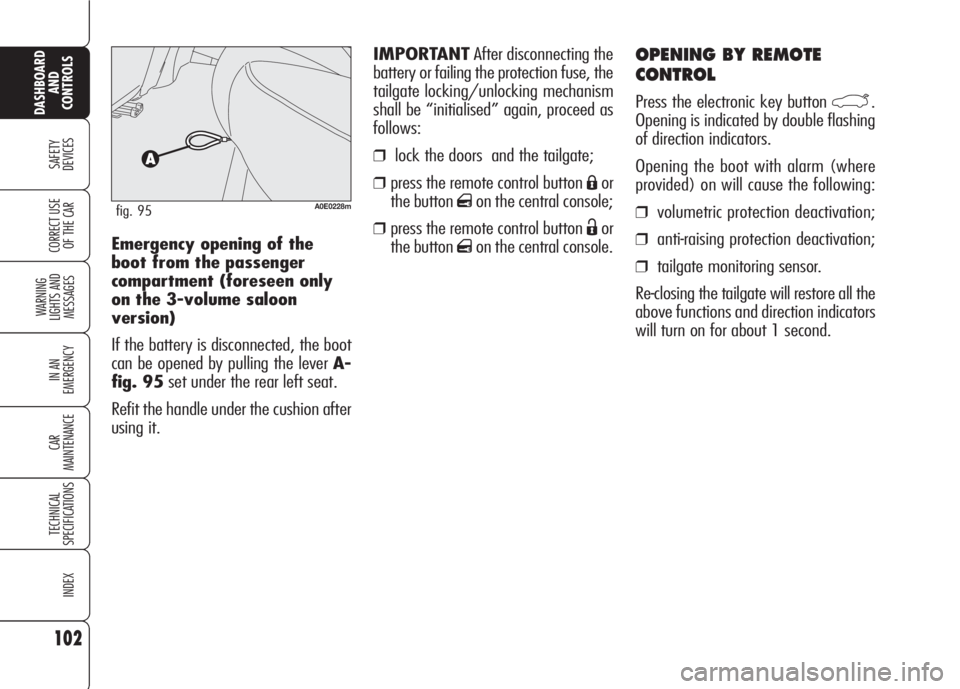
If the battery is disconnected, the boot
can be opened by pulling the lever A-
fig. 95set under the rear left seat.
Refit the handle under the cushion after
using it.
A0E0228mfig. 95
IMPORTANTAfter disconnecting the
battery or failing the protection fuse, the
tailgate locking/unlocking mechanism
shall be “initialised” again, proceed as
follows:
❒lock the doors and the tailgate;
❒press the remote control button Áor
the button
qon the central console;
❒press the remote control button Ëor
the button
qon the central console.
Page 105 of 303

103
SAFETY
DEVICES
WARNING
LIGHTS AND
MESSAGES
IN AN
EMERGENCY
CAR
MAINTENANCE
TECHNICAL
SPECIFICATIONS
INDEX
CORRECT USE
OF THE CAR
DASHBOARD
AND
CONTROLS
TAILGATE CLOSING
Lower the tailgate pressing the lock un-
til hearing the locking click.
IMPORTANT If the option for ”Indep.
boot” is on, before closing the boot,
check whether you have with you the
ignition key since the boot will be locked
automatically.
The addition of objects
(speakers, spoilers, etc.)
on the rear shelf or boot
lid, except those envisaged by
the manufacturer, may prevent
the gas filled struts at the sides
of the boot from working prop-
erly.
When using the boot,
make sure the loads do
not exceed the permitted
weight (see “Technical specifi-
cations” chapter). Also make
sure the items in the boot are
arranged properly to prevent
them being thrown forwards
and injuring passengers should
you brake sharply.
WARNING
Never travel with ob-
jects on the rear shelf
to prevent them being thrown
forwards and injuring passen-
gers in case of accident or
sharp braking.
WARNING
EXTENDING THE BOOT
(where provided)
To extend the boot proceed as follows:
❒remove rear head restraints;
❒turn head restraints by 180° and fit
them into their seat;
❒move aside the seat belt, check that
it is not twisted;
❒lift seat back lever A-fig. 96 and
tilt the seat back forward. Lever rais-
ing is indicated by a “red band” B.
A0E0085mfig. 96
Page 204 of 303

202
SAFETY
DEVICES
WARNING
LIGHTS AND
MESSAGES
CAR
MAINTENANCE
TECHNICAL
SPECIFICATIONS
INDEX
CORRECT USE
OF THE CAR
DASHBOARD
AND
CONTROLS
IN AN
EMERGENCY
Reversing light/rear fog
lights
To replace the bulbs proceed as follows:
❒open the tailgate;
❒turn deviceA-fig. 33 to open lid
B;
❒lower the lid and remove the bulb
holder unit by pressing the retaining tabs
C-fig. 34;
❒remove and replace the burnt-out
bulb by pressing it slightly and turn-
ing it counterclockwise fig. 35:
D:reversing light bulb on passenger
side (or right side);
D:reversing light bulb on driver side (or
left side)
❒refit the bulb holder unit securing it
properly using the retaining tabs C-
fig. 34;
❒close lidB-fig. 33.
REAR LIGHT UNITS
Rear light units contain: reversing light,
rear fog light, direction indicators, tail-
lights, number plate lights, brake light
and third brake light bulbs.
A0E0165mfig. 33A0E0166mfig. 34A0E0167mfig. 35
Page 205 of 303

203
SAFETY
DEVICES
WARNING
LIGHTS AND
MESSAGES
CAR
MAINTENANCE
TECHNICAL
SPECIFICATIONS
INDEX
CORRECT USE
OF THE CAR
DASHBOARD
AND
CONTROLS
IN AN
EMERGENCY
Direction indicators/
Taillights/Brake lights
To replace the bulbs proceed as follows:
❒open the tailgate;
❒loosen screw A-fig. 37and remove
the protection cover B;
❒remove the bulb holder unit C-
fig. 38by pressing the retaining
tabsD.
A0E0170mfig. 37
Taillight bulb on tailgate
To replace the bulbs proceed as follows:
❒open the tailgate;
❒turn deviceA-fig. 33 to open lid
B;
❒lower the lid and remove the bulb
holder unit by pressing the retaining
tabsC-fig. 34;
A0E0229mfig. 36
❒remove and replace the burnt-out
bulb by pressing it slightly and turn-
ing it counterclockwisefig. 36:
D: taillight bulb on right/left headlight
❒refit the bulb holder unit securing it
properly using the retaining tabs C-
fig. 34;
❒close lidB-fig. 33.
A0E0040mfig. 38
Page 210 of 303

208
SAFETY
DEVICES
WARNING
LIGHTS AND
MESSAGES
CAR
MAINTENANCE
TECHNICAL
SPECIFICATIONS
INDEX
CORRECT USE
OF THE CAR
DASHBOARD
AND
CONTROLS
IN AN
EMERGENCY
BOOT LIGHT
To change the bulb, proceed as follows:
❒open the tailgate;
❒remove the light unit A-fig. 50lev-
ering in the point shown by the ar-
row;
❒open the protection cover B-fig. 51
and replace the bulb releasing it from
the side contacts making sure that
the new bulb is correctly clamped be-
tween the contacts;
❒re-close the protective cover B;
❒refit the light unit inserting first one
side and then the other one until
hearing the locking click.
❒close protection B-fig. 53on light
unitA-fig. 52;
❒refit the light unit inserting first one
side and then the other one until
hearing the locking click.
A0E0205mfig. 50A0E0075mfig. 52A0E0204mfig. 51
PUDDLE LIGHT
To change the bulb, proceed as follows:
❒open the door and remove lens A-
fig. 52levering in the point shown
by the arrow;
❒raise protectionB-fig. 53and re-
place the snap-fitted bulb;
A0E0235mfig. 53