Alfa Romeo Brera/Spider 2010 Owner handbook (in English)
Manufacturer: ALFA ROMEO, Model Year: 2010, Model line: Brera/Spider, Model: Alfa Romeo Brera/Spider 2010Pages: 271, PDF Size: 4.45 MB
Page 21 of 271

19
SAFETY
DEVICES
WARNING
LIGHTS AND
MESSAGES
IN AN
EMERGENCY
CAR
MAINTENANCE
TECHNICAL
SPECIFICATIONS
INDEX
DASHBOARD
AND
CONTROLS
CORRECT USE
OF THE CAR
IGNITION DEVICE
The ignition device is located on the
dashboard and it consists of the fol-
lowing:
❒electronic key reading device
A-fig. 13(set near the steering
wheel);
❒buttonSTART/STOP(set under
the electronic key reading device).
IMPORTANTTo prevent running
down the battery do not leave the elec-
tronic key into the ignition device when
the engine is off.
HOW TO CUT OFF THE
ALARM SYSTEM
To deactivate the alarm system com-
pletely (for instance during prolonged
inactivity of the car) simply lock the car
by rotating the metal insert (provided
inside the electronic key) into the dri-
ver’s door lock.
MINISTERIAL
HOMOLOGATION
In keeping with the laws in force in each
country on the subject of radio fre-
quency, for markets in which the trans-
mitter needs to be marked the certifi-
cation number is given on the compo-
nent. For certain versions/markets, the
code may also be marked on the trans-
mitter and/or on the receiver.
A0F0219mfig. 13
If the ignition device is
tampered with (for ex-
ample during an attempted
break-in) have it checked over
by Alfa Romeo Authorized
Services before travelling
again.
WARNING
When leaving the car
always remove the
electronic key from the ignition
device to prevent any passen-
ger in the car from inadver-
tently activating the controls.
Remember to engage the
handbrake and if the car is fac-
ing uphill, first gear and if the
car is facing downhill, reverse.
Never leave children unat-
tended in the car.
WARNING
Page 22 of 271
20
SAFETY
DEVICES
WARNING
LIGHTS AND
MESSAGES
IN AN
EMERGENCY
CAR
MAINTENANCE
TECHNICAL
SPECIFICATIONS
INDEX
DASHBOARD
AND
CONTROLS
CORRECT USE
OF THE CAR
TURNING THE INSTRUMENT
PANEL OFF
With the engine off and brake and clutch
pedal released, press button
START/STOPor take the electronic
key out of the ignition device.
Few seconds after the instrument pan-
el will gradually turn off.
IMPORTANTIf when removing the
electronic key from the ignition device
the instrument panel stays on, contact
Alfa Romeo Authorized Services.
TURNING THE INSTRUMENT
PANEL ON
Proceed as follows:
❒fit the electronic key into the ignition
device;
❒if the electronic key is fitted yet,
press button START/STOPwith-
out pressing the clutch or brake ped-
al.
To safeguard the battery, when leaving
the car with the instrument panel on,
electric and electronic devices will be de-
activated after approx. 1 hour.
IMPORTANT Fit the electronic key in-
to the ignition device completely until
it locks into place.
IMPORTANTIf when fitting the elec-
tronic key into the ignition device the in-
strument panel stays off, contact Alfa
Romeo Authorized Services.
IMPORTANTIf when fitting the elec-
tronic key into the ignition device, sym-
bol
Yis displayed (on certain versions
together with a message) check
whether the electronic key is the prop-
er one and then try to refit it into the
ignition device. If the problem persists
contact Alfa Romeo Authorized Services.
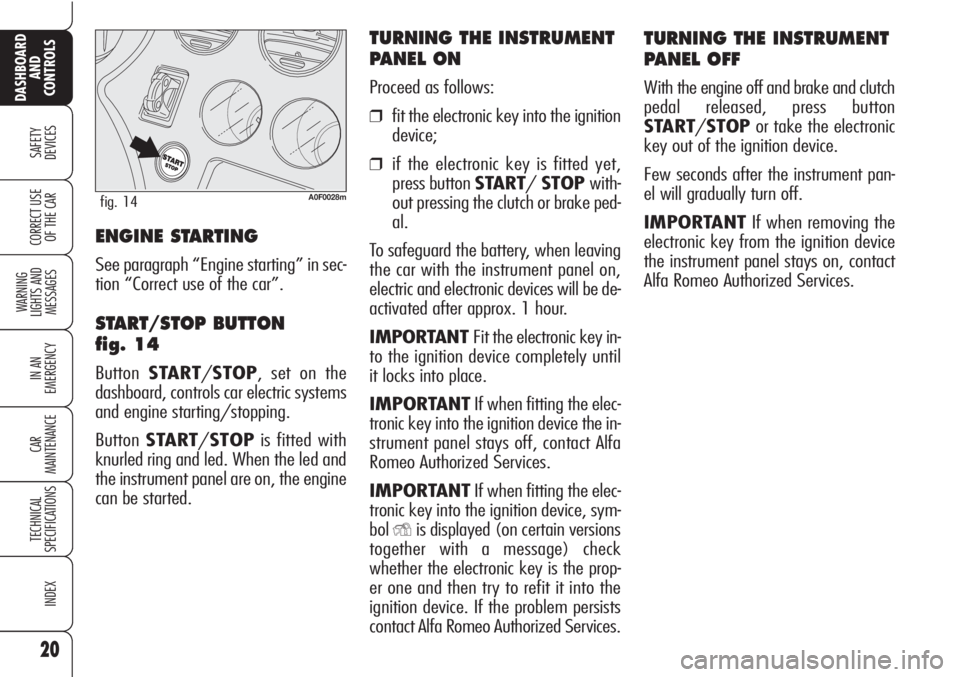
A0F0028mfig. 14
ENGINE STARTING
See paragraph “Engine starting” in sec-
tion “Correct use of the car”.
START/STOP BUTTON
fig. 14
ButtonSTART/STOP, set on the
dashboard, controls car electric systems
and engine starting/stopping.
ButtonSTART/STOPis fitted with
knurled ring and led. When the led and
the instrument panel are on, the engine
can be started.
Page 23 of 271
21
SAFETY
DEVICES
WARNING
LIGHTS AND
MESSAGES
IN AN
EMERGENCY
CAR
MAINTENANCE
TECHNICAL
SPECIFICATIONS
INDEX
DASHBOARD
AND
CONTROLS
CORRECT USE
OF THE CAR
It is absolutely forbidden
to carry out whatever
after-market operation involv-
ing steering system or steering
column modifications (e.g.: in-
stallation of anti-theft device)
that could badly affect perfor-
mance and safety, cause the
lapse of warranty and also re-
sult in non-compliance of the car
with homologation require-
ments.
WARNING
Disengaging
The steering column lock will disengage
after fitting the electronic key into the
ignition device.
IMPORTANTSwitching the engine off
when the car is running will not engage
the steering column lock till next switch-
ing off of the engine with car stopped. In
this event a dedicated message will be dis-
played.
IMPORTANTSteering column lock fail-
ure is indicated by symbol + message on
the display. In this event contact Alfa
Romeo Authorized Services.STEERING COLUMN LOCK
Engaging
The steering column lock will engage
5 seconds after removing the electron-
ic key from the ignition device and if the
following conditions are present:
❒engine off;
❒ instrument panel off with car at a
standstill;
❒electronic key removed from ignition
device.IMPORTANTIf after turning the in-
strument panel on and/or starting the en-
gine, the display shows the message “Car
protection system not available”, repeat
the operation using the moving the steer-
ing wheel to facilitate steering column un-
locking. Displaying of the warning mes-
sage will not impair steering column lock
regular operation.
Page 24 of 271

22
SAFETY
DEVICES
WARNING
LIGHTS AND
MESSAGES
IN AN
EMERGENCY
CAR
MAINTENANCE
TECHNICAL
SPECIFICATIONS
INDEX
DASHBOARD
AND
CONTROLS
CORRECT USE
OF THE CAR
FUEL GAUGE fig. 15
The pointer shows the amount of fuel
left in the tank.
0- tank empty.
1- tank full (see the indications given
in paragraph “At the filling station").
The fuel gauge warning light turns on to
indicate that approx. 10 litres of fuel are
left in the tank. When range falls below
50 km (or 31 mi) the display will show
a dedicated warning message.
If warning light Kstarts
flashing when travel-
ling, contact Alfa Romeo
Authorized Services.
A0F00177mfig. 15
INSTRUMENTS
REV. COUNTER
Rev counter shows engine rpm. The dan-
ger zone (red) indicates excessive high
engine revs. Do not drive for long peri-
ods with the pointer in this area.
IMPORTANTThe electronic injection
control system gradually shuts off the
flow of fuel when the engine is “over-
revving” (rev counter pointer in red
area) resulting in a gradual loss of en-
gine power, in order to bring back rpm
below the safety limit.The rev counter may, when the engine is
idling, indicate gradual or sudden increase
of engine revs as the case may be; such
behaviour is normal and must not be in-
terpreted as a faulty condition as it occurs
during normal operation, for instance when
climate control or electric fan are switched
on. In particular, slow revs variation helps
keep the battery charged.
Page 25 of 271

23
SAFETY
DEVICES
WARNING
LIGHTS AND
MESSAGES
IN AN
EMERGENCY
CAR
MAINTENANCE
TECHNICAL
SPECIFICATIONS
INDEX
DASHBOARD
AND
CONTROLS
CORRECT USE
OF THE CAR
IMPORTANTUnder certain conditions
(heavy slopes, for instance), the reading
on the gauge may differ from the actual
amount of fuel in the tank and changes
in level may be indicated late. This con-
dition falls within the regular operating log-
ics of the fuel gauge.The turning on of the warning light u
(together with a message on the dis-
play) indicates that the coolant fluid
temperature is too high; in this case,
stop the engine and contact Alfa Romeo
Authorized Services.
IMPORTANTThe temperature of the
engine coolant may rise towards the
maximum values (red sector) when the
car is driven at low speeds, uphill, fully
laden or during towing, especially if the
ambient temperature is high.
A0F0178mfig. 16
ENGINE COOLANT
TEMPERATURE GAUGE
fig. 16
This shows the temperature of the en-
gine coolant fluid and begins working
when the fluid temperature exceeds ap-
prox. 50°C.
The pointer should normally be towards
the middle of the scale. If the pointer
reaches the red sector, reduce your de-
mand on the engine.
Page 26 of 271

24
SAFETY
DEVICES
WARNING
LIGHTS AND
MESSAGES
IN AN
EMERGENCY
CAR
MAINTENANCE
TECHNICAL
SPECIFICATIONS
INDEX
DASHBOARD
AND
CONTROLS
CORRECT USE
OF THE CARENGINE OIL TEMPERATURE
GAUGE
(petrol versions except
1750 TURBO BENZINA)
fig. 17
This shows the temperature of the en-
gine oil and begins working when the
oil temperature exceeds approx. 70
°C.
If the pointer reaches the red sector, re-
duce your demand on the engine.
A0F0179mfig. 17
The turning on of the warning light `
when travelling (together with a mes-
sage on the display) indicates that the
oil temperature is too high; in this case,
stop the engine and contact Alfa Romeo
Authorized Services.
IMPORTANTThe temperature of the
engine oil may rise towards the maxi-
mum values (red sector) when the car
is driven at low speeds, uphill, fully
laden or during towing, especially if the
ambient temperature is high.
A0F0180mfig. 18
TURBOCHARGER PRESSURE
GAUGE (1750 TURBO
BENZINA and diesel
versions) fig. 18
This shows the turbocharger pressure
value.
Page 27 of 271
25
SAFETY
DEVICES
WARNING
LIGHTS AND
MESSAGES
IN AN
EMERGENCY
CAR
MAINTENANCE
TECHNICAL
SPECIFICATIONS
INDEX
DASHBOARD
AND
CONTROLS
CORRECT USE
OF THE CAR
AUTOMATIC INSTRUMENT
PANEL LIGHT DIMMER
To give max. visibility and comfort un-
der whatever driving conditions (e.g.:
lights on in daylight, tunnels, etc…), the
speedometer is fitted with a sensor for
adjusting automatically, after fitting the
electronic key into the ignition device and
pressing button START/STOP, the
light intensity of the instrument panel dis-
play, sound system display, climate con-
trol system display, radionavigation sys-
tem display (for versions/markets,
where provided), and instruments (i.e.:
fuel level gauge, engine oil temperature
gauge for petrol versions or turbocharg-
er pressure gauge for diesel versions, and
engine coolant temperature gauge).
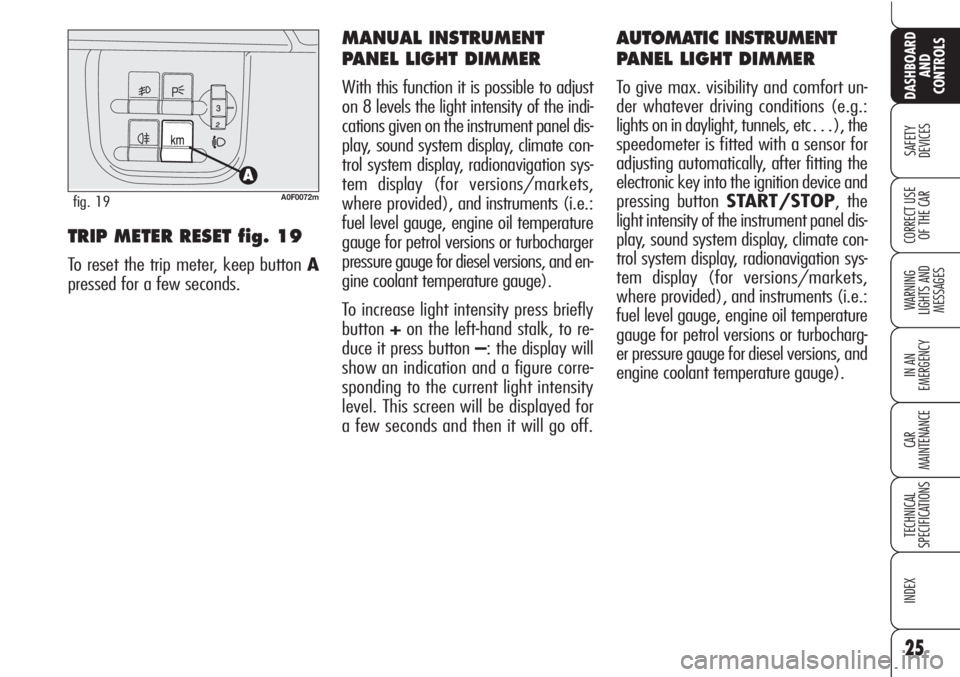
TRIP METER RESET fig. 19
To reset the trip meter, keep button A
pressed for a few seconds.
MANUAL INSTRUMENT
PANEL LIGHT DIMMER
With this function it is possible to adjust
on 8 levels the light intensity of the indi-
cations given on the instrument panel dis-
play, sound system display, climate con-
trol system display, radionavigation sys-
tem display (for versions/markets,
where provided), and instruments (i.e.:
fuel level gauge, engine oil temperature
gauge for petrol versions or turbocharger
pressure gauge for diesel versions, and en-
gine coolant temperature gauge).
To increase light intensity press briefly
button+on the left-hand stalk, to re-
duce it press button –: the display will
show an indication and a figure corre-
sponding to the current light intensity
level. This screen will be displayed for
a few seconds and then it will go off.
A0F0072mfig. 19
Page 28 of 271
26
SAFETY
DEVICES
WARNING
LIGHTS AND
MESSAGES
IN AN
EMERGENCY
CAR
MAINTENANCE
TECHNICAL
SPECIFICATIONS
INDEX
DASHBOARD
AND
CONTROLS
CORRECT USE
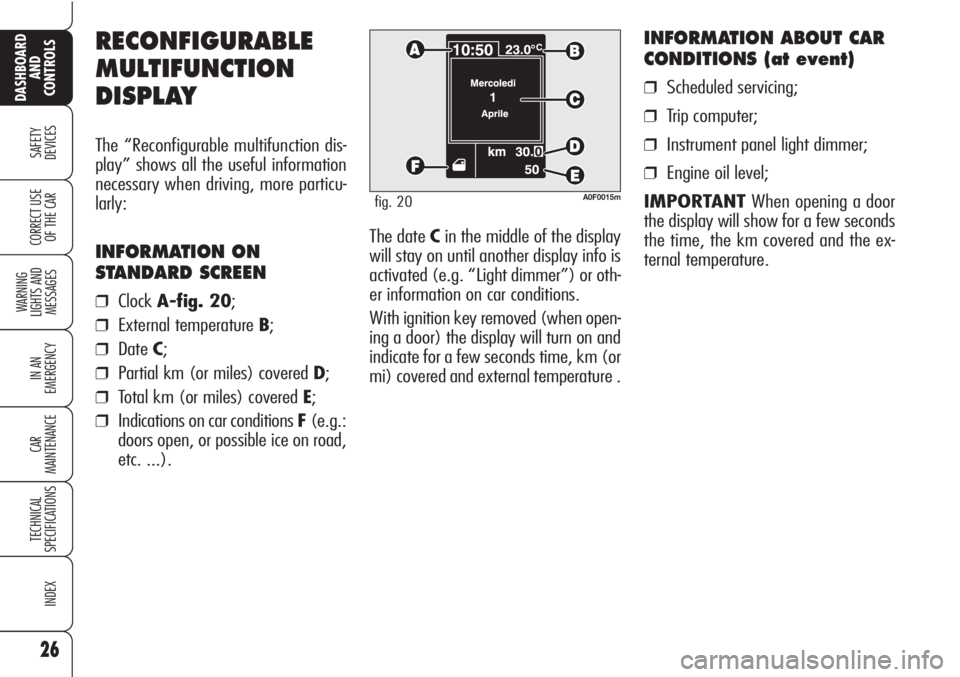
OF THE CARThe date Cin the middle of the display
will stay on until another display info is
activated (e.g. “Light dimmer”) or oth-
er information on car conditions.
With ignition key removed (when open-
ing a door) the display will turn on and
indicate for a few seconds time, km (or
mi) covered and external temperature .
INFORMATION ABOUT CAR
CONDITIONS (at event)
❒Scheduled servicing;
❒Trip computer;
❒Instrument panel light dimmer;
❒Engine oil level;
IMPORTANTWhen opening a door
the display will show for a few seconds
the time, the km covered and the ex-
ternal temperature.
RECONFIGURABLE
MULTIFUNCTION
DISPLAY
The “Reconfigurable multifunction dis-
play” shows all the useful information
necessary when driving, more particu-
larly:
INFORMATION ON
STANDARD SCREEN
❒ClockA-fig. 20;
❒External temperature B;
❒DateC;
❒Partial km (or miles) covered D;
❒Total km (or miles) covered E;
❒Indications on car conditions F(e.g.:
doors open, or possible ice on road,
etc. ...).
A0F0015mfig. 20
Page 29 of 271
27
SAFETY
DEVICES
WARNING
LIGHTS AND
MESSAGES
IN AN
EMERGENCY
CAR
MAINTENANCE
TECHNICAL
SPECIFICATIONS
INDEX
DASHBOARD
AND
CONTROLS
CORRECT USE
OF THE CAR
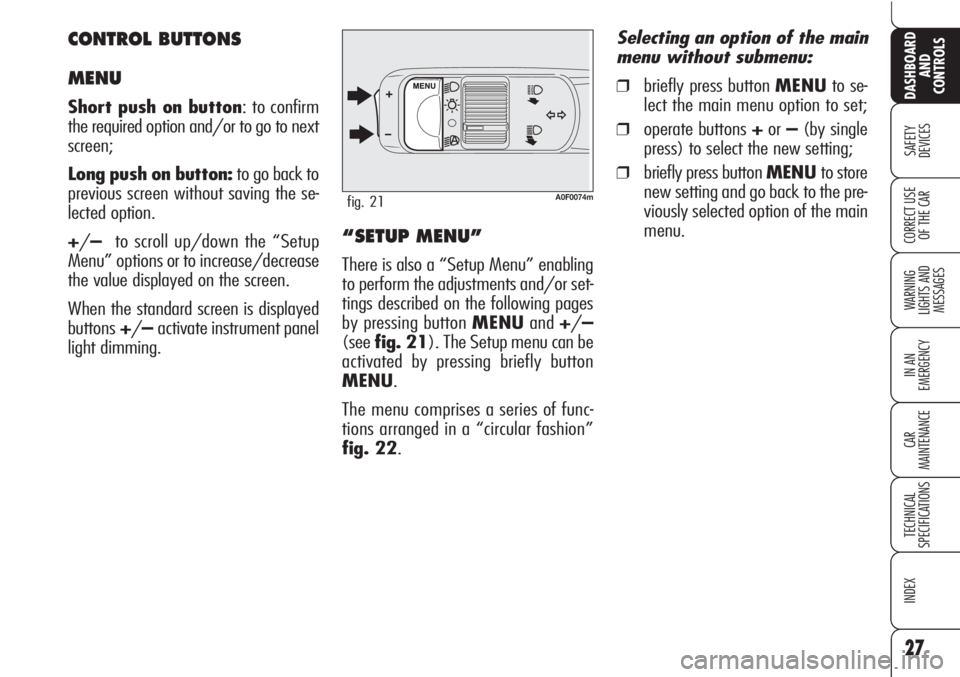
A0F0074mfig. 21
“SETUP MENU”
There is also a “Setup Menu” enabling
to perform the adjustments and/or set-
tings described on the following pages
by pressing button MENUand+/–
(seefig. 21). The Setup menu can be
activated by pressing briefly button
MENU.
The menu comprises a series of func-
tions arranged in a “circular fashion”
fig. 22.
Selecting an option of the main
menu without submenu:
❒briefly press button MENUto se-
lect the main menu option to set;
❒operate buttons +or–(by single
press) to select the new setting;
❒briefly press button MENUto store
new setting and go back to the pre-
viously selected option of the main
menu.
CONTROL BUTTONS
MENU
Short push on button: to confirm
the required option and/or to go to next
screen;
Long push on button:to go back to
previous screen without saving the se-
lected option.
+/–to scroll up/down the “Setup
Menu” options or to increase/decrease
the value displayed on the screen.
When the standard screen is displayed
buttons+/–activate instrument panel
light dimming.
Page 30 of 271
28
SAFETY
DEVICES
WARNING
LIGHTS AND
MESSAGES
IN AN
EMERGENCY
CAR
MAINTENANCE
TECHNICAL
SPECIFICATIONS
INDEX
DASHBOARD
AND
CONTROLS
CORRECT USE
OF THE CAR
Selecting “Date” and “Clock”:
❒briefly press button MENUto select
the first value to change (e.g. hours
/minutes or year /month /day);
❒operate buttons +or–(by single
press) to select the new setting;
❒briefly press button MENUto store
new setting and go back to the pre-
viously selected option of the main
menu, if this is the last one you will
go back to the previously selected
option of the main menu.
ENGINE OIL
LEVEL INDICATION
Fitting the electronic key into the igni-
tion device, the display will show for a
few seconds the engine oil level. At this
stage, to clear this indication and to go
to next screen, press button MENU.
Low/excessive oil level will be indicat-
ed by a dedicated warning message on
the display.
IMPORTANT Check the proper en-
gine oil level on the dipstick (see para-
graph “Checking levels” in section “Car
maintenance”).
IMPORTANTProper engine oil level
shall be checked with the car on level
ground.
IMPORTANTFor proper oil level in-
dication, after fitting the key, wait for
about 2 seconds before starting the en-
gine.
IMPORTANTEngine oil level could in-
crease after a long stop.
Selecting an option of the main
menu with submenu:
❒briefly press button MENUto dis-
play the first submenu option;
❒operate buttons +or–(by single
press) to scroll all submenu options;
❒briefly press button MENUto select
the displayed submenu option and
to enter the corresponding setup
menu;
❒ operate buttons +or–(by single
press) to select the new setting of this
submenu option;
❒ briefly press button MENUto store
the new setting and go back to the
previously selected submenu option.