ALFA ROMEO GIULIA 2021 Service Manual
Manufacturer: ALFA ROMEO, Model Year: 2021, Model line: GIULIA, Model: ALFA ROMEO GIULIA 2021Pages: 284, PDF Size: 8.87 MB
Page 41 of 284
39
To operate HomeLink®, push and release any
of the programmed HomeLink® buttons.
These buttons will activate the devices they
are programmed to with each press of the
corresponding HomeLink® button.
The HomeLink® indicator light is located
above the center button
Ú
page 273.
Before You Begin Programming
HomeLink®
For efficient programming and accurate trans -
mission of the radio-frequency signal, it is
recommended that a new battery be placed in
the hand-held transmitter of the device that is
being programmed to the HomeLink® system.
Make sure your hand-held transmitter is
programmed to activate the device you are
trying to program your HomeLink® button to.
Ensure that your vehicle is parked outside of
the garage before you begin programming.
It is recommended that you erase all the chan -
nels of your HomeLink® before you use it for
the first time.
Erasing All The HomeLink® Channels
To erase the channels, follow this procedure:
1. Place the ignition switch into the ON/RUN position.
2. Push and hold the two outside HomeLink® buttons (I and III) for up to 20 seconds, or
until the HomeLink® indicator light flashes. NOTE:
Erasing all channels should only be performed
when programming HomeLink® for the first
time. Do not erase channels when program
-
ming additional buttons.
Identifying Whether You Have A Rolling
Code Or Non-Rolling Code Device
Before programming a device to one of your
HomeLink® buttons, determine whether the
device has a rolling code or non-rolling code.
Rolling Code Devices
To determine if your device has a rolling code,
a good indicator is its manufacturing date.
Typically, devices manufactured after 1995
have rolling codes. A device with a rolling code
will also have a “LEARN” or “TRAIN” button
located where the antenna is attached to the
device. The button may not be immediately
visible when looking at the device. The name
and color of the button may vary slightly by
manufacturer.
NOTE:
The “LEARN” or “TRAIN” button is not the
button you normally use to operate the device.
Non-rolling Code Devices
Most devices manufactured before 1995 will
not have a rolling code. These devices will also
not have a “LEARN” or “TRAIN” button.
Programming HomeLink® To A Garage
Door Opener
To program any of the HomeLink® buttons to
activate your garage door opener motor, follow
the steps below:
NOTE:
All HomeLink® buttons are programmed using
this procedure. You do not need to erase all
channels when programming additional buttons.
1. Place the ignition switch into the ON/RUN position.
2. Place the garage door opener transmitter 1 to 3 inches (3 to 8 cm) away from the
HomeLink® button you wish to program,
while keeping the HomeLink® indicator
light in view.
3. Push and hold the HomeLink® button you want to program while you push and hold
the garage door opener transmitter button
you are trying to replicate.
4. Continue to hold both buttons and observe the HomeLink® indicator light. The
HomeLink® indicator light will flash slowly
and then rapidly. Once this happens,
release both buttons.
NOTE:
Make sure the garage door opener motor is
plugged in before moving on to the rolling
code/non-rolling code final steps.
21_GA_OM_EN_USC_t.book Page 39
Page 42 of 284
GETTING TO KNOW YOUR VEHICLE
40
Rolling Code Garage Door Opener Final Steps
NOTE:
You have 30 seconds in which to initiate rolling
code final step 2, after completing rolling code
final step 1.
1. At the garage door opener motor (in thegarage), locate the “LEARN” or “TRAIN”
button. This can usually be found where
the hanging antenna wire is attached to
the garage door opener motor. Firmly push
and release the “LEARN” or “TRAIN”
button.
2. Return to the vehicle and push the programmed HomeLink® button three
times (holding the button for two seconds
each time). If the garage door opener
motor operates, programming is complete.
3. Push the programmed HomeLink® button to confirm that the garage door opener
motor operates. If the garage door opener
motor does not operate, repeat the final
steps for the rolling code procedure. Non-Rolling Code Garage Door Opener Final
Steps
1. Push and hold the programmed HomeLink®
button and observe the HomeLink®
indicator light. If the HomeLink® indicator
light stays on constantly, programming is
complete.
2. Push the programmed HomeLink® button to confirm that the garage door opener
motor operates. If the garage door opener
motor does not operate, repeat the steps
from the beginning.Programming HomeLink® To A
Miscellaneous Device
Follow the procedure on programming
HomeLink® to a garage door opener
Ú
page 39.
Be sure to determine if the device has a rolling
code, or non-rolling code before beginning the
programming process.
NOTE:
Canadian radio frequency laws require trans -
mitter signals to time-out (or quit) after several
seconds of transmission, which may not be
long enough for HomeLink® to pick up the
signal during programming. Similar to this
Canadian law, some U.S. gate operators are
designed to time-out in the same manner. The
procedure may need to be performed multiple
times to successfully pair the device to your
HomeLink® buttons.
Reprogramming A Single HomeLink®
Button
To reprogram a single HomeLink® button that
has been previously trained, without erasing
all the channels, follow the procedure below.
Be sure to determine whether the new device
you want to program the HomeLink® button to
has a Rolling Code, or Non-rolling Code.
WARNING!
Your motorized door or gate will open and
close while you are programming the
universal transceiver. Do not program the
transceiver if people or pets are in the
path of the door or gate.
Do not run your vehicle in a closed garage or
confined area while programming the trans -
ceiver. Exhaust gas from your vehicle
contains Carbon Monoxide (CO) which is
odorless and colorless. Carbon Monoxide is
poisonous when inhaled and can cause you
and others to be severely injured or killed.
21_GA_OM_EN_USC_t.book Page 40
Page 43 of 284

41
1. Place the ignition in the ON/RUN position,without starting the engine.
2. Push and hold the desired HomeLink® button until the HomeLink® Indicator light
begins to flash after 20 seconds. Do not
release the button.
3. Without releasing the button , proceed with
Step 2 in “Programming HomeLink® To A
Garage Door Opener” and follow all
remaining steps.
Canadian/Gate Operator Programming
The programming of transmitters in Canada/
United States require the transmitter signals
to “time-out” after several seconds of trans -
mission.
Canadian radio frequency laws require trans -
mitter signals to time-out (or quit) after several
seconds of transmission – which may not be
long enough for HomeLink® to pick up the
signal during programming. Similar to this
Canadian law, some U.S. gate operators are
designed to time-out in the same manner.
It may be helpful to unplug the device during
the cycling process to prevent possible over -
heating of the garage door or gate motor. 1. Place the ignition in the ON/RUN position.
2. Place the hand-held transmitter 1 to
3 inches (3 to 8 cm) away from the
HomeLink® button you wish to program
while keeping the HomeLink® indicator
light in view.
3. Continue to press and hold the HomeLink® button, while you press and
release (cycle) your hand-held transmitter
every two seconds until HomeLink® has
successfully accepted the frequency
signal. The indicator light will flash slowly
and then rapidly when fully trained.
4. Watch for the HomeLink® indicator to change flash rates. When it changes, it is
programmed. It may take up to 30
seconds or longer in rare cases. The
garage door may open and close while you
are programming.
5. Press and hold the programmed HomeLink® button and observe the indicator light.
NOTE:
If the indicator light stays on constantly,
programming is complete and the garage
door/device should activate when the
HomeLink® button is pressed.
To program the two remaining HomeLink®
buttons, repeat each step for each
remaining button. DO NOT erase the chan
-
nels.
If you unplugged the garage door opener/
device for programming, plug it back in at this
time.
Reprogramming A Single HomeLink® Button
(Canadian/Gate Operator)
To reprogram a channel that has been previ -
ously trained, follow these steps:
1. Place the ignition to the ON/RUN position.
2. Press and hold the desired HomeLink® button until the indicator light begins to
flash after 20 seconds. Do not release the
button.
3. Without releasing the button, proceed with “Canadian/Gate Operator Programming”
step 2 and follow all remaining steps.
21_GA_OM_EN_USC_t.book Page 41
Page 44 of 284

GETTING TO KNOW YOUR VEHICLE
42
EXTERIOR LIGHTS
Headlight Switch
The headlight switch is located on the left side
of the instrument panel, next to the steering
wheel. The headlight switch controls the oper-
ation of the headlights, parking lights, instru -
ment panel lights, instrument panel light
dimming, interior lights and rear fog lights.
In addition, there are buttons for the Park -
Sense system and Engine Stop/Start
Ú
page 86.
Headlight Switch The instrument panel and the various controls
on the dashboard will be illuminated when the
exterior lights are turned on.
To turn on the headlights, rotate the headlight
switch clockwise. When the headlight switch is
on, the parking lights, taillights, license plate
light and instrument panel lights are also turned
on. To turn off the headlights, rotate the head
-
light switch back to the O (off) position.
Daytime Running Lights (DRLs)
The Daytime Running Lights (DRLs) (low inten -
sity) come on automatically whenever the igni -
tion is placed in the ON/RUN position, and the
headlight switch is turned to the position,
and the dusk sensor detects sufficient
external light.
If the turn signals are operated, the brightness
of the corresponding Daytime Running Lights
will be decreased as long as the turn signals
are on.
The DRL can be activated/deactivated from
the radio system, by selecting the following
functions in sequence on the main MENU:
1. “Settings.”
2. “Lights.”
3. “Daytime Running Lights.”
NOTE:
The Daytime Running Lights cannot be deacti -
vated in Canadian markets.
High Beam Headlights
Push the multifunction lever towards the
instrument panel to switch the headlights to
high beams. The headlight switch must be
turned to the (auto) or (on) position.
The High Beam Indicator on the instrument
panel will illuminate when the high beams are
on.
Multifunction Lever
Pulling the multifunction lever back will turn
the low beams on.
Automatic Headlights
This system automatically turns the headlights
on or off according to ambient light levels. To
turn the system on, rotate the headlight switch
to the (AUTO) position.
NOTE:
The function can only operate with the ignition
placed in the ON/RUN position.
1 — ParkSense Button
2 — Parking Light, Daylight Running Lights,
Headlight Switch
3 — Instrument Panel Dimmer
4 — Rear Fog Light Button
5 — Engine Stop/Start Button
21_GA_OM_EN_USC_t.book Page 42
Page 45 of 284

43
To turn the automatic headlights off, turn the
headlight switch out of the (AUTO) position.
Flash-To-Pass
You can signal another vehicle with your head-
lights by lightly pulling the multifunction lever
toward you. This will cause the high beam
headlights to turn on, and remain on, until the
lever is released.
Automatic High Beam Headlights — If
Equipped
The Automatic High Beam Headlights system
provides increased forward lighting at night by
automating high beam control through the use
of a camera mounted on the windshield. This
camera detects vehicle specific light and auto -
matically switches from high beams to low
beams until the approaching vehicle is out of
view.
This function is enabled with the radio system,
and can only be activated with the light switch
turned to (auto).
If the high beam headlights are on, the blue
icon/warning light will illuminate in the
instrument panel.
When the speed is higher than 25 mph
(40 km/h) and the function is active, the lights
will turn off if the multifunction lever is pushed
again. When the speed is lower than 15 mph
(25 km/h) and the function is active, the func
-
tion switches the high beam headlights off.
If the high beam headlights are operated
quickly again (pushing the multifunction lever
towards the instrument panel), the warning
light/icon will illuminate in the instrument
panel, and the high beam headlights will turn
on constantly until the speed exceeds 25 mph
(40 km/h).
When the speed of 25 mph (40 km/h) is
exceeded again, the automatic functioning is
reactivated.
If the multifunction lever is pushed again with
the Automatic High Beam Headlights acti -
vated, the Automatic High Beam Headlights
function deactivates.
To deactivate the automatic headlight function,
rotate the headlight switch to the position.
NOTE:
If the system recognizes heavy traffic areas,
the automatic functions remain disabled
independently of the vehicle’s speed.
The Automatic High Beam functionality may
also be influenced by:
• Reflections on road signs
• Dim headlights from oncoming traffic
• Poor weather conditions •
Presence of dirt or other obstructions on
the sensor
• Damage to the windshield
Parking Lights
To turn on the parking lights and instrument
panel lights, rotate the headlight switch clock -
wise to the position. All of the parking lights
will turn on for eight minutes, and opening the
door activates an audible warning.
To leave only the lights on one side (right/left)
illuminated, move the multifunction lever
(located on the left side of the steering wheel)
to the side that you want to remain on. With
the parking lights on, the warning light on
the instrument panel will illuminate.
To turn off the parking lights, rotate the head -
light switch back to the O (off) position.
Headlight Off Delay
To assist when exiting the vehicle, the “Head -
light Off Delay” feature will leave the head -
lights on for up to 90 seconds. This delay is
initiated when the ignition is placed in the OFF
position while the headlight switch is on, and
then the headlight switch is cycled off. Head -
light delay can be canceled by either turning
on the headlights or side lights, or by placing
the ignition in the ON position.
21_GA_OM_EN_USC_t.book Page 43
Page 46 of 284
GETTING TO KNOW YOUR VEHICLE
44
The function can be activated from the radio
system by selecting the following functions in
sequence on the main menu:
1. “Settings.”
2. “Lights.”
3. “Headlight Off Delay.”
Rear Fog Light
The rear fog lights may be operated as desired
when visibility is poor due to fog. The rear fog
light button is integrated with the headlight
switch.
Push the button to turn the rear fog lights
on/off.
The lights can be turned off by pushing the
button again or by turning the headlight switch
to the O (off) position and holding it there for a
few seconds.
NOTE:
The headlight switch must first be turned to
the parking lights or headlights position before
the rear fog light button can be pushed.
When the engine is stopped with the rear fog
lights on, they will remain off the next time the
engine is started.
Adaptive Frontlight System (AFS Function) —
If Equipped
This is a system combined with Xenon head-
lights (Bi-Xenon 35 W headlamp if equipped)
which directs the headlights horizontally, and
continuously and automatically adapts them
to the driving conditions around bends or
when cornering.
The system directs the headlights to light up
the road in the best way, taking into account
the speed of the vehicle and the bend or
corner angle, as well as the speed at which the
steering wheel is turned.
The adaptive lights are automatically activated
when the vehicle is started.
Turn Signals
Move the multifunction lever up or down to
activate the turn signals. The arrows on each
side of the instrument cluster flash to show
proper operation.
The or turn signal will blink on the instru -
ment panel.
Lane Change Assist
Lightly push the lever up or down once, without
moving beyond the detent, and the turn signal
will flash five times then automatically turn off.
To turn off the flashing before the end of the
cycle, move the lever in the opposite direction
until the first click (about half way).
Static Bending Light Function (SBL) — If
Equipped
The SBL function utilizes Light Emitting Diodes
(LEDs) in order to better illuminate the street
and increase the light angle while turning. This
function is enabled by rotating the light switch
to position (on) or (auto). The SBL LEDs
activate when the speed is below 25 mph
(40 km/h) and the steering radius is below
0.3 miles (500 m).
This function can be activated/deactivated on
the radio system by selecting the following
functions in sequence on the main menu:
1. “Settings.”
2. “Lights.”
3. “Cornering Lights.”
INTERIOR LIGHTS
Courtesy lights are turned on when the front
doors are opened or when the dimmer control
is rotated to its farthest upward position. The
glove compartment light turns on automati -
cally when the glove compartment is opened
and turn off when it is closed. The door cour -
tesy lights illuminate when one of the front
doors is opened, and turn off when it is closed.
The trunk courtesy lights turn on automatically
when the trunk is opened and turn off when it
is closed. All of these lights turn on and off
regardless of the ignition status.
21_GA_OM_EN_USC_t.book Page 44
Page 47 of 284
45
Front Map Reading Lights
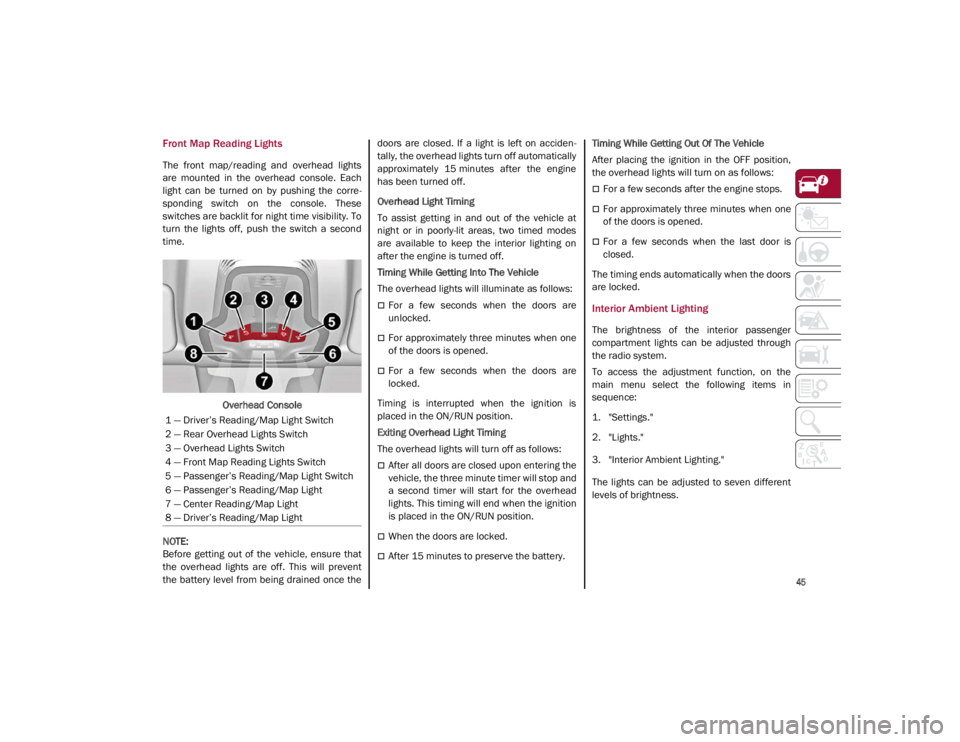
The front map/reading and overhead lights
are mounted in the overhead console. Each
light can be turned on by pushing the corre-
sponding switch on the console. These
switches are backlit for night time visibility. To
turn the lights off, push the switch a second
time.
Overhead Console
NOTE:
Before getting out of the vehicle, ensure that
the overhead lights are off. This will prevent
the battery level from being drained once the doors are closed. If a light is left on acciden
-
tally, the overhead lights turn off automatically
approximately 15 minutes after the engine
has been turned off.
Overhead Light Timing
To assist getting in and out of the vehicle at
night or in poorly-lit areas, two timed modes
are available to keep the interior lighting on
after the engine is turned off.
Timing While Getting Into The Vehicle
The overhead lights will illuminate as follows:
For a few seconds when the doors are
unlocked.
For approximately three minutes when one
of the doors is opened.
For a few seconds when the doors are
locked.
Timing is interrupted when the ignition is
placed in the ON/RUN position.
Exiting Overhead Light Timing
The overhead lights will turn off as follows:
After all doors are closed upon entering the
vehicle, the three minute timer will stop and
a second timer will start for the overhead
lights. This timing will end when the ignition
is placed in the ON/RUN position.
When the doors are locked.
After 15 minutes to preserve the battery. Timing While Getting Out Of The Vehicle
After placing the ignition in the OFF position,
the overhead lights will turn on as follows:
For a few seconds after the engine stops.
For approximately three minutes when one
of the doors is opened.
For a few seconds when the last door is
closed.
The timing ends automatically when the doors
are locked.
Interior Ambient Lighting
The brightness of the interior passenger
compartment lights can be adjusted through
the radio system.
To access the adjustment function, on the
main menu select the following items in
sequence:
1. "Settings."
2. "Lights."
3. "Interior Ambient Lighting."
The lights can be adjusted to seven different
levels of brightness.
1 — Driver’s Reading/Map Light Switch
2 — Rear Overhead Lights Switch
3 — Overhead Lights Switch
4 — Front Map Reading Lights Switch
5 — Passenger’s Reading/Map Light Switch
6 — Passenger’s Reading/Map Light
7 — Center Reading/Map Light
8 — Driver’s Reading/Map Light
21_GA_OM_EN_USC_t.book Page 45
Page 48 of 284
GETTING TO KNOW YOUR VEHICLE
46
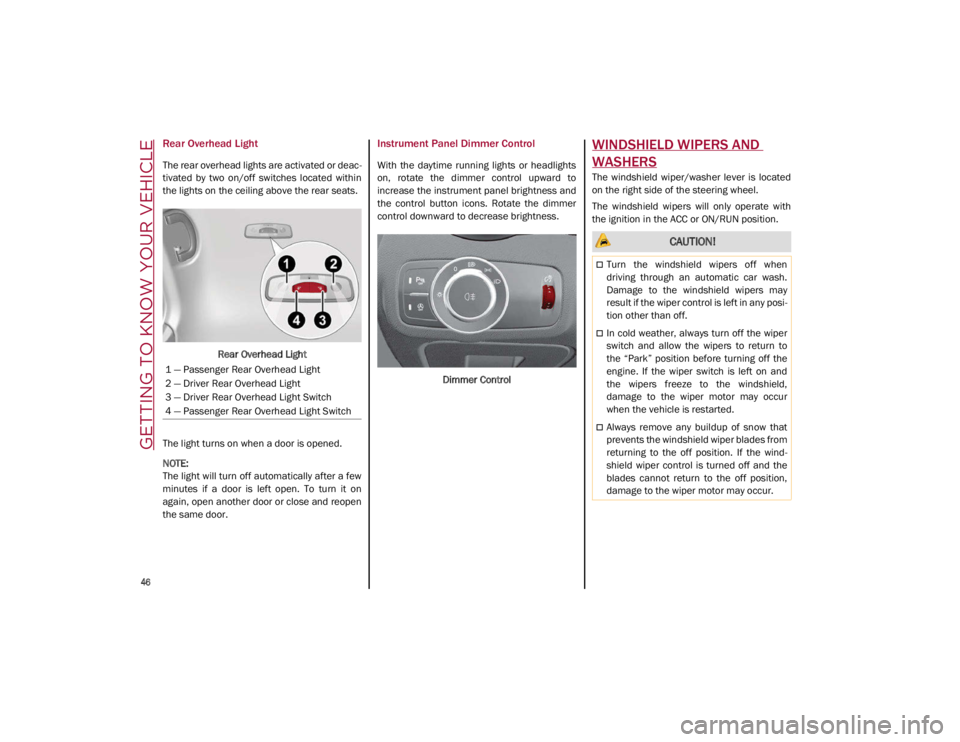
Rear Overhead Light
The rear overhead lights are activated or deac-
tivated by two on/off switches located within
the lights on the ceiling above the rear seats.
Rear Overhead Light
The light turns on when a door is opened.
NOTE:
The light will turn off automatically after a few
minutes if a door is left open. To turn it on
again, open another door or close and reopen
the same door.
Instrument Panel Dimmer Control
With the daytime running lights or headlights
on, rotate the dimmer control upward to
increase the instrument panel brightness and
the control button icons. Rotate the dimmer
control downward to decrease brightness.
Dimmer Control
WINDSHIELD WIPERS AND
WASHERS
The windshield wiper/washer lever is located
on the right side of the steering wheel.
The windshield wipers will only operate with
the ignition in the ACC or ON/RUN position.
1 — Passenger Rear Overhead Light
2 — Driver Rear Overhead Light
3 — Driver Rear Overhead Light Switch
4 — Passenger Rear Overhead Light Switch
CAUTION!
Turn the windshield wipers off when
driving through an automatic car wash.
Damage to the windshield wipers may
result if the wiper control is left in any posi -
tion other than off.
In cold weather, always turn off the wiper
switch and allow the wipers to return to
the “Park” position before turning off the
engine. If the wiper switch is left on and
the wipers freeze to the windshield,
damage to the wiper motor may occur
when the vehicle is restarted.
Always remove any buildup of snow that
prevents the windshield wiper blades from
returning to the off position. If the wind -
shield wiper control is turned off and the
blades cannot return to the off position,
damage to the wiper motor may occur.
21_GA_OM_EN_USC_t.book Page 46
Page 49 of 284
47
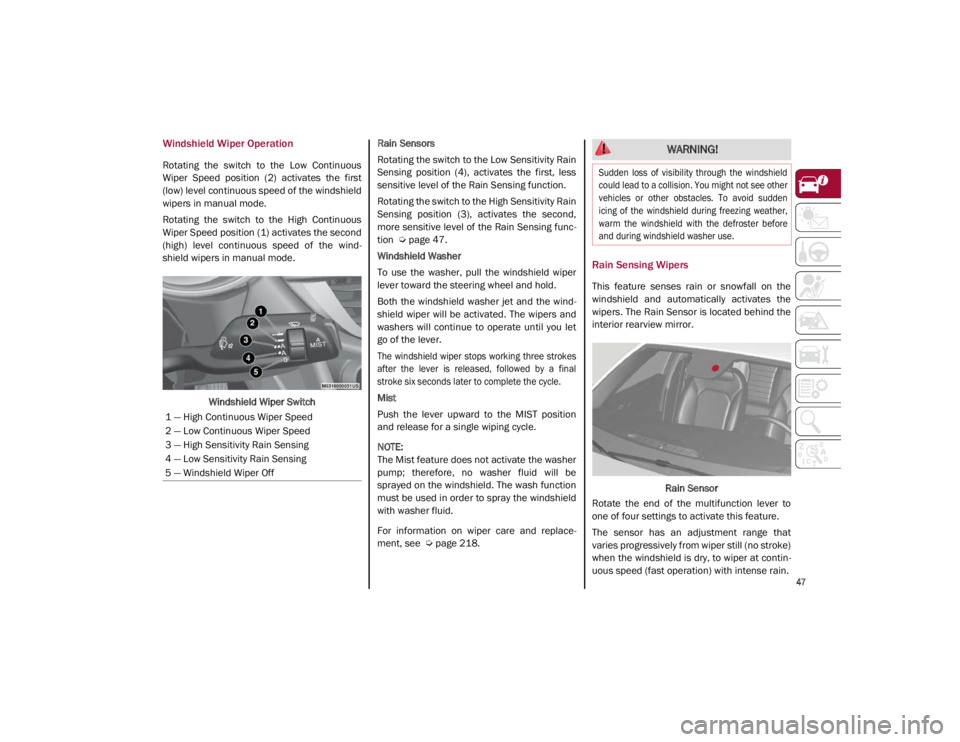
Windshield Wiper Operation
Rotating the switch to the Low Continuous
Wiper Speed position (2) activates the first
(low) level continuous speed of the windshield
wipers in manual mode.
Rotating the switch to the High Continuous
Wiper Speed position (1) activates the second
(high) level continuous speed of the wind-
shield wipers in manual mode.
Windshield Wiper Switch Rain Sensors
Rotating the switch to the Low Sensitivity Rain
Sensing position (4), activates the first, less
sensitive level of the Rain Sensing function.
Rotating the switch to the High Sensitivity Rain
Sensing position (3), activates the second,
more sensitive level of the Rain Sensing func
-
tion
Ú
page 47.
Windshield Washer
To use the washer, pull the windshield wiper
lever toward the steering wheel and hold.
Both the windshield washer jet and the wind -
shield wiper will be activated. The wipers and
washers will continue to operate until you let
go of the lever.
The windshield wiper stops working three strokes
after the lever is released, followed by a final
stroke six seconds later to complete the cycle.
Mist
Push the lever upward to the MIST position
and release for a single wiping cycle.
NOTE:
The Mist feature does not activate the washer
pump; therefore, no washer fluid will be
sprayed on the windshield. The wash function
must be used in order to spray the windshield
with washer fluid.
For information on wiper care and replace -
ment, see
Ú
page 218.
Rain Sensing Wipers
This feature senses rain or snowfall on the
windshield and automatically activates the
wipers. The Rain Sensor is located behind the
interior rearview mirror.
Rain Sensor
Rotate the end of the multifunction lever to
one of four settings to activate this feature.
The sensor has an adjustment range that
varies progressively from wiper still (no stroke)
when the windshield is dry, to wiper at contin -
uous speed (fast operation) with intense rain.
1 — High Continuous Wiper Speed
2 — Low Continuous Wiper Speed
3 — High Sensitivity Rain Sensing
4 — Low Sensitivity Rain Sensing
5 — Windshield Wiper Off
WARNING!
Sudden loss of visibility through the windshield
could lead to a collision. You might not see other
vehicles or other obstacles. To avoid sudden
icing of the windshield during freezing weather,
warm the windshield with the defroster before
and during windshield washer use.
21_GA_OM_EN_USC_t.book Page 47
Page 50 of 284

GETTING TO KNOW YOUR VEHICLE
48
Activation
Rotating the wiper switch to the Low Sensitivity
Rain Sensing position (4) or High Sensitivity
Rain Sensing position (3) activates the rain
sensor.
The activation of the rain sensor system is
done by tapping the wiper stalk upwards while
the switch is in the Low Sensitivity Rain
Sensing position (4) or High Sensitivity Rain
Sensing position (3).
The variation in sensitivity during rain sensor
operation is also signaled by a stroke of the
wiper.
If the windshield washer is used with the rain
sensor activated, the normal washing cycle is
performed, and then the rain sensor resumes
its normal automatic operation.
NOTE:
Keep the glass in the sensor area clean.
With the windshield wiper lever in the Low
Sensitivity Rain Sensing position (4) or High
Sensitivity Rain Sensing position (3), wiping
operates automatically and is disabled
when the outside temperature is below
32°F (0°C).Deactivation
To turn off the Rain Sensing Wipers, use the
wiper switch or place the ignition in the OFF
position.
In the event of malfunction of the rain sensor
while it is active, the windshield wiper oper
-
ates intermittently at a speed consistent with
the sensitivity setting of the rain sensor,
whether or not there is rain on the glass for as
long as the sensor failure is indicated on the
display.
The sensor continues to operate and it is
possible to set the windshield wiper to contin -
uous mode (1 or 2). The failure indication
remains on for as long as the sensor is active.
The rain sensor is able to recognize and auto -
matically adjust itself in the presence of the
following conditions:
Presence of dirt on the controlled surface
(salt, dirt, etc.).
Presence of streaks of water caused by the
worn window wiper blades.
Difference between day and night.
CLIMATE CONTROL
The Climate Control system allows you to regu -
late the temperature, air flow, and direction of
air circulating throughout the vehicle. The
controls are located on the touchscreen and
on the instrument panel below the radio.
21_GA_OM_EN_USC_t.book Page 48