boot Alfa Romeo Giulietta 2012 Owner handbook (in English)
[x] Cancel search | Manufacturer: ALFA ROMEO, Model Year: 2012, Model line: Giulietta, Model: Alfa Romeo Giulietta 2012Pages: 297, PDF Size: 9.37 MB
Page 99 of 297
95
GETTING
TO KNOW
YOUR CAR
SAFETY
STARTING
AND DRIVING
IN AN
EMERGENCY
SERVICING AND
MAINTENANCE
TECHNICAL
SPECIFICATIONS
CONTENTS
DOORS
CENTRAL DOOR LOCKING/UNLOCKING
FUNCTION
Locking the doors from the outside
With the doors closed press button Áon the remote control or turn
the metal insert (located inside the key) in the driver’s door lock.
The LED over the button
≈will light up to indicate that the
doors have been locked.
The door locking function is operated:
❍with all the doors closed;
❍with all the doors closed and boot open.
fig. 66A0K0145m
Unlocking the doors from the outside
Press button Ëon the remote control or turn the metal insert (lo-
cated inside the key) in the driver’s door lock.
Locking/unlocking the doors from the inside
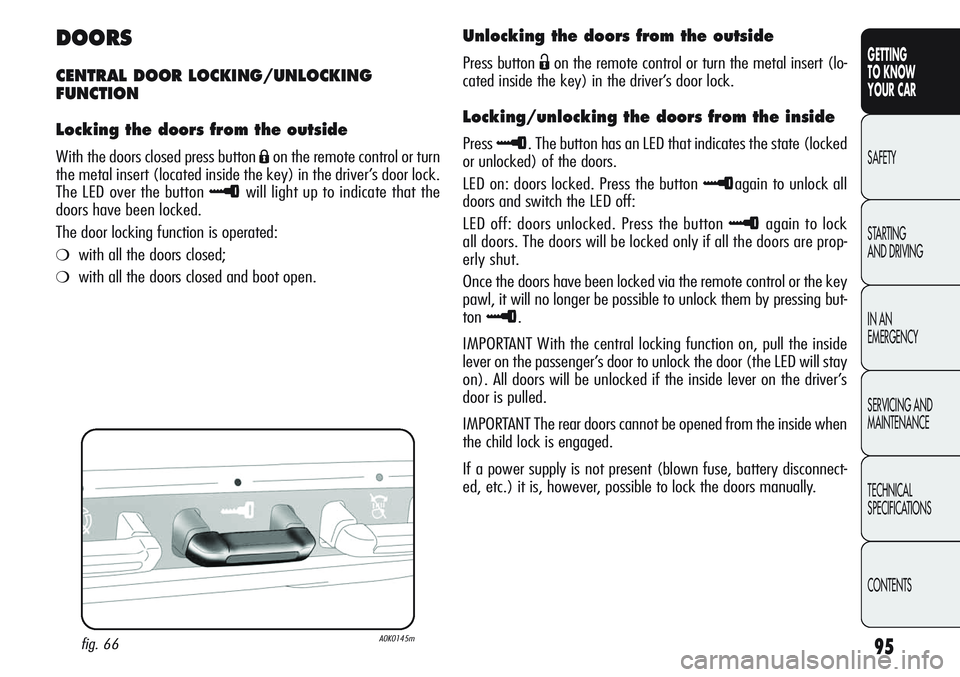
Press≈. The button has an LED that indicates the state (locked
or unlocked) of the doors.
LED on: doors locked. Press the button
≈again to unlock all
doors and switch the LED off:
LED off: doors unlocked. Press the button
≈again to lock
all doors. The doors will be locked only if all the doors are prop-
erly shut.
Once the doors have been locked via the remote control or the key
pawl, it will no longer be possible to unlock them by pressing but-
ton
≈.
IMPORTANT With the central locking function on, pull the inside
lever on the passenger’s door to unlock the door (the LED will stay
on). All doors will be unlocked if the inside lever on the driver’s
door is pulled.
IMPORTANT The rear doors cannot be opened from the inside when
the child lock is engaged.
If a power supply is not present (blown fuse, battery disconnect-
ed, etc.) it is, however, possible to lock the doors manually.
Page 105 of 297
101
GETTING
TO KNOW
YOUR CAR
SAFETY
STARTING
AND DRIVING
IN AN
EMERGENCY
SERVICING AND
MAINTENANCE
TECHNICAL
SPECIFICATIONS
CONTENTS
BOOT
The boot is unlocked electrically operated and this is deactivated
when the car is in motion.
OPENING
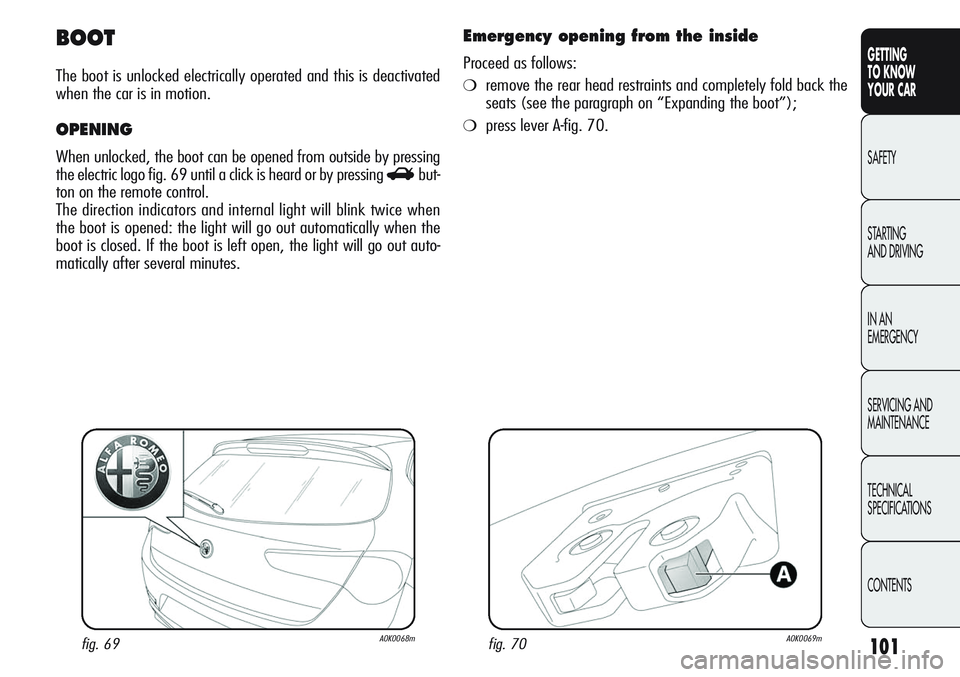
When unlocked, the boot can be opened from outside by pressing
the electric logo fig. 69 until a click is heard or by pressing
Rbut-
ton on the remote control.
The direction indicators and internal light will blink twice when
the boot is opened: the light will go out automatically when the
boot is closed. If the boot is left open, the light will go out auto-
matically after several minutes.
fig. 69A0K0068m
Emergency opening from the inside
Proceed as follows:
❍remove the rear head restraints and completely fold back the
seats (see the paragraph on “Expanding the boot”);
❍press lever A-fig. 70.
fig. 70A0K0069m
Page 106 of 297
102
GETTING
TO KNOW
YOUR CAR
SAFETY
STARTING
AND DRIVING
IN AN
EMERGENCY
SERVICING AND
MAINTENANCE
TECHNICAL
SPECIFICATIONS
CONTENTS
BOOT INITIALISATION
IMPORTANT If the battery is disconnected or the protection fuse
blows, the boot opening/closing mechanism must be reinitialised
as follows:
❍close all the doors and the boot;
❍press button Áon the remote control;
❍press button Ëon the remote control.
CLOSING
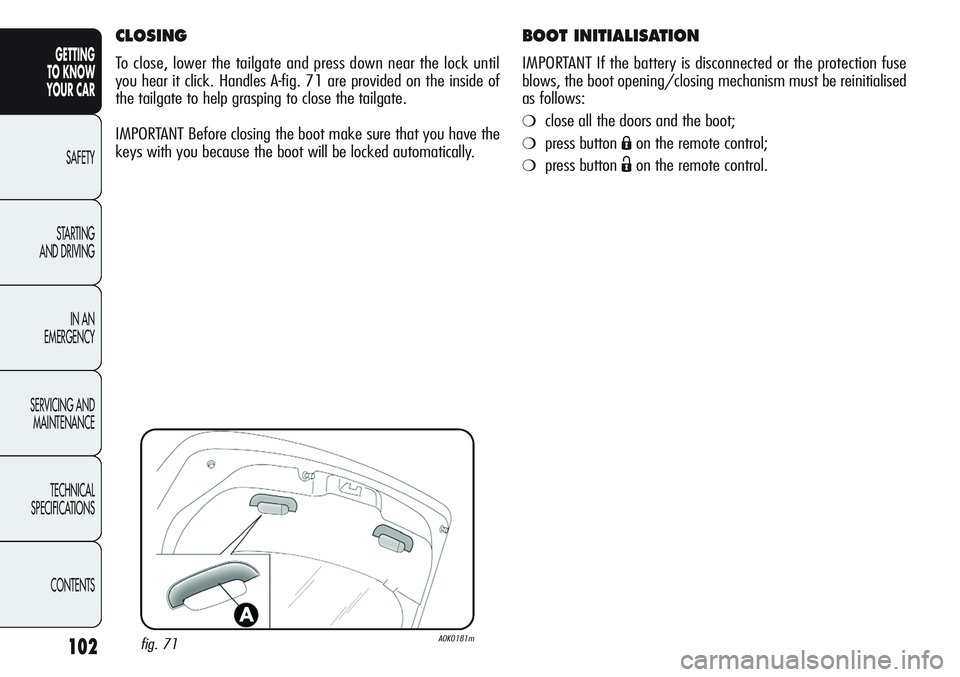
To close, lower the tailgate and press down near the lock until
you hear it click. Handles A-fig. 71 are provided on the inside of
the tailgate to help grasping to close the tailgate.
IMPORTANT Before closing the boot make sure that you have the
keys with you because the boot will be locked automatically.
fig. 71A0K0181m
Page 107 of 297
103
GETTING
TO KNOW
YOUR CAR
SAFETY
STARTING
AND DRIVING
IN AN
EMERGENCY
SERVICING AND
MAINTENANCE
TECHNICAL
SPECIFICATIONS
CONTENTS
fig. 72A0K0070m
EXPANDING THE BOOT
The boot can be partially (1/3 or 2/3) or totally extended by
splitting the rear seat. See the descriptions in “Removing the
parcel shelf” and “Folding back the seats” paragraphs for how to
expand the boot.
fig. 73A0K0182m
Removing the parcel shelf
Proceed as follows:
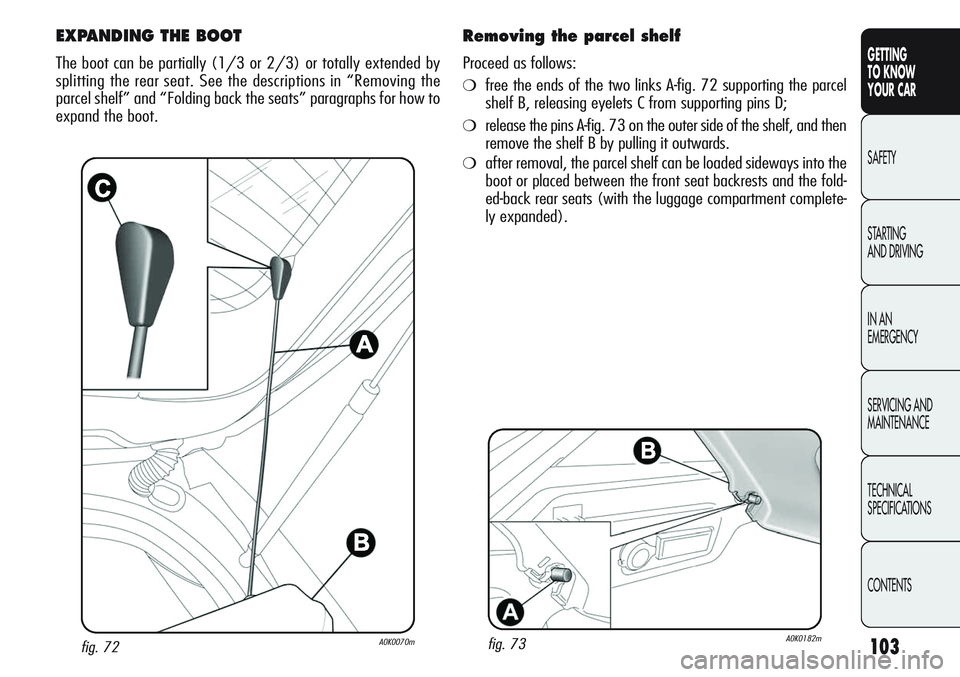
❍free the ends of the two links A-fig. 72 supporting the parcel
shelf B, releasing eyelets C from supporting pins D;
❍release the pins A-fig. 73 on the outer side of the shelf, and then
remove the shelf B by pulling it outwards.
❍after removal, the parcel shelf can be loaded sideways into the
boot or placed between the front seat backrests and the fold-
ed-back rear seats (with the luggage compartment complete-
ly expanded).
Page 109 of 297
105
GETTING
TO KNOW
YOUR CAR
SAFETY
STARTING
AND DRIVING
IN AN
EMERGENCY
SERVICING AND
MAINTENANCE
TECHNICAL
SPECIFICATIONS
CONTENTS
Heavy, unsecured baggage may cause severe injury
to passengers in case of an accident.
If you are travelling in areas with few refuelling
stations and you want to transport fuel in a spare
tank, comply with the law by using only an ap-
proved, suitably secured tank. In the event of a collision
the fire risk is increased all the same.
SECURING YOUR LOAD
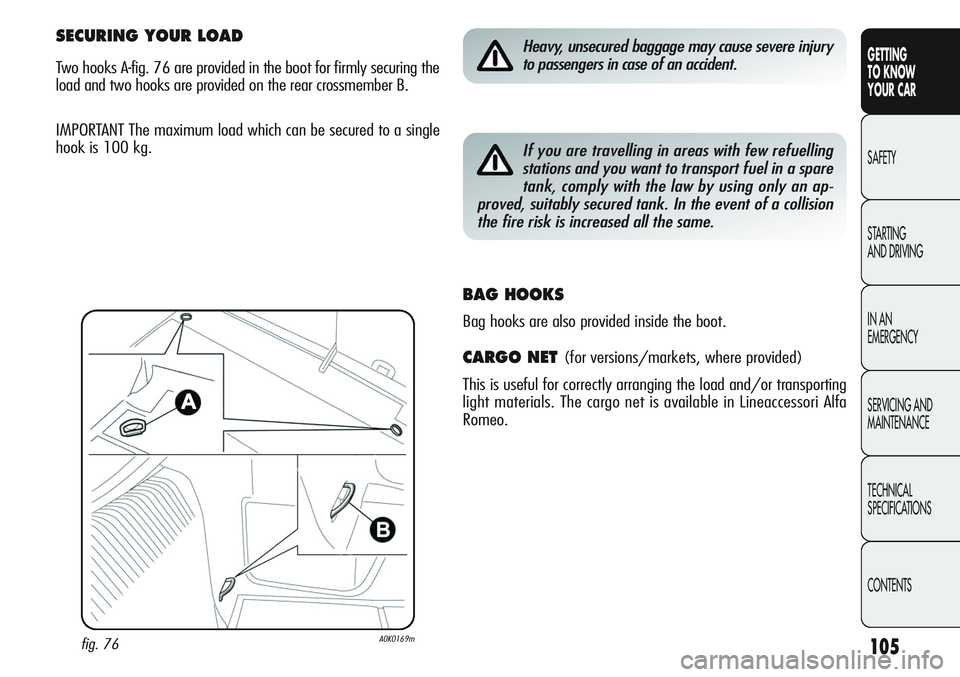
Two hooks A-fig. 76 are provided in the boot for firmly securing the
load and two hooks are provided on the rear crossmember B.
IMPORTANT The maximum load which can be secured to a single
hook is 100 kg.
fig. 76A0K0169m
BAG HOOKS
Bag hooks are also provided inside the boot.
CARGO NET (for versions/markets, where provided)
This is useful for correctly arranging the load and/or transporting
light materials. The cargo net is available in Lineaccessori Alfa
Romeo.
Page 112 of 297
108
GETTING
TO KNOW
YOUR CAR
SAFETY
STARTING
AND DRIVING
IN AN
EMERGENCY
SERVICING AND
MAINTENANCE
TECHNICAL
SPECIFICATIONS
CONTENTS
Adjusting headlight alignment
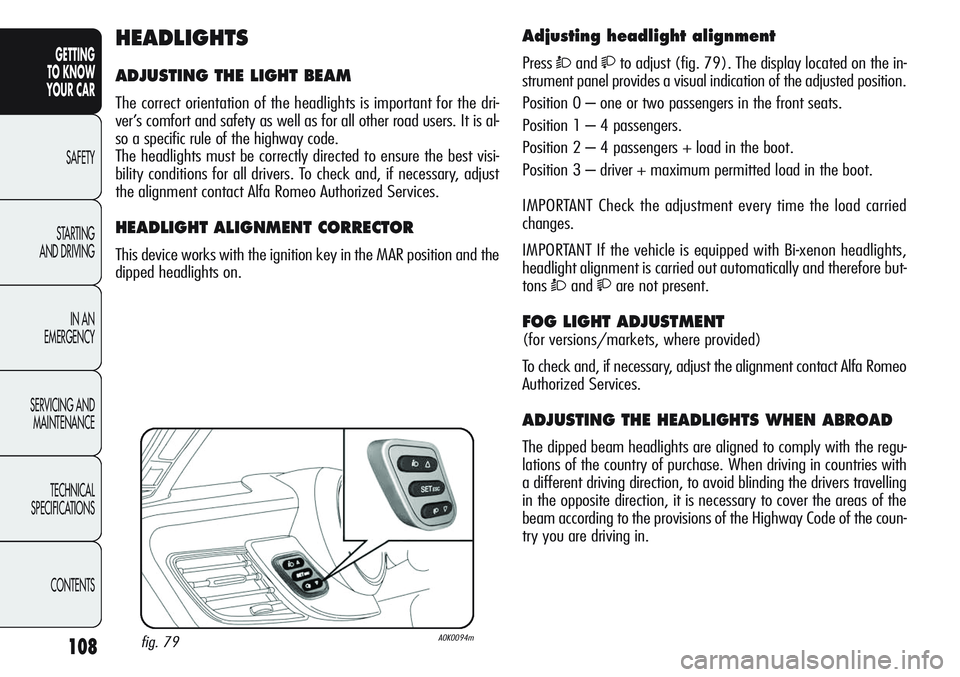
PressÒandto adjust (fig. 79). The display located on the in-
strument panel provides a visual indication of the adjusted position.
Position 0 – one or two passengers in the front seats.
Position 1 – 4 passengers.
Position 2 – 4 passengers + load in the boot.
Position 3 – driver + maximum permitted load in the boot.
IMPORTANT Check the adjustment every time the load carried
changes.
IMPORTANT If the vehicle is equipped with Bi-xenon headlights,
headlight alignment is carried out automatically and therefore but-
tons
Òandare not present.
FOG LIGHT ADJUSTMENT
(for versions/markets, where provided)
To check and, if necessary, adjust the alignment contact Alfa Romeo
Authorized Services.
ADJUSTING THE HEADLIGHTS WHEN ABROAD
The dipped beam headlights are aligned to comply with the regu-
lations of the country of purchase. When driving in countries with
a different driving direction, to avoid blinding the drivers travelling
in the opposite direction, it is necessary to cover the areas of the
beam according to the provisions of the Highway Code of the coun-
try you are driving in.
A0K0094mfig. 79
HEADLIGHTS
ADJUSTING THE LIGHT BEAM
The correct orientation of the headlights is important for the dri-
ver’s comfort and safety as well as for all other road users. It is al-
so a specific rule of the highway code.
The headlights must be correctly directed to ensure the best visi-
bility conditions for all drivers. To check and, if necessary, adjust
the alignment contact Alfa Romeo Authorized Services.
HEADLIGHT ALIGNMENT CORRECTOR
This device works with the ignition key in the MAR position and the
dipped headlights on.
Page 132 of 297
128
GETTING
TO KNOW
YOUR CAR
SAFETY
STARTING
AND DRIVING
IN AN
EMERGENCY
SERVICING AND
MAINTENANCE
TECHNICAL
SPECIFICATIONS
CONTENTS
fig. 89A0K0115mfig. 90A0K0222m
FUEL FILLER CAP
The fuel cap is unlocked when the central locking system is released
and automatically locked when the central locking system is ap-
plied.
To open
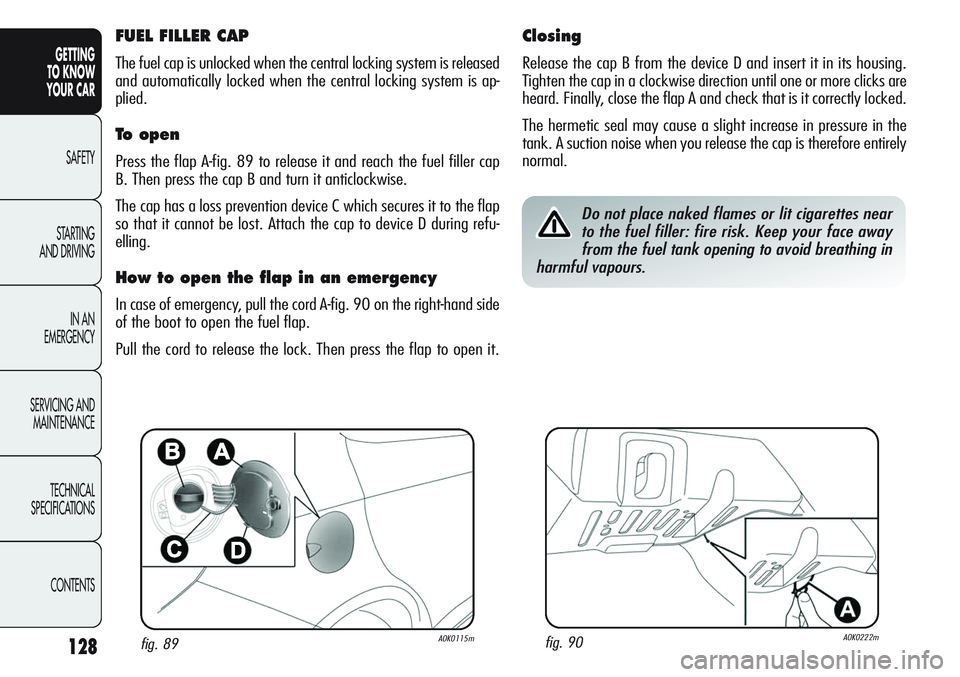
Press the flap A-fig. 89 to release it and reach the fuel filler cap
B. Then press the cap B and turn it anticlockwise.
The cap has a loss prevention device C which secures it to the flap
so that it cannot be lost. Attach the cap to device D during refu-
elling.
How to open the flap in an emergency
In case of emergency, pull the cord A-fig. 90 on the right-hand side
of the boot to open the fuel flap.
Pull the cord to release the lock. Then press the flap to open it.
Closing
Release the cap B from the device D and insert it in its housing.
Tighten the cap in a clockwise direction until one or more clicks are
heard. Finally, close the flap A and check that is it correctly locked.
The hermetic seal may cause a slight increase in pressure in the
tank. A suction noise when you release the cap is therefore entirely
normal.
Do not place naked flames or lit cigarettes near
to the fuel filler: fire risk. Keep your face away
from the fuel tank opening to avoid breathing in
harmful vapours.
Page 159 of 297
155
GETTING
TO KNOW
YOUR CAR
SAFETY
STARTING
AND DRIVING
IN AN
EMERGENCY
SERVICING AND
MAINTENANCE
TECHNICAL
SPECIFICATIONS
CONTENTS
SAVING FUEL
Here are some suggestions which may help you to save fuel and
lower the amount of harmful emissions released into the atmos-
phere.
GENERAL CONSIDERATIONS
Car maintenance
Have checks and adjustments carried out in accordance with the
“Scheduled Servicing Plan” (see chapter “Servicing and mainte-
nance”).
Tyres
Check the tyre pressure at least once every 4 weeks: if the pres-
sure is too low, consumption levels increase as resistance to rolling
is higher.
Unnecessar y loads
Do not travel with an overloaded boot. The weight of the car and
its arrangement greatly affect fuel consumption and stability.
Roof rack/ski rack
Remove the roof rack or the ski rack from the roof after use. These
accessories decrease aerodynamic penetration and have a nega-
tive effect on fuel consumption. It is better to use a trailer to trans-
port particularly bulky objects.
Electric devices
Use electric devices only for the amount of time needed. The heat-
ed rear windscreen, additional headlights, windscreen wipers and
heater fan require a considerable amount of energy; increasing the
current uptake increases fuel consumption (by up to +25% in an
urban cycle).
Climate control system
Using the climate control system will increase consumption: use
the air vents when the external temperature so allows.
Spoilers
The use of non-certified spoilers may adversely affect aerodynam-
ics and fuel consumption.
Page 168 of 297
164
GETTING
TO KNOW
YOUR CAR
SAFETY
STARTING
AND DRIVING
IN AN
EMERGENCY
SERVICING AND
MAINTENANCE
TECHNICAL
SPECIFICATIONS
CONTENTS
Replace the wheel as follows:
❍stop the car in a position so that it is not a danger for on-com-
ing traffic and where you can replace the wheel safely. The
ground must be flat and solid;
❍switch off the engine, pull up the handbrake and engage 1st
gear or reverse; put on the high visibility jacket (required by
law) before leaving the car;
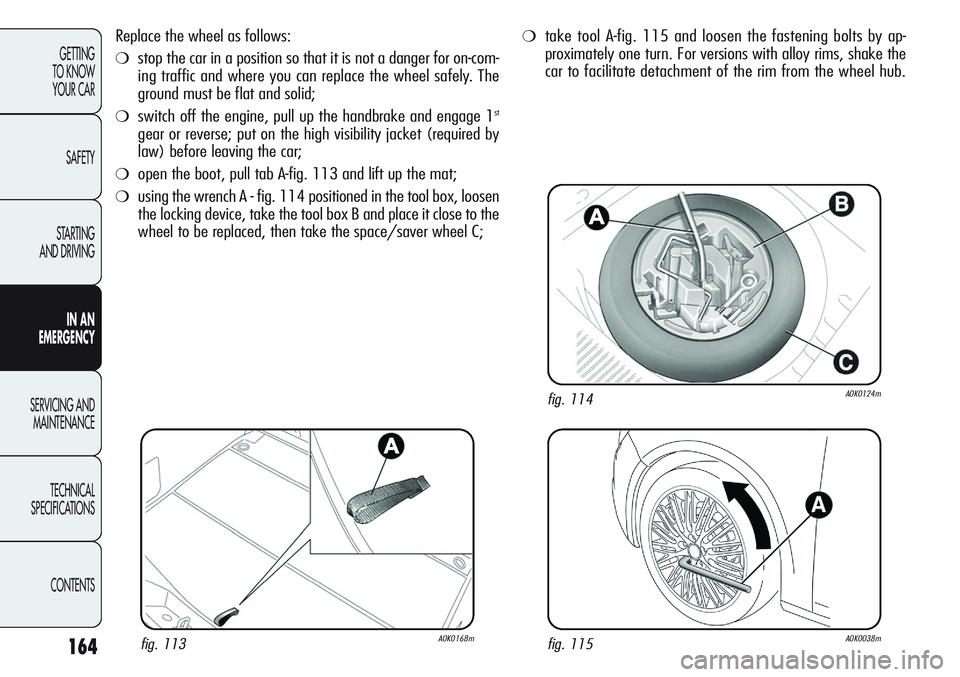
❍open the boot, pull tab A-fig. 113 and lift up the mat;
❍using the wrench A - fig. 114 positioned in the tool box, loosen
the locking device, take the tool box B and place it close to the
wheel to be replaced, then take the space/saver wheel C;
fig. 115A0K0038m
❍take tool A-fig. 115 and loosen the fastening bolts by ap-
proximately one turn. For versions with alloy rims, shake the
car to facilitate detachment of the rim from the wheel hub.
fig. 114A0K0124m
fig. 113A0K0168m
Page 170 of 297
166
GETTING
TO KNOW
YOUR CAR
SAFETY
STARTING
AND DRIVING
IN AN
EMERGENCY
SERVICING AND
MAINTENANCE
TECHNICAL
SPECIFICATIONS
CONTENTS
fig. 118A0K0040mfig. 119A0K0235m
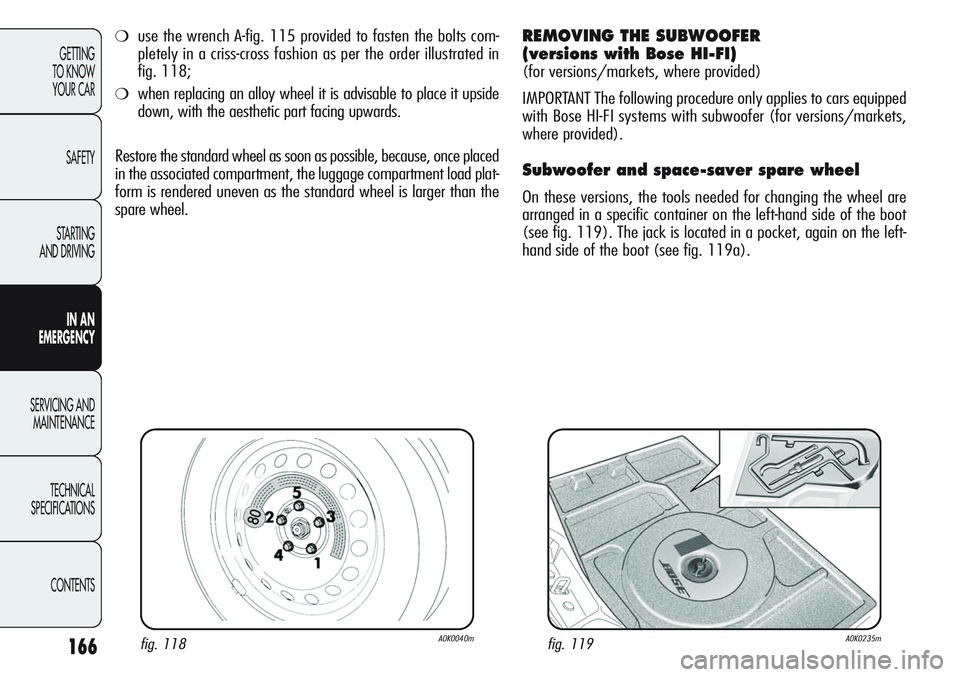
❍use the wrench A-fig. 115 provided to fasten the bolts com-
pletely in a criss-cross fashion as per the order illustrated in
fig. 118;
❍when replacing an alloy wheel it is advisable to place it upside
down, with the aesthetic part facing upwards.
Restore the standard wheel as soon as possible, because, once placed
in the associated compartment, the luggage compartment load plat-
form is rendered uneven as the standard wheel is larger than the
spare wheel.
REMOVING THE SUBWOOFER
(versions with Bose HI-FI)
(for versions/markets, where provided)
IMPORTANT The following procedure only applies to cars equipped
with Bose HI-FI systems with subwoofer (for versions/markets,
where provided).
Subwoofer and space-saver spare wheel
On these versions, the tools needed for changing the wheel are
arranged in a specific container on the left-hand side of the boot
(see fig. 119). The jack is located in a pocket, again on the left-
hand side of the boot (see fig. 119a).