warning lights Alfa Romeo Giulietta 2017 Owner's Manual
[x] Cancel search | Manufacturer: ALFA ROMEO, Model Year: 2017, Model line: Giulietta, Model: Alfa Romeo Giulietta 2017Pages: 212, PDF Size: 4.56 MB
Page 19 of 212
Electrical mirror folding
(for versions/markets, where provided)
To fold the mirrors, press button 3 fig. 17.
Press the button again to restore the
mirrors to the driving position.
Manual mirror folding
When required, fold the mirrors in
towards the vehicle.
IMPORTANT When driving, the mirrors
must always be open.
WARNING
12)As the driver's door mirror is curved, it
may slightly alter the perception of distance.
EXTERNAL LIGHTS
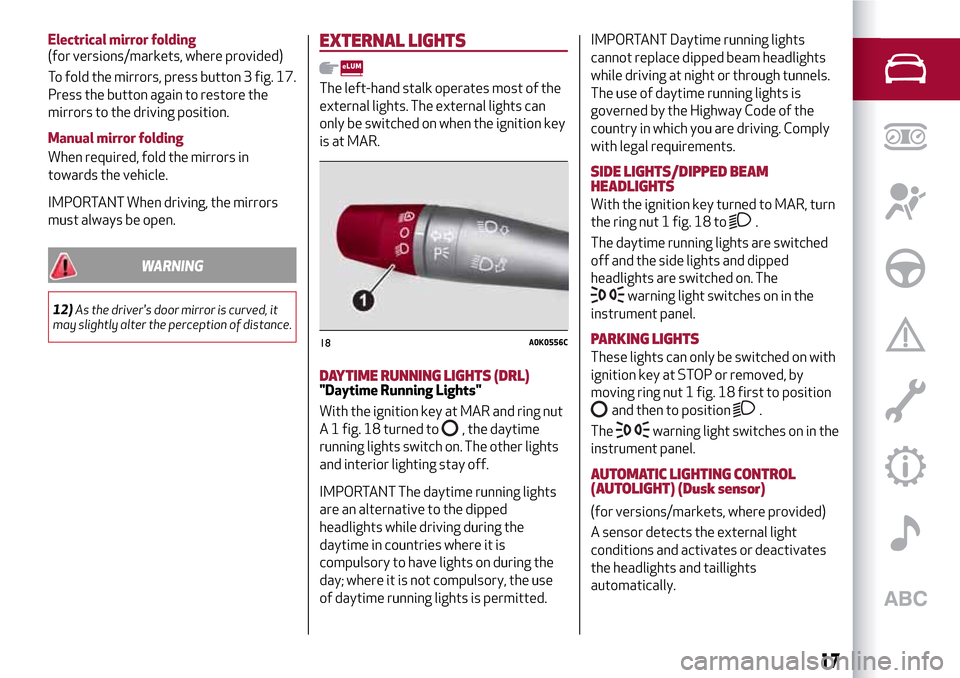
The left-hand stalk operates most of the
external lights. The external lights can
only be switched on when the ignition key
is at MAR.
DAYTIME RUNNING LIGHTS (DRL)"Daytime Running Lights"
With the ignition key at MAR and ring nut
A 1 fig. 18 turned to
, the daytime
running lights switch on. The other lights
and interior lighting stay off.
IMPORTANT The daytime running lights
are an alternative to the dipped
headlights while driving during the
daytime in countries where it is
compulsory to have lights on during the
day; where it is not compulsory, the use
of daytime running lights is permitted.IMPORTANT Daytime running lights
cannot replace dipped beam headlights
while driving at night or through tunnels.
The use of daytime running lights is
governed by the Highway Code of the
country in which you are driving. Comply
with legal requirements.
SIDE LIGHTS/DIPPED BEAM
HEADLIGHTS
With the ignition key turned to MAR, turn
the ring nut 1 fig. 18 to
.
The daytime running lights are switched
off and the side lights and dipped
headlights are switched on. The
warning light switches on in the
instrument panel.
PARKING LIGHTS
These lights can only be switched on with
ignition key at STOP or removed, by
moving ring nut 1 fig. 18 first to position
and then to position.
The
warning light switches on in the
instrument panel.
AUTOMATIC LIGHTING CONTROL
(AUTOLIGHT) (Dusk sensor)
(for versions/markets, where provided)
A sensor detects the external light
conditions and activates or deactivates
the headlights and taillights
automatically.
18A0K0556C
17
Page 20 of 212
Activation
Turn the knurled ring 1 fig. 18 to position
. To activate automatic control of the
side lights and dipped beam headlights
according to the external light conditions.
When the lights are automatically
switched off, the front and rear fog lights
(if activated) are also switched off. The
next time the lights are switched on
automatically, the fog lights must be
reactivated manually (if required).
MAIN BEAM HEADLIGHTS
To activate the main beam headlights,
with ring nut 1 fig. 18 at
, pull the
stalk towards the steering wheel beyond
the end of travel position. The
warning light switches on in the
instrument panel.
When the stalk is pulled towards the
steering wheel again, beyond the end of
travel position, the main beam headlights
deactivate, the dipped headlights
reactivate and the
warning light
switches off.
FLASHING THE HEADLIGHTS
To do this, pull the stalk towards the
steering wheel (unstable position),
regardless of the position of ring nut 1
fig. 18. The
warning light switches
on in the instrument panel.
HEADLIGHT ALIGNMENT CORRECTOR
This device works with the ignition key in
the MAR position and the dipped
headlights on.
Headlight alignment adjustment
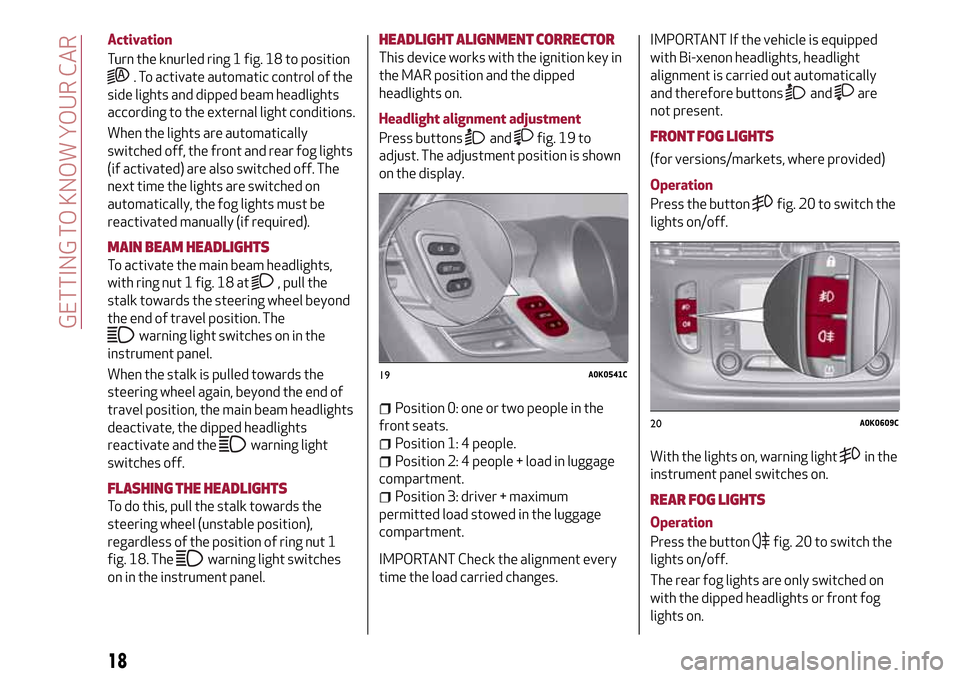
Press buttons
andfig. 19 to
adjust. The adjustment position is shown
on the display.
Position 0: one or two people in the
front seats.
Position 1: 4 people.
Position 2: 4 people + load in luggage
compartment.
Position 3: driver + maximum
permitted load stowed in the luggage
compartment.
IMPORTANT Check the alignment every
time the load carried changes.IMPORTANT If the vehicle is equipped
with Bi-xenon headlights, headlight
alignment is carried out automatically
and therefore buttons
andare
not present.
FRONT FOG LIGHTS
(for versions/markets, where provided)
Operation
Press the button
fig. 20 to switch the
lights on/off.
With the lights on, warning light
in the
instrument panel switches on.
REAR FOG LIGHTS
Operation
Press the button
fig. 20 to switch the
lights on/off.
The rear fog lights are only switched on
with the dipped headlights or front fog
lights on.
19A0K0541C
20A0K0609C
18
GETTING TO KNOW YOUR CAR
Page 21 of 212
Press the button again to turn the lights
off or turn off the dipped beam
headlights and/or the front fog lights (for
versions/markets, where provided).
With the lights on, the warning light
in
the instrument panel switches on.
DIRECTION INDICATORS
Bring the stalk to the (stable) position:
upwards: activates right direction
indicator;
downwards: activates left direction
indicator.
The
orwarning light will blink on
the instrument panel.
The direction indicators are switched off
automatically when the steering wheel is
straightened.
"Lane change" function
If you wish to signal a lane change, place
the left stalk in the unstable position for
less than half a second. The direction
indicator on the side selected will flash
five times and then switch off
automatically.
"FOLLOW ME HOME" DEVICE
This device allows you to illuminate the
area in front of the car for a certain
amount of time.Activation
With the key turned to STOP or removed,
pull stalk A towards the steering wheel
within 2 minutes from when the engine is
turned off.
Each time the stalk is moved, the lights
stay on for an extra 30 seconds up to a
maximum of 210 seconds; then the lights
are switched off automatically.
Deactivation
Keep the stalk pulled towards the
steering wheel for more than 2 seconds.
EXTERNAL COURTESY LIGHTS
These light up the car and the space in
front of it when the doors are unlocked.
Activation
When the car is parked and the doors are
unlocked by pressing the button
on the
remote control (or the luggage
compartment is unlocked by pressing
), the dipped beam headlights, rear
side lights and number plate lights are
activated.
The lights stay on for approximately
25 seconds unless the doors and luggage
compartment are locked again with the
remote control or the doors (or luggage
compartment) are opened and reclosed.
In these cases they switch off after
5 seconds.
AFS ADAPTIVE LIGHTS(Adaptive Frontlight System)
(for versions/markets, where provided)
This is a system combined with Xenon
headlamps which directs the main light
beam and adapts it to the driving
conditions round bends/when cornering,
continuously and automatically.
The adaptive lights are automatically
activated when the car is started.
19
Page 33 of 212
WARNING
17)A heavy load that has not been secured
may cause serious injuries to passengers in
the event of an accident.
18)If you are travelling in an area with
limited opportunities for vehicle refuelling
and you wish to bring petrol with you in a
petrol can, you must do so in compliance with
current regulations and using an approved
can, appropriately secured to the load
securing attachments. In the event of a
collision the fire risk is increased all the
same.
HEADLIGHTS
LIGHT BEAM DIRECTION
The correct orientation of the headlights
is important for the driver's comfort and
safety as well as for all other road users.
This is also covered by a specific rule of
the highway code.
The headlights must be correctly
directed to ensure the best visibility
conditions for all drivers. Contact a Alfa
Romeo Dealership to have the headlights
checked and adjusted, if necessary.
FOG LIGHTS ALIGNMENT(for versions/markets, where provided)
Contact a Alfa Romeo Dealership to have
the headlights checked and adjusted, if
necessary.
ADJUSTING THE HEADLIGHTS ABROAD
The dipped beam headlights are aligned
to comply with the regulations of the
country of purchase. When driving in
countries with a different traffic
direction, to avoid blinding the drivers
travelling in the opposite direction, it is
necessary to cover the areas of the beam
according to the provisions of the
Highway Code of the country you are
driving in.
Alfa DNASYSTEM (Car dynamic
control system)
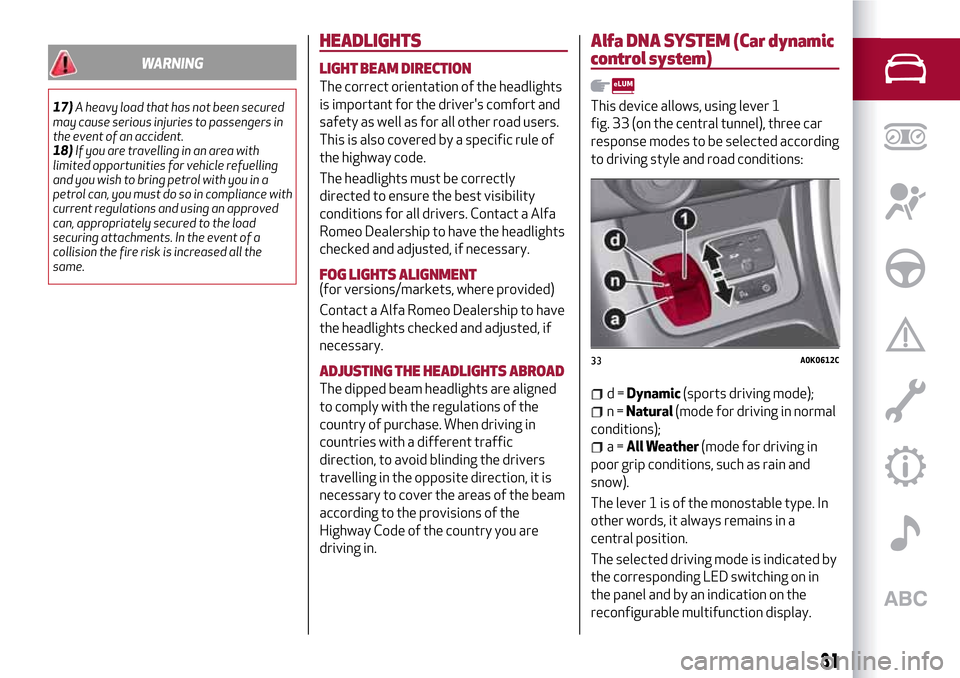
This device allows, using lever 1
fig. 33 (on the central tunnel), three car
response modes to be selected according
to driving style and road conditions:
d=Dynamic(sports driving mode);
n=Natural(mode for driving in normal
conditions);
a=All Weather(mode for driving in
poor grip conditions, such as rain and
snow).
The lever 1 is of the monostable type. In
other words, it always remains in a
central position.
The selected driving mode is indicated by
the corresponding LED switching on in
the panel and by an indication on the
reconfigurable multifunction display.
33A0K0612C
31
Page 37 of 212
This section of the booklet gives you all the information you need
to understand, interpret and use the instrument panel correctly.
KNOWING THE INSTRUMENT PANEL
CONTROL PANEL AND ON-BOARD INSTRUMENTS .........36
DISPLAY....................................38
MENU ITEMS.................................40
TRIP COMPUTER..............................41
WARNING LIGHTS AND MESSAGES . ..................42
Page 38 of 212
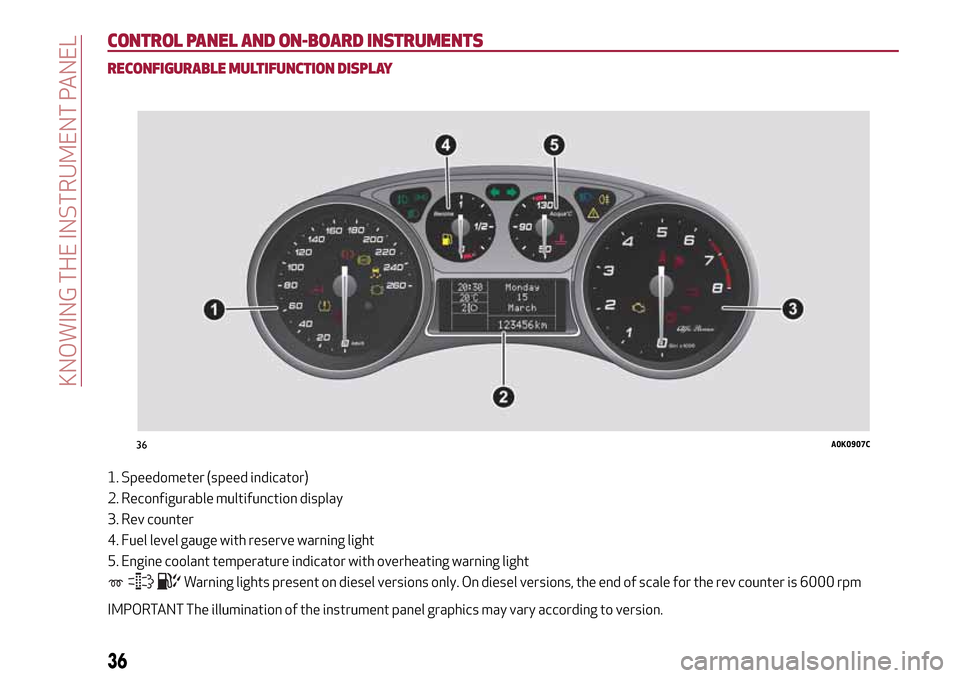
CONTROL PANEL AND ON-BOARD INSTRUMENTS
RECONFIGURABLE MULTIFUNCTION DISPLAY
1. Speedometer (speed indicator)
2. Reconfigurable multifunction display
3. Rev counter
4. Fuel level gauge with reserve warning light
5. Engine coolant temperature indicator with overheating warning light
Warning lights present on diesel versions only. On diesel versions, the end of scale for the rev counter is 6000 rpm
IMPORTANT The illumination of the instrument panel graphics may vary according to version.
36A0K0907C
36
KNOWING THE INSTRUMENT PANEL
Page 39 of 212
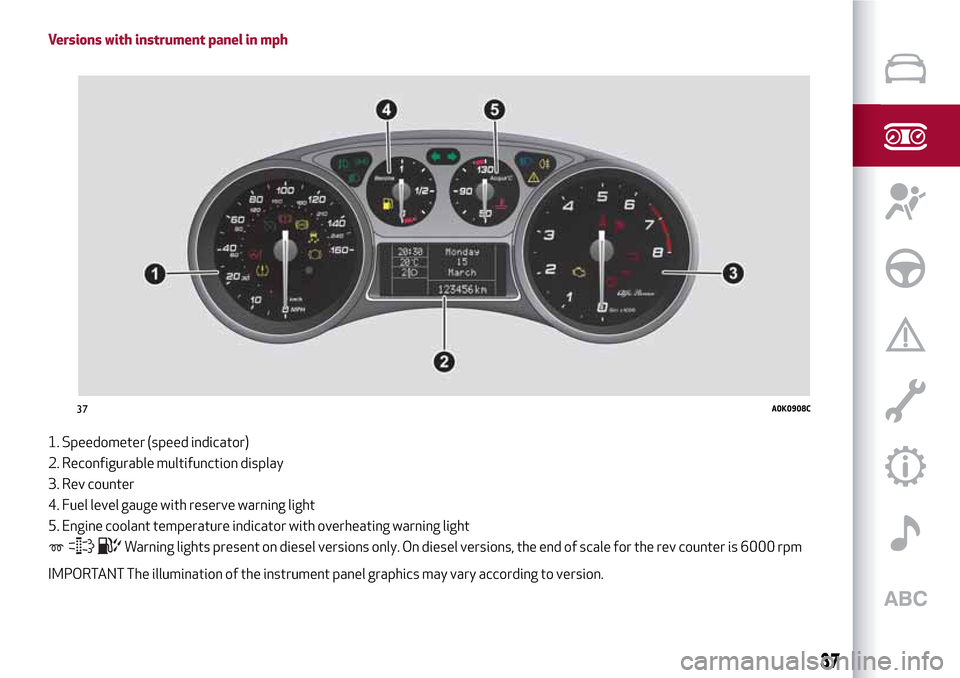
Versions with instrument panel in mph
1. Speedometer (speed indicator)
2. Reconfigurable multifunction display
3. Rev counter
4. Fuel level gauge with reserve warning light
5. Engine coolant temperature indicator with overheating warning light
Warning lights present on diesel versions only. On diesel versions, the end of scale for the rev counter is 6000 rpm
IMPORTANT The illumination of the instrument panel graphics may vary according to version.
37A0K0908C
37
Page 41 of 212
within the menu, they allow you to
scroll up or down through the options;
during setting operations, they
increase or decrease values.
MAIN MENU
The menu comprises a series of options
which can be selected using the buttons
andto access the different
selection and setting (Setup) operations
indicated below.
Some options have a submenu. The menu
can be activated by briefly pressing the
SET/ button
.
The menu includes the following items:
MENU
LIGHTING
SPEED WARNING
HEADLIGHT SENSOR (for
versions/markets where provided)
RAIN SENSOR (for versions/markets,
where provided)
TRIP B ACTIVATION
SET TIME
SET DATE
FIRST PAGE (for versions/markets,
where provided)
AUTOCLOSE
MEASUREMENT UNIT
LANGUAGE
BUZZER VOLUME
SEAT BELT BEEP
SERVICE
PASSENGER AIRBAG
DAYTIME RUNNING LIGHTS
ADAPTIVE LIGHTS (for
versions/markets, where provided)
COURTESY LIGHTS
EXIT MENU
Some menu items are shown on the
navigator display in models equipped
with radio-navigation systems (for
versions/markets, where provided).
Selecting an option from the main
menu without a submenu:
press the SET/ buttonbriefly to
select the main menu setting you wish to
change;
press the buttonsor
(with single presses) to select the
new setting;
press the SET/ buttonbriefly to
save the new setting and go back to the
previous main menu option.
Selecting an option from the main
menu with a submenu:
briefly press the SET/ buttonto
display the first submenu option;
press the buttonsor
(with single presses) to scroll
through all the submenu options;
press the SET/ buttonbriefly to
select the displayed submenu option and
to open the relevant settings menu;
press the buttonsor
(with single presses) to select the
new setting for this submenu option;
press the SET/ buttonbriefly to
store the new setting and go back to the
previous submenu option.
39
Page 42 of 212
MENU ITEMS
IMPORTANT If there is anUconnect™
system, some menu items are displayed
and managed by the latter and not the
instrument panel (refer to the
description in the Multimedia chapter or
in the supplements available online).
Menu
Access to the Setup Menu.
Lights
(only with side lights on)
Adjustment (8 levels) of the brightness of
the instrument panel, theUconnect™
system controls (for versions/markets
where provided) and the automatic
climate control system controls (for
versions/markets where provided).
Speed warning
Vehicle speed limit setting (km/h or mph).
When this is exceeded, the driver is
notified by an audible warning signal.
Headlight sensor
(for versions/markets, where provided)
Automatic switch on/off of lights
according to external light conditions.
The dusk sensor sensitivity can be
adjusted according to 3 levels (level
1=minimum sensitivity, level 2=average
sensitivity, level 3=maximum sensitivity).Rain sensor
(for versions/markets, where provided)
Adjustment (4 levels) of the sensitivity of
the rain sensor.
TripB activation
Activation (On) and deactivation (Off) of
Trip B display (partial trip counter). For
more information see the "Trip computer"
section.
Set time
Clock setting through two sub-menus:
“Time” and “Format”.
Set date
Date setting (day - month - year).
First page
(for versions/markets, where provided)
Selection of the information you would
like to see on the main screen. You can
view the date or the trip distance.
Autoclose
Activation of the automatic locking of the
doors on exceeding the speed of
20 km/h.Measurement unit
Unit of measurement setting via three
submenus: “Distances”, “Fuel
consumption” and “Temperature”.
If the set distance unit is "km", the display
allows the fuel consumption unit to be set
as km/l or l/100km. If the set distance
unit is “mi” the fuel consumption unit will
be displayed in “mpg”.
Language
Display language selection.
Warning volume
Adjustment (8 levels) of the volume of
the buzzer which accompanies the
display of failures/warnings.
Seat belt beep
This function can be displayed only after
an Alfa Romeo Dealership has
deactivated the SBR system (see
paragraph “SBR system” in the “Safety”
chapter).
Service
Display of information about km/mileage
intervals or, for versions/markets, where
provided, time intervals for car servicing.
Passenger airbag
Activation/deactivation of front
passenger side airbag and side air bag for
pelvis, chest and shoulder protection -
Side bag
40
KNOWING THE INSTRUMENT PANEL
Page 44 of 212
WARNING LIGHTS AND MESSAGES
IMPORTANT The warning light switches on in the instrument panel together with a dedicated message and/or acoustic signal when
applicable. These indications are indicative and precautionary and as such must not be considered as exhaustive and/or alternative
to the information contained in the Owner Handbook, which you are advised to read carefully in all cases. Always refer to the
information in this section in the event of a failure indication.
IMPORTANT Failure indications displayed are divided into two categories: very serious and less serious failures. Serious faults are
indicated by a repeated and prolonged warning "cycle". Less serious faults are indicated by a warning "cycle" with a shorter duration.
The display cycle of both categories can be interrupted. The instrument panel warning light will stay on until the cause of the
malfunction is eliminated.
WARNING LIGHTS ON INSTRUMENT PANEL
Warning lights on
panelWhat it means What to do
LOW BRAKE FLUID/HANDBRAKE ENGAGED
The warning light switches on when the key is turned to
MAR-ON, but it should switch off after a few seconds.
Low brake fluid level
The warning light (or symbol on the display) switches on
when the level of the brake fluid in the reservoir falls
below the minimum level, possibly due to leaks in the
circuit.Restore the brake fluid level, then check that the warning
light has switched off.
If the warning light stays on, contact an Alfa Romeo
Dealership.
Handbrake engaged
The warning light (or symbol on the display) switches on
when the handbrake is engaged. If the car is moving an
acoustic signal is also emitted.Release the handbrake, then check that the warning light
has switched off.
If the warning light (or symbol on the display) stays on,
contact an Alfa Romeo Dealership.
42
KNOWING THE INSTRUMENT PANEL