Time Alfa Romeo MiTo 2014 Service Manual
[x] Cancel search | Manufacturer: ALFA ROMEO, Model Year: 2014, Model line: MiTo, Model: Alfa Romeo MiTo 2014Pages: 280, PDF Size: 8.79 MB
Page 114 of 280
REFUELLING THE CARStop the engine before refuelling.PETROL ENGINESOnly use unleaded petrol. The petrol octane rating (RON) must not be
lower than 95. In order to prevent damage to the catalytic converter
never introduce even the smallest amount of leaded petrol, even in the
event of an emergency.DIESEL ENGINESUse only diesel fuel compliant with European specification EN590. The
use of other products or mixtures may damage the engine beyond
repair and consequently invalidate the warranty, due to the damage
caused.
Operation at low temperatures
If the outside temperature is very low, the diesel thickens due to the
formation of paraffin clots with consequent defective operation of the
fuel supply system.
In order to avoid these problems, different types of diesel fuel are
distributed according to the season: summer type, winter type and
arctic type (cold/mountain areas). If refuelling with diesel fuel whose
features are not suitable for the temperature of use, it is advisable
to mix TUTELA DIESEL ART additive with the fuel, in the proportions
shown on the container. Pour the additive into the tank before the fuel.
When using or parking the vehicle for a long time in the mountains
or cold areas, it is advisable to refuel using locally available fuel.
In this case, it is also advisable to keep the tank over 50% full.
FUEL TANK CAPOpening
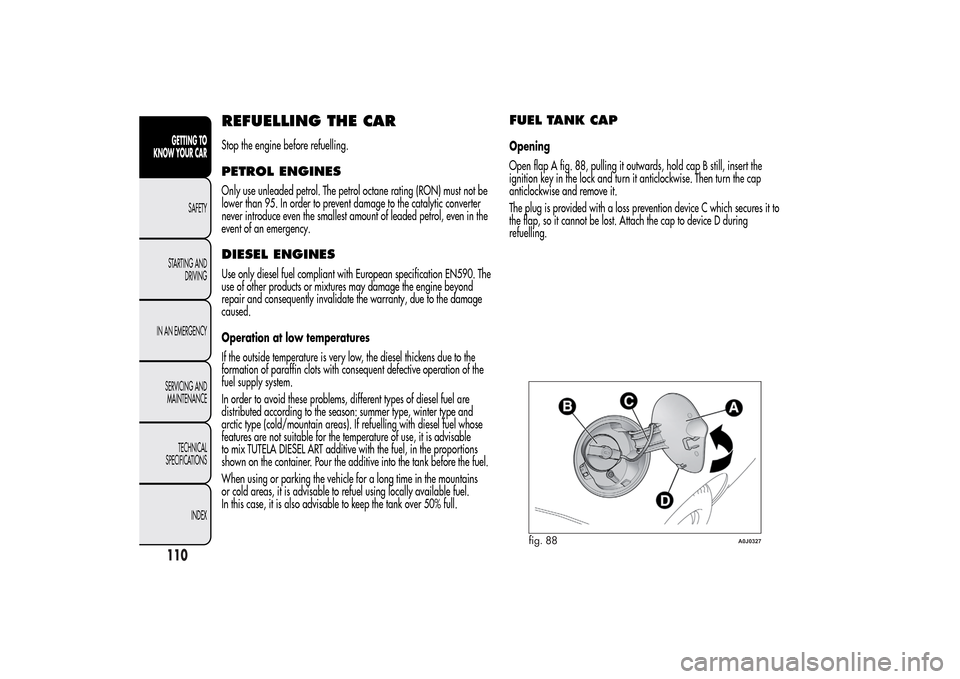
Open flap A fig. 88, pulling it outwards, hold cap B still, insert the
ignition key in the lock and turn it anticlockwise. Then turn the cap
anticlockwise and remove it.
The plug is provided with a loss prevention device C which secures it to
the flap, so it cannot be lost. Attach the cap to device D during
refuelling.
fig. 88
A0J0327
110GETTING TO
KNOW YOUR CAR
SAFETY
STARTING AND
DRIVING
IN AN EMERGENCY
SERVICING AND
MAINTENANCE
TECHNICAL
SPECIFICATIONS
INDEX
Page 115 of 280
Closure
Fit the cap (complete with key) and turn it clockwise until it clicks once
or more. Then turn the key clockwise and extract it, then close the flap.
The sealing may cause a slight pressure increase in the tank. A little
breathing off, while slackening the cap is absolutely normal.
Do not place naked flames or lit cigarettes near to the
fuel filler: fire risk. Also, keep your face away from
this fuel inlet to avoid inhaling harmful fumes.
PROTECTING THE ENVIRONMENTThe following devices are used for reducing petrol fuel engine
emissions: catalytic converter, oxygen sensors and evaporation control
system
The following devices are used for reducing diesel fuel engine
emissions: oxidising catalytic converter, exhaust gas recirculation
system (EGR) and particulate filter (DPF).DIESEL PARTICULATE FILTER (DPF)(Diesel Particulate Filter)
(for versions/markets, where provided)
The Diesel Particulate Filter is a mechanical filter, integral to the
exhaust system, that physically traps carbon particles present in the
exhaust gases of diesel engines.
The diesel particulate filter is needed to eliminate almost all carbon
particle emissions in compliance with current/future regulations and
standards.
During standard use of the vehicle, the engine control unit records a set
of data (e.g.: travel time, type of route, temperatures, etc.) and it will
then calculate how much particulate has been trapped by the filter.
Since this filter physically traps particulate, it should be periodically
regenerated (cleaned) at regular intervals by burning carbon particles.
111GETTING TO
KNOW YOUR CARSAFETY
STARTING AND
DRIVING
IN AN EMERGENCY
SERVICING AND
MAINTENANCE
TECHNICAL
SPECIFICATIONS
INDEX
Page 118 of 280
IMPORTANT When putting the rear seat back in its normal position,
make sure that the seat belts are positioned so that they are ready
to use.
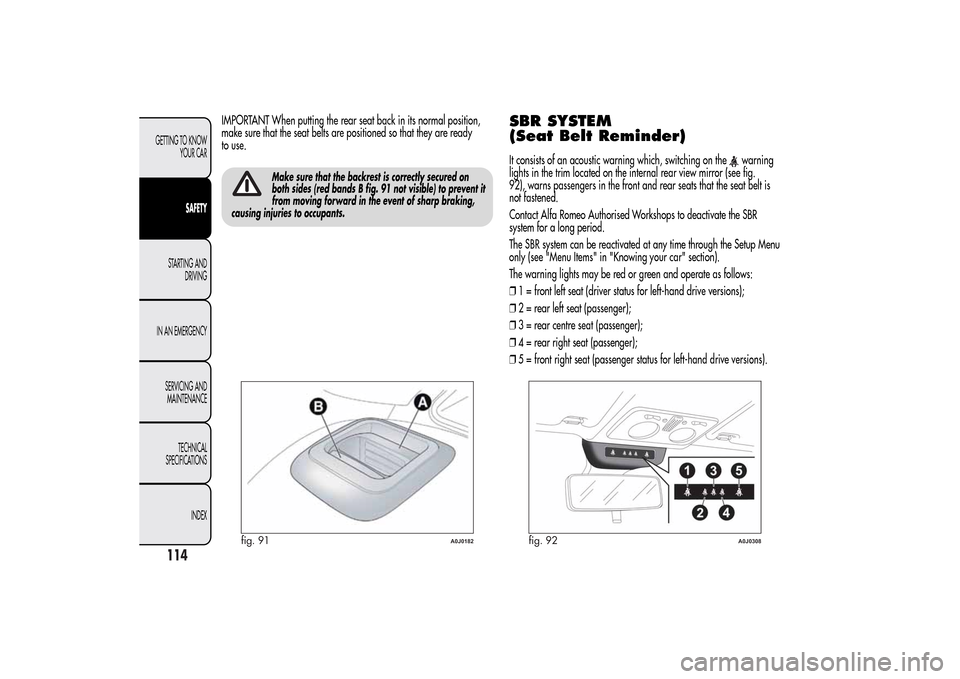
Make sure that the backrest is correctly secured on
both sides (red bands B fig. 91 not visible) to prevent it
from moving forward in the event of sharp braking,
causing injuries to occupants.
SBR SYSTEM
(Seat Belt Reminder)It consists of an acoustic warning which, switching on the
warning
lights in the trim located on the internal rear view mirror (see fig.
92), warns passengers in the front and rear seats that the seat belt is
not fastened.
Contact Alfa Romeo Authorised Workshops to deactivate the SBR
system for a long period.
The SBR system can be reactivated at any time through the Setup Menu
only (see "Menu Items" in "Knowing your car" section).
The warning lights may be red or green and operate as follows:
❒1 = front left seat (driver status for left-hand drive versions);
❒2 = rear left seat (passenger);
❒3 = rear centre seat (passenger);
❒4 = rear right seat (passenger);
❒5 = front right seat (passenger status for left-hand drive versions).
fig. 91
A0J0182
fig. 92
A0J0308
114GETTING TO KNOW
YOUR CAR
SAFETY
STARTING AND
DRIVING
IN AN EMERGENCY
SERVICING AND
MAINTENANCE
TECHNICAL
SPECIFICATIONS
INDEX
Page 120 of 280
PRETENSIONERSThe car is equipped with front seat belt pretensioners, which draw
back the seat belts by several centimetres in the event of a violent
frontal impact. This guarantees the perfect adherence of the seat belts
to the occupants’ bodies before the restraining action begins.
It is evident that the pretensioners have been activated when the belt
withdraws towards the reel.
The car is also equipped with a second pretensioner (in the kick plate
area). Its activation is signalled by the shortening of the metal cable.
A slight discharge of smoke may be produced during the activation of
the pretensioner. This is not harmful and does not indicate the start
of a fire.
IMPORTANT To obtain the highest degree of protection from the action
of the pretensioner, wear the seat belt tight to the chest and pelvis.
The pretensioner does not require any maintenance or lubrication: any
changes to its original conditions will invalidate its efficiency. If, due
to exceptional natural events (floods, sea storms, etc.), the device
has been affected by water and mud, it must be replaced.
The pretensioner may be used only once. Once it has
been activated, contact Alfa Romeo Authorised
Workshops to have it replaced. Consult the plate in the
glove compartment to check the status of the device. Contact Alfa
Romeo Authorised Workshops to have the device replaced as
this date approaches.
Operations which lead to knocks, vibrations or localised
heating (over 100°C for a maximum of 6 hours) in the area
around the pretensioners may cause damage or trigger
them. These devices are not affected by vibrations caused by
irregularities of the road surface or low obstacles such as kerbs, etc.
Contact Alfa Romeo Authorized Services for any assistance necessary.
LOAD LIMITERSTo increase protection, the front seat belt reels contain a load limiter
which controls the force acting on the chest and shoulders during
the belt restraining action in the event of a head-on collision.GENERAL INSTRUCTIONS FOR USING
THE SEAT BELTSComply with (and ensure that all the other occupants of the car comply
with) the local laws in force regarding the use of seat belts. Always
fasten the seat belts before starting off.
Seat belts must also be worn by pregnant women: the risk of injury in
the event of an accident is reduced for them and the unborn child if
they are wearing a seat belt.
116GETTING TO KNOW
YOUR CAR
SAFETY
STARTING AND
DRIVING
IN AN EMERGENCY
SERVICING AND
MAINTENANCE
TECHNICAL
SPECIFICATIONS
INDEX
Page 141 of 280
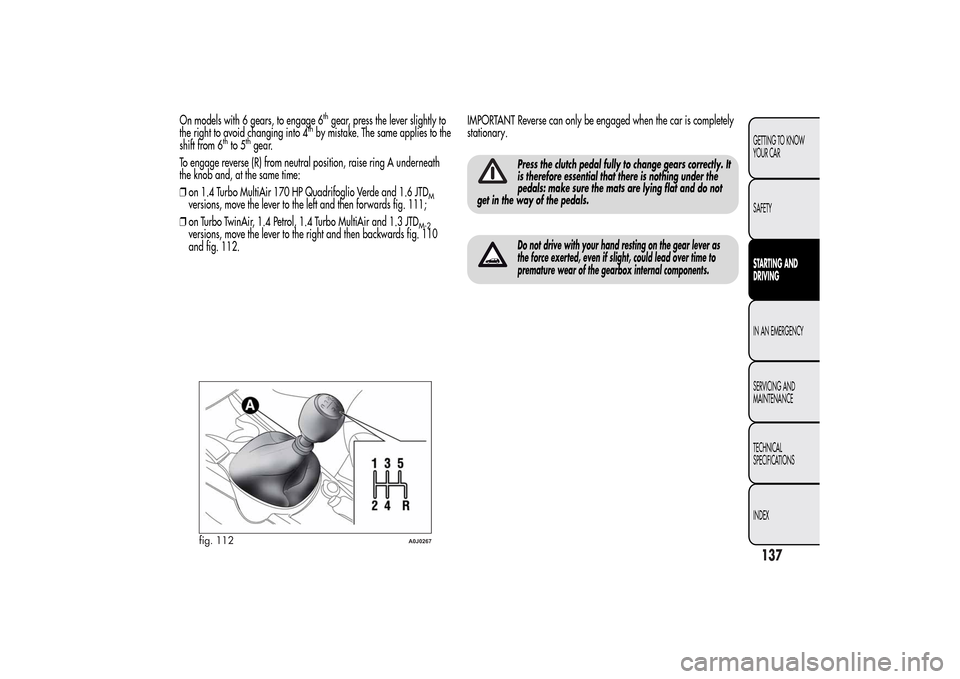
On models with 6 gears, to engage 6
thgear, press the lever slightly to
the right to avoid changing into 4
thby mistake. The same applies to the
shift from 6
thto 5
thgear.
To engage reverse (R) from neutral position, raise ring A underneath
the knob and, at the same time:
❒on 1.4 Turbo MultiAir 170 HP Quadrifoglio Verde and 1.6 JTD
M
versions, move the lever to the left and then forwards fig. 111;
❒on Turbo TwinAir, 1.4 Petrol, 1.4 Turbo MultiAir and 1.3 JTD
M-2
versions, move the lever to the right and then backwards fig. 110
and fig. 112.IMPORTANT Reverse can only be engaged when the car is completely
stationary.
Press the clutch pedal fully to change gears correctly. It
is therefore essential that there is nothing under the
pedals: make sure the mats are lying flat and do not
get in the way of the pedals.Do not drive with your hand resting on the gear lever as
the force exerted, even if slight, could lead over time to
premature wear of the gearbox internal components.
fig. 112
A0J0267
137GETTING TO KNOW
YOUR CAR
SAFETYSTARTING AND
DRIVINGIN AN EMERGENCY
SERVICING AND
MAINTENANCE
TECHNICAL
SPECIFICATIONS
INDEX
Page 142 of 280
SAVING FUELHere are some suggestions which can help you to save fuel and lower
harmful emissions.GENERAL CONSIDERATIONSCar maintenance
Have checks and adjustments carried out in accordance with the
“Scheduled Servicing Plan” (see chapter “Maintenance and care”).
Ty r e s
Check the tyre pressure at least once every 4 weeks: if the pressure is
too low, consumption levels increase as resistance to rolling is higher.
Unnecessary loads
Do not travel with an overloaded boot. The weight of the car and its
arrangement greatly affect fuel consumption and stability.
Roof rack/ski rack
Remove the roof rack or the ski rack from the roof after use. These
accessories lower aerodynamic penetration and adversely affect
consumption levels. It is better to use a trailer to transport particularly
bulky objects.
Electrical devices
Only use electrical devices for the time needed. The heated rear
window, additional headlights, windscreen wipers and heater fan
require a considerable amount of energy; increasing the current uptake
increases fuel consumption (by up to +25% in an urban cycle).Climate control system
Using the climate control system will increase consumption: use the air
vents when the external temperature allows it.
Devices for aerodynamic control
The use of non-certified devices for aerodynamic control may adversely
affect air drag and fuel consumption.
DRIVING STYLEStarting
Do not warm up the engine at low or high revs when the vehicle is
stationary; this causes the engine to warm up more slowly, thereby
increasing fuel consumption and emissions. It is therefore advisable to
move off immediately, slowly, avoiding high speeds: in this way the
engine will warm up more quickly.
Unnecessary actions
Avoid revving up when at traffic lights or before switching off the
engine. The latter action, like double-declutching, is unnecessary and
causes increased fuel consumption and pollution.
Gear selection
Use a higher gear when traffic and road conditions allow it. Using a
low gear for faster acceleration will increase consumption. In the same
way improper use of a high gear increases consumption, emissions
and engine wear.
138GETTING TO KNOW
YOUR CAR
SAFETYSTARTING AND
DRIVINGIN AN EMERGENCY
SERVICING AND
MAINTENANCE
TECHNICAL
SPECIFICATIONS
INDEX
Page 149 of 280
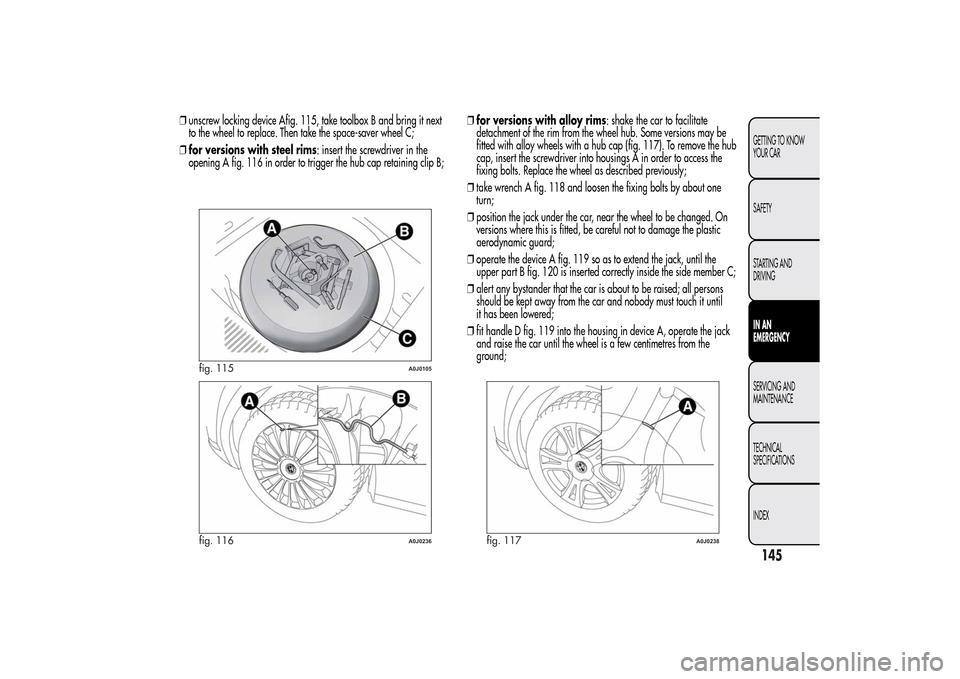
❒unscrew locking device Afig. 115, take toolbox B and bring it next
to the wheel to replace. Then take the space-saver wheel C;
❒for versions with steel rims: insert the screwdriver in the
opening A fig. 116 in order to trigger the hub cap retaining clip B;❒for versions with alloy rims: shake the car to facilitate
detachment of the rim from the wheel hub. Some versions may be
fitted with alloy wheels with a hub cap (fig. 117). To remove the hub
cap, insert the screwdriver into housings A in order to access the
fixing bolts. Replace the wheel as described previously;
❒take wrench A fig. 118 and loosen the fixing bolts by about one
turn;
❒position the jack under the car, near the wheel to be changed. On
versions where this is fitted, be careful not to damage the plastic
aerodynamic guard;
❒operate the device A fig. 119 so as to extend the jack, until the
upper part B fig. 120 is inserted correctly inside the side member C;
❒alert any bystander that the car is about to be raised; all persons
should be kept away from the car and nobody must touch it until
it has been lowered;
❒fit handle D fig. 119 into the housing in device A, operate the jack
and raise the car until the wheel is a few centimetres from the
ground;
fig. 115
A0J0105
fig. 116
A0J0236
fig. 117
A0J0238
145GETTING TO KNOW
YOUR CAR
SAFETY
STARTING AND
DRIVINGIN AN
EMERGENCYSERVICING AND
MAINTENANCE
TECHNICAL
SPECIFICATIONS
INDEX
Page 159 of 280
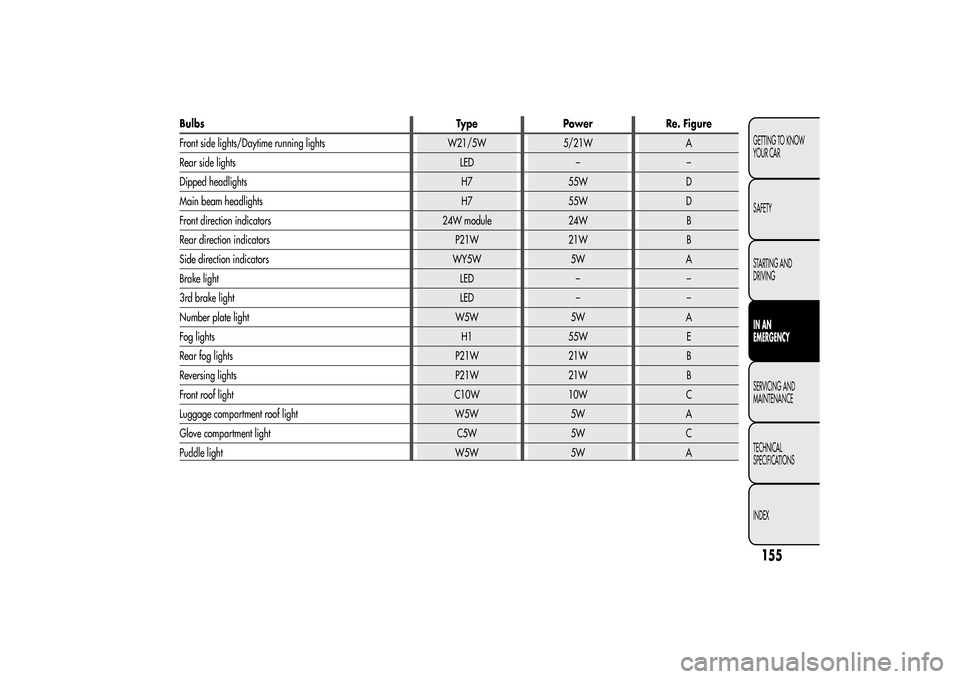
Bulbs Type Power Re. Figure
Front side lights/Daytime running lights W21/5W 5/21W A
Rear side lights LED – –
Dipped headlights H7 55W D
Main beam headlights H7 55W D
Front direction indicators 24W module 24W B
Rear direction indicators P21W 21W B
Side direction indicators WY5W 5W A
Brake light LED – –
3rd brake light LED – –
Number plate light W5W 5W A
Fog lights H1 55W E
Rear fog lights P21W 21W B
Reversing lights P21W 21W B
Front roof light C10W 10W C
Luggage compartment roof light W5W 5W A
Glove compartment light C5W 5W C
Puddle light W5W 5W A
155GETTING TO KNOW
YOUR CAR
SAFETY
STARTING AND
DRIVINGIN AN
EMERGENCYSERVICING AND
MAINTENANCE
TECHNICAL
SPECIFICATIONS
INDEX
Page 160 of 280
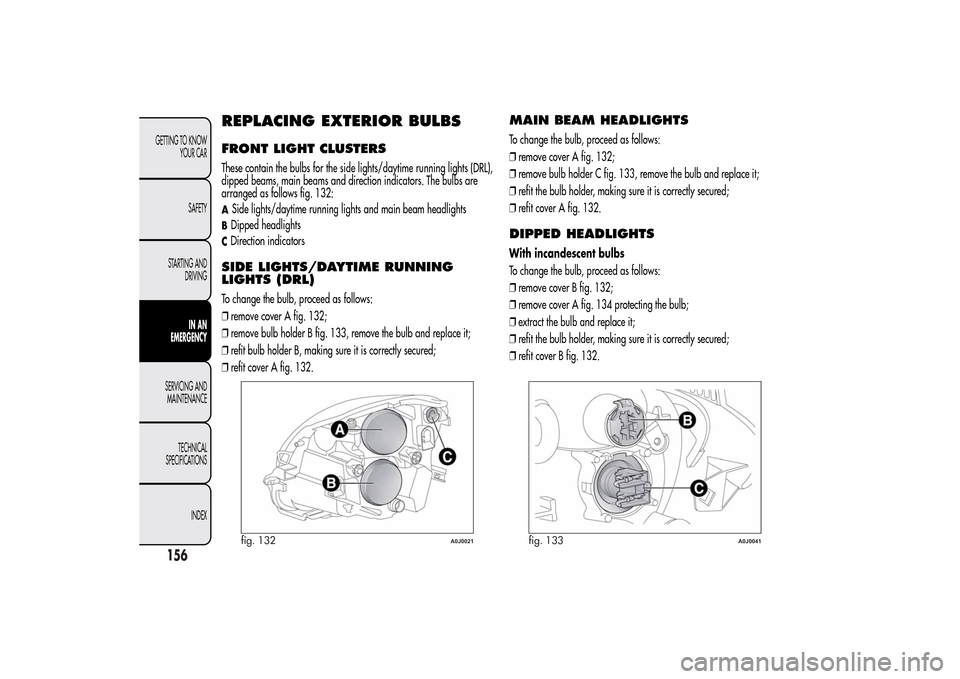
REPLACING EXTERIOR BULBSFRONT LIGHT CLUSTERSThese contain the bulbs for the side lights/daytime running lights (DRL),
dipped beams, main beams and direction indicators. The bulbs are
arranged as follows fig. 132:ASide lights/daytime running lights and main beam headlightsBDipped headlightsCDirection indicatorsSIDE LIGHTS/DAYTIME RUNNING
LIGHTS (DRL)To change the bulb, proceed as follows:
❒remove cover A fig. 132;
❒remove bulb holder B fig. 133, remove the bulb and replace it;
❒refit bulb holder B, making sure it is correctly secured;
❒refit cover A fig. 132.
MAIN BEAM HEADLIGHTSTo change the bulb, proceed as follows:
❒remove cover A fig. 132;
❒remove bulb holder C fig. 133, remove the bulb and replace it;
❒refit the bulb holder, making sure it is correctly secured;
❒refit cover A fig. 132.DIPPED HEADLIGHTSWith incandescent bulbs
To change the bulb, proceed as follows:
❒remove cover B fig. 132;
❒remove cover A fig. 134 protecting the bulb;
❒extract the bulb and replace it;
❒refit the bulb holder, making sure it is correctly secured;
❒refit cover B fig. 132.
fig. 132
A0J0021
fig. 133
A0J0041
156GETTING TO KNOW
YOUR CAR
SAFETY
STARTING AND
DRIVING
IN AN
EMERGENCY
SERVICING AND
MAINTENANCE
TECHNICAL
SPECIFICATIONS
INDEX
Page 174 of 280
BATTERY RECHARGINGIMPORTANT The battery recharging procedure is given as information
only. Contact Alfa Romeo Authorized Services to carry out this
operation.
IMPORTANT After turning the ignition key to STOP, wait at least 1
minute before disconnecting the battery power supply.
We recommend recharging the battery slowly for approximately 24
hours at low amperage. Charging for a longer time may damage the
battery.VERSIONS WITHOUT Start&Stop
SYSTEM(for versions/markets, where provided)
Charge the battery as follows:
❒disconnect the negative battery terminal;
❒connect the charger cables to the battery terminals, observing the
polarity;
❒turn on the battery charger;
❒when it is recharged, turn the charger off before disconnecting it
from the battery;
❒reconnect the negative battery terminal.
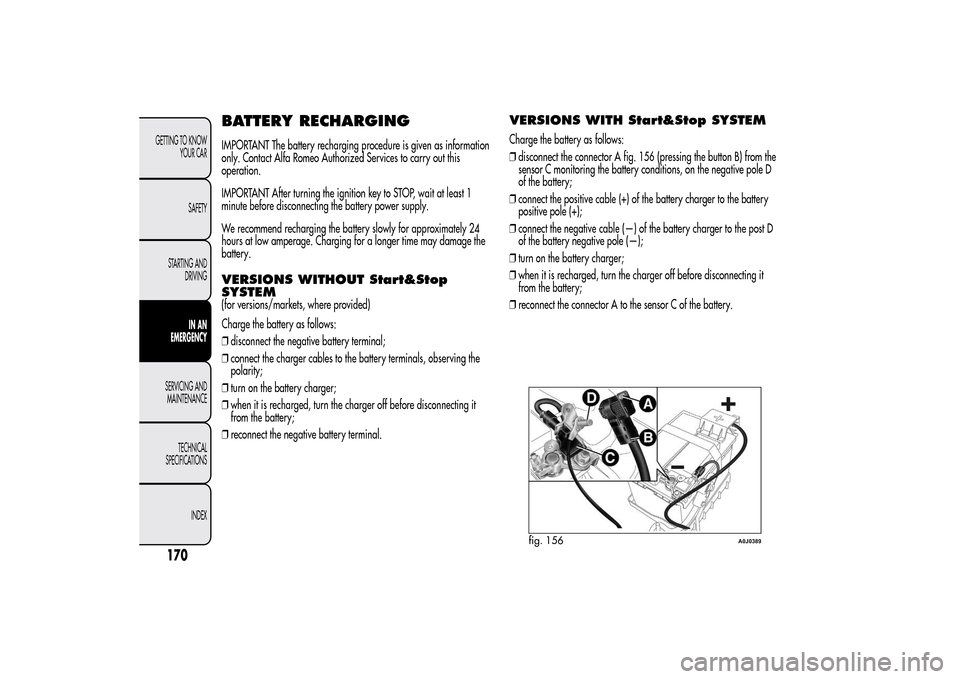
VERSIONS WITH Start&Stop SYSTEMCharge the battery as follows:
❒disconnect the connector A fig. 156 (pressing the button B) from the
sensor C monitoring the battery conditions, on the negative pole D
of the battery;
❒connect the positive cable (+) of the battery charger to the battery
positive pole (+);
❒connect the negative cable (—) of the battery charger to the post D
of the battery negative pole (—);
❒turn on the battery charger;
❒when it is recharged, turn the charger off before disconnecting it
from the battery;
❒reconnect the connector A to the sensor C of the battery.
fig. 156
A0J0389
170GETTING TO KNOW
YOUR CAR
SAFETY
STARTING AND
DRIVING
IN AN
EMERGENCY
SERVICING AND
MAINTENANCE
TECHNICAL
SPECIFICATIONS
INDEX