boot ASTON MARTIN DB7 1997 User Guide
[x] Cancel search | Manufacturer: ASTON MARTIN, Model Year: 1997, Model line: DB7, Model: ASTON MARTIN DB7 1997Pages: 421, PDF Size: 9.31 MB
Page 131 of 421
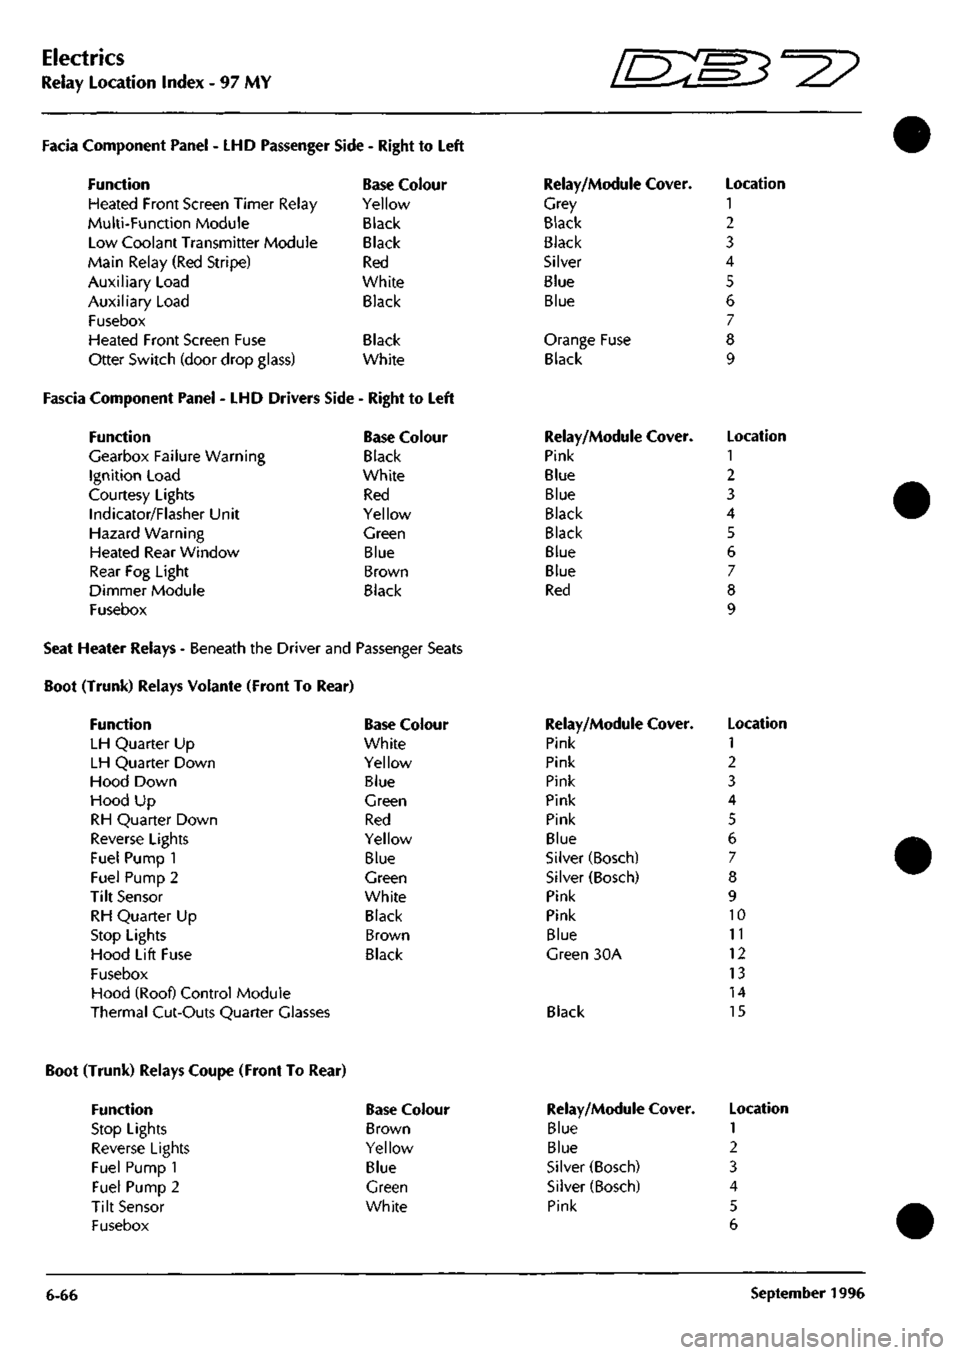
Electrics
Relay Location Index - 97 MY
D^^
Facia Component Panel
- LHD
Passenger
Function
Heated Front Screen Timer Relay
Multi-Function Module
Low Coolant Transmitter Module
Main Relay (Red Stripe)
Auxiliary Load
Auxiliary Load
Fusebox
Heated Front Screen Fuse
Otter Switch (door drop glass)
Side
-
Right
to
Left
Base Colour
Yellow
Black
Black
Red
White
Black
Black
White
Fascia Component Panel
- LHD
Drivers Side
-
Right
to
Left
Function
Gearbox Failure Warning
Ignition Load
Courtesy Lights
Indicator/Flasher Unit
Hazard Warning
Heated Rear Window
Rear
Fog
Light
Dimmer Module
Fusebox
Base Colour
Black
White
Red
Yellow
Green
Blue
Brown
Black
Relay/Module Cover.
Grey
Black
Black
Silver
Blue
Blue
Orange Fuse
Black
Relay/Module Cover.
Pink
Blue
Blue
Black
Black
Blue
Blue
Red
Location
1
2
3
4
5
6
7
8
9
Location
1
2
3
4
5
6
7
8
9
Seat Heater Relays - Beneath the Driver and Passenger Seats
Boot (Trunk) Relays Volante (Front To Rear)
Function
LH Quarter
Up
LH Quarter Down
Hood Down
Hood
Up
RH Quarter Down
Reverse Lights
Fuel Pump
1
Fuel Pump
2
Tilt Sensor
RH Quarter
Up
Stop Lights
Hood Lift Fuse
Fusebox
Hood (Roof) Control Module
Thermal Cut-Outs Quarter Glasses
Base Colour
White
Yellow
Blue
Green
Red
Yellow
Blue
Green
White
Black
Brown
Black
Relay/Module Cover.
Pink
Pink
Pink
Pink
Pink
Blue
Silver (Bosch)
Silver (Bosch)
Pink
Pink
Blue
Green
30A
Black
Location
1
2
3
4
5
6
7
8
9
10
11
12
13
14
15
Boot (Trunk) Relays Coupe (Front To Rear)
Function
Stop Lights
Reverse Lights
Fuel Pump 1
Fuel Pump 2
Tilt Sensor
Fusebox
Base Colour
Brown
Yellow
Blue
Green
White
6-66
Relay/Module
Blue
Blue
Silver (Bosch)
Silver (Bosch)
Pink
Cover. Location
1
2
3
4
5
6
September
1996
Page 132 of 421
^^?
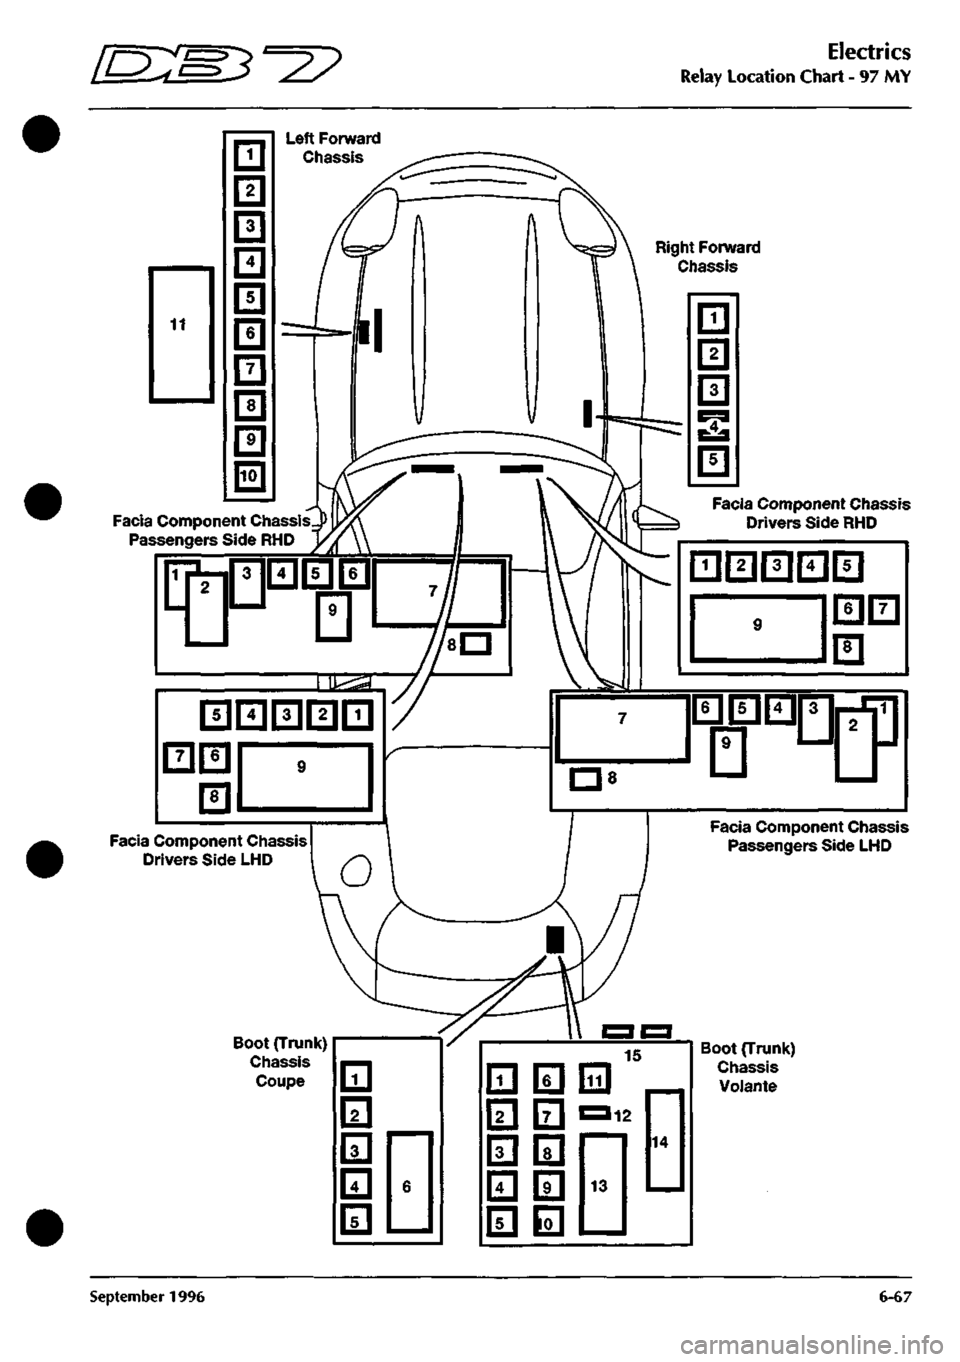
Electrics
Relay Location Chart - 97 MY
Right Forward
Chassis
Facia Component Chassis
Passengers Side RHD
Facia Component Chassis
Drivers Side LliD
Boot (Trunk)
Chassis
Coupe 111
I2I
131
m
fsl
6
Boot (Trunlt)
Chassis
VoJante
September 1996 6-67
Page 164 of 421
NO
COLOUR
PIN
AREA I0S8
KB I
I7.B3-I79 JAO
OC 2 H.BI
WINDOW LIFT NO COLOUR
PIN
AREA I0S3
GR I
I6.A3 1051
GW 2
I6.A3
I
NO
COLOUR AREA 1829
RN
I4.BI
I HEATED BACKLIGHTi
VAPOUR MANAGEMENT VALVE
HOOD LIFT NO COLOUR 1054
GW
1053
GR
1060 GW lOEl
GR
1
I
4
I
AREA I6.AI le.AI
I5.ei-I54A I5.BI-I54B
NO COLOUR
PIN
1096 BW 828
BG
AREA I4.AI I4.BI
I4.B5-I60 I4.BI
FUEL PUMP
I
NO COLOUR
PIN
1086
B 1
1087 UG
2
AREA I6.B3 I7.A2
NO COLOUR
PIN
AREA 16.85 I7.A3
INTERIOR LIGHT NO COLOUR
PIN
AREA
1056 P I I4.C4-I56 1057 PW 2 I4.C4-I57
m
fsD
1ST SECURITY STEM
I
AERIAL
I
NO
COLOUR
PIN
799
BR I
1800
B 2
AREA 14.Al 14.Al
I
NO
COLOUR ||055
TIN
AREA I7.B6
LINK PINS
I a 2
LING
PIN 3 a 4
NO COLOUR
PIN
AREA
1062
NP
792
VG
I6.B3-I68 I4.AI
6)[5]o[4)|3J
02 01 Qi 03
REAR LAMP
SHORTING
PLUG
02 01 Ql 03
NO COLOUR PINAREA
1064
GP I
IG.B5-I74
1065 GP
2 16.01 1066 RU 3 I4.C5-I59
1067
RU 4 16,01
Ql D3 D2 01
LINK PINS
I 8 4
RH REAR LAMP
NO COLOUR 1067
RU
1068
ON
1069 CW 1070
B
1071
RG
1065
GP
PIN 1 ? ^ 4 •) 6
AREA 16.01 I6.B3-I7I I6.BI-I67 I6.C3-IG9 I6.C3-I70 16.01
mmra CEIinnn
(—\ Qi 01
cr
D 0 I—I 03 06 SHEET 18 '• AREA B/CI
0
01 Qi 0 D 03 06
NO COLOUR AREA 813
LGO 14.01
1080
B
I6.B4-I73 FUEL TANK SENDER UNIT
NO COLOUR AREA 1086
B
1088
B
1090
B
1091
B
I6.A5 I6.A6 16.84-173 I6.C3-I69
TH^
SHEET 17 AREA Bl
-» ^
-F^Pl-'
NO COLOUR
PIN
AREA
1094
BR U
16.86-178
1095 BR W 16.84-172
NO COLOUR PIN 797 S I
1092
B 2
652
WU 3
1093
HP 4
AREA 14.01
I6.B4-I73 14.01 I6.B5-I75
NO COLOUR AREA 2183
B
I6.C5-2I8 1084 RG
16.04
RADIO TELEPHONE
E
Di 05 D 0 D D 04 08/
4
8
J^Q a
£o 0 PO 0
T?D 0 ^ 1 S ^
NO COLOUR
PIN
1081
BR I
1082 PG
2
3
NO COLOUR AREA
1078
NP
I6.B3-I68 1079
BR
I6.B4-I72
AREA I6.B4-I72 I7.C6
1084
RG 1085 B 16.03-170 I6.B4-I73
NO COLOUR
PIN
1081
BR I
1082
PG 2
3 i
RS 4
5 6 1084 RG
7
1085
B 8
AREA le.CG 16.CG
I6.C6 I6.C5-2I8
Zl
1
RH NUMBER PLATE LAMP
NO COLOUR
PIN
AREA 1081
BR I
I6.C4 2184
B 2
l6.C5-2ia
BOOT LOCK ACTUATOR NO COLOUR
PIN
AREA 2185
B I
I6.C5-2I8 1082
PG 2
I6.C4
^[}
[}
JLH
NUMBER
PLATE LAMP
NO COLOUR AREA 2186
B
I6.C5-2I6 ;I083
RS
I6.D4
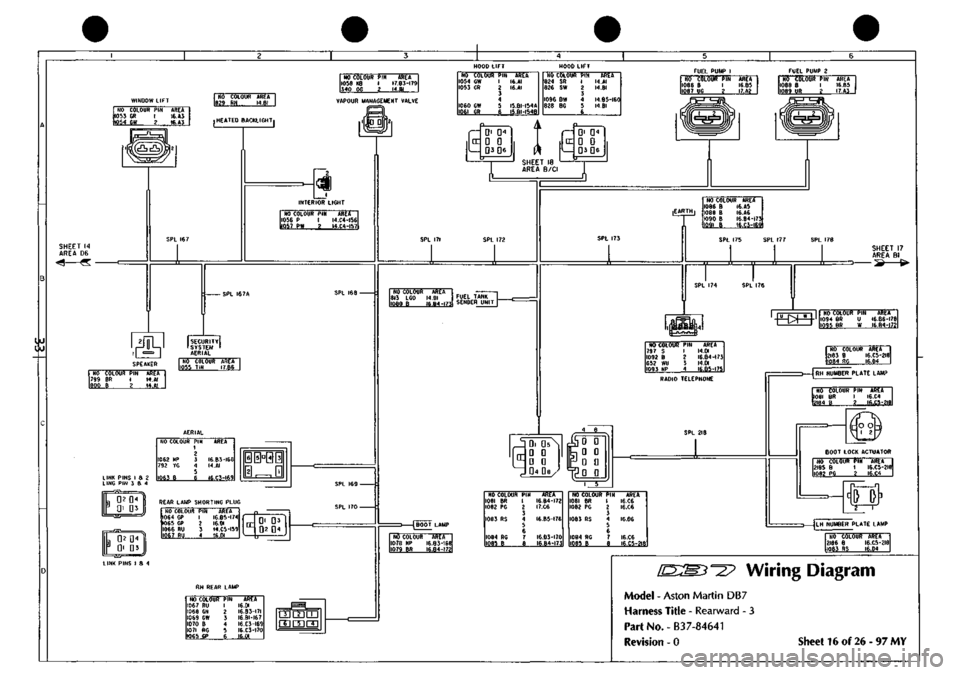
Wiring Diagram
Model - Aston Martin DB7
Harness Title - Rearward - 3
Part No. -
B3
7-84641
Revision - 0 Sheet 16 of 26-97 MY
Page 166 of 421
STOP LAMP
NO COLOUR 807
CB
1097
G
1098
GP
1099
G
RELAY
PIN AREA 85 I4.CI 86 I7.D2 87 I6.B5-I74
87A
30
17X2
REVERSE LAMP RELAY FUEL PUMP RELAY 1
NO COLOUR 803
SLG
1100
W
IIOI
GN
1102
NP
PIN 85 88
8/
R7A 30
AREA M.CI 17.02 I6.B3-I7I
I6B5-I75
NO COLOUfl 335 OR 1103 KB 1087 UG 337 RN 1104 NP
PIN BS R6 87 R7A 30
AREA I4.CI I7.B3-I79 I6.A5 14.01 17.02
FUEL PUMP RELAY 2
NO COLOUR 336 0 1105 KB 1089 UR 809 YN 1106 NP
PIN AREA 85 I4.CI 86 I7.B3-I79 87 le.AG 87A I4.CI 30 I7.C2
TILT SENSOR RELAY
NO COLOUfl 1109 B 1110 WK
nil BO 1112 B
PIN AREA 85 17.84-183 S6 I7.B4-I82 87 87A I4.B4-I58 30 I7.B4-I83
I^OBROWN
BASE
87A ^JSSPBL
[jylYELLOW
BASE
ma
3«-i
J¥tU
SHEET
16
AREA
B6
10 in
'-fts'^B^-'
lijZ-il
[NATURAL
BASE
L 3JA
NO COLOUR AREA 1107
N
17.83-180 llOe
N
17.83-181
NO COLOUR 1125
N
1126
G
1127
G
1128
N
1130
N
1072
R
1075
R
1133
G
1135
N
1137
G
1138
N
1140
N
PIN 1 2 3 4 5 6
/
8 9 10 II
12 13
AREA 17.83-180 16.86-177 16.86-177 I7.B3-I8I I7.B3-I80 14.84-155 14.84-155 16.86-177 17.83-180 I6.B6-I77 I7.B3-I8I I7.B3-I8I
c
SHEET
25
AREA
B/C6
CZE
BOOT FUSEBOX HARNESS
•^-
rp
NO COLOUR
iioe NP 1099 G 1097 G 1129 NP 1115 NS 1131 RS 1132 RG 1134 m 1136 NS 1100 W 1139 NP 1104 NP
PIN 1 2 3 4 5 6 7 8 9 10 II
\l
AREA I7.A3 I7.AI I7.AI 16.83-168 I7.C4 I6.B5-I76 I6.C3-I70 17.84-182 I7.B5-I84 I7.A2 16.85-175 I7.A2
I
D
a
D
D
D
D,
D
c^
D
D
D
0
D
D
NO COLOUR
PIN
1113
VS A
1114
NS B
AREA 17.86 I7.C6
i'^AAA'
ITYRE
COMPRESSORI
NO COLOUR AREA 1115
NS
I7.DI 1116
8 I7.B4-IB3
5^
\_/
SECURITY NO COLOUR 1055
TIN
1026
KB
1117
BR
1118
BR
1028
HI
772
OR
1027
U
1119
WY
3
YS
1113
YS
1120
GR
1121
8
1122
8RD
1021
UO
773
OU
374
0
1
LG
1082
PG
1123
GW
1114
NS
1124
NS
SYSTEM
PIN 1 ? 3 4 5 6
7 8 9 10
II II 12 13
14 15
16
17 18 19 20 ?l
22 23 24 25 2b
AREA I6.C2 I4.B6 16.84-172 16.86-178 14 .C6 I4.CI 14.06
17.84-182 M.BI I7.B5 I5.B1-163 17.84-183 I6.82-I67A
I4.C4 I4.CI
I5.BI
I4.CI ie.C4 16.81-167 17.85 17.85-184
'^7
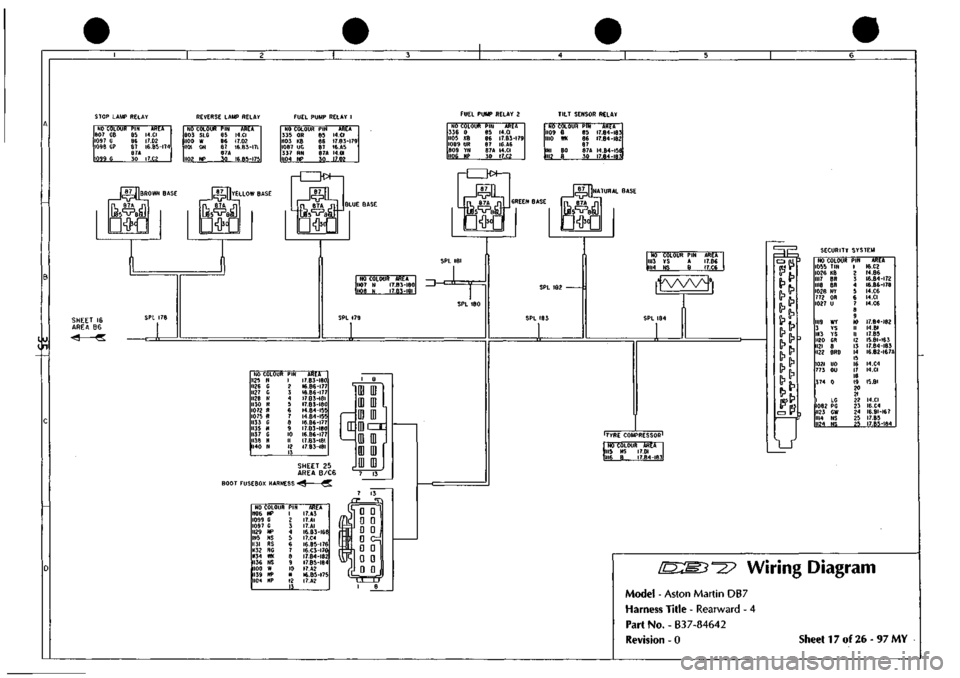
Wiring Diagram
Model
- Aston Martin DB7
Harness
Title - Rearward - 4
Part
No. - B37-84642
Revision
- 0
Sheet
17 of 26-97 MY
Page 182 of 421
\L^C=£
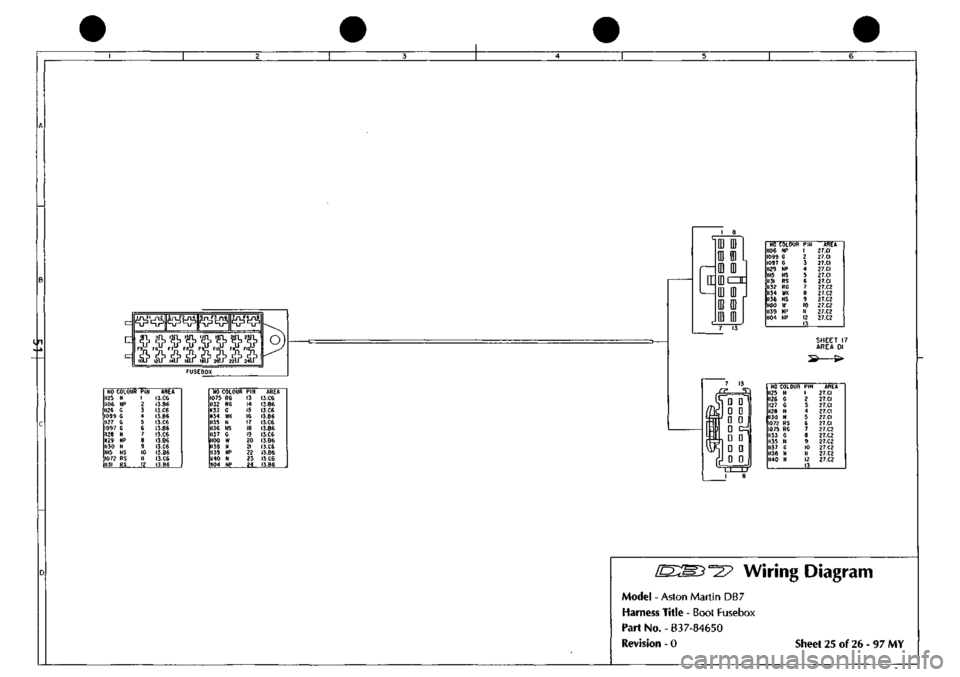
NO
COLOUR
1106 HP 1099 G 1097 G 1129 NP 1115 NS 1131 RS 113? RG 1134 WK 1136 NS 1100 W 1139 H? 1104 NP
PIN 1 2 3 4 5 6 t S 9 10 II 12 13
AREA
2T.a
2?.CI 27.CI
27.01
27.CI 27.CI 27.C2 27.C2 27.C2 27.C2 27.C2 27.02
SHEET
17
AREA
Dl
NO
COLOUR
1125 N 1126 G 1127 G 1128 N 1130 M 1072 RS 1075 RG 1133 G 1135 N 1137 0 1136 N 1140 N
PIN 1 2 3 4 S 6 7 S 9 10 II 12 13
AREA 27.CI 27.CI 27.CI 27.CI
n.a
27.CI 27.C2 27.C2 27.02
27 C2
27.C2 27.C2
Wiring Diagram
Model
-
Aston Martin
DB7
Harness Title
-
Boot Fusebox
Part
No. -
837-84650
Revision
- 0
Sheet
25 of
26-97
MY
in
^n^P^F^^j^Fj^T^rj^
NO
COLOUF
1125 N
iioe
NP 1126 G 1099
G
1127 G 1097 G 1128 N 1129 NP 1130 N 1115 NS 1072 RS 1131 RS
PIN 1 2 3 4 5 6 / 8 9 10 II 12
AREA I3.C6
13.86
I3.C6
13.86 13.C6 13.86
I3.C6 I3.8G I3.C6 I3.B6 I3.C6 I3.B6
NO
COLOUF
1075 RG 1132 RG 1133 G 1134 WK 1135 N 1136 NS 1137 G 1100 W 1138 N 1139 NP 1140 N 1104 NP
PIN 13 14 15 16 17 18 19 ?0 21 ?? 23 24
AREA I3.C6
13.86
I3.C6
13.86
I5.C6
13.86
I3.ce
13.86
I3.C6
13.86
I3.C6
13.86
Page 187 of 421
^=2?
Electrics
Airbag System
Eye Protection
Chemical protective goggles are recommended
where there is a possibility of eye contact with the
propellant. Safety glasses with side shields are
recommended for all other operations.
Protective Clothing
Approved protective gloves, overalls and shoes/
boots should be worn.
Handling and Storage Precautions
Do not store airbag modules near live electrical
equipment or circuitry. Store in a dry environment
at ambient temperatures.
Good housekeeping and engineering practices
should be employed to prevent the generation and
accumulation of
dusts.
Store in compliance with all
local state and federal regulations.
Driver and Passenger Airbag Modules
Assembly/Removal/Service Instructions
WARNING: In the event of a vehicle impact where the
airbags and the seatbeltpretensioner (if fitted) are
deployed, the following actions MUST be
performed:
Check the condition of the seatbelts, steering
wheel,
steering column, all connections to airbags,
and the column switchgear connectors for integrity
and damage. If in any
doubt,
replace suspected
parts for new parts.
Replace both crash
sensors,
the
safing sensor
and
the seatbelt pretensioner module (if fitted).
On completion of all repair procedures, switch on
the ignition and check that the
Airbag/SRS
warning
light comes on when the ignition is switched on
and extinguishes after approximately six seconds
indicating satisfactory completion of the airbag
and pretensioner
system
self
tests.
WARNING: Before starting
work,
ensure
that the ignition
switch is in position 'O' and the ignition key is
removed.
Disconnect the battery negative lead
within 12 seconds of switching off the ignition to
prevent the alarm system triggering.
As the airbag control module is equipped with a
back-up power source and due to the risk of the
airbag being inadvertently deployed, wait one
minute or longer after disconnecting the battery
before starting work on the airbag module.
• Disconnectingthe battery negative cable cancels
the memory for the 'one-touch' window down
system and stops the vehicle clock. Reset the
window memory and the clock when work is
completed.
• Never use airbags from other vehicles, always
use new parts.
• After work is completed, reconnect the battery
and perform the airbag warning light check
• Never use electrical probes to check voltage or
electrical resistance of the airbag modules.
• Disconnect the airbag before carrying out any
work on, or in the vicinity of the module, or
when using electric welding equipment.
• Always ensure that the battery negative lead has
been disconnected for at least one minute before
commencing any removal procedure.
September 1996 6-71
Page 231 of 421
^"^
Body and Trim
Body Repair
Precautions
Paint
Ensure that there is efficient ventilation at all times. Paint spraying should be confined to spray booths.
Anyone with a history asthma should not be engaged in any process which involves the use of isocyanates.
Any operator working inside a spray booth where isocyanates are present must use air-fed breathing equipment.
Supplied air to the visor should be fed at the recommended pressure and filtered to remove oil, water and fumes.
Operators involved in handling, mixing or spraying should wear protective clothing, gloves and goggles to avoid
skin and eye contact. A Paticle mask or canister typr respirator should be worn when sanding.
Applied heat
When welding, flame cutting or brazing and so on, goggles, a mask or fume extractor and flameproof protective
clothing should be used always.
It is especially important when working with polyurethane compounds to use air-fed breathing equipment.
Ensure that at all times the appropriate fire fighting equipment isavailableand that personnel are trained in its use.
Metal repair
Wear appropriate eye and hand protection when sanding, drilling, cutting, chiselling, flatting or welding. Wear a
face mask or air-fed visor when sanding or flatting either body solder or
fillers.
When a soldering operation has been
completed,
remove swarf from the work area and wash your hands thoroughly.
General Repair Notes
The following precautions should be noted before any work is carried out:
• disconnect the vehicle battery ground
lead,
taking note of the reconnection procedures
• Make sure that you have read and understood the safety related procedures in this section.
Caution:
Electric arc
welding must not
be
used on the
vehicle as the high
voltages produced by
this process
will
cause
irreparable
damage
to the electrical control and
microprocessor
systems.
All trim and electrical components in the locality of the repair must be removed or disconnected prior to panel
removal or replacement.
Welding and Gas Process Special Notes
Resistance spot welding, MIG welding and all gas processes may only be carried out on bare, unpainted or unplated
metal.
The flanges of panels, which are to be welded together, must be clean, corrosion free and treated as
appropriate with either weld-through or inter-weld sealer.
The resistance spot welding equ ipment used in vehicle repair does not always produce
a
weld of
equ
ivalent strength
to that produced in manufacturing. This means that a single row of spot welds should be spaced on a pitch of 19-
25 mm, which will usually result in more spot welds than found in the original factory joint.
Use a resistance spot weld cutter to remove resistance spot welds. Where a new joint is to be MIC welded, cut the
old resistance spot welds from the panel that is to be retained; the resulting holes are then used for plug welding.
Suitable holes may be drilled or punched as follows:
• 8.0 mm for sections up to 1.5 mm thickness
• 10.0 mm for thicker sections.
Always refer to the welding equipment manufacturers diagrams and tables for the relevant procedure.
May 1996 7-3
Page 266 of 421
^=2?
Body and Trim
Roof Hydraulic Control System
9. Position the rear edge of the roof to the body.
10.
Position the rear cable to the roof lower edge.
Position the loops on the cable (approximately 17in
equi-spaced apart). Position the cable to the
mou nti ng
brackets,
fit but do not tighten the
secu
ring
nuts.
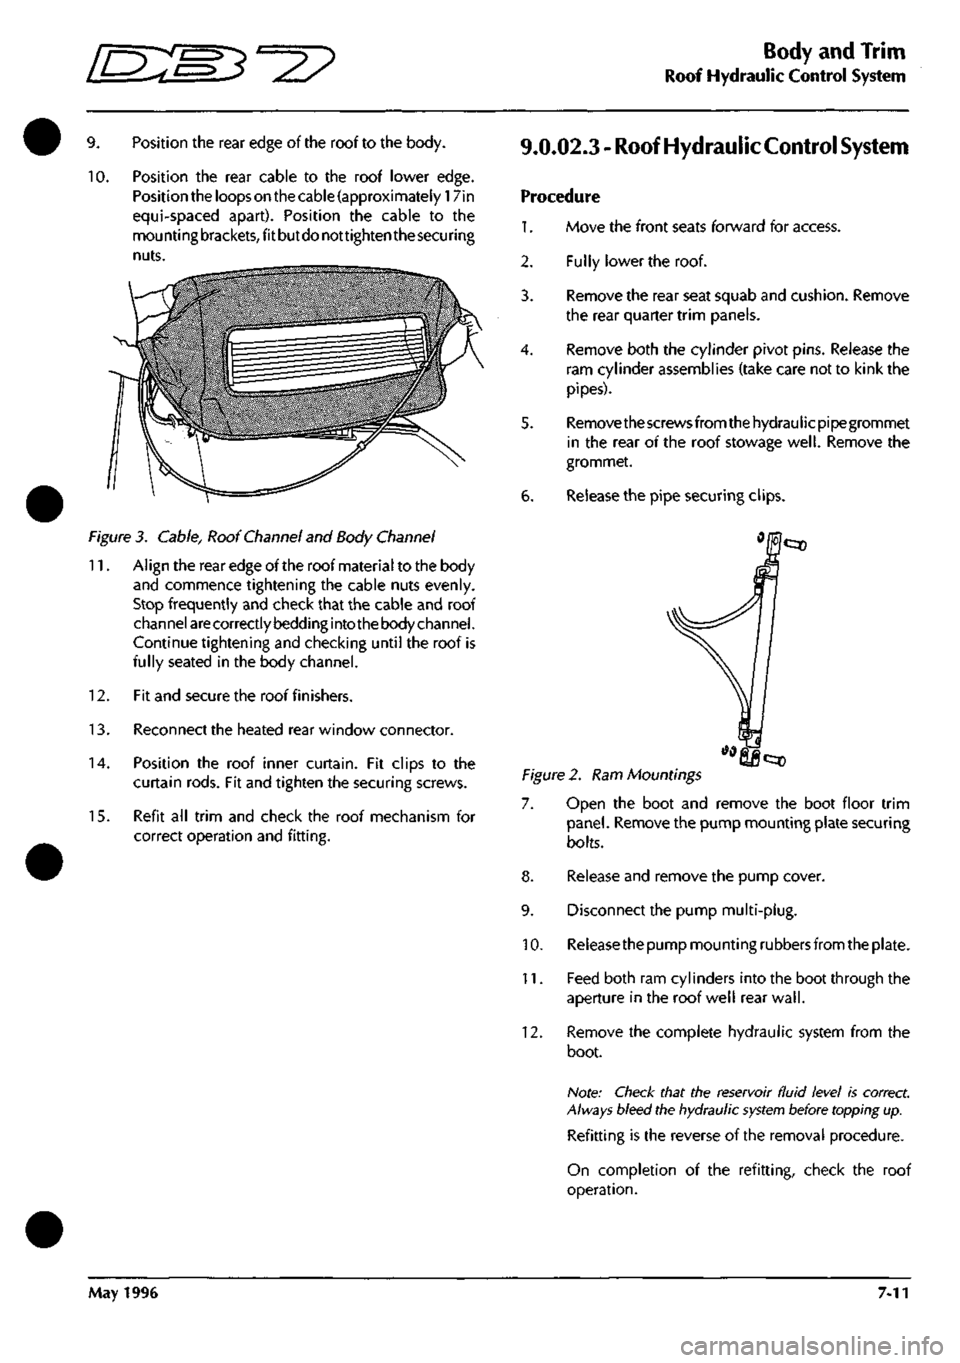
Figure 3. Cable, Roof Channel and Body Channel
11.
Align the rear edge of the roof material to the body
and commence tightening the cable nuts evenly.
Stop frequently and check that the cable and roof
channel
are
correctly bedding into the body channel.
Continue tightening and checking until the roof is
fully seated in the body channel.
12.
Fit and secure the roof finishers.
13.
Reconnect the heated rear window connector.
14.
Position the roof inner curtain. Fit clips to the
curtain rods. Fit and tighten the securing screws.
15.
Refit all trim and check the roof mechanism for
correct operation and fitting.
9.0.02.3 - Roof Hydraulic
Control
System
Procedure
1.
Move the front seats forward for access.
Fully lower the roof.
2.
3.
4.
6.
Remove the rear seat squab and cushion. Remove
the rear quarter trim panels.
Remove both the cylinder pivot pins. Release the
ram cylinder assemblies (take care not to kink the
pipes).
Remove the screws from the hydraulicpipegrommet
in the rear of the roof stowage
well.
Remove the
grommet.
Release the pipe securing clips.
Figure 2. Ram Mountings
7. Open the boot and remove the boot floor trim
panel.
Remove the pump mounting plate securing
bolts.
8. Release and remove the pump cover.
9. Disconnect the pump multi-plug.
10.
Releasethe pump mounting rubbers from the plate.
11.
Feed both ram cylinders into the boot through the
aperture in the roof well rear
wall.
12.
Remove the complete hydraulic system from the
boot.
Note: Check that the reservoir fluid level is correct.
Always bleed the hydraulic
system
before topping up.
Refitting is the reverse of the removal procedure.
On completion of the refitting, check the roof
operation.
May 1996 7-11