charging ASTON MARTIN DB7 1997 User Guide
[x] Cancel search | Manufacturer: ASTON MARTIN, Model Year: 1997, Model line: DB7, Model: ASTON MARTIN DB7 1997Pages: 421, PDF Size: 9.31 MB
Page 324 of 421
^?
Air Conditioning
Torque Settings / Depressurising the System
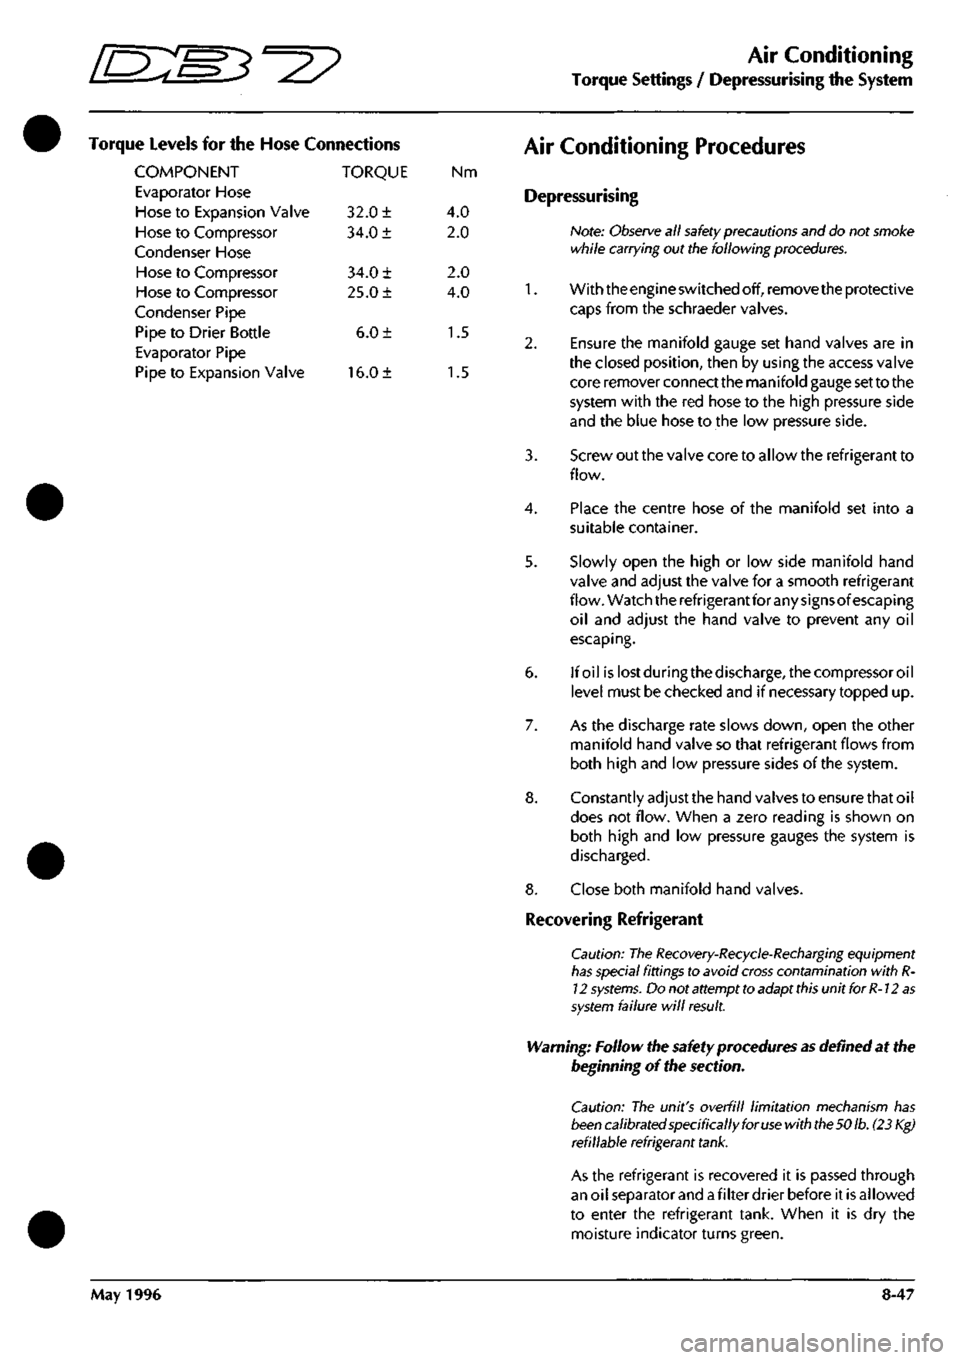
Torque Levels for the Hose Connections
COMPONENT TORQUE Nm
Evaporator Hose
Hose to Expansion Valve 32.0 ± 4.0
Hose to Compressor 34.0 ± 2.0
Condenser Hose
Hose to Compressor 34.0 ± 2.0
Hose to Compressor 25.0 ± 4.0
Condenser Pipe
Pipe to Drier Bottle 6.0 ± 1.5
Evaporator Pipe
Pipe to Expansion Valve 16.0 ± 1.5
Air Conditioning Procedures
Depressurising
Note:
Observe
all
safety
precautions and do not smoke
while carrying out the following
procedures.
1.
With the engine switched off, remove the protective
caps from the schraeder valves.
2.
Ensure the manifold gauge set hand valves are in
the closed position, then by using the access valve
core remover connect the manifold gauge set to the
system with the red hose to the high pressure side
and the blue hose to the low pressure side.
3. Screw out the valve core to allow the refrigerant to
flow.
4.
Place the centre hose of the manifold set into a
suitable container.
5. Slowly open the high or low side manifold hand
valve and adjust the valve for a smooth refrigerant
flow. Watch the refrigerant for any signsof escaping
oil and adjust the hand valve to prevent any oil
escaping.
6. If oil islostduringthedischarge,thecompressoroil
level must be checked and if necessary topped up.
7. As the discharge rate slows down, open the other
manifold hand valve so that refrigerant flows from
both high and low pressure sides of the system.
8. Constantly adjust the hand valves to ensure that oil
does not flow. When a zero reading is shown on
both high and low pressure gauges the system is
discharged.
8. Close both manifold hand valves.
Recovering Refrigerant
Caution: The
Recovery-Recycle-Recharging
equipment
has
special fittings to avoid
cross
contamination with
R-
12
systems.
Do not attempt to adapt
this
unit for
R-12
as
system
failure will
result.
Warning: Follow the safety procedures
as
defined at the
beginning of the section.
Caution: The unit's overfill limitation mechanism has
been
calibrated specifically for
use
with
the 50
lb.
(23 Kg)
refillable refrigerant
tank.
As the refrigerant is recovered it is passed through
an oil separator and
a
filter drier before it is allowed
to enter the refrigerant tank. When it is dry the
moisture indicator turns green.
May 1996 8-47
Page 326 of 421
^2?
Air Conditioning
System Recharging / Compressor Oil Check
Recharging the System
1.
Open the high side valve on the unit control panel.
If the messages PROGRAM and CHARGE are not
displayed press the CHG key to enter PROGRAM
mode.
2.
Key in the amount of refrigerant needed to recharge
the system and press ENTER.
3. Press the CHG key; the message AUTOMATIC and
the entered amount of refrigerant wi
11
be displayed.
The display counts down to zero as the charging
process proceeds. When the charging is complete
the message CPL is displayed.
If the refrigerant transfer is too slow the charging
unit emits a signal. If the message CHECK
REFRIGERANT is not displayed, close the high side
valve,
open the low side valve and start the air
conditioning system to pull the remainder of the
charge into the system.
If the refrigerant transfer will not complete and the
message CHECK REFRIGERANT is displayed, press
the HOLD/CONT key to interrupt the cycle then
reset the unit by pressing the RESET key. Recover
the refrigerant already charged into the system by
following the procedure for recovering the
refrigerant, add new refrigerant to the tank and
return to Step 1 to recharge the system.
4.
If the air conditioning system is not running start it
and let it run until the gauge pressure readings
stabilize (compare the gauge readings with the
system manufacturer's specifications).
Note:
Ensure
that the
readings
are accurate by closing
both the high and low side
valves
on the unit's control
panel.
5. Check the evaporator outlet temperature to make
sure that the air conditioning system is operating
properly (refer to the system manufacturer's
specifications for the proper temperature).
Compressor Oil Checic
Data
Special Tools
Sanden oil dipstick JD 149
Torque Figures
Oil filler plug 8-12 Nm
Procedure
Whenever a component has been replaced in the
refrigerator system or there is an obvious oil leak, the
following procedure should be carried out.
A Sanden oil dipstick and angle gauge are required in
order to carry out the check.
1.
Run the compressor for 10 minutes at engine idle
speed.
2.
Depressurise the system.
3. Lay the angle gauge across the flat surfaces of the
two front mounting lobes. Centre the bubble and
note the mounting angle.
4.
Remove the compressor from the vehicle.
3. Remove the plug from the oil filler hole
(1
Fig. 1).
4.
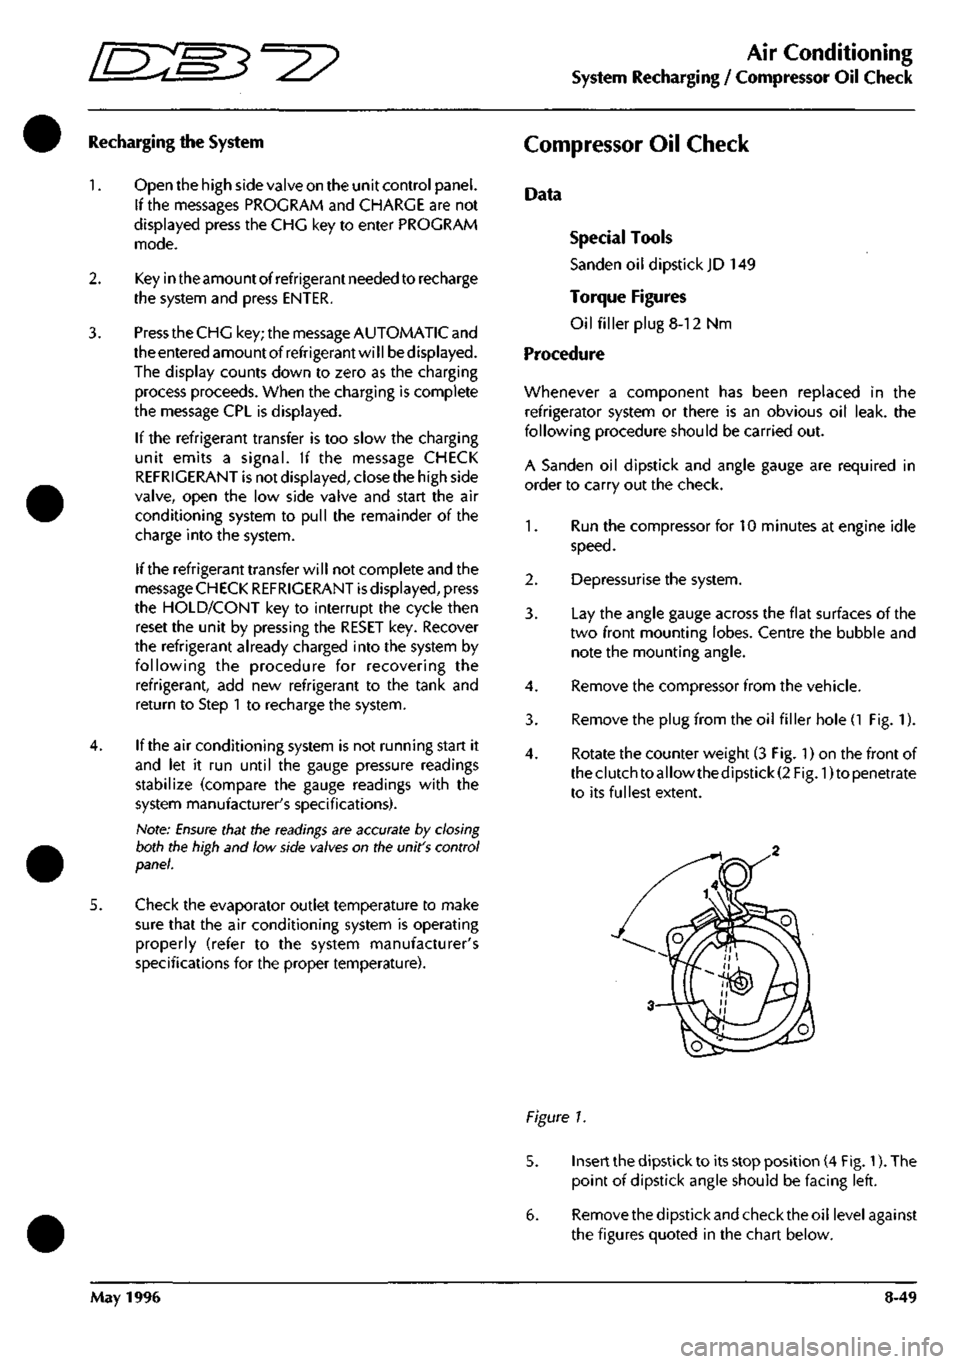
Rotate the counter weight (3 Fig. 1) on the front of
theclutchtoallowthedipstick(2 Fig. 1)to penetrate
to its fullest extent.
Figure 1.
5. Insert the dipstick to its stop position (4 Fig. 1). The
point of dipstick angle should be facing left.
6. Removethedipstickandchecktheoil levelagainst
the figures quoted in the chart below.
May 1996 8-49
Page 354 of 421
'=^
The Aston Martin Lagonda Diagnostic System
Installation Instructions
12 10
19 22 21 20
VIA A / /^^>^ I B T
A-XA^I'A® QA
13
16
18 29
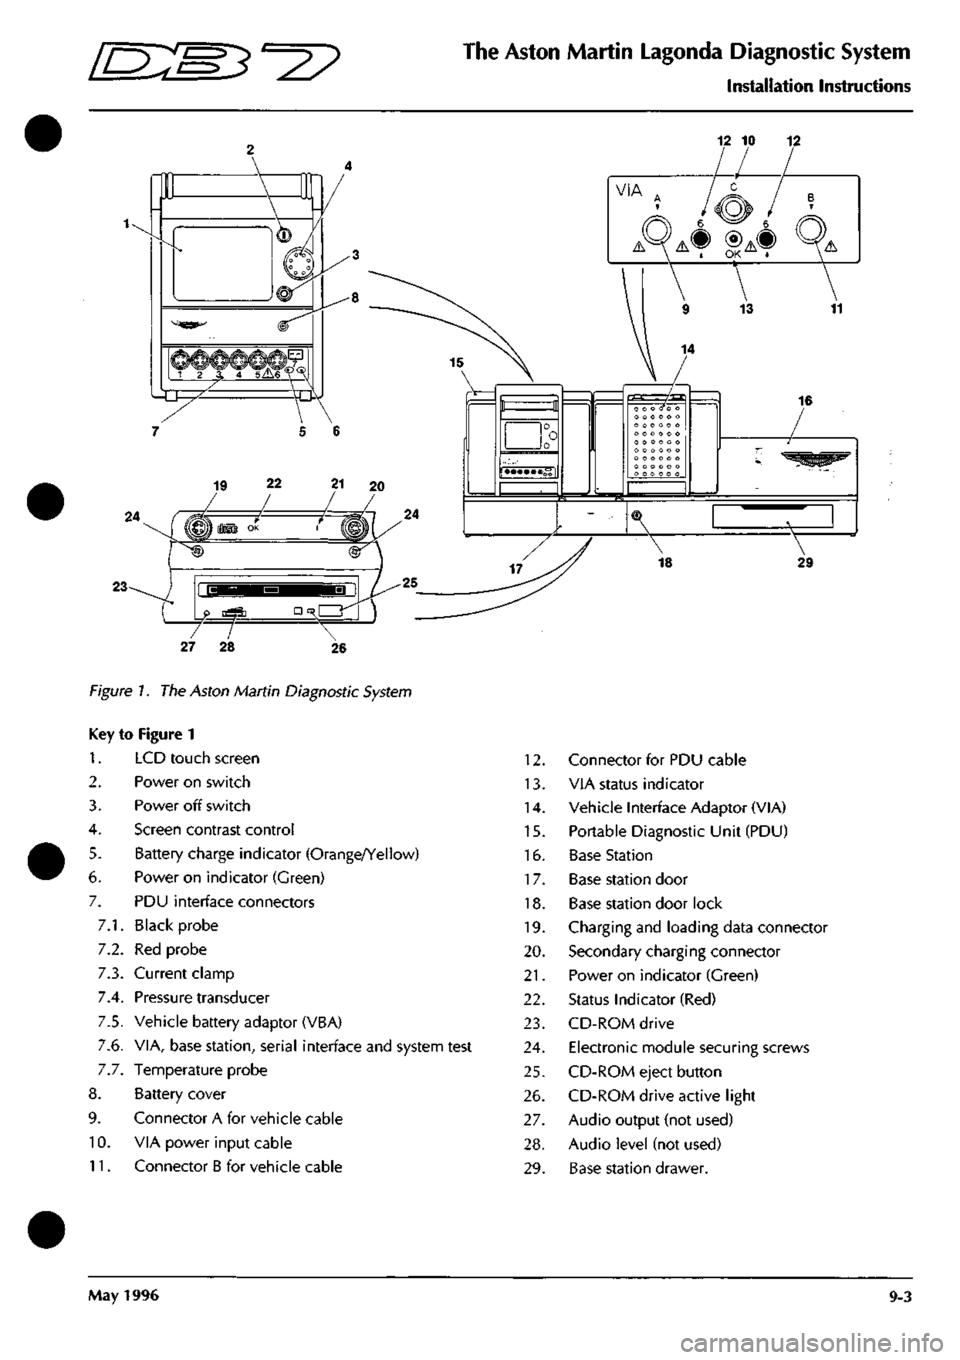
Figure 7. The Aston Martin Diagnostic System
Key to Figure 1
1.
2.
3.
4.
5.
6.
7.
7.1.
7.2.
7.3.
7.4.
7.5.
7.6.
7.7.
8.
9.
10.
11.
LCD touch screen
Power on switch
Power off switch
Screen contrast control
Battery charge indicator (Orange/Yellow)
Power on indicator (Green)
PDU interface connectors
Black probe
Red probe
Current clamp
Pressure transducer
Vehicle battery adaptor (VBA)
VIA, base station, serial interface and system test
Temperature probe
Battery cover
Connector A for vehicle cable
VIA power input cable
Connector B for vehicle cable
12.
13.
14.
15.
16.
17.
18.
19.
20.
21.
22.
23.
24.
25.
26.
27.
28.
29.
Connector for PDU cable
VIA status indicator
Vehicle Interface Adaptor (VIA)
Portable Diagnostic Unit (PDU)
Base Station
Base station door
Base station door lock
Charging and loading data connector
Secondary charging connector
Power on indicator (Green)
Status Indicator (Red)
CD-ROM drive
Electronic module securing screws
CD-ROM eject button
CD-ROM drive active light
Audio output (not used)
Audio level (not used)
Base station drawer.
May 1996 9-3
Page 355 of 421
The Aston Martin Lagonda Diagnostic System
Installation Instructions "^P
Component Identification
Base Station (Fig
1
-16)
The Base Station is a wall or bench mounted steel
unit on which up to two Portable Diagnostic Units
and a Vehicle Interface Adaptor can be stored.
Portable Diagnostic Unit (PDU) (Fig 1-15)
The PDU is a hand held diagnostic tool utilising a
touch sensitive screen and serial communications
capability
Electronics Module
The Electronics Module is located behind the base
station door (Fig
1
-17) and facilitates the charging
of the PDU battery. Also contained in the module
is
the CD-ROM drive (Fig
1
-23) for the storage of
al I
system software. The PDU must be connected to
the electronic modu le whenever it is located on the
base station.
Vehicle interface Adaptor (VIA) (Fig
1
-14)
The VIA enables the PDU to interface with vehicle
systems not equipped with serial communications.
Vehicle Battery Adaptor (VBA)
The VBA provides the correct voltage to power the
PDU from the vehicle battery and also protects the
PDU from any interference from the vehicles
electrical systems.
Controls
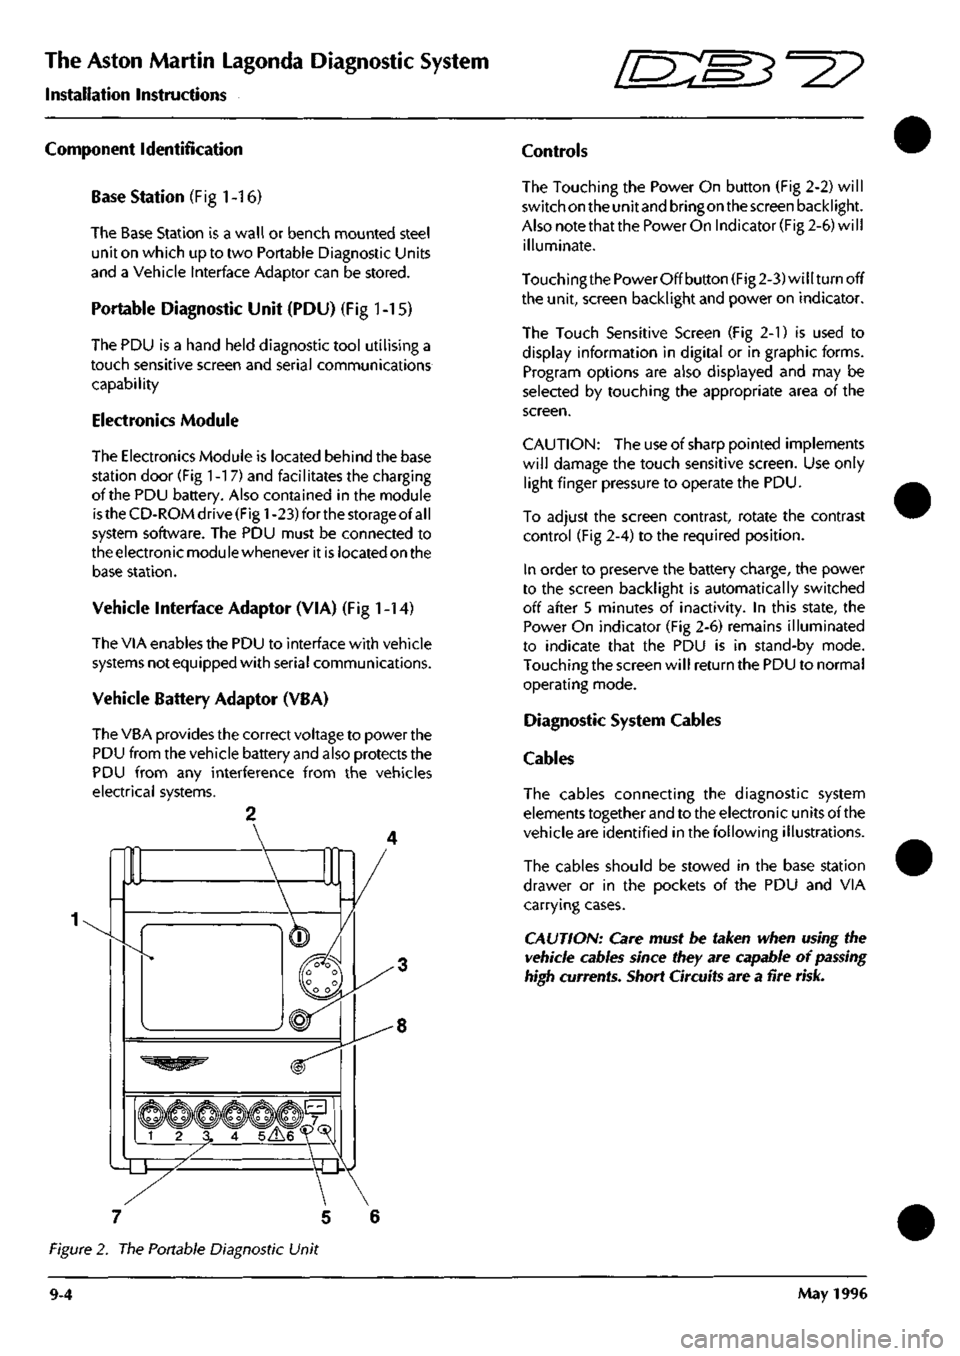
The Touching the Power On button (Fig 2-2) will
switch on the unit and bringon the screen backlight.
Also note that the Power On Indicator (Fig 2-6) will
illuminate.
Touching the Power Off button (Fig 2-3) will turn off
the unit, screen backlight and power on indicator.
The Touch Sensitive Screen (Fig 2-1) is used to
display information in digital or in graphic forms.
Program options are also displayed and may be
selected by touching the appropriate area of the
screen.
CAUTION:
The use of sharp pointed implements
will damage the touch sensitive screen. Use only
light finger pressure to operate the PDU.
To adjust the screen contrast, rotate the contrast
control (Fig 2-4) to the required position.
In order to preserve the battery charge, the power
to the screen backlight is automatically switched
off after 5 minutes of inactivity. In this state, the
Power On indicator (Fig 2-6) remains illuminated
to indicate that the PDU is in stand-by mode.
Touching the screen will return the PDU to normal
operating mode.
Diagnostic System Cables
Cables
The cables connecting the diagnostic system
elements together and to the electronic units of the
vehicle are identified in the following illustrations.
The cables should be stowed in the base station
drawer or in the pockets of the PDU and VIA
carrying cases.
CAUTION: Care must be taken when using the
vehicle cables since they are capable of
passing
high currents. Short Circuits are a fire
risk.
7 5 6
Figure 2. The Portable Diagnostic Unit
9-4 May 1996
Page 361 of 421
The Aston Martin Lagonda Diagnostic System
Installation Instructions
[ES^'^?
Powering-Up the Base Station
When first operating the System or when first using
a PDU fitted with substitute batteries, it will take up
to36 hourstoachievefull charge. Inthemeantime,
the PDU can be used whilst connected to the base
station or to the vehicle battery.
Vi/\RNmGS:
When using the system equipment, basic safety
precautions should always be followed, including:
Carefully read and follow all instructions.
Care should be taken as burns can occur from
touching hot parts.
Do not operate the appliance with a damaged
mains lead or if the appliance has been dropped or
damaged. Call your local GenRad Service Centre
immediately for a substitute
part.
Do not let the mains lead hang over the
edge
of the
table, bench or counter or come into contact with
hot manifolds or moving fan blades.
The Aston Martin Portable Diagnostic Unit
is
fitted with an
auto switching power supply suitable for voltage supplies
of 100 - 240 VAC 50 - 60 Hz. You need only check that
the power cord connector is of the correct type for your
power outlets.
1.
Connect the mains lead to the mains outlet.
2.
Check that the green indicator lamp above the base
station door is illuminated. If the green lamp does
not come on, see the problem solving section for
advice.
3. After a few seconds, during which the electronics
module completes its self-test, the red OK indicator
lamp should illuminate. If the red lamp does not
come on, see the problem solving section for
advice.
4.
Allow the base station electronics module to reach
working temperature. This will take approximately
BOminutes, after which time the base station will be
ready to accept the software on CD-ROM.
5. Slide the PDU into its carrying case and place the
associated cables and probes in the carrying case
compartments.
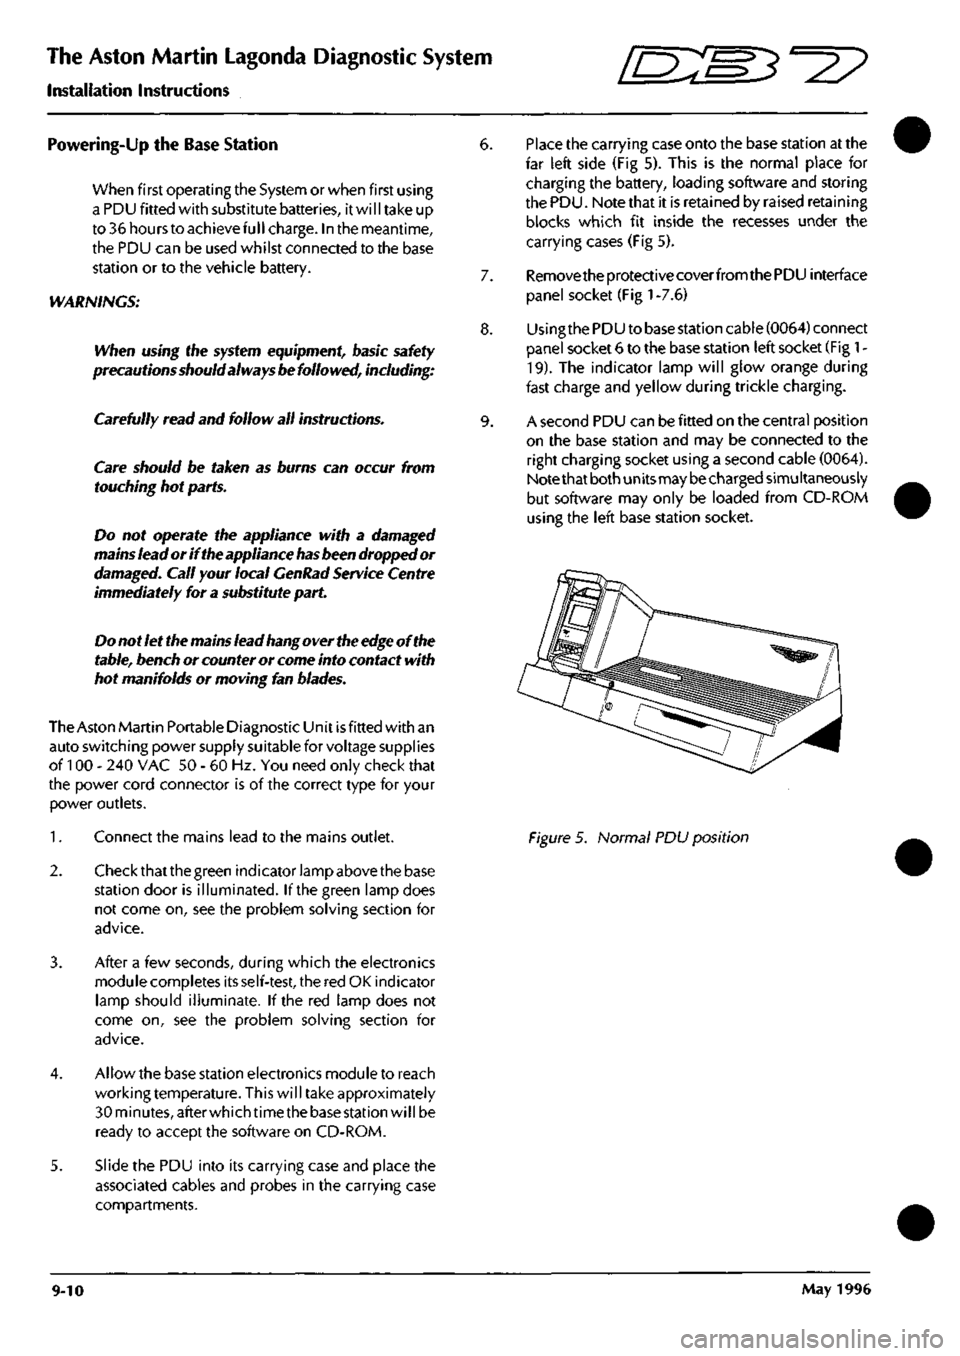
6. Place the carrying case onto the base station at the
far left side (Fig 5). This is the normal place for
charging the battery, loading software and storing
the PDU. Note that it is retained by raised retaining
blocks which fit inside the recesses under the
carrying cases (Fig 5).
7. Remove the protective coverfromthe PDU interface
panel socket (Fig
1
-7.6)
8. Usingthe PDU to base station cable (0064) connect
panel socket 6 to the base station left socket (Fig
1
-
19).
The indicator lamp will glow orange during
fast charge and yellow during trickle charging.
9. A second PDU can be fitted on the central position
on the base station and may be connected to the
right charging socket using a second cable (0064).
Note that both units may be charged simultaneously
but software may only be loaded from CD-ROM
using the left base station socket.
Figure 5. Normal PDU position
9-10 May 1996
Page 365 of 421
The Aston Martin Lagonda Diagnostic System
Installation Instructions 5^27
Battery Charging
The PDU is fitted with internal NICAD batteries
which allow the PDU to be transported whilst
retaining programs. The batteries are not designed
to be used as a general power source. A special
circuit monitorstheamountofcharge in the batteries
so that they cannot be overcharged.
From the time when first operating the system or a
PDU fitted with substitute batteries, it will take up
to 36 hours to achieve full charge. In the meantime,
the PDU can be used whilst connected to the base
station or to the vehicle battery. Keep transit times
to and from the vehicle as short as reasonably
possible to preserve battery charge.
Subsequent battery charges
shou Id
take six to seven
hours from fully discharged. The PDU must always
be left connected to the base station when not in
use in order to keep the batteries fully charged.
CAUTION: The rechargeable NICAD batteries
fitted to the PDU are of a special type and must
only be replaced with GenRad approved parts. Do
not substitute the batteries with any other type.
Always
dispose
of old batteries in compliance with
local recycling regulations. The procedure for
changing the battery pack
is
described later in this
installation guide.
Operating Procedures
Refer to the Aston Martin Diagnostic System Users
Guide for detail on each of the PDU software
options
Selecting Diagnostics
1.
Switch on the PDU, the main menu will be
displayed.
2.
Select 'Run Diagnostic' from the main menu and
confirm the selection by pressing the 'tick'
icon.
A
sequence of menus will be displayed requesting
identification of the vehicle under test.
3. The system will load the appropriate software.
4.
On completion of software loading, disconnect the
PDU from the base station and transfer it in its
carrying case to the vehicle. The additional pockets
in the carrying case may be used for carrying any
interface cables required.
5. If the VIA is required, also transfer it in its carrying
case to the vehicle together with any vehicle
interface cable required.
Using the PDU on the Vehicle
At the vehicle, the PDU may be removed from its
carrying case if required. The PDU should always
be connected to the vehicle using the Vehicle
Battery Adaptor (VBA) (0024). The PDU will
continue to charge from the vehicle battery.
Vehicle Battery Adaptor
This unit transforms battery voltage to the correct
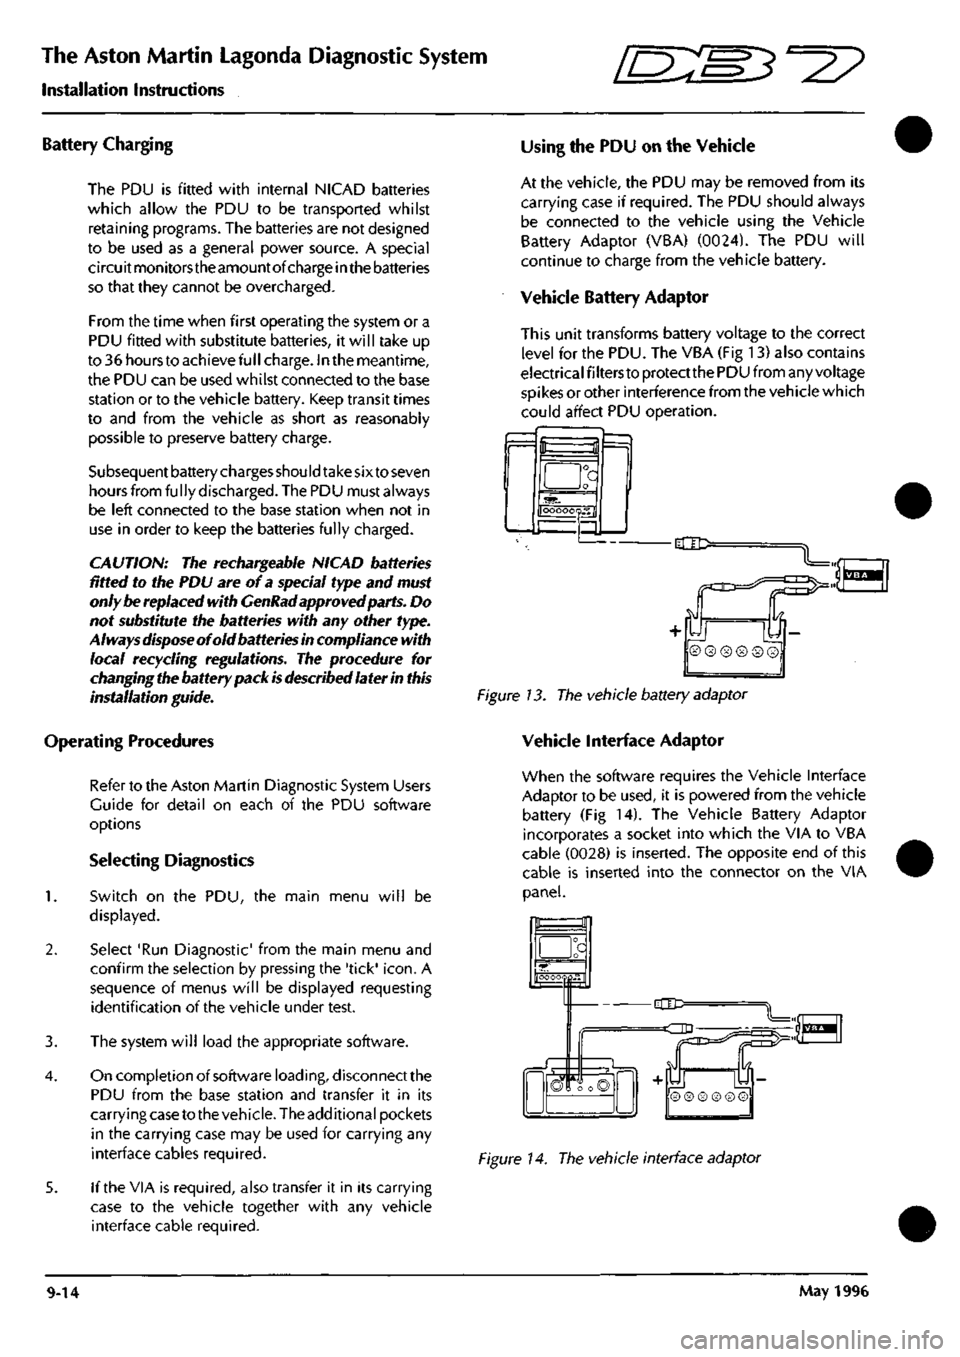
level for the PDU. The VBA (Fig 13) also contains
electrical filters to protect the PDU from any voltage
spikes or other interference from the vehicle which
could affect PDU operation.
f=l
a
OOOOOQS.fl
-dlD:
Figure 13. The vehicle battery adaptor
Vehicle Interface Adaptor
When the software requires the Vehicle Interface
Adaptor to be used, it is powered from the vehicle
battery (Fig 14). The Vehicle Battery Adaptor
incorporates a socket into which the VIA to VBA
cable (0028) is inserted. The opposite end of this
cable is inserted into the connector on the VIA
panel.
_a
hOOOOQpH"
-CIC=
=dD
n
S
© ® ® ® © ©
Figure 14. The vehicle interface adaptor
9-14 May 1996
Page 366 of 421

r^ ' ^ ^ The Aston Martin Lagonda Diagnostic System
Installation Instructions
Finishing the Test
When data analysis is finished, switch off the PDU
and disconnect it from the vehicle. Store the PDU
and cables in the carrying case and refit the case to
the base station.
Connect the PDU to the base station using cable
0064.
The base station will keep the PDU batteries
fully charged at all times (Fig 15).
Figure 15. PDU connected for recharging
Care of the Equipment
CAUTION: With the exception of those parts
referred to in the Servicing and Maintenance
section, there are no user serviceable parts. All
servicing must be carried out by GenRad Service
Centres.
Switch offthe power before cleaningtheequipment.
The Aston Martin Diagnostic System should only
be cleaned using a non-abrasive, mild cleaning
agent. Dust and other particles should be lightly
brushed from the surface before
cleaning.
Cleaning
agent should be applied to a soft lint-free cleaning
cloth and never directly to the unit. Do not soak the
cleaning cloth and take care not to allow cleaning
fluid to enter connectors.
CAUTION: Ifany liquid is spilt on theequipment,
switch off immediately.
Ensure
that the equipment
has
dried out completely before operating it again,
especially in connectors where fluid can lodge.
May 1996 9-15
Page 373 of 421
The Aston Martin Lagonda Diagnostic System
Installation Instructions ^=2?
Warranty
The Aston Martin Diagnostic System is covered by a one year warranty. Should any of the electrical components
fail during the warranty period, contact your local GenRad Service Centre for a replacement part. Note that the
warranty does not include physical damage.
Spare Parts
Refer to the Aston Martin Diagnostic System Users Guide for a full parts list. All spare parts should be obtained from
your local GenRad Service Centre who can advise you on current prices.
Servicing and Maintenance
CA UTION: With the exception of those parts listed in this section, there are no user serviceable parts within the
system. All servicing must be carried out by GenRad Service Centres.
Battery Testing.
The NICAD batteries fitted in the PDU are designed to be rechargeable and should normally last through many
recharge cycles. Battery life of three to five years can be expected. The capacity of new batteries improves after
several charging cycles. After extended use, they may require renewing. The following procedure will assist you to
determine when renewal is required. Do not use this procedure with new batteries or with a new PDU.
Testing Procedure
1.
Remove all cables from the PDU.
2.
Switch the PDU on and leave it until it switches off (the power on indicator will extinguish)
3. Connect the PDU to the base station for at least 12 hours charging.
4.
Remove all cables from the PDU, switch on the PDU and start timing.
5. If the PDU switches off in less than 30 minutes, the batteries should be renewed.
Changing the Battery Pack
CAUTION: Always read and follow safety warnings and instructions printed on the equipment. The rechargeable
NICAD batteries fitted to the PDU are of a special type. They must only be substituted by GenRad approved parts.
Do not substitute the batteries with any other type. Always dispose of old batteries in compliance with local
recycling regulations.
Battery Changing Procedure
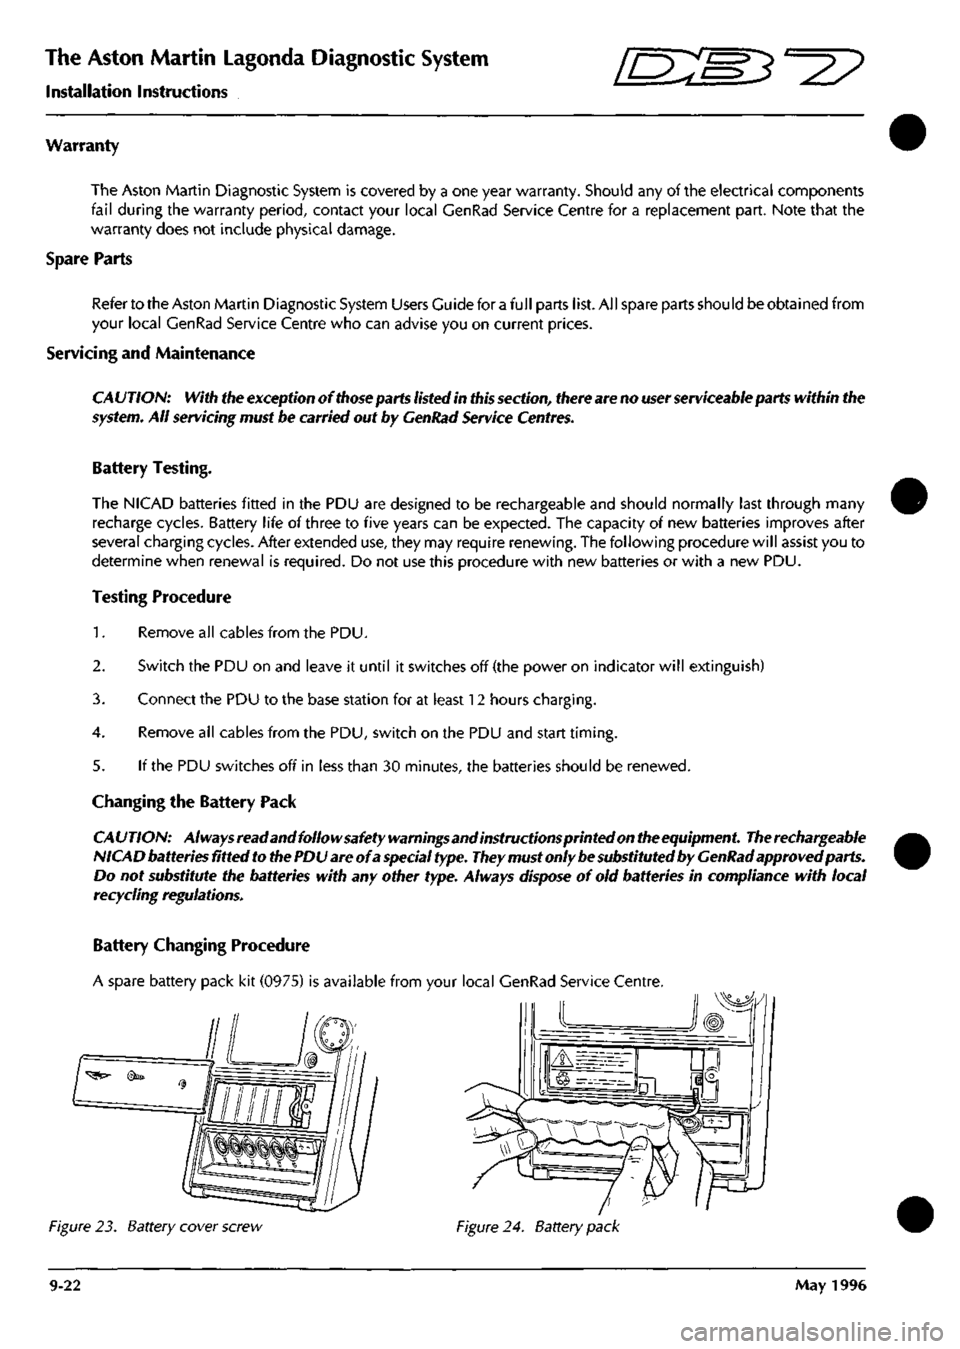
A spare battery pack kit (0975) is available from your local GenRad Service Centre.
Figure 23. Battery cover screw Figure 24. Battery pack
9-22 May 1996
Page 374 of 421
^?
The Aston Martin Lagonda Diagnostic System
Installation Instructions
1.
Switch off the PDU and remove all cables.
2.
Remove the cover screw (Fig 23) and remove the cover.
3. If damaged, remove the old foam gasket from the cover and replace with the new one supplied.
4.
Note the orientation of the connector. Disconnect the connector and remove the old battery pack.
5. Fit and connect the new battery pack (Fig 24) with the black cable towards the touch screen.
6. Refit the cover and cover screw.
7. Refer to the Battery Charging instructions for recharging times.
Changing the Dust Filter
The electronic module has a dust filter fitted to the underside of the module. Every three months a new filter wil
be supplied. To change the filter, proceed as follows:
1.
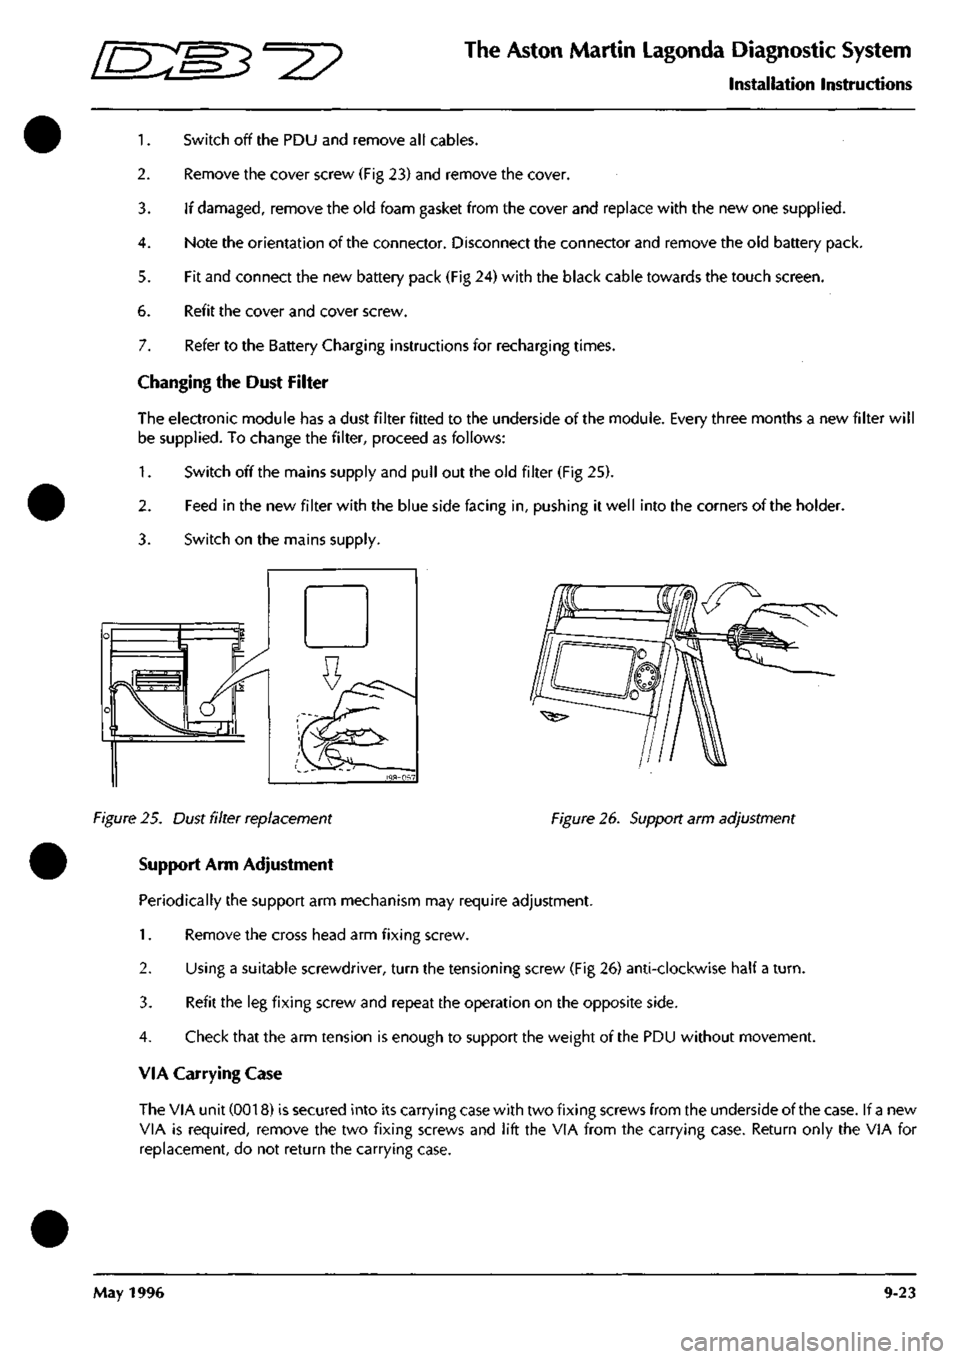
Switch off the mains supply and pull out the old filter (Fig 25).
2.
Feed in the new filter with the blue side facing in, pushing it well into the corners of the holder.
3. Switch on the mains supply.
Figure 25. Dust filter replacement Figure 26. Support arm adjustment
Support Arm Adjustment
Periodically the support arm mechanism may require adjustment.
1.
Remove the cross head arm fixing screw.
2.
Using a suitable screwdriver, turn the tensioning screw (Fig 26) anti-clockwise half a
turn.
3. Refit the leg fixing screw and repeat the operation on the opposite side.
4.
Check that the arm tension is enough to support the weight of the PDU without movement.
VIA Carrying Case
The VIA unit (0018) is secured into its carrying case with two fixing screws from the underside of the case. If a new
VIA is required, remove the two fixing screws and lift the VIA from the carrying case. Return only the VIA for
replacement, do not return the carrying case.
May 1996 9-23