light ASTON MARTIN DB7 1997 Owner's Manual
[x] Cancel search | Manufacturer: ASTON MARTIN, Model Year: 1997, Model line: DB7, Model: ASTON MARTIN DB7 1997Pages: 421, PDF Size: 9.31 MB
Page 158 of 421

CIGAR LIGHTER
NO COLOUR 735 B 347 RW
746 8 818 RG 819 OR RH
1
1 4 5
AREA l3.B3-2ieA 15.B5-JI9A
I3.B3-2I84 13.86 I3.B6 WINDOW SWITCH
NO COLOUR PIN AREA 730 8 I l3.B3-2ieA 820 GP 2 13.86 329 RW I3.B5-2I9AI
0 0
[D
CRUISE ON/OFF SWITCH
•*• NO COLOUR 725 B 2203 YO 2201 LGY 2204 YO 307 RW
PIN 1 2 3 4
AREA 13.B3-2I8A 13.B4-2I9 I3.B4-2I8 13.84-219 I3.B5-2I9A
NO COLOUR AREA 729 8 I3.C3-2I8A
RIP
D
CRUISE SET SWITCH
•*• NO COLOUR 230 U 825 BP 2205 LGY 177 Y 343 RW
PIN 1 2 3 4
AREA I3.B3 I3.B6 I3.B4-2I8 13.86 I3.B5-2I9A
NO COLOUR AREA 734 B 13.C3-219A
0
D
NO COLOUR 817 YO 818 RG 819 GR 379 RU 380 GU 820 6P S2I RW 177 Y 825 BP 731 U 2202 LGY
332 8
PIN 1 ? 3 4 5 6 7 8 9 10 II 12 13 14 15 16
AREA 13.84-219 I3.A2 I3.A2 I3.D2 13.02 I3.A3 I3,B5-2I9A I3.A5 I3.B5 I3.B3 I3.B4-2I8
IS.B3-2I8A
SHEET II AREA Dl
GEAR SELECTOR ILLUMINATION
LH WINDOW SWITCH
NO COLOUR PIN AREA 331 RW I 13.B5-219A 705 6 2 l3.B3-2ieA NO COLOUR PIN 748 B 342 RW
778
B
379 RU 380 GU
AREA l3.B3-2ieA I3.B5-2I9A
I3.B3-2I8A 13.66 13.86 ^7 Wiring Diagram
Model - Aston Martin DB7
Harness Title - Console
Part No. - B37-84638
Revision - 0 Sheet 13 of 26-97 MY
Page 164 of 421
NO
COLOUR
PIN
AREA I0S8
KB I
I7.B3-I79 JAO
OC 2 H.BI
WINDOW LIFT NO COLOUR
PIN
AREA I0S3
GR I
I6.A3 1051
GW 2
I6.A3
I
NO
COLOUR AREA 1829
RN
I4.BI
I HEATED BACKLIGHTi
VAPOUR MANAGEMENT VALVE
HOOD LIFT NO COLOUR 1054
GW
1053
GR
1060 GW lOEl
GR
1
I
4
I
AREA I6.AI le.AI
I5.ei-I54A I5.BI-I54B
NO COLOUR
PIN
1096 BW 828
BG
AREA I4.AI I4.BI
I4.B5-I60 I4.BI
FUEL PUMP
I
NO COLOUR
PIN
1086
B 1
1087 UG
2
AREA I6.B3 I7.A2
NO COLOUR
PIN
AREA 16.85 I7.A3
INTERIOR LIGHT NO COLOUR
PIN
AREA
1056 P I I4.C4-I56 1057 PW 2 I4.C4-I57
m
fsD
1ST SECURITY STEM
I
AERIAL
I
NO
COLOUR
PIN
799
BR I
1800
B 2
AREA 14.Al 14.Al
I
NO
COLOUR ||055
TIN
AREA I7.B6
LINK PINS
I a 2
LING
PIN 3 a 4
NO COLOUR
PIN
AREA
1062
NP
792
VG
I6.B3-I68 I4.AI
6)[5]o[4)|3J
02 01 Qi 03
REAR LAMP
SHORTING
PLUG
02 01 Ql 03
NO COLOUR PINAREA
1064
GP I
IG.B5-I74
1065 GP
2 16.01 1066 RU 3 I4.C5-I59
1067
RU 4 16,01
Ql D3 D2 01
LINK PINS
I 8 4
RH REAR LAMP
NO COLOUR 1067
RU
1068
ON
1069 CW 1070
B
1071
RG
1065
GP
PIN 1 ? ^ 4 •) 6
AREA 16.01 I6.B3-I7I I6.BI-I67 I6.C3-IG9 I6.C3-I70 16.01
mmra CEIinnn
(—\ Qi 01
cr
D 0 I—I 03 06 SHEET 18 '• AREA B/CI
0
01 Qi 0 D 03 06
NO COLOUR AREA 813
LGO 14.01
1080
B
I6.B4-I73 FUEL TANK SENDER UNIT
NO COLOUR AREA 1086
B
1088
B
1090
B
1091
B
I6.A5 I6.A6 16.84-173 I6.C3-I69
TH^
SHEET 17 AREA Bl
-» ^
-F^Pl-'
NO COLOUR
PIN
AREA
1094
BR U
16.86-178
1095 BR W 16.84-172
NO COLOUR PIN 797 S I
1092
B 2
652
WU 3
1093
HP 4
AREA 14.01
I6.B4-I73 14.01 I6.B5-I75
NO COLOUR AREA 2183
B
I6.C5-2I8 1084 RG
16.04
RADIO TELEPHONE
E
Di 05 D 0 D D 04 08/
4
8
J^Q a
£o 0 PO 0
T?D 0 ^ 1 S ^
NO COLOUR
PIN
1081
BR I
1082 PG
2
3
NO COLOUR AREA
1078
NP
I6.B3-I68 1079
BR
I6.B4-I72
AREA I6.B4-I72 I7.C6
1084
RG 1085 B 16.03-170 I6.B4-I73
NO COLOUR
PIN
1081
BR I
1082
PG 2
3 i
RS 4
5 6 1084 RG
7
1085
B 8
AREA le.CG 16.CG
I6.C6 I6.C5-2I8
Zl
1
RH NUMBER PLATE LAMP
NO COLOUR
PIN
AREA 1081
BR I
I6.C4 2184
B 2
l6.C5-2ia
BOOT LOCK ACTUATOR NO COLOUR
PIN
AREA 2185
B I
I6.C5-2I8 1082
PG 2
I6.C4
^[}
[}
JLH
NUMBER
PLATE LAMP
NO COLOUR AREA 2186
B
I6.C5-2I6 ;I083
RS
I6.D4
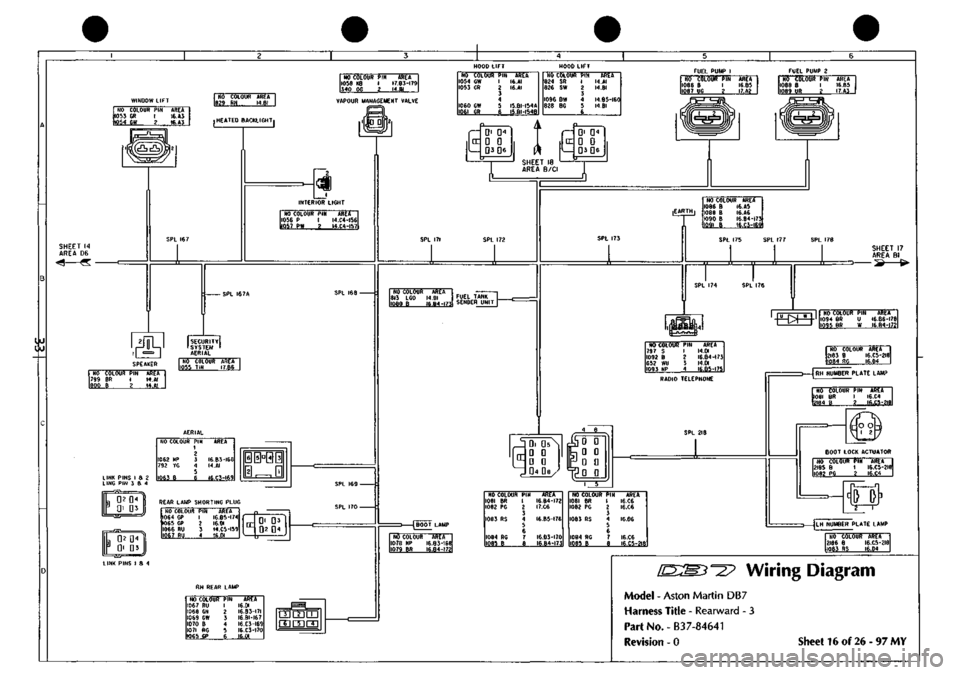
Wiring Diagram
Model - Aston Martin DB7
Harness Title - Rearward - 3
Part No. -
B3
7-84641
Revision - 0 Sheet 16 of 26-97 MY
Page 187 of 421
^=2?
Electrics
Airbag System
Eye Protection
Chemical protective goggles are recommended
where there is a possibility of eye contact with the
propellant. Safety glasses with side shields are
recommended for all other operations.
Protective Clothing
Approved protective gloves, overalls and shoes/
boots should be worn.
Handling and Storage Precautions
Do not store airbag modules near live electrical
equipment or circuitry. Store in a dry environment
at ambient temperatures.
Good housekeeping and engineering practices
should be employed to prevent the generation and
accumulation of
dusts.
Store in compliance with all
local state and federal regulations.
Driver and Passenger Airbag Modules
Assembly/Removal/Service Instructions
WARNING: In the event of a vehicle impact where the
airbags and the seatbeltpretensioner (if fitted) are
deployed, the following actions MUST be
performed:
Check the condition of the seatbelts, steering
wheel,
steering column, all connections to airbags,
and the column switchgear connectors for integrity
and damage. If in any
doubt,
replace suspected
parts for new parts.
Replace both crash
sensors,
the
safing sensor
and
the seatbelt pretensioner module (if fitted).
On completion of all repair procedures, switch on
the ignition and check that the
Airbag/SRS
warning
light comes on when the ignition is switched on
and extinguishes after approximately six seconds
indicating satisfactory completion of the airbag
and pretensioner
system
self
tests.
WARNING: Before starting
work,
ensure
that the ignition
switch is in position 'O' and the ignition key is
removed.
Disconnect the battery negative lead
within 12 seconds of switching off the ignition to
prevent the alarm system triggering.
As the airbag control module is equipped with a
back-up power source and due to the risk of the
airbag being inadvertently deployed, wait one
minute or longer after disconnecting the battery
before starting work on the airbag module.
• Disconnectingthe battery negative cable cancels
the memory for the 'one-touch' window down
system and stops the vehicle clock. Reset the
window memory and the clock when work is
completed.
• Never use airbags from other vehicles, always
use new parts.
• After work is completed, reconnect the battery
and perform the airbag warning light check
• Never use electrical probes to check voltage or
electrical resistance of the airbag modules.
• Disconnect the airbag before carrying out any
work on, or in the vicinity of the module, or
when using electric welding equipment.
• Always ensure that the battery negative lead has
been disconnected for at least one minute before
commencing any removal procedure.
September 1996 6-71
Page 196 of 421
Electrics
Airbag System ^2?
6.4.21.4
Airbag Disarming/Arming
Procedures
WARNINGS AND CAUTIONS:
WARNINGS:
Disarm the airbags by disconnecting the battery
ground (black)
lead,
waiting one minute and then
removing the airbag modules before servicing of
any airbag or steering column component.
After disconnecting the battery ground
lead,
allow
a minimum of one minute delay for the back-up
power supply to discharge before servicing the
airbag system.
The system components are non-serviceable, if
faults are
suspected,
change components for new
items
only.
Failure to observe the above procedures may
result in accidental deployment of the airbags.
Always wear safety
glasses
when working on airbag
equipped vehicles.
Personnel carrying an airbag module must ensure
that the module and trim cover are pointing away
from the
body.
When positioning on a bench or
work surface, ensure that the airbag module and
trim cover face upwards to limit motion on
accidental deployment.
Always wear
gloves
when handling deployed airbag
modules. Deposits of sodium hydroxide may be
presenton the module surface. If sodium hydroxide
contacts any area of the skin, wash the affected
area immediately with mild soap and
water.
Dispose of the deployed airbag using the correct
procedures referred to in this section.
Cautions:
When scrapping vehicles,
ensure
that the
airbags
have
been deployed (see
Scrapping Vehicles
with Live
Airbags).
If a component
has been
renewed and the fault
does
not
clear,
refit the original item and repeat the diagnostic
procedure.
After
servicing,
repeatthe diagnostic
procedures
to ensure
correct
system
operation.
Renew
the airbag module if the surrounding trim
panels
are
damaged.
Do not attempt to repaint trim covers as
paint may
damage
cover material.
Disarming the Airbags
3.
4.
WARNING: Carry out the following disarming
procedure before attempting any work on the
vehicles electrical
systems.
Note: The battery ground (black) lead must be
disconnected within 12 seconds of switching off the
ignition to avoid the alarm siren sounding.
Disconnect the battery ground
lead.
Allow a
minimum of one minute delay for the back-up
power supply to discharge.
Remove the drivers side airbag module and replace
it with an airbag simulatorfrom the simulator kit (Pt
No.
43.27028).
Remove the passengers airbag module and replace
it with an airbag simulator from the simulator kit.
Reconnect the battery ground.
Rearming the Airbags
WARNING: Carry out the following procedure to
rearm and check the airbags after completing all
work on the vehicles electrical
systems.
Note: The vehicle battery
must be
disconnected within
12
seconds
of switching off
the
ignition
to
avoid the alarm
siren sounding.
^. Disconnect the battery ground
lead.
Allow a
minimum of one minute delay for the back-up
power supply to discharge.
2.
Removethedriverssideairbagsimulatorand replace
it with the drivers airbag module. Secure the airbag
module with the two captive torx screws.
3. Remove the passengers side airbag simulator and
replace it with the passenger side airbag module.
Secure the module with four nuts and washers.
Close the passenger side airbag door.
4.
Reconnect the battery ground.
5. Switch on the ignition and check for correct
indications from the SRS/AIRBAG warning light.
TheSRS/AIRBAC lamp should come on after
a
brief
delay and remain on for approximately six seconds
during the airbag system self check. The lamp will
extinguish upon satisfactory completion of the self
check, or will flash a diagnostic code if an airbag
system fault is detected. Continuous illumination of
the warning lamp may indicate a seatbelt
pretensioner fault
Note:
Reset the
clock and window
ECUs
on completion.
6-80 September 1996
Page 199 of 421
"^p
Electrics
Airbag System
No Airbag Warning Lamp
I
noperative lamp, lamp ci rcu it or no ign ition voltage
to the diagnostics module
Normal Operation
The airbag warning lamp is designed to illuminate
for approximately six seconds when the ignition is
switched
on.
This period
is
allocated for satisfactory
performance of the airbag system self test.
Note: The a irbag warning lamp is
driven
by
the instrument
pack and not directly by the airbag diagnostic module.
The airbag diagnostic module requires an ignition
supply to pin
1
to energise the airbag warning lamp
circuit. If the warning lamp circuit is open, or the
diagnostic module does not receive an ignition
voltageatpini, the warning lamp will not illuminate.
Open circuit in the warning lamp supply, in
conjunction with another system fault, will cause
the diagnostic module to emit five tones every 30
minutes while the ignition is switched on. Repair
the faulty circuit before further diagnosis.
Note:
The
diagnostic module will not emit
the
five tone
signal if the warning lamp
is
open circuit and
there
is no
system
fault.
Possible Causes
Defective airbag warning lamp
Faulty wiring in the airbag warning lamp circuit
Loss of ignition voltage at diagnostic module pin 1.
Loss of ground at diagnostic module pin 3
Instrument pack fault
Fault Analysis
WARNING: Read and adhere to all warnings and
safety procedures at the start of this section when
working on the airbag
systent.
1.
Remove the instrument pack and check the airbag
warning lamp.
If the lamp is good, go to step 2.
If the lamp is defective, replace it, switch on the
ignition and check that the lamp is now on for
approximately six seconds after ignition on.
2.
Disarm the airbag system and fit airbag simulators
(6.4.21.4).
9.
Connect the PDU. Switch on the ignition. Measure
the 12V ignition supply voltage from airbag
diagnostic connector pin
1 -1
{+) to chassis ground.
If ignition voltage is present, go to step 6. If ignition
voltage is not present, go to step 4.
Checkfuse F15passengersidefuseboxRHDorF17
passenger side fusebox LHD (Ignition supply to the
diagnostic module pin
1
-1). If the fuse is good, go
to step 5. If the fuse is replaced, go to step 6.
Check for an open circuit on the YW wire from fuse
F15 passenger sidefusebox(F17 LHD)todiagnostic
module pin 1-1. If continuity is good, isolate the
fault in the 12V supply to fuse Fl 5 (Fl 7) and then
go to step 9.
Measure the voltage from diagnostic module pin
1
-
1 to diagnostic module pin 1-3. If 12V is not
present, isolate and service the open circuit in the
diagnostic module ground to pin 1-3. Then go to
step 7.
Switch the ignition off. Set up to measure the
voltage from DM pin
1
-4 to DM pin
1
-5 during the
first six seconds after ignition on.
Switch on the ignition, the warning light signal to
the instrument pack should switch for six seconds
after a brief delay.
If the signal does not switch, the diagnostic module
is
fau Ity. Replace the modu
le,
switch on the ign ition
and check that the airbag warning lamp does light
for six seconds after ignition on.
If the signal does switch for approx. six seconds
after ignition on, the fault is in the instrument pack
or wiring, go to step 8.
Check continuity of the YW wire from diagnostic
module pin
1
-4 to instrument pack 16 way plug pin
2.
If continuity is good, service the instrument pack
and then retesttoensure correct indication from the
airbag warning lamp at ignition on.
If continuity is defective, service the wire and then
retest to ensure correct indication from the airbag
warning lamp at ignition on.
Disconnect the PDU, and rearm the airbags
(6.4.21.4). Switch on the ignition and check for
correct indications from the airbag warning lamp.
September 1996 6-83
Page 200 of 421
Electrics
Airbag System [EE:^^^?
Continuous Airbag Warning Lamp
Inoperative lamp circuit or no ignition supply to the
airbag diagnostic module.
Normal Operation
The airbag warning lamp is designed to illuminate
for approximately six seconds when the ignition is
switched
on.
This period isallocated for satisfactory
performance of the airbag system self test. If after
this period, the diagnostic module detects a fault
within the system, the airbag warning lamp will
begin to flash.
Note:
The seat
belt
pretensioner system
(if fitted)
shares
the
airbag/SRS
warning lamp with
the airbag
system.
If a
seat belt pretensioner fault is
detected,
the
Airbag/SRS
warning lamp will be permanently illuminated. Ensure
thata permanently lit
lamp
is nottheresultof a pretensioner
fault before carrying out fault analysis on the airbag
system.
Poor connection or disconnection of the diagnostic
module harness may cause a short circuit from DM
pin 4 (warning lamp control) to pin 5 (ground) and
cause permanent illumination ofthe warning lamp.
Faulty operation of the diagnostic module internal
logic may fail to turn off the warning lamp control
circuit and cause constant illumination of the
warning lamp.
Fault Analysis
WARNING: Read and adhere to all warnings and
safety procedures at the start of this section when
working on the airbag system.
1.
Disarm the airbag system and fit airbag simulators
(6.4.21.4). Reconnect the battery.
2.
Inspectthe instrument pack and diagnostic module
connectors for damaged, pushed out pins, proper
location etc.
If any defects are identified, service as necessary.
Retest to ensure correct operation of the airbag
warning light.
If the connector condition and security are good,
reconnect the connectors and go to step 3.
5.
Connect the PDU to the upper diagnostic socket
and monitorthe airbag warning lamp
signal.
Switch
on the ignition.
If the signal is permanently low, suspect a short
circuit to ground on the airbag warning lamp
control line within the diagnostic module or from
diagnostic module pin
1
-4 to earth. Co to step 4.
If the signal switches low for six seconds after
ignition on but the airbag warning lamp is
permanently illuminated, suspect a fault in the
output side of the instrument pack to the airbag
warning lamp.
Disconnect diagnostic module plug 1 (slate) and
withdraw the plastic locking wedge to prevent
shorts to other circuits. Check continuity from pin
1-1 to ground.
If a short circuit to ground is detected, service the
wiring
as
necessary. Replacethe locking
wedge,
re
insert the connector. Switch on the ignition and
check that the airbag warning lamp signal atpin 1-
4 goes high six seconds after switching on the
ignition and that the warning lamp extinguishes.
If no short circuitto ground isdetected,thediagnostic
module is faulty. Replace the diagnostic module.
Switch on the ignition and check that the airbag
warning lamp signal at pin
1
-4 goes high six seconds
after switching on the ignition and that the warning
lamp extinguishes.
Switch off the ignition. Disconnect the battery.
Rearm the airbags (6.4.21.4). Switch on the
ign
ition
and check for correct indications from the airbag
warning lamp.
6-84 September 1996
Page 215 of 421

in:[M3^?
Electrics
Airbag System
Airbag DM Fault Code 52
Back-up power supply - voltage boost fault.
Normal Operation
A back-up power supply consisting of a capacitor
and voltage booster is contained within the
diagnostic module. The voltage booster charges
the capacitor to 24 ±
1
volt when the ignition is on.
The back-up power supply is connected to
diagnostic module pin 1-9 via a diode. Since the
resistance of pin 1-9 to ground is infinite, the
capacitor has no discharge path and the back-up
supply
is
maintained ata high
voltage.
Thediagnostic
module monitors this voltage and will flag a code
52 if a minimum of 23V is not achieved within 45
seconds of switching on the ignition.
Possible Causes
Low back-up supply voltage may be caused by:
• Partial or total short circuit of pin 1-9 to ground.
• Boost circuit failure within the diagnostic
module.
Fault Analysis
1.
Disarm the airbag system and fit airbag simulators
(6.4.21.4).
2.
Disconnect the diagnostic module. Check for a
partial or permanent short circuit to ground from
diagnostic module harness connector pin 1-9.
If no short circuit is detected, go to step 3.
If a short circuit is detected, service the wiring as
necessary. Reconnectthediagnostic module. Clear
the code 52. Rearm the airbags.
3. Using a high resistance digital multimeter, set up to
measure the voltage from diagnostic module pin
1
-
9 to ground. Switch on the ignition.
If the voltage is in the range 24 ± 1 volt, the back
up power supply is good. Suspect an intermittent
short circuit to ground and recheck the output
circuit from pin 1-9.
Ifthe voltage is below the range 24 ±
1
volt, replace
the diagnostic module.
4.
Rearm the airbags (6.4.21.4).
Airbag DM Fault Code 53
internal diagnostic module failure.
Normal Operation
The diagnostic module constantly measures the
voltage on pins
1
-2,
1
-6,
1 -11
and
1
-12. It should
be 10
±1
volt. The voltage is regulated by a resistor
within the diagnostic module and the resistance to
ground ofpins
1-2,6,11
and 12 should be infinite.
The resistance across the normally open contacts of
the crash sensors should also be infinite. If the
resistance of the pins to ground or across the crash
sensors becomes measurable, the voltage wi
11
drop.
At between 5V and lOVthe diagnostic module will
recognise an internal voltage regulation failure and
flag a code 53 fault and the airbag warning light will
be illuminated.
Notes: A dead short to ground in the
crash
sensor circuits
will drop the voltage below 5V and the diagnostic
module will flag
a
code
14
fault.
The
diagnostic module
performs several self-tests as
the
ignition is switched on. If it fails any
test,
fault code 53
will be flagged.
Possible Causes
• A decrease in resistance from infinity between
the primary crash sensor circuits and ground.
• An internal diagnostic module self-test failure.
Fault Analysis
1.
Disarm the airbag system and fit airbag simulators
(6.4.21.4).
2.
Check each of pins 1-2, 1-6, 1-11 and 1-12 for
continuity to ground.
If resistance of all circuits is infinity, go to step 3.
If any resistance other than infinity is detected,
service the circuit wiring as necessary. Reconnect
all connectors and switch on and clear all fault
codes.
Switch off the ignition and then switch on again.
Check that the airbag warning lamp comes on at
'ignition on' and extinguishes after approximately
six seconds on satisfactory completion of the airbag
system self-check.
3. Rearm the airbags (6.4.21.4).
September 1996 6-99
Page 216 of 421

Electrics
Airbag System [n:M^^^?
Airbag DM Fault Code 99
Rapid continuous flashing of the airbag warning
light - Both front crash sensors disconnected.
Normal Operation
Each crash sensor has three wires. Two deploy the
airbag and monitor the sensors connection to the
diagnostic monitor. The third wire monitors the
mounting of the sensor to the vehicle bodywork. A
code99isdeclaredifbothsensorsaredisconnected
and not properly grounded.
Fault Analysis
Disarm the airbag system and fit airbag simulators
(6.4.21.4).
Check continuity of all circuits listed below and
service as necessary.
LH Crash Sensor
DM Pin
1-6
1-12
2-9
RH Crash Sensor
DM Pin
1-2
1-11
2-8
Sensor Pin
1
2
4
Sensor Pin
1
2
4
Also check for correct grounding of the diagnostic
module and the sensor cases.
Reconnect all connectors, clear fault code 99.
Switch off the ignition and then switch on again.
Check that the airbag warning lamp comes on at
'ignition on' and extinguishes after approximately
six seconds on satisfactory completion of the airbag
system self-check.
Rearm the airbags (6.4.21.4).
6-100 September 1996
Page 218 of 421
Electrics //—>> ^^^^^^ • >^
Seat Belt Pretensioner I'•—
-"i-t.
^-^
JH—X
System Fault Strategy
No single fault may cause an unexpected deployment. The controller will supervise the pretensioner electrical
system in order to warn the driver should a fault occur. Any fault detected by the self diagnostics shall cause the SRS/
airbag warning lamp to be activated, and in some cases the pretensioner control module to enter shutdown mode.
In shutdown mode, the energy of the reserve capacitors shall be discharged to avoid unintended deployment.
As the ignition is switched on, the pretensioner controller will directly discharge the energy capacitors. When the
start up procedure is completed without detecting any faults, the DC/DC converter will be activated allowing the
capacitors to be charged. The system shall be fully active within
11
secondsafterswitchingthe ignition on providing
that no faults are detected.
All system faults monitored by the controller are filtered in software to avoid fault warnings due to transient electrical
disturbances.
If a fault which could lead to inadvertent deployment is detected by the microprocessor, a software shutdown will
be generated. However, a leakage to an earth or positive potential in the pretensioner output circuit shall not cause
the controller to enter shutdown mode.
If a permanent short of the ignition transistor occurs, a shutdown shall be generated by the hardware circuit. If a
shutdown occurs, the system shall be unable to deploy the pretensioner after a period of 3 seconds (i.e. capacitors
discharged to under minimum deployment voltage).
WARNING: To avoid the possibility of personal injury caused by accidental deployment of the pretensioner,
disconnect the vehicle battery and wait at least 10 minutes for all voltages to fully discharge before working on
the pretensioner
system.
This
covers the possibility of the normal capacitor discharge circuits being inoperative
and failing to discharge the capacitor when instructed to do so.
WA RNING: Do not make any electrical measurements on the pretensioner squib. Electrical measurement devices
can induce sufficient voltage to cause unintentional firing of the pretensioner assembly
If the module enters shutdown mode, all diagnostic functions are stopped, but the communications link remains
active.
A fault code corresponding to the cause of the problem may be read by the PDU.
Assembly/Removal/Service I nstructions
WARNING: In the event of a vehicle impact where the airbags and the seatbelt pretensioner (if fitted) are
deployed, the following actions MUST be performed:
Check the condition of the
seatbelts,
steering wheel, steering column, all connections to airbags, and the column
switchgear connectors for integrity and damage. If in any doubt, replace suspected parts for new parts.
Replace both crash
sensors,
the safing sensor and the seatbelt pretensioner module (if fitted).
On completion of all repair procedures, switch on the ignition and check that the Airbag/SRS warning light
comes
on when the ignition is switched on and extinguishes after approximately six seconds indicating satisfactory
completion of the airbag and pretensioner
system
self
tests.
Vehicles for the North American, Australian and Japanese markets are fitted with drivers seat belt pretensioner
systems and are fitted with a shorting plug in the yellow connector adjacent to the pretensioner control module.
Vehicles for other markets do not have drivers seat belt pretensioners fitted but have a blanking plug in the yellow
connector adjacent to the pretensioner control module.
6-102 September 1996
Page 229 of 421
O" D^?
Body and Trim
Contents
Contents
Body and Trim
Body Repair
Potential Risks
Precautions
General Repair Notes
Steel Body Parts - Repair, Remove and Replace
RTM Body Parts
Body Panel and Trim Removal
Front Apron
Front Undertray
Wheel Arch Liners
Side Sills (top fixings)
Side Sills (bottom fixings)
Rear Bumper
Doors
Door Liners
Door Liner (components)
Steering Wheel
Column Switches
Instrument Panel (surround)
Instrument Panel
Facia Underscuttles
Glove Box
Facia Mountings (1)
Facia Mountings (2)
Console Instruments
Radio
Front Seats
Ashtray
Centre Console
Seat ECU Covers
Rear Console
Rear Seats and C Post Trim
Quarter Panels, B Post Panels, Parcel Shelf
Headlining
Roof System Description and Repair Procedures
Vol ante Roof
Roof and Rear Quarter Light Control
Roof Component Location
Roof Control System
9.0.02.1
Roof Removal/Replacement
9.0.02.3
Roof Hydrailic Control System
9.0.02.5
Bleeding the Roof Hydraulic System
9.1.01.1
Rear Quarter Window Renewal
9.1.01.2
Rear Quarter Glass Adjustment
9.1.01.4
Rear Quarter Window Lift Motor - LH
9.1.01.5
Rear Quarter Window Lift Motor - RH
Roof Sealing and Wind Noise
9.2.01.5
'A' Post/Header Sealing and Lock Adj
9.2.01.6
Roof Seals - Adjustment
9.2.01.7
Cheater Plate Seals - Adjust/Renew
9.2.01.8
Door Glass Adjustment
Alcantara Cleaning
7-1
7-2
7-2
7-3
7-3
7-4
7-5
7-6
Sheet 1
Sheet 2
Sheet 3
Sheet 4
Sheet 5
Sheet 6
Sheet 7
Sheet 8
Sheet 9
Sheet 10
Sheet 11
Sheet 12
Sheet 13
Sheet 14
Sheet 15
Sheet 16
Sheet 17
Sheet 18
Sheet 19
Sheet 20
Sheet 21
Sheet 22
Sheet 23
Sheet 24
Sheet 25
Sheet 26
Sheet 27
7-7
7-7
7-8
7-9
7-10
7-11
7-12
7-13
7-14
7-15
7-16
7-17
7-17
7-18
7-19
7-20
7-21
May 1996 7-1