compressor ASTON MARTIN DB7 1997 Owner's Guide
[x] Cancel search | Manufacturer: ASTON MARTIN, Model Year: 1997, Model line: DB7, Model: ASTON MARTIN DB7 1997Pages: 421, PDF Size: 9.31 MB
Page 325 of 421
Air Conditioning
Refrigerant Recovery and Recycling ^=2?
Recovery Procedure
Hote:
Run the
air-conditioning
system
for
a
few
minutes
before starting the
recovery
procedure as
this will
enable
more refrigerant to be recovered. Turn the
system
off
before
starting
the procedure.
1.
Attach the red (high side) hose oftheunittothe high
side fitting of the system on the vehicle then fit the
blue (low side) fitting to the low side on the vehicle.
Note: Make sure that the Air conditioning
system
has
pressure in it before beginning the recovery
process;
if
there is no
system
pressure there is no refrigerant to
recover.
Also
make sure that the
oil
drain
valve
is
closed.
2. Open both the high and low side valves on the
control panel.
3. Open the red CAS (vapour) valve and the blue
LIQUID valve on the tank.
4.
Turn on the MAIN POWER switch.
5. Press the RECOVERY key on the key-pad. The
display shows that the unit in the RECOVER mode
and AUTOMATIC cycle. After the compressor starts
the display shows the weight of refrigerant being
recovered.
The compressor shuts off automatically
when the recovery is complete and the display
shows the message 'CPL' and the final weight of the
recovered refrigerant.
6. Wait for five minutes and watch the manifold
gauges for a rise above 0. If a rise occurs press the
HOLD/CONT key. Repeat as needed until the
system pressure holds for two minutes.
Note: Drain the oil
separator
after
each
job.
7. Slowly open the oil drain valve and drain the oil
into the oil catch bottle. When all the recovered oil
has completely drained close the valve.
8. Replace oil lost during the recovery procedure by
measuringthe amount of oil inthe catch bottle and
adding the same amount of new oil to the system.
Note:
Dispose
of the
recovered
oil in an approved way.
9. When the recovery tank is full the compressor is
shut off and the display shows the message FULL.
Evacuating and Recycling the Refrigerant
1.
Open the red (high side) and the blue (low side)
valves on the unit and open the red GAS (vapour)
valve and the blue LIQUID valve on the tank.
2.
Enter the required time using the key-pad, press
enter,thedisplayshowstheenteredtime in minutes.
3. Start the vacuum pump by pressing the VACUUM
KEY again. The recycling process begins
approximately five seconds after the vacuum pump
starts and the message RECYCLE is displayed.
Note: If the vacuum pump
has
run for ten hours or
over
without an oil change the
message
OIL
flashes
on the
display.
Change
the pump oil and
then press
the
SHIFT/
RESET key and
the
zero key to
reset the
oil
change
timer
to zero.
The digital display counts down the evacuation
time.
4.
Check for non-condensibles after five minutes
recycling.
Ifthegauge needles are more than lOpsi
apart purge the non-condensibles from the tank by
open
i ng
the purge valve on the back of the
un
it and
continue to bleed until both needles show the same
reading.
The vacuum sequence continues until the
programmed time has elapsed at which point the
message CPL is displayed.
5. If the moisture indicator turns green recharge with
refrigerant.
or
5. If the moisture indicator has not turned green
replace the unit's filter-drier, which is probably
saturated.
Note:
Pressing
any key at this point allows the next
function to be
accessed.
To recycle the refrigerant only without pulling a
vacuum for an indefinite period of time press the
SHIFT/RESET key and the RECYCLE key on the key
pad.
Press the SHIFT/RESET key to cancel.
For vacuum only press the SHIFT/RESET key and
the ENTER key and then press
"1".
Run the vacuum
pump as long as required and then press
"1"
or
press SHIFT/RESET to cancel.
8-48 May 1996
Page 326 of 421
^2?
Air Conditioning
System Recharging / Compressor Oil Check
Recharging the System
1.
Open the high side valve on the unit control panel.
If the messages PROGRAM and CHARGE are not
displayed press the CHG key to enter PROGRAM
mode.
2.
Key in the amount of refrigerant needed to recharge
the system and press ENTER.
3. Press the CHG key; the message AUTOMATIC and
the entered amount of refrigerant wi
11
be displayed.
The display counts down to zero as the charging
process proceeds. When the charging is complete
the message CPL is displayed.
If the refrigerant transfer is too slow the charging
unit emits a signal. If the message CHECK
REFRIGERANT is not displayed, close the high side
valve,
open the low side valve and start the air
conditioning system to pull the remainder of the
charge into the system.
If the refrigerant transfer will not complete and the
message CHECK REFRIGERANT is displayed, press
the HOLD/CONT key to interrupt the cycle then
reset the unit by pressing the RESET key. Recover
the refrigerant already charged into the system by
following the procedure for recovering the
refrigerant, add new refrigerant to the tank and
return to Step 1 to recharge the system.
4.
If the air conditioning system is not running start it
and let it run until the gauge pressure readings
stabilize (compare the gauge readings with the
system manufacturer's specifications).
Note:
Ensure
that the
readings
are accurate by closing
both the high and low side
valves
on the unit's control
panel.
5. Check the evaporator outlet temperature to make
sure that the air conditioning system is operating
properly (refer to the system manufacturer's
specifications for the proper temperature).
Compressor Oil Checic
Data
Special Tools
Sanden oil dipstick JD 149
Torque Figures
Oil filler plug 8-12 Nm
Procedure
Whenever a component has been replaced in the
refrigerator system or there is an obvious oil leak, the
following procedure should be carried out.
A Sanden oil dipstick and angle gauge are required in
order to carry out the check.
1.
Run the compressor for 10 minutes at engine idle
speed.
2.
Depressurise the system.
3. Lay the angle gauge across the flat surfaces of the
two front mounting lobes. Centre the bubble and
note the mounting angle.
4.
Remove the compressor from the vehicle.
3. Remove the plug from the oil filler hole
(1
Fig. 1).
4.
Rotate the counter weight (3 Fig. 1) on the front of
theclutchtoallowthedipstick(2 Fig. 1)to penetrate
to its fullest extent.
Figure 1.
5. Insert the dipstick to its stop position (4 Fig. 1). The
point of dipstick angle should be facing left.
6. Removethedipstickandchecktheoil levelagainst
the figures quoted in the chart below.
May 1996 8-49
Page 327 of 421
Air Conditioning
Compressor Oil Check ^^?
7.
Mounting
Degrees
0°
10°
20°
30°
40°
50°
60°
90°
Angle Acceptable
Increments
3-5
4-6
5-7
6-8
7-9
8-10
9-11
10-12
If the level indicated on the dipstick does not match
the increments given in the table for a particular
mounting angle, add or subtract oil to the midpoint
value.
Ensure that the "O" ring seal and seat are clean.
Coat the seal with compressor oil and refit the oil
filler
plug.
Torque tighten the plug to 8-12 Nm. Do not over
tighten the plug to stop a leak. If necessary, remove
the plug and fit a new oil
seal.
9. Refit the compressor.
10.
Recharge the system with refrigerant.
8-50 May 1996
Page 328 of 421
^?
Air Conditioning Repair Procedures
Compressor Removal
8.1.01.1 Compressor Removal/Renewal
Procedure
1.
Open the bonnet and fit a wing cover.
2.
Depressurise the air conditioning system.
3.
6.
7.
8.
9.
Disconnect the low and high pressure hoses from
the rear of the compressor. Plug the hose ends to
prevent the ingress of dirt.
Remove the compressor pivot bolt securing nut.
Carefully separate the muffler from the compressor
and remove and discard the 'O' ring
seal.
Fit a blanking plug to the muffler and a blanking
plate to the compressor, fit and tighten the bolt that
secures blanking plate.
Raise the vehicle to working height on a ramp.
Figure 7.
10.
Slacken the compressor drive belt adjuster rod and
adjuster plate securing nuts and bolts (Fig.
1
-4, 5, 6
and 7)
11.
Slacken adjuster nut (Fig.
1
-10).
12.
Remove the nut and bolt (Fig. 1-4 and 5) from
adjuster plate (Fig. 1-3).
13.
Slacken trunnion nut and bolt (Fig.
1
-9 and 2) and
remove the adjuster rod (Fig. 1-1).
14.
Disconnect the compressor multi-plug.
1
5. Remove the compressor drive belt.
16.
Pivot the compressor away from engine, support
the compressor and remove the top pivot bolt and
lift the compressor clear of the vehicle.
17.
Removethemountingbracketsfromthecompressor.
26.
Lift the compressor up to the engine and fit the top
pivot bolt (Fig.
1
-2) from above.
27.
Attach adjustment rod loosely to the compressor
(Fig.
1
-1) with nut and bolt (Fig.
1
-6 and 7).
28.
Loosely attach adjustment plate (Fig. 1-3) to the
compressor with nut and bolt (Fig.
1
-4 and 5).
29.
Fit bolt (Fig.
1
-2) through trunnion (Fig.
1
-8) and fit
nut (Fig. 1-9) to the bolt.
30.
Fit the drive belt over the pulley, move the
compressor away from the engine to tension the
drive belt and lightly tighten the bolts and nuts.
31.
To obtain the correct tension on the drive belt
tighten adjuster nuts
(Fig.
1
-10). The belt
is
correctly
tensioned when a load of 59- 63.6 kg (130 -140 lb)
applied at the centre deflects the belt 4 mm.
32.
Ensure that all securing bolts and nuts are fully
tightened.
33.
Lowerthe vehicle to the ground.
34.
Remove the blanking plate and the blanking plugs
from the compressor.
36.
Fit new 'O' ring seals to the low and high pressure
hoses and connect them to the compressor. Fit the
retaining plate, fit and tighten the screw.
38.
Charge the air conditioning system.
39.
Remove the wing cover and close the bonnet.
May 1996 8-51
Page 329 of 421
Air Conditioning Repair Procedures
Field Coil Renewal
/
Gasket Kit Renewal ffi^e^'^^
8.1.02.1 Field Coil Renewal 8.1.03.1 Renew Gasket
Kit
Procedure
1.
Open
the
bonnet
and fit a
wing cover.
2.
Depressurise
the air
conditioning system.
3. Remove
the
compressor.
4.
Remove
the
compressor drive clutch.
5. Remove
the
compressor pulley.
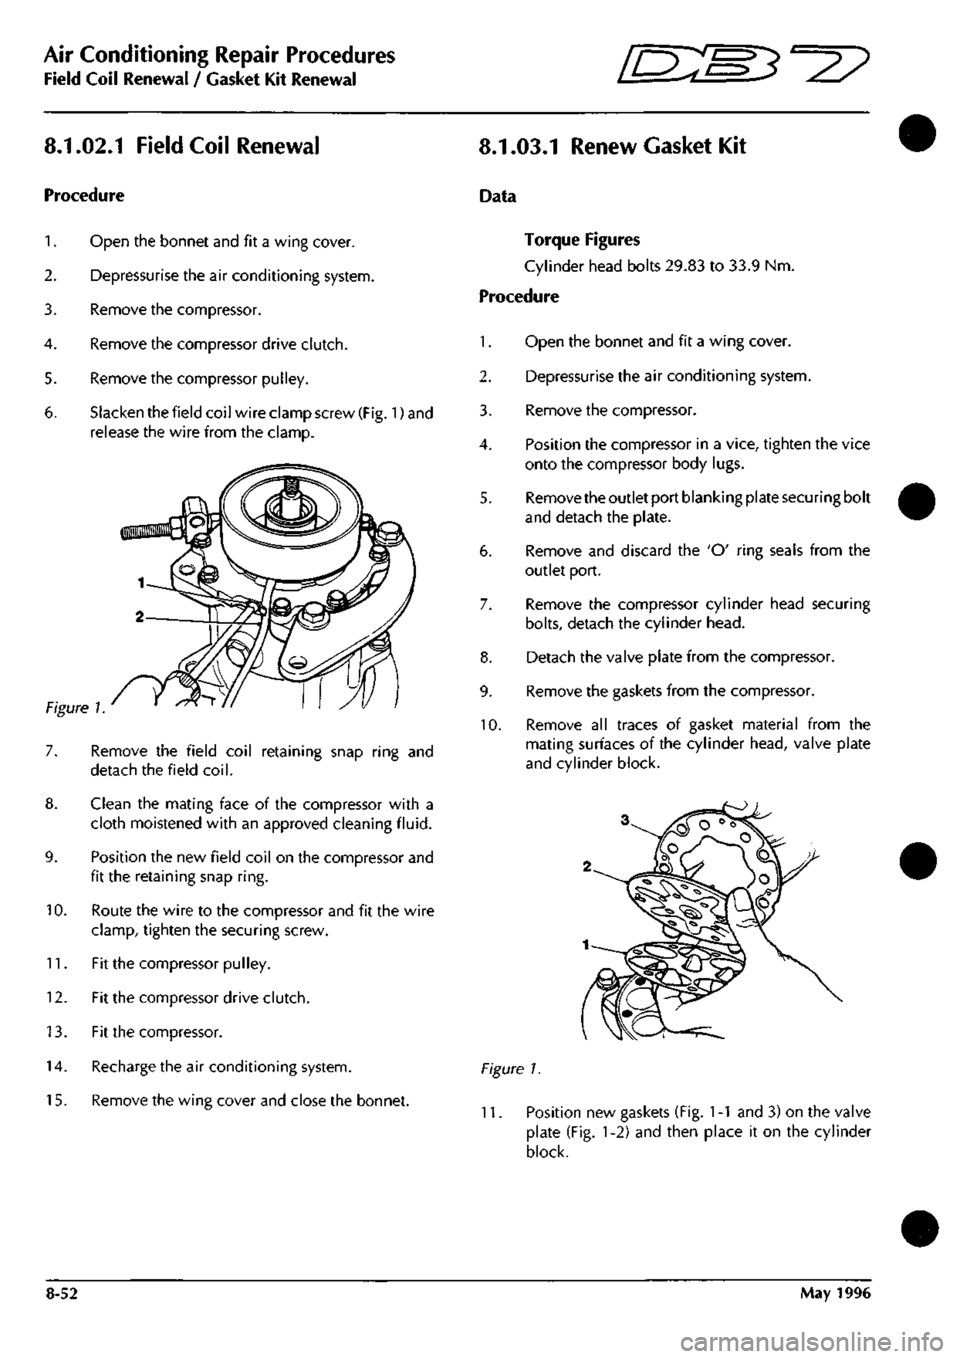
6. Slacken
the
field coil wire clamp screw
(Fig.
1) and
release
the
wire from
the
clamp.
10.
Remove
the
field coil retaining snap ring
and
detach
the
field
coil.
Clean
the
mating face
of the
compressor with
a
cloth moistened with
an
approved cleaning
fluid.
Position
the new
field coil
on the
compressor
and
fit
the
retaining snap
ring.
Route
the
wire
to the
compressor
and fit the
wire
clamp, tighten
the
securing screw.
11.
Fit the
compressor pulley.
12.
Fit the
compressor drive clutch.
13.
Fit the
compressor.
14.
Recharge
the air
conditioning system.
15.
Remove
the
wing cover
and
close
the
bonnet.
Data
Torque Figures
Cylinder head bolts 29.83
to 33.9 Nm.
Procedure
1.
Open
the
bonnet
and fit a
wing cover.
2.
Depressurise
the air
conditioning system.
3. Remove
the
compressor.
4.
Position
the
compressor
in a
vice, tighten
the
vice
onto
the
compressor body lugs.
5. Remove the outlet port blanking plate securing bolt
and detach
the
plate.
6. Remove
and
discard
the 'O'
ring seals from
the
outlet port.
7. Remove
the
compressor cylinder head securing
bolts,
detach
the
cylinder head.
8. Detach
the
valve plate from
the
compressor.
9. Remove
the
gaskets from
the
compressor.
10.
Remove
all
traces
of
gasket material from
the
mating surfaces
of the
cylinder head, valve plate
and cylinder block.
Figure
1.
11.
Position
new
gaskets (Fig.
1 -1
and 3) on the
valve
plate
(Fig. 1-2) and
then place
it on the
cylinder
block.
8-52 May
1996
Page 330 of 421
ES3^^
Air Conditioning Repair Procedures
Valve Plate Renewal
Figure
2.
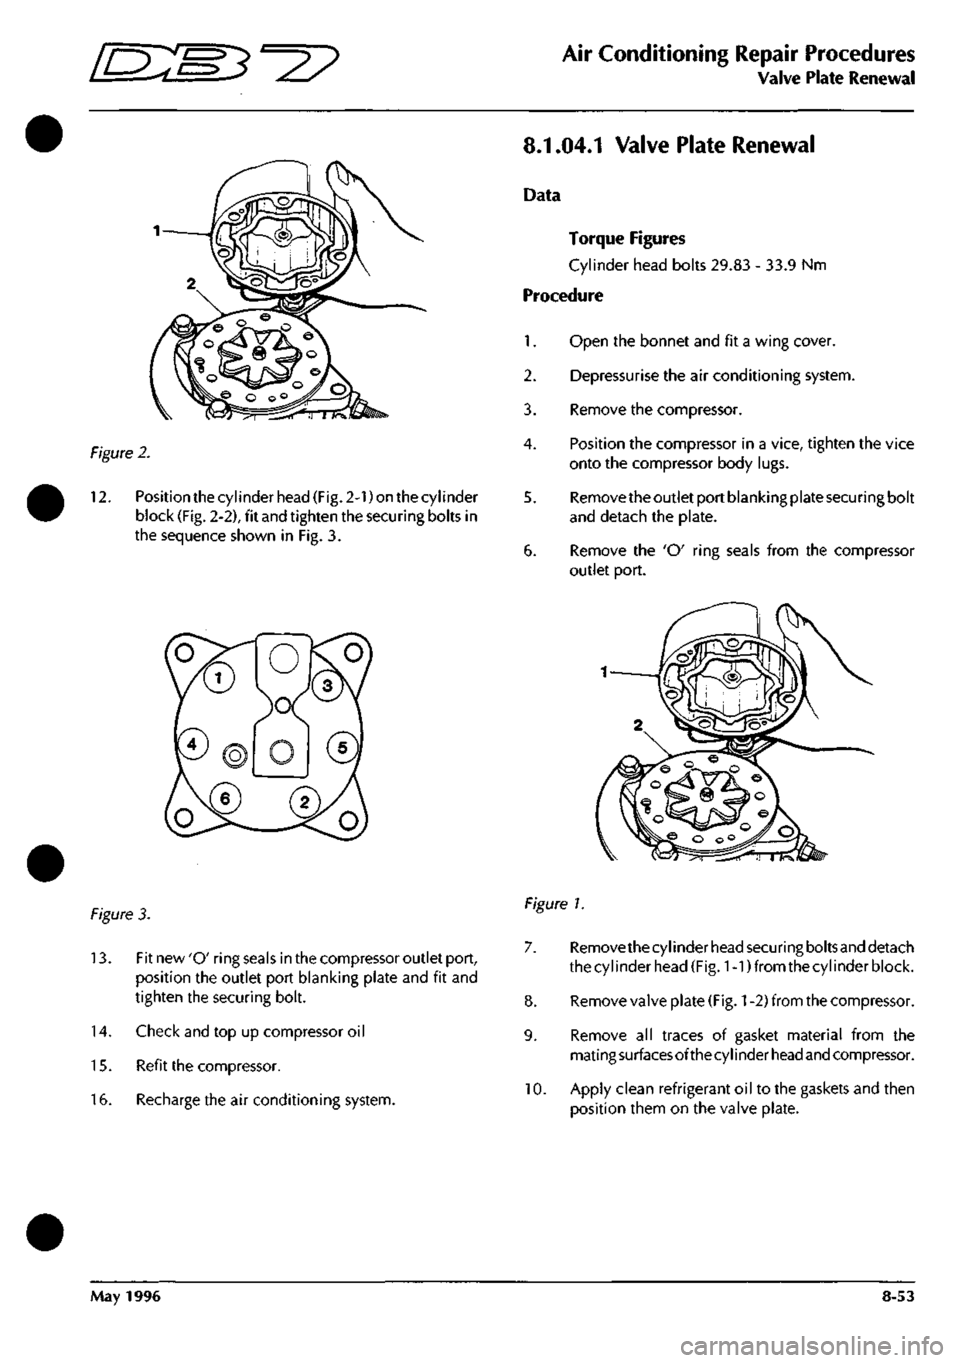
12.
Position the cylinder head (Fig. 2-1) on the cylinder
block (Fig. 2-2), fit and tighten the securing bolts in
the sequence shown in Fig. 3.
8.1.04.1 Valve Plate Renewal
Data
Torque Figures
Cylinder head bolts 29.83 - 33.9 Nm
Procedure
1.
Open the bonnet and fit a wing cover.
2.
Depressurise the air conditioning system.
3. Remove the compressor.
4.
Position the compressor in a vice, tighten the vice
onto the compressor body lugs.
5. Remove the outlet port blanking plate securing bolt
and detach the plate.
6. Remove the 'O' ring seals from the compressor
outlet port.
figure 3.
13.
Fit new 'O' ring seals in the compressor outlet port,
position the outlet port blanking plate and fit and
tighten the securing bolt.
14.
Check and top up compressor oil
15.
Refit the compressor.
16.
Recharge the air conditioning system.
Figure 1.
7. Removethecylinder head securing boltsand detach
the cylinder head (Fig. 1-1) from the cylinder block.
8. Remove valve plate
(Fig.
1
-2) from the compressor.
9. Remove all traces of gasket material from the
mati
ng
surfaces of the cy
I
i nder
head
and compressor.
10.
Apply clean refrigerant oil to the gaskets and then
position them on the valve plate.
May 1996 8-53
Page 331 of 421
Air Conditioning Repair Procedures
Expansion Valve Renewal
ES^'^?
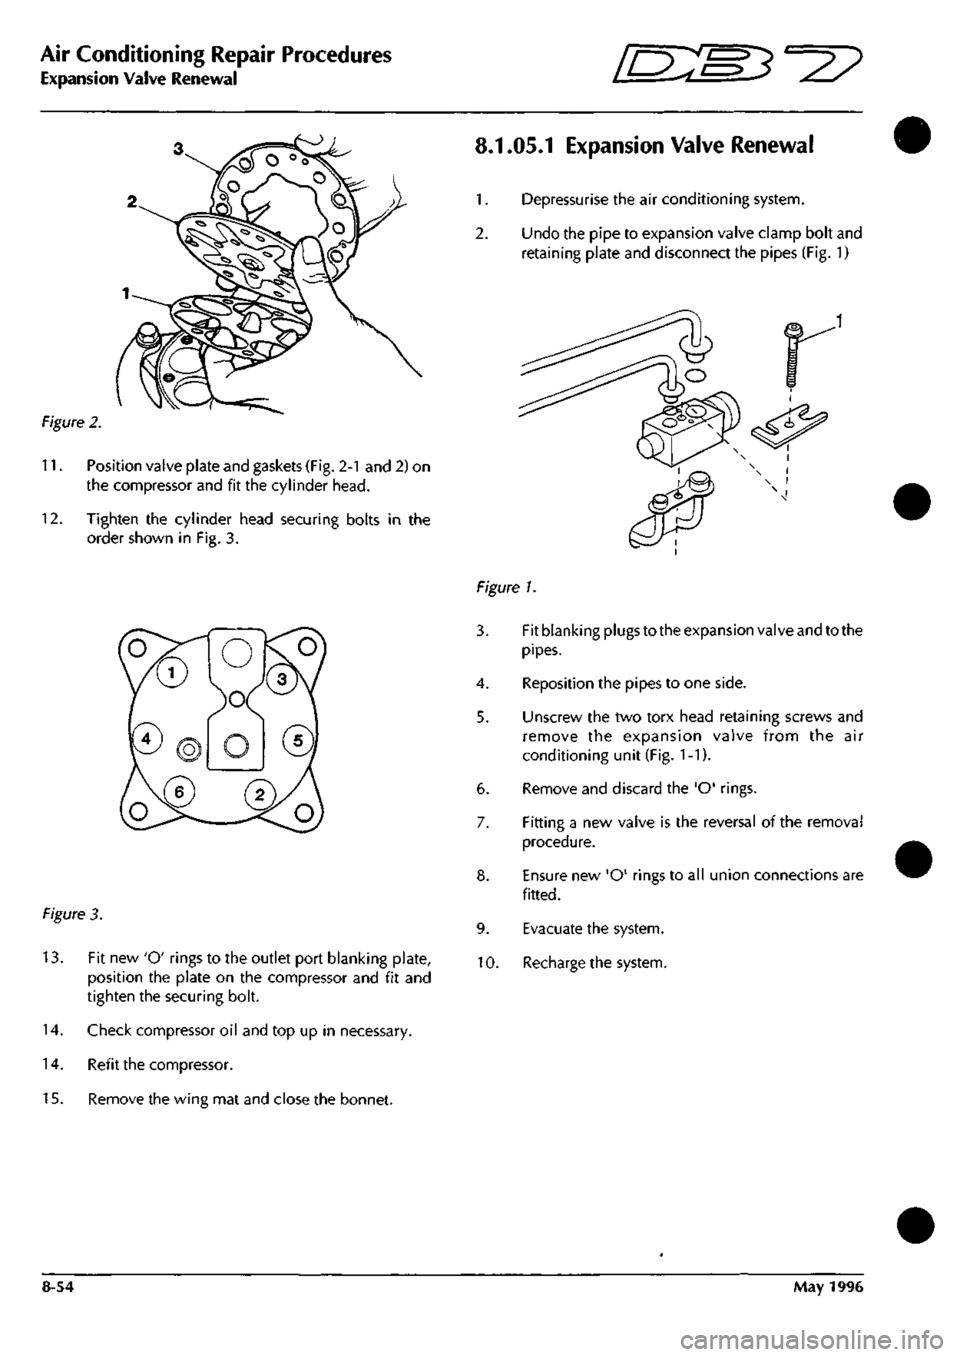
Figure 2.
11.
Position valve plate and gaskets (Fig. 2-1 and 2) on
the compressor and fit the cylinder head.
12.
Tighten the cylinder head securing bolts in the
order shown in Fig. 3.
Figure 3.
13.
Fit new 'O' rings to the outlet port blanking plate,
position the plate on the compressor and fit and
tighten the securing bolt.
14.
Check compressor oil and top up in necessary.
14.
Refit the compressor.
15.
Remove the wing mat and close the bonnet.
8.1.05.1 Expansion Valve Renewal
1.
Depressurise the air conditioning system.
2.
Undo the pipe to expansion valve clamp bolt and
retaining plate and disconnect the pipes (Fig. 1)
Figure 1.
3. Fit blanking plugs to the expansion valve and to the
pipes.
4.
Reposition the pipes to one side.
5. Unscrew the two torx head retaining screws and
remove the expansion valve from the air
conditioning unit (Fig.
1
-1).
6. Remove and discard the 'O' rings.
7. Fitting a new valve is the reversal of the removal
procedure.
8. Ensure new 'O' rings to all union connections are
fitted.
9. Evacuate the system.
10.
Recharge the system.
8-54 May 1996
Page 332 of 421
^2?
Air Conditioning Repair Procedures
Hose - Compressor to Evaporator/Air-Con Unit Renew
8.1.06.1 Hose-Compressor
to
Evaporator
Renewal
Procedure
1.
Open the bonnet and fit a wing cover.
2.
Depressurise the air conditioning systenn.
3. Remove the hose to evaporator valve clamping
plate,
disconnect the hose from the valve, remove
and discard the 'O' ring
seal.
4.
Fit a blanking plug to the evaporator valve. Release
the evaporator hose securing clips.
5. Remove the compressor outlet port retaining bolt.
6. Disconnect the hose from the compressor, discard
the hose complete with 'O' ring seals.
7. Connect the hose to the evaporator valve and
tighten clamp onto the hose.
8. Route the hose to the compressor, fit a new 'O' ring
seal and connect it to the compressor.
9. Position the outlet port retaining plate on the
compressor, fit and tighten the securing bolt.
10.
Refit the hose to the clips.
11.
Charge the air conditioning system.
12.
Remove the wing cover and close the bonnet.
8.2.01.1 Air Conditioning Unit Renewal
1.
Disconnect the battery earth
lead.
2.
Drain the engine coolant into a suitable container.
3. Depressurise the air conditioning system.
4.
Disconnect the high and low pressure hoses and
expansion valve from the air conditioning unit (see
expansion valve renewal).
5. Slacken the coolant hose to the heater matrix pipe
securing clips and disconnect the hoses from the
matrix. (This will require the removal of the air
intake hose for access.)
6. Remove the following items from inside the car:
front seats
underscuttle panels/knee bolsters
glove box assembly
facia trim (walnut trim)
radio and ashtray
centre console switch panel assembly
instrument panel and surround trim
steering wheel and column
facia assembly complete
hoses - distribution box to door vents
facia support frame
Details and drawings of the above operations can
be found in the electrical and trim sections.
Disconnect the vacuum hoses from the blower
motors, water valve and reservoir.
Un-clip the electrical harness from the air
conditioningunit, release theelectrical connections
and reposition the harness to allow removal of the
unit.
Displace and remove the footwell ventilator ducts
and hoses (Fig. 1-1).
May 1996 8-55
Page 344 of 421
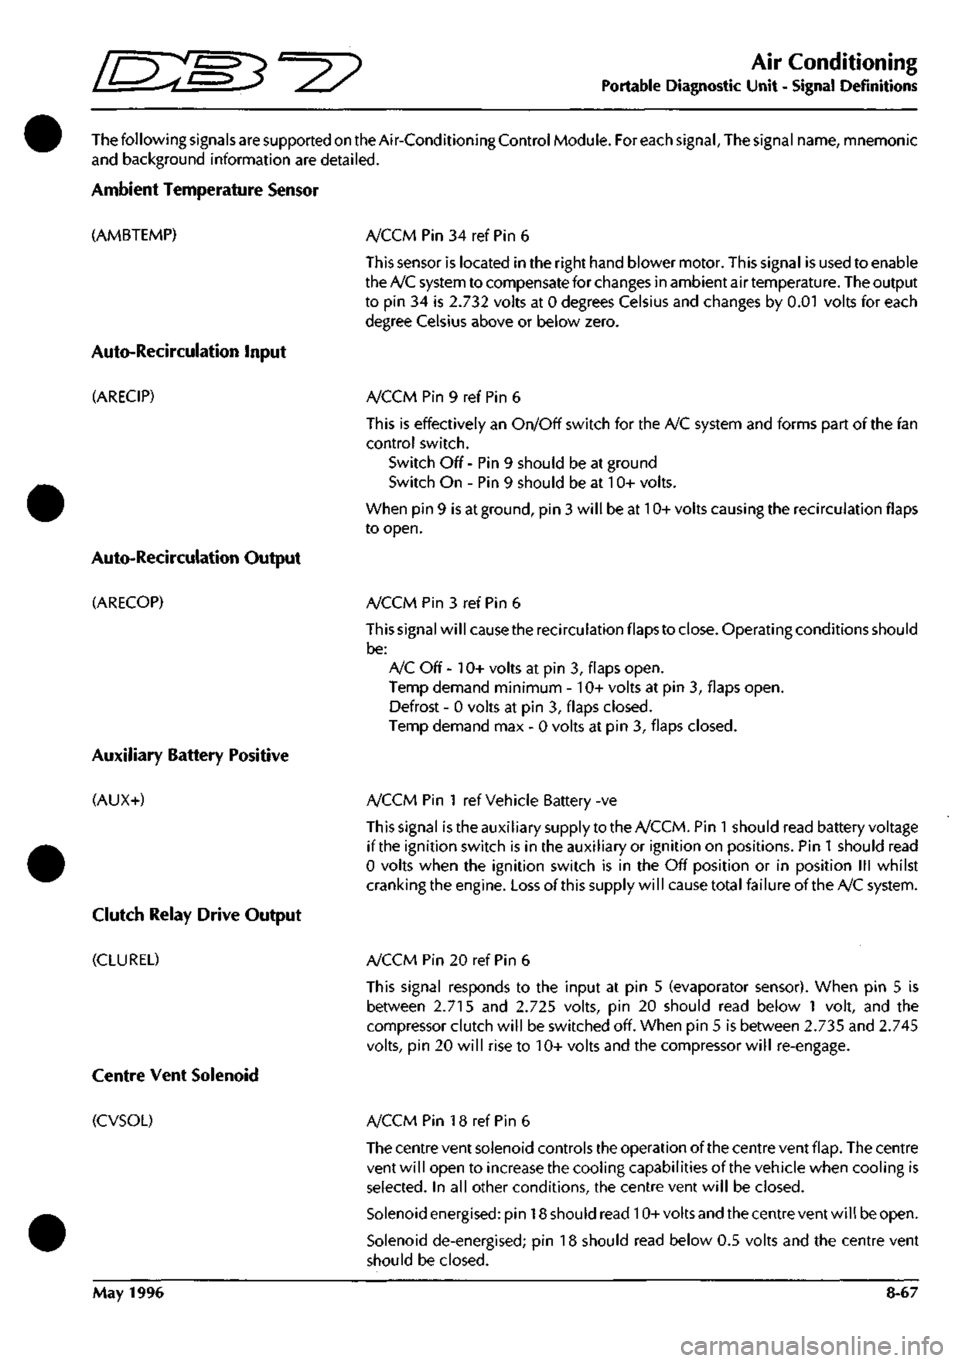
^=2?
Air Conditioning
Portable Diagnostic Unit - Signal Definitions
ThefollowingsignalsaresupportedontheAir-ConditioningControlModule. For each signal. The signal name, mnemonic
and background information are detailed.
Ambient Temperature Sensor
(AMBTEMP)
Auto-Recircuiation Input
(ARECIP)
Auto-Recirculation Output
(ARECOP)
Auxiliary Battery Positive
(AUX+)
Clutch Relay Drive Output
(CLUREL)
A/CCM Pin 34 ref Pin 6
This sensor is located in the right hand blower motor. This signal is used to enable
the A/C system to compensate for changes in ambient air temperature. The output
to pin 34 is 2.732 volts at 0 degrees Celsius and changes by 0.01 volts for each
degree Celsius above or below zero.
A/CCM Pin 9 ref Pin 6
This is effectively an On/Off switch for the A/C system and forms part of the fan
control switch.
Switch Off - Pin 9 should be at ground
Switch On - Pin 9 should be at 10+ volts.
When pin 9 is at ground, pin 3 will be at 10+ volts causing the recirculation flaps
to open.
A/CCM Pin 3 ref Pin 6
This signal will cause the recirculation flaps to close. Operating conditions should
be:
A/C Off - 10+ volts at pin 3, flaps open.
Temp demand minimum - 10+ volts at pin 3, flaps open.
Defrost - 0 volts at pin 3, flaps closed.
Temp demand max - 0 volts at pin 3, flaps closed.
A/CCM Pin 1 ref Vehicle Battery -ve
This signal istheauxiliary supply to the A/CCM. Pin
1
should read battery voltage
if the ignition switch is in the auxiliary or ignition on positions. Pin
1
should read
0 volts when the ignition switch is in the Off position or in position III whilst
cranking the engine. Loss of this supply will cause total failureof the A/C system.
A/CCM Pin 20 ref Pin 6
This signal responds to the input at pin 5 (evaporator sensor). When pin 5 is
between 2.715 and 2.725 volts, pin 20 should read below 1 volt, and the
compressor clutch will be switched off. When pin 5 is between 2.735 and 2.745
volts,
pin 20 will rise to 10+ volts and the compressor will re-engage.
Centre Vent Solenoid
(CVSOL) A/CCM Pin 18 ref Pin 6
The centre vent solenoid controls the operation of the centre vent flap. The centre
vent will open to increase the cooling capabilities of the vehicle when cooling is
selected.
In all other conditions, the centre vent will be closed.
Solenoid energised: pin 18 should read 10+volts and the centre vent will be open.
Solenoid de-energised; pin 18 should read below 0.5 volts and the centre vent
should be closed.
May 1996 8-67
Page 345 of 421

Air Conditioning
Portable Diagnostic Unit - Signal Definitions ^27
Defrost Solenoid
(DEFSOL)
Temperature Differential
(DIFF)
Evaporator Sensor
(EVSEN)
Fanspeed Defrost
(FANDEF)
Fanspeed High
(FANHIG)
Fanspeed Low
(FAN LOW)
A/CCM Pin 11 ref Pin 6
The defrost solenoid controls the operation ofthe screen vents. When the solenoid
is energised, the screen vents will be held closed by the vacuum created. To open
the vents the solenoid is de-energised.
The solenoid is energised when a ground supply is provided to pin 11. The
solenoid is de-energised when the ground supply is removed, at which point 10+
volts can be read at pin 11.
A/CCM Pin 28 ref Pin 6
This sets the differential between the position ofthe upper and lower flaps. With
minimum differential selected, pin 28 should read between 0 and 100 millivolts.
The voltage at pin 28 will rise smoothly as the differential is increased, up to a
maximum of 2.885 volts.
A/CCM Pin 5 ref Pin 6
This sensor monitors the temperature of the evaporator matrix, the output is used
to trigger the compressor circuit via the A/CCM pin 20. Operating conditions are
2.732 volts at 0 degrees Celsius ±0.01 volts for every degree Celsius above or
below zero.
A/CCM Pin 27 ref Pin 6
This signal is normal ly held at 3.6 ±0.8 volts by the control module. When Defrost
is selected from the control panel, the line is pulled down to 0.6 volts or below.
This will cause the defrost flaps to open by applying system voltage (approx 11
volts) to pin
11.
In addition, both fans will go to full speed i.e. high speed fan relay
energised .
A/CCM Pin 15 ref Pin 6
This signal is generated from the fan speed control switch.
Switch at High, pin
1
5 should read 0.6 volts.
Switch at Off, L, M or D positions, pin 15 should read 3.6 ±0.8 volts.
A/CCM Pin 13 ref Pin 6
This signal is generated from the fanspeed control switch.
Switch at Low, pin 13 should read 0.6 volts.
Switch at Off, M, H or D positions, pin 13 should read 3.6 ±0.8 volts.
8-68 May 1996