window ASTON MARTIN DB7 1997 Owner's Guide
[x] Cancel search | Manufacturer: ASTON MARTIN, Model Year: 1997, Model line: DB7, Model: ASTON MARTIN DB7 1997Pages: 421, PDF Size: 9.31 MB
Page 266 of 421
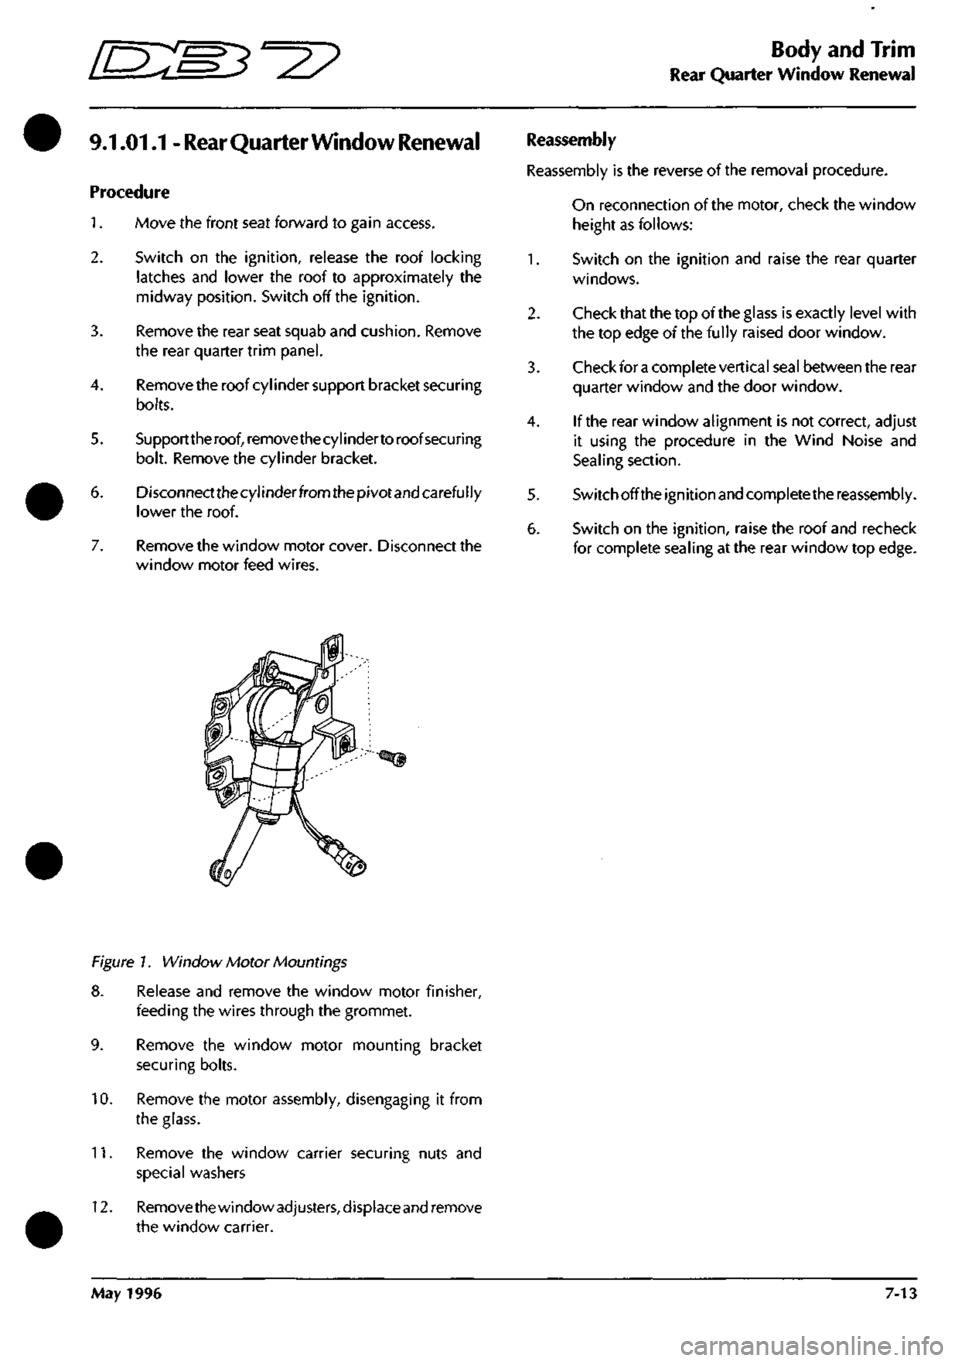
^=2?
Body and Trim
Roof Hydraulic Control System
9. Position the rear edge of the roof to the body.
10.
Position the rear cable to the roof lower edge.
Position the loops on the cable (approximately 17in
equi-spaced apart). Position the cable to the
mou nti ng
brackets,
fit but do not tighten the
secu
ring
nuts.
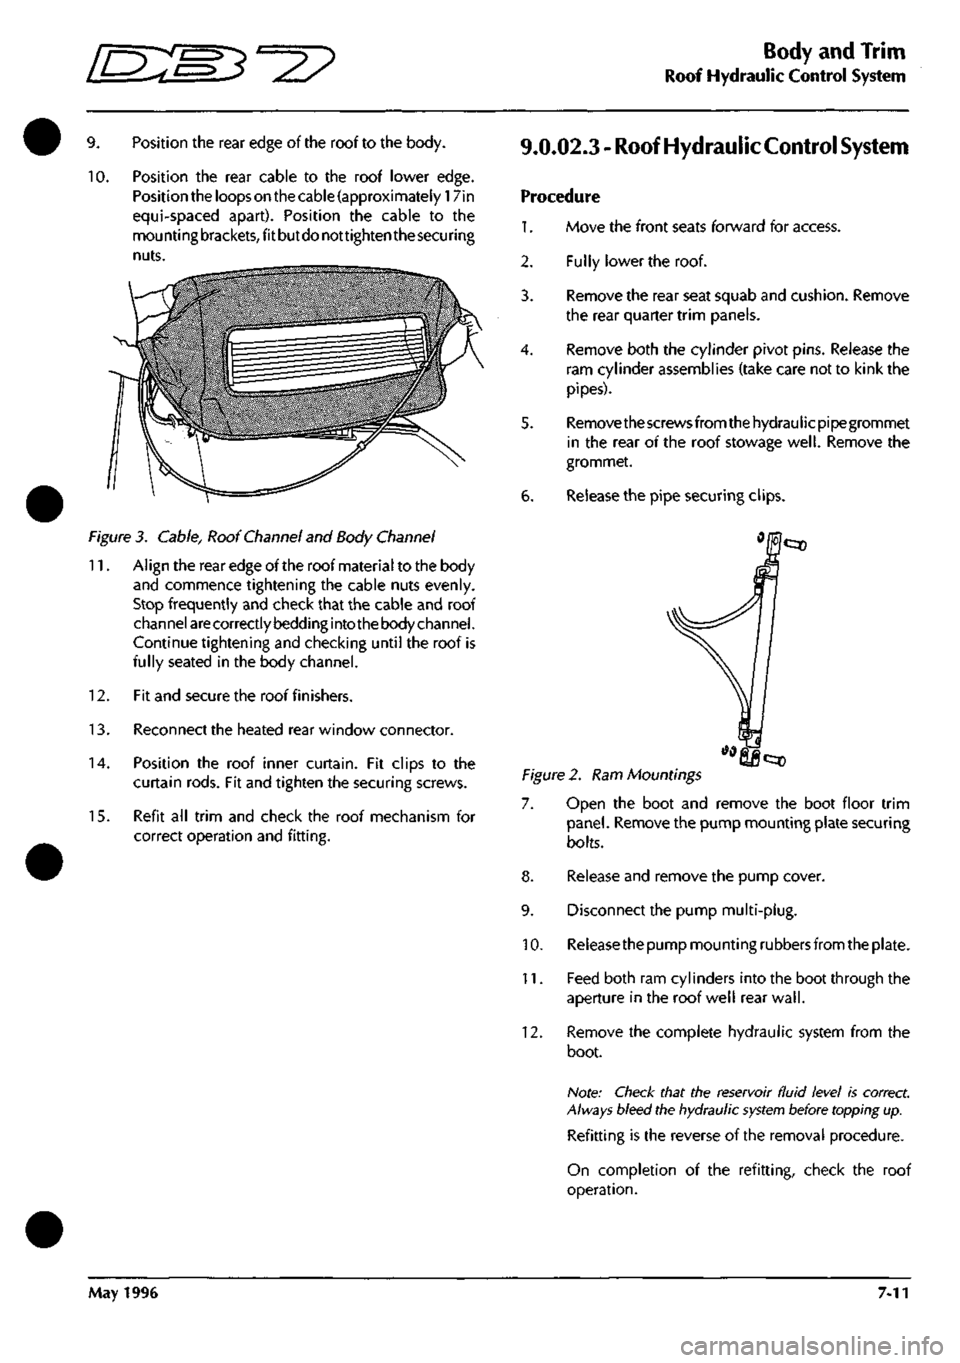
Figure 3. Cable, Roof Channel and Body Channel
11.
Align the rear edge of the roof material to the body
and commence tightening the cable nuts evenly.
Stop frequently and check that the cable and roof
channel
are
correctly bedding into the body channel.
Continue tightening and checking until the roof is
fully seated in the body channel.
12.
Fit and secure the roof finishers.
13.
Reconnect the heated rear window connector.
14.
Position the roof inner curtain. Fit clips to the
curtain rods. Fit and tighten the securing screws.
15.
Refit all trim and check the roof mechanism for
correct operation and fitting.
9.0.02.3 - Roof Hydraulic
Control
System
Procedure
1.
Move the front seats forward for access.
Fully lower the roof.
2.
3.
4.
6.
Remove the rear seat squab and cushion. Remove
the rear quarter trim panels.
Remove both the cylinder pivot pins. Release the
ram cylinder assemblies (take care not to kink the
pipes).
Remove the screws from the hydraulicpipegrommet
in the rear of the roof stowage
well.
Remove the
grommet.
Release the pipe securing clips.
Figure 2. Ram Mountings
7. Open the boot and remove the boot floor trim
panel.
Remove the pump mounting plate securing
bolts.
8. Release and remove the pump cover.
9. Disconnect the pump multi-plug.
10.
Releasethe pump mounting rubbers from the plate.
11.
Feed both ram cylinders into the boot through the
aperture in the roof well rear
wall.
12.
Remove the complete hydraulic system from the
boot.
Note: Check that the reservoir fluid level is correct.
Always bleed the hydraulic
system
before topping up.
Refitting is the reverse of the removal procedure.
On completion of the refitting, check the roof
operation.
May 1996 7-11
Page 268 of 421
•=2?
Body and Trim
Rear Quarter Window Renewal
9.1.01.1 -
Rear
Quarter Window Renewal
Procedure
1.
Move the front seat forward to gain access.
2.
Switch on the ignition, release the roof locking
latches and lower the roof to approximately the
midway position. Switch off the ignition.
3. Remove the rear seat squab and cushion. Remove
the rear quarter trim panel.
4.
Remove the roof cylinder support bracket securing
bolts.
5. Support the roof, removethecylindertoroofsecuring
bolt. Remove the cylinder bracket.
6. Disconnectthecylinderfromthepivotand carefully
lower the roof.
7. Remove the window motor cover. Disconnect the
window motor feed wires.
Reassembly
Reassembly is the reverse of the removal procedure.
On reconnection of the motor, check the window
height as follows:
1.
Switch on the ignition and raise the rear quarter
windows.
2.
Check that the top of the glass is exactly level with
the top edge of the fully raised door window.
3. Check for
a
complete vertical seal between the rear
quarter window and the door window.
4.
If the rear window alignment is not correct, adjust
it using the procedure in the Wind Noise and
Sealing section.
5. Switch off the ignition and complete the reassembly.
6. Switch on the ignition, raise the roof and recheck
for complete sealing at the rear window top edge.
Figure 1. Window Motor Mountings
8. Release and remove the window motor finisher,
feeding the wires through the grommet.
9. Remove the window motor mounting bracket
securing bolts.
10.
Remove the motor assembly, disengaging it from
the glass.
11.
Remove the window carrier securing nuts and
special washers
12.
Remove the window
adjusters,
d isplace and remove
the window carrier.
May 1996 7-13
Page 270 of 421
^^7
Body and Trim
Rear Quarter Window Lift Motor
9.1.01.4 - Rear Quarter Window Lift
Motor - Left Hand
Procedure
1.
Move the front seat forward to gain access.
2.
Switch on the ignition, release the roof locking
latches and lower the roof. Switch off the ignition.
Remove the rear seat squab and cushion. Remove
the rear quarter trim panel.
Disconnect the window motor feed wires.
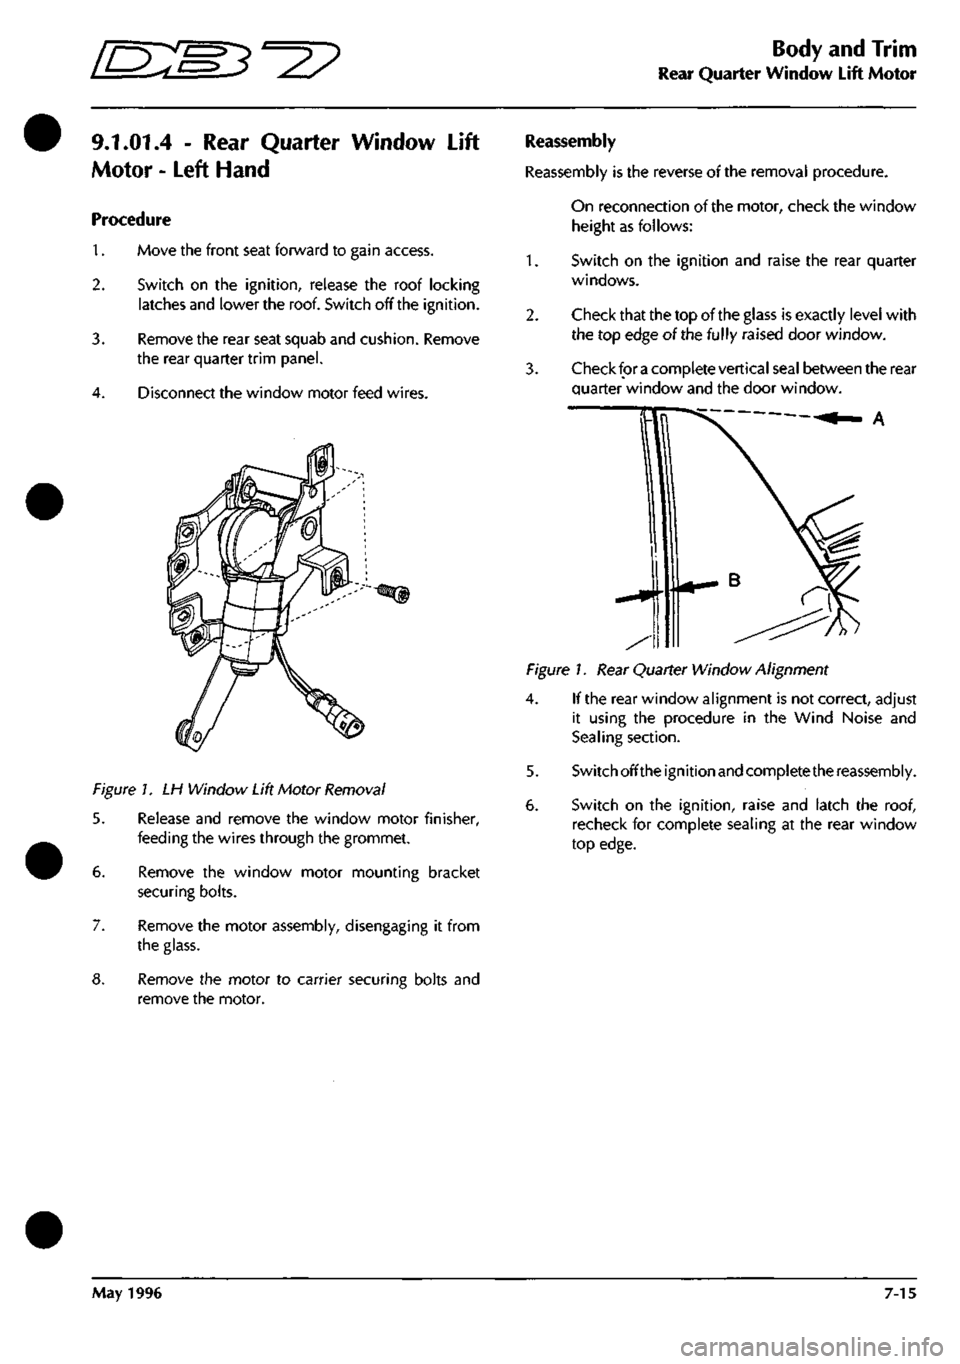
Figure 1. LH Window Lift Motor Removal
5. Release and remove the window motor finisher,
feeding the wires through the grommet.
6. Remove the window motor mounting bracket
securing bolts.
7. Remove the motor assembly, disengaging it from
the glass.
8. Remove the motor to carrier securing bolts and
remove the motor.
Reassembly
Reassembly is the reverse of the removal procedure.
On reconnection of the motor, check the window
height as follows:
1.
2.
Switch on the ignition and raise the rear quarter
windows.
Check that the top of the glass is exactly level with
the top edge of the fully raised door window.
Check for
a
complete vertical seal between the rear
quarter window and the door window.
Figure 1. Rear Quarter Window Alignment
4.
If the rear window alignment is not correct, adjust
it using the procedure in the Wind Noise and
Sealing section.
5. Switch off the ignition and complete the reassembly.
6. Switch on the ignition, raise and latch the roof,
recheck for complete sealing at the rear window
top edge.
May 1996 7-15
Page 271 of 421
Body and Trim
Rear Quarter Window Lift Motor '^^
9.1.01.5 - Rear Quarter Window Lift
Motor - Right Hand
Procedure
1.
Move the front seat forward to gain access.
2.
Switch on the ignition, release the roof locking
latches and lower the roof. Switch off the ignition.
3. Remove the rear seat squab and cushion. Remove
the rear quarter trim panel.
4.
Disconnect the window motor feed wires.
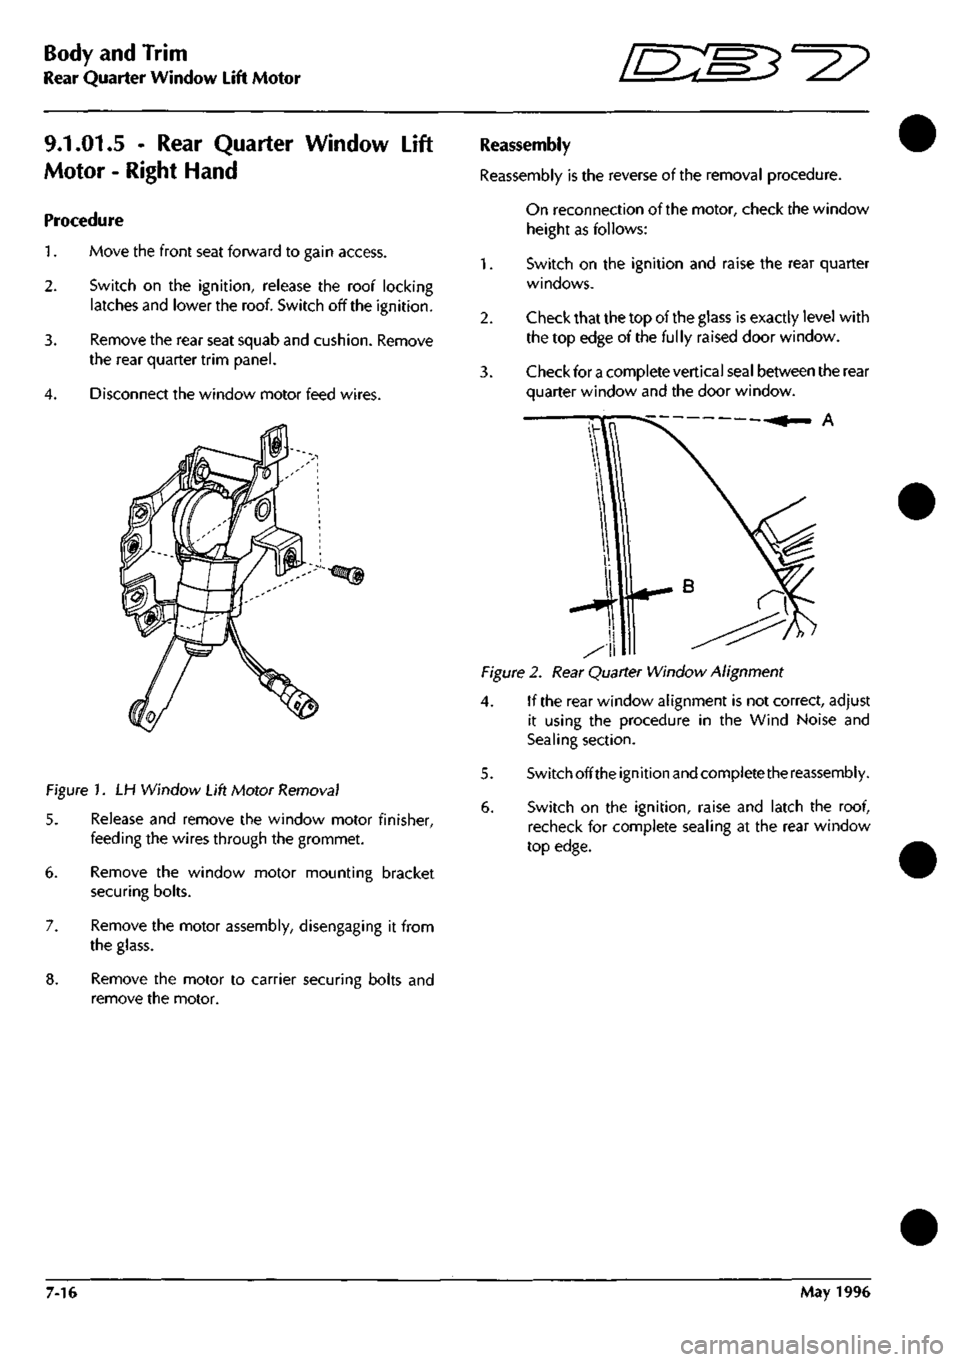
Figure 1. LH Window Lift Motor Removal
5. Release and remove the window motor finisher,
feeding the wires through the grommet.
6. Remove the window motor mounting bracket
securing bolts.
7. Remove the motor assembly, disengaging it from
the glass.
8. Remove the motor to carrier securing bolts and
remove the motor.
Reassembly
Reassembly is the reverse of the removal procedure.
On reconnection of the motor, check the window
height as follows:
1.
Switch on the ignition and raise the rear quarter
windows.
2.
Check that the top of the glass is exactly level with
the top edge of the fully raised door window.
3. Check for a complete vertical seal between the rear
quarter window and the door window.
A
Figure 2. Rear Quarter Window Alignment
4. If the rear window alignment is not correct, adjust
it using the procedure in the Wind Noise and
Sealing section.
5. Switch offthe ignition and complete the reassembly.
6. Switch on the ignition, raise and latch the roof,
recheck for complete sealing at the rear window
top edge.
7-16 May 1996
Page 272 of 421
^^2?
Body and Trim
Roof Sealing and Wind Noise
Roof Sealing and Wind Noise
Roof seals and side windows have been provided
with
a range
ofadjustments capable ofdealing with
any leaks which may occur.
The following information is divided into five
sections:
1.
A post and header sealing/roof lock adjustment
2.
Roof seals - adjustment
3. Cheater plate seals - adjustment/renewal
4.
Door glass - adjustment
5. Rear quarter glass - adjustment (9.1.01.2)
When a leak is
reported,
either wind noise or water
ingress, try to pinpoint the actual leak path using
any of the following methods:
• An ultrasonic leak detector
• An air flow
detector,
e.g.
Drager
smoke
tube
• Paper test strips at seal contact areas
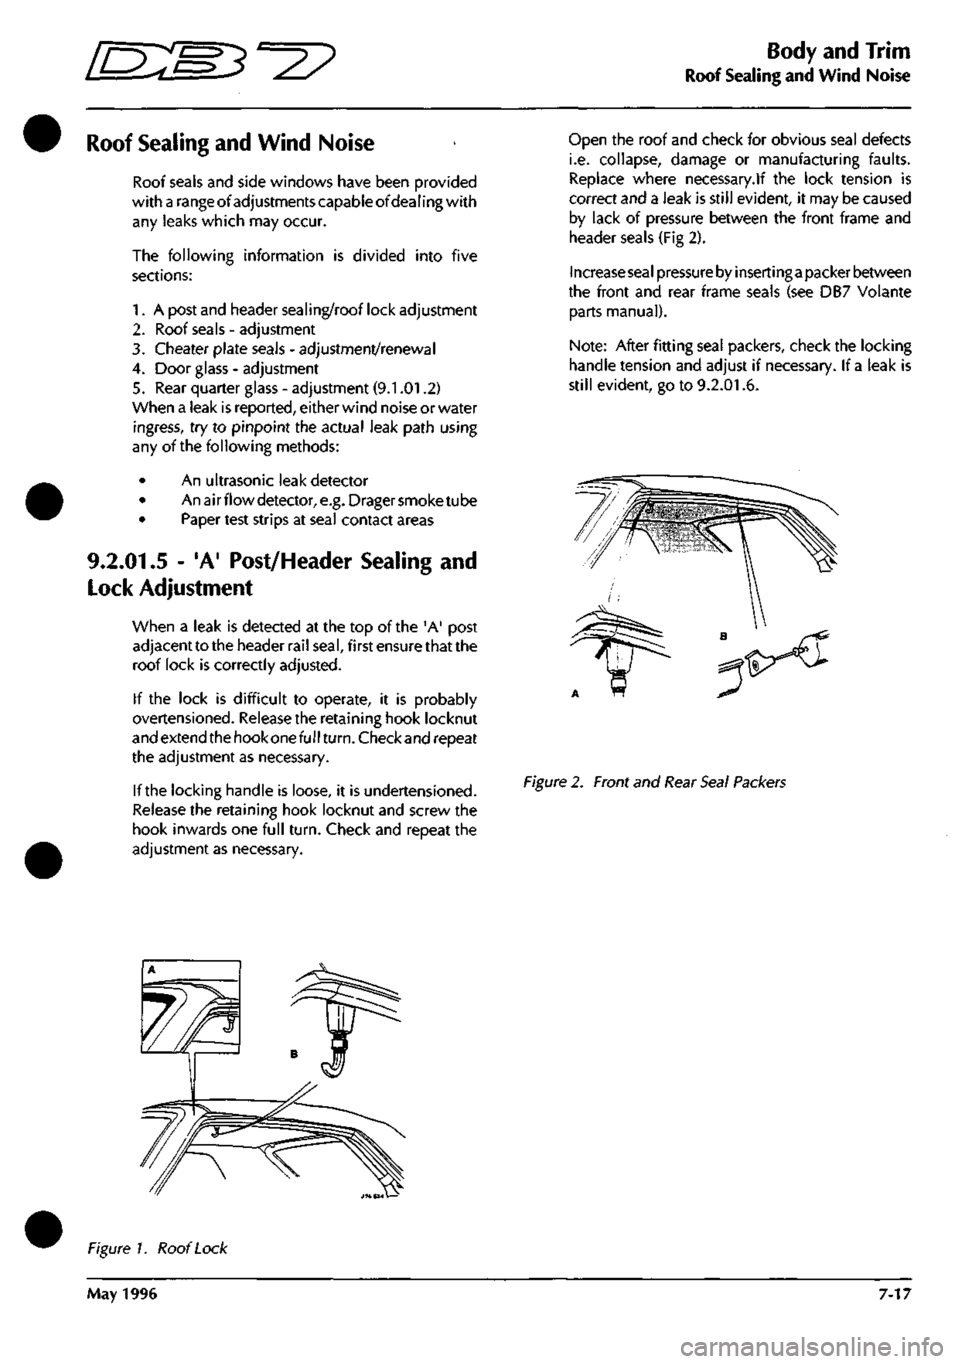
9.2.01.5 - 'A' Post/Header Sealing and
Lock Adjustment
when a leak is detected at the top of the 'A' post
adjacent to the header rail
seal,
first
ensure
that the
roof lock is correctly adjusted.
If the lock is difficult to operate, it is probably
overtensioned. Release the retaining hook locknut
and extend
the hook
one full
turn.
Checkand repeat
the adjustment as necessary.
If the locking handle is loose, it is undertensioned.
Release the retaining hook locknut and screw the
hook inwards one full
turn.
Check and repeat the
adjustment as necessary.
Open the roof and check for obvious seal defects
i.e. collapse, damage or manufacturing faults.
Replace where necessary.lf the lock tension is
correct and a leak is still evident, it may be caused
by lack of pressure between the front frame and
header seals (Fig 2).
Increase seal pressure by inserting a
packer between
the front and rear frame seals (see DB7 Volante
parts manual).
Note:
After fitting
sea!
packers, check the locking
handle tension and adjust if necessary. If
a
leak is
still evident, go to 9.2.01.6.
Figure
2. Front and
Rear Seal Packers
Figure 1. Roof
Lock
May 1996 7-17
Page 275 of 421
Body and Trim
Door Glass Adjustment ^?
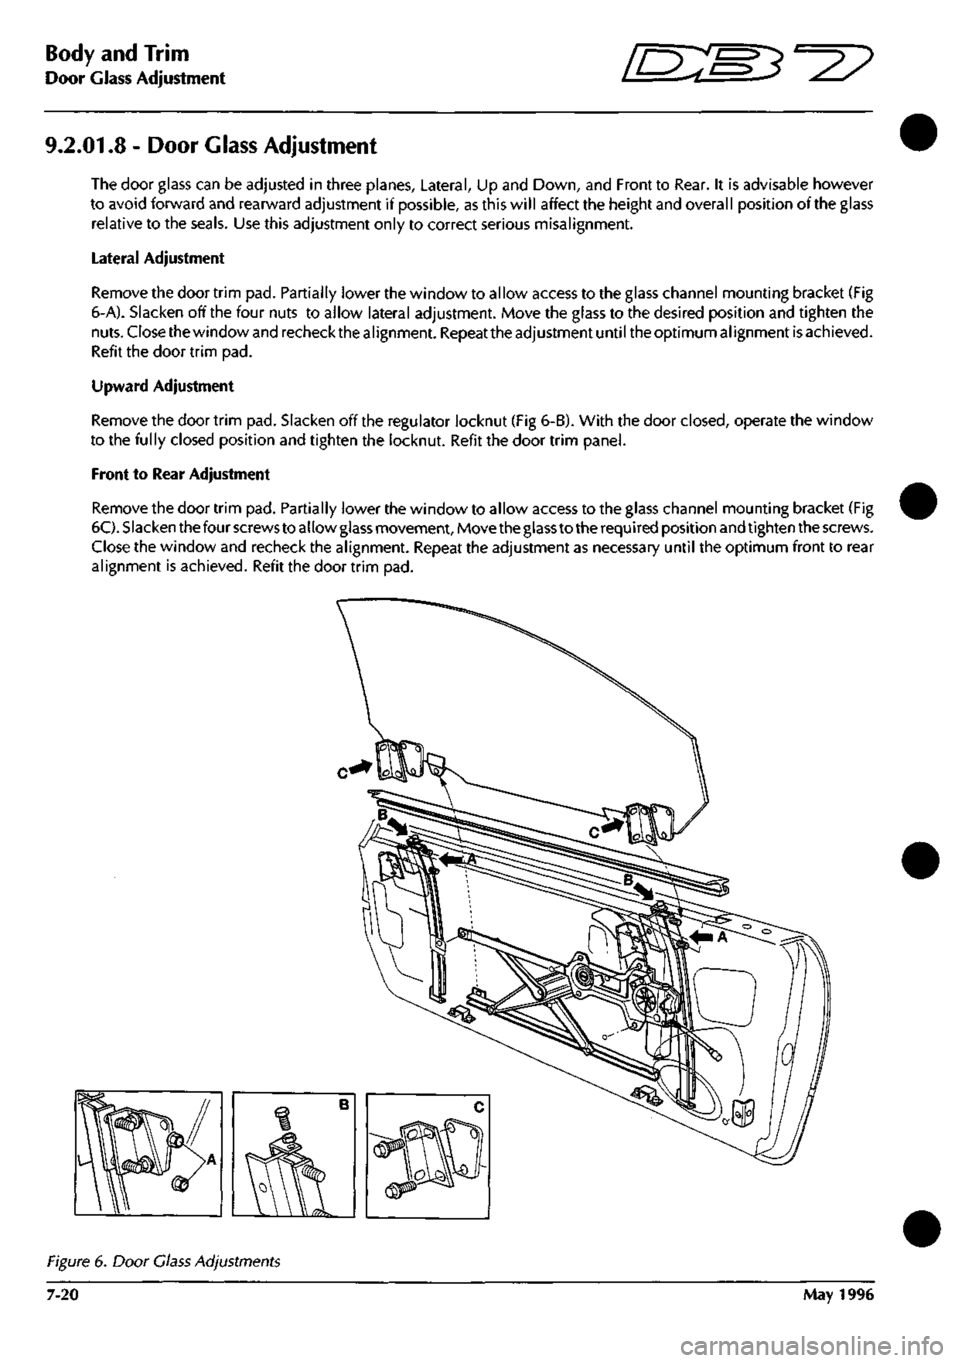
9.2.01.8 - Door Glass Adjustment
The door glass can be adjusted in three planes. Lateral, Up and Down, and Front to Rear. It is advisable however
to avoid forward and rearward adjustment if possible,
as
this will affect the height and overall position of
the
glass
relative to the seals. Use this adjustment only to correct serious misalignment.
Lateral Adjustment
Remove the door trim pad. Partially lower the window to allow access to the glass channel mounting bracket (Fig
6-A). Slacken off the four nuts to allow lateral adjustment. Move the glass to the desired position and tighten the
nuts.
Close the
window
and
recheck the alignment.
Repeat the
adjustment until
the
optimum alignment
is
achieved.
Refit the door trim pad.
Upward Adjustment
Remove the door trim pad. Slacken off the regulator locknut (Fig 6-B). With the door
closed,
operate the window
to the fully closed position and tighten the locknut. Refit the door trim panel.
Front to Rear Adjustment
Remove the door trim pad. Partially lower the window to allow access to the glass channel mounting bracket (Fig
6C).
Slacken
the
four
screws
to allow
glass
movement.
Move
theglass
to the
required position
and tighten
the screws.
Close the window and recheck the alignment. Repeat the adjustment as necessary until the optimum front to rear
alignment is achieved. Refit the door trim pad.
Figure
6. Door
Class Adjustments
7-20 May 1996
Page 317 of 421
Air Conditioning
System Checking with the Manifold Gauge Set D'^?
Purging the Test Hoses
1.
With the manifold test set attached to the system.
2.
Purge the high pressure test hose by cracking open
the high pressure side hand valve on the manifold
gauge set for 3 to 5 seconds. This allows the system
refrigerant to purge the air from the test hose and
discharge through the manifold centre test hose.
Immediately cl ose the high pressure side hand
valve.
3. Purge the low pressure test hose in the same manner
by cracking open the low pressure side hand valve
manifold gauge
set
for 3 to 5 seconds, then close the
hand valve.
Stabilising the System
The manifold gauge set is now attached to the
system and the test hoses purged of air. With both
hand valves closed, the system must be operated
for a few minutes to stabilise all pressures and
temperatures throughout the system in order to
obtain accurate test gauge readings.
Proceed as follows:
1.
Place all test hoses, gauge set and other equipment
away from all engine moving parts. Also keep the
hoses from touching the hot engine manifold.
2.
Start the engine and adjust engine speed to fast idle
3. Turn on the air conditioning and set for maximum
cooling with blower fans on high speed
4.
Open the car doors and/or windows (to quickly
eliminate car interior heat).
5. Operate the system under these conditions for 5 to
10 minutes to stabilise the system ready for testing.
6. Check the system for full refrigerant by noting the
sightglass indications. Some refrigerant loss occurs
over a period of time.
Note: The air conditioning
system
must contain a full
refrigerant
charge
before an accurate
system
check can
be
made.
An insufficient
charge
is indicated by
a stream
of
bubbles
or
foam.
If
the
refrigerant charge is low, the
system
must
be
fullydischarged into
a
refrigerant recovery
station and recharged with the correct weight of refrigerant
82.30.08. Do not top up a
system
with refrigerant.
Leak Test
A high proportion of ail air conditioning work
consists of locating and repairing leaks.
Many leaks are located at connections and are
caused by vibration. They may only require the re-
tightening of a connection or clamp.
Occasionally a hose rubs on a structural part of the
vehicle and creates a leak, or a hose deteriorates
which will require a replacement.
The specified maximum leakage rate at each fitting
is 0.5 kg of R 134a in 40 years and a leak detector
capable of operating to this accuracy must be
provided.
To check place the leak detector probe at
the lowest pointofeach joint, pausefortwo seconds.
Do not wave the probe about as refrigerant is
heavier than air and flows to the lowest point. If a
leak is greater than 0-5 kg in forty years is detected
identify the leak point for rectification.
Check that the leaking fitting has been tightened to
the correct torque. If the torque is low, rectify and
repeat leak test. If the torque is satisfactory,
depressurise the system, dismantle the leaking
connection and check the quality of the fitting.
If the fitting is satisfactory, clean and reassemble
after applying a thin film of refrigerant to the seat of
aflarefitting, ora newoiled "O" ring to an "O" ring
fitting.
Tighten to the correct torque.
Charge the system with 200 g of El 34A and leak test
the rectified system. If the system is satisfactory,
depressurise, evacuate and recharge the system.
If the system is unsatisfactory, i.e. leakage greater
than 0.5 kg in forty years, depressurise and replace
the leaking assembly.
8-40 May 1996
Page 405 of 421
The Aston Martin Lagonda Diagnostic System
Users Guide
•=2?
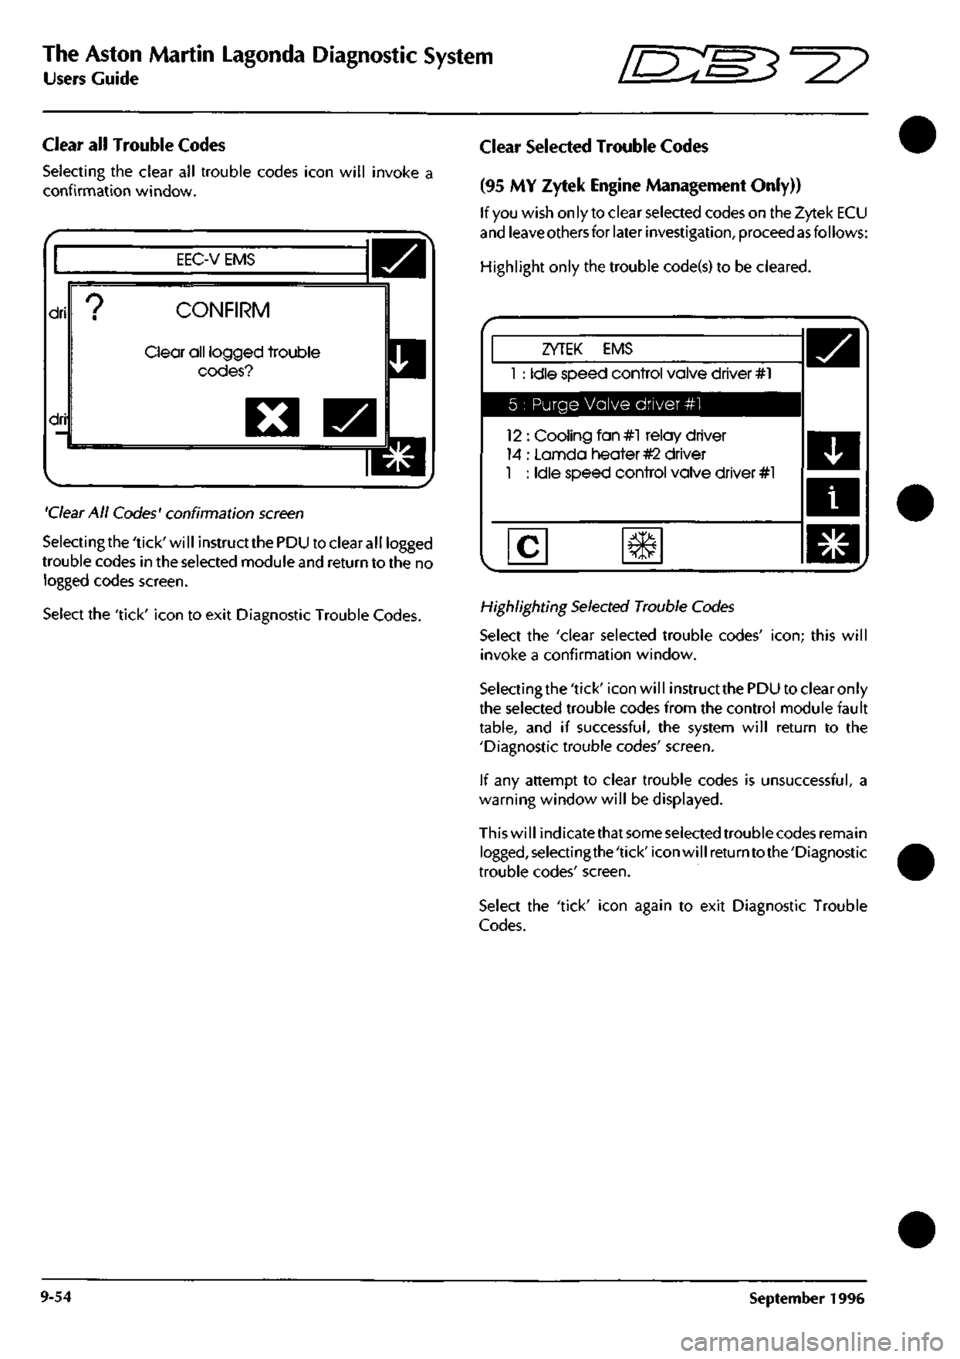
Clear all Trouble Codes
Selecting the clear all trouble codes icon will invoke a
confirmation window.
EEC-V EMS
dri
dri
CONFIRM
Clear all logged trouble
codes?
O
'Clear
All Codes' confirmation
screen
Selectingthe'tick'will instructthePDU to clear all logged
trouble codes in the selected module
and
return to the no
logged codes screen.
Select the 'tick' icon to exit Diagnostic Trouble Codes.
Clear Selected Trouble Codes
(95 MY Zytek Engine Management Only))
If
you
wish only to clear selected codes on the Zytek ECU
and
leave others
for later
investigation,
proceed
as
follows:
Highlight only the trouble code(s) to be cleared.
ZYTEK EMS
1 : Idle speed control valve driver #1
5 : Purge Valve driver #1
12 : Cooling fan#l relay driver
14 : Lannda heater
#2
driver
1 : Idle speed control valve driver #1
Highlighting
Selected
Trouble
Codes
Select the 'clear selected trouble codes'
icon;
this will
invoke a confirmation window.
Selectingthe 'tick' icon will instruct
the
PDU to clear only
the selected trouble codes from the control module fault
table,
and if successful, the system will return to the
'Diagnostic trouble codes' screen.
If any attempt to clear trouble codes is unsuccessful, a
warning window will be displayed.
This will indicatethat
some selected
trouble codes remain
logged,selectingthe'tick'iconwillreturntothe'Diagnostic
trouble codes' screen.
Select the 'tick' icon again to exit Diagnostic Trouble
Codes.
9-54 September 1996