headlamp ASTON MARTIN DB7 1997 Workshop Manual
[x] Cancel search | Manufacturer: ASTON MARTIN, Model Year: 1997, Model line: DB7, Model: ASTON MARTIN DB7 1997Pages: 421, PDF Size: 9.31 MB
Page 9 of 421
[Em^^^?
Electrics
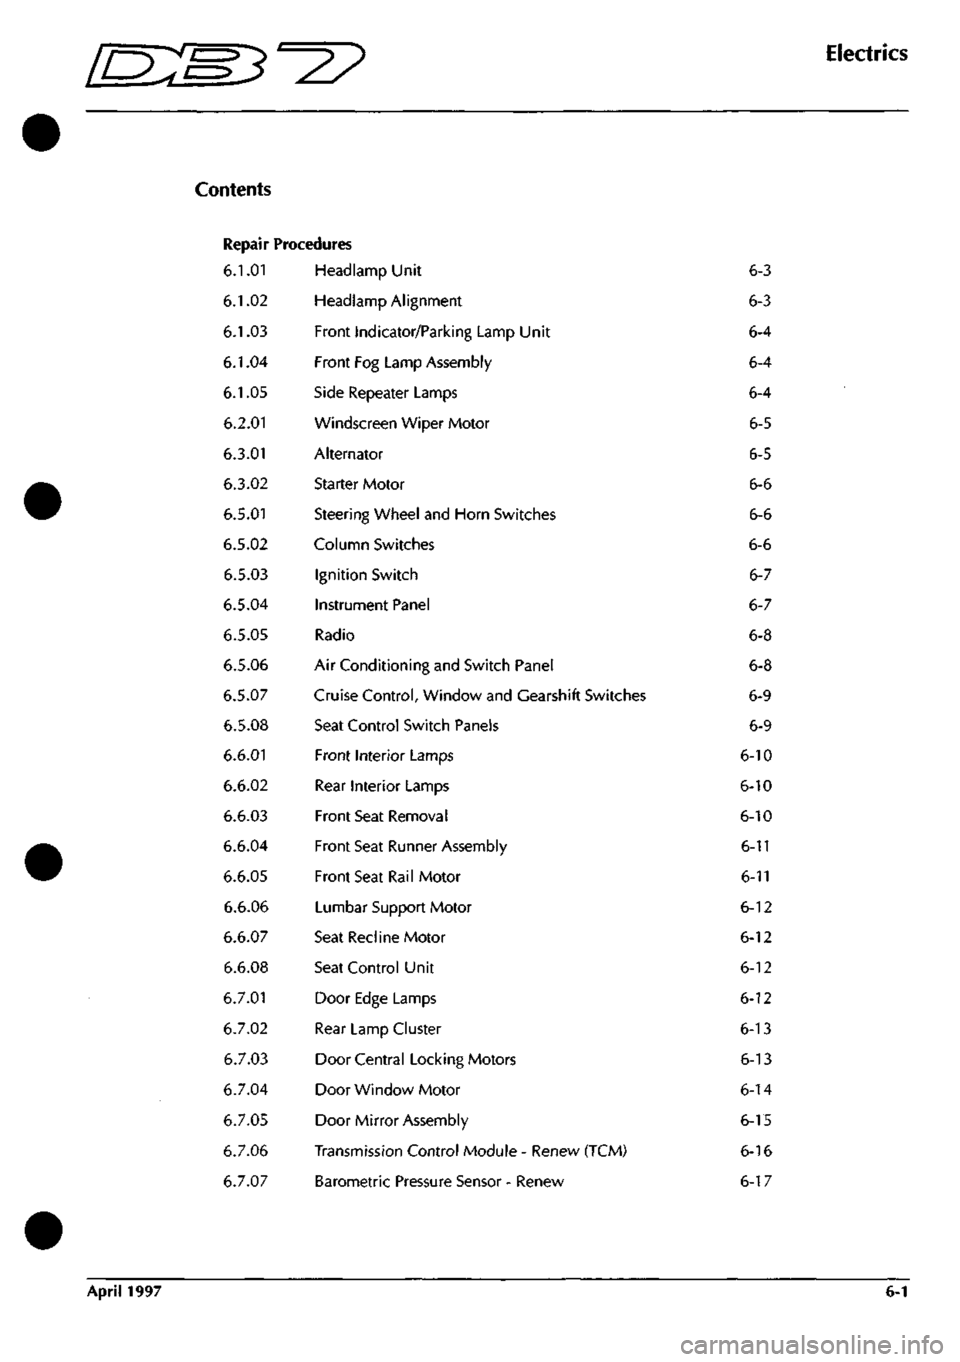
Repair Procedures
6.1.01
6.1.02
6.1.03
6.1.04
6.1.05
6.2.01
6.3.01
6.3.02
6.5.01
6.5.02
6.5.03
6.5.04
6.5.05
6.5.06
6.5.07
6.5.08
6.6.01
6.6.02
6.6.03
6.6.04
6.6.05
6.6.06
6.6.07
6.6.08
6.7.01
6.7.02
6.7.03
6.7.04
6.7.05
6.7.06
6.7.07
Headlamp Unit
Headlamp Alignment
Front Indicator/Parking Lamp Unit
Front Fog Lamp Assembly
Side Repeater Lamps
Windscreen Wiper Motor
Alternator
Starter Motor
Steering Wheel and Horn Switches
Column Switches
Ignition Switch
Instrument Panel
Radio
Air Conditioning and Switch Panel
Cruise Control, Window and Gearshift Switches
Seat Control Switch Panels
Front Interior Lamps
Rear Interior Lamps
Front Seat Removal
Front Seat Runner Assembly
Front Seat Rail Motor
Lumbar Support Motor
Seat Recline Motor
Seat Control Unit
Door Edge Lamps
Rear Lamp Cluster
Door Central Locking Motors
Door Window Motor
Door Mirror Assembly
Transmission Control Module - Renew (TCM)
Barometric Pressure Sensor - Renew
6-3
6-3
6-4
6-4
6-4
6-5
6-5
6-6
6-6
6-6
6-7
6-7
6-8
6-8
6-9
6-9
6-10
6-10
6-10
6-11
6-11
6-12
6-12
6-12
6-12
6-13
6-13
6-14
6-15
6-16
6-17
April 1997 6-1
Page 11 of 421
ES^^^?
Electrics
Headlamp Unit / Headlamp Alignment
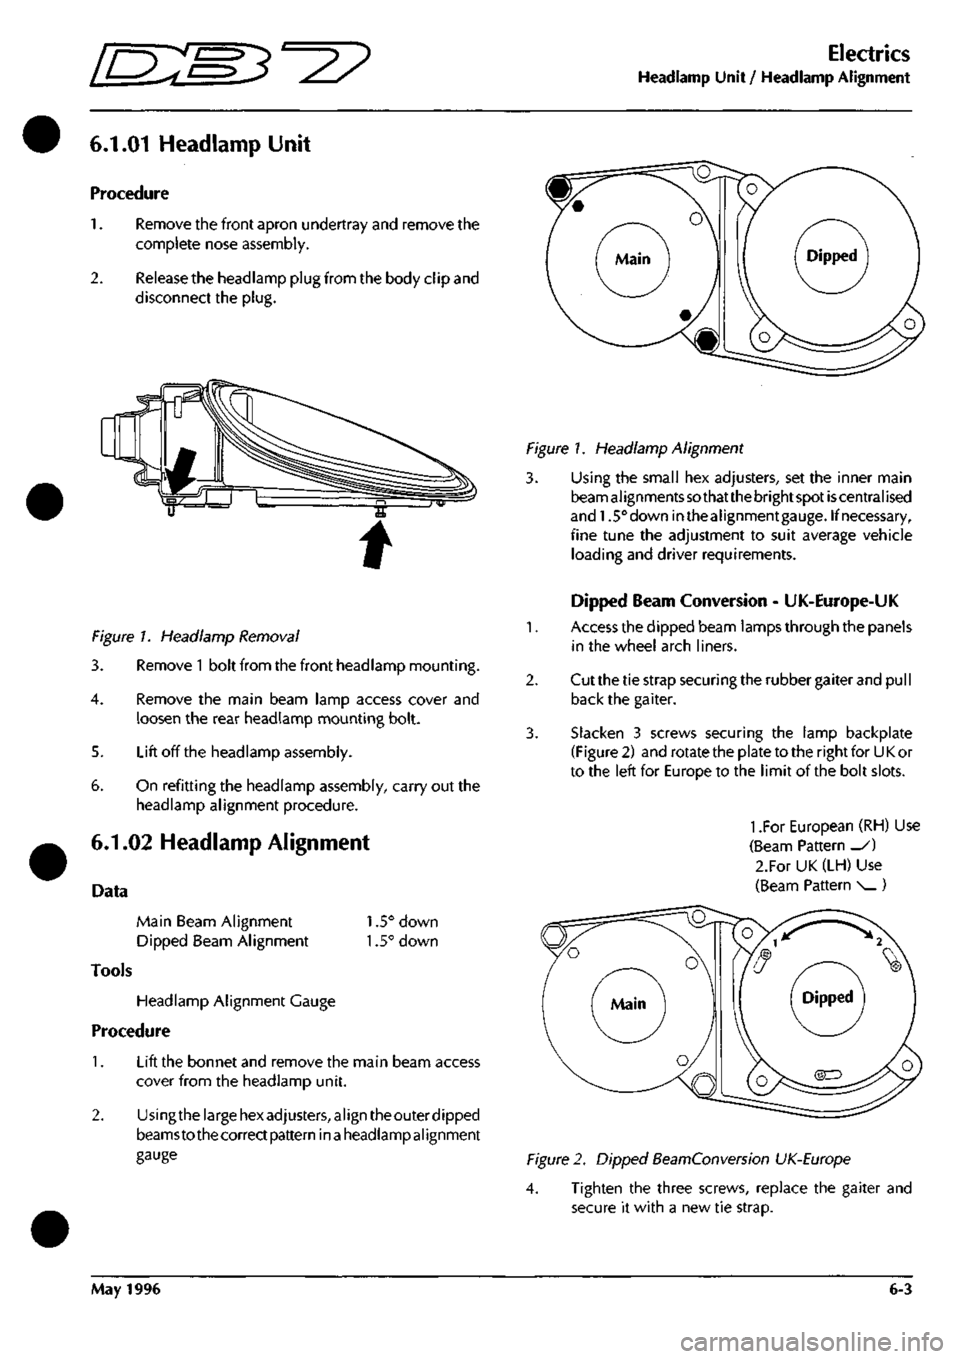
6.1.01 Headlamp Unit
Procedure
1.
Remove the front apron undertray and remove the
complete nose assembly.
2.
Release the headlamp plug from the body clip and
disconnect the
plug.
Figure 7. Headlamp Removal
3. Remove
1
bolt from the front headlamp mounting.
4.
Remove the main beam lamp access cover and
loosen the rear headlamp mounting bolt.
5. Lift off the headlamp assembly.
5. On refitting the headlamp assembly, carry out the
headlamp alignment procedure.
6.1.02 Headlamp Alignment
Data
Main Beam Alignment 1.5° down
Dipped Beam Alignment 1.5° down
Tools
Headlamp Alignment Gauge
Procedure
1.
Lift the bonnet and remove the main beam access
cover from the headlamp unit.
2.
Usingthe large hex adjusters, align theouter dipped
beamsto thecorrect pattern in
a
headlampalignment
gauge
Figure 1. Headlamp Alignment
3. Using the small hex adjusters, set the inner main
beam al ignments
so
that the bright spot
is
central ised
and 1.5° down inthealignmentgauge. If necessary,
fine tune the adjustment to suit average vehicle
loading and driver requirements.
Dipped Beam Conversion - UK-Europe-UK
1.
Access the dipped beam lamps through the panels
in the wheel arch liners.
2.
Cut the tie strap securing the rubber gaiter and pull
back the gaiter.
3. Slacken 3 screws securing the lamp backplate
(Figure 2) and rotate the plate to the right for U
K
or
to the left for Europe to the limit of the bolt slots.
1
.For European (RH) Use
(Beam Pattern _/)
2.For UK (LH) Use
(Beam Pattern ^^)
Figure 2. Dipped BeamConversion UK-Europe
4. Tighten the three screws, replace the gaiter and
secure it with a new tie strap.
May 1996 6-3
Page 28 of 421
Electrics
Electrical Component Location Index •
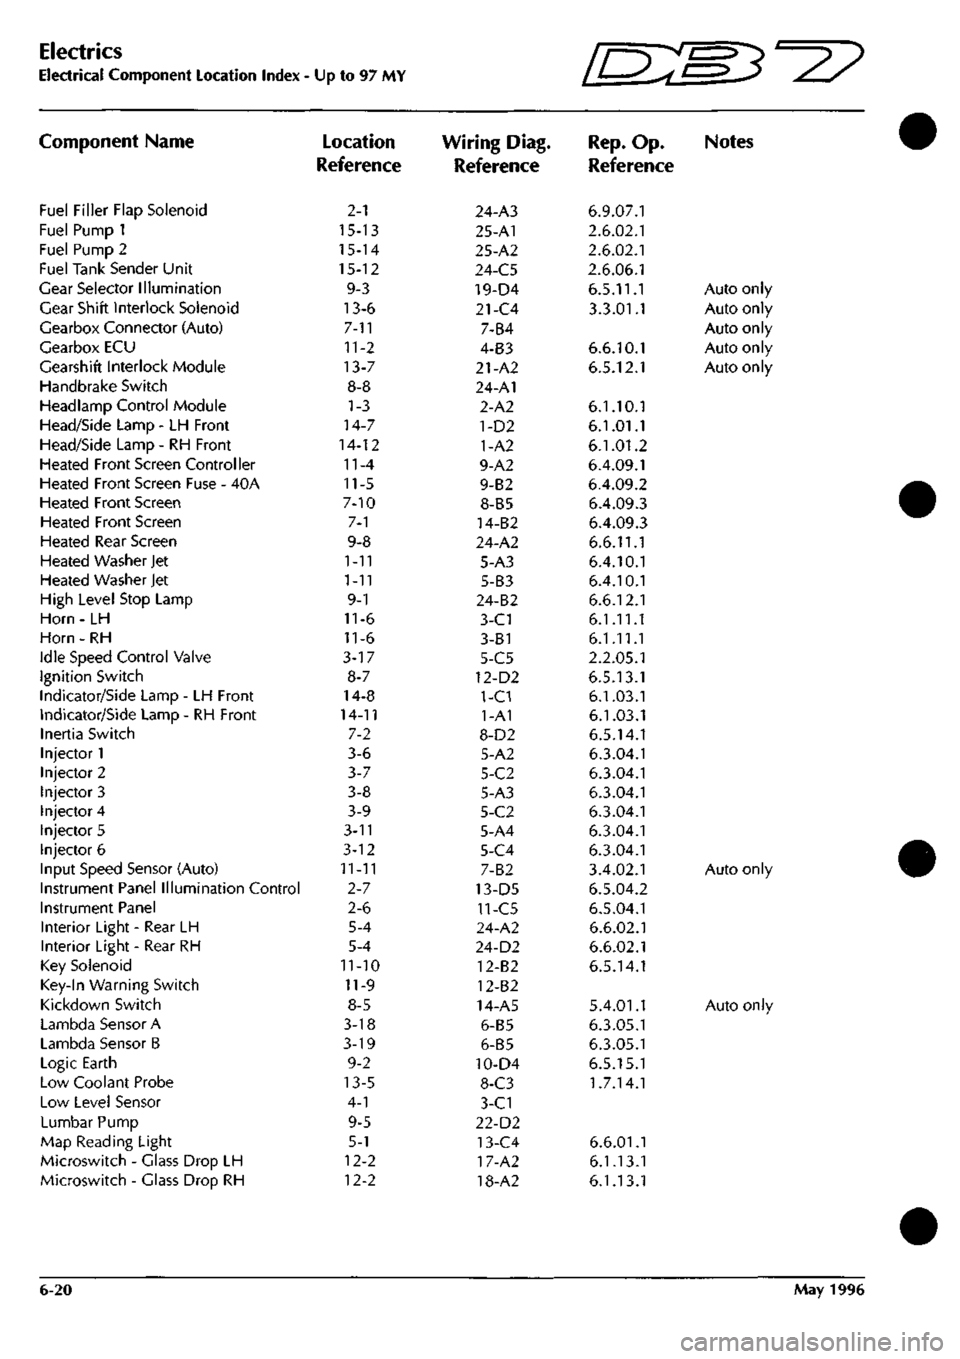
Component Name
Fuel Filler Flap Solenoid
Fuel Pump 1
Fuel Pump 2
Fuel Tank Sender Unit
Gear Selector Illumination
Gear Shift Interlock Solenoid
Gearbox Connector (Auto)
Gearbox ECU
Gearshift Interlock Module
Handbrake Switch
Headlamp Control Module
Head/Side Lamp - LH Front
Head/Side Lamp - RH Front
Heated Front Screen Controller
Heated Front Screen Fuse - 40A
Heated Front Screen
Heated Front Screen
Heated Rear Screen
Heated Washer Jet
Heated Washer Jet
High Level Stop Lamp
Horn - LH
Horn - RH
Idle Speed Control Valve
Ignition Switch
Indicator/Side Lamp - LH Front
Indicator/Side Lamp - RH Front
Inertia Switch
Injector 1
Injector 2
Injector 3
Injector 4
Injector 5
Injector 6
Input Speed Sensor (Auto)
Instrument Panel Illumination Control
Instrument Panel
Interior Light - Rear LH
Interior Light - Rear RH
Key Solenoid
Key-In Warning Switch
Kickdown Switch
Lambda Sensor A
Lambda Sensor B
Logic Earth
Low Coolant Probe
Low Level Sensor
Lumbar Pump
Map Reading Light
Microswitch - Glass Drop LH
Microswitch - Glass Drop RH
Up to 97 MY
Location
Reference
2-1
15-13
15-14
15-12
9-3
13-6
7-11
11-2
13-7
8-8
1-3
14-7
14-12
11-4
11-5
7-10
7-1
9-8
1-11
1-11
9-1
11-6
11-6
3-17
8-7
14-8
14-11
7-2
3-6
3-7
3-8
3-9
3-n
3-12
11-11
2-7
2-6
5-4
5-4
11-10
11-9
8-5
3-18
3-19
9-2
13-5
4-1
9-5
5-1
12-2
12-2
Wiring Diag.
Reference
24-A3
25-A1
25-A2
24-C5
19-D4
21-C4
7-B4
4-B3
21-A2
24-A1
2-A2
1-D2
1-A2
9-A2
9-B2
8-B5
14-B2
24-A2
5-A3
5-B3
24-B2
3-C1
3-81
5-C5
12-D2
1-C1
1-A1
8-D2
5-A2
5-C2
5-A3
5-C2
5-A4
5-C4
7-B2
13-D5
11-C5
24-A2
24-D2
12-B2
12-B2
14-A5
6-B5
6-B5
10-D4
8-C3
3-C1
22-D2
13-C4
17-A2
18-A2
Ini^'
IL-^^'^
Rep.
Op.
Reference
6.9.07.1
2.6.02.1
2.6.02.1
2.6.06.1
6.5.11.1
3.3.01.1
6.6.10.1
6.5.12.1
6.1.10.1
6.1.01.1
6.1.01.2
6.4.09.1
6.4.09.2
6.4.09.3
6.4.09.3
6.6.11.1
6.4.10.1
6.4.10.1
6.6.12.1
6.1.11.1
6.1.11.1
2.2.05.1
6.5.13.1
6.1.03.1
6.1.03.1
6.5.14.1
6.3.04.1
6.3.04.1
6.3.04.1
6.3.04.1
6.3.04.1
6.3.04.1
3.4.02.1
6.5.04.2
6.5.04.1
6.6.02.1
6.6.02.1
6.5.14.1
5.4.01.1
6.3.05.1
6.3.05.1
6.5.15.1
1.7.14.1
6.6.01.1
6.1.13.1
6.1.13.1
W3^y
Notes
Auto only
Auto only
Auto only
Auto only
Auto only
Auto only
Auto only
6-20 May 1996
Page 29 of 421
[n:m3^y
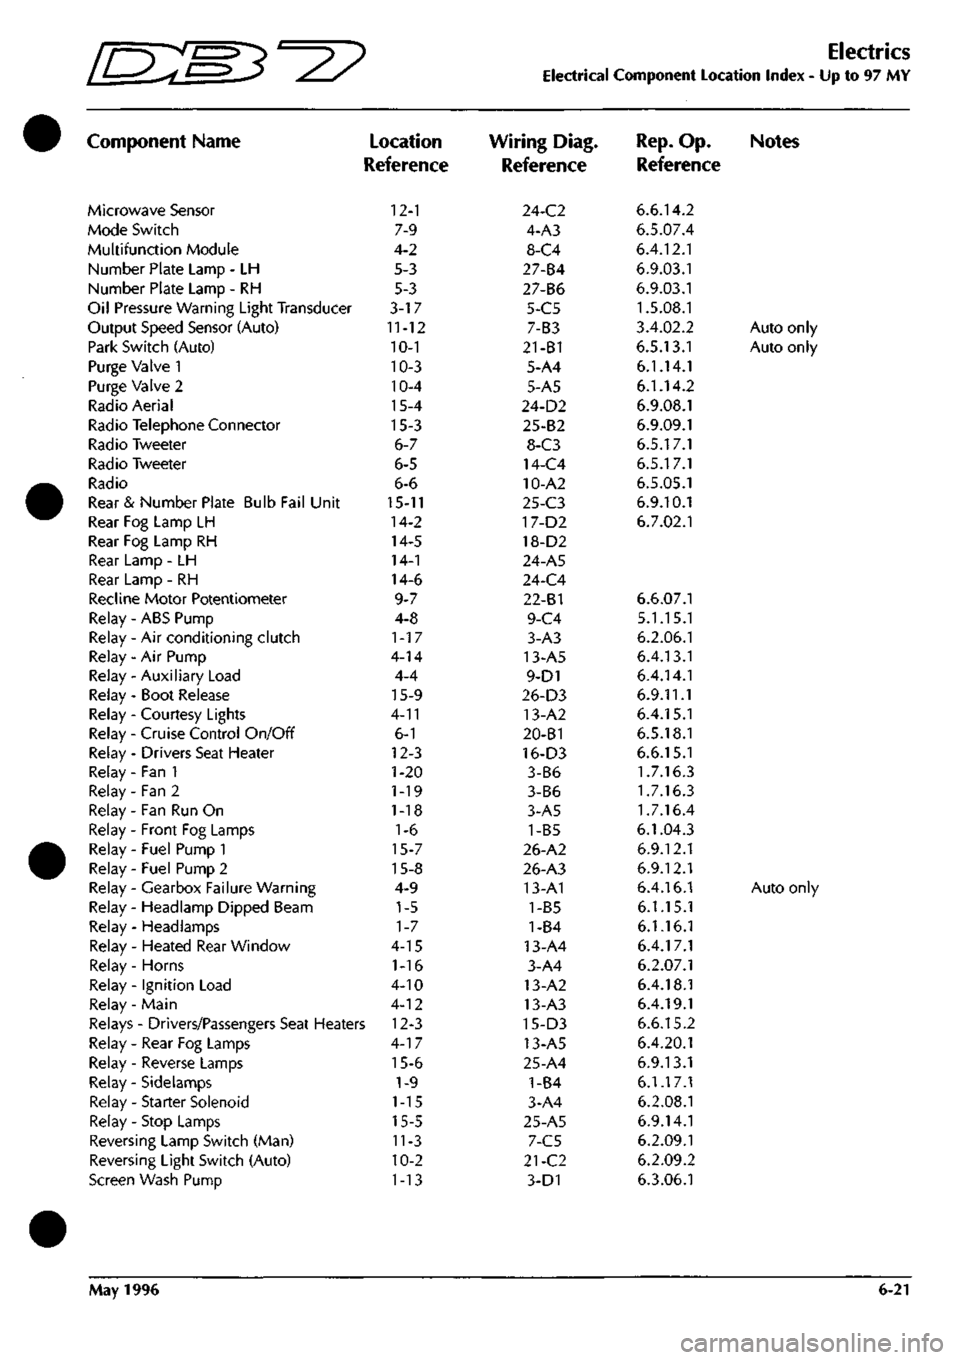
Component Name
Microwave Sensor
Mode Switch
Multifunction Module
Number Plate Lamp - LH
Number Plate Lamp - RH
Oil Pressure Warning Light Transducer
Output Speed Sensor (Auto)
Park Switch (Auto)
Purge Valve 1
Purge Valve 2
Radio Aerial
Radio Telephone Connector
Radio Tweeter
Radio Tweeter
Radio
Rear & Number Plate Bulb Fail Unit
Rear Fog Lamp LH
Rear Fog Lamp RH
Rear Lamp - LH
Rear Lamp - RH
Recline Motor Potentiometer
Relay - ABS Pump
Relay - Air conditioning clutch
Relay - Air Pump
Relay - Auxiliary Load
Relay - Boot Release
Relay - Courtesy Lights
Relay - Cruise Control On/Off
Relay - Drivers Seat Heater
Relay - Fan 1
Relay - Fan 2
Relay - Fan Run On
Relay - Front Fog Lamps
Relay - Fuel Pump 1
Relay - Fuel Pump 2
Relay - Gearbox Failure Warning
Relay - Headlamp Dipped Beam
Relay - Headlamps
Relay - Heated Rear Window
Relay - Horns
Relay - Ignition Load
Relay - Main
)
Location
Reference
12-1
7-9
4-2
5-3
5-3
3-17
11-12
10-1
10-3
10-4
15-4
15-3
6-7
6-5
6-6
15-11
14-2
14-5
14-1
14-6
9-7
4-8
1-17
4-14
4-4
15-9
4-11
6-1
12-3
1-20
1-19
1-18
1-6
15-7
15-8
4-9
1-5
1-7
4-15
1-16
4-10
4-12
Relays - Drivers/Passengers Seat Heaters 12-3
Relay - Rear Fog Lamps
Relay - Reverse Lamps
Relay - Sidelamps
Relay - Starter Solenoid
Relay - Stop Lamps
Reversing Lamp Switch (Man)
Reversing Light Switch (Auto)
Screen Wash Pump
4-17
15-6
1-9
1-15
15-5
11-3
10-2
1-13
Electrics
Electrical Component Location Index - Up to 97 MY
Wiring Diag.
Reference
24-C2
4-A3
8-C4
27-84
27-B6
5-C5
7-B3
21-B1
5-A4
5-A5
24-D2
25-B2
8-C3
14-C4
10-A2
25-C3
17-D2
18-D2
24-A5
24-C4
22-81
9-C4
3-A3
13-A5
9-D1
26-D3
13-A2
20-B1
16-D3
3-B6
3-B6
3-A5
1-B5
26-A2
26-A3
13-A1
1-B5
1-84
13-A4
3-A4
13-A2
13-A3
15-D3
13-A5
25-A4
1-B4
3-A4
25-A5
7-C5
21-C2
3-D1
Rep.
Op. Notes
Reference
6.6.14.2
6.5.07.4
6.4.12.1
6.9.03.1
6.9.03.1
1.5.08.1
3.4.02.2
Auto only
6.5.13.1
Auto only
6.1.14.1
6.1.14.2
6.9.08.1
6.9.09.1
6.5.17.1
6.5.17.1
6.5.05.1
6.9.10.1
6.7.02.1
6.6.07.1
5.1.15.1
6.2.06.1
6.4.13.1
6.4.14.1
6.9.11.1
6.4.15.1
6.5.18.1
6.6.15.1
1.7.16.3
1.7.16.3
1.7.16.4
6.1.04.3
6.9.12.1
6.9.12.1
6.4.16.1
Auto only
6.1.15.1
6.1.16.1
6.4.17.1
6.2.07.1
6.4.18.1
6.4.19.1
6.6.15.2
6.4.20.1
6.9.13.1
6.1.17.1
6.2.08.1
6.9.14.1
6.2.09.1
6.2.09.2
6.3.06.1
May 1996 6-21
Page 49 of 421
Electrics
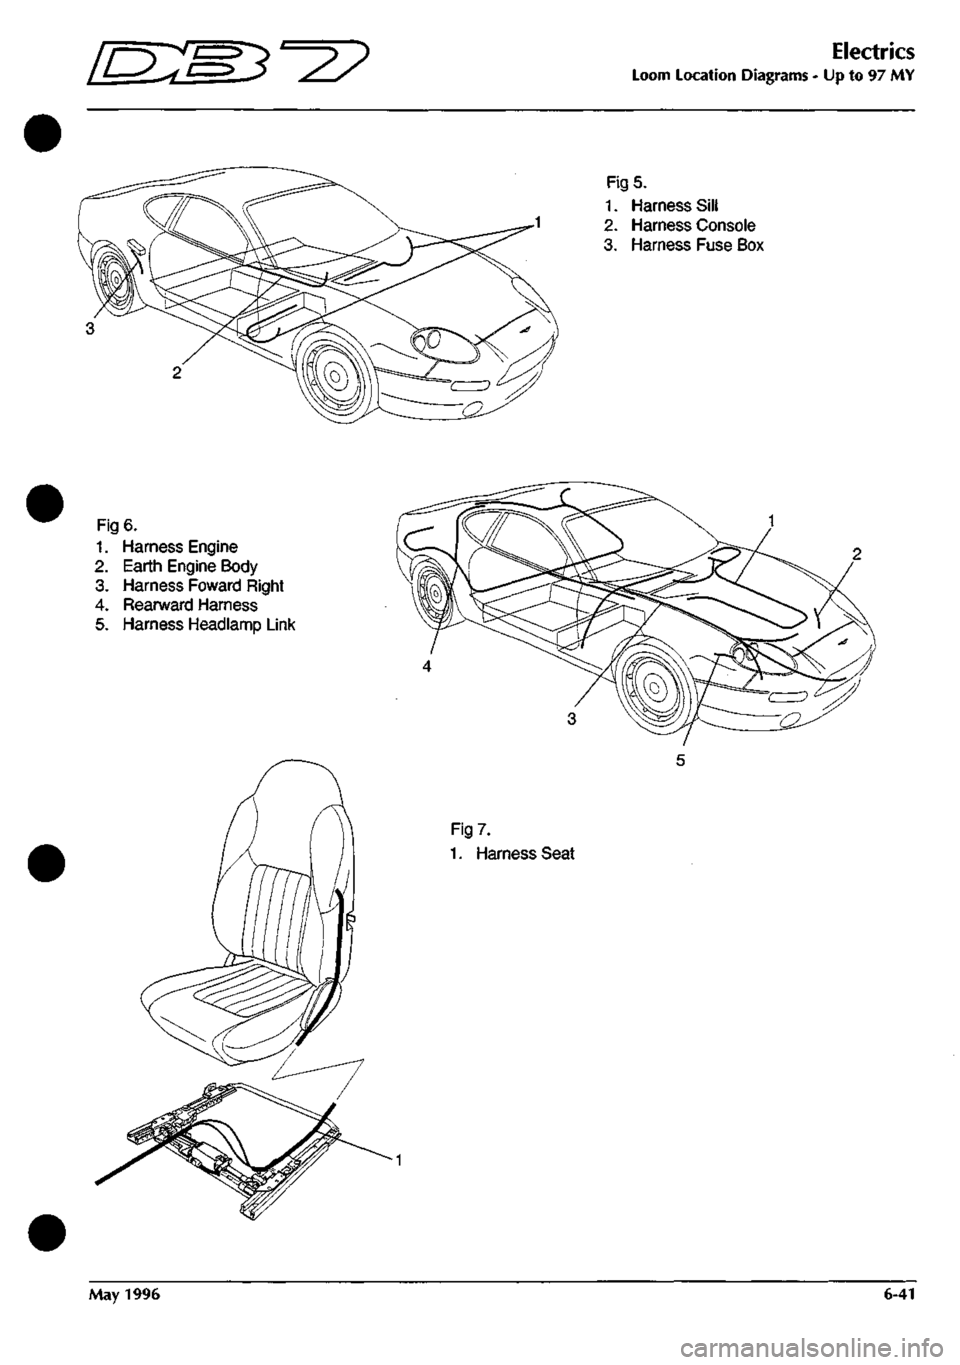
Loom Location Diagrams - Up to 97 MY
Fig 5.
1.
Harness Sill
2.
Harness Console
3. Harness Fuse Box
Fig 6.
1.
Harness Engine
2.
Earth Engine Body
3. Harness Foward Right
4.
Rearward Harness
5. Harness Headlamp Link
Fig 7.
1.
Harness Seat
May 1996 6-41
Page 53 of 421
Nb 61 62
COLOUR
PIN
BR
1
B
2
}
kKk
B6 CI
BONNET SWITCH
80
RC
es
B
S4
RY 97 Sr
98
YP
NO COLOUH 65
UB
66
U
67
B
68
N
69
UW
t>IN
1 ? 3 4
5
i
-
AREA B6 B3-I3 CI B4-i8 B2-I2
HEADLAMP CONTROL MODULE
NO COLOUR
PIN
63
YO 1
64
YP 2
?
Uiti
C6 CI
NO 70 71
?2
COLOUR
PIN YW YB
YP_.
1 2 3
AREA
C6 C6
V.
.,
SPEED CONTROL
W»
VALVE SPEED CONTROL
PUW
84 N 84-18 85 H eiJi
I BATTERY POST
|
SPL
15
SPL
16
I
i 1 I
rUSEBOX
NO
COLOW
73
R
39
RO
74
N
53
NY
75
UW
34
UW
76
UW
9
UW
77
RS
78
RS
79
RG
80
RC
81
UR
33
UR
82
UR
8
UR
83
WK
6
LG
PIN 1 2 J
4 6 6 7 8
9 10 II 12 13 14 15 16
1/
IS 19 20 21
li
AREA
B3-15
CI
B4-I8
CI
B2-I2
Bl
B2-I2
Bl B6 Dl B6 Dl
B2-I0
61
B2-I0
Bl Be Bl
1 II
^0
D
("
c
D
Q
00=^ Q
D
0
Q
Q
0
Q
Q
QOZ
Q
0
G
G
NO COLOUF 90 GR 14 WU 17 GW 77 RS 83 DM 91 W 92 NR 93 R 61 BR 94 RY 95 U 79 RG 65 UB 87 YR 46 NB 86 BK 4 NP 5 YS
PIN 1 ? 3 4 5 6 7 8 9 10 II 12 13 14 15 16 17
,1?,
,
AREA B4-I6 Bl Bl 03 03 B2-II 83-14 83-15 Al 01 83-13 D3 A2 04 CI 04 Bl Bl
SHEET
8
AREA
Al
.S
^
(•
QQl 0
Gl,
0
G
Qcm
G
0
G
0
G
0
NO COLOUR 96
UW
97
CY
98
YP
70
YW
71
YB
51
RO
15
RO
99
UR
63
YO
50
BR
P»i 1
2 3
4 5 6 7
8 9 10
II 12 1?
AREA 82-12
Dl
01 A3 A3 CI 81
82-10
A2 CI
'LH SIDE REPEATER'
fcRUISE
CONTROL!
CLUTCH
SWITCH
NO COLOUR AREA 88
B Dl
99
{R
E±J1
NO COLOUR AREA 86 BK 86 67 YR B6
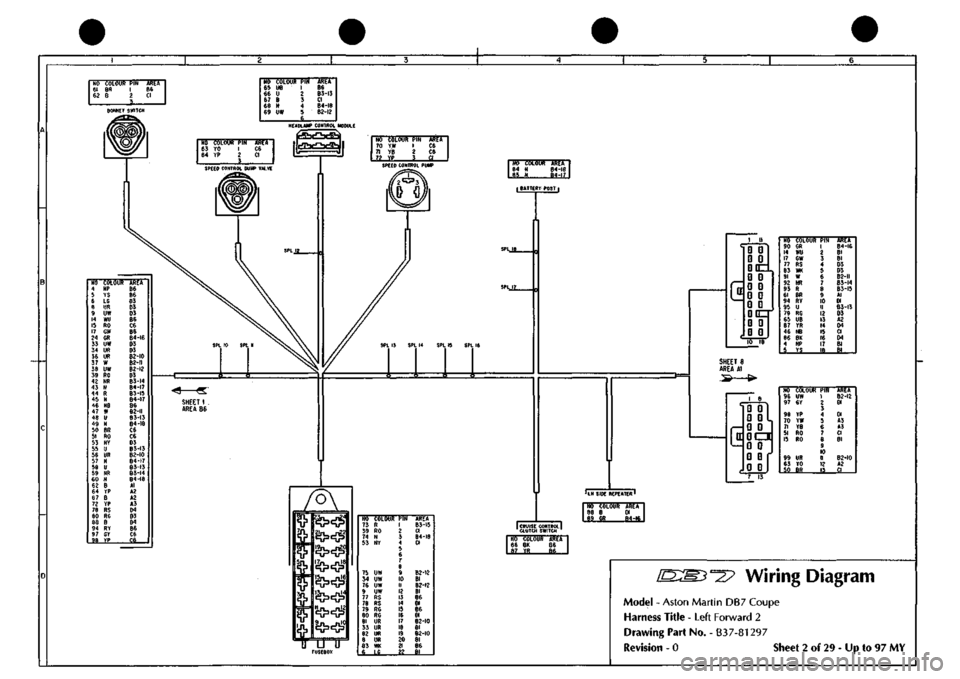
^27 Wiring Diagram
Model
-
Aston Martin
DB7
Coupe
Harness Title
-
Left Forward
2
Drawing Part No.
-
B37-81297
Revision
- 0
Sheet
2 of 29
-
Up to 97 MY
Page 110 of 421
Electrics
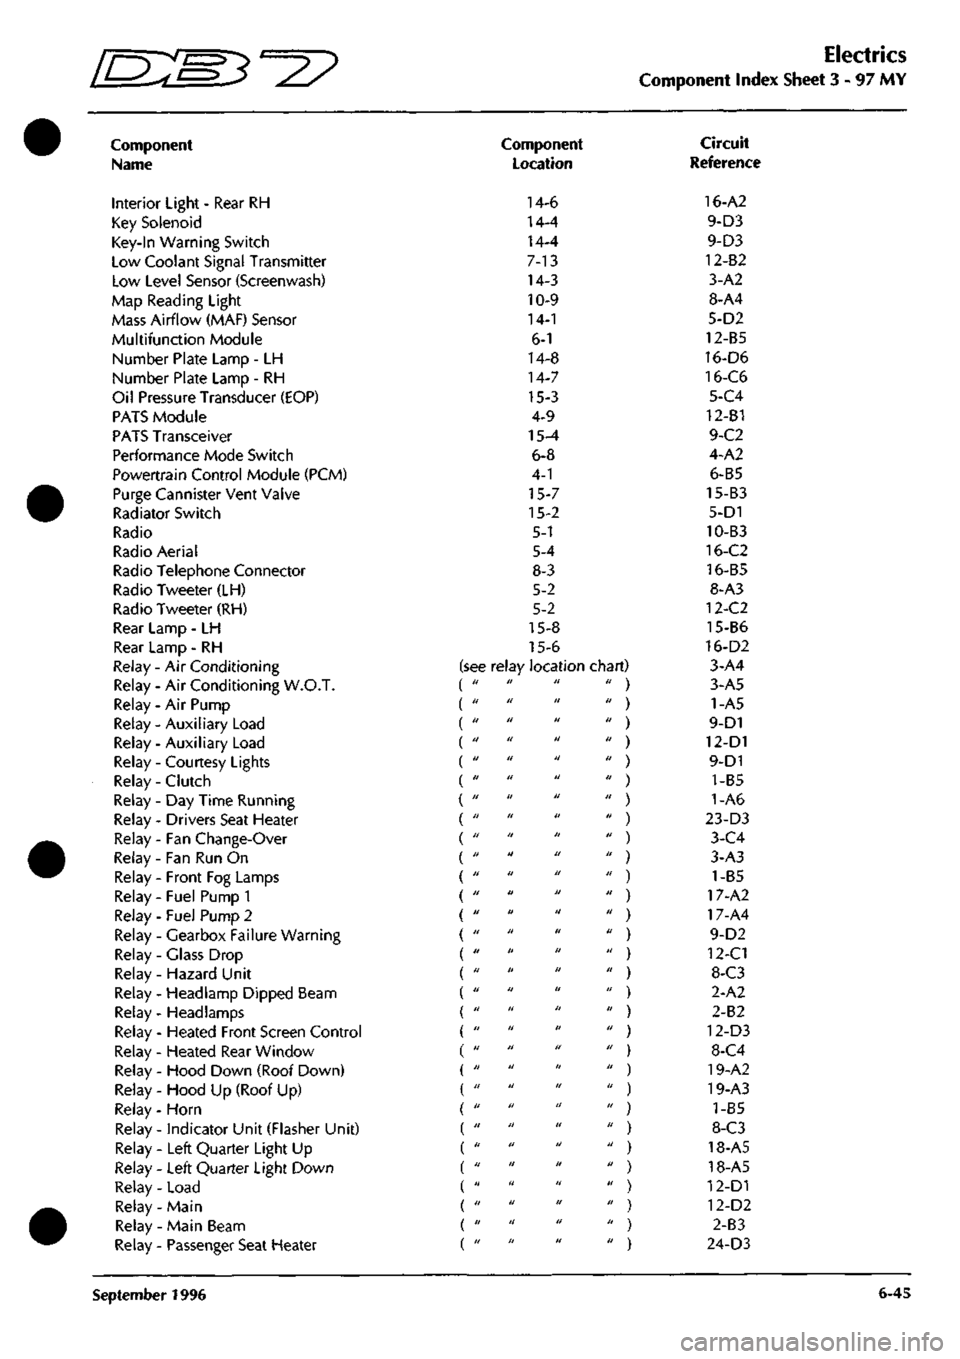
Component Index Sheet 3 - 97
MY
Component
Name
Interior Light - Rear RH
Key Solenoid
Key-In Warning Switch
Low Coolant Signal Transmitter
Low Level Sensor (Screenwash)
Map Reading Light
Mass Airflow (MAF) Sensor
Multifunction Module
Number Plate Lamp - LH
Number Plate Lamp - RH
Oil Pressure Transducer (EOP)
PATS Module
PATS Transceiver
Performance Mode Switch
Powertrain Control Module (PCM)
Purge Cannister Vent Valve
Radiator Switch
Radio
Radio Aerial
Radio Telephone Connector
Radio Tweeter (LH)
Radio Tweeter (RH)
Rear Lamp - LH
Rear Lamp - RH
Relay - Air Conditioning
Relay - Air Conditioning W.O.T.
Relay - Air Pump
Relay - Auxiliary Load (
Relay - Auxiliary Load (
Relay - Courtesy Lights (
Relay - Clutch (
Relay-Day Time Running (
Relay - Drivers Seat Heater (
Relay - Fan Change-Over (
Relay - Fan Run On
Relay - Front Fog Lamps
Relay - Fuel Pump 1
Relay - Fuel Pump 2
Relay - Gearbox Failure Warning
Relay - Glass Drop
Relay - Hazard Unit
Relay - Headlamp Dipped Beam
Relay- Headlamps
Relay - Heated Front Screen Control
Relay - Heated Rear Window
Relay - Hood Down (Roof Down)
Relay - Hood Up (Roof Up)
Relay - Horn
Relay - indicator Unit (Flasher Unit)
Relay - Left Quarter Light Up
Relay - Left Quarter Light Down
Relay - Load
Relay- Main
Relay - Main Beam
Relay - Passenger Seat Heater
Component
Location
14-6
14-4
14-4
7-13
14-3
10-9
14-1
6-1
14-8
14-7
15-3
4-9
15-4
6-8
4-1
15-7
15-2
5-1
5-4
8-3
5-2
5-2
15-8
15-6
see relay location chart) di II II II
II II II II
II II II II
11 II II II
II II II II
II II II II
II II II II
II II II II
II II II II
11 II II II
II II II II
II II II II
II II It II
II II II II
11 II II II
II II II II
II II II II
II II II II
II II II II
II It II II
II II II II
11 II II II
II II II II
11 II II II
11 II II II
II II II II
II II II II
II II II II
II II II II
II II II II
Circuit
Reference
16-A2
9-D3
9-D3
12-82
3-A2
8-A4
5-D2
12-B5
16-D6
16-C6
5-C4
12-B1
9-C2
4-A2
6-B5
15-B3
5-D1
10-B3
16-C2
16-B5
8-A3
12-C2
15-B6
16-D2
3-A4
3-A5
1-A5
9-D1
12-D1
9-D1
1-B5
1-A6
23-D3
3-C4
3-A3
) 1-B5
) 17-A2
) 17-A4
9-D2
) 12-C1
) 8-C3
2-A2
) 2-B2
) 12-D3
) 8-C4
) 19-A2
) 19-A3
) 1-85
) 8-C3
) 18-A5
) 18-A5
) 12-D1
) 12-D2
) 2-83
) 24-D3
September 1996 6-45
Page 129 of 421
Electrics
Relay Location Index - 97 MY 5^^?
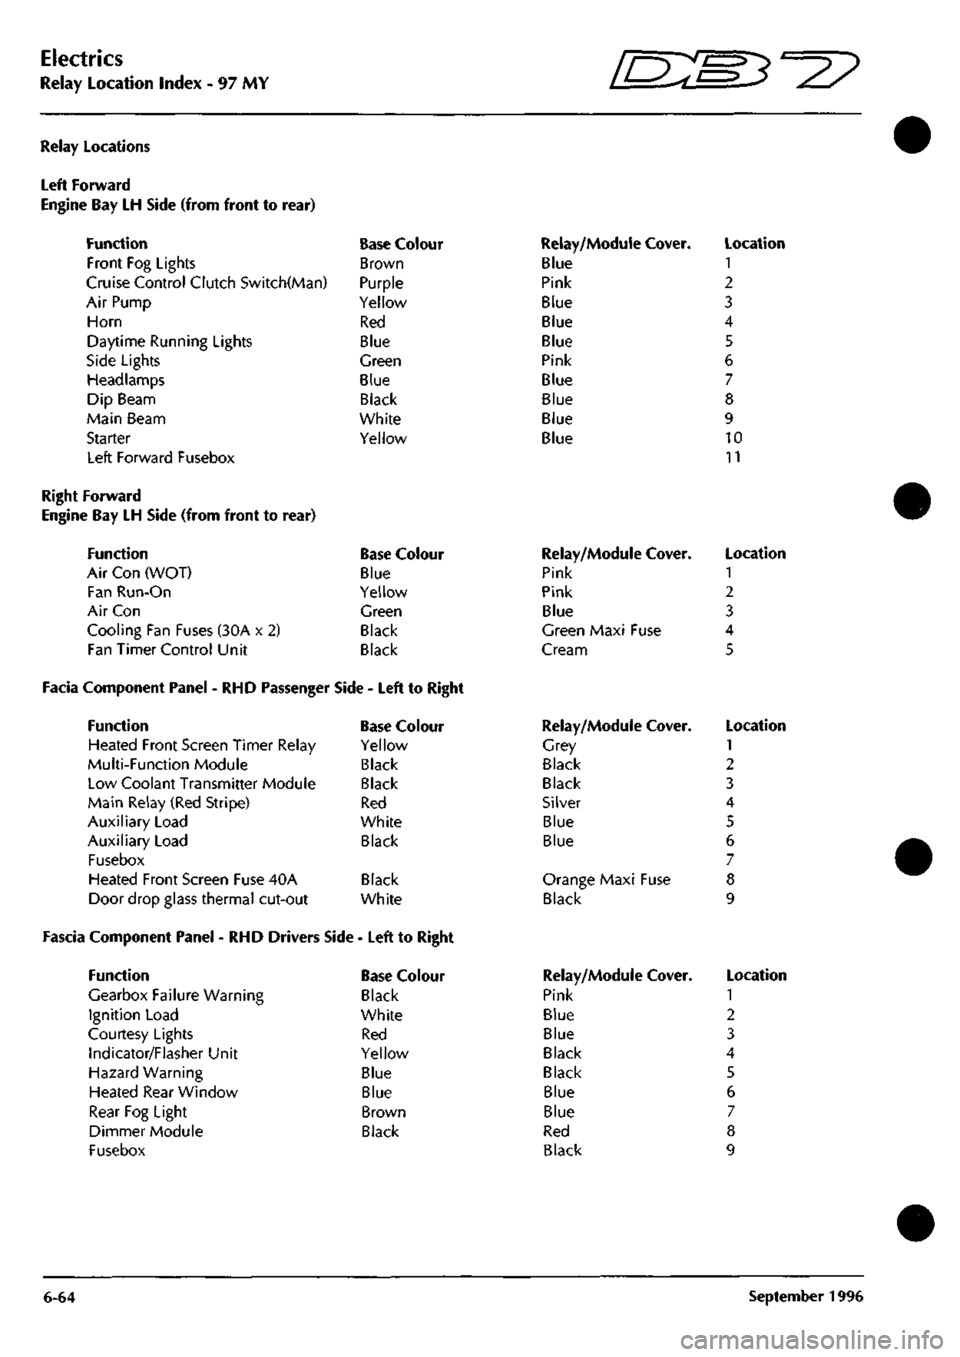
Relay Locations
Left Forward
Engine Bay LH Side (from front to
Function
Front Fog Lights
rear)
Cruise Control Clutch Switch(Man)
Air Pump
Horn
Daytime Running Lights
Side Lights
Headlamps
Dip Beam
Main Beam
Starter
Left Forward Fusebox
Base Colour
Brown
Purple
Yellow
Red
Blue
Green
Blue
Black
White
Yellow
Relay/Module Cover.
Blue
Pink
Blue
Blue
Blue
Pink
Blue
Blue
Blue
Blue
Location
1
2
3
4
5
6
7
8
9
10
11
Right Forward
Engine Bay LH Side (from front to rear)
Function Base Colour
Air Con (WOT) Blue
Fan Run-On Yellow
Air Con Green
Cooling Fan Fuses (30A x 2) Black
Fan Timer Control Unit Black
Facia Component Panel - RHD Passenger Side - Left to Right
Function Base Colour
Heated Front Screen Timer Relay Yellow
Multi-Function Module Black
Low Coolant Transmitter Module Black
Main Relay (Red Stripe) Red
Auxiliary Load White
Auxiliary Load Black
Fusebox
Heated Front Screen Fuse 40A Black
Door drop glass thermal cut-out White
Fascia Component Panel - RHD Drivers Side - Left to Right
Function
Gearbox Failure Warning
Ignition Load
Courtesy Lights
Indicator/Flasher Unit
Hazard Warning
Heated Rear Window
Rear Fog Light
Dimmer Module
Fusebox
Base Colour
Black
White
Red
Yellow
Blue
Blue
Brown
Black
Relay/Module
Pink
Pink
Blue
Cover.
Green Maxi Fuse
Cream
Relay/Module
Grey
Black
Black
Silver
Blue
Blue
Cover.
Orange Maxi Fuse
Black
Relay/Module
Pink
Blue
Blue
Black
Black
Blue
Blue
Red
Black
Cover.
Location
1
2
3
4
5
Location
1
2
3
4
5
6
7
8
9
Location
1
2
3
4
5
6
7
8
9
6-64 September 1996
Page 136 of 421
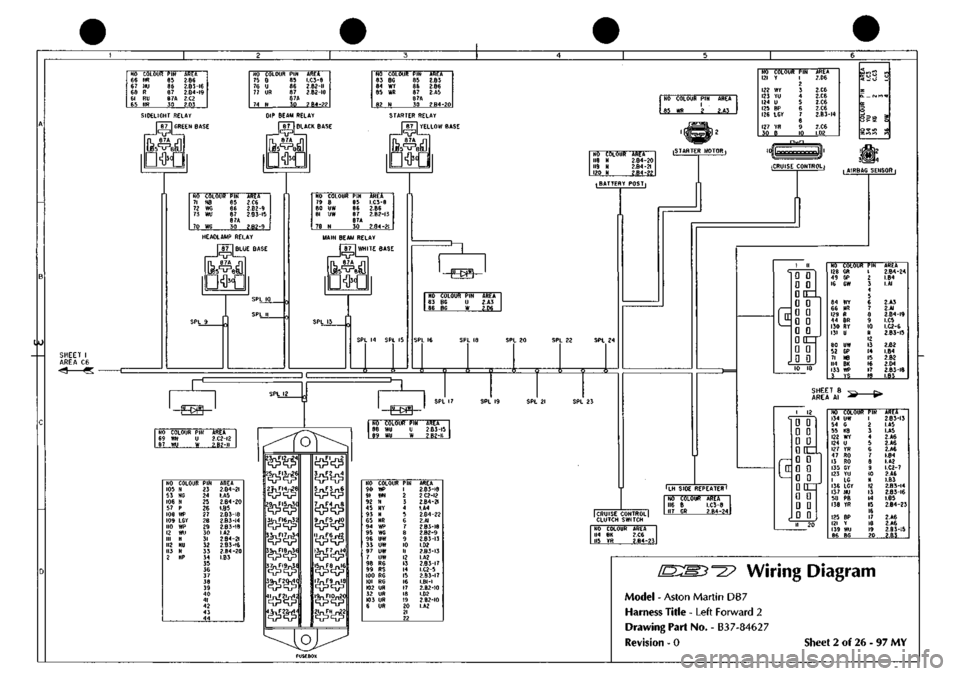
NO 66 67 68 61 6I>
COLOUR
NR NU R RU NR
PIN RS 86 87 8« 30
AREA 2.B6
2.B3-I6
2.B4-I9
2.C2 2.D3
NO 75 76 77
74
COLOUR
B U UR
N
PIN 85 86
87 87A
30
AREA
1.03-8
2.82-11
2.B2-I0
2.B4-22
NO 83 M 85
82
COLOUR
8G wr WR
N
PIN B5 86
87 B7A
30
AREA 2.B3 2.86 2.A5
2.84-20
SIDELIGHT RELAY I
87
{GREEN BASE
JqpL L 87A
DW|
OlP BEAM RELAY I 87 I BLACK BASE
87A
'5^BI
lO
SHEET I AREA C6 <4 «
mu
STARTER RELAY I
87 I
YELLOW BASE
87A
'5^ei
NO COLOUR
PIN
I
.
85
WD 2
AREA
2.A3
NO 71 7? 73
70
COLOUR
N8 WG WU
WG
pm 85 86 8/ 87A 30
AREA 2.C6
2.82-9
2.B3-I5
2.B2-9
HEADLAMP RELAY
I
87
I
BLUE BASE
BTA
DW|
NO COLOUR 121
Y
122
WY
123
YU
124
U
125
BP
126
LGY
127
YR
30
B
PIN
1 7
3 4 5 6
7 8
9 10
AREA 2.D6
2.C6 2.C6 2.C6 2.C6
2.B3-I4
2.C6 l,D2
NO 79 80 81
78
COLOUR
B UW UW
N
PIN 85 86
87 87A
30
AREA LC3-e 2.B6
2.82-13
2.84-21
MAIN BEAM RELAY
I 87 I WHITE BASE
87A
SPL 14 SPL 15
HO 118 119 120
COLOUR N N N
AREI 2.84 ?.B4 2.84
20 21 22
iSTARTER MOTOR I
•BATTERY POSTi
^
NO 83 86
COLOUR PIN 8G U BG W
AREA 2.A3 2.D6
SPL 22 SPL 24
xf
3 C
'-Fw^'
NO 69 87
COLOUR
PIN
WN
U
WU
W
AREA
2.C2-I2
2.82-11
^
'-Fag—'
NO COLOUF 105 N 53 NG 106 N 57 P 108 WP 109 LGY 110 WP 12 WU III N 112 NU 113 N 2 NP
PIN 23 24 25 26 27 28 29 30 31 32 33 34 35 36 37 38 39 40 41 42 43 44
AREA
2.84-21
I.A5
2.84-20
I.B5
2.83-18
2.83-14
2.B3-I8
I.A2
2.84-21
2.B3-I6
2.84-20
1.83
2^n2^.
25nFI3;^6
'^'^^
3lnfl6n32
3^EI7j^.
35nFI8n3e
3^n9^,
,^r2^,
3^.2^
5^F3^6
7^E4^
9^E5^0
1^6^
,3^E7^4
l5j^E8^6
I^P9^8
i9nFiOn20|
2^r,l^2
NO 88 89
COLOUR
PIN
WU
U
WU
W
AREA
2.B3-I5
2.B2-I1
NO COLOUf 90
WP
91
WN
92
N
45
NY
93
N
65
NR
94
WP
95
WG
96
UW
33
UW
97
UW
7
UW
98
RG
99
RS
100
RG
101
RG
102
UR
32
UR
103
UR
6
UR
PIN 1 2 3 4 5 6 7 8 9 10 II 12 13 14 15 16 17 18 19
20 21 22
AREA
2.B3-I8
2.C2-I2
2.B4-2I
I.A4
2.84-22
2.AI
2.83-18
2.82-9
2.83-13
1.02
2.83-13
I.A2
2.B3-I7
I.C2-5
2.83-17
LBI-I
2.B2-IO
1.02
2.82-10
I.A2
iCRUISE CONTROLi
("
D D • D
DDC^
G D D D D D D D DQzr D • D 0
NO COLOUF 128 GR 49 GP 16 GW
84 WY 66 NR 129 R 44 8R 130 RY 131 U
80 UW 52 GP 71 NB 114 8K 133 WP 3 YS
PIN
1 2 3 4 5 6 7 8 9 10 II 12 13 14 15 16 17 18
AREA
2.B4-24
I.B4 I.AI
2.A3 2.AI
2.B4-I9
I.C5
I.C2-6
2.B3-I5
2.B2 1.84 2.B2 2.04
2.83-18
1.83
SHEET 8 AREA Al
-(*•
LH SIDE REPEATER
I
I CRUISE CONTROL] CLUTCH SWITCH
NO COLOUR AREA
116 B
I.C3-8
117
GR
2.84-24
NO 114 115
COLOUR AREA 8K
2.C6
YR 2.B4-23
c
1
12 D 0 0 G D D D[E±
HDD
^ • n Qtrr 0 G D D D D
NO COLOUf 134
UW
54
G
55
KB
122
WY
124
U
127
YR
47
RO
13
RO
135
GY
123
YU
1
LG
136
LGY
137
NU
58
PB
138
YR
125
BP
121
Y
139
WU
86
BG
PIN 1 ? 3 4 5 6 7 8 9 10 II 12 13 14
15 16
17 IB 19 20
AREA
2,B3-I3
I.A5 I.A5 2.A6 2.A6 2.Ae
LB4
I.A2
I.C2-7
2.A6 1.83
2.B3-I4
2.83-16
1.85
2.84-23
2.A6 2.A6
2.83-15
2.83
'^^? Wiring Diagram
Model - Aston Martin DB7
Harness Title - Left Forward 2
Drawing Part No. - B3
7-8462
7
Revision - 0 Sheet 2 of 26 - 97 MY