11-2 ASTON MARTIN V8 VANTAGE 2010 User Guide
[x] Cancel search | Manufacturer: ASTON MARTIN, Model Year: 2010, Model line: V8 VANTAGE, Model: ASTON MARTIN V8 VANTAGE 2010Pages: 947, PDF Size: 43.21 MB
Page 397 of 947

Power Conversion (03.11)
Engine (03.00)
May 2007 Workshop Manual 3-11-25
17. Remove bolts (x4) securing LH and RH HEGO sensor
multiplug brackets to sump (see Figure 8).
Figure 8
18. Disconnect multiplug from A/C compressor.
19. Remove bolts (x4) securing A/C compressor to mounting
bracket. Remove compressor.
20. Remove bolts (x2) securing inlet and outlet oil pipes to sump (see Figure 9).
Figure 9
21. Release both oil pipes toge ther from sump, remove and
discard O-ring seals from pipes. 22. Remove Torx bolts (x4)
securing A/C compressor
mounting bracket to engine bedplate and sump.
Remove bracket (see Figure 10).
Figure 10
23. Remove bolts (x16) securing sump to engine bedplate (see Figure11).
Figure 11
24. Release and remove sump.
25. Remove bolts (x8) securing windage tray to engine bedplate, remove windage tray.
A030206C
A030247
A0302303
A030206D
Page 398 of 947

Power Conversion (03.11)
Engine (03.00)3-11-26 Workshop Manual May 2007
26. Mark bearing caps and connecting rods for correct
installation (see Figure 12).
Figure 12
27. Rotate crankshaft clockwise to access number 1 cylinder
connecting rod bolts.
28. Remove bolts (x2) securing bearing cap to connecting rod, remove bearing cap (see Figure 13).
Figure 13
29. Install special tools (303-535) to the connecting rod to prevent damage to crankshaft journal.
30. Carefully push connecting rod/piston assembly upwards and remove from cylinder bore.
31. Remove special tools from connecting rod.
32. Install bearing cap on connecting rod, install and lightly tighten retaining bolts. 33. Note that piston grade number on crown and thick
flange on connecting rod faces to front of engine on RH
bank (A) (see Figure 14).
Figure 14
34. Note that piston grade number on crown and thick flange on connecting rod faces to front of engine on LH
bank (B) (see Figure5).
Figure 15
Installation
1. Clean cylinder bore.
2. Use an expander and remove piston rings from piston.
3. Install piston rings in cylin der bore to a pre-determined
depth and measure ring gaps.
4. Remove piston ring set from cylinder bore and install on piston.
5. Clean connecting rod.
6. Correctly position ring gaps on piston prior to installation.
7. Remove connecting rod bearing cap.
8. Install bearings in connecting rod and bearing cap.
9. Lubricate cylinder bore, pi ston and rings with clean
engine oil.
Caution
Connecting rod bolts are tor que tightened to yield and
must be replaced.
A0311329
A0311314
Caution
Make sure the piston ring gaps are positioned at
different positions opposite the thrust side of the piston before installation.
A0311332
A0311332
Page 399 of 947

Power Conversion (03.11)
Engine (03.00)
May 2007 Workshop Manual 3-11-27
10. Install special tools (303-535) to the connecting rod to
prevent damage to crankshaft journal.
11. Install piston ring clamp to piston, install piston assembly
in its cylinder bore. Remo ve piston ring clamp (see
Figure 16).
Figure 16
12. Lubricate crankshaft journal with clean engine oil.
13. Carefully pull connecting ro d into place on crankshaft
journal.
14. Install bearing cap to connecting rod. Install and torque tighten retaining bolts (x2).
15. Clean windage tray.
16. Install windage tray, install and torque tighten bolts (x8).
17. Clean old sealant from sump flange and engine bedplate.
18. Ensure that sump flange and mating face on engine bedplate are clean and dry.
19. Apply a continuous 3mm diameter bead of RTV sealant to sump flange as recommended.
20. Ensure that there are no gaps in sealant track.
21. Install sump, install and torque tighten bolts (x16) in the correct sequence.
22. Install A/C compressor mounting bracket, install and torque tighten Torx bolts (x4).
23. Lubricate and install new O-ring seals to oil pipes.
24. Install oil pipes in sump, install and torque tighten bolts (x2)
25. Install compressor, install and torque tighten bolts (x4).
26. Connect multiplug to A/C compressor.
27. Install LH and RH HEGO se nsor multiplug brackets to
sump. Install and torque tighten bolts (x4).
28. Secure harness clips (x6) in sump.
29. Connect multiplug to crankshaft timing sensor.
30. Connect multiplug to engine electric coolant temperature sensor. 31. Connect multiplug to oil pressure sensor.
32. Clean oil scavenge pump and mating face on sump.
33. Install oil pump(s) drive sprocket.
34. Install new oil scavenge pu
mp gasket, align on dowels
(x2).
35. Install chain onto oil scavenge pump sprocket.
36. Install oil scavenge pump, align to dowels (x2), Install and torque tighten bolts (x3).
37. Install chain onto oil pump drive sprocket.
38. Clean oil pressure pump and mating face on sump.
39. Install new gasket to sump, align to dowels (x2).
40. Position oil pressure pump, install chain on pump sprocket.
41. Install oil pressure pump, align to dowels (x2), Install and torque tighten bolts (x3).
42. Install chain tensioner, install and torque tighten bolt, remove guide pin.
43. Install crankshaft timing sprocket.
44. Install cylinder head gaskets - engine set (see Workshop Manual procedure 03.01.HW Gasket - Cylinder Head -
Engine Set - Renew With Engine Removed).Piston Ring Set-Additional-Renew (Each)
Removal
1. Mark bearing cap and connecting rod for correct
installation (see Figure 1).
Figure 1
Caution
Install pistons into cylinder block with the ‘arrow’ on the
piston crown facing to the front of the engine.
Caution
Use only a plastic scraper when removing old sealant
and gaskets from engine components.
A0311337
Repair Operation Time (ROT)
WA R N I N G
DO NOT GET USED ENGINE OIL ON YOUR SKIN.
USED ENGINE OIL CAN BE HARMFUL.
A0311329
Page 400 of 947

Power Conversion (03.11)
Engine (03.00)3-11-28 Workshop Manual May 2007
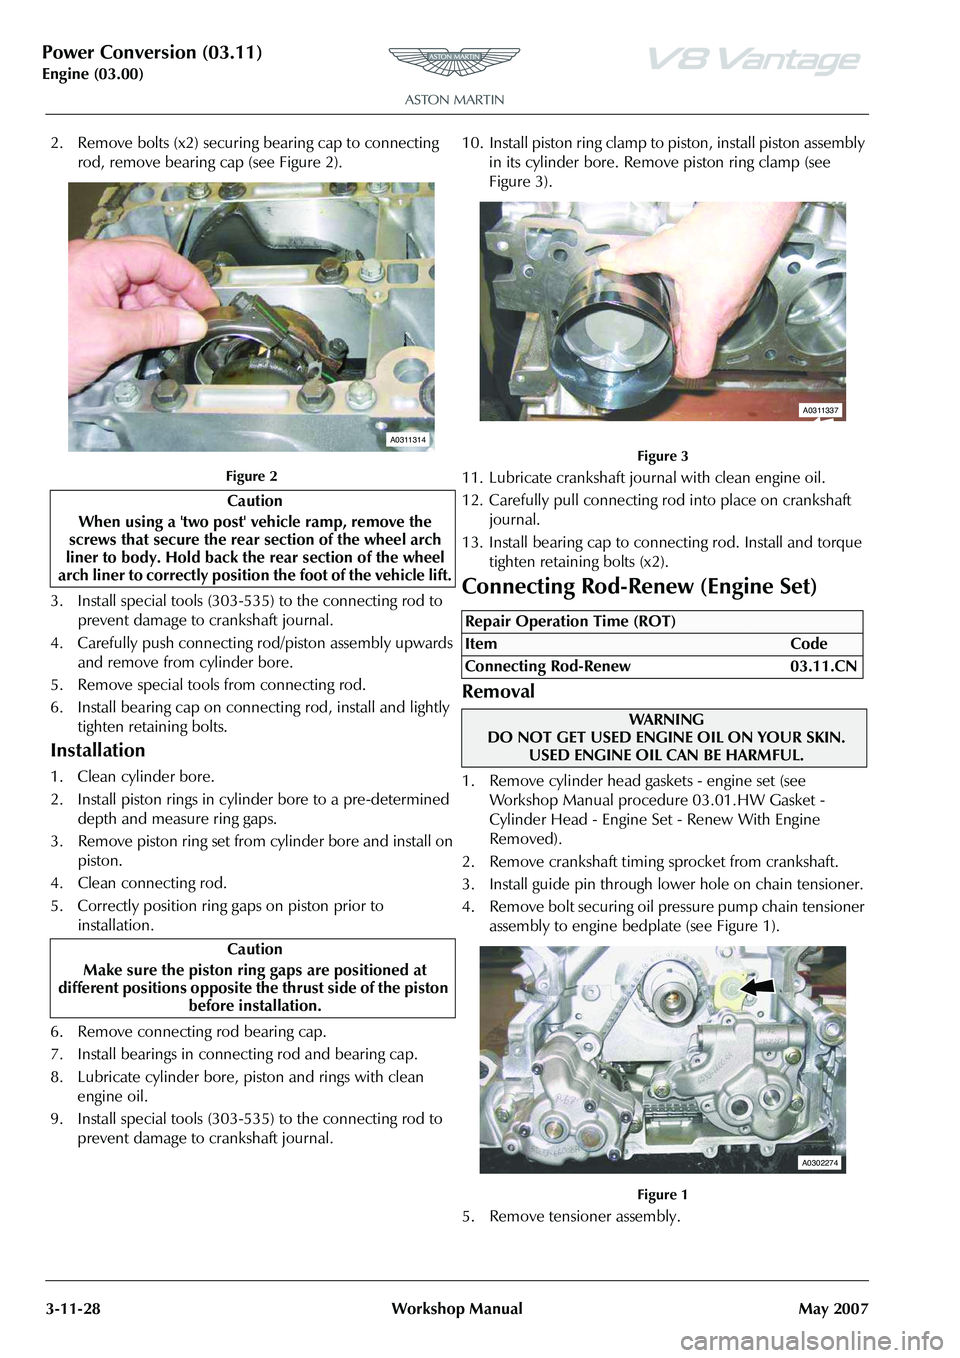
2. Remove bolts (x2) securing bearing cap to connecting
rod, remove bearing cap (see Figure 2).
Figure 2
3. Install special tools (303-535) to the connecting rod to prevent damage to crankshaft journal.
4. Carefully push connecting rod/piston assembly upwards and remove from cylinder bore.
5. Remove special tools from connecting rod.
6. Install bearing cap on connecting rod, install and lightly tighten retaining bolts.
Installation
1. Clean cylinder bore.
2. Install piston rings in cylinder bore to a pre-determined depth and measure ring gaps.
3. Remove piston ring set from cylinder bore and install on piston.
4. Clean connecting rod.
5. Correctly position ring gaps on piston prior to installation.
6. Remove connecting rod bearing cap.
7. Install bearings in connecting rod and bearing cap.
8. Lubricate cylinder bore, pi ston and rings with clean
engine oil.
9. Install special tools (303-535) to the connecting rod to prevent damage to crankshaft journal. 10. Install piston ring clamp to piston, install piston assembly
in its cylinder bore. Remove piston ring clamp (see
Figure 3).
Figure 3
11. Lubricate crankshaft jour nal with clean engine oil.
12. Carefully pull connecting rod into place on crankshaft journal.
13. Install bearing cap to connecting rod. Install and torque tighten retaining bolts (x2).
Connecting Rod-Renew (Engine Set)
Removal
1. Remove cylinder head gaskets - engine set (see Workshop Manual procedure 03.01.HW Gasket -
Cylinder Head - Engine Set - Renew With Engine
Removed).
2. Remove crankshaft timing sprocket from crankshaft.
3. Install guide pin through lower hole on chain tensioner.
4. Remove bolt securing oil pressure pump chain tensioner assembly to engine bedplate (see Figure 1).
Figure 1
5. Remove tensioner assembly.
Caution
When using a 'two post' vehicle ramp, remove the
screws that secure the rear section of the wheel arch
liner to body. Hold back the rear section of the wheel
arch liner to correctly position the foot of the vehicle lift.
Caution
Make sure the piston ring gaps are positioned at
different positions opposite th e thrust side of the piston
before installation.
A0311314
Repair Operation Time (ROT)
ItemCode
Connecting Rod-Renew 03.11.CN
WAR NI NG
DO NOT GET USED ENGINE OIL ON YOUR SKIN.
USED ENGINE OIL CAN BE HARMFUL.
A0311337
A0302274
Page 401 of 947

Power Conversion (03.11)
Engine (03.00)
May 2007 Workshop Manual 3-11-29
6. Remove bolts (x3) securing oil pressure pump to sump
(see Figure 2).
Figure 2
7. Release chain from oil pressure pump sprocket, remove oil pump.
8. Remove and discard oil pressure pump gasket.
9. Remove bolts (x3) securing oil scavenge pump to sump
(see Figure 3).
Figure 3
10. Release chain from oil scavenge pump sprocket, remove scavenge pump. 11. Remove and discard oil scavenge pump gasket (see
Figure 4).
Figure 4
12. Remove oil pump(s) drive sprocket.
13. Disconnect multiplug from oil pressure sensor (see
Figure 5).
Figure 5
A0302274A
A0302274B
A0302276
A030216
Page 560 of 947

Automatic Shifting Subsystem (07.11)
Transmission (07.00)7-11-2 Workshop Manual May 2007
Page 600 of 947

Issue 5, January 2010 Workshop Manual 11-1-1
Steering (11.00)
Contents
Steering Gear (11.01) .......................................... 11-1-2Diagnostics - Symptom Chart................................. 1-2
Specifications.......................................................... 1-4
Power Steering (11.02) ........................................ 11-2-1 Description ............................................................. 2-1
Specifications.......................................................... 2-1
Maintenance ........................................................... 2-2Power Steering System - Bleed ............................... 2-2
Procedure .............................................................. 2-2
Power Steering Pump-Renew ................................. 2-2
Power Assisted Steering (PAS) Rack -
Remove and Install................................................. 2-2
RH/LH Track Rod End-Renew .............................. 2-11
Power Steering Pump to Rack Hose Assembly
-Renew ................................................................ 2-11
Power Steering Rack to Cooler Hose-Renew ........ 2-12
Steering Column (11.04)...................................... 11-4-1 Description ............................................................. 4-1
Specifications.......................................................... 4-1
Maintenance ........................................................... 4-1Top Shroud for the Steering Column
- Remove and Install .............................................. 4-1
Bottom Shroud for the Steering Column
- Remove and Install .............................................. 4-1
Steering Column Gaiter-Renew .............................. 4-2
Upper Steering Column Assembly-Renew .............. 4-3
Top and Bottom Shrouds for the Steering Column
- Remove and Install .............................................. 4-4
Steering Column Lower Shaft Assembly-Renew ...... 4-5
Steering Column Switches (11.05)....................... 11-5-1 Maintenance ........................................................... 5-1Ignition Switch-Renew (Pre-08 MY Only) ............... 5-1
Steering Column Stalk Assembly Switch-Renew
(Pre-08 MY Only) ................................................... 5-1
Cruise Control Switch-Renew................................. 5-2
Indicator Switch for the Steering Column
- Remove and Install .............................................. 5-2
Airbag Rotary Coupler Assembly - Remove and
Install ..................................................................... 5-2
Wiper Switch for the Steering Column
- Remove and Install .............................................. 5-4
Steering Wheel (11.06) ........................................ 11-6-1 Specifications.......................................................... 6-1
Maintenance ........................................................... 6-1Steering Wheel-Renew .......................................... 6-1
Driver’s Airbag Module - Remove and Install .......... 6-1
Page 604 of 947

Power Steering (11.02)
Steering (11.00)
Issue 5, January 2010 Workshop Manual 11-2-1
Steering (11.00)
Power Steering (11.02)
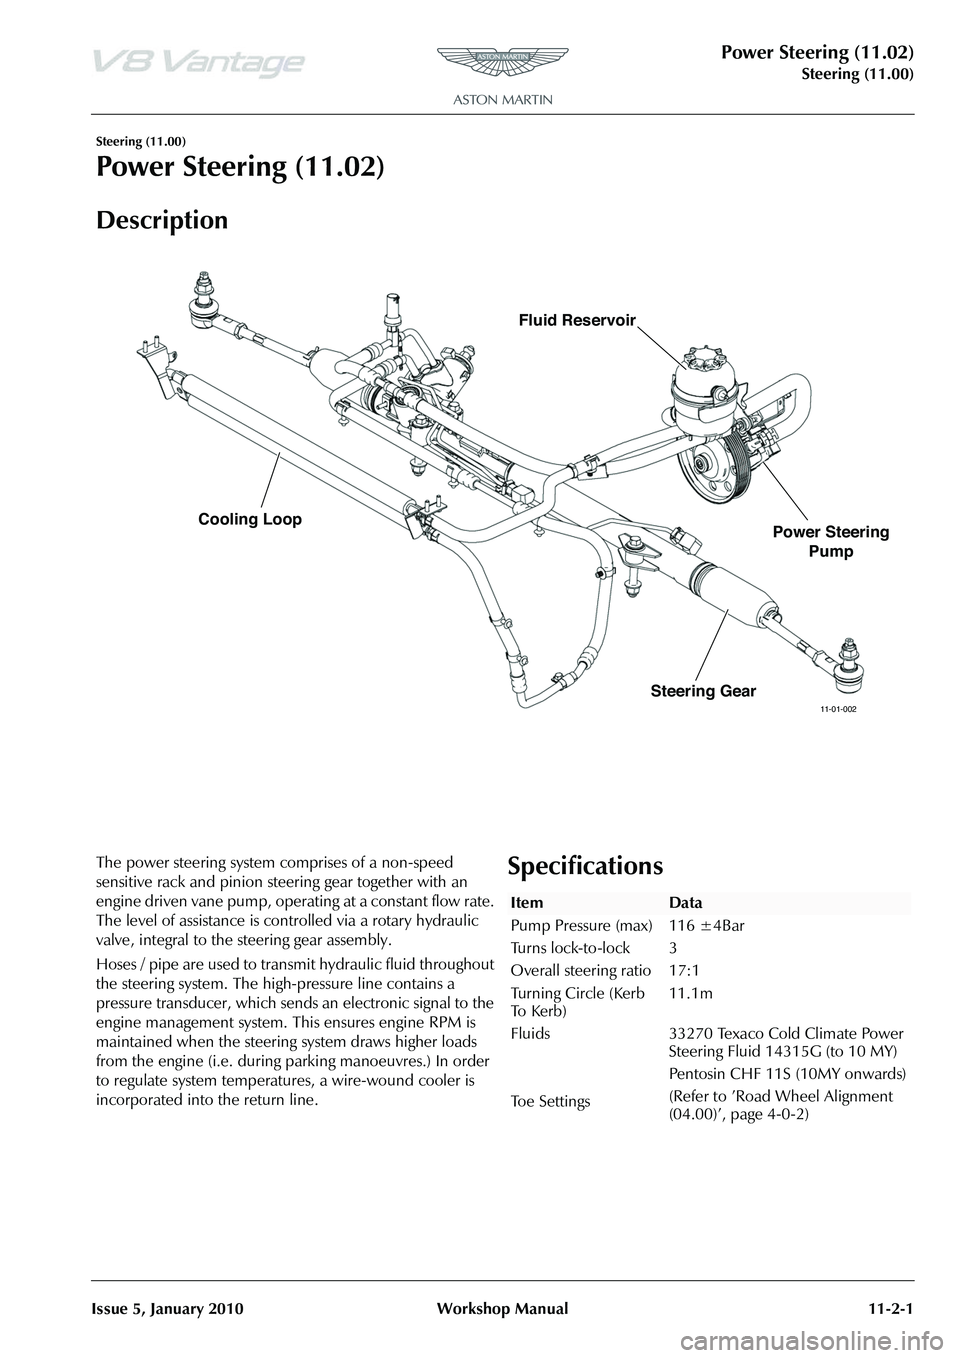
Description
The power steering system comprises of a non-speed
sensitive rack and pinion steering gear together with an
engine driven vane pump, operating at a constant flow rate.
The level of assistance is co ntrolled via a rotary hydraulic
valve, integral to the steering gear assembly.
Hoses / pipe are used to transm it hydraulic fluid throughout
the steering system. The high -pressure line contains a
pressure transducer, which sends an electronic signal to the
engine management system. This ensures engine RPM is
maintained when the steering system draws higher loads
from the engine (i.e. during parking manoeuvres.) In order
to regulate system temperatures, a wire-wound cooler is
incorporated into the return line.Specifications
11-01-002Steering Gear
Cooling Loop
Power Steering
Pump
Fluid Reservoir
ItemData
Pump Pressure (max)
Turns lock-to-lock
Overall steering ratio
Turning Circle (Kerb
To K e r b )
Fluids
Toe Settings 116 ±4Bar
3
17:1
11.1m
33270 Texaco Cold Climate Power
Steering Fluid 14315G (to 10 MY)
Pentosin CHF 11S (10MY onwards)
(Refer to ’Road Wheel Alignment
(04.00)
Page 605 of 947

Power Steering (11.02)
Steering (11.00)11-2-2 Workshop Manual Issue 5, January 2010
Maintenance
Power Steering System - Bleed
Procedure
1. Do a check of the fluid level in the PAS fluid reservoir. Add fluid if necessary.
2. Start the engine and let it idle for 20 seconds.
3. Operate the steering fully to the left and then the right through three cycles.
4. Stop the engine.
5. Wait for five minutes then do a check of the fluid level in the PAS fluid reservoir again.
6. Add fluid if necessary.
7. Install the PAS fluid reservoir cap.
Power Steering Pump-Renew
Removal
1. Remove A/C compressor (see Workshop Manual procedure 03.05.BE Compre ssor - Air Conditioning -
Renew).
2. Coolant drain (see Workshop Manual procedure 03.03.AD Coolant - Drain & Refill).
3. Remove PAS fluid from reservoir.
4. Disconnect HP union from PAS pump pipe.
5. Remove bolt P-clip suction hose to body.
6. Remove bolt (x1) HP pump pipe to engine.
7. Remove bolts (x3) PAS pump to engine.
8. Disconnect bottom hose and move aside.
9. Unclip (x1) harness from cylinder head for access.
10. Manouvre pump forward and up.
11. Disconnect suction hose (cut off clip) and remove pump.
12. Remove HP union pipe from pump (mark position on
pump).
Installation
1. Install HP union pipe to pump (align correctly), fit new O-ring.
2. Install pump to vehicle connect suction pipe to PAS pump, align timing marks and fit new clip.
3. Manouvre pump into position.
4. Install bolts (x3) PAS pump to engine (torque).
5. Install bolt (x1) HP pump pipe to engine (torque).
6. Connect bottom hose.
7. Clip (x1) harness from cylinder head for access. 8. Install bolt P-clip suction hose to body (torque).
9. Connect HP union to PAS pump pipe, replace O-ring
(torque).
10. Coolant refill (see Workshop Manual procedure 03.03.AD Coolant - Drain & Refill).
11. Install A/C compressor (see Workshop Manual procedure 03.05.BE Compre ssor - Air Conditioning -
Renew).
12. Top-up PAS fluid.
13. Start and run engine, operate steering lock to lock x2.
14. Top-up PAS fluid.
Power Assisted Steering (PAS) Rack -
Remove and Install
Removal
1. Disconnect the battery ground cable.
2. Remove the front undertray (refer to Workshop Manual Procedure 01.02.NB - Front Undertray).
3. Remove the front wheels and tyres (refer to Workshop Manual Procedure 04.04.ED - Wheel and Tyre - Pair).
4. Remove the front right side wheel-arch liner (refer to Workshop Manual Procedure 01.02.GB - Front Right
Side Wheel-Arch Liner).
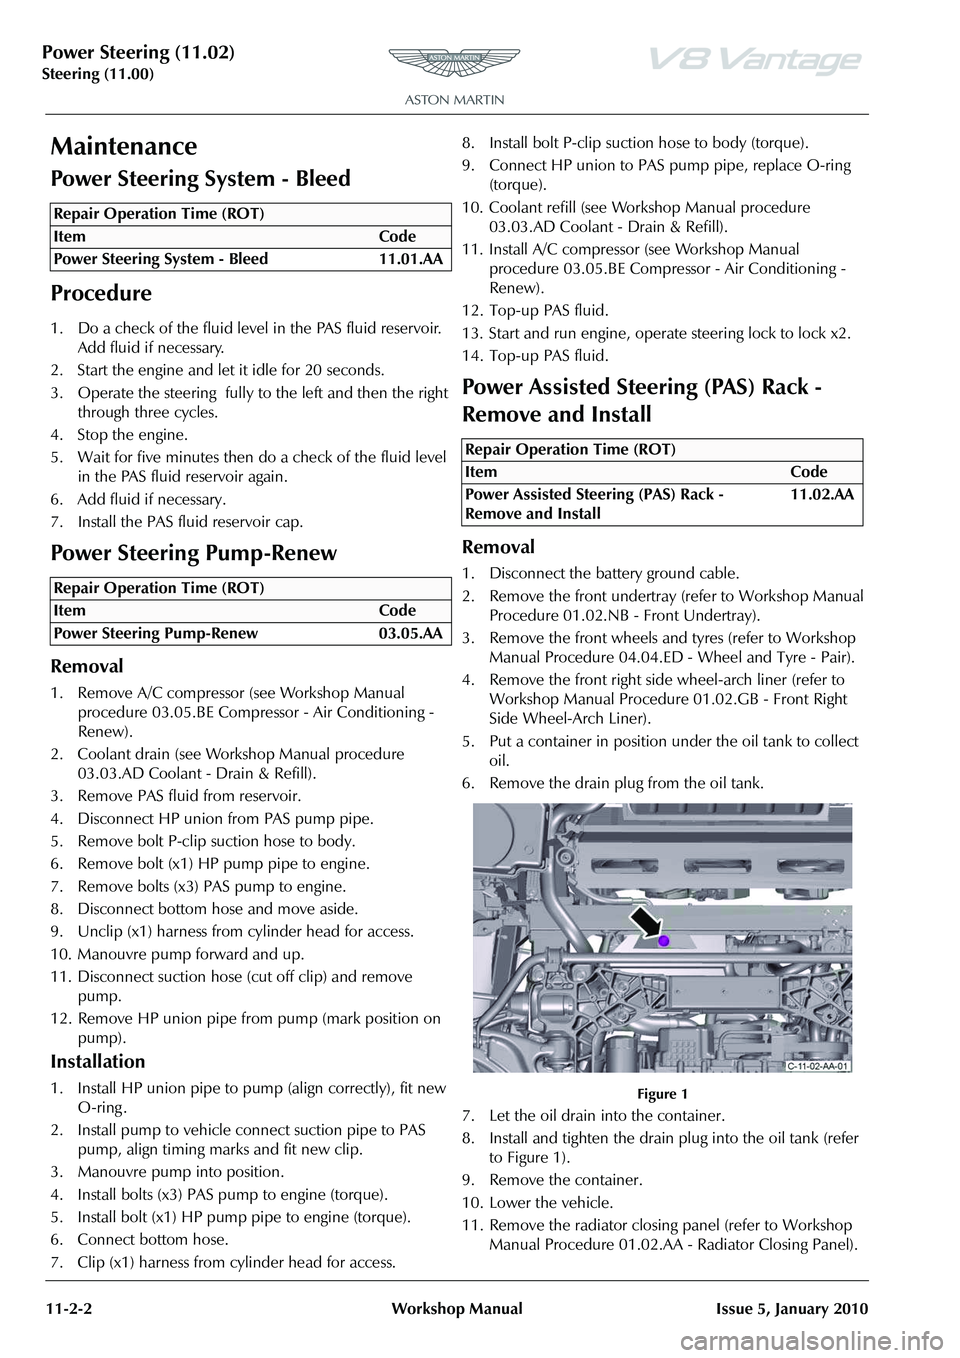
5. Put a container in position under the oil tank to collect oil.
6. Remove the drain plug from the oil tank.
Figure 1
7. Let the oil drain into the container.
8. Install and tighten the drain plug into the oil tank (refer to Figure 1).
9. Remove the container.
10. Lower the vehicle.
11. Remove the radiator closing panel (refer to Workshop Manual Procedure 01.02.AA - Radiator Closing Panel).
Repair Operation Time (ROT)
Repair Operation Time (ROT)
Repair Operation Time (ROT)
ItemCode
Power Assisted Steering (PAS) Rack -
Remove and Install 11.02.AA
Page 606 of 947

Power Steering (11.02)
Steering (11.00)
Issue 5, January 2010 Workshop Manual 11-2-3
12. Disconnect the two breather pipes from the air intake pipe.
Figure 2
13. Install sealing caps into the open ports.
14. Release the clip that attaches the air intake pipe to the throttle body.
Figure 3
15. Release the clip that attaches the air intake pipe to the outlet pipe for the right side air cleaner.
Figure 4
16. Disconnect the air intake pi pe from the outlet pipe for
the right side air cleaner and move it away.
Figure 5
17. Disconnect the two oil breather pipes from the oil tank.
Figure 6
18. Install sealing caps into the open ports.
19. Loosen the union that attaches the top oil pipe to the oil tank and move the pipe away.
Figure 7
20. Install sealing plugs into the open ports.