tow ASTON MARTIN V8 VANTAGE 2010 User Guide
[x] Cancel search | Manufacturer: ASTON MARTIN, Model Year: 2010, Model line: V8 VANTAGE, Model: ASTON MARTIN V8 VANTAGE 2010Pages: 947, PDF Size: 43.21 MB
Page 112 of 947

Instrument Panel (IP) (01.12)
Body System (01.00)1-9-24 Workshop Manual Issue 5, January 2010
27. Move the stowage box and remove the armrest.
C-01-12-DA-40
28. Remove the two screws that attach the centre console panel to the body.
C-01-12-DA-13
29. Push the gear knob down and turn it counterclockwise.
C-01-12-DA-14
30. Remove the gear knob. 31. Release the centre console panel from the body.
C-01-12-DA-17
32. Disconnect the electrical
connector from each of the
four switches.
C-01-12-DA-18
33. Remove the centre console panel.
Install
1. Connect the four electrical connector to each of the four switches (refer to Figure C-01-12-DA-18).
2. Put the centre console panel into position.
C-01-12-DA-19
3. Install the centre console panel.
4. Install the gearknob.
Page 113 of 947

Instrument Panel (IP) (01.12)
Body System (01.00)
Issue 5, January 2010 Workshop Manual 1-9-25
5. Push the gearknob down and turn it clockwise.
C-01-12-DA-15
6. Install and tighten the two screws that attach the centre console panel to the body.
C-01-12-DA-13
7. Install but do not tighten, the two Torx screws, washers and bracket to the armrest.
E-01-12-DA-08
8. Move the stowage box and install the armrest.
C-01-12-DA-40
9. Tighten the two Torx scrws th at attach the armrest to the
bracket.
C-01-12-DA-06
10. Install and tighten the two Torx screws that attach the armrest to the body.
C-01-12-DA-08
Page 114 of 947

Instrument Panel (IP) (01.12)
Body System (01.00)1-9-26 Workshop Manual Issue 5, January 2010
11. Install the leather insert.
C-01-12-DA-07
12. Install the rubber mat into the cupholder.
C-01-12-DA-05
13. Install and tighten the two screws that attach the stowage compartment to the body.
C-01-12-DA-39
14. Install and tighten the four Torx screws that attach the stowage compartment to the body.
C-01-12-DA-38
15. Install and tighten the screw that attaches the stowage compartment to the body.
C-01-12-DA-37
16. Install the stowage compartment cover.
C-01-12-DA-36
Page 115 of 947

Instrument Panel (IP) (01.12)
Body System (01.00)
Issue 5, January 2010 Workshop Manual 1-9-27
17. Install and tighten the four Torx screws and the four nuts that attach the stowage compartment cover to the body.
C-01-12-DA-35
18. Install the right side cover panel for the centre console.
C-01-12-DA-34
19. Install and tighten the two nuts that attach the right side cover panel for the centre console to the body.
C-01-12-DA-33
20. Install and tighten the two screws that attach the right side cover panel for the centre console to the body.
C-01-12-DA-32
21. Install the right side rear bulkhead cover.
C-01-12-DA-31
22. Install and tighten the screw that attaches the right side rear bulkhead cover to the body.
C-01-12-DA-30
Page 116 of 947
Instrument Panel (IP) (01.12)
Body System (01.00)1-9-28 Workshop Manual Issue 5, January 2010
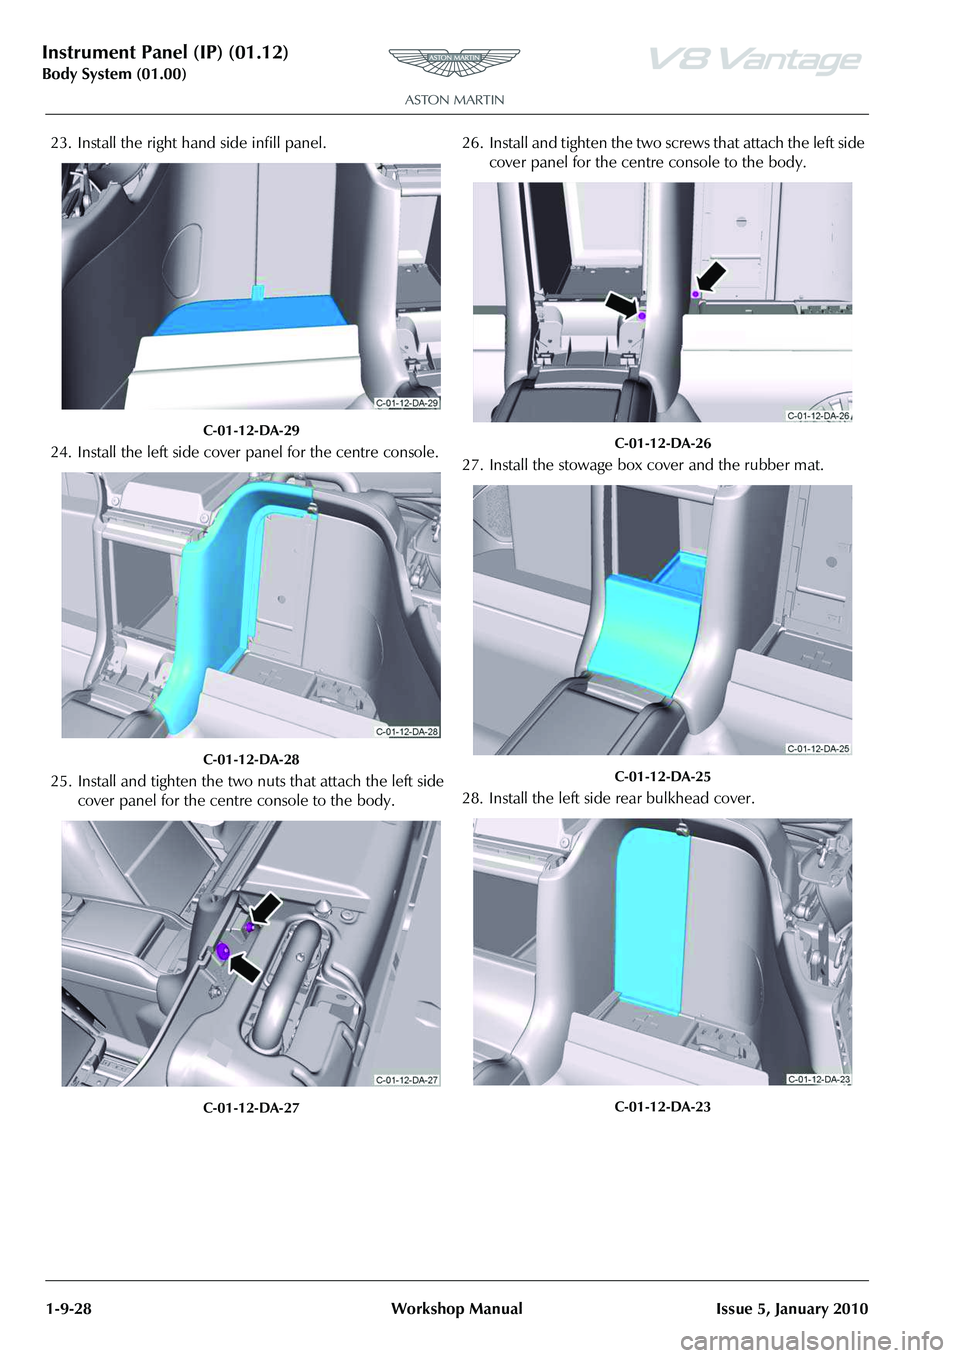
23. Install the right hand side infill panel.
C-01-12-DA-29
24. Install the left side cover panel for the centre console.
C-01-12-DA-28
25. Install and tighten the two nuts that attach the left side
cover panel for the centre console to the body.
C-01-12-DA-27
26. Install and tighten the two sc rews that attach the left side
cover panel for the centre console to the body.
C-01-12-DA-26
27. Install the stowage box cover and the rubber mat.
C-01-12-DA-25
28. Install the left side rear bulkhead cover.
C-01-12-DA-23
Page 140 of 947
Convertible Roof (01.17)
Body System (01.00)1-12-2 Workshop Manual May 2007
Maintenance
Hood Assembly-Renew
Removal
1. Remove Tonneau well liner (see Workshop Manual procedure 01.17.DB Tonneau Well Liner - Renew).
2. Remove Panel assembly body side LH (see Workshop
Manual procedure 01.05.DY Panel Assembly - Bodyside
Trim - Rear - LH - Renew).
3. Remove Panel assembly body side RH (see Workshop Manual procedure 01.05.DX Panel Assembly - Bodyside
Trim - Rear - RH - Renew).
4. Remove Tonneau cover (see Workshop Manual procedure 01.17.CA Cover - Tonneau - Renew).
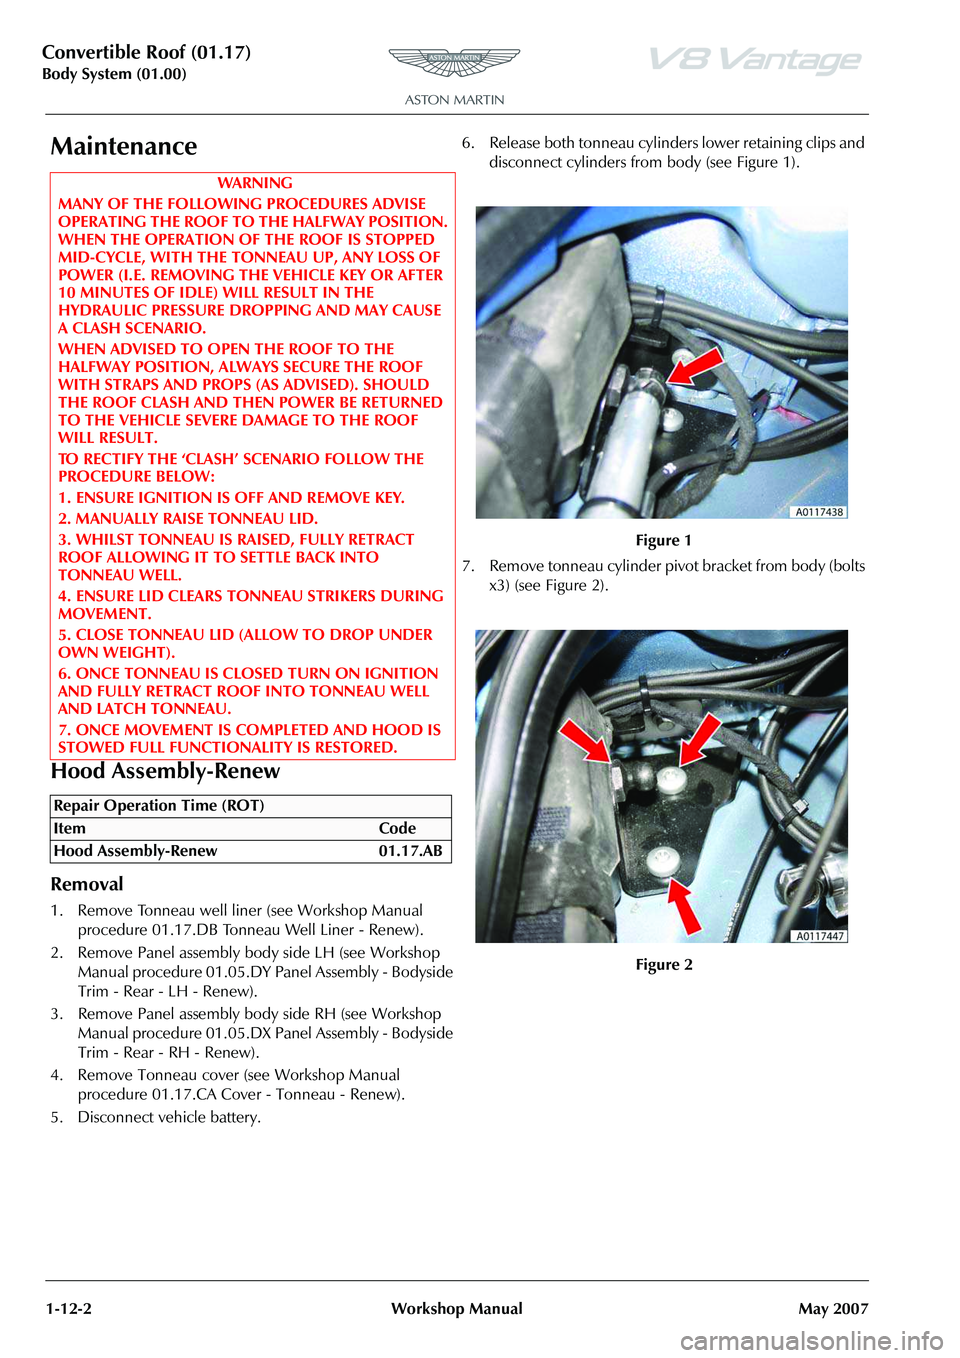
5. Disconnect vehicle battery. 6. Release both tonneau cylinders lower retaining clips and
disconnect cylinders from body (see Figure 1).
7. Remove tonneau cylinder pivot bracket from body (bolts x3) (see Figure 2).
WAR NI NG
MANY OF THE FOLLOWING PROCEDURES ADVISE
OPERATING THE ROOF TO THE HALFWAY POSITION.
WHEN THE OPERATION OF THE ROOF IS STOPPED
MID-CYCLE, WITH THE TO NNEAU UP, ANY LOSS OF
POWER (I.E. REMOVING THE VEHICLE KEY OR AFTER
10 MINUTES OF IDLE) WILL RESULT IN THE
HYDRAULIC PRESSURE DROPPING AND MAY CAUSE
A CLASH SCENARIO.
WHEN ADVISED TO OPEN THE ROOF TO THE
HALFWAY POSITION, ALWA YS SECURE THE ROOF
WITH STRAPS AND PROPS (AS ADVISED). SHOULD
THE ROOF CLASH AND THEN POWER BE RETURNED
TO THE VEHICLE SEVERE DAMAGE TO THE ROOF
WILL RESULT.
TO RECTIFY THE ‘CLASH’ SCENARIO FOLLOW THE
PROCEDURE BELOW:
1. ENSURE IGNITION IS OFF AND REMOVE KEY.
2. MANUALLY RAISE TONNEAU LID.
3. WHILST TONNEAU IS RAISED, FULLY RETRACT
ROOF ALLOWING IT TO SETTLE BACK INTO
TONNEAU WELL.
4. ENSURE LID CLEARS TONNEAU STRIKERS DURING
MOVEMENT.
5. CLOSE TONNEAU LID (ALLOW TO DROP UNDER
OWN WEIGHT).
6. ONCE TONNEAU IS CLOSED TURN ON IGNITION
AND FULLY RETRACT ROOF INTO TONNEAU WELL
AND LATCH TONNEAU.
7. ONCE MOVEMENT IS COMPLETED AND HOOD IS
STOWED FULL FUNCTIONALITY IS RESTORED.
Repair Operation Time (ROT)
Figure 1
Figure 2
Page 143 of 947
Convertible Roof (01.17)
Body System (01.00)
May 2007 Workshop Manual 1-12-5
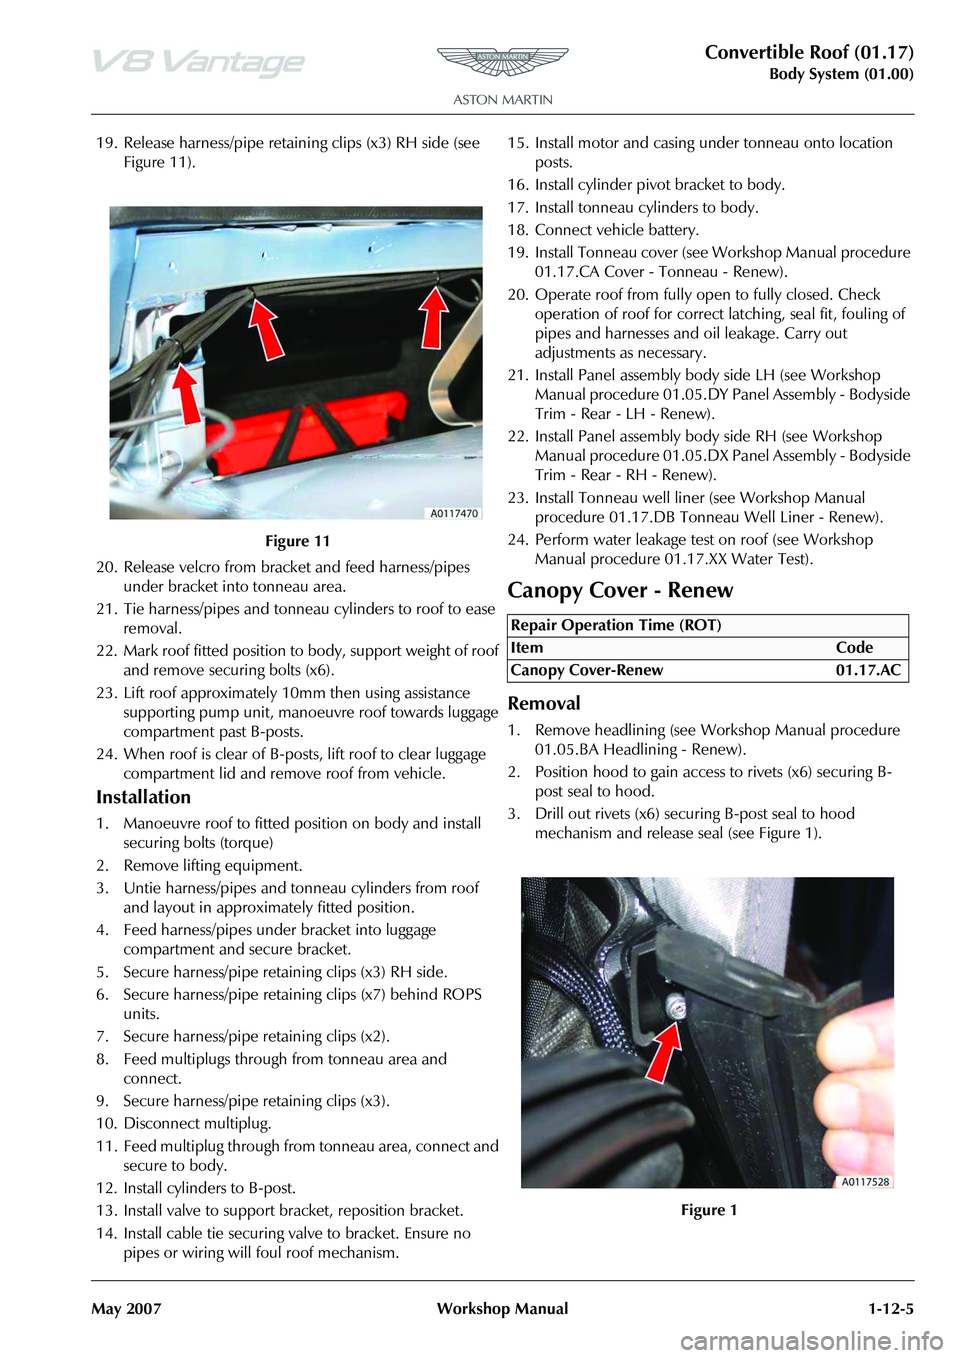
19. Release harness/pipe retaining clips (x3) RH side (see Figure 11).
20. Release velcro from bracket and feed harness/pipes under bracket into tonneau area.
21. Tie harness/pipes and tonneau cylinders to roof to ease removal.
22. Mark roof fitted position to body, support weight of roof and remove securing bolts (x6).
23. Lift roof approximately 10mm then using assistance
supporting pump unit, manoeuvre roof towards luggage
compartment past B-posts.
24. When roof is clear of B-post s, lift roof to clear luggage
compartment lid and remove roof from vehicle.
Installation
1. Manoeuvre roof to fitted position on body and install securing bolts (torque)
2. Remove lifting equipment.
3. Untie harness/pipes and tonneau cylinders from roof and layout in approximately fitted position.
4. Feed harness/pipes under bracket into luggage compartment and secure bracket.
5. Secure harness/pipe retaining clips (x3) RH side.
6. Secure harness/pipe retaining clips (x7) behind ROPS units.
7. Secure harness/pipe retaining clips (x2).
8. Feed multiplugs through from tonneau area and connect.
9. Secure harness/pipe retaining clips (x3).
10. Disconnect multiplug.
11. Feed multiplug through from tonneau area, connect and secure to body.
12. Install cylinders to B-post.
13. Install valve to support bracket, reposition bracket.
14. Install cable tie securing valve to bracket. Ensure no pipes or wiring will foul roof mechanism. 15. Install motor and casing under tonneau onto location
posts.
16. Install cylinder pivot bracket to body.
17. Install tonneau cylinders to body.
18. Connect vehicle battery.
19. Install Tonneau cover (see Workshop Manual procedure 01.17.CA Cover - Tonneau - Renew).
20. Operate roof from fully open to fully closed. Check operation of roof for correct latching, seal fit, fouling of
pipes and harnesses and oil leakage. Carry out
adjustments as necessary.
21. Install Panel assembly bo dy side LH (see Workshop
Manual procedure 01.05.DY Panel Assembly - Bodyside
Trim - Rear - LH - Renew).
22. Install Panel assembly body side RH (see Workshop Manual procedure 01.05.DX Pa nel Assembly - Bodyside
Trim - Rear - RH - Renew).
23. Install Tonneau well line r (see Workshop Manual
procedure 01.17.DB Tonneau Well Liner - Renew).
24. Perform water leakage test on roof (see Workshop Manual procedure 01.17.XX Water Test).
Canopy Cover - Renew
Removal
1. Remove headlining (see Workshop Manual procedure
01.05.BA Headlining - Renew).
2. Position hood to gain access to rivets (x6) securing B- post seal to hood.
3. Drill out rivets (x6) secu ring B-post seal to hood
mechanism and release seal (see Figure 1).
Figure 11
Repair Operation Time (ROT)
Page 159 of 947
Convertible Roof (01.17)
Body System (01.00)
May 2007 Workshop Manual 1-12-21
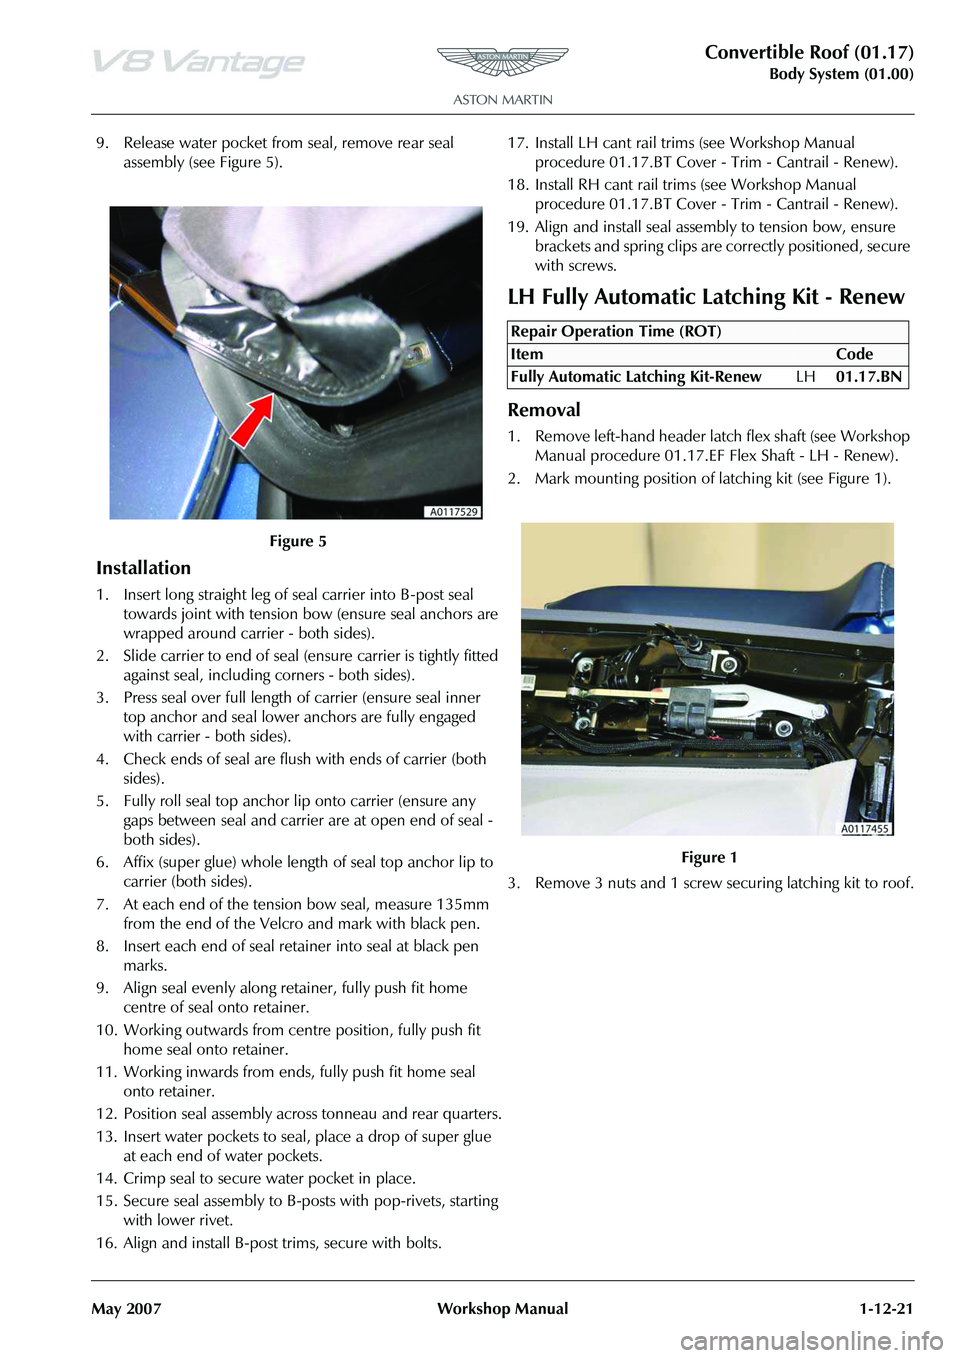
9. Release water pocket from seal, remove rear seal assembly (see Figure 5).
Installation
1. Insert long straight leg of seal carrier into B-post seal
towards joint with tension bo w (ensure seal anchors are
wrapped around carrier - both sides).
2. Slide carrier to end of seal (ensure carrier is tightly fitted
against seal, including corners - both sides).
3. Press seal over full length of carrier (ensure seal inner
top anchor and seal lower anchors are fully engaged
with carrier - both sides).
4. Check ends of seal are flush with ends of carrier (both sides).
5. Fully roll seal top anchor lip onto carrier (ensure any gaps between seal and carrier are at open end of seal -
both sides).
6. Affix (super glue) whole length of seal top anchor lip to carrier (both sides).
7. At each end of the tension bow seal, measure 135mm from the end of the Velcro and mark with black pen.
8. Insert each end of seal retainer into seal at black pen marks.
9. Align seal evenly along retainer, fully push fit home centre of seal onto retainer.
10. Working outwards from cent re position, fully push fit
home seal onto retainer.
11. Working inwards from ends, fully push fit home seal onto retainer.
12. Position seal assembly across tonneau and rear quarters.
13. Insert water pockets to seal, place a drop of super glue at each end of water pockets.
14. Crimp seal to secure water pocket in place.
15. Secure seal assembly to B-posts with pop-rivets, starting with lower rivet.
16. Align and install B-post trims, secure with bolts. 17. Install LH cant rail tr
ims (see Workshop Manual
procedure 01.17.BT Cover - Trim - Cantrail - Renew).
18. Install RH cant rail trims (see Workshop Manual procedure 01.17.BT Cover - Trim - Cantrail - Renew).
19. Align and install seal asse mbly to tension bow, ensure
brackets and spring clips are correctly positioned, secure
with screws.
LH Fully Automatic Latching Kit - Renew
Removal
1. Remove left-hand header latch flex shaft (see Workshop Manual procedure 01.17.EF Flex Shaft - LH - Renew).
2. Mark mounting position of latching kit (see Figure 1).
3. Remove 3 nuts and 1 screw securing latching kit to roof.
Figure 5
Repair Operation Time (ROT)
Page 457 of 947
Road Wheels and Tyres (04.04)
Suspension (04.00)
May 2007 Workshop Manual 4-4-7
Repairs
In view of the high performance capability of the vehicle,
damaged tyres should be renewed and not repaired.
Care of Alloy Road Wheels
Aluminium alloy road wheels are covered with a protective
coating. To prevent corrosion it is essential that this coating
is not damaged. When removing or installing tyres only
equipment utilizing spigot or stud hole clamping must be
used. The equipment must not have any moving parts which
contact the road wheel, and ty re levers must not be used.
To clean road wheels use warm soapy water; stubborn stains
can be removed using a soft brush or by using a proprietary
alloy road wheel cleaner.
Road Wheel Alignment
It is important that correct road wheel alignment be
maintained. Misalignment causes tyre tread to be scrubbed
off laterally because the natural direction of the road wheel
differs from that of the vehicle.
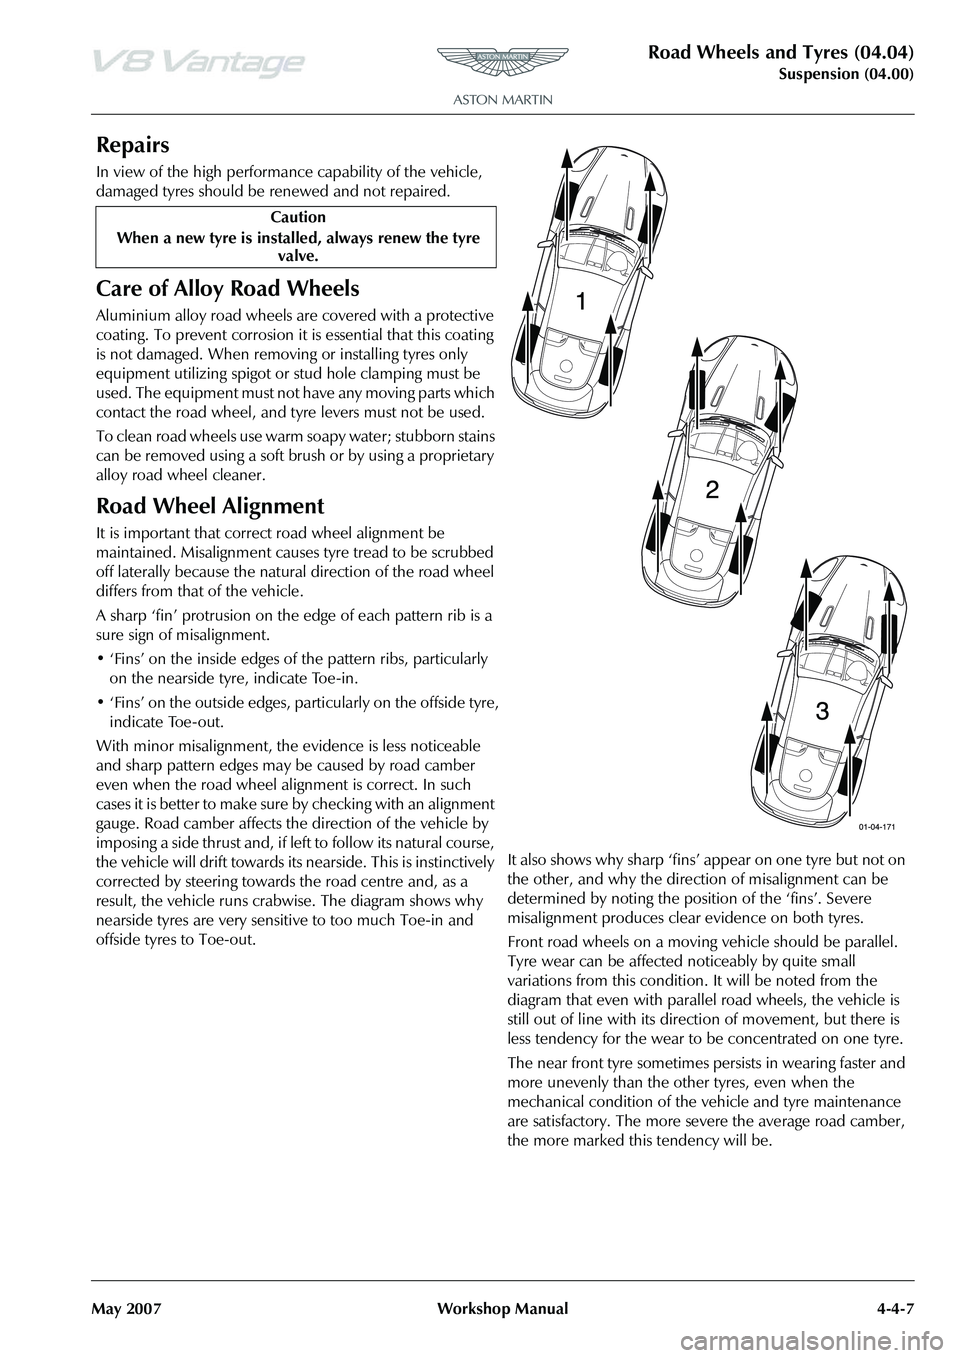
A sharp ‘fin’ protrusion on the edge of each pattern rib is a
sure sign of misalignment.
• ‘Fins’ on the inside edges of the pattern ribs, particularly on the nearside tyre, indicate Toe-in.
• ‘Fins’ on the outside edges, particularly on the offside tyre, indicate Toe-out.
With minor misalignment, the ev idence is less noticeable
and sharp pattern edges may be caused by road camber
even when the road wheel alignment is correct. In such
c a s e s i t i s b e t t e r t o m a k e s u r e b y c h e c k i n g w i t h a n a l i g n m e n t
gauge. Road camber affects the direction of the vehicle by
imposing a side thrus t and , if le ft to follow its natural cou rs e,
the vehicle will drift towards its nearside. This is instinctively
corrected by steering towards the road centre and, as a
result, the vehicle runs crab wise. The diagram shows why
nearside tyres are very sensitive to too much Toe-in and
offside tyres to Toe-out. It also shows why sharp ‘fins’ appear on one tyre but not on
the other, and why the direction of misalignment can be
determined by noting the position of the ‘fins’. Severe
misalignment produces clea
r evidence on both tyres.
Front road wheels on a moving vehicle should be parallel.
Tyre wear can be affected noticeably by quite small
variations from this condition. It will be noted from the
diagram that even with parallel road wheels, the vehicle is
still out of line with its dire ction of movement, but there is
less tendency for the wear to be concentrated on one tyre.
The near front tyre sometimes persists in wearing faster and
more unevenly than the other tyres, even when the
mechanical condition of the vehicle and tyre maintenance
are satisfactory. The more severe the average road camber,
the more marked this tendency will be.
Caution
When a new tyre is installe d, always renew the tyre
valve.
Page 460 of 947
Road Wheels and Tyres (04.04)
Suspension (04.00)4-4-10 Workshop Manual May 2007
Display Unit
The display unit provides additional features when correctly
connected to a previously installed ‘Smartire’ system. The
display unit connects directly to the front of the basic
‘Smartire’ receiver and is powered from the vehicle circuits.
The display will be fully illu minated during use but will go
into ‘Energy Saver’ mode when no activity is detected.
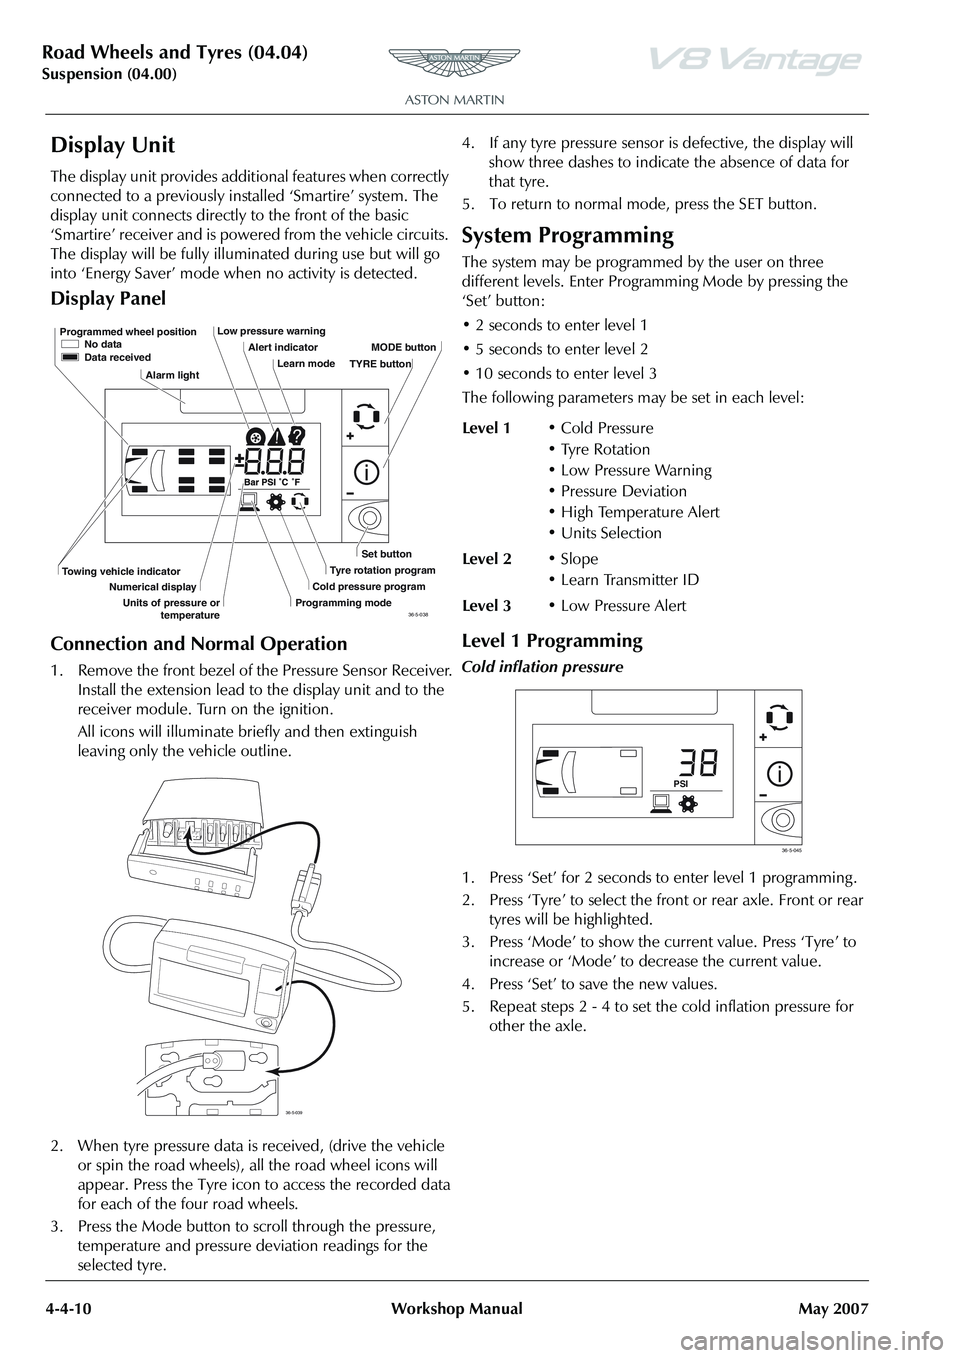
Display Panel
Connection and Normal Operation
1. Remove the front bezel of the Pressure Sensor Receiver. Install the extension lead to the display unit and to the
receiver module. Turn on the ignition.
All icons will illuminate briefly and then extinguish
leaving only the vehicle outline.
2. When tyre pressure data is received, (drive the vehicle
or spin the road wheels), all the road wheel icons will
appear. Press the Tyre icon to access the recorded data
for each of the four road wheels.
3. Press the Mode button to scroll through the pressure, temperature and pressure deviation readings for the
selected tyre. 4. If any tyre pressure sensor is defective, the display will
show three dashes to indicate the absence of data for
that tyre.
5. To return to normal mode, press the SET button.
System Programming
The system may be programmed by the user on three
different levels. Enter Progra mming Mode by pressing the
‘Set’ button:
• 2 seconds to enter level 1
• 5 seconds to enter level 2
• 10 seconds to enter level 3
The following parameters ma y be set in each level:
Level 1 Programming
Cold inflation pressure
1. Press ‘Set’ for 2 seconds to enter level 1 programming .
2. Press ‘Tyre’ to select the front or rear axle. Front or rear
tyres will be highlighted.
3. Press ‘Mode’ to show the current value. Press ‘Tyre’ to increase or ‘Mode’ to decrease the current value.
4. Press ‘Set’ to save the new values.
5. Repeat steps 2 - 4 to set the cold inflation pressure for other the axle.
Programmed wheel position No data
Data received
Alarm light Low pressure warning
Alert indicatorLearn mode MODE button
Set button
Tyre rotation program
Cold pressure program
Programming mode
Towing vehicle indicator
Numerical display
Units of pressure or temperature TYRE button
36-5-038
36-5-039
Level 1
• Cold Pressure
• Tyre Rotation
• Low Pressure Warning
• Pressure Deviation
• High Temperature Alert
•Units Selection
Level 2 •Slope
• Learn Transmitter ID
Level 3 • Low Pressure Alert
PSI
36-5-045