engine oil ASTON MARTIN V8 VANTAGE 2010 Owner's Manual
[x] Cancel search | Manufacturer: ASTON MARTIN, Model Year: 2010, Model line: V8 VANTAGE, Model: ASTON MARTIN V8 VANTAGE 2010Pages: 947, PDF Size: 43.21 MB
Page 262 of 947
Engine Structure (03.01)
3-1-14Workshop ManualIssue 4, November 2008
14. Inspect cylinder head face for warpage, across centre
and from corner to corner.
15. Check condition and measure free length of valve springs.
16. Decarbonise combustion chambers and exhaust ports.
17. Measure valve stem diameters.
18. Use new valves and check valve guide clearance.
Installation
1. Clean cylinder head face and inlet/exhaust manifold faces. Use and air line to completely dry cylinder head
surfaces.
2. Lubricate and install intake and exhaust valves (x16).
3. Install valve stem oil seals.
4. Install valve springs and collars.
5. Using valve spring compressor, compress valve spring, install collets.
6. Release/remove spring compressor.
7. Repeat procedure for remaining valve assemblies.
8. Install selective tappet buckets in their original fitted positions.
9. Lubricate intake camshaft bearings and journals with clean engine oil.
10. Install intake camshaft, install bearing caps (x5), install bolts (x10).
11. Torque tighten bearing cap bolts in the correct sequence.
12. Lubricate exhaust camshaft be arings and journals with
clean engine oil.
13. Install exhaust camshaft, install bearing caps (x5), install bolts (x10).
14. Torque tighten bearing cap bolts in the correct sequence.
15. Install camshaft sprocket Torx bolts in intake and exhaust camshafts.
16. Rotate intake camshaft clockwise, check and log each valve clearance using feeler gauges.
17. Calculate the correct tappet bucket grade.
18. Repeat procedure for exhaust valve clearances.
19. Remove bearing cap bolts (x10), remove bearing caps (x5), remove intake camshaft.
20. Remove tappet buckets, install selected tappet buckets.
21. Repeat procedure for exhaust valve clearances.
22. Install intake camshaft, install bearing caps (x5), install bolts (x10).
23. Torque tighten bearing cap bolts in the correct sequence.
24. Rotate intake camshaft clockwise, re-check each valve clearance using feeler gauges.
25. Repeat procedure and re-check exhaust valve clearances.
26. Remove camshaft sprocket Torx bolts (x2).
27. Remove bearing cap bolts (x10), remove bearing caps (x5), remove intake camshaft. 28. Remove bearing cap bolts (x10), remove bearing caps
(x5), remove exhaust camshaft.
29. Clean EGR tube.
30. Install new gasket, install EGR tube to cylinder head, install and torque tighten Torx screws (x2).
31. Clean Knock sensors (x2).
32. Install knock sensors (x2) to cylinder head, install and torque tighten bolts (x2).
33. Clean camshaft timing sensor.
34. Install camshaft timing sensor, install and torque tighten bolt.
35. Install spark plugs.
36. Install cylinder head gasket RH (see Workshop Manual procedure 03.01.GU Gasket - Cylinder Head - RH -
Renew).
Cylinder Head (Engine Set) - Overhaul
Removal
1. Remove cylinder head gaskets - engine set (see Workshop Manual procedure 03.10.AL Gasket -
Cylinder Head - Engine Set - Renew).
2. Remove Torx screws (x4) securing EGR tubes to cylinder heads, remove tubes.
3. Remove and discard gaskets.
4. Remove bolts (x2) securing camshaft timing sensors to cylinder heads, remove sensors.
5. Remove bolts (x4) securing knock sensors (x4) to cylinder heads, remove sensors.
6. Remove spark plugs from cylinder heads (x8).
7. Remove selective tappet buckets, keep in their fitted order.
8. Position valve spring compressor, compress valve springs.
9. Remove collets, release/remove spring compressor, collect collars and valve springs.
10. Remove valves from cylinder heads.
11. Remove valve stem oil seals.
12. Keep valves and springs in their fitted order.
13. Inspect cylinder head face for warpage, across centre and from corner to corner.
14. Check condition and measure free length of valve springs.
15. Decarbonise combustion chambers and exhaust ports.
16. Use new valves and check valve guide clearances.
Installation
1. Clean cylinder head face and inlet/exhaust manifold faces. Use and air line to completely dry cylinder head
surfaces.
Repair Operation Time (ROT)
ItemCode
Cylinder Head (Engine Set)-Overhaul LHD03.01.GZ
Cylinder Head (Engine Set)-Overhaul RHD03.01.FZ
Page 263 of 947
Engine Structure (03.01)
Issue 4, November 2008Workshop Manual 3-1-15
2. Lubricate and install intake and exhaust valves (x16).
3. Install valve stem oil seals.
4. Install valve springs and collars.
5. Using valve spring compressor, compress valve spring,
install collets.
6. Release/remove spring compressor.
7. Install selective tappet buckets in their original fitted positions.
8. Lubricate intake and exha ust camshaft bearings and
journals with clean engine oil.
9. Install intake and exhaust camshafts, install bearing caps (x20), install bolts (x40).
10. Torque tighten bearing cap bolts in the correct sequence.
11. Install camshaft sprocket Torx bolts in intake and exhaust camshafts.
12. Rotate intake camshaft cl ockwise, check and log each
valve clearance using feeler gauges.
13. Calculate the correct tappet bucket grade.
14. Remove bearing cap bolts (x40), remove bearing caps
(x20), remove intake and exhaust camshafts.
15. Remove tappet buckets, install selected tappet buckets.
16. Install intake and exhaust camshafts, install bearing caps (x20), install bolts (x40).
17. Torque tighten bearing cap bolts in the correct sequence.
18. Rotate intake and exhaus t camshafts clockwise, re-
check each valve clearance using feeler gauges.
19. Remove camshaft sprocket Torx bolts (x4).
20. Remove bearing cap bolts (x40), remove bearing caps
(x20), remove intake and exhaust camshafts.
21. Clean EGR tubes.
22. Install new gaskets, install EGR tubes to cylinder heads, install and torque tighten Torx screws (x4).
23. Clean Knock sensors (x4).
24. Install knock sensors (x4) to cylinder head, install and torque tighten bolts (x4).
25. Clean camshaft timing sensors.
26. Install camshaft timing sensor, install and torque tighten bolt.
27. Install spark plugs.
28. Install cylinder head gaskets - engine set (see Workshop Manual procedure 03.10.AL Gasket - Cylinder Head -
Engine Set - Renew).
Valve Set (Engine Set) - Renew (including
de-coke)
Removal
1. Remove cylinder head gaskets - engine set (see Workshop Manual procedure 03.10.AL Gasket -
Cylinder Head - Engine Set - Renew).
2. Remove spark plugs (x8).
3. Remove selective tappet buckets, keep in their fitted order.
4. Position valve spring compressor, compress valve spring.
5. Remove collets, release/remove spring compressor, collect collar and valve spring.
6. Remove valves from cylinder.
7. Remove valve stem oil seals.
8. Keep valves and springs in their fitted order.
9. Inspect cylinder head face for warpage, across centre and from corner to corner.
10. Check condition and measure free length of valve springs.
11. Decarbonise combustion chambers and exhaust ports.
12. Use new valves and check valve guide clearances.
Installation
1. Clean cylinder head face and inlet/exhaust manifold faces. Use and air line to completely dry cylinder head
surfaces.
2. Lubricate and install intake and exhaust valves (x32).
3. Install valve stem oil seals.
4. Install valve springs and collars.
5. Using valve spring compressor, compress valve spring, install collets.
6. Release/remove spring compressor.
7. Install selective tappet buckets in their original fitted positions.
8. Lubricate intake and exhaust camshaft bearings and journals with clean engine oil.
9. Install intake and exhaust camshafts, install bearing caps (x20), install bolts (x40).
10. Torque tighten bearing cap bolts in the correct sequence.
11. Install camshaft sprocket Torx bolts in intake and exhaust camshafts.
12. Rotate intake camshaft clockwise, check and log each valve clearance using feeler gauges.
13. Calculate the correct tappet bucket grade.
14. Remove bearing cap bolts (x40), remove bearing caps (x20), remove intake and exhaust camshafts.
15. Remove tappet buckets, install selected tappet buckets.
16. Install intake and exhaust camshafts, install bearing caps (x20), install bolts (x40).
17. Torque tighten bearing cap bolts in the correct sequence.
18. Rotate intake and exhaust camshafts clockwise, re- check each valve clearance using feeler gauges.
19. Remove camshaft sprock et Torx bolts (x4).
Repair Operation Time (ROT)
Page 264 of 947
Engine Structure (03.01)
3-1-16Workshop ManualIssue 4, November 2008
20. Remove bearing cap bolts (x40), remove bearing caps
(x20), remove intake and exhaust camshafts.
21. Install spark plugs.
22. Install cylinder head gaskets - engine set (see Workshop Manual procedure 03.10.AL Gasket - Cylinder Head -
Engine Set - Renew).
Inlet Valve (Set) - Renew
Removal
1. Remove cylinder head gaskets - engine set (see Workshop Manual procedure 03.10.AL Gasket -
Cylinder Head - Engine Set - Renew).
2. Remove spark plugs from cylinder head.
3. Remove intake selective tappet buckets from cylinder heads, keep in their fitted order.
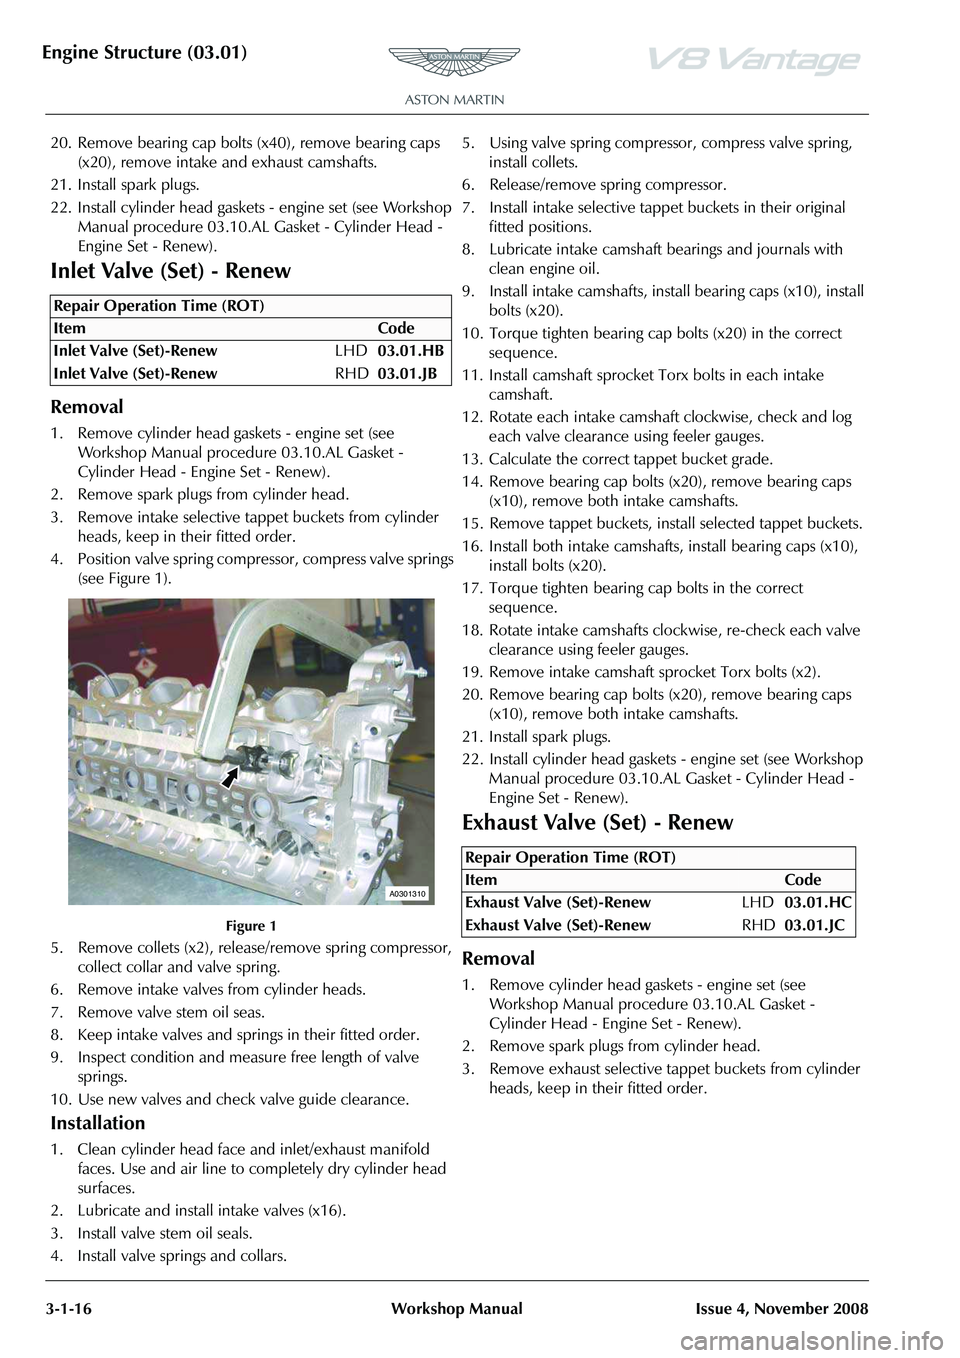
4. Position valve spring compressor, compress valve springs (see Figure 1).
Figure 1
5. Remove collets (x2), releas e/remove spring compressor,
collect collar and valve spring.
6. Remove intake valves from cylinder heads.
7. Remove valve stem oil seas.
8. Keep intake valves and springs in their fitted order.
9. Inspect condition and measure free length of valve springs.
10. Use new valves and check valve guide clearance.
Installation
1. Clean cylinder head face and inlet/exhaust manifold faces. Use and air line to completely dry cylinder head
surfaces.
2. Lubricate and install intake valves (x16).
3. Install valve stem oil seals.
4. Install valve springs and collars. 5. Using valve spring compressor, compress valve spring,
install collets.
6. Release/remove spring compressor.
7. Install intake selective tappet buckets in their original fitted positions.
8. Lubricate intake camshaft bearings and journals with clean engine oil.
9. Install intake camshafts, inst all bearing caps (x10), install
bolts (x20).
10. Torque tighten bearing cap bolts (x20) in the correct sequence.
11. Install camshaft sprocket Torx bolts in each intake
camshaft.
12. Rotate each intake camshaft clockwise, check and log each valve clearance using feeler gauges.
13. Calculate the correct tappet bucket grade.
14. Remove bearing cap bolts (x20), remove bearing caps (x10), remove both intake camshafts.
15. Remove tappet buckets, install selected tappet buckets.
16. Install both intake camshaf ts, install bearing caps (x10),
install bolts (x20).
17. Torque tighten bearing cap bolts in the correct sequence.
18. Rotate intake camshafts clockwise, re-check each valve clearance using feeler gauges.
19. Remove intake camshaft sp rocket Torx bolts (x2).
20. Remove bearing cap bolts (x20), remove bearing caps (x10), remove both intake camshafts.
21. Install spark plugs.
22. Install cylinder head gaskets - engine set (see Workshop Manual procedure 03.10.AL Gasket - Cylinder Head -
Engine Set - Renew).
Exhaust Valve (Set) - Renew
Removal
1. Remove cylinder head gaskets - engine set (see Workshop Manual procedure 03.10.AL Gasket -
Cylinder Head - Engine Set - Renew).
2. Remove spark plugs from cylinder head.
3. Remove exhaust selective tappet buckets from cylinder heads, keep in their fitted order.
Repair Operation Time (ROT)
A0301310
Repair Operation Time (ROT)
ItemCode
Exhaust Valve (Set)-Renew LHD03.01.HC
Exhaust Valve (Set)-Renew RHD03.01.JC
Page 265 of 947
Engine Structure (03.01)
Issue 4, November 2008Workshop Manual 3-1-17
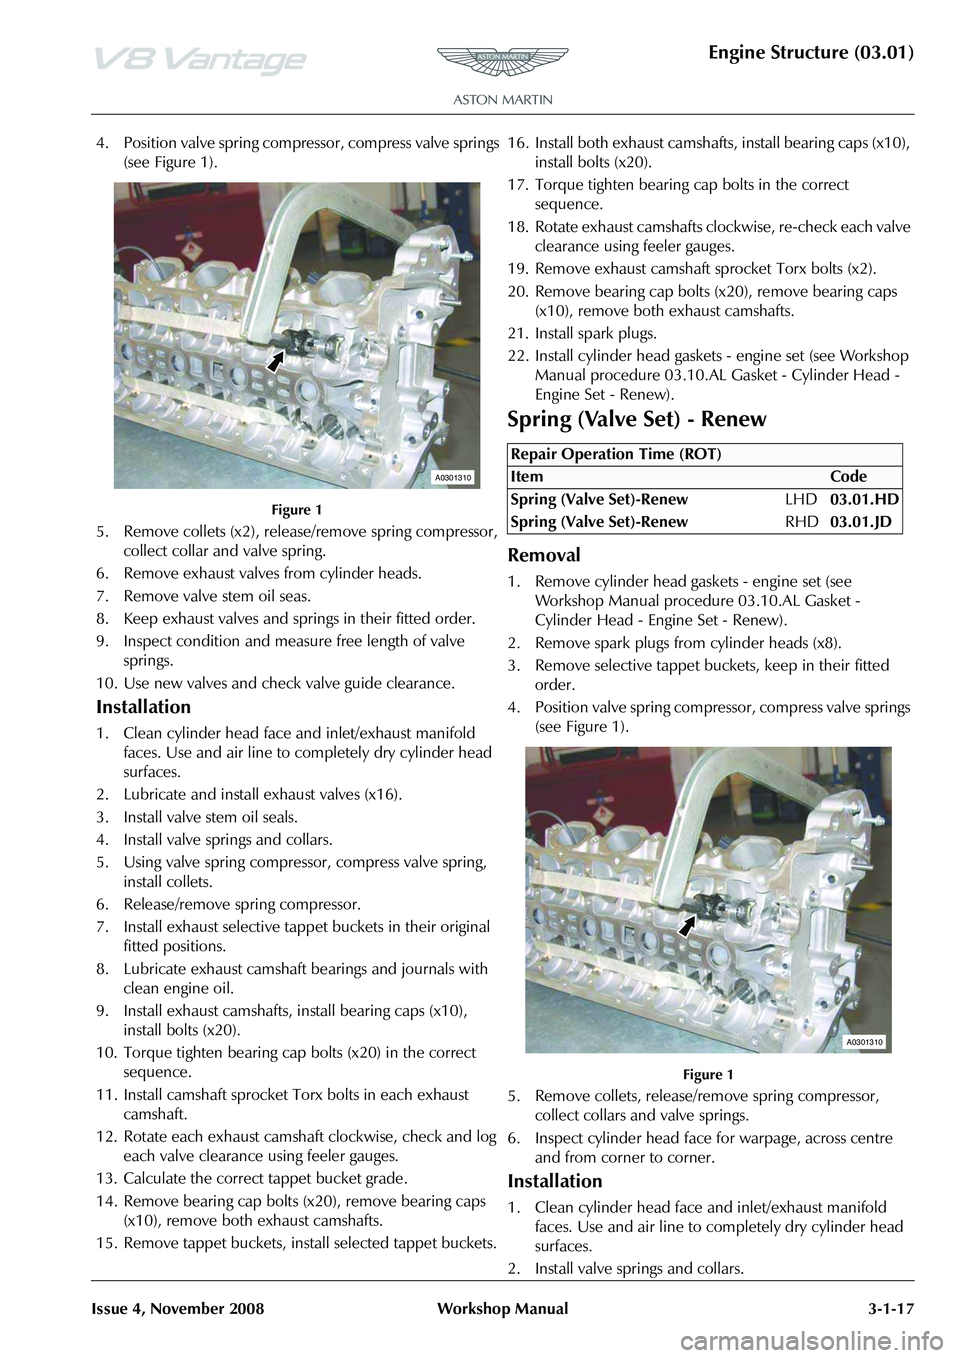
4. Position valve spring compressor, compress valve springs
(see Figure 1).
Figure 1
5. Remove collets (x2), release/remove spring compressor, collect collar and valve spring.
6. Remove exhaust valves from cylinder heads.
7. Remove valve stem oil seas.
8. Keep exhaust valves and springs in their fitted order.
9. Inspect condition and measure free length of valve springs.
10. Use new valves and check valve guide clearance.
Installation
1. Clean cylinder head face and inlet/exhaust manifold faces. Use and air line to completely dry cylinder head
surfaces.
2. Lubricate and install exhaust valves (x16).
3. Install valve stem oil seals.
4. Install valve springs and collars.
5. Using valve spring compressor, compress valve spring, install collets.
6. Release/remove spring compressor.
7. Install exhaust selective tappet buckets in their original fitted positions.
8. Lubricate exhaust camshaft be arings and journals with
clean engine oil.
9. Install exhaust camshafts, install bearing caps (x10), install bolts (x20).
10. Torque tighten bearing cap bolts (x20) in the correct
sequence.
11. Install camshaft sprocket Torx bolts in each exhaust camshaft.
12. Rotate each exhaust camshaf t clockwise, check and log
each valve clearance using feeler gauges.
13. Calculate the correct tappet bucket grade.
14. Remove bearing cap bolts (x20), remove bearing caps
(x10), remove both exhaust camshafts.
15. Remove tappet buckets, install selected tappet buckets. 16. Install both exhaust camshaft
s, install bearing caps (x10),
install bolts (x20).
17. Torque tighten bearing cap bolts in the correct sequence.
18. Rotate exhaust camshafts clockwise, re-check each valve clearance using feeler gauges.
19. Remove exhaust camshaft sprocket Torx bolts (x2).
20. Remove bearing cap bolts (x20), remove bearing caps (x10), remove both exhaust camshafts.
21. Install spark plugs.
22. Install cylinder head gaskets - engine set (see Workshop Manual procedure 03.10.AL Gasket - Cylinder Head -
Engine Set - Renew).
Spring (Valve Set) - Renew
Removal
1. Remove cylinder head gaskets - engine set (see Workshop Manual procedure 03.10.AL Gasket -
Cylinder Head - Engine Set - Renew).
2. Remove spark plugs from cylinder heads (x8).
3. Remove selective tappet buckets, keep in their fitted order.
4. Position valve spring compressor, compress valve springs (see Figure 1).
Figure 1
5. Remove collets, release/remove spring compressor, collect collars and valve springs.
6. Inspect cylinder head face for warpage, across centre and from corner to corner.
Installation
1. Clean cylinder head face and inlet/exhaust manifold faces. Use and air line to completely dry cylinder head
surfaces.
2. Install valve springs and collars.
A0301310
Repair Operation Time (ROT)
A0301310
Page 266 of 947
Engine Structure (03.01)
3-1-18Workshop ManualIssue 4, November 2008
3. Using valve spring compressor, compress valve spring,
install collets.
4. Release/remove spring compressor.
5. Install selective tappet buckets in their original fitted positions.
6. Lubricate intake and exhaust camshaft bearings and journals with clean engine oil.
7. Install intake and exhaust camshafts, install bearing caps (x20), install bolts (x40).
8. Torque tighten bearing cap bolts in the correct sequence.
9. Install camshaft sprocket Torx bolts in intake and exhaust camshafts.
10. Rotate intake camshaft clockwise, check and log each valve clearance using feeler gauges.
11. Calculate the correct tappet bucket grade.
12. Remove bearing cap bolts (x40), remove bearing caps (x20), remove intake and exhaust camshafts.
13. Remove tappet buckets, install selected tappet buckets.
14. Install intake and exhaust camshafts, install bearing caps (x20), install bolts (x40).
15. Torque tighten bearing cap bolts in the correct sequence.
16. Rotate intake and exhaust camshafts clockwise, re- check each valve clearance using feeler gauges.
17. Remove camshaft sprocket Torx bolts (x4).
18. Remove bearing cap bolts (x40), remove bearing caps (x20), remove intake and exhaust camshafts.
19. Install spark plugs.
20. Install cylinder head gaskets - engine set (see Workshop Manual procedure 03.10.AL Gasket - Cylinder Head -
Engine Set - Renew).
Spring (Inlet Valve Set) - Renew
Removal
1. Remove cylinder head gaskets - engine set (see Workshop Manual procedure 03.10.AL Gasket -
Cylinder Head - Engine Set - Renew).
2. Remove spark plugs from cylinder heads (x8).
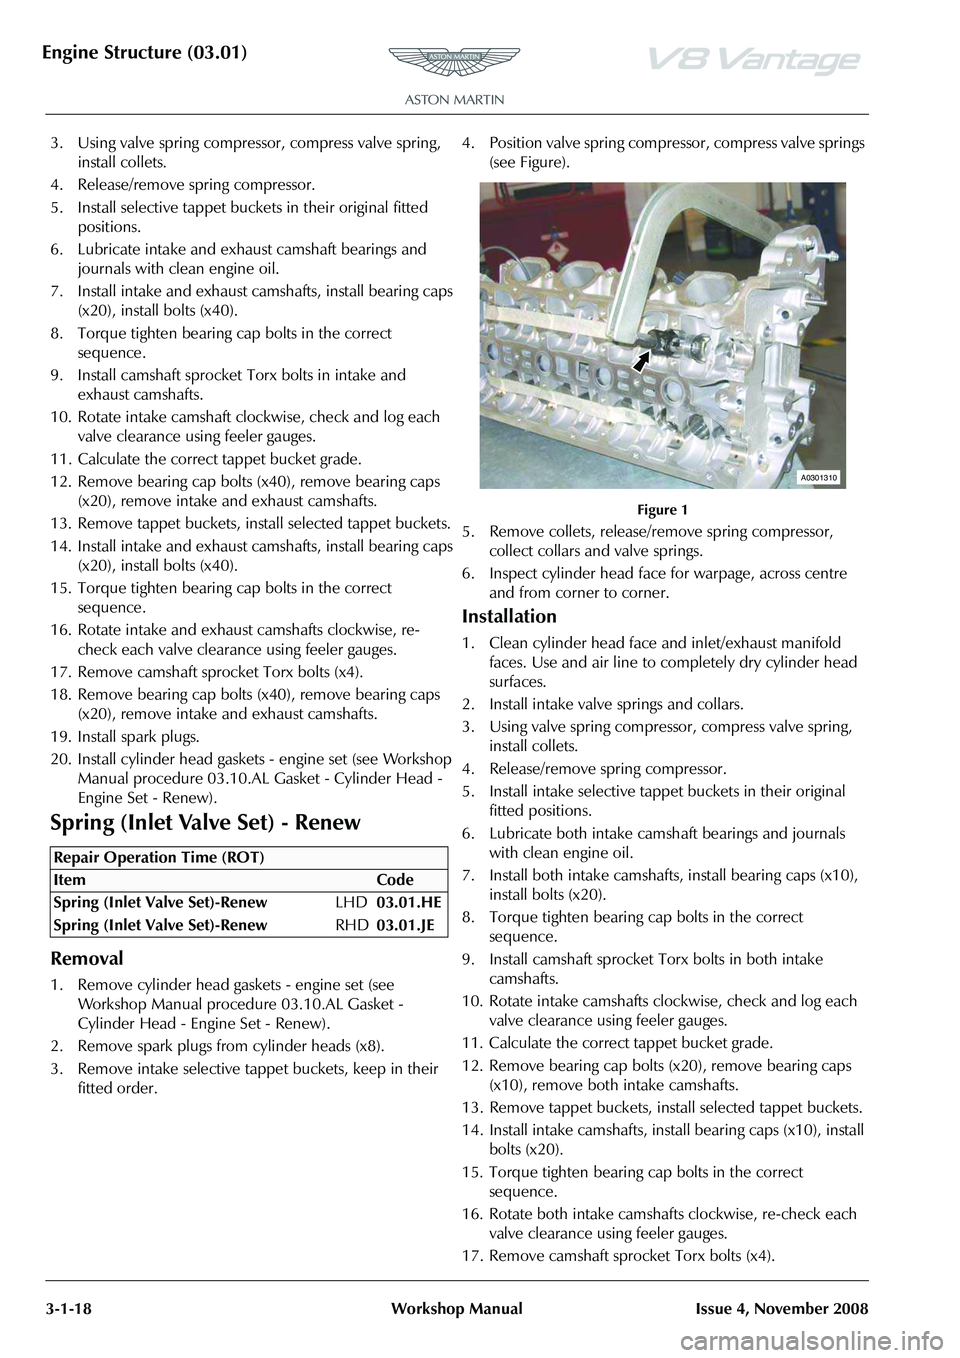
3. Remove intake selective tappet buckets, keep in their fitted order. 4. Position valve spring compressor, compress valve springs
(see Figure).
Figure 1
5. Remove collets, release/remove spring compressor, collect collars and valve springs.
6. Inspect cylinder head face for warpage, across centre and from corner to corner.
Installation
1. Clean cylinder head face and inlet/exhaust manifold faces. Use and air line to completely dry cylinder head
surfaces.
2. Install intake valve springs and collars.
3. Using valve spring compressor, compress valve spring, install collets.
4. Release/remove spring compressor.
5. Install intake selective tappet buckets in their original fitted positions.
6. Lubricate both intake camsh aft bearings and journals
with clean engine oil.
7. Install both intake camshafts, install bearing caps (x10), install bolts (x20).
8. Torque tighten bearing cap bolts in the correct sequence.
9. Install camshaft sprocket Torx bolts in both intake camshafts.
10. Rotate intake camshafts clockwise, check and log each valve clearance using feeler gauges.
11. Calculate the correct tappet bucket grade.
12. Remove bearing cap bolts (x20), remove bearing caps (x10), remove both intake camshafts.
13. Remove tappet buckets, install selected tappet buckets.
14. Install intake camshafts, inst all bearing caps (x10), install
bolts (x20).
15. Torque tighten bearing cap bolts in the correct sequence.
16. Rotate both intake camshafts clockwise, re-check each valve clearance using feeler gauges.
17. Remove camshaft sprocket Torx bolts (x4).
Repair Operation Time (ROT)
A0301310
Page 267 of 947
Engine Structure (03.01)
Issue 4, November 2008Workshop Manual 3-1-19
18. Remove bearing cap bolts (x20), remove bearing caps
(x10), remove both intake camshafts.
19. Install spark plugs.
20. Install cylinder head gaskets - engine set (see Workshop Manual procedure 03.10.AL Gasket - Cylinder Head -
Engine Set - Renew).
Inlet and Exhaust Valve Seal (Engine Set)
- Renew
Removal
1. Remove cylinder head gaskets - engine set (see Workshop Manual procedure 03.10.AL Gasket -
Cylinder Head - Engine Set - Renew).
2. Remove spark plugs (x8).
3. Remove selective tappet buckets, keep in their fitted order.
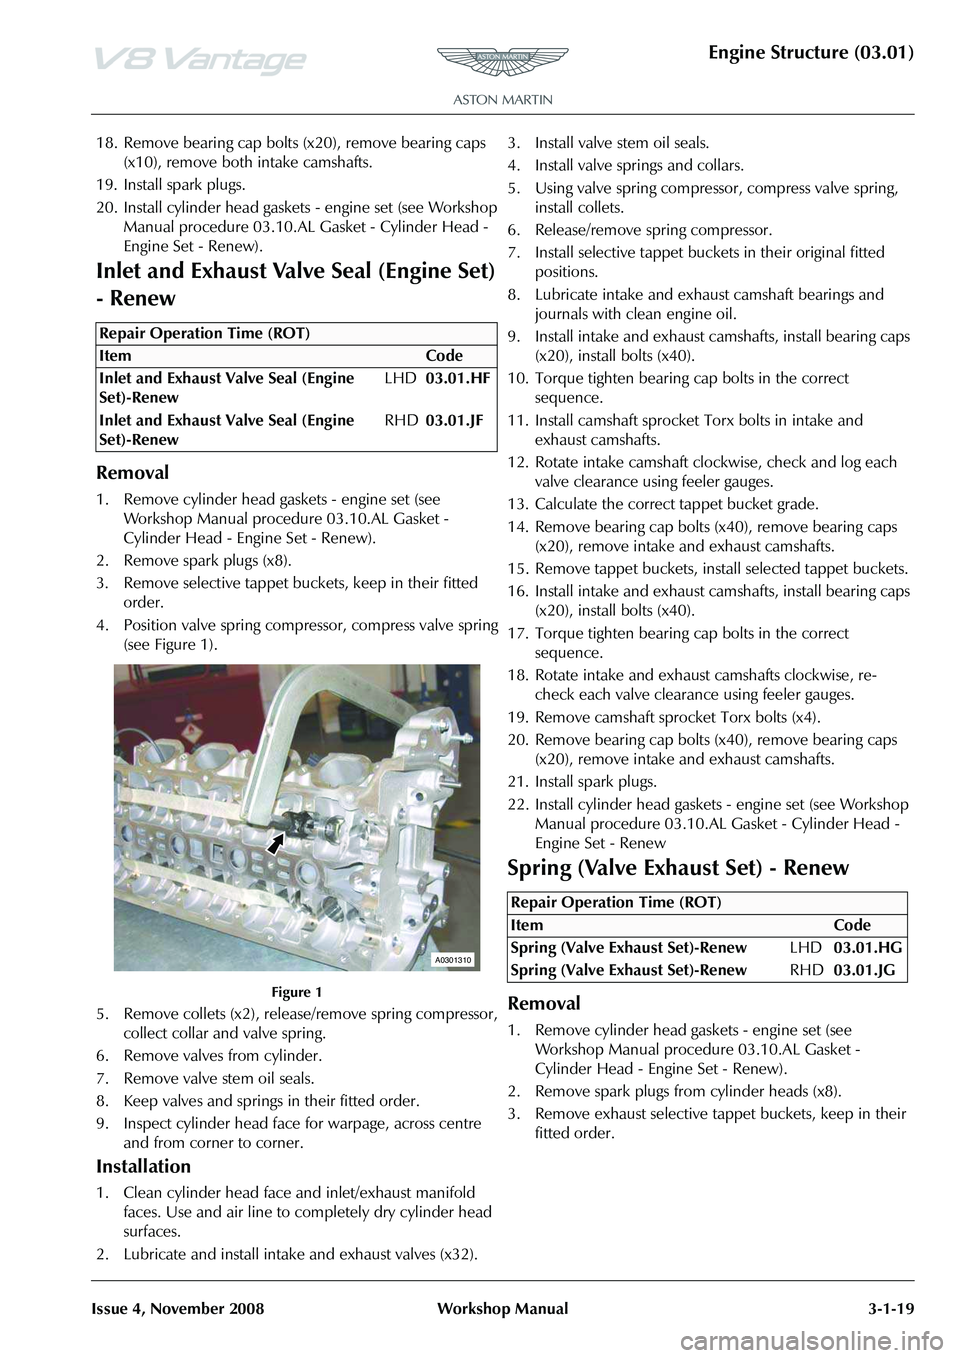
4. Position valve spring compressor, compress valve spring (see Figure 1).
Figure 1
5. Remove collets (x2), release/remove spring compressor, collect collar and valve spring.
6. Remove valves from cylinder.
7. Remove valve stem oil seals.
8. Keep valves and springs in their fitted order.
9. Inspect cylinder head face for warpage, across centre and from corner to corner.
Installation
1. Clean cylinder head face and inlet/exhaust manifold faces. Use and air line to completely dry cylinder head
surfaces.
2. Lubricate and install intake and exhaust valves (x32). 3. Install valve stem oil seals.
4. Install valve springs and collars.
5. Using valve spring compressor, compress valve spring,
install collets.
6. Release/remove spring compressor.
7. Install selective tappet buckets in their original fitted positions.
8. Lubricate intake and exhaust camshaft bearings and journals with clean engine oil.
9. Install intake and exhaust camshafts, install bearing caps (x20), install bolts (x40).
10. Torque tighten bearing cap bolts in the correct sequence.
11. Install camshaft sprocket Torx bolts in intake and exhaust camshafts.
12. Rotate intake camshaft clockwise, check and log each valve clearance using feeler gauges.
13. Calculate the correct tappet bucket grade.
14. Remove bearing cap bolts (x40), remove bearing caps (x20), remove intake and exhaust camshafts.
15. Remove tappet buckets, install selected tappet buckets.
16. Install intake and exhaust camshafts, install bearing caps (x20), install bolts (x40).
17. Torque tighten bearing cap bolts in the correct sequence.
18. Rotate intake and exhaust camshafts clockwise, re- check each valve clearance using feeler gauges.
19. Remove camshaft sprock et Torx bolts (x4).
20. Remove bearing cap bolts (x40), remove bearing caps (x20), remove intake and exhaust camshafts.
21. Install spark plugs.
22. Install cylinder head gaskets - engine set (see Workshop Manual procedure 03.10.AL Gasket - Cylinder Head -
Engine Set - Renew
Spring (Valve Exhaust Set) - Renew
Removal
1. Remove cylinder head gaskets - engine set (see Workshop Manual procedure 03.10.AL Gasket -
Cylinder Head - Engine Set - Renew).
2. Remove spark plugs from cylinder heads (x8).
3. Remove exhaust selective tappet buckets, keep in their fitted order.
Repair Operation Time (ROT)
A0301310
Repair Operation Time (ROT)
Page 268 of 947
Engine Structure (03.01)
3-1-20Workshop ManualIssue 4, November 2008
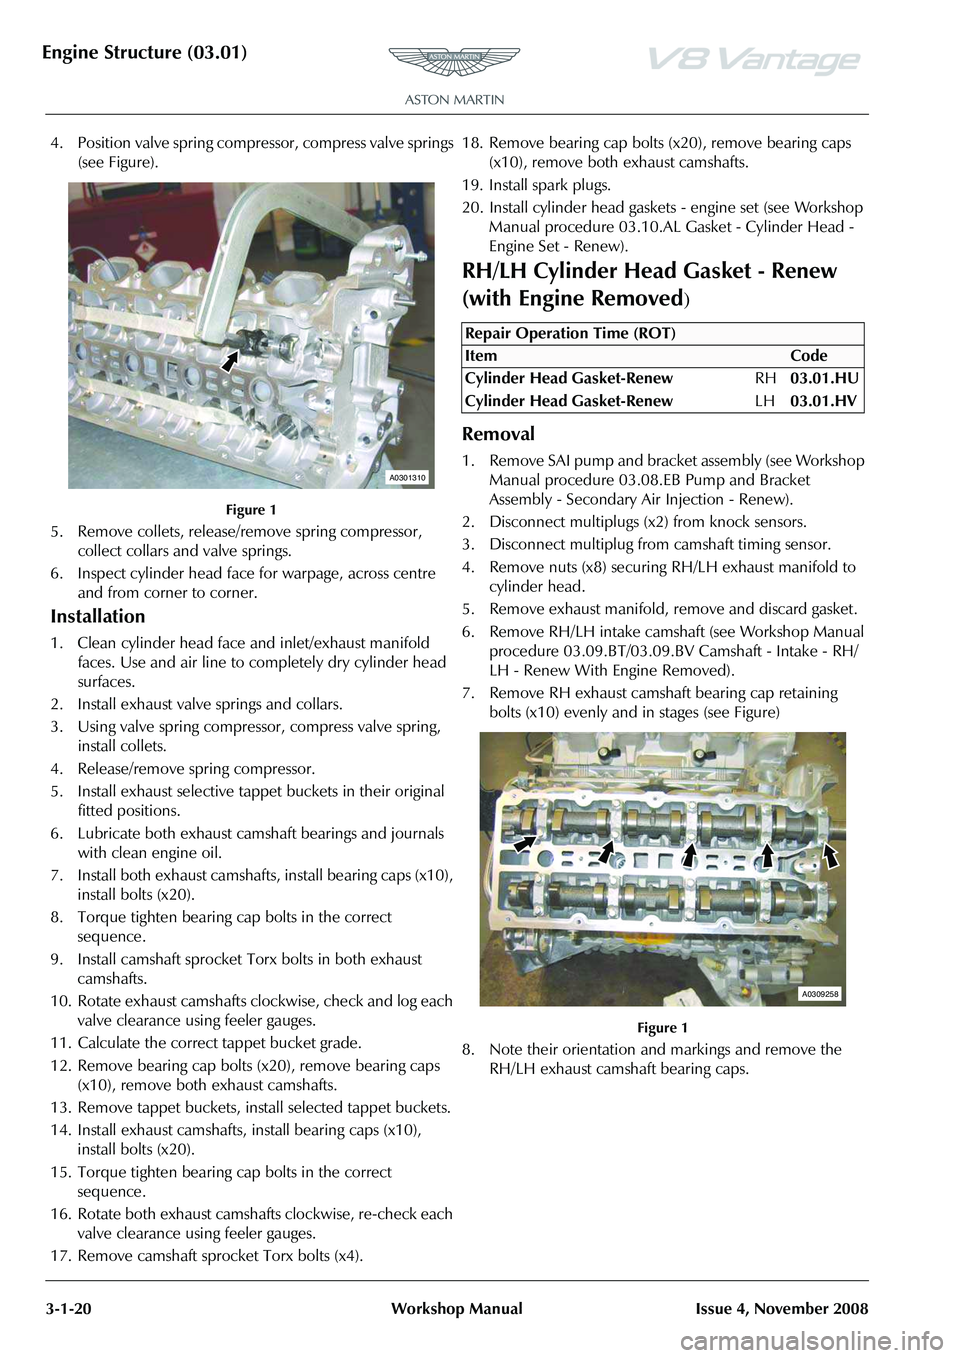
4. Position valve spring compressor, compress valve springs
(see Figure).
Figure 1
5. Remove collets, release/re move spring compressor,
collect collars and valve springs.
6. Inspect cylinder head face for warpage, across centre and from corner to corner.
Installation
1. Clean cylinder head face and inlet/exhaust manifold faces. Use and air line to completely dry cylinder head
surfaces.
2. Install exhaust valve springs and collars.
3. Using valve spring compressor, compress valve spring, install collets.
4. Release/remove spring compressor.
5. Install exhaust selective tappet buckets in their original fitted positions.
6. Lubricate both exhaust camshaft bearings and journals with clean engine oil.
7. Install both exhaust camshafts , install bearing caps (x10),
install bolts (x20).
8. Torque tighten bearing cap bolts in the correct sequence.
9. Install camshaft sprocket Torx bolts in both exhaust camshafts.
10. Rotate exhaust camshafts clockwise, check and log each valve clearance using feeler gauges.
11. Calculate the correct tappet bucket grade.
12. Remove bearing cap bolts (x20), remove bearing caps (x10), remove both exhaust camshafts.
13. Remove tappet buckets, install selected tappet buckets.
14. Install exhaust camshafts, install bearing caps (x10), install bolts (x20).
15. Torque tighten bearing cap bolts in the correct sequence.
16. Rotate both exhaust camshafts clockwise, re-check each valve clearance using feeler gauges.
17. Remove camshaft sprocket Torx bolts (x4). 18. Remove bearing cap bolts (x20), remove bearing caps
(x10), remove both exhaust camshafts.
19. Install spark plugs.
20. Install cylinder head gaskets - engine set (see Workshop Manual procedure 03.10.AL Gasket - Cylinder Head -
Engine Set - Renew).
RH/LH Cylinder Head Gasket - Renew
(with Engine Removed
)
Removal
1. Remove SAI pump and bracket assembly (see Workshop Manual procedure 03.08. EB Pump and Bracket
Assembly - Secondary Ai r Injection - Renew).
2. Disconnect multiplugs (x2) from knock sensors.
3. Disconnect multiplug from camshaft timing sensor.
4. Remove nuts (x8) securing RH/LH exhaust manifold to
cylinder head.
5. Remove exhaust manifold, remove and discard gasket.
6. Remove RH/LH intake camshaft (see Workshop Manual procedure 03.09.BT/03.09.BV Camshaft - Intake - RH/
LH - Renew With Engine Removed).
7. Remove RH exhaust camshaft bearing cap retaining bolts (x10) evenly and in stages (see Figure)
Figure 1
8. Note their orientation and markings and remove the RH/LH exhaust camshaft bearing caps.
A0301310
Repair Operation Time (ROT)
ItemCode
Cylinder Head Gasket-Renew RH03.01.HU
Cylinder Head Gasket-Renew LH03.01.HV
A0309258
Page 269 of 947

Engine Structure (03.01)
Issue 4, November 2008Workshop Manual 3-1-21
9. Remove RH/LH exhaust camshaft (see Figure 2).
Figure 2
10. Remove bolts (x2) securing front end of RH/LH cylinder
head to cylinder block.
11. Remove bolts (x10), evenly and in stages securing RH/ LH cylinder head to cylinder block (see Figure 3).
Figure 3
12. With assistance, remove RH /LH cylinder head assembly.
13. Remove and discard cylinder head gasket.
Installation
1. Thoroughly clean RH/LH cylinder head face and retaining bolt pockets.
2. Thoroughly clean RH/LH cylinder block face.
3. Thoroughly clean and dry RH cylinder head retaining
bolts.
4. Install new RH/LH cylinder gasket, locate on dowels.
5. With assistance, install RH/LH cylinder head, locate on dowels.
6. Install and torque tighten cylinder head bolts (x12) in the correct sequence.
7. Lubricate RH exhaust camsha ft journals, camshaft lobes,
bearing surfaces on cylinder head and bearing caps with
clean engine oil.
8. Install RH exhaust camshaft, install bearing caps (x5) in their original positions.
9. Install bolts (x10) and torque tighten in the sequence specified.
10. Install sprocket retaining Torx bolt in camshaft. 11. Rotate camshaft accordingly and check each valve
clearance using feeler gauges.
12. Remove sprocket retaining Torx bolt.
13. Install RH intake camsha ft (see Workshop Manual
procedure (03.09.BT/03.09.BV) Camshaft - Intake - RH/
LH - Renew With Engine Removed).
14. Install timing chain tensioni ng tool (303-532) into RH/
LH exhaust camshaft sprocket.
15. Apply a force to the tool (3 03-532) in an anti-clockwise
direction and torque tighten RH/LH sprocket Torx bolts.
Remove special tool.
16. Connect multiplug to camshaft timing sensor.
17. Connect multiplugs (x2) to knock sensors.
18. Clean RH/LH exhaust manifold.
19. Install new RH/LH exhaust manifold gasket, install exhaust manifold.
20. Install and torque tighten RH/LH exhaust manifold nuts (x8).
21. Install SAI pump and bracket assembly (see Workshop Manual procedure 03.08. EB Pump and Bracket
Assembly - Secondary Air Injection - Renew).
Cylinder Head Gasket (Engine Set) -
Renew (with Engine Removed)
Removal
1. Remove SAI pump and bracke t assembly (see Workshop
Manual procedure 03.08.EB Pump and Bracket
Assembly - Secondary Air Injection - Renew).
2. Disconnect multiplugs (x4) from LH and RH knock sensors.
3. Disconnect multiplugs (x2) from LH and RH camshaft
timing sensors.
4. Remove nuts (x8) securing LH exhaust manifold to cylinder head.
5. Remove LH exhaust manifold, remove and discard gasket.
6. Remove LH intake camshaft (see Workshop Manual procedure 03.09.BV Camshaft - Intake - LH - Renew
With Engine Removed).
A0309260
A0310319
Repair Operation Time (ROT)
Page 272 of 947

Engine Structure (03.01)
3-1-24Workshop ManualIssue 4, November 2008
23. Remove RH exhaust camshaft bearing cap retaining
bolts (x10) evenly and in stages (see Figure 10).
Figure 10
24. Note their orientation and markings and remove the RH exhaust camshaft bearing caps.
25. Remove RH exhaust camshaft (see Figure 11).
Figure 11
26. Remove bolts (x2) securing front end of RH cylinder head to cylinder block.
27. Remove bolts (x10), evenly and in stages securing RH cylinder head to cylinder block (see Figure 12).
Figure 12
28. With assistance, remove RH cylinder head assembly.
29. Remove and discard cylinder head gasket.
Installation
1. Thoroughly clean LH and RH cylinder head faces and retaining bolt pockets.
2. Thoroughly clean LH and RH cylinder block faces.
3. Thoroughly clean and dry LH and RH cylinder head retaining bolts.
4. Install new RH cylinder gasket, locate on dowels.
5. With assistance, install RH cylinder head, locate on dowels.
6. Install and torque tighten cylinder head bolts (x12) in the correct sequence.
7. Lubricate camshaft journals , camshaft lobes, bearing
surfaces on cylinder head and bearing caps with clean
engine oil.
8. Install RH exhaust camshaft, install bearing caps (x5) in their original positions.
9. Install bolts (x10) and torque tighten in the sequence specified.
10. Install sprocket retaining Torx bolt in camshaft.
11. Rotate camshaft accordingly and check each valve clearance using feeler gauges.
12. Repeat procedure and install RH intake camshaft.
13. Remove sprocket retaining Torx bolt.
14. Rotate RH intake and exhaust camshafts until timing flats on each camshaft face uppermost.
15. Install tool (303-530) to RH cylinder head to secure camshafts, install and tighten bolts (x3).
16. Install new LH cylinder gasket, locate on dowels.
17. With assistance, install LH cylinder head, locate on dowels.
18. Install and torque tighten cylinder head bolts (x12) in the correct sequence.
19. Lubricate LH exhaust camshaf t journals, camshaft lobes,
bearing surfaces on cylinder head and bearing caps with
clean engine oil.
20. Install LH exhaust camshaft, install bearing caps (x5) in their original positions.
21. Install bolts (x10) and torque tighten in the sequence specified.
22. Install sprocket retaining Torx bolt in LH exhaust camshaft.
23. Rotate LH exhaust camshaft accordingly and check each valve clearance using feeler gauges.
24. Remove sprocket retaining Torx bolt.
25. Install LH intake camshaft (see Workshop Manual procedure 03.09.BV Camshaft - Intake - LH - Renew
With Engine Removed).
26. Install timing chain tensio ning tool (303-532) into RH
exhaust camshaft sprocket.
27. Apply a force to the tool (303-532) in an anti-clockwise direction and torque tighten RH sprocket Torx bolts.
Remove special tool.
28. Connect multiplugs to LH and RH camshaft timing sensors.
A0309258
A0309260
A0310319
Page 275 of 947
Lubrication System (03.02)
Engine (03.00)
Issue 5, Janauary 2010 Workshop Manual 3-2-1
Engine (03.00)
Lubrication System (03.02)
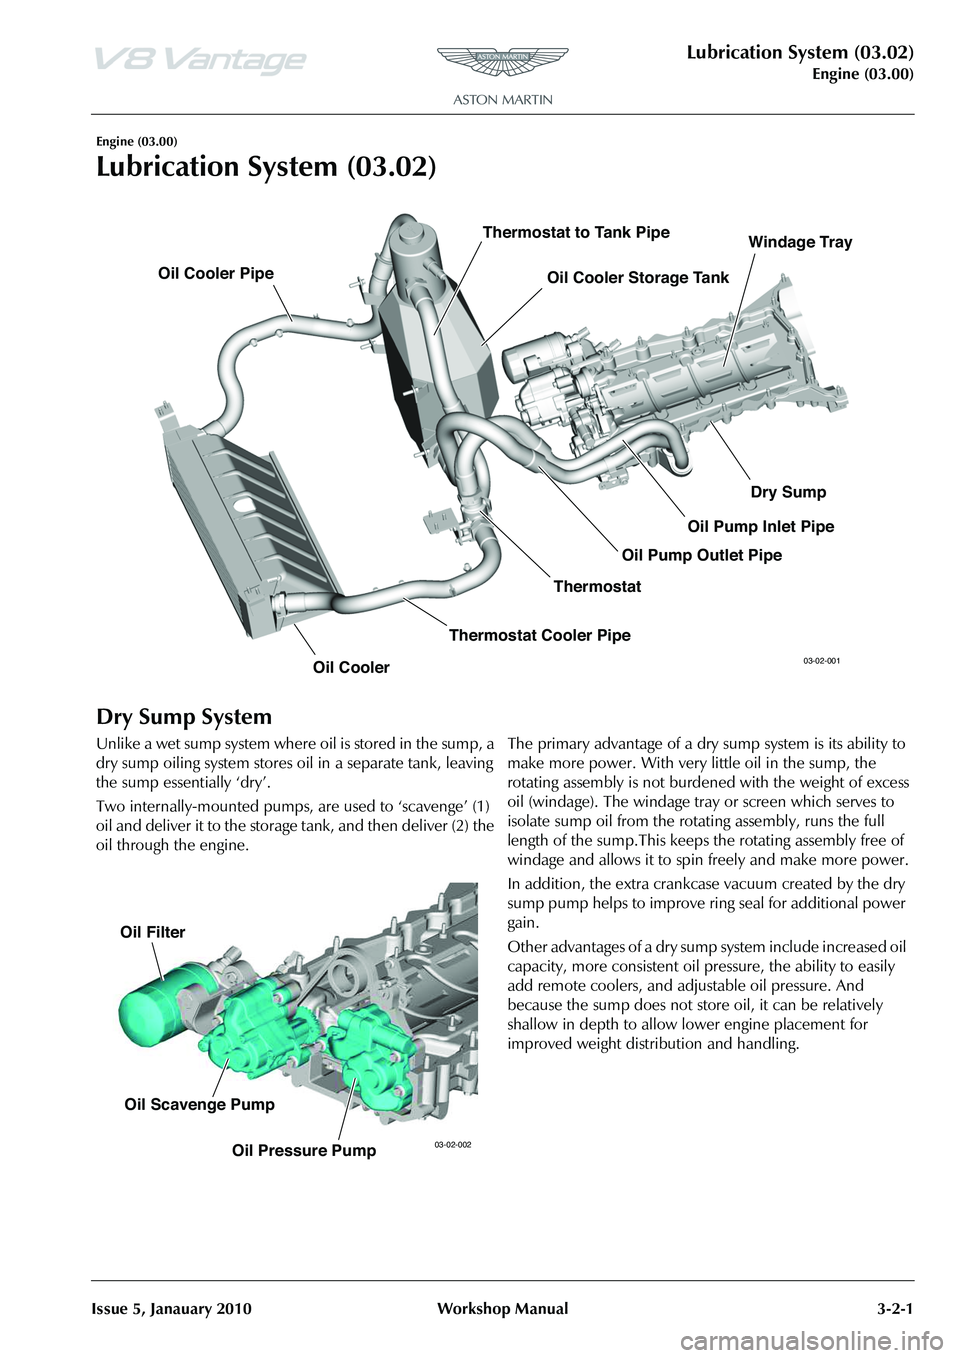
Dry Sump System
Unlike a wet sump system where oil is stored in the sump, a
dry sump oiling system stores oil in a separate tank, leaving
the sump essentially ‘dry’.
Two internally-mounted pumps, are used to ‘scavenge’ (1)
oil and deliver it to the storage tank, and then deliver (2) the
oil through the engine. The primary advantage of a dry sump system is its ability to
make more power. With very little oil in the sump, the
rotating assembly is not burdened with the weight of excess
oil (windage). The windage tray or screen which serves to
isolate sump oil from the rota
ting assembly, runs the full
length of the sump.This keeps the rotating assembly free of
windage and allows it to spin freely and make more power.
In addition, the extra crankcase vacuum created by the dry
sump pump helps to improve ring seal for additional power
gain.
Other advantages of a dry sump system include increased oil
capacity, more consistent oil pr essure, the ability to easily
add remote coolers, and adjustable oil pressure. And
because the sump does not stor e oil, it can be relatively
shallow in depth to allow lower engine placement for
improved weight distribution and handling.
Oil Cooler Oil Cooler Storage Tank
Oil Cooler Pipe
Thermostat
Thermostat to Tank Pipe
Thermostat Cooler Pipe Dry Sump
Oil Pump Outlet Pipe Oil Pump Inlet PipeWindage Tray03-02-001
Oil Filter
Oil Scavenge Pump Oil Pressure Pump
03-02-002